
Hour 22. Game Revisions
What You’ll Learn in This Hour:
• How to make Amazing Racer mobile capable
• How to make Chaos Ball mobile capable
• How to make Captain Blaster mobile capable
• How to make Gauntlet Runner mobile capable
Let’s make a lot of games! More specifically, let’s revisit the games you made before and make them mobile capable. You will start by adding movement, looking, and jumping capabilities to Amazing Racer. From there, you will add turning and moving controls to Chaos Ball. Next, you will change orientations to work in portrait mode with Captain Blaster. Finally, you will add input controls to Gauntlet Runner.
Note: Completed Games
Each of the completed, “mobile friendly”, games will be available in the book assets for Hour 22. They will be named after their original game projects.
Amazing Racer
The first game you made is probably the most difficult one to convert to a mobile device. The reason is that there are three forms of unique input: moving, looking, and jumping. The moving part can easily be read from the accelerometer. The looking and jumping, however, are both derived from touch input. Therefore, you need some way to differentiate between touch inputs.
Moving and Looking
The first thing you will want to do is change the way the player moves. This particular game utilizes a first person controller. The best way to implement mobile controls would be to open the controller up and modify the code inside. This is a bit more complex than desired at this point, however, so you will instead be creating new scripts on top of the already existing functionality. You will be making it so that the accelerometer information moves the player forward, backward, and side to side. Any touches that occur on the right half of the screen will allow you to move the view around. Due to the complexity of “looking” mechanics, looking up and looking down will rotate the camera of the controller while looking left and right will actually rotate the controller itself.
To set up movement and horizontal looking:
1. Open up the Amazing Racer completed game. Add a new script to the “Scripts” folder named “MobileInputScript” and attach it to the “Player” game object.
2. Add the following code to the script:
public float speed = 15;
public float jump = 3;
CharacterController control;
void Start () {
control = GetComponent<CharacterController>();
}
// Update is called once per frame
void Update () {
float x = Input.acceleration.x * Time.deltaTime * speed;
float z = -Input.acceleration.z * Time.deltaTime * speed;
transform.Translate(x, 0f, z);
foreach(Touch touch in Input.touches)
{
//turning
if(touch.position.x > Screen.width / 2)
{
transform.Rotate(0f, touch.deltaPosition.x, 0f);
}
}
}
3. Attach a mobile device to your computer and run the Unity Remote. While holding the device in landscape mode, run the scene. Notice how you are able to move around by tilting the phone. Try dragging your finger around the right side of the screen. Notice how you can use a touch on the right side of the screen to look around.
Now that moving and horizontal looking are added, you will need to add vertical looking. The vertical looking component will be added directly to the camera of the first person controller. It will look using the same mechanic as the horizontal looking does. To add this:
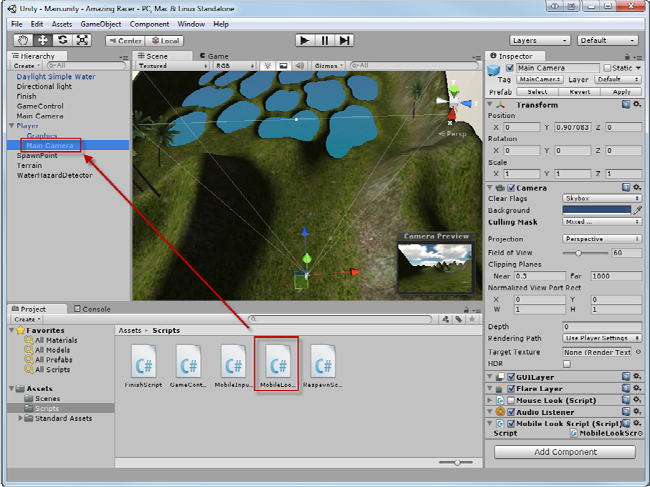
1. Create a new script in the scripts folder named “MobileLookScript”. Attach the script to the “Main Camera” which is nested under the “Player” game object (see Figure 22.1).
Figure 22.1. Adding the look script to the controller’s camera.
2. Add the following code to the Update() method in the look script:
foreach(Touch touch in Input.touches)
{
if(touch.position.x > Screen.width / 2)
{
transform.Rotate(-touch.deltaPosition.y, 0f, 0f);
}
}
3. Run the scene. Notice how you can now use a finger on the right side of the screen to look up and down. Together, you will be able to use a single finger to look all around your scene.
Jumping
The last bit of functionality you will want to add to this game is the jumping feature. As was mentioned above, this game was made with a first person controller. As such, the jumping that you will be adding will not function exactly in the same way. The best way to do this would be to modify the controller code to allow for the jumping input. Due to complexity, you will be adding new code on instead.
Jumping will work by tapping anywhere on the left side of the screen. In this case, the code is looking for any tap. Doing so will jump the player up into the air. To do this:
1. You will not be creating a new script. Instead, open the “MobileInputScript” you created before.
2. Add the following code to the Update() method. You should already have some of the code listed. It is simply there as a reference so that you know where this code should go:
foreach(Touch touch in Input.touches) //Here for reference
{
//jumping
if(touch.position.x < Screen.width - Screen.width / 2 &&
touch.phase == TouchPhase.Began)
{
control.Move(new Vector3(0f, jump, 0f));
}
//turning – Here for reference
if(touch.position.x > Screen.width / 2)
//...
3. Run the scene. Notice how you can now jump as well as move and look with a mobile device.
At this point, all of the mobile conversion should be done for Amazing Racer!
Note: Game Quality
When running this game on a mobile device, you may notice a lack of control quality. The jump mechanic is very jerky and the move and turn mechanics are a bit twitchy. This is correct and in no way indicates a problem with your mobile device. The fact of the matter is, you are adding new functionality on top of an already functioning game. Not all mechanics will integrate easily. These mechanics could be smoothed out, but doing so would take too much time. Remember, you still have three games to go! Instead, use these games as an indicators of what is possible with mobile controls and as a guideline to the basics of how they can be implemented.
Chaos Ball
The second game you creating, Chaos Ball, will be a bit simpler of an implementation. The idea again is that the accelerometer will control the paddle’s movement. You can then use a touch to control the looking. Since there is no other input required you don’t need to split the screen or use touching for anything else. The scripts here will look very similar to the previous game as they use very similar controls. Here are the steps to converting this game:
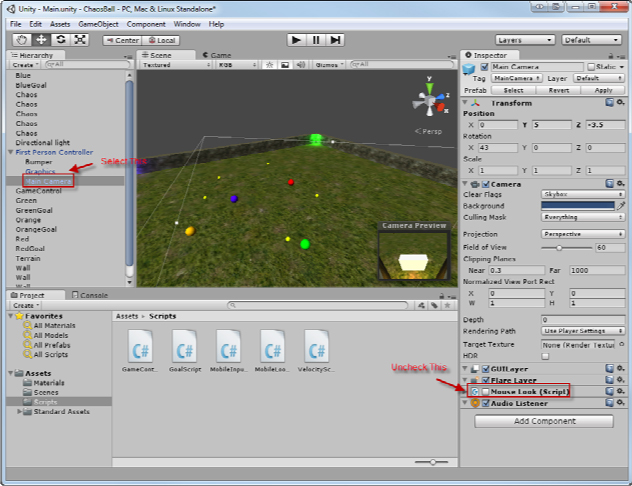
1. Open up the Chaos Ball project in Unity. Disable the “Mouse Look (Script)” component on the “Main Camera” of the “First Person Controller” game object (see Figure 22.2).
Figure 22.2. Removing the “Mouse Look” component.
2. Add a new script to the “Scripts” folder named “MouseInputScript”. Attach the script to the “First Person Controller” game object. Add the following code to the script:
public float speed = 15;
void Update () {
float x = Input.acceleration.x * Time.deltaTime * speed;
float z = -Input.acceleration.z * Time.deltaTime * speed;
transform.Translate(x, 0f, z);
foreach(Touch touch in Input.touches)
{
//turning
if(touch.position.x > Screen.width / 2)
{
transform.Rotate(0f, touch.deltaPosition.x * 10, 0f);
}
}
}
3. Add another script named “MouseLookScript” and attach it to the “Main Camera” of the “First Person Controller” game object (see Figure 22.1 above). Add the following code to the Update() method of the script:
foreach(Touch touch in Input.touches)
{
transform.Rotate(-touch.deltaPosition.y, 0f, 0f);
}
4. Run the game. Notice how you can now move around and look about with the accelerometer and touch input.
That is all you need to do to convert this game to mobile inputs (and make it very difficult!). One thing to be aware of is that now the player can move through the walls and fall off of the level. This is due to the fact that you are now using a Translate() to move the player about and not the controller. A couple ways you could fix this would be to utilize the already existing character controller or raycasting from the player to see if they are too close to a wall.
Captain Blaster
The game Captain Blaster is unique amongst the games you have made so far in that it is treated as a 2D game and it is a vertical oriented game. That means that you won’t have to worry about the z axis. It also means that you will need to configure your game to work in portrait orientation. If you recall, portrait orientation is what you get when you hold a mobile device upright so that its short edge is parallel to the ground while its long edge is perpendicular to the ground.
In order to get the Unity Remote to work in portrait mode, you will need to make some changes to the Unity editor. What you need to do is tell it you want to operate in portrait mode. To do this:
1. Open up the Captain Blaster Unity project.
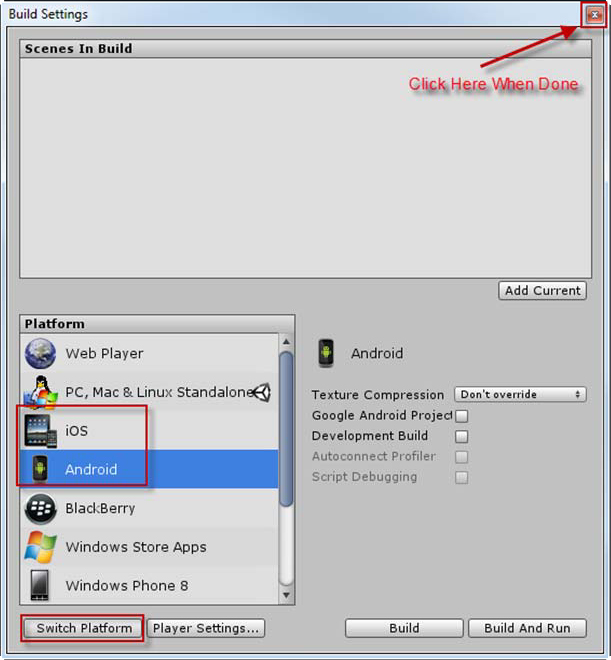
2. Click “File->Build Settings” to bring up the build settings dialog. Do not worry too much about what is in here. It will be covered more extensively in the next hour. In the left menu, select either Android or iOS depending on which type of device you are using and then click “Switch Platform”. When you are done, click the “X” in the upper right corner to exit this dialog (see Figure 22.3).
Figure 22.3. Switching platforms.
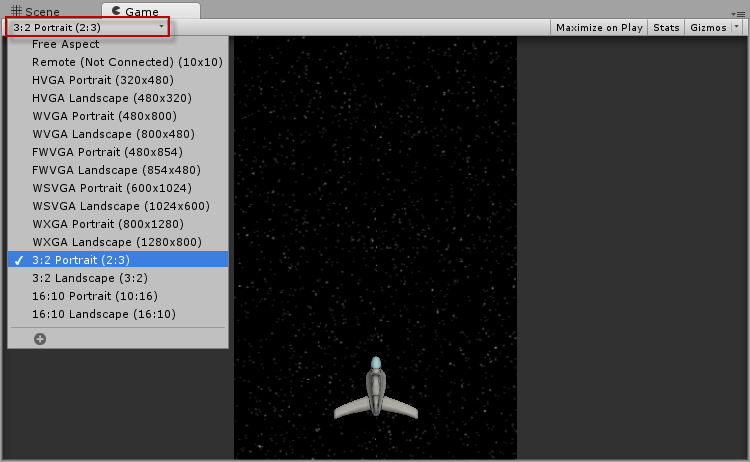
3. In the game view, choose the resolution for your game. It is best if you choose the dimensions of the mobile device you are using. If you don’t know what the dimensions are, you can choose the generic “3:2 Portrait” (see Figure 22.4).
Figure 22.4. Changing the scene resolution.
Note: Console Errors
During this process you may see a bunch of red errors in the console. You can safely ignore those at this point. They are generated when the textures and models in a scene get converted. As soon as you play the scene they will go away and everything will correct itself.
Now your scene is ready to go. When run in the Unity Remote, it should display in the proper portrait orientation. Now all you need to do is map the accelerometer and taps to game input. This is very easy this time since you didn’t use one of the built in controllers when you made this game originally. Now you can just modify the code you wrote to work with a mobile device:
1. In the “Scripts” folder, locate the “PlayerScript” and open it.
2. To make movement work, place the line:
transform.Translate(Input.acceleration.x * speed * Time.deltaTime, 0f, 0f);
underneath the line:
transform.Translate(Input.GetAxis("Horizontal") * speed * Time.deltaTime, 0f, 0f);
3. To make shooting work, modify the line:
if(Input.GetButtonDown("Jump"))
to be:
if(Input.GetButtonDown("Jump") || Input.touches.Length > 0)
Now your mobile inputs are set up! You may have noticed that you left the original controls in. This is nice because it allows the game to run on both a mobile device and a computer. One thing to mention is that since the resolution has changed to be narrower, many meteors are spawning off screen. The improve this you would need to change the dimensions of the area the meteors can spawn.
Gauntlet Runner
The last game that you made, Gauntlet Runner, is also the easiest to convert to a mobile device. Truly all you need to do to make this game work is apply the code changes that you also applied to Captain Blaster. Since that is boring, you are going to implement a different system for the player to move around.
This time, the player will move left and right by dragging their finger left and right. In order to jump, the player will need to “flick” their finger upward. Both of these actions relay on the “deltaPosition” variable inside the “Touch”. To implement this:
1. Open the Gauntlet Runner, project in Unity.
2. Locate and open the “PlayerScript” script inside the “Scripts” folder. Modify the Update() method to contain the following:
transform.Translate(Input.GetAxis("Horizontal") * Time.deltaTime * strafeSpeed, 0f, 0f);
//if there is a touch
if(Input.touches.Length > 0)
{
//use the position of the first one
transform.Translate(Input.touches[0].deltaPosition.x * Time.deltaTime * strafeSpeed,
0f, 0f);
}
if(transform.position.x > 3)
transform.position = new Vector3(3, transform.position.y, transform.position.z);
else if(transform.position.x < -3)
transform.position = new Vector3(-3, transform.position.y, transform.position.z);
if (anim.GetCurrentAnimatorStateInfo(0).IsName("Base Layer.Jump"))
{
anim.SetBool("Jumping", false);
jumping = true;
}
else
{
jumping = false;
if(Input.GetButtonDown("Jump"))
{
anim.SetBool("Jumping", true);
}
//check for "flick" if there are touches
else if(Input.touches.Length > 0)
{
if(Input.touches[0].deltaPosition.y > 2)
anim.SetBool("Jumping", true);
}
}
3. Run the game. Notice how sliding a finger back and forth moves the player side to side. Also notice how you are able to jump by flicking your finger upward.
As you work through the code for this game, you may notice the line:
if(Input.touches[0].deltaPosition.y > 2)
You might be wandering why a value of 2 was used here. The basic idea is that while you might be flicking your finger upwards very fast, the game is cycling 60 times a second. This means that compared to the game, you are actually going quite slow. Therefore, the value to determine if you are flicking your finger is very low. By setting this value any higher, your game may not recognize slower flicks. By setting it lower, the game may think you are flicking your finger when you aren’t.
Summary
This hour you rebuilt your four previous games to include mobile device controls. You started with Amazing Racer where you adding movement, jumping, and looking controls. From there, you modified Chaos Ball to allow mobile accelerometer and touch inputs. You changed gears in the next game, Captain Blaster, where you modified the game to be in a mobile portrait orientation. You also added accelerometer movement and tap shooting. In your final game, Gauntlet Runner, you tried a new style of control. You added swiping and flicking motions to control the player.
Q&A
Q. Some of the games didn’t seem to translate well to mobile. Is that normal?
A. yes it is. Often, when a game is not made with mobile platforms in mind, it is very difficult to transition it. Computers and gaming consoles have many more control options available to them than the simple mobile device. Always ask yourself when designing a game if a mobile version is possible in the future.
Workshop
Take some time to work through the questions here to ensure you have a firm grasp on the material.
Quiz
1. How did you handle needing to use the screen to both jump and look in Amazing Racer?
2. What is the major problem with using translations to move the player in Chaos Ball?
3. True or False: Captain Blaster was modified to be in landscape orientation.
4. What constitutes a “flick” in Gauntlet Runner?
Answers
1. Half the screen was used for jumping input and the other half was for looking.
2. The player is able to move through the walls and fall off of the world.
3. False. It was modified to be in portrait orientation.
4. A flick is when the player moves their finger upward really quickly.
Exercise
This hour you worked through a lot of control mechanics on four different games. When developing games, major mechanics overhauls can sometimes take place. It is not uncommon to change how inputs or controls work to try and build a better user experience. As with any major change, you should always retest afterwards to see what impact the changes had. For this exercise, go back through and replay these games again. This time, play them with mobile controls. Like always, take notes on what you like and what you don’t like. When you are finished playing, compare these notes to the notes you took when you originally made the games (you kept those right?). See what changes you can make to the controls, or the game, to make the “mobile experience” better. Try to implement some or all of those changes.