
Hour 5. Environments
What You’ll Learn in This Hour:
• How to add trees and grass to your terrain
• How to add environment effects to your terrain
• How to navigate your world with a character controller
In the previous hour you learned to sculpt and texture terrain for your game. In this hour you will be adding environment effects that will really give character to your world. You will start by learning how to add vegetation like trees and grass to your terrain. From there you will learn to apply environment effects like water, sky, fog, and lens flares. You will finish by adding a character controller to your scene and moving around inside your world.
Generating Trees and Grass
A world with only flat textures would be very boring. Almost every natural landscape has some form of plant life. In this section you will learn how to add and customize trees and grass to give your terrain an organic look and feel.
Painting Trees
Adding trees to your terrain works just like the sculpting and texturing from the previous hour; the whole process is very similar to painting. The basic premise is to load a tree model, set the properties for the trees, and then paint the area you want to trees to appear in. Based on the options you choose, Unity will spread the trees out and vary them to give a more natural and organic look.
To follow along with the rest of this section, you will need the standard terrain assets loaded into your project. If you do not have them, refer to the previous hour for instructions on how to import them into your project.
The Place Trees tool is used to spread trees out over the terrain. Once the terrain has been selected in the scene, the Place Trees tool is accessed in the inspector view as part of the “Terrain (Script)” component. Figure 5.1 shows the Place Trees tool and its standard properties.
Figure 5.1. The “place trees” tool.
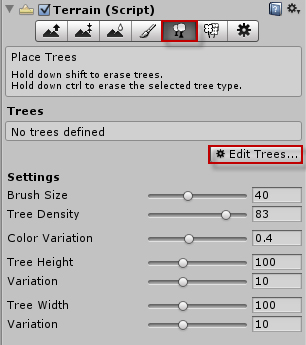
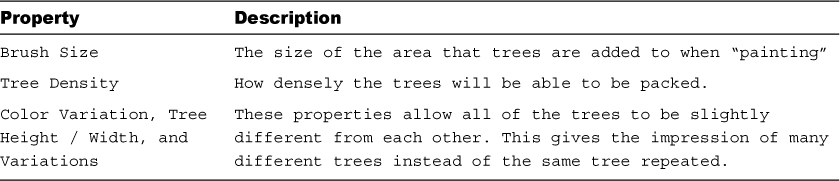
Here is a listing of the tree tool’s properties and their explanations:
Table 5.1. The “Place Tree” Tool’s Properties
Note: Dark Trees
You may notice that some trees appear black. This can happen when smaller trees are placed close to larger trees. The reason is that whatever lighting exists in your scene is calculated as hitting the taller trees around the smaller tree. In effect, the smaller tree is in the shadow of the larger trees. This issue can be resolved with Unity Pro as the lighting is dynamically calculated and tends to be a little more accurate. If you don’t have the pro version, you can also simply remove and replace the tree.
Note: Tree Warping
As you move about your scene view, you may see some trees bending and changing. What you are witnessing are built in efficiencies to make the project run faster. When trees are far away from the viewer, they get rendered as a much lower quality billboard. As the viewer gets closer, the trees are swapped with higher quality versions. The effect is the warping that you are seeing. You can change when and how these transitions occur by changing some of the terrain settings. You will get a chance to work with those later this hour.
Painting Grass
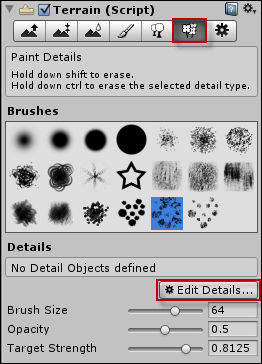
Now that you have learned how to paint trees you are going to learn how to apply grass or other small plant life to your world. Grass and other small plants are called “details” in Unity. Therefore, the tool used to paint grass is the Paint Details tool. Unlike trees, which are 3D models, details are billboards. Just like you have seen over and over by now, details are applied to a terrain using a brush and a painting motion. Figure 5.3 illustrates the Paint Details tool and some of its properties.
Figure 5.3. The Paint Details tool.
Note: Billboards
Billboards are a special type of visual component in a 3D world that give the effect of a 3D model without actually being a 3D model. Models exist in all 3 dimensions. Therefore, when moving around one, you can see the different sides. Billboard in the other hand are flat images that always face the camera. When you attempt to go around a billboard, the billboard turns to face your new position. Common uses for billboards are grass details, particles, and onscreen effects.
Applying grass to your terrain is a fairly straightforward process. You will first need to add a grass texture. To add a grass texture:
1. Click “Edit Details” in the inspector view and select “Add Grass Texture”.
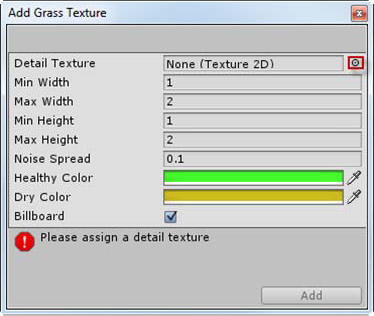
2. In the “Add Grass Texture” dialog, click the circle next to the texture textbox (see Figure 5.4). Select the “Grass” texture (NOTE: Not the “Grass (Hill)” texture).
Figure 5.4. The “Add Grass Texture” dialog.
3. Set your texture properties to whatever values you want. Pay special attention to the color properties as those establish the range of natural colors for your grass.
4. When done, click “Apply”.
Once you have your grass loaded, you just need to choose a brush and your brush properties. You are now ready to begin painting grass.
Tip: Realistic Grass
You may notice that when you begin painting grass that it does not look realistic. There are a few things you need to focus on when adding grass to your terrain. The first is to pay attention to the colors you set for the grass texture. Try to keep them darker and more earth toned. The next thing you need to do is choose a non-geometric brush shape to help break up hard edges (see Figure 5.3 for a good brush to use). Finally, keep your opacity and target strength properties very low. A good setting to start with would be .02 for each. If you need more grass, you can just keep painting over the same area.
Caution: Vegetation and Performance
The more trees and grass you have in a scene the more processing is required to render it. If you are concerned with performance, you will need to keep the amount of vegetation low. There are some properties that you will look at later this hour that will help you manage this, but as an easy rule, try to only add trees and grass to areas where it is really needed.
Tip: Disappearing Grass
As with trees, grass is affected by its distance from the viewer. Where trees revert to a lower quality when the viewer is far away, grass is just not rendered. The result is a ring around the viewer beyond which no grass is visible. Again, this distance can be modified by properties you will look at later this hour.
Terrain Settings
The last button on this list of terrain tools in the inspector view is the Terrain Settings. These settings control how the terrain, texture, trees, and details look and function overall. Figure 5.5 shows all of the terrain settings.
Figure 5.5. The “Terrain Settings”
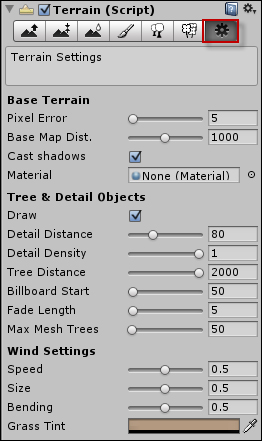
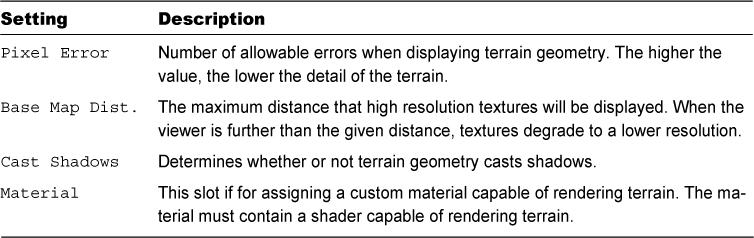
The first grouping of settings is for the overall terrain. Table 5.1 has the explanations for the different settings.
Table 5.1. Base Terrain Settings
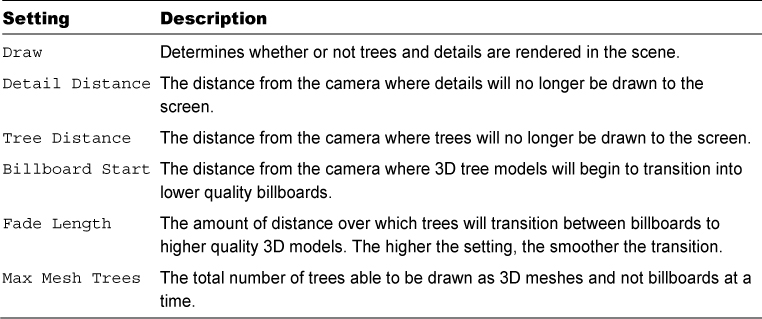
There are also settings that directly affect the way trees and details (like grass) behave in your terrain. These settings are described in Table 5.2.
Table 5.2. Tree & Detail Object Settings
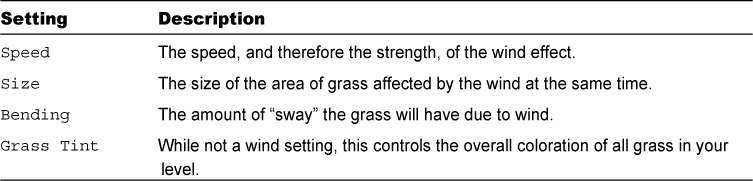
The last settings are for the wind. You might be wondering what that means because you haven’t had a chance to actually run around inside your world yet (you will later this hour). Basically, Unity simulates a light wind over your terrain. This causes the grass to bend and sway and liven up the world. Table 5.3 describes the wind settings.
Environment Effects
At this point you have sculpting, textured, and added trees and grass to your terrain. It is safe to say that it is looking a good deal better than when it was just a flat white square. In this section you will learn about adding environment details to really make your game world as complete as possible.
Skyboxes
You may have noticed that while your terrain is full of texture and detail, the sky is a bland solid color. What you need to do is to add a skybox to your world. A skybox is a large box that goes around your world. Even though it is a cube consisting of 6 flat sides, it has inward facing textures to make it look round and infinite. You can create your own skyboxes or use one of Unity’s standard skyboxes. In this book you will be using the built in ones.
In order to use the standard skyboxes, you will need to import the assets into your project. To import the skyboxes, click “Assets->Import Package->Skyboxes”. This will open the “Import Package Dialog”. Leave everything checked and click “Import”. Once the assets are imported, you are able to begin working with skyboxes.
There are two methods of adding skyboxes to your world. You can add the skybox to your camera or add it to the scene.
Adding a Skybox to the Camera
You can add a skybox to your camera so that whatever the camera see beyond your game world will be replaced with “sky”. To add a skybox to your camera:
1. Select the “Main Camera” in the hierarchy view.
2. Add a skybox component by clicking “Component->Rendering->Skybox”.
3. In the inspector view, locate the “Skybox” component and click the selector circle next to the “Custom Skybox” field (see Figure 5.6). In the “Select Material” dialog, select the “Sunn2 Skybox”.
Figure 5.6. The Skybox component
4. Run your scene to see the skybox applied to the camera.
Note: Multiple Skyboxes
The reason there is an option to add the skybox to a specific camera is so you can have different skyboxes (or no skyboxes) on different cameras. This gives you the ability to make the world look different to different viewers. If you want to have flexibility in the way your world looks, add the skybox to the camera. If you want your world to look uniform to everyone, add it to the scene (covered below).
Adding a Skybox to the Scene
If you add a skybox to the scene then it will be present for all viewers. Another benefit of this method is that the skybox will be visible in the scene view. This makes it easy to see how your world looks with all elements in place. To add a skybox to your scene:
1. Click “Edit->Render Settings”. This will open the render settings for the scene in the inspector view.
2. Locate the “Skybox Material” field and click the circle selector to the right of it.
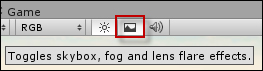
3. Choose the “Sunny1 Skybox”. Notice how the scene view changes to contain the sky. If the scene view doesn’t change, turn on the “skybox, fog, and lens flare” scene setting (see Figure 5.7).
Figure 5.7. The environment effects toggle
Fog
In Unity, you can add fog to a scene. This fog can be used to simulate many different natural occurrences like haze, an actual fog, or the fading of objects over great distances. Fog can also be used to give new and alien appearances to your world.
Let’s take a moment to add fog to your scene and learn about the different properties that effect it.
1. Click “Edit->Render Settings”. The render settings will open in the inspector view.
2. Turn on fog by checking the “Fog” checkbox.
3. Experiment with the different fog densities and colors. A full explanation of the fog properties can be found on Table 5.4.
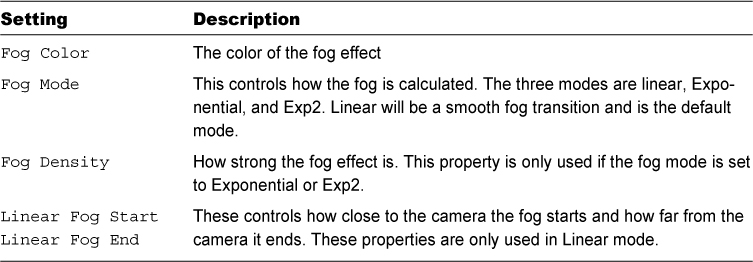
There are several properties that controls how a fog looks in the scene. These properties and their descriptions can be found in Table 5.4 below.
Lens Flares
A lens flare is a visual deformity that occurs whenever a camera looks at a bright light source. It is the result of light bouncing around inside the glass of a lens. A lens flare can also be experienced when you attempt to look into a bright source like the sun (not recommended). In Unity, you can add flares to light sources to give them a more realistic effect and make it seem like they are very bright.
At this point, your flare is on the light and will be picked up by the camera. This is because the Main Camera of the scene has a “Flare Layer” component by default. Any cameras without that component will not be able to see the lens flares.
Tip: Where’s the Flare?
You may not be able to see the lens flare yet because your camera is not pointed at your directional light. Don’t bother trying to make the camera point at the light just yet. Later this hour you will be able to move around your scene while it is running. At that point you will be able to see it and make any needed adjustments.
Water
The last environment effect you will look at adding is water. Water is an effect that varies depending on whether you have the pro or free version of Unity. The free version of Unity has access to basic water. The object is a little generic, but it is passable. The pro version’s water is much better looking. If you have pro, that is definitely the version you will opt for. Since this book is written to use the free version, that is the version that will be used.
In Unity, water is an asset that needs to be imported. In the scene, water is a flat plane that looks like the top surface area of a pond or lake. Note that the water is just an effect. If a player jumps into a lake with water, the player will fall right through the water and down into the hole that was sculpted for it.
In order to add water, you will need some part of your terrain to contain the water. In this exercise you will be sculpting a lake and adding water to it.
1. Create a new terrain or work with an existing terrain. Sculpt a lakebed down into the terrain.
2. Import the water assets by clicking “Assets->Import Package->Water (Basic)”. In the “Import Package” dialog, leave everything checked and click “Import”.
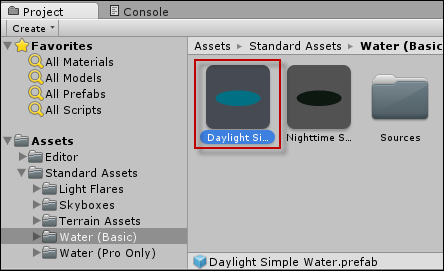
3. Locate the “Water (Basic)” folder in the project view and locate the “Daylight Simple Water” asset (see Figure 5.8).
Figure 5.8. The “Water (Basic)” folder and assets.
4. Drag the “Daylight Simple Water” asset onto the scene view and into the lakebed you created. Scale and move the water as necessary until it fills up the lakebed properly.
Character Controllers
At this point you have finished your terrain. It has been sculpting, textured, had trees and grass added, been given a sky, has a fog, lens flare, and water. It is now time to get into your level and “play” it. Unity provides two basic character controllers to easily get right into your scene without a lot of work on your end. Basically, you drop a controller into your scene and then move around with the control scheme common to most first person games.
Adding a Character Controller
In order to add a character controller to your scene, you will first need to import the asset. Click “Assets->Import Package->Character Controller”. In the “Import Package” dialog, leave everything checked and click “Import”. A new folder named “Character Controllers” should have been added to your project view under the “Standard Assets” folder. Since you don’t have a 3D model to use as the player, we are going to use the first person controller. Locate the “First Person Controller” asset in the “Character Controllers” folder (see Figure 5.9) and drag it onto your terrain in the scene view.
Now that the character controller has been added to your scene, you can move around in the terrain you created. When you play your scene, you will notice that you are now able to see from where the controller was placed. You can use the WASD keys to move around, the mouse to look around, and the space bar to jump. Play around with the controls if they feel a bit unusual to you and enjoy experiencing your world!
Tip: “2 Audio Listeners”
When you added the character controller to the scene, you may have noticed a message at the bottom of the editor that said “There are 2 audio listeners in the scene”. This is because the main camera (the camera that exists by default) has an audio listener component and so does the character controller that you added. Since the cameras represent the player’s perspective, only one can listen for audio. You can fix this by removing the “Audio Listener” component from the main camera.
Tip: Falling Through the World
If you find the camera falling through the world whenever you run your scene, chances are that your character controller is stuck partially in the ground. Try raising your character controller up a little bit above the ground. When the scene starts the camera should fall just a little bit until it hits the ground and stops.
Note: Importing Assets
In this hour you imported a lot of asset packages. When you imported them, you left everything checked in the “Import Package” dialog. This caused every asset in that package to be added to your project. Doing this can make the project files very large. In a more realistic situation, you would only be importing the assets that you needed to use. All assets that you didn’t need would be unchecked. Remember, you can always import them later if needed!
Fixing Your World
Now that you are able to enter your world and see it close up, it is time to refine some of the smaller details. You may notice that some areas that you built to be a path are too steep to walk on. You may also see some areas where the textures are not placed quite right. Now is the time to smooth out the world and fix any errors you find. It can be difficult to see all of the places that need fixed from the scene view. It is not until you are on the ground moving around your world that you really get a chance to experience it.
One fix that is worth looking at is the lens flare added previously. If you look up at the sky you will notice a sun that is part of the skybox texture. You may also notice a lens flare. Chances are the lens flare that simulates the sun and the sun image itself does not line up. While looking at the sun and the flare pause the scene. In the scene view, rotate the directional light until the sun image and the flare line up. Be sure to note the rotation information because as soon as you stop the scene, any changes will be lost. Once the scene is stopped, simply rotate the directional light back to the direction that lined up with the sun image. Cross one more detail off your list!
Summary
This hour you learned all about environment details in Unity. You started by learning to add trees and grass to your scene. Next, you added ambient effects like the sky, fog, and lens flares. From there you worked with Unity’s water assets. You finished this hour up by adding a character controller to your scene and actually playing around in your world.
Q&A
Q. Do trees and grass greatly impact performance?
A. It depends on how much of it you have on scene at once. It also depends on the power of the computer you are running it on. A good rule is to have grass and trees if they positively impact your scene.
Q. Can I make my own skyboxes?
A. Yes you can. You should consider it mostly if you are building a custom world or a world with specific details not present in the available skyboxes.
Q. There are a lot of properties to the character controller. Will I need to know them all?
A. Not really. The character controllers are easy to use as they are. If you need to make easy changes to the movement, you can do that, but it shouldn’t be necessary for most uses.
Workshop
Take some time to work through the questions here to ensure you have a firm grasp on the material.
Quiz
1. What setting controls how much trees sway in the wind?
2. What’s the name of the ambient effect that can simulate haze or fading of colors at a distance?
3. This object is a cube that fits around your world and is textured to look like a sky.
4. What character controller did you add to your scene: first person or third person?
Answers
1. That’s a trick question. Trees don’t sway in the wind, grass does. The setting that controls it is “Bending” under “Wind Settings”.
2. Fog
3. A skybox
4. First person.
Exercise
In this exercise you will have a chance to finish the terrain you began making at the end of Hour 4. You will be adding the rest of the environmental effects to give your world a better level of realism.
Open up the project or scene with the terrain you created in Hour 4. You need to add the following to it:
• Add water to the lakebed you created.
• Add some sparse grass around the edge of the lakebed and more grass over the flat plains.
• Add some palm trees to the grassy area where the grass texture meets the sand texture of the beach.
• Add a skybox to your scene.
• Add a fog effect to your scene. Change the settings so that it realistically makes the mountain range look cloudy.
• Add a directional light and a lens flare to the light. Ensure the light lines up with a sun image if it is present in the skybox.
• Add a character controller and test drive your level. Ensure that everything is properly placed and looks realistic.