
Hour 4. Terrain
What You’ll Learn in This Hour:
• The fundamentals of terrain
• How to sculpt terrain
• How to decorate your terrain with textures
In this hour you will be working with terrain generation. You will learn what terrain is, how to create it, and how to sculpt it. You will also get hands on with texture painting and fine tuning. You will learn to make large, expansive, realistic looking terrain pieces for your games.
Terrain Generation
All 3D game levels exist in some form of a world. These worlds can be highly abstract or very realistic. Often, games with expansive “outdoor” levels are said to have a terrain. The term terrain refers to any section of land that simulates a planet’s external landscape. Tall mountains, far plains, or dank swamps are all examples of possible game terrain.
In Unity, terrain is a flat mesh that is able to be sculpted into many different shapes. It can help to think of terrain as the sand in a sandbox. You can dig into the sand or raise sections of it up. The only thing basic terrain cannot do is overlap. This means that you are not able to make things like caves or overhangs. Those items will have to be modeled separately. Also, just like any other object in Unity, terrain has a position, rotation, and scale; though they aren’t usually changed.
Adding Terrain to your Project
Creating a flat terrain in a scene is a very easy task with some basic parameters. To add terrain to a scene, simply click the menu items “Terrain->Create Terrain”. You will see that an object called “Terrain” has been added. If you navigate around in your scene view, you may also notice that the terrain piece is very large. In fact, the piece is much larger than we could possibly need right now. Therefore, we need to modify some of the properties of this terrain.
In order to make this terrain more manageable, you will need to change the terrain resolution. By modifying the resolution you can change the length, width, and maximum height of your piece of terrain. The reason the term “resolution” is used will become more apparent later when you learn about heightmaps. To change the resolution of the terrain piece:
1. Select “Terrain->Set Resolution”
2. The “Set Heightmap Resolution” dialog will appear (see Figure 4.1).
Figure 4.1. The Set Heightmap Resolution Dialog
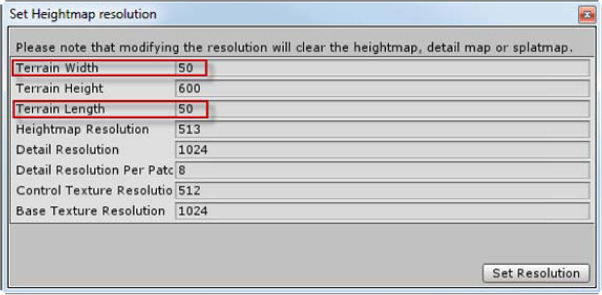
3. Currently, the terrain width and length are set to 2000. Set these values both to 50 and click “Set Resolution”.
The other options in the “Set Heightmap resolution” dialog modify how textures are drawn and the performance of your terrain. They should be left alone for now. Once you have changed the width and the height you will see that the terrain is much smaller and manageable. Now it is time to start sculpting.
Caution: Terrain Size
Currently, you are going to be working with terrain that is 50 units long and wide. This is purely for manageability while learning the various tools. In a real game, the terrain would probably be a bigger size to fit your needs. It is also worth noting that if you already have a heightmap (covered below) then you will want the terrain ration (the ratio of length and width) to match the ratio of the heightmap.
Heightmap Sculpting
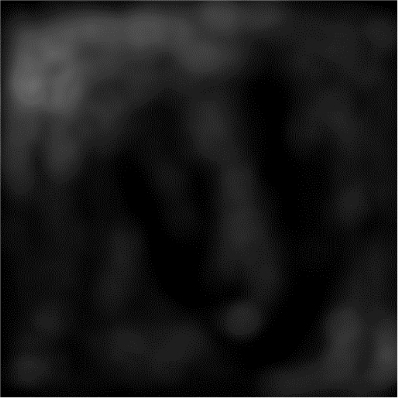
Traditionally, there are 256 shades of gray available in 8-bit images. These shades range from 0 (black) to 255 (white). Knowing this, you can take a black and white image, often called a “grayscale” image, and use it as something called a heightmap. A heightmap is a grayscale image that contains elevation information similar to a topographical map. The darker shades can be thought of as low points and the lighter shades are high points. Figure 4.2 has an example of a heightmap. It may not look like much, but a simple image like that can produce some dynamic scenery.
Figure 4.2. A simple heightmap.
Applying a heightmap to your currently flat terrain is simple. You simply start with a flat terrain and import the heightmap onto it. Below are the steps in greater detail.
Let’s walk through the steps of importing and applying a heightmap.
1. Locate the “terrain.raw” file in the Hour 4 files and put it somewhere you can easily find it.
2. Click “Terrain->Import Heightmap – Raw”.
3. The “Import Raw Heightmap” dialog will open. Locate the “terrain.raw” file from step 1 and click “Open”.
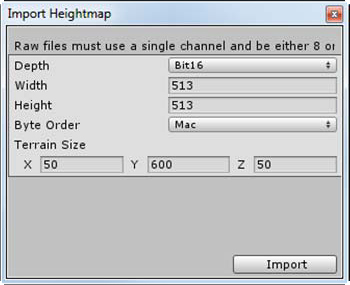
4. The “Import Heightmap” dialog will open (see Figure 4.3). Leave all options as they appear and click “Import”. Right about now your terrain is looking very strange. The problem is that when you set the length and width of your terrain to be more manageable, you left the height at 600. This is obviously much too high for your current needs.
Figure 4.3. Import Heightmap Dialog
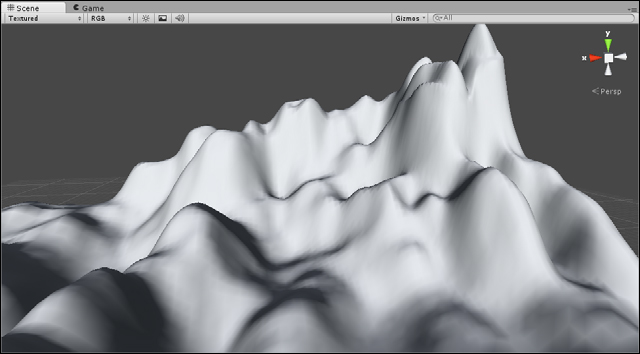
5. Change the terrain resolution by going to “Terrain->Set Resolution”. This time, change the height value to 60. The result should be something much more pleasant (See Figure 4.4).
Figure 4.4. Terrain after importing heightmap.
Tip: Calculating Height
So far the heightmap might seem random, but it is actually quite easy to figure out. Everything is based on a percentage of 255 and the maximum height of the terrain. The max height of the terrain defaults to 600 but is easily changeable. If you apply the formula of (gray shade) / 255 * (max height) you can easily calculate any point on the terrain. For instance, black has a value of 0 and so any spot that is black will be 0 units high (0 / 255 * 600). White has a value of 255 and therefore produces spots that are 600 units high (255 / 255 * 600). If you had a medium gray with a value of 125, then any spots that color would produce terrain that is about 294 units high (125 / 255 * 600).
Note: Heightmap Formats
In Unity, heightmaps must be grayscale images in the .raw format. There are many ways to generate these types of images; you can use a simple image editor or even Unity itself. If you create a heightmap using an image editor, try to make the map as the same length and width ratio as your terrain. Otherwise, some distortion will be apparent. If you sculpt some terrain using Unity’s sculpting tools and you wish to generate a heightmap for it, you can by going to “Terrain->Export Heightmap – Raw”
Unity Terrain Sculpting Tools
Unity gives you multiple tools for hand sculpting your terrain. You can see these tools in the inspector view under the component “Terrain (Script)”. These tools all work under the same premise: you use a brush with a given size and opacity to “paint” terrain. In effect, what you are doing behind the scene is painting a heightmap which is translated into changes for the 3D terrain. The painting effects are cumulative, which means that the more you paint an area, the stronger the effect is on that area. Figure 4.5 shows you the tools and gives their names. Using these tools you can generate pretty much any landscape you can imagine.
Figure 4.5. The terrain sculpting tools
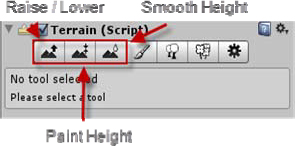
The first tool you will learn to use is the Raise / Lower tool. This tool, just as it sounds, allows you to raise or lower the terrain wherever you “paint”. In order to sculpt with this tool:
1. Select a brush. Brushes determine the size and shape of the sculpting effect
2. Choose a brush size and opacity. The opacity will determine how strong the sculpting effect is.
3. Click and drag over the terrain in the scene view to raise the terrain. Holding shift when you click and drag will instead lower the terrain.
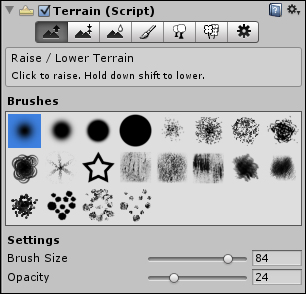
Figure 4.6 illustrates some good starting options for sculpting given the terrain size 50 x 50 with a height of 60.
Figure 4.6. Good starting properties for sculpting
Tip: Flattening Terrain
If at any time you would like to reset your terrain back to being flat, you can do so by going to “Terrain->Flatten Heightmap”. One added benefit of this is that you can flatten the terrain to a height other than its default 0. If your maximum height is 60 and you flatten your heightmap to 30, then you have the ability raise the terrain by 30 units, but you can also lower it by 30 units. This makes it easy to sculpt valleys into your otherwise flat terrain.
The next tool is the Paint Height tool. This tool works almost exactly as the raise / lower tool except that it paints your terrain to a specified height. If the specified height is higher than the current terrain then painting will raise the terrain. If the specified height is lower than the current terrain, however, then the terrain will be lowered. This is very useful for creating mesas or other flat structures in your landscape. Go ahead and try it out!
The final tool you will use is the Smooth Height tool. This tool doesn’t alter the terrain in highly noticeable ways. Instead, it removes a lot of the jagged lines that appear when sculpting terrain. This tool can be thought of as a polisher. You will really only use it after your major sculpting is done to make minor tweaks.
Now that you have learned about the sculpting tools, let’s practice using them. In this exercise you will be attempting to sculpt a specific piece of terrain.
1. Create a new project or scene and add a terrain. Set the resolution of the terrain to 50 x 50 and give it a height of 60.
2. Flatten the terrain to a height of 20 (click “Terrain->Flatten Heightmap”).
3. Using the sculpting tools, attempt to create a landscape similar to Figure 4.7
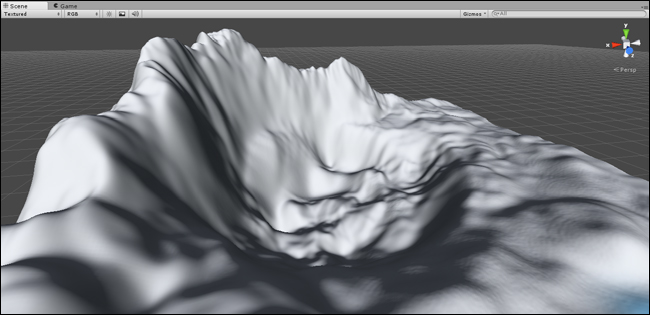
4. Continue to experiment with the tools to try and add unique features to your terrain.
Tip: Practice, Practice, Practice
Developing strong, compelling levels is an art form itself. Much thought has to be given to the placement of hills, valleys, mountains, and lakes. Not only do the elements need to be visually satisfying, they need to be placed in such a way as to make the level playable. This type of skill doesn’t develop overnight. Be sure to practice and refine your level building skills in order to make exciting and memorable levels.
Terrain Textures
You now know how to make the physical dimensions of a 3D world. Even though there may be a lot of features to your landscape, it is still very bland and difficult to navigate. It is time to add some character to your level. In this section you will be learning how to texture your terrain to give it an engaging look.
Importing Terrain Assets
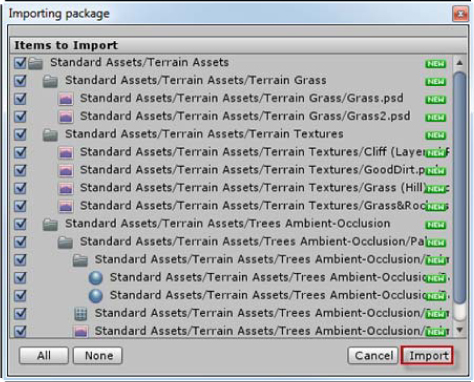
Like sculpting terrain, texturing terrain works a lot like painting. You will select a brush and a texture and paint it onto your world. Before you can begin painting the world with textures though, you need some textures to work with. Unity has some terrain assets available to you, only you need to import them first. To load these assets click “Assets->Import Package->Terrain Assets”. The “Importing Package” dialog will appear (see Figure 4.8). This dialog is where you determine exactly which assets you want to import. Deselecting unneeded items is a good idea if you want to keep your project size down. For now, just leave all options checked and select “Import”. You should now have a new folder under “Assets” in the project view called “Standard Assets”. This folder contains all of the terrain assets you will be using in the rest of this hour.
Figure 4.8. The “Importing Packages” dialog.
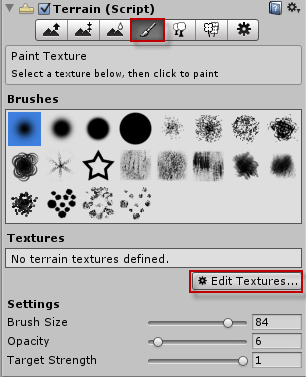
Texturing Terrain
The terrain texturing procedure is very simple in Unity and works a lot like the sculpting. The very first thing you need to do is load a texture. Figure 4.9 illustrates the texturing tool in the inspector. Pay attention to the three numerical properties: brush size, opacity, and target strength. You should be familiar with the first two properties, but the last one is new. The target strength is the maximum opacity that it achievable through constant “painting”. Its value is a percentage. (1 is 100%). Use this as a control to prevent painting your textures on too strongly.
Figure 4.9. Terrain texture tool and properties.
In order to load a texture you will need to follow these steps:
1. Click “Edit Textures->Add Texture”.
2. The “Add Terrain Texture” dialog will appear. Click “Select” in the texture box (see Figure 4.10) and select the “Grass (Hill)” texture.
Figure 4.10. The “Add Terrain Texture” dialog.
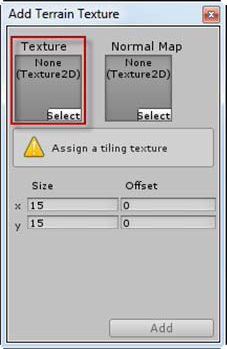
3. Click “Add”.
At this point, your entire terrain should be covered in patchy grass. Certainly this looks better than the white terrain previously, but it is still very far from realistic. Now is the time you will actually begin painting and making your terrain look better.
Let’s take a moment to apply a new texture to your terrain to give it a more realistic two-tone effect.
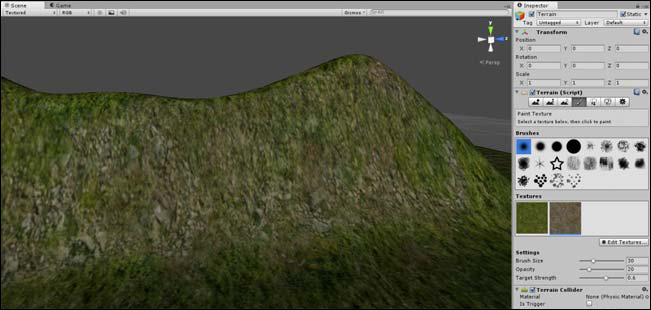
1. Using the steps listed above, add a new texture. This time, load the “Grass&Rock” texture. Once loaded, be sure to select it by clicking on it (a blue bar will appear under it if it is selected).
2. Set your brush size to 30, your opacity to 20, and your target strength to 0.6.
3. Very sparingly, paint (click and drag) on the steep parts and crevices of your terrain. This will give the impression that grass isn’t growing on the sides of steep grades and in between hills (see Figure 4.11 for an example).
Figure 4.11. Example of two-toned textured cliff.
4. Continue experimenting with texture painting. Feel free to load the texture “Cliff” and apply it to steeper parts or the texture “Sand” and make a path.
You can load as many textures as you want in this fashion and achieve some very realistic effects. Be sure to practice texturing to determine the best looking patterns.
Note: Creating Terrain Textures
Often, game worlds are unique and require custom textures to fit within the context of the games they are created for. There are some general guidelines you can use when making your own textures for terrain. The first is to always try to make the pattern repeatable. This means that the textures can be tiled seamlessly. The larger the texture, the less obvious a repeating pattern is. The second guideline is to make the texture square. The last guidelines is to try and make the texture dimension a power of two (32, 64, 128, 512, etc). The last two guidelines effect the compression of the texture and the texture’s efficiency. With a little practice you will be making brilliant terrain textures in no time.
Tip: Subtlety Is the Best Policy
When texturing, remember to keep your effects subtle. Most of nature fades from one element to another without many harsh transitions. Your texturing efforts should also reflect that. If you can zoom out away from a piece of terrain and tell the exact point where one texture starts, then your effect is too sudden. It can often be better to work in many small and subtle applications of a texture over one broad application.
Summary
This hour you learned all terrains in Unity. You started by learning what terrains are and how to add them to your scene. From there, you looked at sculpting the terrain with both a heightmap and Unity’s built in sculpting tools. Finally, you learned how to make your terrains look more appealing by applying textures in a realistic fashion.
Q&A
Q. Does my game have to have terrain?
A. Not at all. Many games take place entirely inside modeled rooms or in abstract spaces.
Q. My terrain doesn’t look very good. Is that normal?
A. It takes quite a while to build up proficiency with the sculpting tools. With some practice your levels will begin looking much better. True quality comes from play testing a level, which we will cover in the next hour.
Workshop
Take some time to work through the questions here to ensure you have a firm grasp on the material.
Quiz
1. True or False: You can make caves out of the Unity terrain.
2. What is a grayscale image containing terrain elevation information called?
3. True or False: Sculpting terrain in Unity is a lot like painting.
4. How do you access Unity’s available terrain textures?
Answers
1. False, Unity’s terrain cannot overlap
2. A heightmap
3. True
4. You import the terrain assets by going to “Assets->Import Package->Terrain Assets”
Exercise
Let’s practice terrain sculpting and texturing. Sculpt a terrain that contains the following elements:
• A lakebed.
• A beach.
• A mountain range.
• Flat plains.
Once sculpted, apply textures to your terrain in the following manner. All textures listed can be found in the terrain assets package.
• The beach should use the texture “Sand” and should fade into “Grass&Rock”.
• Plains and all flat areas should be textured with “Grass”.
• The texture “Grass” should smoothly transition into “Grass&Rock” as the terrain gets steeper.
• The texture “Grass&Rock” should transition into “Cliff” at its steepest and highest points.
Be as creative as you want with this exercise. Build a world that you can be proud of.