|
Engineering Challenge |


To complete this quest, Minecrafters and their families will engineer solutions to several design challenges.
Code Your Commands
Program in game using /commands, and then go deeper by programming with online resources.
Chain Reaction Contraption
Create a complex series of simple machines to complete a simple task.
LAB 21 |
Code Your Commands |

Programming has become increasingly important in our world. It takes programming to build and more programming to update Minecraft. Learn about programming while playing Minecraft!
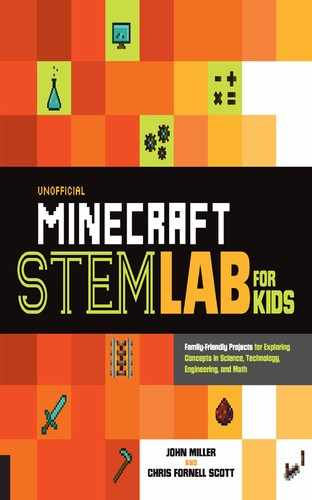
In this activity, you’ll create a simple program so your partner can complete the dot programming game. A program is a list of instructions; this one tells your partner how to move through the game. The goal is to successfully move your partner through dot by dot, without running into any boundary lines. We created four designs that start off easy and gradually increase in difficulty.
![]() APPROXIMATE TIME TO COMPLETE
APPROXIMATE TIME TO COMPLETE
1 hour
![]() MATERIALS
MATERIALS
Dot programming sheet (see here)
Pencil
Paper
1. To complete the game, your partner will follow your instructions (program) to connect the dots. From the start position, write each move your partner will need to make from dot to dot. Choose from the following moves: draw right, draw left, draw up, draw down. If you’d like your partner to move in any direction more than one dot, you’ll need to tell them. For example, to move up 4 dots, your program would read, “Draw up × 4” (fig. 1).

Fig. 1: Write commands like these for your game partner. The commands tell your partner where to draw the lines.
2. The completed list of moves (commands) is your program. Give your program to your game partner and ask them to follow your moves exactly, even if it means not following the game boundary lines on the sheet. If your program crosses the game boundary lines or over itself, it’s buggy. Debug your program by altering the moves (fig. 2).
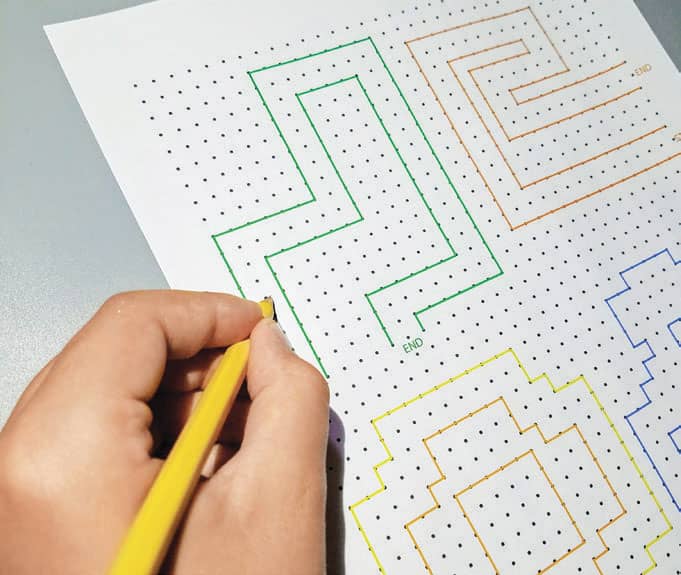
Fig. 2: Instead of following the boundary lines, your partner should follow the commands to connect the dots.
3. You can create a program for one of the shapes shown in figure 3, or draw your own design on dot paper (see here) and craft a program for your partner to follow.

Fig. 3: Four sample dot-programming templates you can use.
 FIND IT ONLINE
• This video produced by Facebook explains the concept of computer science: https://goo.gl/IoT1JO
• Go to this web address for a printable version of our sample dot programming template https://goo.gl/7eKGME
Minecraft Play: /Commands
For this in-game part of the lab, you’ll type commands and get items that are impossible to collect in game. Who doesn’t want enchanted weapons with the 32747 level? There are many more commands you can try in game that are not covered in this lab. Try to figure out how to customize the commands as you work through the lab.
![]() GAME MODE
GAME MODE
Creative or survival (must be OP)
![]() APPROXIMATE TIME TO COMPLETE
APPROXIMATE TIME TO COMPLETE
1 hour
FIND IT ONLINE
• For a list of all the commandsand how to use them, visitthe Minecraft Wiki: https://goo.gl/UKwyRP
• Devise even crazier commands using the MCStacker website: https://mcstacker.bimbimma.com
• Subscribe to Jragon014 to learn how to make your own Minecraft commands: https://goo.gl/zl67WA
1. You must be OP (operator) in the world. In single player, either start the world with cheats on or open your world to LAN, press Escape, and you’ll see a button that says open to LAN. The commands must be typed in the chat box by pressing t or / to start a command (fig. 1).
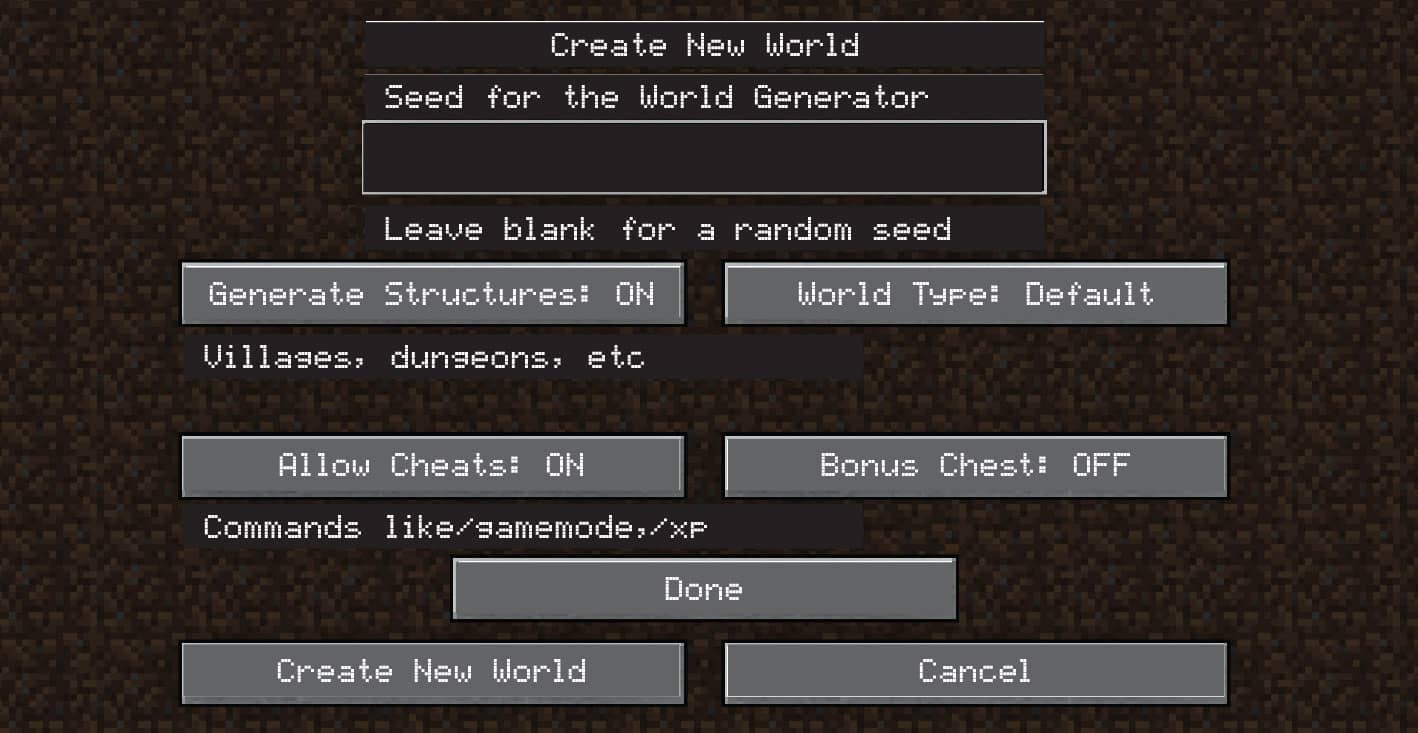
Fig. 1: You must allow cheats to run /commands. It’s easiest to do this before creating the world, but if you’re already in a world and didn’t allow cheats, then open the world to LAN.
2. Start with altering the weather and time of day. Type /weather thunder 100 and press Enter. Type /set time night and press Enter. There are three weather options: clear, rain, and thunder. The number at the end of the weather command is the number of seconds you’re changing the weather.
3. Commands can be location specific. One of the most useful commands is the /tp command to teleport users around the world. Type /tp with coordinates to teleport yourself to a new location (fig. 2). An example is /tp 100 75 -270. When playing with others, teleport to them by typing /tp (person being teleported) (person at location). An example is /tp cscottsy escottsy (this command will send cscottsy to escottsy). For more on coordinates, review Lab 5.

Fig. 2: Teleport anywhere in the world and to other players using the simple /tp command.
4. Many of the features you’re used to are controlled by the command /gamerule. Try to turn pvp on by typing /gamerule pvp true (or false to turn it off).
5. With the /summon command, things get interesting. You can summon much more than a regular creeper or cow. With a few additions to a command or argument, you can change their characteristics. Type /summon and then press the tab key to see a list of options. An example is /summon chicken ~ ~1 ~ {CustomName:“Cluck_cluck”,CustomNameVisible:1} (fig. 3).
Fig. 3: We summoned a chicken with a visible name, named Cluck_cluck one block above our coordinates.
6. Super enchant a diamond sword by typing /give @p minecraft:diamond_sword 1 0 {ench:[{id:16,lvl:32767},{id:21,lvl:32767},{id:20,lvl:32767}]}. This command will give you a diamond sword with Sharpness (16), Looting (21), and Fire Aspect (20) at a maximum level of 32767 (fig. 4).
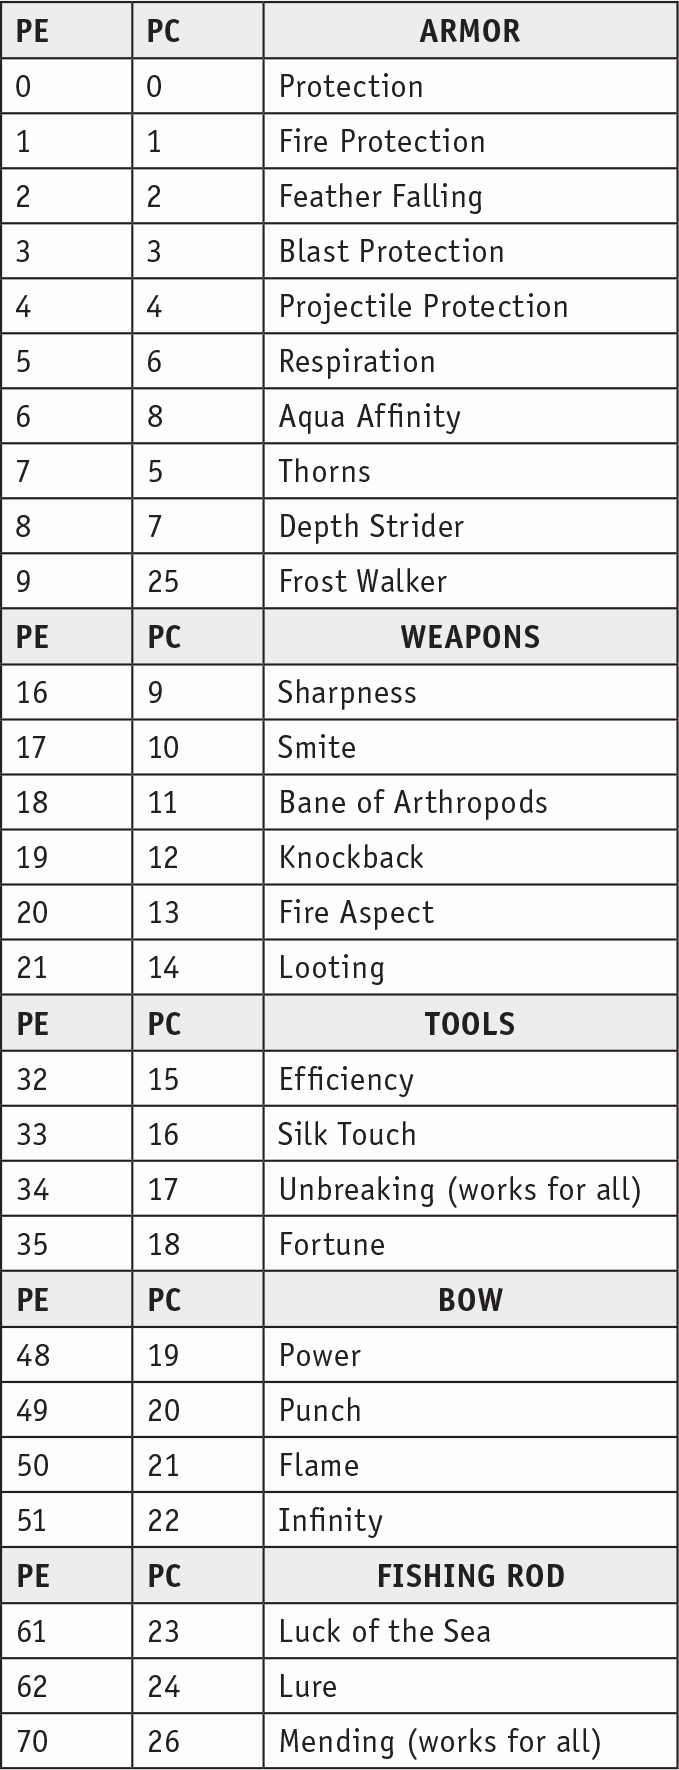
Fig. 4: Use this table as you craft your own enchanted tools. Don’t forget to share super- powerful items with your friends.
LAB 22 |
Chain Reaction Contraption |

In this lab, you’ll use simple mechanisms to create a chain reaction to accomplish a simple task, also known as Rube Goldberg machines. Consisting of mechanisms such as levers, pulleys, wheels and axles, screws, wedges, and gears, these machines are named after Rube Goldberg, a cartoonist and engineer who created famous newspaper cartoons. Some overly complex machines can take hours to build and seconds to perform. You’ll get to build your own in and out of Minecraft.
FIND IT ONLINE
• Learn more about Rube Goldberg, his comic strips, contests, and more: www.rubegoldberg.com
In this activity, we’re going to build a Rube Goldberg machine. We pulled together a bunch of items lying around to build our example. The materials list is just a suggestion; see what you have around your house.
![]() APPROXIMATE TIME TO COMPLETE
APPROXIMATE TIME TO COMPLETE
1 hour
![]() MATERIALS
MATERIALS
Wooden train tracks with train
Dominoes
Large bouncy ball
Wood blocks
Books
Electrical surge protector with on/off switch
Electric fan
Family Activity: Build a Rube Goldberg Machine
1. All great Rube Goldberg machines repurpose parts found around the house. While you design your machine, consider using old and new toys with string, tape, electrical switches, swinging bouncy balls, train tracks, balloons, and dominoes.
2. Every Rube Goldberg machine has a clever start. Try hanging a large bouncy ball taped on a string that will pendulum into something to kick-start your machine (fig. 1).
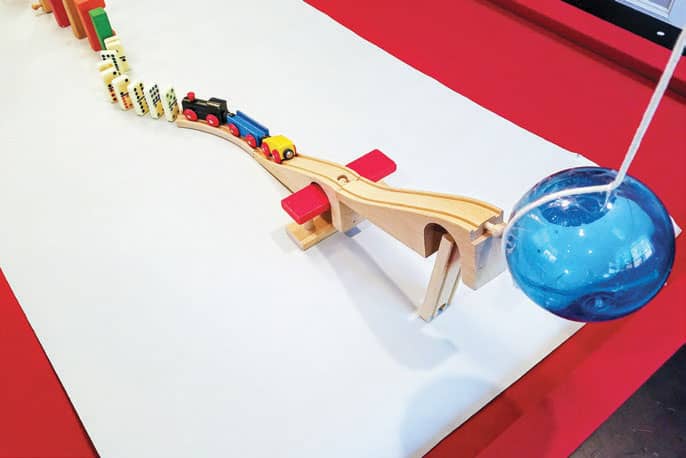
Fig. 1: Pull back on the ball to start the machine.
3. Our machine has six different reactions. A swinging ball hits the train that rolls into the dominoes. The dominoes hit the larger blocks, which hit the large wood train track pieces. The train track pieces fall onto the books, which tumble onto the electrical switch to turn on the fan (fig. 2).
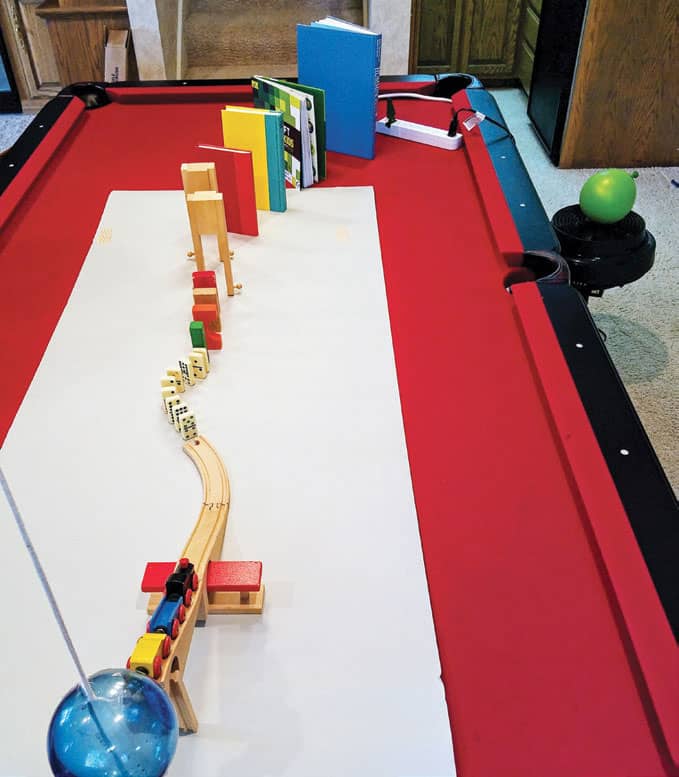
Fig. 2: This run has six reactions. Notice the small wood tree taped onto the power switch to make sure the fan turns on.
4. It takes several tries to have one successful start-to-finish run (fig. 3). Don’t worry if it takes dozens of attempts, as the best Rube Goldberg machines require a lot of patience.

Fig. 3: It takes patience to devise a successful start-to-finish run.
Minecraft Play: Rube Goldberg Meets Redstone
With a little creativity, you can use items in Minecraft to create reactions. Just as you built an actual machine in the family activity, you’re going to design, build, test, and rebuild a Rube Goldberg machine in-game. You’ll use dispensers, slime blocks, comparators, repeaters, pistons, detector rails, armor stands, and more!
![]() Game mode
Game mode
Creative
![]() Approximate time to complete
Approximate time to complete
90 minutes
1. Pick a fun location to craft your Rube Goldberg machine. Start and end your machine in a similar location. We’ve crafted a pumpkin pie delivery machine.
2. To start our Rube Goldberg chain reaction machine, we fire an arrow at a wooden button placed on the side of a dispenser. The dispenser releases a piece of redstone dust that flows down the river (fig. 1).

Fig. 1: Firing the arrow at the button causes the dispenser to release redstone dust that flows down the river and into the chest.
3. At the end of the river, the redstone enters the hopper. The hopper moves the redstone into the chest. Once the chest has the redstone, the redstone comparator is activated (fig. 2).

Fig. 2: Notice the half slab used to create an end to the river. Without the half slab, the water will flow out in all directions.
4. The redstone comparator sends a signal through redstone to activate the sticky piston. A slime block on the end of the sticky piston pushes the armor stand down the icy runway. The armor stand ends on a stone pressure plate (fig. 3).

Fig. 3: Hoppers are clever items. In this build, we’re using a hopper to transfer the redstone dust collected from the end of the river into the chest.
5. The stone pressure plate sends a redstone signal to a powered redstone rail. Place a cart on top of the redstone rail. The block immediately behind the cart forces the cart to move once the redstone rail becomes powered (fig. 4).

Fig. 4: Be sure to add the block behind the minecart. Customize your build by adding or removing rail.
6. The cart rides the rail to a detector rail that activates the redstone ladder. The signal burst up the ladder starts the redstone clock on top of the platform. The dispenser filled with arrows at the end of the redstone clock starts firing at the wooden button (fig. 5).

Fig. 5: The redstone ladder is a compact method for sending a signal vertically. Check out Lab 3 (shown here) for directions on how to build a redstone ladder.
7. The last step is for the minecart with pumpkin pie in the chest to be delivered to the original firing station. The arrows from the dispenser activate the redstone rail and send the cart on its way.
![]() NOW TRY THIS
NOW TRY THIS
Search for Rube Goldberg in the app store on your mobile device for more Rube Goldberg machine fun.
LAB 23 |
Pocket Solar System |
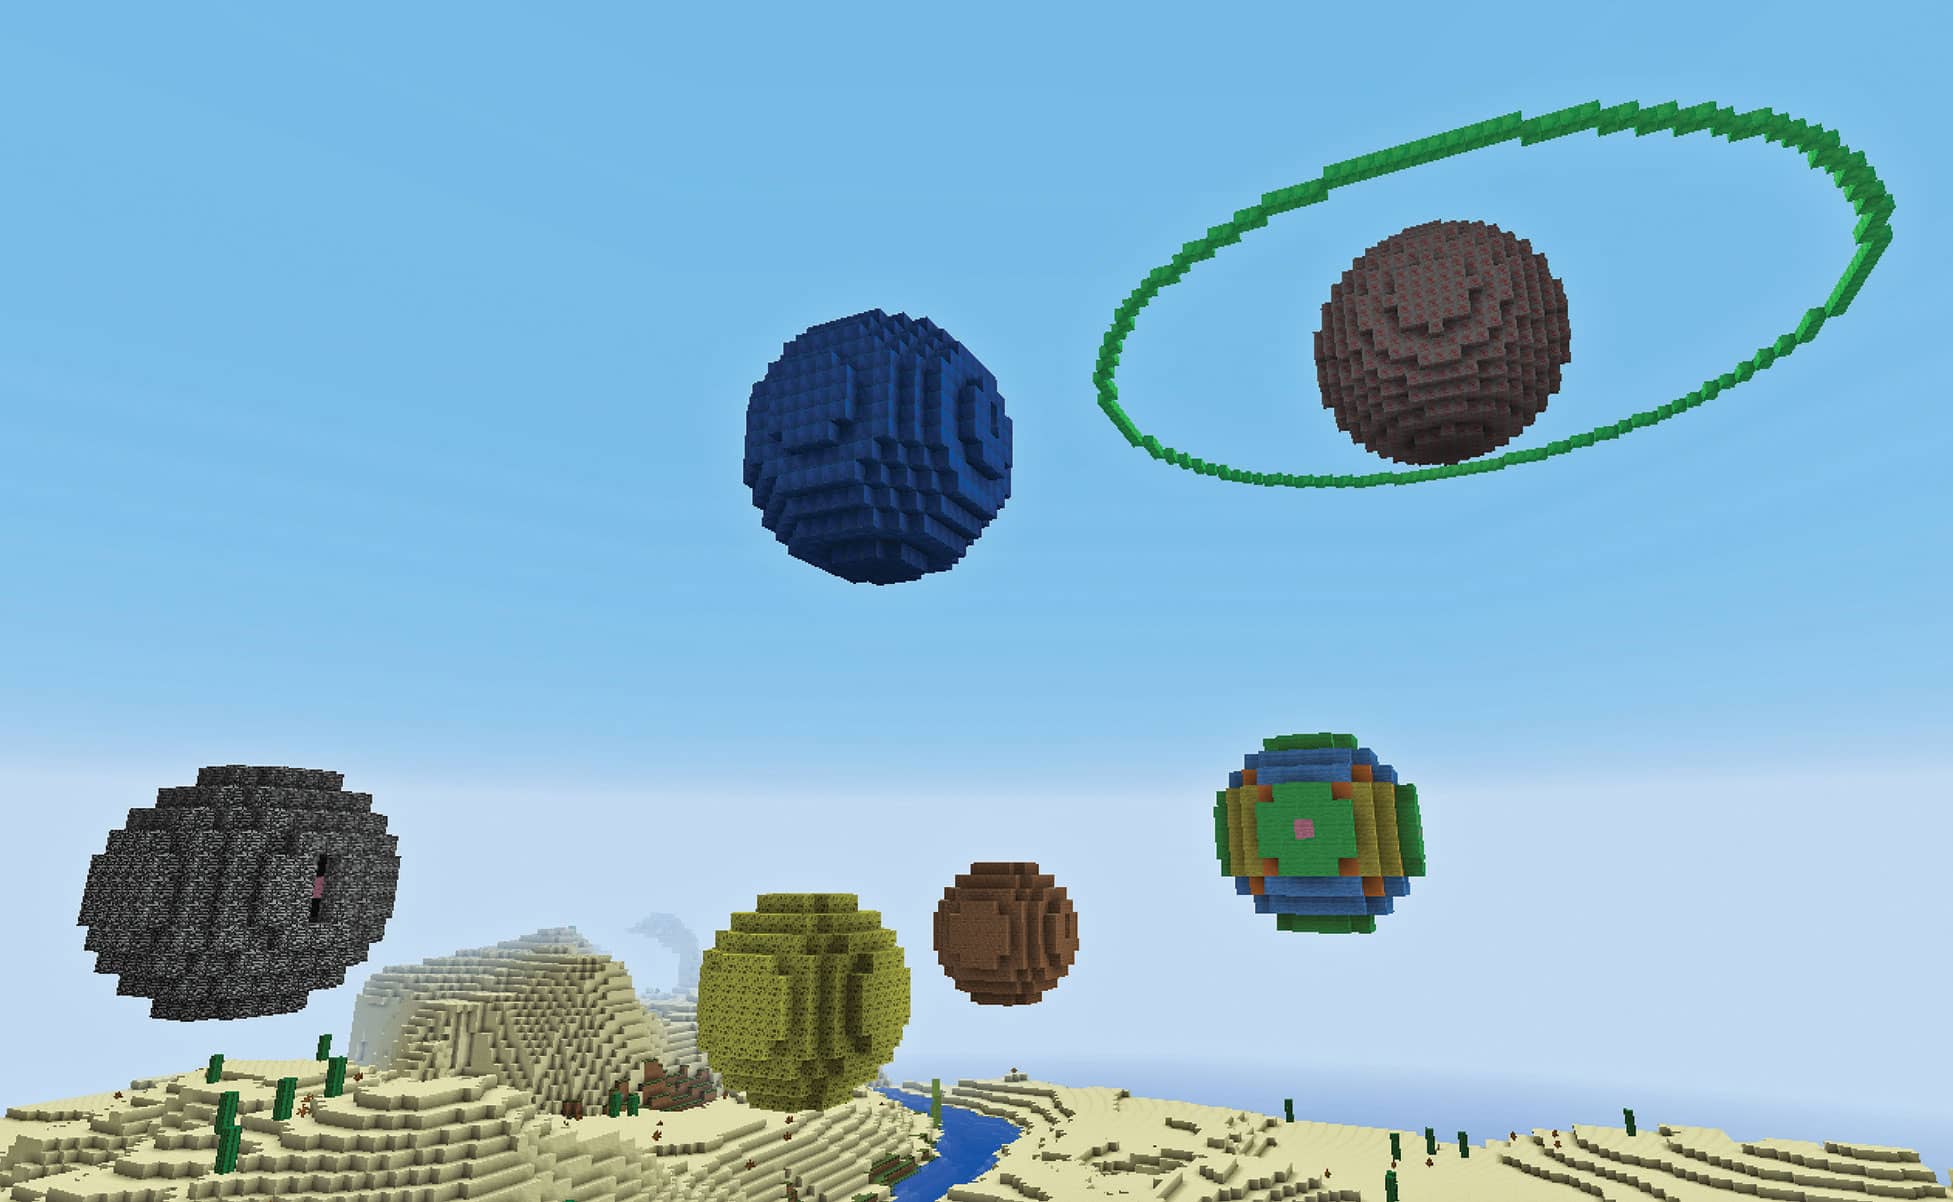
You’ll be diving into astronomy in this lab, where the challenge is to make a mini solar system in Minecraft. You’ll park the planets in the sky right outside your science lab and create a beautiful nighttime view. In the family activity, you will focus on the ringed planet Saturn and make a clay model of its interior.
Family Activity: Clay Saturn
In this lab, you will be creating a model of the planet Saturn out of clay.
![]() APPROXIMATE TIME TO COMPLETE
APPROXIMATE TIME TO COMPLETE
1 hour
![]() MATERIALS
MATERIALS
5 blocks of modeling clay, about 4 ounces (113 g) each, in assorted colors
Rolling pin
10 toothpicks
Sharp knife (get help from adult)
1. Although Saturn is a gas planet, astronomers think its core may be solid. Roll half a block of clay into a ball (fig. 1).
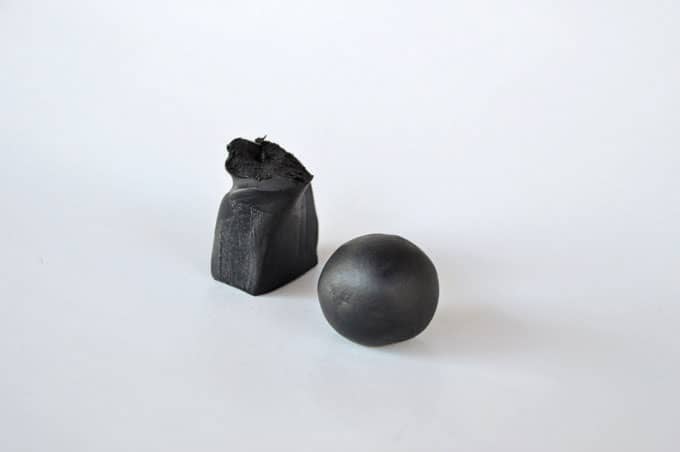
Fig. 1: We used black clay to form the solid core.
2. Select another color of clay and roll about half of it out flat. Cover the core with this “liquid neon” layer (fig. 2). Repeat to add two more layers, helium and hydrogen (fig. 3).

Fig. 2: Roll out the clay to make it easier to cover each layer. This is the liquid neon layer.

Fig. 3: Add two more layers; helium is pink and hydrogen is yellow in our model.
3. To create the ring disk, roll out the final color into a flat circle. With a toothpick, cut a hole out of the center that’s just slightly smaller than your planet (fig. 4). Insert the toothpicks around the equator (fig. 5) and lay the ring disk on top of the toothpicks, stretching the center as needed.

Fig. 4: Cut a hole in the center using a toothpick to make a ring disk.
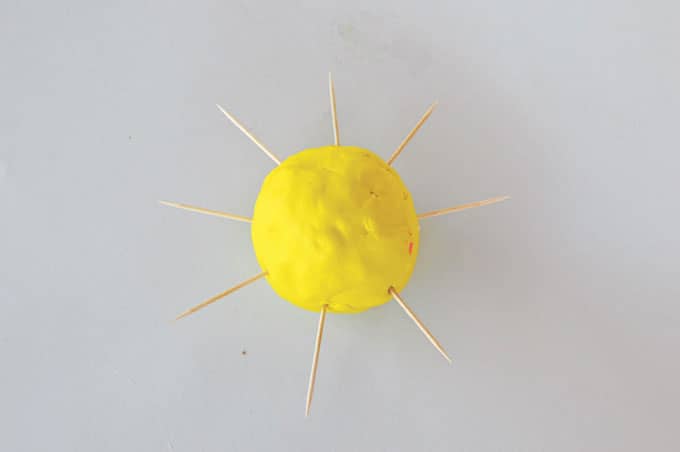
Fig. 5: Add toothpicks to support thering disk.
4. With a sharp knife and adult supervision, cut a quarter section out of the planet to expose its interior (fig. 6).

Fig. 6: We added some leftover clay to our rings and cut out a section of the planet to reveal the gaseous core.
Minecraft Play: Design and Build a Solar System
Gather the family and a few friends to help you create a solar system. In this lab, you’ll use math to construct planetoids to enhance the sky view from your laboratory.
![]() GAME MODE
GAME MODE
Creative
![]() APPROXIMATE TIME TO COMPLETE
APPROXIMATE TIME TO COMPLETE
1-2 hours
1. To build in the sky, you’ll need to make a tall pillar that extends high into the air. Where you stop will be the base (or south pole) of your first planet. You likely already know about a number line. You might even have experience with graphing numbers using the coordinate system. It’s the same system used in Minecraft to determine your location: x, y, and z .
2. Circles and spheres have a radius, which is the distance from the center to the outer edge. We’ll make our first sphere with a radius of 5. Remember that number; it will come up again. Place your first block on the base (south pole of your planet) and then 10 more straight up for a total of 11 blocks. This will be the y-axis. Find the center and add 5 blocks on both sides. This is the x-axis. Finally, repeat this step from the center to create the z-axis (fig. 1).

Fig. 1: Build this frame in the directions x, y, and z. Each axis is11 blocks of pink wool.
3. At the end of each axis, create an X reaching outward from each end block by adding 2 blocks in all directions (fig. 2). Fill in each X to create a 5 × 5 square, but leave out each corner (fig. 3).

Fig. 2: We used green wool to add an X shape at the end of each axis.

Fig. 3: Fill in the X shape, but leave each corner unfilled.
4. Beginning at the bottom, add 2 rows of 5 blocks each that climb like stairs upward. Repeat this step from the top downward (fig. 4).
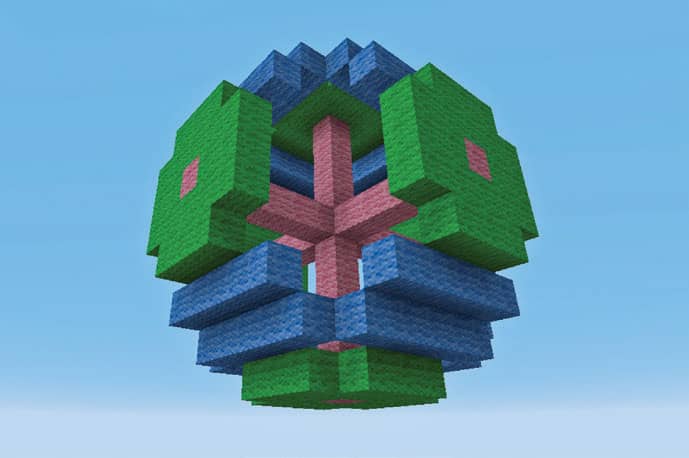
Fig. 4: Build 2 rows of 5 blocks (blue wool in image) on the south and north poles of your sphere.
5. Complete a similar task to step 3, but instead of rows, create 2 columns of 5 blocks. Add these columns all the way around the sphere (fig. 5).
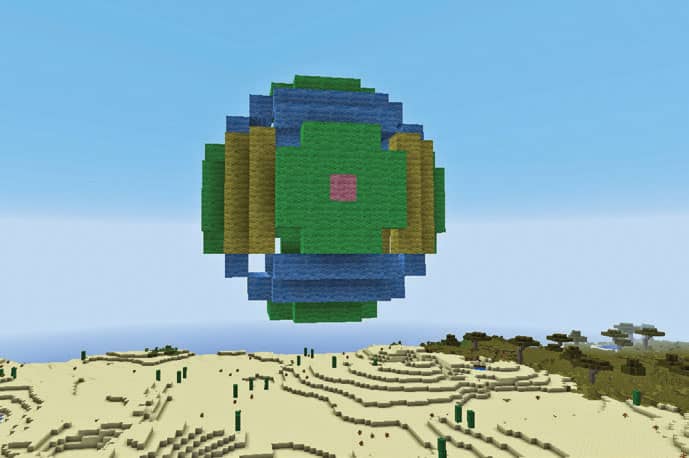
Fig. 5: Add 2 columns of 5 blocks (yellow wool in image) around your sphere from east to west.
6. Finally, add a few more blocks to fill in the remaining gaps and you’ll end up with your first planet (fig. 6)!
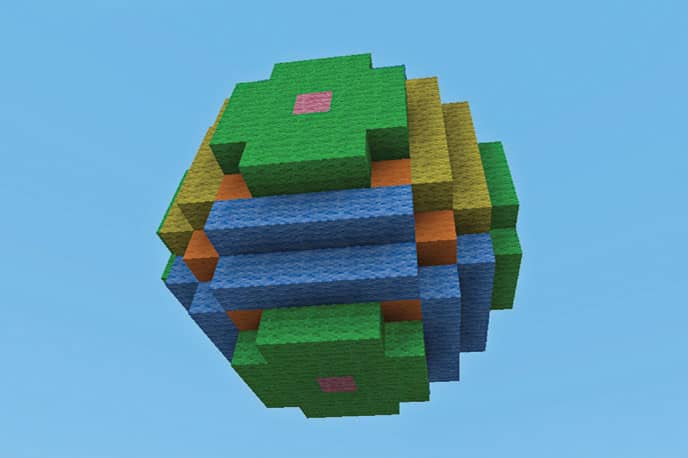
Fig. 6: Almost done! Fill in the remaining holes with blocks (orange wool in image) and your planet is complete.
7. Repeat this process and create as many planets as you would like. Experiment with different blocks, colors, and textures to create the ultimate solar system.
![]() NOW TRY THIS
NOW TRY THIS
• Construct a larger planet with a radius of 7 or 9. Is there a relationship between the radius and the number of rowsand columns?
• Add a ring around a planet. Your ring should be at least three times the radius of the planet.
• Create a star like our Sun by using glowstone.
FIND IT ONLINE
Want to create even moreamazing shapes? Look no further than the Plotz website, a handytool that helps you visualize Minecraft structures in 3D: http://www.plotz.co.uk
LAB 24 |
Under the Sea |

Put on your scuba gear! We’re going to dive deep under the ocean and build an underwater oceanography station, a structure that will keep you safe, well fed, and investigating the bottom of the sea for hours. To begin, let’s make a submarine and learn about the science of buoyancy.
This activity requires adult supervision and participation. You’ll make a submarine out of plastic bottles (a great opportunity to recycle some empties), sink it, and then use your lung power to raiseit once again.
![]() APPROXIMATE TIME TO COMPLETE
APPROXIMATE TIME TO COMPLETE
30 minutes
![]() MATERIALS
MATERIALS
Small plastic or paper funnel
1 large (2L) plastic bottle
Sand, enough to fill most of the large bottle
Scissors
2 smaller (12oz) plastic bottles
4 rubber bands
2 drinking straws
Small amount of nonhardening modeling clay
2 binder clips
Ruler
Aquarium, water tank, or bathtub with water, and large enough to contain your model submarine
1. Gather your materials. Using a funnel, fill the large plastic bottle with enough sand so that it gently sinks in the water. In our example, we filled the bottle two-thirds full (fig. 1).

Fig. 1: Fill the large bottle with enough sand to gently sink it.
2. With the scissors, poke a small hole in one side of the first small bottle. The hole needs to be large enough for a straw to enter. Find the opposite side of the small bottle and poke a larger hole, about twice the size of the first hole. Repeat with the second smaller bottle (fig. 2).

Fig. 2: The holes in the small bottles should be large enough to thread a straw through.
3. Attach the small bottles (buoyancy tanks) on either side of the large bottle using the rubber bands. The small hole for each straw should be on top. Insert a straw into the hole in the top of each small bottle. Smear modeling clay around each straw to create a watertight seal. Attach a binder clip at the midpoint on each straw. This will be used to trap the air supply in each tank (fig. 3).
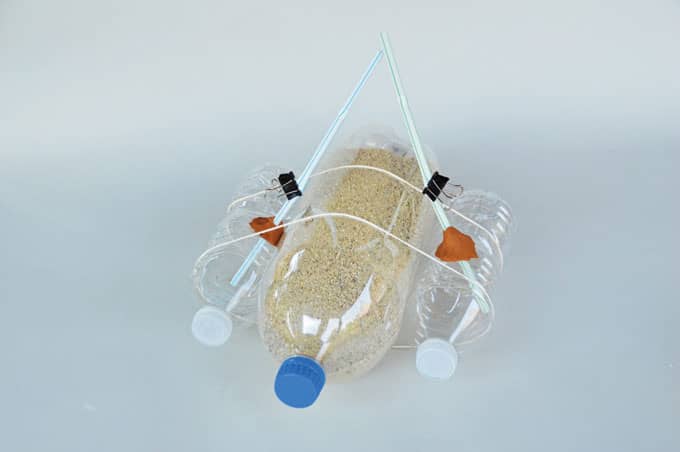
Fig. 3: Attach the smaller bottles, insert the straws, cover the area around each with modeling clay, and attach a binder clip at the midpoint of each.
4. Place your submarine into the water. It should float as each buoyancy tank contains enough trapped gas to equalize forces.
5. Release each binder clip. The gas trapped inside each tank will escape through the straw and water will enter the larger hole underneath. The forces are no longer equal and your submarine sinks (fig. 4).
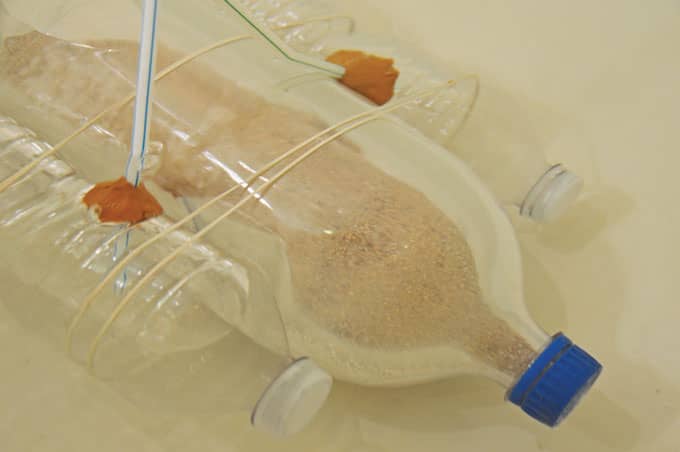
Fig. 4: Place sub in water, release the clips, and watch it sink as the air is replaced by water. To raise the sub, blow into both straws at the same time to force out water.
6. Now try to raise it from the bottom. Blow into both straws at the same time to force the water out and the carbon dioxide back into each tank. The submarine will rise as each tank fills with the less dense gas.
Minecraft Play: Oceanography Station
Your challenge is to take what you’ve learned in this book and apply it to an underwater oceanography field station. You’ll need your automation skills, command block knowledge, and a solid understanding of redstone mechanisms to make it work.
Lay out your field station on paper, first. It should include the following:
• Access to food and shelter
• A power supply
• Automated doors or a mob trap
• A teleport station to return to the surface hub
• A large fish tank and viewing platform
![]() GAME MODE
GAME MODE
Creative
![]() APPROXIMATE TIME TO COMPLETE
APPROXIMATE TIME TO COMPLETE
3–4 hours
1. Working underwater can be a difficult challenge. You can’t see very well, you move more slowly, and you need to remove lots of water as you build. Find a location that isn’t too deep and is mostly flat. Lay out a large number of glowstone or sea lantern blocks to light your work area (fig. 1).
Fig. 1: Give yourself plenty of room to build. Light up the area with glowstone. Replace it with sea lanterns as you build.
2. To get the hang of building underwater, let’s start with a small section of your field station. In our model, we started with the bedroom that has the dimensions of 6 × 7. Lay down the floor and put up the walls and the roof. Place a door. The door creates an air pocket, even if it is left open. With the door closed, place a sponge in your hand and right-click. The sponge will absorb all the water in the room, leaving you with a wet sponge and a dry bedroom (fig. 2).

Fig. 2: Build a small room, first. Add a door to create an air pocket, then right-click with a sponge to soak up all the water. You can then destroy the wet sponge.
3. As you complete each building, surround it with a layer of glass, clear or colored. Now you can punch out windows anywhere without being flooded and it stops water drops from leaking through your roofed areas (fig. 3).

Fig. 3: Add glass all around to allow for instant window creation. It also stops the roof from leaking.
4. Connect separate builds with long corridors. Use lots of light and glass. Soak up the water as described in step 2 (fig. 4).
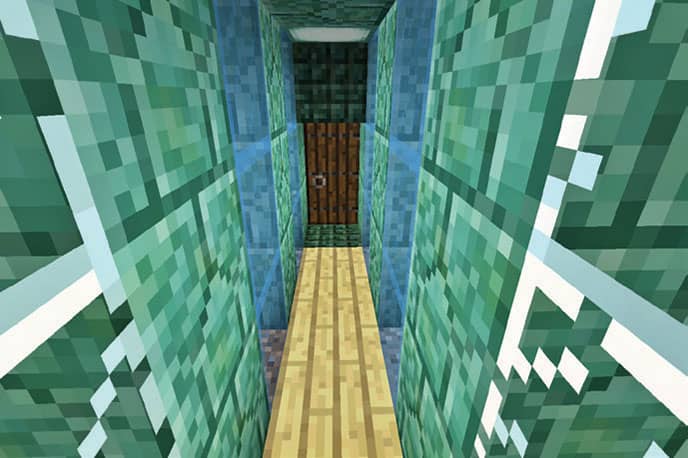
Fig. 4: Use corridors to connect each building in your complex.
5. Build a room that has a great view of the ocean beyond and turn it into a giant aquarium by surrounding it with glass walls, several blocks away from your building (fig. 5). Place items on the sea floor that might be found in an aquarium and spawn squid when finished.
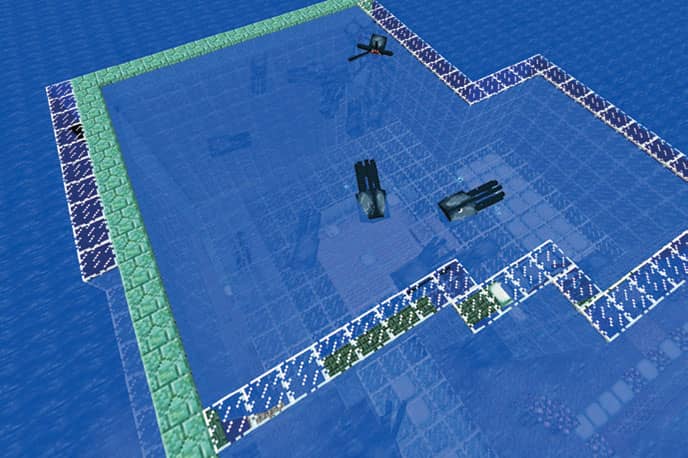
Fig. 5: Enclose an area around one of your larger buildings and turn it into an aquarium. Spawn squid and build items you might find in an aquarium.
6. Finish by adding a teleport station, redstone-powered piston doors, and a power supply (fig. 6).

Fig. 6: Add as many extras as you need to complete the challenge. You’ll need a way back to land.
![]() NOW TRY THIS
NOW TRY THIS
• How else could you use command blocks in this build? Experiment with the /summon command in your aquarium.
• Every oceanographer needs a submarine. Build one and attach it to the lab by creating adocking station.
FIND IT ONLINE
Looking for some truly crazy things to incorporate into you undersea lab?Check out UnspeakableGaming’s20-minute video full of redstoneideas: https://goo.gl/rd6JdE