Joomla sites allow you to use and create two different kinds of content: dynamic content and static content. Though both are very useful, Joomla predominately runs and thrives on dynamic content—so much so that Dynamic Content Items are simply called Content Items in Joomla by default.
Because we know that most anyone reading this Short Cut understands, at least conceptually, what content is, we will do our best to stay true to keeping this a Short Cut. So, strap on your seatbelts and let’s get started!
There are a few different ways to access the new Content Item screen, which is where all the action takes place:
In the backend of Joomla, from the home page or Control Panel, click the Add New Content radio button (shown in Figure 22).
You can also select: Content → All Content Items → click the New tab in the top-righthand corner.
Select: Content → Content by Section → [Section Name] → [Section Name] Items → click the New tab in the top-righthand corner.

You will notice the screen is dived into two halves. One half is called Item Details and contains two white content editing boxes, each with its own WYSIWYG (What-You-See-Is-What-You-Get) editor. The other half is a series of parameter tabs, which control how your content is displayed. We will first talk about the Items Details lefthand side of the screen, where you enter your content.
For adding content to your site, Joomla provides a WYSIWYG editor. The default editor for Joomla is called Tiny MCE Editor and is available for editing on both the back- and frontend. The editor works much like a typical word processor. There are two content boxes here: one says “Intro Text: (required),” and one says “Main Text: (optional).” This is where you enter your content for the item.
Enter the Title of your Content Item, and enter the Title under Title Alias. The Title of your article is what will appear at the top of the article, usually in some form of header tag. A Title Alias is an alternate title for your content item, used by SEF scripts and dynamic title/meta scripts.
Assign a Section and a Category for your content item, using the drop-down menus.
Reminder
You must define the Sections and Categories before creating content items.
Use the WYSIWYG Editor to enter your content.
If you prefer to write your own HTML code, toggle the HTML code editor, by selecting the HTML button provided in the menu options on the WYSIWYG editor. You will now get a pop-up window that says HTML Source Editor. This enables you to edit the actual HTML source of your content item. Once you select the Update button at the bottom of the window, the changes you have made to your content item appear in the WYSIWYG editor.
Save your work.
You may save your work by selecting the Save or the Apply radio buttons in the top-right corner of the screen. Each of these buttons saves your work, but with different functions:
Selecting Save saves your work to the site, and closes the content item window, taking you back to the Content Items Manager screen.
Selecting Apply saves your work to the site and allows you to keep working on the content item. This is a very useful option if you are working for long amounts of time on a particular content item, or if you want to preview (in a new browser tab), while you work, your content item as a published article on the Web.
When entering the actual content (the text, photos, etc.) for a particular item, you have the option in Joomla to publish the article outright, in its entirety, or to publish an introductory portion of the article with a Read More button at the end. When the user clicks on the Read More button, the content item displays itself whole. Many people are familiar with this function from reading online newspapers. The title and first few lines of a content item are present, alongside the titles and first few lines of several other articles, and the user is able to choose what she reads whole. It is also an option to turn off the actual Read More button, and allow the title of the article to be the hyperlink to the whole text.
If you choose to display your content item with this Read More option:
Enter the introductory lines of your content into the “Intro Text: (required)” box. Joomla, if it is enabled, will automatically generate the Read More option.
Enter the remainder of the article in the “Main Text: (optional)” box directly below the Intro Text box.
These Content Items are the meat and potatoes of your site. Practically speaking, they make up 95% of your site’s substance, and are the primary reason people will visit and revisit your site. Though many people think of web pages as two-dimensional, flat, magazine-like pages, it’s best to imagine these Joomla content items as three-dimensional entities. Each content item can be used interchangeably within Joomla’s various structures of content representation. For you, this means that with a few mouse clicks, you can rearrange the entire layout, presentation, or order of your content without having to rearrange or lay out each piece of content (text, photos, etc.) on a page.
For example, if you are trying to present the most recent press articles about your company, you can display them as a three-column vertical layout, or a bulleted list of headlines (which link to the full text), or a series of short, bloglike teaser lines that have a Read More button that links to the entire article. Joomla is able to provide this versatile functionality through the organization of each content item into a section and category. For this reason, all Content Items at the time of their creation must necessarily be assigned a section and category.
Static content items, on the other hand, do not belong to the dynamic structure of section → category → content item. They are not required to have an assigned a section or category. Likewise, static content items cannot be integrated with Joomla’s forms of dynamic content representation. Whereas a page of dynamic content consists of a collection of individual content items, which can be arranged in a variety of ways, a static content item is a two-dimensional page, as a business flyer. If you have ever created web sites made up of entirely of static, separated HTML pages, static content pages will seem familiar to you.
Placing images within a Joomla content item is a relatively
simple process that involves using the {mosimage} tag inside your content text
(within the WYSIWYG or HTML editor) where you would like for the image
to appear. Figure 23 shows the
MOSImage Control Panel.
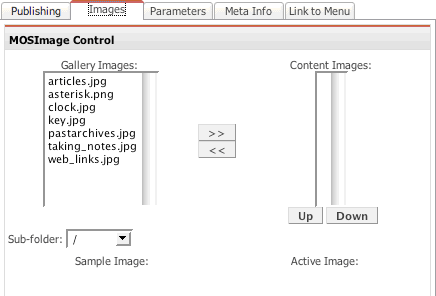
Select the Images tab on the right side of the Content Item: New Page.
Under MOS Image Control, you should see two lists of images; one is Gallery Images and one is Content Images.
The Gallery Images automatically lists the images available to you within the images folder called stories within your site. Its actual location on the server is yoursite.com/images/stories. You should get to know the stories folder, because it comes in handy almost anywhere you need to insert images in Joomla.
Highlight the image(s) in the Gallery Images that you would like to use in your content item. If your image is within a subfolder of the stories folder, use the Sub-folder drop-down field to locate your file.
Tip
If your image is not anywhere on your site at all, use the Menu Manager to upload your image into the stories folder.
Use the >> arrows to move those images into the Content Images column. These images are now available to be used for your content item.
Highlight each image you would like to insert, and use the “Edit the image selected” options below to define the parameters of your image. When you are finished, click the Apply button at the very bottom of this screen (Figure 24). Your image is now defined for you and ready to be placed within your content item.
Warning
This Apply button must be selected in order to save your edits to the image. This Apply button is entirely separate from the general Apply button, which enables you to save your item and keep working.
Inside of your WYSIWYG editor, insert the tag
{mosimage}wherever you would like for your image to appear. If you have multiple images in a content item, simply use the{mosimage}tag each time, and the images will appear in your content item in the same order, top to bottom, that they appear in the Content Images field. To reorder the images in the Content Images field, highlight the image you wish to move and use the up and down buttons to relocate.

Using the Publishing Tab, you will find the settings for how, for whom, and when your article is to be published:
Show on Front page determines whether the Content Item is displayed on the Front Page (or Home Page). Check this box if you want the Content Item to be published on the Front Page.
Published determines whether the Content Item is published or not once it saved. Choosing “leave a content item unpublished” can be very useful if the item is a work in progress, or if a content item needs approval before going live.
Access Level determines whether the general public can view the item, or only registered members of your site. This restricted option is very useful if you’re attempting to gain registered members/emails to your site. By default, set to Public.
Using the Author Alias and Change Creator options, you may specify the author (among site-registered editors) of the article, or make up a name, i.e., Webmaster.
The Ordering option gives you the power to set the position in which this Content Item appears within its Section or Category. For example, if you are creating a content item for a breaking news story within your site, you might use this option to order it first, so that when it publishes, it will appear at the very top of your page. This operation of ordering and reordering content items can also be done on the Content Items Manager screen.
The Start Publishing and Finish Publishing Options allow you to set an automated start and stop to the publication of a particular content item. For example, if a meeting location has changed at the last minute, and you need to create an announcement that will remain published in the top position on the front page of your company’s site for one day, or even one hour, this function enables you to do this by setting the beginning and end publication times. You can specify that an item be published for 10 years, 10 minutes, 10 seconds, or any variation thereof.
The default setting for the Start Publishing option is Now (whatever the current time is at the time of the initial saving of the item). The default setting for Finish Publishing is never. These will remain so, unless you, as the content creator, override these options by entering a specific start and/or stop publishing time.
Considering that it is the first impression a user has of your site, the home page, or front page as Joomla calls it, deserves some special attention. There are two easy ways to publish any (dynamic) content item on the on the front page of your site.
One is by checking the Show on Front Page box (under the Publishing Info) tab, while you are actually creating or editing the content on the Content Item: New page. A quicker way to easily publish and unpublish front page items is by viewing the Content Items Manager screen.
Select Content → All Content Items. You are now viewing a list of your content items.
Under the column titled Front Page, there will be a green check next to those content items, which are already appearing on the front page, and a red X next to those that are not published on the front page.
You can quickly change any content item from published to unpublished on the front page by clicking this green check (or vice versa by clicking the red X—unpublished to published).
In trying to manage the appearance of these front page items, Joomla gives you a Front Page Manager, similar to the Content Items Manager.
Select Content → Front Page Manager, and you are now viewing a list of the content items published to the front page. From here you can publish or unpublish the items, simply by clicking on the icon under the word Published for each item. You may also rearrange the order in which the items are displayed on the front page, either by clicking the blue arrows (corresponding to a particular content item) up or down. Or, if you wish to reorder more than one content item at a time, you can type in the order number you wish next to the corresponding content item in the provided type-box. After you have the order you want, simply click the icon of the disk next to the word Order at the top of the page, and Joomla reorders your pages for you.
As you might imagine from the title, archiving Content Items in Joomla is a way to store older items on your site that may be past their prime in relevance, but still retain enough value to store online.
To archive an item:
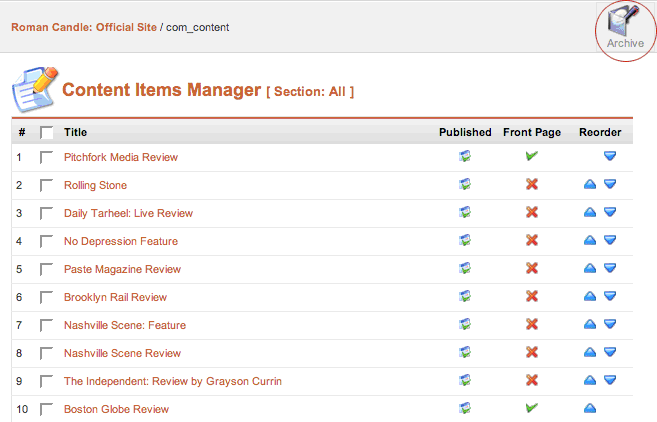
Select Content → All Content Items. You are now at the Content Items Manager, shown in Figure 25.
Check the box next to any content items you want to put in the archive. The box is directly to the left of the content item title. You may check more than one item at a time.
Select Archive from the radio buttons at the top right of the screen.
Archived items remain on your Joomla site and can be retrieved, or unarchived, at any time using the Archive Manager.
To unarchive an item:
Content → Archive Manager.
Check the box next to any content items you want to unarchive. The box is directly to the left of the content item title. You may check more than one item at a time.
Select Unarchive from the radio buttons at the top right of the screen.
By publishing the Archive module, you can allow frontend users to have automatic access to these archived content items. A Calendar (month/year) is created within the module, and allows the reader to view archived items based on the time they were created.
Imagine yourself reading through your own web site, looking over pages, articles, images, etc. You notice a blaring typo on a recently published item (yikes!). You click an Edit button that magically appears at the top of this content item. Your content editor of choice—whether it be WYSIWYG, or a good old plain-text HTML editor—appears. You fix the error, click the Save button (which has also magically appeared), and your page is corrected, live on the Web. For Joomla users, this convenience is an actuality.
All backend administrators, if they are logged in to the front of their site, can edit any piece of content on their site simply by clicking the pencil and paper icon that appears next to each content item, shown in Figure 26. Once this icon is clicked, the same set of boxes and parameters presents itself within the content module (the frontend) of your site for you to edit. Just as in the backend, you can use the WYSIWYG editor, or not, and save, apply, or cancel your edits.
Note
This icon only appears to registered backend users. They are: Managers → Administrators → Super Administrators.

Within Joomla sites, it is also possible for certain registered users to submit content from the frontend. This content can be a weblink or an actual content item, like those created by backend administrators. These certain registered users are Authors, Editors, and Publishers.
In order for this to be active, however, a few prerequisites must be met:
The backend administrator must enable the function for submitting content from the frontend by setting up a Submit Content menu item.
The user must be logged in, and already a registered Author, Editor, Publisher, Manager, Administrator, or Super Administrator.
A backend administrator before publication must approve the content item, once submitted.
As an administrator, you can enable plain-old Registered Users to submit weblinks, though not content items.
To insert a hyperlink into a content item, you can either code the HTML yourself, or use the WYSIWYG editor. To insert a hyperlink with the WYSIWYG editor:
Highlight the text or item you’d like to turn into a hyperlink with your mouse.
Click on the chain button in the WYSIWYG toolbar, shown in Figure 27. Please note there must be something highlighted, for the chain hyperlink buttons to become clickable. In this case, the OUT OF 5 is highlighted.
A pop-up window, shown in Figure 28, appears with some text fields and option tabs. In the Link URL field, type (or paste) the link you want to insert. If you are trying to link to an anchor, use the drop-down menu to locate it by name (naturally, it must already be created for it to appear in the drop-down menu).
Use the target drop-down menu to specify whether you want the link to open in a new window, this window, or otherwise. It is usually a good idea if you are linking to an external site to use the Target=_blank option, so that once somebody clicks that link, and leaves your site, he can easily return.
If you’d like to give your link a title, which sometimes can be useful in the realm of SEO (Search Engine Optimization), type it in the Title field.
Finally click Insert in the bottom of the pop-up window, and you should see your new link in the content box you had been working in.


Though there are many options available for setting up a link in this Tiny MCE Editor window, we are going to cover the basic ones to get you off the ground with Joomla. If you need a Tiny MCE tutorial, we recommend going to the developers’ home site: http://tinymce.moxiecode.com.
Unfortunately for all the amazing short cuts Joomla handles on its own, there is no one-click way to create internal links, without the help of an external plug-in. Maybe this will be a standard feature in upcoming versions of Joomla, but for now, you insert internal links within content items (if you are using the WYSIWYG editor), using the same pop-up window that you use for external links.
The challenge however, is determining the URL for the (internal) page to which you wish to link. There are a few ways of finding out:
You can plainly publish the page and view it from the frontend, copy the URL, and paste it into the Link URL field.
You can install an SEF component that rewrites your URLs from the long messy generated ones to predictable, more user-friendly ones. (See the “Options” section, next.)
You can use the content ID number provided on the Content Items Manager Page, shown in Figure 29, and use it in conjunction with the long, complicated (though actually predictable) URLs generated by Joomla.

To understand this method, let’s look at the generated URL for a typical content item:
http://yoursite.com/index.php?option=com_content&task=view&id=1&Itemid=29
Though at first this URL may look big, scary and indecipherable, it’s actually identical to all other (dynamic) content item URLs on your site. Identical, that is, apart from one detail: the numbers at the very end of the URL (in this case, the 29 of Itemid=29). These numbers are the identifiers, or the I.D., for your content item. And they are provided for you on the Content Items Manager page.
It follows that all the other (dynamic) content items share a long, identical, Joomla generated portion of their URLs. Specifically:
http://yoursite.com/index.php?option=com_content&task=view&id=1&Itemid=So, using this long PHP URL, which is common to all content items, we can simply substitute the I.D. number at the end of the line to insert the correct link. For example, in the above screenshot, if we wanted to create a link to our Rolling Stone article (content I.D. number 10), we would use this URL :
http://yoursite.com/index.php?option=com_content&task=view&id=1&Itemid=10This, though maybe more involved than just copying and pasting the published page’s URL, is a valuable tool to understanding how your Joomla site works and interacts with its database.
When entering a link within your own site, you do not have to include the http://yoursite.com or the http://www.yoursite.com portion of the URL. It is just as effective, and probably more efficient, simply to type the remainder of the URL after the .com, .net, .org, etc. You must, however, begin with the / if the URL for your company page is:
http://yoursite.com/company.html
or:
http://yoursite.com/index.php?option=com_content&task=view&id=1&Itemid=29
All that you would have to type in the Link URL field when linking to this page would be:
/contact.html
or:
/index.php?option=com_content&task=view&id=1&Itemid=29
What make it more efficient is that the user’s browser knows to stay within the same folder on your server in order to find the linked page. This means that the page loads faster, because the browser doesn’t have to go out into the World Wide Web (http://www.yoursite.com, etc.) just to come back to a page right next door on the same server.
Most importantly, though, is consistency in the way your links are entered. If you enter internal links with the full site address (http://www.yoursite.com/...), then stay consistent throughout.
There are several open source components that allow you to rewrite your URLs from the complex, though standard, PHP endings to more user-friendly and search-engine-friendly endings. For example, your News page on your Joomla site might have this URL, or something similar:
http://yoursite.com/index.php?option=com_content&task=view&id=1&Itemid=28
with a Search Engine Friendly (SEF) Component installed, you can rewrite this long, messy URL to:
http://yoursite.com/news
Many components automatically rewrite the URLs for content items for you, based on the title and/or title alias of the item. One of these SEF components we like to use for rewriting URLs is:
- ARTIO JoomSEF
http://www.artio.cz/en/joomla-extensions/artio-joomsef
Before we add menus to our site, let’s learn how to manage and customize the menus that Joomla automatically provides on installation. After customizing the four they’ve already provided, you may not need to actually add a new menu. If you do, however, want to add extra menus to your site, Joomla makes it very easy to do so.
The menus that Joomla provides (on installation) for you are:
Main Menu (mainmenu)
Other Menu (othermenu)
Top Menu (topmenu)
User Menu (usermenu)
By default on a Joomla installation, the User Menu is a registered menu. This means that even when it is published in the backend, it will not be displayed on the frontend until a registered user logs in. Each of these menus is its own nav bar with editable buttons, sub-buttons, and functions. Joomla menus are fantastically diverse in what they offer, but for the sake of explanation, we need to draw a distinction between menus and menu items. A menu is an empty nav bar or container in which you can create and edit menu items. Menu Items are the buttons within a menu that (when clicked) generate links, images, content, etc.
Here is an example of the default locations for three default Joomla menus, shown in Figure 30.
Note
The User Menu (usermenu), which is a registered menu, is not pictured here.

As mentioned previously, each of these menus is coupled with a corresponding menu module, which can be found and edited in the Module Manager. The menu module for each menu is where you are able to change the location or published/unpublished status. See Menu Modules, later, for more information.
To add a menu:
Select Menu → Menu Manager.
You should see a list of the current menus for your site, as shown in Figure 31. Click the New radio button in the top-right corner.
Enter the name of your new menu in the text field.
Enter the title of the corresponding Module Title for your menu. This will title the menu module in the Site Module Manager portion of the backend of your site. Usually the menu title and module title will be the same.

To rename menu items:
From the backend, go to Menu → Menu Manager.
Now click on the menu item you want to rename; the only text field available for editing is the title.
To add menu items (follow these same instructions to edit already existing menu items):
From the backend, go to Menu → (Name of menu to which you want to add).
Click the New radio button in the top-right corner of the screen.
Select the type of menu item you want to add (see Types of Menus, next).
Click Next.
Name your new menu item. Depending on which type pf menu you are adding, configure the parameters for it, and click Save or Apply.
It is worthwhile to note that at the top of the screen in bright red, Joomla says:
| Some menu types appear in more than one grouping but they are still the same menu type. |
This means, for example, there are multiple occurrences of the menu option: Link – Content Item on the page (it appears under both the Content groupings and the Links groupings), but that they are referring to the same menu item (type). Now, if you’ve never worked with dynamic content items before, setting up new menu items can seem confusing, unless you remember that these menu items and their functions hinge on the fact that content items are classified into Sections and Categories. Many of these Menu Item Types, shown in Figure 32, are simply pre-set (though configurable to your needs) ways within Joomla of presenting content. A blog in the Joomla sense is a list of articles, each with its own introductory or teaser paragraph followed by a Read More link.

Let’s say, for example, that your company site has a Recent News category, into which all of your current news-content is classified. If you assigned a Blog – Content Category menu item to that Recent News category, Joomla would generate a page with all the content items you’ve entered (and published) in that category. They would appear on the page in accordance with the way you had configured your blog (i.e., layout) and with the order in which your content items are arranged in the backend of your site (i.e,. in the Content Items Manager). There are many options for layout within a Joomla Blog, which we will cover momentarily in the “Controlling Page Layout” section.
Under the grouping Content:
- Blog – Content Category
This is a blog (in the Joomla sense) of an assigned category (i.e., The Recent News example above).
- Blog – Content Category Archive
This is a blog of an archived content category.
- Blog – Content Section
This is a blog of content section. Considering the hierarchical tree of Sections → Categories (often multiple categories go under one section) → Content Items, this type of blog can include a lot of material.
- Blog – Content Section Archive
This is a blog of an archived content section.
- Link – Content Item
This is a link to a single content item.
- Link – Static Content
This is a link to a static content page.
- List – Content Section
This item presents a list of the content items within the (assigned) section, each of which is clickable, and a link to the content item itself.
This can be very useful if you are trying to display a great quantity of content items on a page.
- Submit – Content
When set up, this menu type allows frontend users (everyone with permissions above a registered user: authors, editors, publisher, etc.) to submit content items into a particular category. The frontend user must be logged in to access this menu item, and the content itself is usually subject to approval by the backend administration.
- Table – Content Category
Similar to the List: Content Section, this menu item displays all the content items in a category (by their title) in a table format. Again, all the content item titles are hyperlinked to the content item itself.
Under the grouping Miscellaneous:
- Separator/Placeholder
This is simply a non-linkable menu item, which serves as a hyphen or a visual divider in a menu, as shown in Figure 33.
- Wrapper
This is a menu type that allows an external URL (i.e., google.com, myspace.com) to be displayed within the actual frame of the content box on your site—the content box being that place where content items are displayed.

Under the grouping Components:
- Link – Component Item
Links to components installed on your site, such as external components (like Virtuemart or Community Builder), and default Joomla components (such as Contacts).
- Link – Contact Item
This is a link to a single content item (same as above).
- Link – Newsfeed
Table – Contact Category Same as above.
- Table – Newsfeed Category
Table – Weblink Category This displays all the links of a weblink category in a table format (see weblinks components).
Under the grouping Links:
- Link – Component Item
Same as above.
- Link – Contact Item
This provides a link to a single contact item (see Contacts component for more info), shown in Figure 34.
- Link – Content Item
Same as above.
- Link – Newsfeed
Same as above.
- Link – Static Content
Same as above.
- Link – Url
This is simply a menu item linking to a URL.

If you have not already noticed, there is no place within the Menu Manager to control the general location, parameters, etc. of the menus themselves, insofar as they appear on the page as modules. Remembering how each menu (Main Menu, User Menu, Top Menu, etc.) is coupled with a corresponding menu module, it makes sense that we would edit them alongside the other site modules. In order to customize/edit these modular aspects of our menu, we must do so from the Module Manager.
To edit a menu module:
From the backend of Joomla, go to Modules → Site Modules. You should now be at the Site Module Manager.
Click on the menu module you would like to edit (again, the editing steps are the same for all menus), and configure or edit the parameters as you would a normal module. The titles of the default Joomla menus (Main Menu, Top Menu, User Menu) are the same in the Menu Manager and the Site Module Manager.
When we first started learning Joomla, we created a Blog – Content Category Menu Item for a site we were creating. Once we published the menu item, we saw, to our surprise, that the content items had been automatically divided into two columns. We went straight into the Cascading Style Sheets (CSS) to try to fix this layout issue. After all, site layout is usually driven by CSS, right? Well, yes and no. In Joomla, your content layout is driven by your choice of menu types and the parameters of those menus.
Note
When we say content layout, we are only speaking about the content that appears in the (usually white) content box of the site. The menu type does not affect the site template, which surrounds the content box on all sides. Subsequently, the CSS and index.php files drive the layout. For the layout in the content box, however, we have to go to the menu parameters.
Select Menu → (name of menu you want to edit, e.g., Main Menu).
Select menu item you want to edit.
Find and edit the Parameters on the right side of the screen (see upcoming images and instructions).
Click Save or Apply.
In looking at the options for menus, you will find that you have the following:
- Menu Image
The parameter shown in Figure 35 gives you the option to hide or show a menu image. If would like to assign a menu image when creating the menu item, this must be toggled to the image you’d like to use. The default folder here is, as always, the stories folder (yoursite.com/images/stories—you may add/edit images in this folder by accessing the Joomla Media Manager).
- Page Class Suffixes
The second field is for adding a page class suffix. In Joomla, this feature allows you to provide individual exceptions to the CSS of your template (in this case, for this particular Blog – Content Category menu item. You must then edit your template_css.css file to reflect this new style class assigned to this menu. This can be accessed through the backend of Joomla (if you are a Super Administrator) or by using an external FTP client, like Cyberduck or Fetch. These instructions will illustrate how to edit the CSS file through the backend of Joomla. For example, if your suffix is _bff, then you must create a CSS class with this suffix attached (
yourclass_bff), and edit it however you want. To access your template_css doc from the backend of Joomla, select Site → Template Manager → Site Templates, and then select your default template (or the template in which you wish to edit) by clicking the bullet tab to the left of the template title. Finally, click the Edit CSS radio button. An editable CSS editor appears in your screen. You can edit the CSS from here and click Save.- Back Button
This refers to an optional link at the bottom of the page, which takes the user to her previous page. The setting for this button is usually defined in the site’s global configuration, but can be overridden here in the drop-down menu. The default setting for this parameter, and many more like it, is Use Global.
- Page Title – Show / Hide Title
These give you the opportunity to provide a title for your menu item, and show or hide it.

These next parameters, shown in Figure 36, drive the layout behind the content for (Joomla) blogs. The general blog structure corresponds to Figure 37.

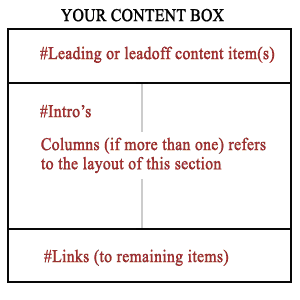
- Leading
Refers to the (#) number of content items you have leading off your blog page. Joomla uses the order of the content items assigned in the Content Items Manager (within the category), selecting the number-one content item as a leadoff item. If you set the parameters to have two leading content items, the number-one and -two (ordered) content items will be displayed, and so on. In the following example (shown in Figure 38), there is one leader. This is also reflected in the image of the backend configuration (Figure 37, previously).
- #Intro
Refers to the (#) number of intros (intro texts of content items) included in the content box. Unlike the leader item, though, these intros can be separated into columns. In the previous image, Newsflash 2 and 3 are intros separated into two columns.
- Columns
Here is where you enter the number of columns in which the intros will be displayed.
Tip
It’s best to use either one or two columns in most templates, because the layout tends to overflow into the right module (or beyond the content wrapper) with three or more.
- #Links
Refers to the number of links, which are displayed at the bottom of the page (after the set number of intros that link to further content items in this category (see Figure 39).
- Primary Order
This is how you instruct your menu item to order your content. Oddly enough, Joomla does not default to the content items order that appears in the Content Items Manager. The default ordering for Joomla here is chronological. The most recent item created is automatically first in the order of content items. Though there are many options for ordering content in this drop-down menu (including most hits, least hits, alphabetical, et. al), you have to select Ordering in this drop-down menu to be able to control the order of the articles via the Content Items Manager.
- Pagination
If you have more content items in a category than appear on your page, Joomla provides the option for an automatic pagination, where your menu parameters divide all content items (you have published in a category) into pages, with a page navigation at the bottom (see Figure 40).
- MOS Images
If you want for images to appear in your content, you must be sure that this button is toggled to Show.


Naturally, if you only have a few content items in a particular category, the depth of these parameters will not be making or breaking your site. However, if you have 50 content items per category, these parameters (in Figure 41) help you craft your page layout with an ease and versatility that is hard to beat.

- Category Name
This gives you the option to display the actual Joomla category name for the content item (e.g., Newsflash),
- Category Linkable
This turns the category name into a hyperlink that links to a list of all content items in the category.
- Item Titles
This controls whether or not the title of each content item is displayed.
Note
These parameters can have more of a function than just aesthetics. We were recently working on a site for a company who wanted greater control over the heading tags for SEO purposes. By toggling this button to Hide, we were able to enter the titles of each item manually into the content item itself (using the HTML editor) and thereby helped the company meet its SEO goals.
- Linked Titles, Read More, Item Ranking
Linked titles do exactly what you might imagine. They turn the item titles into hyperlinks to the entire article, serving the same function as a Read More link. The Read More link can be toggled on and off here, or can default to the global configuration setting. The item ranking displays a user ranking under each item title.
- Author Names, Created/Modified Date And Time
Back to my story of first trying to publish content in Joomla: another surprise we had while publishing our first content item was seeing all manner of information that we had not entered into the content item itself, and that we did not want published. The information in light-gray in Figure 42 represents the published Author Name, Date Created, and Date Modified information. These details can be hidden/shown either in the global configuration, or here in the menu parameters.
- Icons
With one click, Joomla gives users and administrators the great ability to turn any content item into a printed document, a PDF document, or an email to a friend. These icons can be toggled on and off here (or set in the global configuration).

Dynamic and static content aren’t the only useful content types Joomla offers out of the box. In addition to these, you can also create Weblinks, News Feeds, and Polls—all of which we will cover now.
The Weblinks component provides an organized way for you to present links in separate categories on your site. Like Contacts, weblinks must be assigned to a category.
To add a Category:
Select Components → Weblinks → Weblink categories. You should now see the Category Manager Page.
Select the New radio button.
Enter the title and name of your category, and a description if applicable.
Click Save or Apply.
To add a Weblink:
Select Components → Weblinks → Weblink Items. You should now see the Weblink Manager Page.
Select the New radio button.
Enter a name for your link (i.e., BBC Radio 2), the URL itself (i.e., http://www.bbc.co.uk/radio2), and a description if applicable.
Click Save or Apply.
The News Feeds component provides a convenient way for you to present RSS news feeds right into the content of your site. This means that you can have ever-changing, automatically updated content, in the form of headlines/articles from the New York Times, Linux Today, or the Frank Zappa fan club (as long as they offer RSS feeds), channeled into your site. Like weblinks, news feeds must be assigned to a category.
To add a News Feed Category:
Select Components → News Feeds → Manage Categories. You should now see the Category Manager Page.
Select the New radio button.
Enter the title and name of your category, and a description if applicable.
Click Save or Apply.
To add a Newsfeed:
Select Components → Newfeeds → Manage News Feeds. You should now see the Weblink Manager Page.
Select the New radio button.
Enter a name for your News Feed (i.e., Business News) and the News Feed URL itself (i.e., http://headlines.internet.com/internetnews/bus-news/news.rss), and a description if applicable.
In the text field provided, enter the number of articles that you’d like to appear from this RSS feed on your page.
If necessary, customize the cache time (in seconds) for how often you would like to refresh this RSS feed (i.e., look for new headlines, if any, from the RSS source). The default is 3,600 seconds, or one hour.
Click Save or Apply.
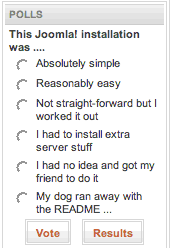
Joomla allows you to create and publish your own polls in modules. Up to 12 text fields are available as choices. See the next image (Figure 43) to see the default poll that comes with a Joomla installation.
To add a New Poll to your site:
Select Components → Polls.
Select the New radio button.
Enter a title for your poll (i.e., Who’s going to win the NBA Finals?)
Enter the potential choices for answers (i.e., Blazers, Bobcats, Lakers, “Who cares, we only watch college basketball,” etc.) under the options test fields.
If necessary, customize the lag time (in seconds) between votes to prevent users from voting repeated times during the same visit to your site. The default is 86,400 seconds, or 24 hours.
Select the page(s) on which you want the poll to appear.
Click Save or Apply
Make sure that the Polls Module is published under the Site Modules manager (Modules → Site Modules).