Chapter 4. 20 Asyncio Libraries You Aren’t Using (But…Oh, Never Mind)
In this chapter we look at case studies using the new Python features for async programming. We’ll be making use of several third-party libraries, and this is important to show because you will mostly be using libraries in your own projects.
The title of this section, 20 Asyncio Libraries… is a play on the
title of a previous book I wrote, called
20
Python Libraries You Aren’t Using (But Should). Many of those
libraries will also be useful in your asyncio-based applications,
but in this chapter we’re going to be using libraries that have been
designed specifically for the new async features in Python.
It is difficult to present asyncio-based code in short snippets. As
you will have seen in all the previous code samples in the book, I’ve
tried to make each example a complete, runnable program, because
application lifetime management is a core consideration required for
using async programming correctly.
For this reason, most of the case studies in this chapter will be somewhat larger, in terms of lines of code, than is usual for such a book. My goal in using this approach was to make the case studies more useful by giving you a “whole view” of an async program rather than leaving you having to figure out how detached fragments might fit together.
Note
Sometimes the code samples in this chapter will compromise on code style in order to save space. I like PEP8 as much as the next Pythonista, but practicality beats purity!
Streams (Standard Library)
Before looking at third-party libraries, let’s begin with the standard library. The Streams API is the high-level interface offered for async socket programming, and as the following case study will show, it’s pretty easy to use; however, application design remains complex due simply to the nature of the domain.
The following case study shows an implementation of a message broker, and first shows a naive design, followed by a more considered design. Neither should be considered production-ready, but my goal is to help you think about the various aspects of concurrent network programming that need to be taken into account when designing such applications.
Case Study: A Message Queue
A message queuing service is a message-oriented middleware or MOM deployed in a compute cloud using software as a service model. Service subscribers access queues and or topics to exchange data using point-to-point or publish and subscribe patterns.1
Wikipedia: “Message queuing service”
Recently I worked on a project that involved using ActiveMQ as a message broker for microservices intercommunication. At a basic level, such a broker (server):
-
maintains persistent socket connections to multiple clients.
-
receives messages from clients with a target “channel name.”
-
delivers those messages to all other clients subscribed to that same channel name.
I recall wondering how hard it might be to create such an application. As an added touch, ActiveMQ can perform different models of message distribution, and the two models are generally differentiated by the channel name:
-
Channel names with the prefix
/topic, e.g.,/topic/customer/registrationare managed with the publish-subscribe pattern (all channel subscribers get all messages) -
Channel names with the prefix
/queueare handled with the point-to-point model in which messages on a channel are distributed between channel subscribers in a round-robin fashion: each subscriber gets a unique message.
In our case study, we build a toy message broker with these basic features. The first issue we must address is that TCP is not a message-based protocol: we just get streams of bytes on the wire. We need to create our own protocol for the structure of messages, and the most simple protocol is to prefix each message with a size header, followed by a message payload of that size. The following utility library provides read and write for such messages:
Example 4-1. Message protocol: read and write
# msgproto.pyimportasynciofromasyncioimportStreamReader,StreamWriterasyncdefread_msg(reader:StreamReader)->bytes:# Raises asyncio.streams.IncompleteReadErrorsize_bytes=awaitreader.readexactly(4)size=int.from_bytes(size_bytes,byteorder='big')data=awaitreader.readexactly(size)returndataasyncdefsend_msg(writer:StreamWriter,data:bytes):writer.write(len(data).to_bytes(4,byteorder='big'))writer.write(data)awaitwriter.drain()defrun_server(client,host='127.0.0.1',port=25000):loop=asyncio.get_event_loop()coro=asyncio.start_server(client,'127.0.0.1',25000)server=loop.run_until_complete(coro)try:loop.run_forever()exceptKeyboardInterrupt:('Bye!')server.close()loop.run_until_complete(server.wait_closed())tasks=asyncio.Task.all_tasks()fortintasks:t.cancel()group=asyncio.gather(*tasks,return_exceptions=Trueloop.run_until_complete(group)loop.close()

Get the first 4 bytes. This is the size prefix.

Those four bytes must be converted into an integer.

Now we know the payload size, read that off the stream.

Write is the inverse of read: first send the length of the data, encoded as 4 bytes.

Then send the data.

drain()ensures that the data is fully sent. Withoutdrain(), the data may still be waiting in the send buffer when this coroutine function exits.
It doesn’t belong here, but I also snuck in a boilerplate function to run a TCP server. The shutdown sequence has been discussed before in a previous section, and I’m including it here only to save space in the code samples that follow. Server shutdown will begin on
SIGINTor Ctrl-C.
Now that we have a rudimentary message protocol, we can focus on the message broker application:
Example 4-2. A 35-line prototype
# mq_server.pyimportasynciofromasyncioimportStreamReader,StreamWriter,gatherfromcollectionsimportdeque,defaultdictfromtypingimportDeque,DefaultDictfrommsgprotoimportread_msg,send_msg,run_serverSUBSCRIBERS:DefaultDict[bytes,Deque]=defaultdict(deque)asyncdefclient(reader:StreamReader,writer:StreamWriter):peername=writer.transport.get_extra_info('peername')subscribe_chan=awaitread_msg(reader)SUBSCRIBERS[subscribe_chan].append(writer)(f'Remote{peername}subscribed to{subscribe_chan}')try:whileTrue:channel_name=awaitread_msg(reader)data=awaitread_msg(reader)(f'Sending to{channel_name}:{data[:19]}...')writers=SUBSCRIBERS[channel_name]ifwritersandchannel_name.startswith(b'/queue'):writers.rotate()writers=[writers[0]]awaitgather(*[send_msg(w,data)forwinwriters])exceptasyncio.CancelledError:(f'Remote{peername}closing connection.')writer.close()exceptasyncio.streams.IncompleteReadError:(f'Remote{peername}disconnected')finally:(f'Remote{peername}closed')SUBSCRIBERS[subscribe_chan].remove(writer)if__name__=='__main__':run_server(client)
Imports from our
msgproto.pymodule.A global collection of currently active subscribers. Every time a client connects, they must first send a channel name they’re subscribing to. A
dequewill hold all the subscribers for a particular channel.The
client()coroutine function will produce a long-lived coroutine for each new connection. Think of it as a callback for the TCP server started inrun_server(). On this line, I’ve shown how the host and port of the remote peer can be obtained, e.g., for logging.Our protocol for clients is the following:
-
On first connect, a client must send a message containing the channel to subscribe to (here,
subscribe_chan). -
Thereafter, for the life of the connection, a client sends a message to a channel by first sending a message containing the destination channel name, followed by a message containing the data. Our broker will send such data-messages to every client subscribed to that channel name.
-
Add the
StreamWriterinstance to the global collection of subscribers.An infinite loop, waiting for data from this client. The first message from a client must be the destination channel name.
Next comes the actual data to distribute to the channel.

Get the deque of subscribers on the target channel.

Some special handling if the channel name begins with the magic word “/queue”: in this case, we send the data to only one of the subscribers, not all of them. This can be used for sharing work between a bunch of workers, rather than the usual pub-sub notification scheme where all subscribers on a channel get all the messages.

Here is why we use a deque and not a list: rotation of the
dequeis how we keep track of which client is next in line for “/queue” distribution. This seems expensive until you realize that a single deque rotation is an O(1) operation.
Target only whichever client is first; this changes after every rotation.

Create a list of coroutines for sending the message to each writer, and then unpack these into
gather()so we can wait for all of the sending to complete.Note: This line is a bad flaw in our program, but it may not be obvious why: though it may be true that all of the sending to each subscriber will happen concurrently, what happens if we have one very slow client? In this case the
gather()will only finish when the slowest subscriber has received their data. We can’t receive any more data from the sending client until all thesesend_msg()coroutines finish. This slows down all message distribution to the speed of the slowest subscriber.
When leaving the
client()coroutine, make sure to remove ourselves from the globalSUBSCRIBERScollection. Unfortunately, this is an O(n) operation which can be a little expensive for very largen. A different data structure would fix this, but for now we console ourselves with the understanding that connections are intended to be long-lived thus few disconnection events; andnis unlikely to be very large (say ~10,000 as a rough order-of-magnitude estimate); and this code is at least very easy to understand!
So that’s our server; now we need clients, and then we can show some output. For demonstration purposes we’ll make two kinds of clients: a “sender” and a “listener.” The server doesn’t differentiate: all clients are the same. The distinction between “sender” and “listener” behavior is only for educational purposes.
Example 4-3. Listener: a toolkit for listening for messages on our message broker
# mq_client_listen.pyimportasyncioimportargparse,uuidfrommsgprotoimportread_msg,send_msgasyncdefmain(args):me=uuid.uuid4().hex[:8](f'Starting up{me}')reader,writer=awaitasyncio.open_connection(args.host,args.port)(f'I am{writer.transport.get_extra_info("sockname")}')channel=args.listen.encode()awaitsend_msg(writer,channel)try:whileTrue:data=awaitread_msg(reader)ifnotdata:('Connection ended.')break(f'Received by{me}:{data[:20]}')exceptasyncio.streams.IncompleteReadError:('Server closed.')if__name__=='__main__':parser=argparse.ArgumentParser()parser.add_argument('--host',default='localhost')parser.add_argument('--port',default=25000)parser.add_argument('--listen',default='/topic/foo')loop=asyncio.get_event_loop()try:loop.run_until_complete(main(parser.parse_args()))exceptKeyboardInterrupt:('Bye!')loop.close()
The
uuidstandard library module is a convenient way of creating an “identity” for this listener. If you start up multiple instances of these, each will have their own identity, and you’ll be able to track what is happening in the logs.Open a connection to the server.
The channel to subscribe to is an input parameter, captured in
args.listen. Encode it intobytesbefore sending.By our protocol rules (as discussed in the broker code analysis previously), the first thing to do after connecting is to send the channel name to subscribe to.
This loop does nothing else but wait for data to appear on the socket.
The command-line arguments for this program make it easy to point to a host, a port, and a channel name to listen to.
The structure of the other client, the “sender” program, is similar to the listener module.
Example 4-4. Sender: a toolkit for sending data to our message broker
# mq_client_sender.pyimportasyncioimportargparse,uuidfromitertoolsimportcountfrommsgprotoimportsend_msgasyncdefmain(args):me=uuid.uuid4().hex[:8](f'Starting up{me}')reader,writer=awaitasyncio.open_connection(host=args.host,port=args.port)(f'I am{writer.transport.get_extra_info("sockname")}')channel=b'/null'awaitsend_msg(writer,channel)chan=args.channel.encode()foriincount():awaitasyncio.sleep(args.interval)data=b'X'*args.sizeorf'Msg{i}from{me}'.encode()try:awaitsend_msg(writer,chan)awaitsend_msg(writer,data)exceptConnectionResetError:('Connection ended.')breakwriter.close()if__name__=='__main__':parser=argparse.ArgumentParser()parser.add_argument('--host',default='localhost')parser.add_argument('--port',default=25000,type=int)parser.add_argument('--channel',default='/topic/foo')parser.add_argument('--interval',default=1,type=float)parser.add_argument('--size',default=0,type=int)loop=asyncio.get_event_loop()try:loop.run_until_complete(main(parser.parse_args()))exceptKeyboardInterrupt:('Bye!')loop.close()
As with the listener, claim an identity.
As with the listener, reach out and make a connection.
According to our protocol rules, the first thing to do after connecting to the server is to give the name of the channel to subscribe to; however, since we are a sender, we don’t really care about subscribing to any channels; nevertheless, the protocol requires it so just provide a null channel to subscribe to (we won’t actually listen for anything).
Send the channel to subscribe to.
The command-line parameter
args.channelprovides the channel to which we want to send messages. Note that it must be converted to bytes first before sending.Using
itertools.count()is like awhile Trueloop, except that you get an iteration variable to use. We use this in the debugging messages since it makes it a bit easier to track which message got sent from where.The delay between sent messages is an input parameter,
args.interval. The next line generates the message payload. It’s either a bytestring of specified size (args.size), or it’s a descriptive message. This flexibility is just for testing.Send! Note that there are two messages here: the first is the destination channel name and the second is the payload.
As with the listener, there are a bunch of command-line options for tweaking the sender: “channel” determines the target channel to send to, while “interval” controls the delay between sends. The “size” parameter controls the size of each message payload.
We now have a broker, a listener, and a sender; it’s time to see some output. To produce the following code snippets, I have started up the server, then two listeners, and then a sender; and after a few messages have been sent, I’ve stopped the server with Ctrl-C:
Example 4-5. Message broker (server) output
$python mq_server.py Remote('127.0.0.1', 55382)subscribed to b'/queue/blah'Remote('127.0.0.1', 55386)subscribed to b'/queue/blah'Remote('127.0.0.1', 55390)subscribed to b'/null'Sending to b'/queue/blah': b'Msg 0 from 6b5a8e1d'... Sending to b'/queue/blah': b'Msg 1 from 6b5a8e1d'... Sending to b'/queue/blah': b'Msg 2 from 6b5a8e1d'... Sending to b'/queue/blah': b'Msg 3 from 6b5a8e1d'... Sending to b'/queue/blah': b'Msg 4 from 6b5a8e1d'... Sending to b'/queue/blah': b'Msg 5 from 6b5a8e1d'... ^CBye! Remote('127.0.0.1', 55382)closing connection. Remote('127.0.0.1', 55382)closed Remote('127.0.0.1', 55390)closing connection. Remote('127.0.0.1', 55390)closed Remote('127.0.0.1', 55386)closing connection. Remote('127.0.0.1', 55386)closed
Example 4-6. Sender (client) output
$python mq_client_sender.py --channel /queue/blah Starting up 6b5a8e1d I am('127.0.0.1', 55390)Connection ended.
Example 4-7. Listener 1 (client) output
$python mq_client_listen.py --listen /queue/blah Starting up 9ae04690 I am('127.0.0.1', 55382)Received by 9ae04690: b'Msg 1 from 6b5a8e1d'Received by 9ae04690: b'Msg 3 from 6b5a8e1d'Received by 9ae04690: b'Msg 5 from 6b5a8e1d'Server closed.
Example 4-8. Listener 2 (client) output
$python mq_client_listen.py --listen /queue/blah Starting up bd4e3baa I am('127.0.0.1', 55386)Received by bd4e3baa: b'Msg 0 from 6b5a8e1d'Received by bd4e3baa: b'Msg 2 from 6b5a8e1d'Received by bd4e3baa: b'Msg 4 from 6b5a8e1d'Server closed.
Our toy message broker works! The code is also pretty easy to understand, given such a complex problem domain, but unfortunately the design of the broker code itself is problematic.
The problem is that, for a particular client, we send messages to
subscribers in the same coroutine as where new messages are
received. This means that if any subscriber is slow to consume what
we’re sending, it might take a long time for that await gather(...) line to
complete, and we cannot receive and process more messages while we
wait.
Instead, we need to decouple the receiving of messages from the sending of messages. In the next case study, we refactor our code to do exactly that.
Case Study: Improving the Message Queue
In this case study we change the design of our toy message broker. The “listener” and “sender” programs remain as is. The main goal for the new broker design is to decouple sending and receiving. The code is slightly longer, but not terribly so.
Example 4-9. Message broker: improved design
# mq_server_plus.pyimportasynciofromasyncioimportStreamReader,StreamWriter,Queuefromcollectionsimportdeque,defaultdictfromcontextlibimportsuppressfromtypingimportDeque,DefaultDict,Dictfrommsgprotoimportread_msg,send_msg,run_serverSUBSCRIBERS:DefaultDict[bytes,Deque]=defaultdict(deque)SEND_QUEUES:DefaultDict[StreamWriter,Queue]=defaultdict(Queue)CHAN_QUEUES:Dict[bytes,Queue]={}asyncdefclient(reader:StreamReader,writer:StreamWriter):peername=writer.transport.get_extra_info('peername')subscribe_chan=awaitread_msg(reader)SUBSCRIBERS[subscribe_chan].append(writer)loop=asyncio.get_event_loop()send_task=loop.create_task(send_client(writer,SEND_QUEUES[writer]))(f'Remote{peername}subscribed to{subscribe_chan}')try:whileTrue:channel_name=awaitread_msg(reader)data=awaitread_msg(reader)ifchannel_namenotinCHAN_QUEUES:CHAN_QUEUES[channel_name]=Queue(maxsize=10)loop.create_task(chan_sender(channel_name))awaitCHAN_QUEUES[channel_name].put(data)exceptasyncio.CancelledError:(f'Remote{peername}connection cancelled.')exceptasyncio.streams.IncompleteReadError:(f'Remote{peername}disconnected')finally:(f'Remote{peername}closed')awaitSEND_QUEUES[writer].put(None)awaitsend_taskdelSEND_QUEUES[writer]SUBSCRIBERS[subscribe_chan].remove(writer)asyncdefsend_client(writer:StreamWriter,queue:Queue):whileTrue:withsuppress(asyncio.CancelledError):data=awaitqueue.get()ifnotdata:writer.close()breakawaitsend_msg(writer,data)asyncdefchan_sender(name:bytes):withsuppress(asyncio.CancelledError):whileTrue:writers=SUBSCRIBERS[name]ifnotwriters:awaitasyncio.sleep(1)continueifname.startswith(b'/queue'):writers.rotate()writers=[writers[0]]msg=awaitCHAN_QUEUES[name].get()ifnotmsg:breakforwriterinwriters:ifnotSEND_QUEUES[writer].full():(f'Sending to{name}:{msg[:19]}...')awaitSEND_QUEUES[writer].put(msg)if__name__=='__main__':run_server(client)
In the previous implementation, there were only
SUBSCRIBERS; now there areSEND_QUEUESandCHAN_QUEUESas global collections. This is a consequence of completely decoupling the receiving and sending of data.SEND_QUEUEShas one queue entry for each client connection: all data that must be sent to that client must be placed onto that queue. (If you peek ahead, thesend_client()coroutine will pull data offSEND_QUEUESand send it.)Up till this point in the
client()coroutine function, the code is the same as the simple server: the subscribed channel name is received and we add theStreamWriterinstance for the new client to the globalSUBSCRIBERScollection.This is new: we create a long-lived task that will do all the sending of data to this client. The task will run independently as a separate coroutine, and will pull messages off the supplied queue,
SEND_QUEUES[writer], for sending.Now we’re inside the loop where we receive data. Remember that we always receive two messages: one for the destination channel name, and one for the data. We’re going to create a new, dedicated
Queuefor every destination channel, and that’s whatCHAN_QUEUESis for: when any client wants to push data to a channel, we’re going to put that data onto the appropriate queue and then go immediately back to listening for more data. This approach decouples the distribution of messages from the receiving of messages from this client.If there isn’t already a queue for the target channel, make one.
Create a dedicated, long-lived task for that channel. The coroutine,
chan_sender(), will be responsible for taking data off the channel queue and distributing that data to subscribers.Place the newly received data onto the specific channel’s queue. Note that if the queue fills up, we’ll wait here until there’s space for the new data. By waiting here, we won’t be reading any new data off the socket, which means that the client will have to wait on sending new data into the socket on their side. This isn’t necessarily a bad thing, since it communicates so-called back-pressure to this client. (Alternatively, you could choose to drop messages here if the use-case is OK with that.)
When the connection is closed, it’s time to clean up! The long-lived task we created for sending data to this client,
send_task, can be shut down by placingNoneonto its queue,SEND_QUEUES[writer](check the code forsend_client()). It’s important to use a value on the queue, rather than outright cancellation, because there may already be data on that queue and we want that data to be sent out beforesend_client()is ended.Wait for that sender task to finish.
Remove the entry in the
SEND_QUEUEScollection (and in the next line we also remove thesockfrom theSUBSCRIBERScollection as before).The
send_client()coroutine function is very nearly a textbook example of pulling work off a queue. Note how the coroutine will exit ifNoneis placed onto the queue. Note also how we suppressCancelledErrorinside the loop: this is because we want this task to only be closed by receiving aNoneon the queue. This way, all pending data on the queue can be sent out before shutdown.chan_sender()is the distribution logic for a channel: it sends data from a dedicated channelQueueinstance to all the subscribers on that channel. But what happens if there are no subscribers for this channel yet? We’ll just wait a bit and try again. (Note that the queue for this channel, i.e.,CHAN_QUEUES[name]will keep filling up though.)As before in our previous broker implementation, we do something special for channels whose name begins with “/queue”: we rotate the
dequeand send only to the first entry. This acts like a crude load-balancing system because each subscriber gets different messages off the same queue. For all other channels, all subscribers get all the messages.
We’ll wait here for data on the queue. On the next line, exit if
Noneis received. Currently this isn’t triggered anywhere (so thesechan_sender()coroutines live forever); but if logic were added to clean up these channel tasks after, say, some period of inactivity, that’s how it would be done.
Data has been received, so it’s time to send to subscribers. Note that we do not do the sending here: instead, we place the data onto each subscriber’s own send queue. This decoupling is necessary to make sure that a slow subscriber doesn’t slow down anyone else receiving data. And furthermore, if the subscriber is so slow that their send queue fills up, we don’t put that data on their queue, i.e., it is lost.
The above design produces the same output as the earlier, simplistic implementation, but now we can be sure that a slow listener will not interfere with message distribution to other listeners.
These two case studies show a progression in thinking around the design of a message distribution system. A key aspect was the realization that sending and receiving data might be best handled in separate coroutines, depending on the use-case. In such instances, queues can be very useful for moving data between those different coroutines, and for providing buffering to decouple them.
The more important goal of these case studies was to show how the Streams API
in asyncio makes it very easy to build socket-based applications.
Twisted
The Twisted project predates—dramatically—the
asyncio standard library, and has been flying the
flag of async programming in Python for around 14 years now. The project
provides not only the basic building blocks, like an event loop, but also
primitives like deferreds that are a bit like the futures in asyncio.
The design of asyncio has been heavily influenced by Twisted and the
extensive experience of its leaders and maintainers.
Note that asyncio does not replace Twisted.2
Twisted includes hiqh-quality implementations of a huge number of internet
protocols, including not only the usual HTTP but also XMPP, NNTP, IMAP, SSH,
IRC, and FTP (both servers and clients). And the list goes on: DNS? Check.
SMTP? Check. POP3? Check.
At the code level, the main difference between Twisted and
asyncio, apart from history and historical context, is that for a
long time, Python lacked language support for coroutines, and this
meant that Twisted and projects like it had to figure out ways of
dealing with asynchronicity that worked with standard Python syntax.
For most of Twisted’s history, callbacks were the means by which
async programming was done, with all the nonlinear complexity that entails.
When it became possible to use generators as makeshift coroutines, it
suddenly became possible to lay out code in Twisted in a linear fashion
using its defer.inlineCallbacks decorator:
@defer.inlineCallbacksdeff():yielddefer.returnValue(123)@defer.inlineCallbacksdefmy_coro_func():value=yieldf()assertvalue==123
Ordinarily, Twisted requires creating instances of
Deferred, and adding callbacks to that instance as the method of constructing async programs. A few years ago, the@inlineCallbacksdecorator was added which repurposes generators as coroutines.While
@inlineCallbacksdid allow you to write code that was linear in appearance (unlike callbacks), some hacks were required, such as this call todefer.returnValue(), which is how you have to return values from@inlineCallbackscoroutines.Here we can see the
yieldthat makes this function a generator. For@inlineCallbacksto work, there must be at least oneyieldpresent in the function being decorated.
Since native coroutines appeared in Python 3.5, the Twisted team
(and Amber Brown in particular) have been
working to add support for running Twisted on the asyncio event loop.
This is an ongoing effort, and my goal in this section is not to convince you to create all your applications as Twisted-asyncio hybrids, but rather to make you aware that work is currently being done to provide significant interoperability between Twisted and asyncio.
For those of you with significant experience with Twisted, the following code example might be jarring:
Example 4-10. Support for asyncio in Twisted
fromtimeimportctimefromtwisted.internetimportasyncioreactorasyncioreactor.install()fromtwisted.internetimportreactor,defer,taskasyncdefmain():foriinrange(5):(f'{ctime()} Hello{i}')awaittask.deferLater(reactor,1,lambda:None)defer.ensureDeferred(main())reactor.run()
This is how you tell Twisted to use the
asyncioevent loop as its mainreactor. Note that this line must come before the reactor is imported fromtwisted.interneton the following line.Anyone familiar with Twisted programming will recognize these imports. We don’t have space to cover them here, but in a nutshell, the
reactoris theTwistedversion of theasyncioloop, anddeferandtaskare namespaces for tools to work with scheduling coroutines.Seeing
async defhere, in a Twisted program, looks terribly out-of-place, but this is indeed what the new support forasync/awaitgives us: the ability to use native coroutines directly in Twisted programs!In the older
@inlineCallbacksworld, you would have usedyield fromhere, but now we can useawait, the same as inasynciocode. The other part of this line,deferLater, is an alternative way to do the same thing asasyncio.sleep(1). Weawaita future where, after 1 second, a do-nothing callback will fire.ensureDeferred()is a Twisted version of scheduling a coroutine. This would be analogous toloop.create_task()orasyncio.ensure_future().Running the reactor is the same as
loop.run_forever()inasyncio.
Output:
$pythontwisted_asyncio.pyMonOct1616:19:492017Hello0MonOct1616:19:502017Hello1MonOct1616:19:512017Hello2MonOct1616:19:522017Hello3MonOct1616:19:532017Hello4
There is much more to learn about Twisted, and in particular it is well
worth your time to go through the list of implemented networking protocols
in Twisted. There is still some work to be done, but the future looks
very bright for interoperation between Twisted and asyncio.
The design of asyncio has been set up so that we can look forward to
a future where it will be possible to incorporate code from many
different async frameworks, such as Twisted and Tornado, into a single application, with all code running on the same event loop.
The Janus Queue
The Janus Queue (installed with pip install janus) provides a
solution for communication between threads and coroutines. In the
standard library, there are these kinds of queues:
-
queue.Queue: a “blocking” queue, commonly used for communication and buffering between threads -
asyncio.Queue: anasync-compatible queue, commonly used for communication and buffering between coroutines.
Unfortunately, neither is useful for communication between threads and coroutines! This is where Janus comes in: it is a single Queue that exposes both APIs: a blocking one and an async one. In the following code sample, data is generated from inside a thread, placed on a queue, and then consumed from a coroutine.
Example 4-11. Connect coroutines and threads with a Janus queue
importasyncio,time,random,janusloop=asyncio.get_event_loop()queue=janus.Queue(loop=loop)asyncdefmain():whileTrue:data=awaitqueue.async_q.get()ifdataisNone:break(f'Got{data}off queue')('Done.')defdata_source():foriinrange(10):r=random.randint(0,4)time.sleep(r)queue.sync_q.put(r)queue.sync_q.put(None)loop.run_in_executor(None,data_source)loop.run_until_complete(main())loop.close()
Create a Janus queue. Note that just like
asyncio.Queue, the Janus queue will be associated with a specific event loop. As usual, if you don’t provide theloopparameter, the standardget_event_loop()call will be used internally.Our
main()coroutine function simply waits for data on a queue. This line will suspend until there is data, exactly likeasyncio.Queue. The queue object has two “faces”: this one is calledasync_q, which provides the async-compatible queue API.Print a message.
Inside the
data_source()function, a random int is generated, which is used both as a sleep duration as well as a data value. Note that thetime.sleep()call is blocking, so this function must be executed in a thread.Place the data onto the Janus queue. This shows the other “face” of the Janus queue:
sync_q, which provides the standard, blockingQueueAPI.
Output:
Got2off queue Got4off queue Got4off queue Got2off queue Got3off queue Got4off queue Got1off queue Got1off queue Got0off queue Got4off queue Done.
If you can, it’s better to aim for having short executor jobs, and in these cases a queue (for communication) won’t be necessary. This isn’t always possible though, and in such situations the Janus queue can be the most convenient solution to buffer and distribute data between threads and coroutines.
aiohttp
aiohttp brings all things HTTP to asyncio, including support for
HTTP clients and servers, as well as websocket support. Let’s jump
straight into code examples, starting with simplicity itself:
“hello world,” next.
Case Study: Hello World
The following example demonstrates a minimal web server using aiohttp:
fromaiohttpimportwebasyncdefhello(request):returnweb.Response(text="Hello, world")app=web.Application()app.router.add_get('/',hello)web.run_app(app,port=8080)
An
Applicationinstance is created.A route is created, with the target coroutine
hello()given as the handler.The web application is run.
Observe how there is no mention of loops, tasks, or futures in this code: the
developers of the aiohttp framework have hidden all that away from us,
leaving a very clean API. This is going to be common in most frameworks
that build on top of asyncio, which has been designed to allow framework
designers to choose only the bits they need, and encapsulate them in
their preferred API.
Case Study: Scraping the News
aiohttp can be used both as a server, as well as a client library, like the very popular (but blocking!) requests library. I wanted to showcase aiohttp by using an example that incorporates both features.
In this case study, we’ll implement a website that does web scraping behind the scenes. The application will scrape two news websites, and combine the headlines into one page of results. Here is the strategy:
-
A browser client makes a web request to http://localhost:8080/news
-
Our web server receives the request, and then on the backend fetches HTML data from multiple news websites
-
Each page’s data is scraped for headlines
-
The headlines are sorted and formatted into the response HTML that we send back to the browser client
Figure 4-1 shows the output:
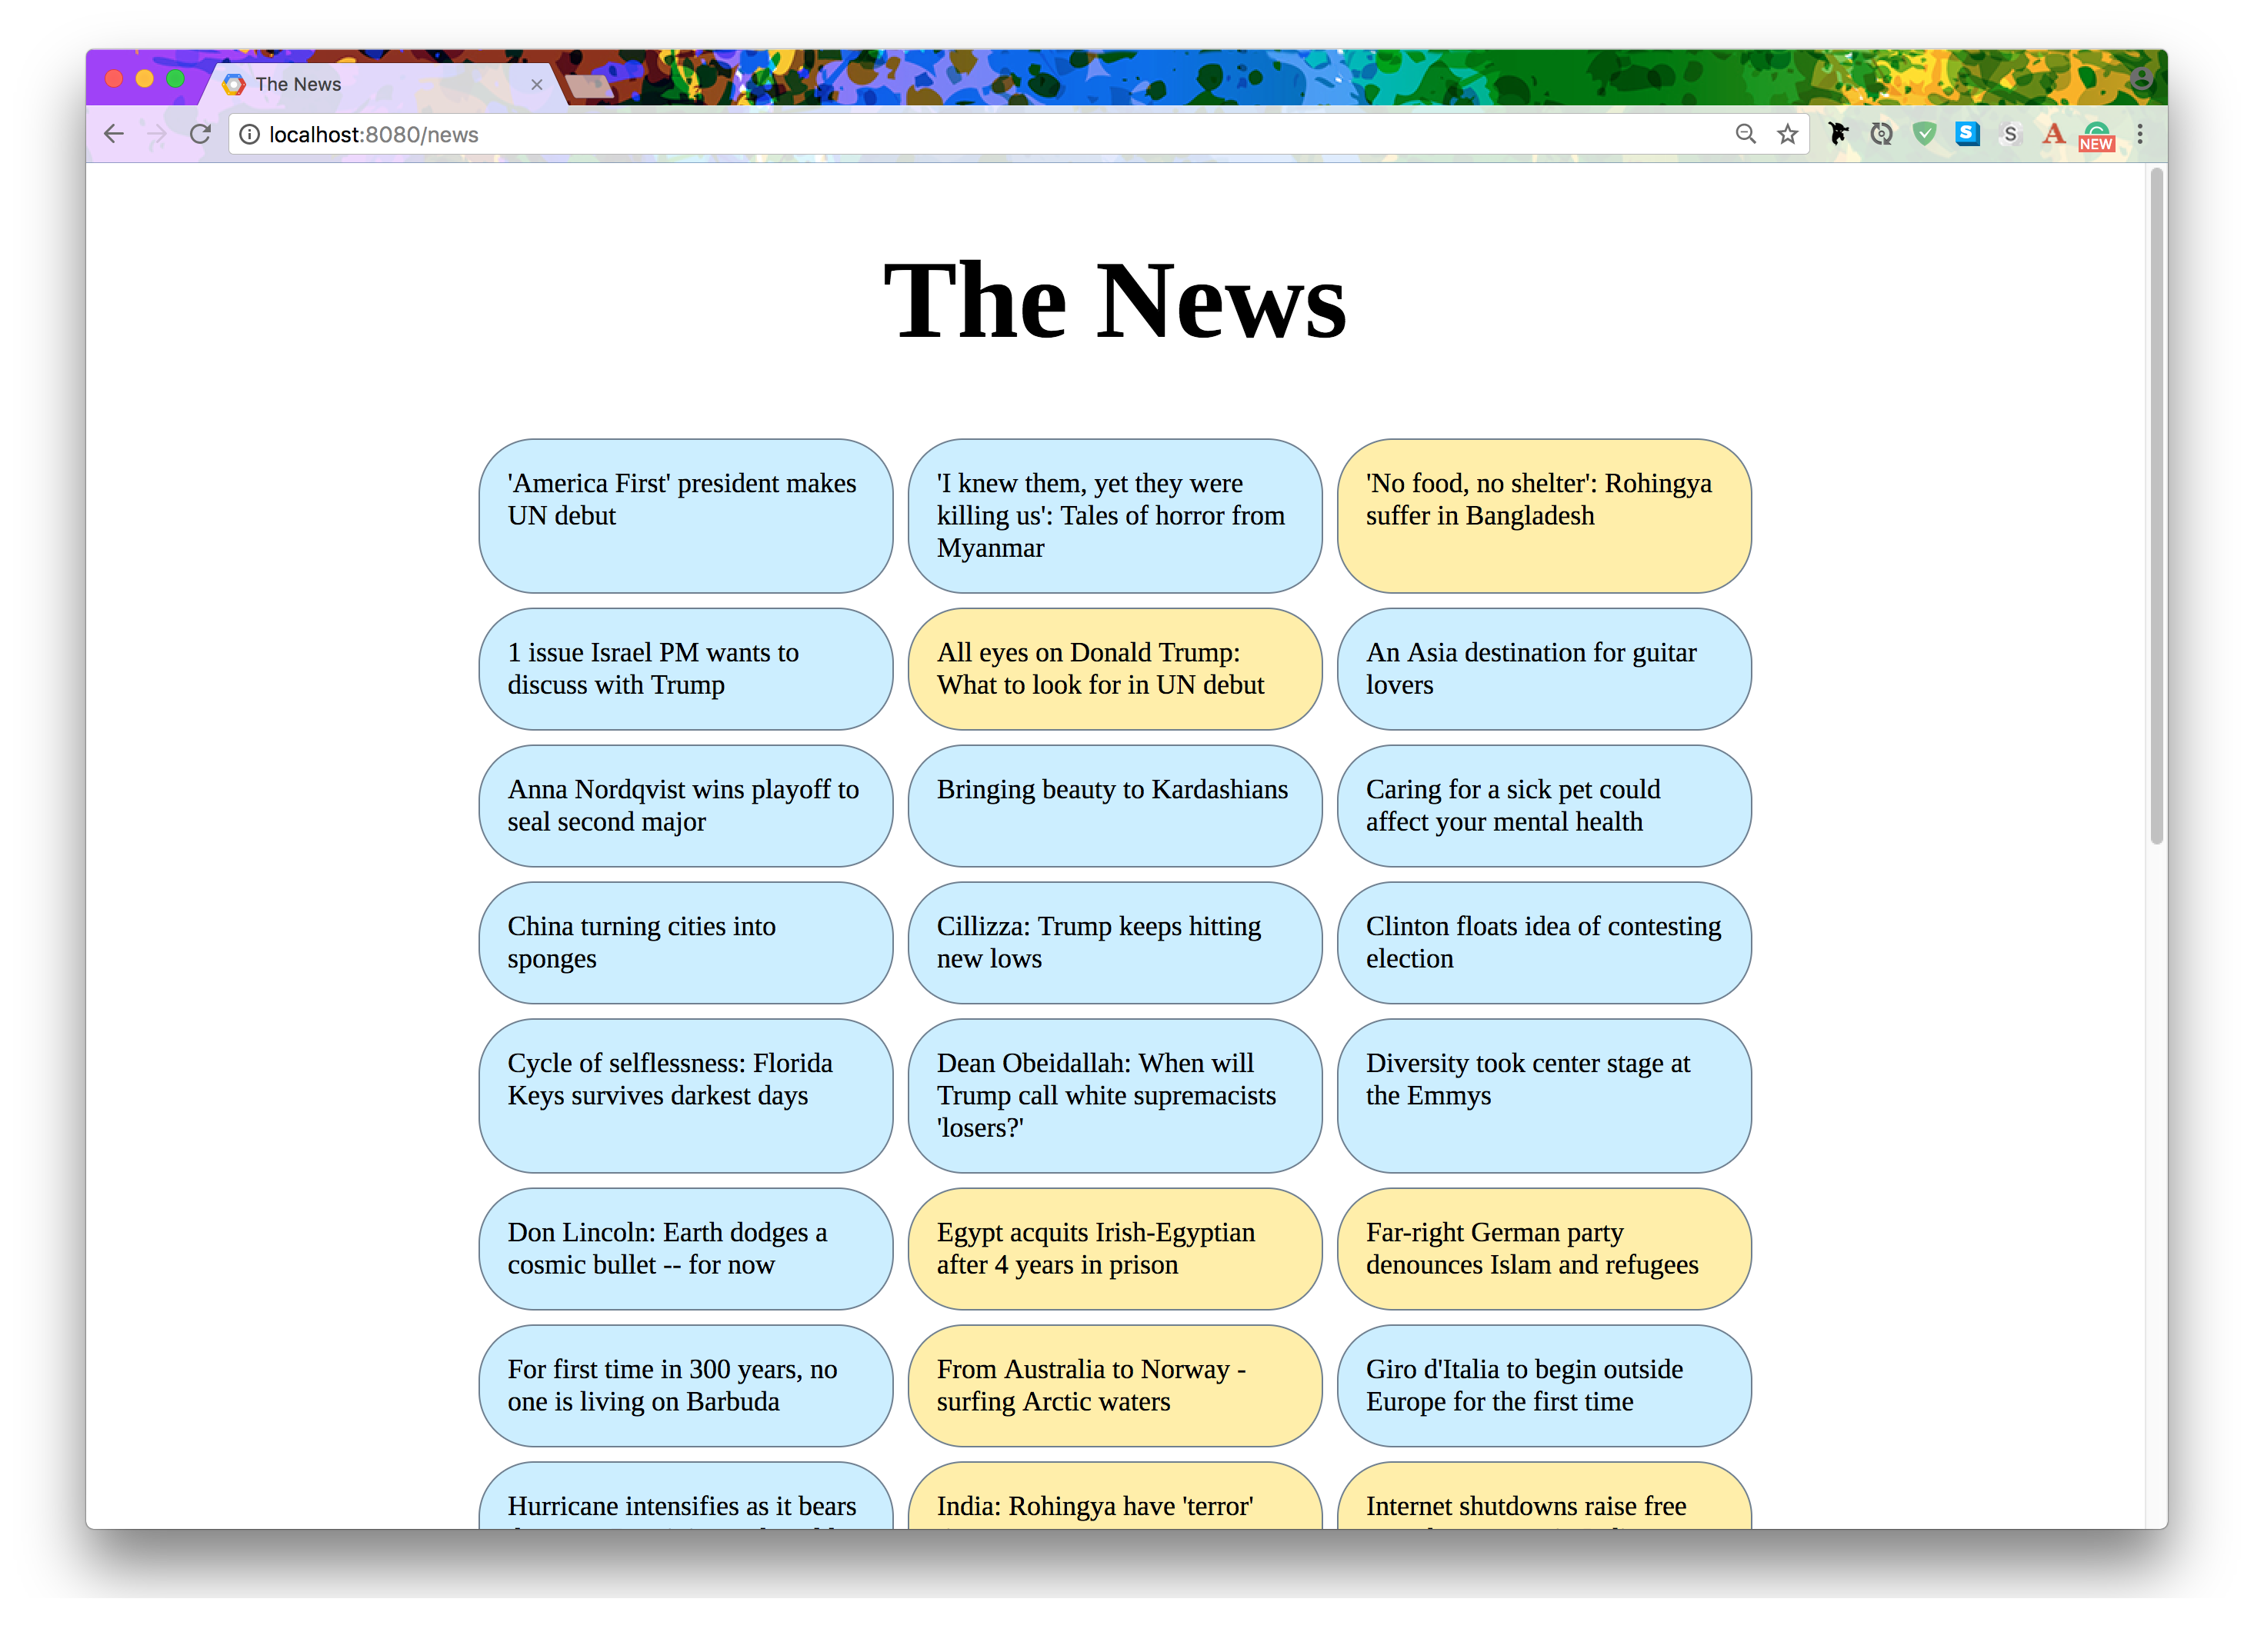
Figure 4-1. The final product of our news scaper: headlines from CNN in blue, and Al Jazeera, yellow
Web scraping has become quite difficult nowadays because many websites make
heavy use of JavaScript to load their content. For example, if you try
requests.get('http://edition.cnn.com'), you’re going to find that the
response contains very little usable data! It has become increasingly
necessary to be able to execute JavaScript locally in order to obtain data,
because many sites use JavaScript to load their actual content. The process
of executing such JavaScript to produce the final, complete HTML output
is called rendering.
To accomplish rendering, we use a neat project called Splash, which describes itself as a “JavaScript rendering service.” It can run in a docker container and provides an API for rendering other sites. Internally, it uses a (JavaScript-capable) WebKit engine to fully load and render a website. This is what we’ll use to obtain website data. Our aiohttp server will call this Splash API to obtain the page data.
Tip
To obtain and run the Splash container, run these commands in your shell:
$ docker pull scrapinghub/splash
$ docker run --rm -p 8050:8050 scrapinghub/splash
Our server backend will call the Splash API at http://localhost:8050.
fromasyncioimportget_event_loop,gatherfromstringimportTemplatefromaiohttpimportweb,ClientSessionfrombs4importBeautifulSoupasyncdefnews(request):sites=[('http://edition.cnn.com',cnn_articles),('http://www.aljazeera.com',aljazeera_articles),]loop=get_event_loop()tasks=[loop.create_task(news_fetch(*s))forsinsites]awaitgather(*tasks)items={text:(f'<div class="box{kind}">'f'<span>'f'<a href="{href}">{text}</a>'f'</span>'f'</div>')fortaskintasksforhref,text,kindintask.result()}content=''.join(items[x]forxinsorted(items))page=Template(open('index.html').read())returnweb.Response(body=page.safe_substitute(body=content),content_type='text/html',)asyncdefnews_fetch(url,postprocess):proxy_url=(f'http://localhost:8050/render.html?'f'url={url}&timeout=60&wait=1')asyncwithClientSession()assession:asyncwithsession.get(proxy_url)asresp:data=awaitresp.read()data=data.decode('utf-8')returnpostprocess(url,data)defcnn_articles(url,page_data):soup=BeautifulSoup(page_data,'lxml')defmatch(tag):return(tag.textandtag.has_attr('href')andtag['href'].startswith('/')andtag['href'].endswith('.html')andtag.find(class_='cd__headline-text'))headlines=soup.find_all(match)return[(url+hl['href'],hl.text,'cnn')forhlinheadlines]defaljazeera_articles(url,page_data):soup=BeautifulSoup(page_data,'lxml')defmatch(tag):return(tag.textandtag.has_attr('href')andtag['href'].startswith('/news')andtag['href'].endswith('.html'))headlines=soup.find_all(match)return[(url+hl['href'],hl.text,'aljazeera')forhlinheadlines]app=web.Application()app.router.add_get('/news',news)web.run_app(app,port=8080)
The
news()function is the handler for the /news URL on our server. It returns the HTML page showing all the headlines.Here, we have only two news websites to be scraped: CNN and Al Jazeera. More could easily be added, but then additional post-processors would also have to be added, just like the
cnn_articles()andaljazeera_articles()functions which are each customized to extract headline data.For each news site, we create a task to fetch and process the HTML page data for their front pages. Note that we unpack the tuple (
(*s)) since thenews_fetchcoroutine function takes both URL and post-process function as parameters. Eachnews_fetch()will return a list of tuples as headline results, in the form(<article URL>, <article title>).All the tasks are gathered together into a single
Future(gather()returns a future representing the state of all the tasks being gathered), and then we immediatelyawaitfor the completion of that future. This line will suspend until the future completes.Since all the
news_fetch()tasks are now complete, we collect all of the results into a dictionary. Note how nested comprehensions are used to iterate over tasks, and then over the list of tuples returned by each task. We also use f-strings to substitute data directly, including even the “kind” of page, which will be used in CSS to color thedivbackground.In this dictionary, the key is the headline title, and the value is an HTML string for a
divthat will be displayed in our result page.Our web server is going to return HTML. We’re loading HTML data from a local file called index.html. This file is presented in the appendix if you want to recreate the case study yourself.
We substitute the collected headline DIVs into the template and return the page to the browser client. This generates the page shown in Figure 4-1.
Here, inside the
news_fetch()coroutine function, we have a tiny template for hitting the Splash API (which, for me, is running in a local docker container on port 8050). Here we demonstrate howaiohttpcan be used as an HTTP client.The standard way is to create a
ClientSession()instance, and then use theget()method on the session instance to perform the REST call. In the next line, the response data is obtained. Note that because we’re always operating on coroutines, withasync withandawait, this coroutine will never block: we’ll be able to handle many thousands of these requests, even though this operation, i.e.,news_fetch()might be relatively slow since we’re doing web calls internally.After the data is obtained, call the post-processing function. Recall from above that for CNN, it’ll be
cnn_articles()and for Al Jazeera it’ll bealjazeera_articles().We have space only for a brief look at the post-processing. After getting the page data, we use the Beautiful Soup 4 library for extracting headlines.
The
match()function will return all matching tags (I’ve manually checked the HTML source of these news websites to figure out which combination of filters extracts the best tags), and then we return a list of tuples, matching the format(<article URL>, <article title>).This is the analogous post-processor for Al Jazeera. The
match()condition is slightly different but it is otherwise the same as the CNN one.
Generally, you’ll find that aiohttp has a quite simple API, and
“stays out of your way” while you develop your applications.
In the next section, we’ll look at using ZeroMQ with asyncio, which has
the curious effect of making socket programming quite enjoyable.
ØMQ (ZeroMQ)
Programming is a science dressed up as art, because most of us don’t understand the physics of software and it’s rarely, if ever, taught. The physics of software is not algorithms, data structures, languages, and abstractions. These are just tools we make, use, and throw away. The real physics of software is the physics of people. Specifically, it’s about our limitations when it comes to complexity and our desire to work together to solve large problems in pieces. This is the science of programming: make building blocks that people can understand and use easily, and people will work together to solve the very largest problems.
Pieter Hintjens, ZeroMQ: Messaging for Many Applications
ZeroMQ (or even ØMQ!) is a popular
language-agnostic library for networking applications: it provides
“smart” sockets. When you create ZeroMQ sockets in code, they resemble
regular sockets, with recognizable method names like recv() and
send() and so on, but internally these sockets handle some of the
more annoying and tedious tasks required for working with conventional
sockets.
One of these features is management of message-passing, so you don’t have to invent your own protocol and count bytes on the wire to figure out when all the bytes for a particular message have arrived—you simply send whatever you consider to be a “message,” and the whole thing arrives on the other end intact!
Another great feature is automatic reconnection logic. If the server goes down and comes back up later, the client ØMQ socket will automatically reconnect. And even better, messages your code sends into the socket will be buffered during the disconnected period, so they will all still be sent out when the server returns. These are some of the reasons why ØMQ is sometimes referred to as brokerless3 messaging: it provides some of the features of message broker software directly in the socket objects themselves.
ØMQ sockets are already implemented as asynchronous internally (so they can maintain many thousands of concurrent connections, even when used in threaded code), but this is hidden from us behind the ØMQ API; nevertheless, support for Asyncio has been added to the PyZMQ Python bindings for the ØMQ library, and in this section we’re going to look at several examples of how these smart sockets might be incorporated into your Python applications.
Case Study: Multiple Sockets
Here’s a head-scratcher: if ØMQ provides sockets that are already
asynchronous, in a way that is usable with threading, what is the point
of using ØMQ with asyncio? The answer is: cleaner code.
To demonstrate, let’s look at a tiny case study where you use multiple ØMQ sockets in the same application. First we’ll show the blocking version (this example is taken from the zguide, the official guide for ØMQ):
Example 4-12. The traditional approach
# poller.pyimportzmqcontext=zmq.Context()receiver=context.socket(zmq.PULL)receiver.connect("tcp://localhost:5557")subscriber=context.socket(zmq.SUB)subscriber.connect("tcp://localhost:5556")subscriber.setsockopt_string(zmq.SUBSCRIBE,'')poller=zmq.Poller()poller.register(receiver,zmq.POLLIN)poller.register(subscriber,zmq.POLLIN)whileTrue:try:socks=dict(poller.poll())exceptKeyboardInterrupt:breakifreceiverinsocks:message=receiver.recv_json()(f'Via PULL:{message}')ifsubscriberinsocks:message=subscriber.recv_json()(f'Via SUB:{message}')
ØMQ sockets have types! This is a
PULLsocket. You can think of it as a “receive-only” kind of socket, that will be fed by some other “send-only” socket which will be aPUSHtype.The
SUBsocket type is another kind of “receive-only” socket, and will be fed aPUBtype socket which is send-only.If you need to move data between multiple sockets in a threaded ØMQ application, you’re going to need a poller. This is because these sockets are not thread-safe, so you cannot
recv()on different sockets in different threads.4It works similar to the
select()system call. The poller will unblock when there is data ready to be received on one of the registered sockets, and then it’s up to you to pull the data off and do something with it. The bigifblock is how you have to detect the correct socket.
Using a poller loop plus an explicit socket-selection block makes
it look a little clunky. Another option might be to .recv() on each
socket in different threads—but now you have to deal with lots of
potential problems around thread safety. For instance: ØMQ sockets
are not threadsafe, and so the same socket must not be used from different
threads. The code shown above is much safer because you don’t have to
worry about any thread safety problems.
Anyhow, before we continue the discussion, let’s show the server code, and a little output:
Example 4-13. Server code
# poller_srv.pyimportzmq,itertools,timecontext=zmq.Context()pusher=context.socket(zmq.PUSH)pusher.bind("tcp://*:5557")publisher=context.socket(zmq.PUB)publisher.bind("tcp://*:5556")foriinitertools.count():time.sleep(1)pusher.send_json(i)publisher.send_json(i)
The server code is not important for the discussion, but briefly:
there’s a PUSH socket and a PUB socket, as we said earlier,
and a loop inside which data gets sent to both sockets every second. Here’s
some output from poller.py (Note: both programs must be running):
$ python poller.py
Via PULL: 0
Via SUB: 0
Via PULL: 1
Via SUB: 1
Via PULL: 2
Via SUB: 2
Via PULL: 3
Via SUB: 3
The code works. But our interest here is not whether the code runs,
but rather whether asyncio has anything to offer for the structure of
the poller.py code. The key thing to understand is that our
asyncio code is going to run in a single thread, which means that
it’s fine to handle different sockets in different coroutines—and
indeed, this is exactly what we’ll do.
Of course,
someone
had to do the hard work to add support for coroutines into pyzmq
(the Python client library for ØMQ) itself for this to work, so it
wasn’t free! But now that the hard work is done, we can improve on
our “traditional” code structure quite a lot:
Note
For the code examples that follow, it is necessary to use
pyzmq >= 17.0.0. At the time of writing, version 17 wasn’t released
yet, so if necessary you will have to install the latest beta of
pyzmq with a major version of 17.
Example 4-14. Clean separation with asyncio
# poller_aio.pyimportasyncioimportzmqfromzmq.asyncioimportContextcontext=Context()asyncdefdo_receiver():receiver=context.socket(zmq.PULL)receiver.connect("tcp://localhost:5557")whileTrue:message=awaitreceiver.recv_json()(f'Via PULL:{message}')asyncdefdo_subscriber():subscriber=context.socket(zmq.SUB)subscriber.connect("tcp://localhost:5556")subscriber.setsockopt_string(zmq.SUBSCRIBE,'')whileTrue:message=awaitsubscriber.recv_json()(f'Via SUB:{message}')loop=asyncio.get_event_loop()loop.create_task(do_receiver())loop.create_task(do_subscriber())loop.run_forever()
This code sample does the same as before, except that now we’re taking advantage of coroutines to restructure everything. Now we can deal with each socket in isolation. We’ve created two coroutine functions, one for each socket, and this one is for the PULL socket.
We’re using the
asynciosupport inpyzmq, which means that allsend()andrecv()calls must use theawaitkeyword. ThePollerno longer appears anywhere, because it’s been integrated into theasyncioevent loop itself.This is the handler for the
SUBsocket. The structure is very similar to thePULLsocket’s handler, but that need not have been the case. If more complex logic had been required, we’d have been able to easily add it here, fully encapsulated within theSUB-handler code only.Again: the
asyncio-compatible sockets require theawaitkeyword to send and receive.The extra lines required to start the
asyncioevent loop and create the tasks for each socket. I’ve cut a few corners here, and omitted all error-handling and cleanup, because I want to emphasize the impact on code layout further up.
The output is the same as before so it won’t be shown.
The use of coroutines has, in my opinion, a staggeringly positive effect on the code layout in these examples. In real production code with lots of ØMQ sockets, the coroutine handlers for each might as well even be in separate files, providing more opportunities for better code structure. And even for programs with a single read-write socket, it is very easy to use separate coroutines for read and write, if necessary.
The improved code looks a lot like threaded code, and indeed, for the
specific example shown above, the same refactor will work for threading:
run blocking do_receiver() and do_subscriber() functions in
separate threads. But do you really want to deal with even the potential
for race conditions, especially as your application grows in features
and complexity over time?
There is lots to explore here, and as I said before, these magic sockets are a lot of fun to play with! In the next case study we look at a more practical use of ØMQ than offered by the one above.
Case Study: Application Performance Monitoring (APM)
In the modern, containerized, microservice-based deployment practices of
today, some things that used to be trivial, such as monitoring your apps’
CPU and memory usage, have become somewhat more complicated than just
running top. To fill this void, several commercial products have
emerged over the last few years, but it remains the case that cost can be
prohibitive for small startup teams and hobbyists.
In this case study we’ll exploit ØMQ and asyncio to build a
toy prototype for distributed application monitoring. Our design has
three parts:
- Application layer
-
This layer contains all our applications. Examples might be a “customers” microservice, a “bookings” microservice, an “emailer” microservice, and so on. We will add a ØMQ “transmitting” socket to each of our applications. This socket will send performance metrics to a central server.
- Collection layer
-
The central server will expose a ØMQ socket to collect the data from all the running application instances. The server will also serve a web page to show performance graphs over time, and our server will live-stream the data as it comes in!
- Visualization layer
-
This is the web page being served. We will display the collected data in a set of charts, and the charts will live-update in real time. To simplify the code samples, we will use the convenient Smoothie Charts JavaScript library which provides all the necessary client-side features.
Example 4-15. The application layer: producing metrics
importargparsefromasyncioimportget_event_loop,gather,sleep,CancelledErrorfromrandomimportrandint,uniformfromdatetimeimportdatetimeasdtfromdatetimeimporttimezoneastzfromcontextlibimportsuppressimportzmq,zmq.asyncio,psutilfromsignalimportSIGINT# zmq.asyncio.install()ctx=zmq.asyncio.Context()asyncdefstats_reporter(color:str):p=psutil.Process()sock=ctx.socket(zmq.PUB)sock.setsockopt(zmq.LINGER,1)sock.connect('tcp://localhost:5555')withsuppress(CancelledError):whileTrue:awaitsock.send_json(dict(color=color,timestamp=dt.now(tz=tz.utc).isoformat(),cpu=p.cpu_percent(),mem=p.memory_full_info().rss/1024/1024))awaitsleep(1)sock.close()asyncdefmain(args):leak=[]withsuppress(CancelledError):whileTrue:sum(range(randint(1_000,10_000_000)))awaitsleep(uniform(0,1))leak+=[0]*args.leakif__name__=='__main__':parser=argparse.ArgumentParser()parser.add_argument('--color',type=str)parser.add_argument('--leak',type=int,default=0)args=parser.parse_args()loop=get_event_loop()loop.add_signal_handler(SIGINT,loop.call_soon,loop.stop)tasks=gather(main(args),stats_reporter(args.color))loop.run_forever()('Leaving...')fortinasyncio.Task.all_tasks():t.cancel()loop.run_until_complete(tasks)ctx.term()
In versions of
pyzmqbelow 17.0.0, it was necessary to use this explicitzmq.asyncio.install()command to enable Asyncio support. At the time of writing, version 17 is currently in beta but hopefully it will have a stable release by the time you read this.This coroutine function will run as a long-lived coroutine, continually sending out data to the server process.
Create a ØMQ socket! There are different flavors of socket. This one is a
PUBsocket type, which allows one-way messages to be sent to another ØMQ socket. This socket has—as the ØMQ guide says—superpowers. It will automatically handle all reconnect and buffering logic for us.Connect to the server.
Our shutdown sequence is driven by
KeyboardInterrupt, further down. When the signal is received, we’ll cancel all the tasks. Here we handle the raisedCancelledErrorwith the handysuppress()context manager from thecontextlibstandard library module.Iterate forever, sending out data to the server.
Since ØMQ knows how to work with complete messages, and not just chunks off a bytestream, it opens the door to a bunch of useful wrappers around the usual
sock.send()idiom: here, we use one of those helper methods,send_json(), which will automatically serialize the argument into JSON. This allows us to use adict()directly.A reliable way to transmit datetime information is via the ISO 8601 format. This is especially true if you have to pass datetime data between software written in different languages, since the vast majority of language implementations will be able to work with this standard.
To end up here, we must have received the
CancelledErrorexception resulting from task cancellation. The ØMQ socket must be closed to allow program shutdown.The
main()function symbolizes the actual microservice application. Fake work is produced with this sum over random numbers, just to give us some non-zero data to view in the visualization layer a bit later.We’re going to create multiple instances of this application, so it would be convenient to be able to distinguish between them (later, in the graphs) with a
--colorparameter.When a
SIGINTsignal is received (e.g., pressing Ctrl-C), schedule a call to stop the loop.Create and gather tasks for each of the coroutine functions.
Having received the shutdown signal, cancel the tasks. This will raise a
CancelledErrorinside all of the coroutines represented in thetasksgroup. After cancellation, it is still necessary to run the tasks to completion, by allowing them the chance to handle the cancellation appropriately. For example, we must close the ØMQ socket in order to shut down at all.Finally, the ØMQ context can be terminated.
The primary point of interest is the stats_reporter() function. This
is what streams out metrics data (collected by the useful psutil
library). The rest of the code can be assumed to be a typical microservice
application.
Now we look at the server code where all the data will be collected and served to a web client.
Example 4-16. The collection layer: this server collects process stats
# metric-server.pyimportasynciofromcontextlibimportsuppressimportzmqimportzmq.asyncioimportaiohttpfromaiohttpimportwebfromaiohttp_sseimportsse_responsefromweakrefimportWeakSetimportjson# zmq.asyncio.install()ctx=zmq.asyncio.Context()connections=WeakSet()asyncdefcollector():sock=ctx.socket(zmq.SUB)sock.setsockopt_string(zmq.SUBSCRIBE,'')sock.bind('tcp://*:5555')withsuppress(asyncio.CancelledError):whileTrue:data=awaitsock.recv_json()(data)forqinconnections:awaitq.put(data)sock.close()asyncdeffeed(request):queue=asyncio.Queue()connections.add(queue)withsuppress(asyncio.CancelledError):asyncwithsse_response(request)asresp:whileTrue:data=awaitqueue.get()('sending data:',data)resp.send(json.dumps(data))returnrespasyncdefindex(request):returnaiohttp.web.FileResponse('./charts.html')asyncdefstart_collector(app):app['collector']=app.loop.create_task(collector())asyncdefstop_collector(app):('Stopping collector...')app['collector'].cancel()awaitapp['collector']ctx.term()if__name__=='__main__':app=web.Application()app.router.add_route('GET','/',index)app.router.add_route('GET','/feed',feed)app.on_startup.append(start_collector)app.on_cleanup.append(stop_collector)web.run_app(app,host='127.0.0.1',port=8088)
One half of this program will receive data from other applications, and the other half will provide data to browser clients via server-sent events (SSE). We use a
WeakSet()to keep track of all the currently connected web clients. Each connected client will have an associatedQueue()instance, so thisconnectionsidentifier is really a set of queues.Recall that in the application layer, we used a
zmq.PUBsocket; here in the collection layer we use its partner, thezmq.SUBsocket type. This ØMQ socket can only receive, not send.For the
zmq.SUBsocket type, it is required to provide a subscription name, but for our goals we’ll just take everything that comes in, hence the empty topic name.Here we bind the
zmq.SUBsocket. Think about that for second! In “pubsub” configurations you usually have to make the pub end the server (bind()) and the sub end the client (connect()). ØMQ is different: either end can be the server. For our use-case this is important, because each of our application-layer instances will be connecting to the same collection server domain name and not the other way round.The support for
asyncioinpyzmqallows us toawaiton data from our connected apps. And not only that, but the incoming data will be automatically deserialized from JSON (yes, this meansdatais adict()).Recall that our
connectionsset holds a queue for every connected web client? Now that data has been received, it’s time to send it to all the clients: the data is placed onto each queue.The
feed()coroutine function will create coroutines for each connected web client. Internally, server-sent events are used to push data to the web clients.As described earlier, each web client will have its own
queueinstance, in order to receive data from thecollector()coroutine. Thequeueinstance is added to theconnectionsset, but becauseconnectionsis a weak set, the entry will automatically be removed fromconnectionswhen the queue goes out of scope, i.e., when a web client disconnects. Weakrefs are really great for simplifying these kinds of bookkeeping tasks.The
aiohttp_ssepackage provides thesse_response()context manager. This gives us a scope inside which to push data to the web client.We remain connected to the web client, and wait for data on this specific client’s queue.
As soon as the data comes in (inside
collector()) it will be sent to the connected web client. Note that we reserialize the datadicthere. An optimization to the code shown here would be to avoid deserializing JSON incollector(), and instead usesock.recv_stringto avoid the serialization round-trip. Of course, in a real scenario you might want to deserialize in the collector anyway, and perform some validation on the data before sending to the browser client. So many choices!The
index()endpoint is the primary page-load, and here we serve a static file called charts.html.The aiohttp library provides facilities for you to hook in additional long-lived coroutines you might need. With the
collector()coroutine, we have exactly that situation, so we create a startup coroutinestart_collector(), and a shutdown coroutine. These will be called during specific phases of aiohttp’s startup and shutdown sequence. Note that we add the collector task to theappitself, which implements a mapping protocol so that you can use it like adict.Here you can see that we obtain our
collector()coroutine off theappidentifier and callcancel()on that.Finally, you can see where the custom startup and shutdown coroutines are hooked in: the
appinstance provides hooks to which your custom coroutines may be appended.
All that remains is the visualization layer. We’re using the
Smoothie Charts library to generate scrolling
charts, and the complete HTML for our main (and only!) web page,
charts.html, which is provided in the Appendix in its entirety. There is
too much HTML, CSS, and JavaScript to present in this section, but I did
want to highlight a few points about how the server-sent events are handled
in JavaScript on the browser client.
Example 4-17. The visualization layer, which is a fancy way of saying “the browser”
<snip>var evtSource = new EventSource("/feed");evtSource.onmessage = function(e) { var obj = JSON.parse(e.data);if (!(obj.color in cpu)) { add_timeseries(cpu, cpu_chart, obj.color); } if (!(obj.color in mem)) { add_timeseries(mem, mem_chart, obj.color); } cpu[obj.color].append( Date.parse(obj.timestamp), obj.cpu);mem[obj.color].append( Date.parse(obj.timestamp), obj.mem); };<snip>
Create a new
EventSourceinstance on the /feed URL. The browser will connect to /feed on our server,metric-server.py. Note that the browser will automatically try to reconnect if the connection is lost. Server-sent events are often overlooked, but there are many situations where the simplicity of SSE might be preferred over websockets.The
onmessage()event will fire every time the server sends data. Here the data is parsed as JSON.Recall that the
cpuidentifier is a mapping of color to aTimeSeries()instance. Here, we obtain that time series and append data to it. We also obtain the timestamp and parse it to get the correct format required by the chart.
Now we get to run the code. To get the whole show moving, a bunch of command-line instructions are required:
Example 4-18. Starting the collector
$python metric-server.py========Running on http://127.0.0.1:8088========(Press CTRL+C to quit)
This starts our collector. The next step is to start up all the microservice instances. These will send their CPU and memory-usage metrics to the collector. Each will be identified by a different color, which is specified on the command line:
Example 4-19. Starting the monitored applications
$python backend-app.py --color red&$python backend-app.py --color blue --leak10000&$python backend-app.py --color green --leak100000&
Figure 4-2 shows our final product! You’ll have to take my word for it that the graphs really do animate. You’ll notice in the listing above that I added some memory leakage to blue, and a lot to green. I even had to restart the green service a few times to prevent it from climbing over 100 MB.
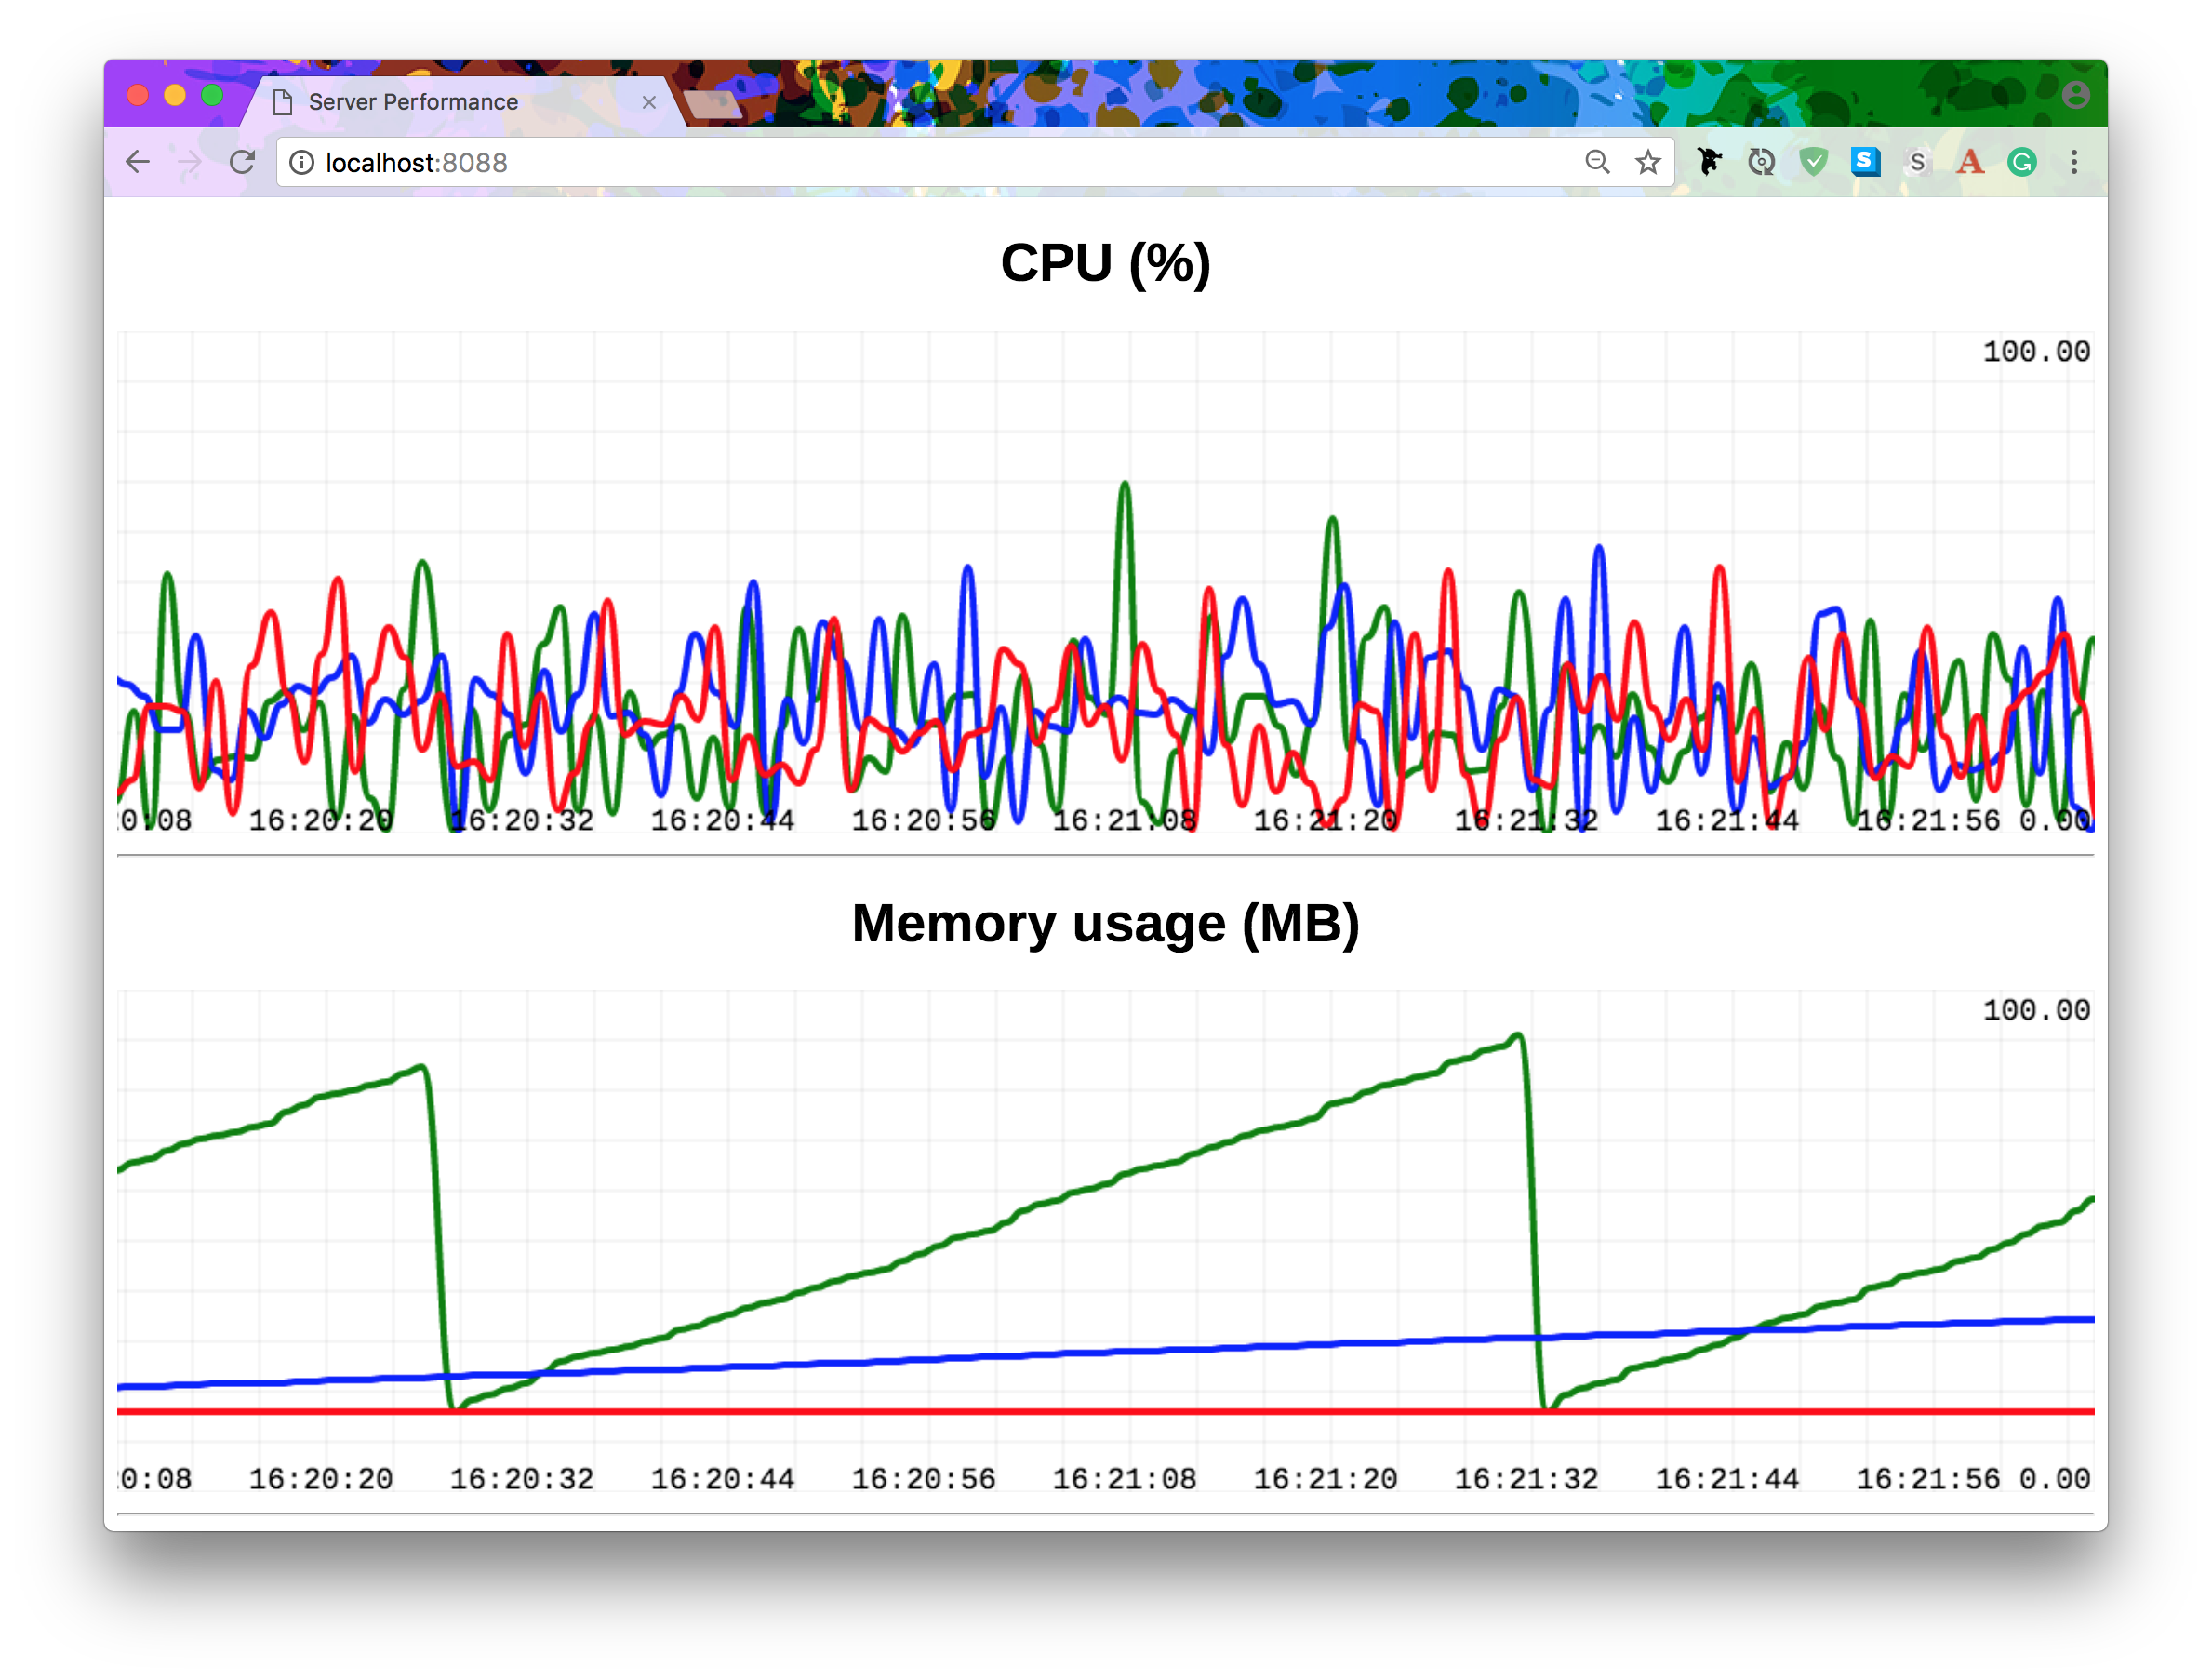
Figure 4-2. We’d better get an SRE on green ASAP!
What is especially interesting about this project is this: any of
the running instances in any part of this stack can be restarted, and
no reconnect-handling code is necessary! The ØMQ sockets, along
with the EventSource JavaScript instance in the browser, magically reconnect
and pick up where they left off.
In the next section we turn our attention to databases, and how asyncio
might be used to design a system for cache invalidation.
asyncpg and Sanic
The asyncpg library
provides client access to the PostgreSQL database, but differentiates itself
from other
asyncio-compatible Postgres client libraries with an
emphasis on speed. asyncpg is authored by
Yury Selivanov, one of the core asyncio
Python developers, who is also the author of the uvloop project. In
addition, asyncpg has no third-party dependencies, although
Cython is required if you’re installing from source.
asyncpg achieves its speed by working directly against the
PostgreSQL binary protocol, and other advantages to this low-level approach
include support for
prepared statements
and scrollable cursors.
We’ll be looking at a case study using asyncpg for cache
invalidation, but before that it will be useful to get a basic understanding
of the API asyncpg provides. For all of the code in this section, we’ll
need a running instance of PostgreSQL, and this is most easily done
with Docker:
Example 4-20. Starting up PostgreSQL in a Docker container
$ docker run -d --rm -p 55432:5432 postgresNote that I’ve exposed port 55432 rather than the default, 5432, just in
case you already have a running instance of the database on the default
port. The code below gives a brief demonstration of how to use asyncpg
to talk to PostgreSQL.
Example 4-21. Basic demo of asyncpg
importasyncioimportasyncpgimportdatetimefromutilimportDatabaseasyncdefmain():asyncwithDatabase('test',owner=True)asconn:awaitdemo(conn)asyncdefdemo(conn:asyncpg.Connection):awaitconn.execute('''CREATE TABLE users(id serial PRIMARY KEY,name text,dob date)''')pk=awaitconn.fetchval('INSERT INTO users(name, dob) VALUES($1, $2)''RETURNING id','Bob',datetime.date(1984,3,1))asyncdefget_row():returnawaitconn.fetchrow('SELECT * FROM users WHERE name = $1','Bob')('After INSERT:',awaitget_row())awaitconn.execute('UPDATE users SET dob = $1 WHERE id=1',datetime.date(1985,3,1))('After UPDATE:',awaitget_row())awaitconn.execute('DELETE FROM users WHERE id=1')('After DELETE:',awaitget_row())if__name__=='__main__':loop=asyncio.get_event_loop()loop.run_until_complete(main())
I’ve hidden some boilerplate away in a tiny
utilmodule to simplify things and keep the core message.The
Databaseclass gives us a context manager that will create a new database for us—in this case namedtest—and will destroy that database when the context manager exits. This turns out to be very useful when experimenting with ideas in code. Because no state is carried over between experiments, you start from a clean database every time. Note that this is anasync withcontext manager; we’ll see more about that later, but for now, the focal area of this demo is what happens inside thedemo()coroutine.The
Databasecontext manager has provided us with aConnectioninstance, which is immediately used to create a new table,users.Insert a new record. While we could have used
.execute()to do the insertion, the benefit of usingfetchval()is that we can obtain theidof the newly inserted record, which we’ll store in thepkidentifier.Note: We use parameters (
$1and$2) for passing data to the SQL query. Never use string interpolation or concatenation to build queries, as this is a security risk!In the remainder of this demo, we’re going to be manipulating data in our new table, so here we make a new utility coroutine function that fetches our record in the table. This will be called several times.
When retrieving data, it is far more useful to use the
fetch-based methods, because these will returnRecordobjects.asyncpgwill automatically cast datatypes to the most appropriate types for Python.We immediately use the
get_row()helper to display our newly inserted record.We modify data using the
UPDATEcommand for SQL. It’s a tiny modification: the year-value in the date of birth is changed by one year. As before, this is performed with the connection’sexecute()method. The remainder of the code demo follows the same structure as seen so far, and aDELETE, followed by anotherprint(), happens a few lines down.
This produces the following output:
$python asyncpg-basic.py After INSERT: <Recordid=1name='Bob'dob=datetime.date(1984, 3, 1)> After UPDATE: <Recordid=1name='Bob'dob=datetime.date(1985, 3, 1)> After DELETE: None
In the output, note how the date value we retrieve in our Record
object has been converted to a Python date object: asyncpg has
automatically converted the datatype from the SQL type to its Python
counterpart. There is a large table of
type
conversions presented in the asyncpg documentation that describes
all the type mappings that are already built into asyncpg.
The code above is very simple; perhaps even crudely so, if you’re used to
the convenience of object-relational mappers (ORMs) like SQLAlchemy or the
Django web framework’s built-in ORM. At the end of this chapter I mention
several third-party libraries that provide access to ORMs or ORM-like
features for asyncpg.
Let’s take a quick look at my boilerplate Database object in the utils
module; you may find it useful to make something similar for your own
experiments:
Example 4-22. Useful tooling for your asyncpg experiments
# util.pyimportargparse,asyncio,asyncpgfromasyncpg.poolimportPoolDSN='postgresql://{user}@{host}:{port}'DSN_DB=DSN+'/{name}'CREATE_DB='CREATE DATABASE{name}'DROP_DB='DROP DATABASE{name}'classDatabase:def__init__(self,name,owner=False,**kwargs):self.params=dict(user='postgres',host='localhost',port=55432,name=name)self.params.update(kwargs)self.pool:Pool=Noneself.owner=ownerself.listeners=[]asyncdefconnect(self)->Pool:ifself.owner:awaitself.server_command(CREATE_DB.format(**self.params))self.pool=awaitasyncpg.create_pool(DSN_DB.format(**self.params))returnself.poolasyncdefdisconnect(self):"""Destroy the database"""ifself.pool:releases=[self.pool.release(conn)forconninself.listeners]awaitasyncio.gather(*releases)awaitself.pool.close()ifself.owner:awaitself.server_command(DROP_DB.format(**self.params))asyncdef__aenter__(self)->Pool:returnawaitself.connect()asyncdef__aexit__(self,*exc):awaitself.disconnect()asyncdefserver_command(self,cmd):conn=awaitasyncpg.connect(DSN.format(**self.params))awaitconn.execute(cmd)awaitconn.close()asyncdefadd_listener(self,channel,callback):conn:asyncpg.Connection=awaitself.pool.acquire()awaitconn.add_listener(channel,callback)self.listeners.append(conn)if__name__=='__main__':parser=argparse.ArgumentParser()parser.add_argument('--cmd',choices=['create','drop'])parser.add_argument('--name',type=str)args=parser.parse_args()loop=asyncio.get_event_loop()d=Database(args.name,owner=True)ifargs.cmd=='create':loop.run_until_complete(d.connect())elifargs.cmd=='drop':loop.run_until_complete(d.disconnect())else:parser.print_help()
The
Databaseclass is just a fancy context manager for creating and deleting a database from a PostgreSQL instance. The database name is passed into the constructor.(Note: The sequence of callouts in the code is intentionally different from this list.) This is an asynchronous context manager. Instead of the usual
__enter__()and__exit__()methods, we have their__aenter__()and__aexit__()counterparts. Here, in the entering side, we’ll create the new database and return a connection to that new database.server_command()is another helper method defined a few lines down. We use it to run the command for creating our new database.A connection is made to the newly created database. Note that I’ve hard-coded several details about the connection: this is intentional, as I want to keep the code samples small. You could easily generalize this by making fields like the username, hostname, and port.
In the exiting side of the context manager, we close the connection and…
…destroy the database.
For completeness, this is our utility method for running commands against the PostgreSQL server itself. It creates a connection for that purpose, runs the given command, and exits.
This is a surprise, and will be featured in the upcoming case study!
Caution
In point 8 above, we create a dedicated connection for each channel we want to listen on. This is very expensive since it means that a PostgreSQL worker will be completely tied up for every channel being listened to. A much better design would be to use one connection for multiple channels. Once you have worked through this example, try to modify the code to use a single connection for multiple channel listeners!
Now that we have an understanding of the basic building blocks of asyncpg, we can explore on a really fun case study: using PostgreSQL’s built-in support for sending event notifications to perform cache invalidation!
Case Study: Cache Invalidation
There are two hard things in computer science: cache invalidation, naming things, and off-by-one errors.
Phil Karlton
It is common in web services and web applications that the persistence layer, i.e., the backing database (DB), becomes the performance bottleneck sooner than any other part of the stack. The application layer can usually be scaled horizontally, i.e., run more instances, whereas it’s trickier to do that with a database.
This is why it’s common practice to look at design options that can limit excessive interaction with the database. The most common option is to use caching to “remember” previously fetched database results and replay them when asked, thus avoiding subsequent calls to the DB for the same information.
However: what happens if one of your app instances writes new data to the database while another app instance is still returning the old, stale data from its internal cache? This is a classic cache invalidation problem, and these can be very difficult to resolve in a robust way.
Our attack strategy is as follows:
-
Each app instance has an in-memory cache of DB queries.
-
When one writes new data to the database, the database alerts all of the connected app instances of the new data.
-
Each app instance then updates its internal cache accordingly.
This case study will highlight how PostgreSQL’s built-in support for event updates, via the LISTEN and NOTIFY commands, can simply tell us when its data has changed.
asyncpg already has support for the LISTEN/NOTIFY API.
This feature of PostgreSQL allows your app to subscribe to events on a
named channel and also post events to named channels. It’s almost
like PostgreSQL can become a lighter version of
RabbitMQ or
ActiveMQ!
This case study has more moving parts than usual, and that makes it awkward to present in the usual linear format. Instead, we’ll begin by looking at the final product, and work backwards towards the underlying implementation.
Our app provides a JSON-based API server for managing the favorite
dishes of patrons at our robotic restaurant. The backing database will
have only one table, patron, with only two fields: name and fav_dish.
Our API will allow the usual set of four operations: create, read,
update, and delete (CRUD).
Here is what it looks like to interact with our API using curl, and
to create a new entry in our database:
Example 4-23. Creating a new patron record
curl -d'{"name": "Carol", "fav_dish": "SPAM Bruschetta"}'-H"Content-Type: application/json"-X POSThttp://localhost:8000/patron
Output:
{"msg":"ok","id":37}
The -d parameter is for data,5 the -H is for the HTTP headers, the -X
is for the HTTP request method (alternatives are GET, DELETE and PUT,
and a few others), and the URL is for our API server. We’ll get to the code
for that shortly.
In the output, we see that the creation was “ok,” and the id being returned
is the primary key of the new record in the database.
In these next few shell snippets, we run through the other three operations: read, update, and delete.
Example 4-24. Reading a patron record
curl -X GET http://localhost:8000/patron/37
Output:
{"id":37,"name":"Carol","fav_dish":"SPAM Bruschetta"}
Reading the data is pretty straightforward, and note that the id of
the desired record must be supplied in the URL.
Example 4-25. Updating an existing patron record (and a check!)
curl -d'{"name": "Eric", "fav_dish": "SPAM Bruschetta"}'-H"Content-Type: application/json"-X PUThttp://localhost:8000/patron/37 curl -X GET http://localhost:8000/patron/37
Output:
{"msg":"ok"}{"id":37,"name":"Eric","fav_dish":"SPAM Bruschetta"}
Updating a resource, as shown above, is very similar to creating one, except for two key differences:
-
The HTTP request method (
-X) isPUT, notPOST. -
The URL now requires the
idfield.
We have also issued another GET immediately after, to verify that the
change was applied. Finally, deletion:
Example 4-26. Delete a patron record (and a check!)
curl -X DELETE http://localhost:8000/patron/37
curl -X GET http://localhost:8000/patron/37
Output:
{"msg":"ok"}null
This example above also shows that null is returned when you try to
get a record that doesn’t exist.
So far this all looks quite ordinary; but our objective is not only to make a CRUD API—we want to look at cache invalidation, so let’s turn our attention toward the cache. Now that we have a basic understanding of our app’s API, we can look at the application logs to see timing data for each request: this will tell us which requests are cached, and which hit the DB.
When the server is first started up, the cache is empty; it’s a memory
cache after all. We’re going to start up our server, and then in a
separate shell run two GET requests in quick succession:
curl -X GET http://localhost:8000/patron/29
curl -X GET http://localhost:8000/patron/29
Output:
{"id":29,"name":"John Cleese","fav_dish":"Gravy on Toast"}{"id":29,"name":"John Cleese","fav_dish":"Gravy on Toast"}
We expect that the first time we retrieve our record above, there’s going to be a cache miss, and the second time, a hit. We can see evidence of this in the log for the API server itself:
$pythonsanic_demo.py2017-09-2916:20:33-(sanic)[DEBUG]:▄▄▄▄▄▀▀▀██████▄▄▄_______________▄▄▄▄▄█████████▄/▀▀▀▀█████▌▀▐▄▀▐█|Gottagofast!|▀▀█████▄▄▀██████▄██|_________________/▀▄▄▄▄▄▀▀█▄▀█════█▀|/▀▀▀▄▀▀███▀▄▄▄███▀▀██▄████████▄▄▀▀▀▀▀▀█▌██▀▄▄▄██▀▄███▀▀▀████▄██▄▀▀▀▄██▄▀▀▌████▒▒▒▒▒▒███▌▄▄▀▌▐▀████▐███▒▒▒▒▒▐██▌▀▄▄▄▄▀▀▀████▒▒▒▒▄██▀▀▀█████████▀▄▄██▀██████▀█▄██▀▀▀▀█▄█▐▌▄▄▄▄█▌▀█▄▄▄▄▀▀▄▌▐▀▀▄▄▄▀▀▀▄▄▀2017-09-2916:20:33(sanic):Goin'Fast@http://0.0.0.0:80002017-09-2916:20:33(sanic):Startingworker[10366]2017-09-2916:25:27(perf):id=37Cachemiss2017-09-2916:25:27(perf):getElapsed:4.26ms2017-09-2916:25:27(perf):getElapsed:0.04ms
Everything up to this line is the default
sanicstartup log message.As described, the first
GETresults in a cache miss because the server has only just started.This is from our first
curl -X GET. I’ve added some timing functionality to the API endpoints. Here the handler for theGETrequest took ~4 ms.The second
GETreturns data from the cache, and the much faster timing data, ~100x, indicates that the data is now being returned from the cache.
So far, nothing unusual. Many web apps use caching in this way.
Let’s start up a second app instance on port 8001 (the first instance was on port 8000):
$python sanic_demo.py --port 8001 <snip> 2017-10-02 08:09:56 -(sanic): Goin'Fast @ http://0.0.0.0:8001 2017-10-02 08:09:56 -(sanic): Starting worker[385]
Both instances, of course, connect to the same database. Now, with
both API server instances running, let’s modify the data for patron
John who lacks, clearly, sufficient Spam in their diet. We do this by
performing an UPDATE against, say, the first app instance at port 8000:
curl -d'{"name": "John Cleese", "fav_dish": "SPAM on toast"}'-H"Content-Type: application/json"-X PUThttp://localhost:8000/patron/29{"msg":"ok"}
Immediately after this update event on only one app instance, both API servers, 8000 and 8001, report the following event in their logs:
Example 4-27. Reported in logs for both Server 8000 and Server 8001
2017-10-02 08:35:49 -(perf)[INFO]: Got DB event:{"table":"patron","id": 29,"type":"UPDATE","data":{"old":{"id": 29,"name":"John Cleese","fav_dish":"Gravy on Toast"},"new":{"id": 29,"name":"John Cleese","fav_dish":"SPAM on toast"},"diff":{"fav_dish":"SPAM on toast"}}}
The database has reported the update event back to the app instances! We haven’t even done any requests against app instance 8001 yet. Does this mean that the new data is already cached there?
To check, we now do a GET on the second server at 8001, and the timing
info shows that we do indeed obtain the data directly from the cache, even
though no GET was previously called on this app instance:
Example 4-28. The first GET for id=29 on server 8001
curl -X GET http://localhost:8001/patron/29{"id":29,"name":"John Cleese","fav_dish":"SPAM on toast"}
Example 4-29. Server 8001 logs: The first GET produces cached data
2017-10-02 08:46:45 -(perf)[INFO]: get Elapsed: 0.04 ms
The punchline is: when the database changes, all connected app instances get notified, allowing them to update their caches.
The elaborate introduction in the preceding example was necessary to explain what we’re
trying to achieve. With that out of the way, we can now look at the
asyncpg code implementation required to make our cache invalidation
actually work.
The basic design for the code is the following:
-
A simple web API using the new,
asyncio-compatible Sanic web framework. -
The data will be stored in a backend PostgreSQL instance, but the API will be served via multiple instances of the web API app servers.
-
The app servers will cache data from the database.
-
The app servers will subscribe to events, via
asyncpgin specific tables on the DB, and will receive update notifications when the data in the DB table has been changed. This allows the app servers to update their individual in-memory caches.
Example 4-30. API server with Sanic
# sanic_demo.pyimportargparsefromsanicimportSanicfromsanic.viewsimportHTTPMethodViewfromsanic.responseimportjsonfromutilimportDatabasefromperfimportaelapsed,aprofilerimportmodelapp=Sanic()@aelapsedasyncdefnew_patron(request):data=request.jsonid=awaitmodel.add_patron(app.pool,data)returnjson(dict(msg='ok',id=id))classPatronAPI(HTTPMethodView,metaclass=aprofiler):asyncdefget(self,request,id):data=awaitmodel.get_patron(app.pool,id)returnjson(data)asyncdefput(self,request,id):data=request.jsonok=awaitmodel.update_patron(app.pool,id,data)returnjson(dict(msg='ok'ifokelse'bad'))asyncdefdelete(self,request,id):ok=awaitmodel.delete_patron(app.pool,id)returnjson(dict(msg='ok'ifokelse'bad'))@app.listener('before_server_start')asyncdefdb_connect(app,loop):app.db=Database('restaurant',owner=False)app.pool=awaitapp.db.connect()awaitmodel.create_table_if_missing(app.pool)awaitapp.db.add_listener('chan_patron',model.db_event)@app.listener('after_server_stop')asyncdefdb_disconnect(app,loop):awaitapp.db.disconnect()if__name__=="__main__":parser=argparse.ArgumentParser()parser.add_argument('--port',type=int,default=8000)args=parser.parse_args()app.add_route(new_patron,'/patron',methods=['POST'])app.add_route(PatronAPI.as_view(),'/patron/<id:int>')app.run(host="0.0.0.0",port=args.port)
The
Databaseutility helper as described earlier. This will provide the methods required to connect to the database.Two more tools I’ve cobbled together to log out the elapsed time of each API endpoint. We used this in the previous discussion to detect when a
GETwas being returned from the cache. The implementations foraelapsed()andaprofiler()are not important for this case study, but you can obtain them in the appendix.The main Sanic app instance is created.
This coroutine function is for creating new patron entries. In an
add_route()call towards the bottom of the code,new_patron()is associated with the endpoint/patron, and only for thePOSTHTTP method. The@aelapseddecorator is not part of the Sanic API: it’s my own invention, merely to log out timings for each call.Sanic provides immediate deserialization of received JSON data using the
.jsonattribute on therequestobject.The
modelmodule, which we imported above, is the model for our patron table in the database. We’ll go through that in more detail in the next code listing. But for now, just understand that all the database queries and SQL are in thismodelmodule. Here we are passing the connection pool for the database, and this is the same pattern for all the interaction with the database model in this function and in thePatronAPIclass further down.A new primary key,
id, will be created, and this is returned back to the caller as JSON.While creation is handled in the
new_patron()function, all other interactions are handled in this class-based view, which is a convenience provided by Sanic. All the methods in this class are associated with the same URL, /patron/<id:int>, which you can see further below in theadd_route()near the bottom. Note that theidURL parameter will be passed to each of the methods, and this parameter is required for all three endpoints.You can safely ignore the
metaclassargument: all it does is wrap each method with the@aelapseddecorator so that timings will be printed in the logs. This is not part of the Sanic API, and is again my own invention for logging timing data.As before, model interaction is performed inside the
modelmodule.If the model reports failure for doing the update, we modify the response data. I’ve included this for readers who have not yet seen Python’s version of the “ternary operator.”
The
@app.listenerdecorators are hooks provided by Sanic to give you a place to add extra actions during the startup and shutdown sequence. This one,before_server_start, is invoked before the API server will be started up. This seems like a good place to initialize our database connection.We use our
Databasehelper to create a connection to our PostgreSQL instance. The DB we’re connecting to isrestaurant.Obtain a connection pool to our database.
Use our model (for the
patrontable) to create the table if missing.Use our model to create a dedicated listener for database events, and we’re listening on the channel
chan_patron. The callback function for these events ismodel.db_event(), which we’ll go through in the next listing. The callback will be called every time the database updates the channel.
after_server_stopis the hook for tasks that must happen during shutdown. Here we disconnect from our database.
This
add_route()sendsPOSTrequests for the/patronURL to thenew_patron()coroutine function.
This
add_route()sends all requests for the /patron/<id:int> URL to thePatronAPIclass-based view. The method names in that class determine which one is called. So aGETHTTP request will call thePatronAPI.get()method, and so on.
The code above contains all the HTTP handling for our server,
as well as startup and shutdown tasks like setting up a connection
pool to the database, and also, crucially, setting up a db-event listener
on the chan_patron channel on the DB server.
Now we’ll go through our model for the patron table in the database:
Example 4-31. DB model for the “patron” table
# model.pyimportloggingfromjsonimportloads,dumpsfromtriggersimport(create_notify_trigger,add_table_triggers)fromboltons.cacheutilsimportLRUlogger=logging.getLogger('perf')CREATE_TABLE=('CREATE TABLE IF NOT EXISTS patron(''id serial PRIMARY KEY, name text,''fav_dish text)')INSERT=('INSERT INTO patron(name, fav_dish)''VALUES ($1, $2) RETURNING id')SELECT='SELECT * FROM patron WHERE id = $1'UPDATE='UPDATE patron SET name=$1, fav_dish=$2 WHERE id=$3'DELETE='DELETE FROM patron WHERE id=$1'EXISTS="SELECT to_regclass('patron')"CACHE=LRU(max_size=65536)asyncdefadd_patron(conn,data:dict)->int:returnawaitconn.fetchval(INSERT,data['name'],data['fav_dish'])asyncdefupdate_patron(conn,id:int,data:dict)->bool:result=awaitconn.execute(UPDATE,data['name'],data['fav_dish'],id)returnresult=='UPDATE 1'asyncdefdelete_patron(conn,id:int):result=awaitconn.execute(DELETE,id)returnresult=='DELETE 1'asyncdefget_patron(conn,id:int)->dict:ifidnotinCACHE:logger.info(f'id={id}Cache miss')record=awaitconn.fetchrow(SELECT,id)CACHE[id]=recordanddict(record.items())returnCACHE[id]defdb_event(conn,pid,channel,payload):event=loads(payload)logger.info('Got DB event:'+dumps(event,indent=4))id=event['id']ifevent['type']=='INSERT':CACHE[id]=event['data']elifevent['type']=='UPDATE':CACHE[id]=event['data']['new']elifevent['type']=='DELETE':CACHE[id]=Noneasyncdefcreate_table_if_missing(conn):ifnotawaitconn.fetchval(EXISTS):awaitconn.fetchval(CREATE_TABLE)awaitcreate_notify_trigger(conn,channel='chan_patron')awaitadd_table_triggers(conn,table='patron')
You have to add triggers to the database to be able to get notifications when data changes. I’ve created these handy helpers to create the trigger function itself (with
create_notify_trigger), and also to add the trigger to a specific table (withadd_table_triggers). The SQL required to do this is somewhat out of scope for this book, but it’s still crucial to understanding how this case study works. I’ve included the annotated code for these triggers in the appendix.The third-party
boltonspackage provides a bunch of useful tools, not least of which is theLRUcache, a more versatile option than the@lru_cachedecorator in thefunctoolsstandard library module.6This block of text holds all the SQL for the standard CRUD operations. Note that we’re using native PostgreSQL syntax for the parameters:
$1,$2, and so on. There is nothing novel here, and it won’t be discussed further.Create the cache for this app instance.
This
add_patron()coroutine function is what we called from the Sanic module inside thenew_patron()endpoint for adding new patrons. Inside the function, we use thefetchval()method to insert new data. Why “fetchval” and not “execute”? Because “fetchval” returns the primary key of the new inserted record!7Update an existing record. When this succeeds, PostgreSQL will return
UPDATE 1, so we use that as a check to verify that the update succeeded.Deletion is very similar to updating.
This is the “read” operation. This is the only part of our CRUD interface that cares about the cache. Think about that for a second: we don’t update the cache when doing insert, update, or delete. This is because we rely on the async notification from the database (via the installed triggers) to update the cache if any data is changed.
Of course, we do still want to use the cache after the first GET.
The
db_event()function is the callback thatasyncpgwill make when there are events on our DB notification channel,chan_patron. This specific parameter list is required byasyncpg.connis the connection on which the event was sent,pidis the process id of the PostgreSQL instance that sent the event,channelis the name of the channel (and in this case will bechan_patron), and the payload is the data being sent on channel.Deserialize the JSON data to a
dict.The cache population is generally quite straightforward but note that “update” events contain both new and old data, so we need to make sure we cache the new data only.
This is a small utility function I’ve made to easily recreate a table if missing. This is really useful if you need to do this frequently—such as writing the code samples for this book!
This is also where the database notification triggers are created and added to ourpatrontable. See the appendix for annotated listing of these functions.
That brings us to the end of this case study. We’ve seen how Sanic
makes it very simple to create an API server, and we’ve seen how
to use asyncpg for performing queries via a connection pool, as
well as using PostgreSQL’s async notification features to receive
callbacks over a dedicated, long-lived database connection.
Many people prefer to use object-relational mappers (ORMs) to work
with databases, and in this area, SQLAlchemy
is the leader. There is growing support for using SQLAlchemy together with asyncpg
in third-party libraries like asyncpgsa
and GINO. Another popular ORM,
peewee, is given support for
asyncio through the aiopeewee
package.
Other Libraries & Resources
There are many other libraries for asyncio not covered in this book. To
find out more, you can check out the
aio-libs project which manages nearly forty
different libraries, and also the
Awesome asyncio project
which bookmarks a large number of other projects for asyncio.
One of the libraries from the links above bears special mention:
aiofiles. If you recall from our
earlier discussions, we said that to achieve high concurrency in
asyncio, it is vitally important that the loop never “block.” In this
context, our focus on blocking operations has been exclusively
network-based I/O, but it turns out that disk access is also a blocking
operation that will impact your performance at very high concurrency
levels. The solution to this is aiofiles, which provides a convenient
wrapper for performing disk access in a thread. This works because
Python releases the GIL8 during file
operations so your main thread (running the asyncio loop) is
unaffected.
The most important domain for asyncio is going to be network programming.
For this reason it’s not a bad idea to learn a little about socket
programming, and even after all these years, Gordon McMillan’s
Socket Programming HOWTO,
included with the standard Python documentation is one of the best
introductions you’ll find.
I learned asyncio from a very wide variety of sources, many of which
have already been mentioned in earlier sections. People learn
differently from different sources, and of my learning materials not
yet mentioned, these were very useful:
-
By far the best YouTube talk on asyncio I came across was Robert Smallshire’s Getting To Grips With Asyncio presented at NDC London in January 2017. The talk may be somewhat advanced for a beginner, but it really does give a clear description of how
asynciois designed. -
Nikolay Novik’s slides presented at PyCon UA 2016: Building Apps With Asyncio. The information is dense, but there is a lot of practical experience captured in these slides.
-
Endless sessions in the Python REPL, trying things out and “seeing what happens!”
Finally, I encourage you to continue learning, and if a concept doesn’t “stick,” keep looking for new sources until you find an explanation that works for you.
1 https://en.wikipedia.org/wiki/Message_queuing_service
2 https://glyph.twistedmatrix.com/2014/05/the-report-of-our-death.html
3 http://zeromq.org/whitepapers:brokerless
4 Actually, you can as long as the sockets being used in different threads are created, used, and destroyed entirely in their own threads. It is possible but hard to do, and many people struggle to get this right. This is why the recommendation to use a single thread and a polling mechanism is so strong.
5 The recipe for this dish, and recipes for other fine SPAM-based fare, can be found here.
6 Obtain boltons with pip install boltons.
7 You also need the RETURNING id part of the SQL though!
8 global interpreter lock