
13. Designing a Projects Library to Share on Your LAN and Synchronize with Your iPhone
Find how to share a projects library over your LAN and on your iPhone.
Taking Another Approach to Projects
In the previous chapter, you saw how to integrate Bento’s libraries that access Address Book as well as iCal Tasks and Events. Together with a MobileMe account, this can mean that from your Bento Projects library you can add and modify the data, which then can be synchronized with other Macs and your iPhone. Beginning with Mac OS X 10.6 (Snow Leopard), you can also synchronize data with a Microsoft Exchange server. This means that you can see all of your data in one place no matter whether it resides on your Mac, the Microsoft Exchange Server, or your iPhone. If you are sharing your Bento libraries over a LAN, you can share their data as well as your Address Book and iCal data.
There are some issues involved in sharing data from these external sources; for many people they do not matter and never arise. Nevertheless, you should be aware of these issues. For example if you share your iCal events through the Bento Events library, it cannot be edited by others.
One very common case of sharing and synchronization occurs if you have an iPhone that is synchronized with a Bento library that resides on your main computer (for many people today, this can be a MacBook that is almost always with them—though not quite so much as an iPhone, which is absolutely always with them). In addition, you may have another Mac in an office, den, or other location that you frequently use. This could be another MacBook, but it also could be an iMac, Mac mini, or Mac Pro. You may even have a variety of other Macs that you frequently use and that also participate in sharing. When Bento is running on the various computers of the same LAN, the libraries can be shared, but remember that the sharing is always from a computer on the network to up to five other computers on the network. A given computer can be on both sides of the sharing paradigm, but a given library is always hosted on a single computer.
In this scenario, your MacBook may have your Bento libraries on it, and when you are within range of the other computers on the same LAN, they can connect to that shared library. If you and your MacBook go off to a camp in the Adirondacks where you may have a solar-powered recharger for your MacBook but no other modern technology, you can update information in your Bento library, but even though you marked that library as sharable it will not actually be shared by any other computers (unless you’ve brought your friends and their MacBooks along to the campsite).
When you return to your home, school, or office and are once again within range of the other computers, your library with your new information can be shared by them, and they can update your library. This may be exactly what you want, but you may want to be able to go off with your MacBook while still allowing your office to function with the shared library.
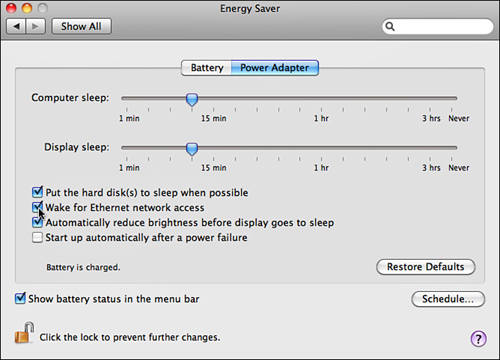
In that case, you want the shared library to be placed on one of the computers that is in the office and, often, a computer that is always on. You can use such a system’s Energy Saver control panel to allow it to sleep with very little power consumption; just make certain to enable the Wake for Ethernet Network Access check box as shown in Figure 13.1.
Figure 13.1. Allow an always-on computer to sleep and wake as needed.
This setup lets you have an always-on computer in your shared workspace so that anyone (including you) can access it when they are on that LAN and have Bento running on their Macs. Anyone who leaves the LAN no longer has access to the shared library.
One person, however, can synchronize the shared library with an iPhone. Remember that an iPhone can only be synchronized with one computer, and one computer can be synchronized with only one iPhone. In addition, one iPad can be synchronized with that computer. It works just as a synchronized iPhone does. These can be changed, but the configuration is designed for relatively stable synchronizations not those that change by the minute. Because of this synchronization option, if you are the owner or main user of the shared library that resides on the always-on computer back in the office, you can take your iPhone with the synchronized library with you when you go off to the campsite or any other location. When you and your iPhone are back on the same LAN as the shared library, you can synchronize the iPhone and the shared library so that the same data is on both. Any users who are using the shared library will also see that updated data (see Figure 13.2). Thus, there are in effect two versions of the shared library—but it is only two (Mac and iPhone) and no more.
Figure 13.2. An iPhone can share a Bento library with one Mac. That Mac can share a library with up to four other Macs on a local network.
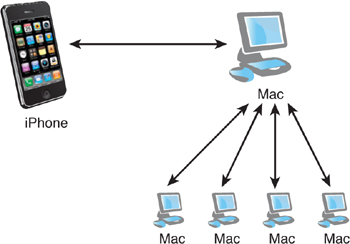
The key to this is the one-to-one synchronization between the shared library and a single iPhone as well as the ability for up to four other computers to connect to the shared library. If you want an environment in which anyone who uses the database can make changes at any time from anywhere without the restriction of being on the same LAN, you need a different type of software. Fortunately it exists: Use FileMaker Pro of FileMaker Server to host the database (you can import it into FileMaker from Bento). FileMaker Pro and FileMaker Server are designed to handle this situation. With FileMaker Pro you still are limited to five users, but they need not be on the same LAN: They can be on any networks that can communicate with one another (even if they use the Internet and are halfway around the world from one another). With FileMaker Server, the limit for the number of simultaneous users is well up into the hundreds.
You may want to expand the Bento Projects library to include additional data that can be shared in these ways. You also may want to deliberately not use your iCal and Address Book data. The most frequent example of this is when you want to keep your event, task, and contact information together with your project data and not in your Address Book or iCal. You may have set up synchronization with iCal and Address Book so that your data is widely available through MobileMe, which may not be what you want for a certain project’s data. Of course, one way to handle this if a separate always-on computer in your office is set up with iCal and Address book and you don’t synchronize them with your own data. In fact, a separate MobileMe account might be just what you want to have the advantages of automatic synchronization without the potential problems of sharing data that should not be shared.
Fortunately Bento and Mac OS X let you set up sharing and synchronization in whatever way works for you.
Tell Me More: Media 13.1—A discussion about related records

Access this video file through your registered Web Edition at my.safaribooksonline.com/9780131388611/media.
Exploring the Projects Library
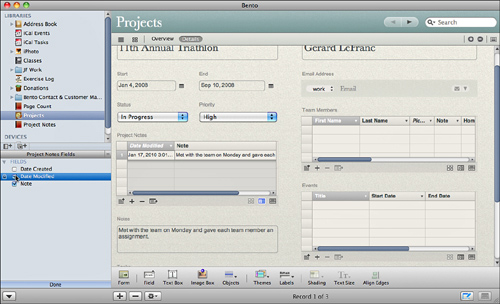
The basic Projects template lets you describe the project, add notes, and associate information from Address Book (team members) and iCal (tasks and events). You can also add messages from Mail. Figure 13.3 shows the Projects library before any changes have been made.
Figure 13.3. Start from the Projects library.

Regardless of which Bento version you are using, you can rearrange this template’s various elements as you see fit. Perhaps, for example, you tend to work with larger or smaller teams: You can change the size of the Team Members related list field to reflect that.
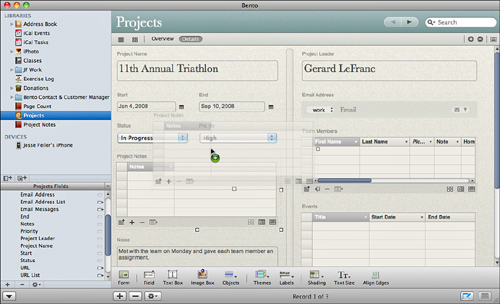
As you can see in Figure 13.2, a Notes field is included in the library. As you start to explore the library, you may discover what may be a limitation for you.
The sample data in Figure 13.2 shows the project lasting over a period of eight months. The note says, “Met with the team on Monday and gave each team member an assignment.” Which Monday? How many such notes might accumulate in this Notes field over the course of the project? How will you find the new ones, let alone deal with old ones?
iCal manages tasks and events—things that happen in the future. You can look at events from the past as well as completed tasks, but the emphasis in any calendar is on the future.
One aspect of project management for many people is keeping track of what has happened in the past—items such as the sample note in Figure 13.3. Because iCal and the Bento Projects library handle tasks and events, if you want to organize and structure your notes, you have to do so yourself. In this chapter, you see how to construct a table for notes that you can relate to a modified version of the Projects library.
Organizing and Implementing Notes: The Basics
The whole point of using a database is to organize your data so that you can easily retrieve it as you need it. Bento makes it easy not only to structure the data but also to modify the structure as well as the data. One way to go about creating a Notes table to be related to Projects is simply to create a table with a single field—Note—and relate it. This section shows you how to do that. You can then modify the Notes table to add additional fields and to structure it a bit more. The following section shows you how to do that.
Remember that by implementing notes as a related table, you are able to use all the relational tools that Bento supports, including the display of records in a scrolling list, the summary row at the bottom, and the like. The related table can be synchronized with an iPhone and shared just as your other Bento libraries are. You will see that on the iPhone Bento app, you can view the records from the related library, and you can view the related records in your main project record. However, the iPhone Bento app does not support the creation of related records. This means that notes have to be entered on Bento running on a Mac. Once you have synchronized with the iPhone, the notes will be there, and you can even modify or delete those records, but you cannot create new related ones.
Note
For most people, creating a Bento library is an iterative process. Remember: you are the user. You can do what you want. In general, it is a good idea not to remove fields from the database unless you are certain that the data they contain appears elsewhere or doesn’t matter. (It is easy to forget that a field not required for the current record in a database may matter very much for other records.) If you find yourself modifying your libraries and database a great deal, consider the tips later in this chapter in the section “Enhancing the Relationship.”
The steps involved in creating the related table are
• Create a new Bento library for notes and call it Project Notes.
• Create the basic fields in Project Notes.
• Add a list of related records to the Projects library.
Each of these steps is detailed in the following sections.
 LET ME TRY IT
Create a New Bento Library for Notes
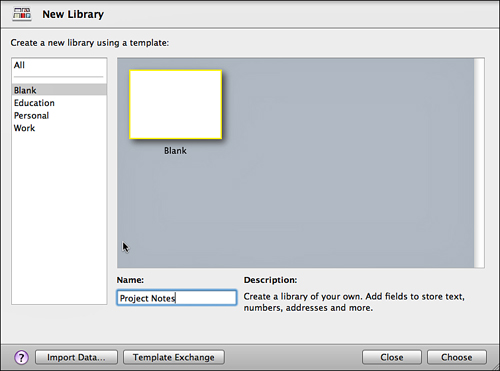
- The first step in creating a related table is to create a new library. Choose File > New Library or click the Add Library (+) button below the Source/Libraries list. Instead of selecting a built-in Bento library, choose the Blank library and name it Project Notes, as shown in Figure 13.4.
Figure 13.4. Create a Project Notes library.
- The two default fields, Date Created and Date Modified, are in the new library as always, although they are not added to the basic table view, as shown in Figure 13.5. By default, they are added to the first form view (Untitled Form). You can remove them from that view or add them to the table view if you want.
Figure 13.5. The new library has the two default fields.

- In addition to the default fields, you need a field to store the note.
- It’s a good idea to change the library icon to a more meaningful one. Select it in the Libraries pane, use the shortcuts menu (control-click), and choose Choose a Library Icon.
LET ME TRY IT
Create the Basic Field in Project Notes
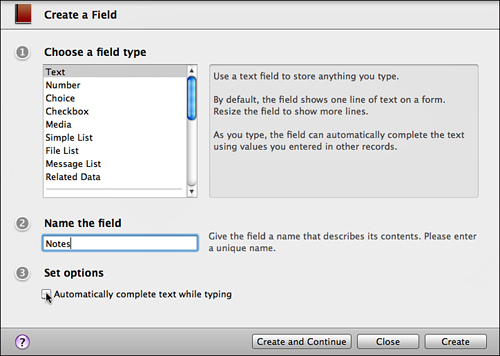
- The next step is to create a Notes field. Choose Insert > New Field or click the Add Field (plus) button below the Fields list.
- In the dialog shown in Figure 13.6, it is relatively obvious that this should be a text field. Should it have the autocomplete option set? That choice is something that you probably need to work out for yourself as you work with the data. If your notes tend to be repetitive (such as “check on this,”) autocomplete can be useful; if they are not, autocomplete can be a nuisance.
Figure 13.6. Add the Notes field.
If you were building a Bento library to use on its own, at this point you would probably start working on one or more forms for your interface. However, in this case, the Project Notes library is going to be used only for related records in the expanded Projects library, so you can move on.
Note
With Bento, you can always come back to make changes. Very few actions in Bento are not reversible (except for the deletion of fields and libraries themselves).
LET ME TRY IT
Add Related Data Fields to the Projects Library
- You now have a library that can hold related data. All you have to do is add a related data field. The simplest way is to select a form in the Projects library and drag the Project Notes library from the Source/Libraries list onto that form. As you drag it, you see the outline of the related data field. Behind it, you see the form rearranging itself to accommodate the new field. Figure 13.7 shows what it looks like in the middle of the drag-and-drop process before you release the mouse button.
Figure 13.7. Create a related records list in the Projects library.
- When you release the mouse button, the new related data field is created in the form, and the field itself shows up in the Related Data section of the Fields list, as shown in Figure 13.8. If you want to change the name of the related data field from the default name (the name of the related library) to another name, just double-click the name in the Fields list and change it.
Figure 13.8. Add the Project Notes library as a related data field.
- By default, the fields shown in a related data field are the fields that you have selected to be shown in the related library’s table view. If you have not selected any fields for the table view, none show up in the related records list field. In that case or in any other in which you want to add fields to the related records list view, click the icon in the lower right corner of the related records list field, which changes the Fields list to show the fields in the related library. Click the check boxes of the field(s) you want to add to the related records list field into that field and rearrange them as you see fit.
- To test your changes, add a related record using the + at the lower left of the related data field. Copy the data from the old Notes field and paste it into the new related data field, as shown in Figure 13.9.
Figure 13.9. Add a related record.
- Choose the Notes library from Libraries list so that you can view the data. At this point, you do need a field in the form, so add a Note Text field. As you can see in Figure 13.10, the pasted note text is visible in the Notes library. You now have a way to enter multiple notes.
Figure 13.10. The related Notes records are updated automatically from Projects.
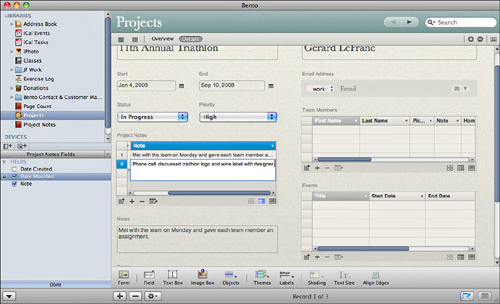
- One further enhancement is to add the Date Modified field for Project Notes to the related records list in Projects, as shown in Figure 13.11.
Figure 13.11. Add Date Modified to the related records list field.
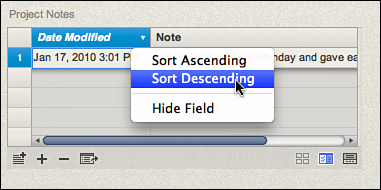
- You can sort on this field to find the most recently modified notes and review them as shown in Figure 13.12.
Figure 13.12. Sort notes the most recent notes are first.
Tip
You can now remove the old Notes field, but before you do so, consider if you will be updating the library with the iPhone Bento app. Remember that you can modify and display related data in the iPhone Bento app, but you cannot create new related data. By leaving the old Notes field, it will be visible in the iPhone Bento app, and you can always update that field. When you are back at your own computer and have synchronized with iPhone, those comments will be on your Mac, and you can create true related records and delete the temporary data you stored in the old Notes field.
By using related records, you transform the free-format Notes field in the Projects library template into a structured collection of individual notes. In general, any time you can do such a transformation, handling your data is easier.
If you want, you can add more fields to the Notes library, but with Bento, simplicity is key. Maybe you think it would be a good idea to add a Completed field to a note to show that it has been handled. But that duplicates tasks for iCal. If something needs to be completed, it is a task, not a note. Many experienced database designers start to think how new features can be added using the existing data structures that they have. If you need a new feature and need to modify the structure, doing so is easy in Bento. But if you can work a variation on the existing structure, that variation simplifies the structure (and also helps you remember where you have put the data!).
Caution
Reusing existing structures does not mean putting multiple types of data in a single field. If you need both a note field and a field to store the phase of a project to which it applies, create a project phase field. When you start cramming unrelated items into single fields, you start to make the database unnecessarily complex. And using special codes or values within a field is a definite no-no. If you are tempted to use a date such as 1/1/2001 to mean “no such data,” do not do it. Reusing the structure means getting as much as you can out of the structure you have, but if you need a new field, add it rather than muddying the structure.
Show Me: Media 13.2—A video about creating a related notes table

Access this video file through your registered Web Edition at my.safaribooksonline.com/9780131388611/media.
Enhancing the Relationship
The Project Notes library that is created here is as generic as can be: You have added only one field to the two default ones. You can use it as related records in almost any library to which notes might apply (which is probably just about any library). Notes can be a record of what you have done, phone calls, or meetings.
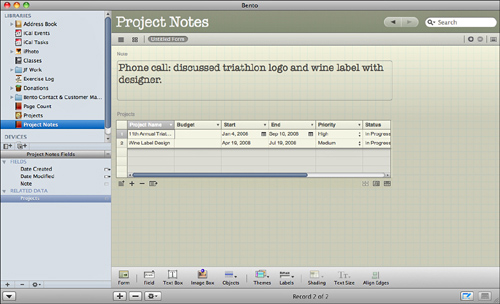
In Figure 13.13, you see an additional note added to the Triathlon project.
Figure 13.13. Add more notes using the Projects library.
But wait a minute...the note references a phone call during which you discussed the logo for the triathlon as well as the design of a wine label. It is reasonable that you might discuss two projects when you are talking to one person—particularly as is the case here, when that person is a designer working on both projects.
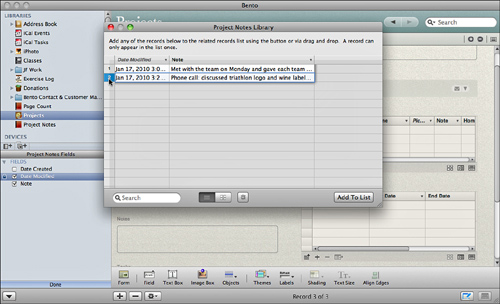
You could create two notes, one for each project, but the reality of such a conversation often is that it bounces back and forth from one to another. If you create a single note, as shown in Figure 13.14, it is automatically related to the first project (Triathlon, in this case). You can then go to the other project and add the same note to that project by clicking the icon in the lower left and choosing to add it, as shown in Figure 13.14.
Figure 13.14. Add a note to more than one project.
You can use the arrows to the right of the navigation bar to switch between the two projects, and you see that the note is attached to both of them.
But you can do more. You have related the Project Notes library to the Projects library, but the relationship also can work in the other direction. In the Project Notes, drag the Project library icon from the Sources/Libraries list to create a related records list field based on Projects. Figure 13.15 shows the Project Notes library with this related records list added.
Figure 13.15. The relationship works in both directions.
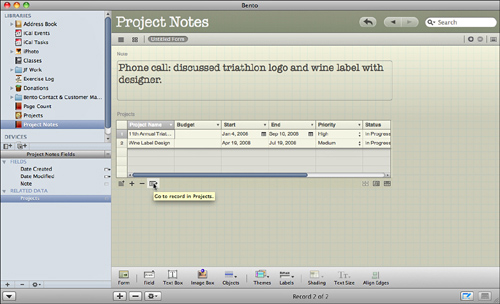
An icon in the lower right of a related data field takes you to the selected record in the other library. It opens in the last view (table or form) that you used in browsing that library. In that related record’s view, you see a Back button at the right of the navigation bar, as shown in Figure 13.16. The Back button takes you back to the original record. If you have implemented both sides of a relationship as described in this section, you can use the Go to related record button in the lower left of a related records list field and the Back button to switch back and forth from one side of the relationship to the other.
Figure 13.16. Go to related records.
Show Me: Media 13.3—A video about going to and from related records
Access this video file through your registered Web Edition at my.safaribooksonline.com/9780131388611/media.
Adding notes (or phone calls or conversations) to project records helps to consolidate information in one place. By using related records, you can keep them separate and organized. You can also use Bento’s relational capabilities to relate a single record to multiple records in a library, as is the case with a multitopic meeting or phone call.
Show Me: Media 13.4—A video about enhancing the relationship
Access this video file through your registered Web Edition at my.safaribooksonline.com/9780131388611/media.
In addition, you can look at all your Project Notes in table view, sorting them as you want (most likely by date). You can keep track of what you were doing from day to day. As you see each note, you can switch to a form view to look at more details, see the project(s) with which it is associated, and go to the project to get more information.
This ability to switch contexts from what you were doing across all projects to a specific project is a powerful part of Bento’s relational functionality. It happens with iCal, which also presents your information in a date-ordered sequence, while at the same time you can organize events and tasks by Bento project or other library.
In general, keeping your Bento libraries relatively simple and focused and using relationships to join them together can make your solutions powerful and robust. Jumbling everything together starts to work against the idea of organizing information. Before you know it, you have reinvented your center desk drawer.