
Introduction
You wouldn’t have purchased this book if you weren’t interested in photography, art, image editing, or some related activity. You also wouldn’t have gotten Using GIMP if you weren’t willing to invest some time and effort in learning an open source image-manipulation program. That’s what this book teaches, with a specific focus on doing, rather than learning concepts, background, or history, so you’ll gain experience in using GIMP very quickly.
The uses for digital imagery are just vast, particularly on the Web. Every image, graphic, wallpaper, and photo you’ve ever encountered had to be created and edited by someone using one or more digital editing tools. Most people tend to think of Adobe products when they think of those tasks, but GIMP is extremely well equipped to do just about everything you can imagine in that realm. With a little practice, you can use GIMP to create many of those images, too.
You may be a Photoshop guru who is interested in leveraging your current skill sets into GIMP, or you may have little or no experience with digital art and imagery at all and see GIMP as a viable tool by which to enter that arena. No matter who you are or what your goals, Using GIMP is designed to start teaching the practical, hands-on aspects of the application from page one and continue with that emphasis throughout the book. In addition, Using GIMP also links you to video tutorials and audio instructions that augment what you’ll learn by reading.
Some of the practical applications of learning GIMP here include photo enhancement and correction methods, such as removing red eye, sharpening blurred images, adjusting color balance, and removing image “speckles.” You will also learn the basics of creating computer desktop wallpapers, avatars, graphic signatures, web page banners and buttons, and other web-related graphics.
Although GIMP’s interface may not seem very intuitive at first, you’ll gain a lot of experience with its common features and functions by following the tutorials contained in the book. Each tutorial in the text is also available as a video, so you can use more than one method of learning the same skill set.
The idea of Using GIMP isn’t to teach you everything there is to know about GIMP, but to teach you exactly what you need to get started using GIMP quickly, establishing a solid foundation on which to build further skills. Practice following all the tutorials and have fun using GIMP.
What’s in This Book
Using GIMP is not like many books that propose to teach you how to use a software application. Most books offer just as much information on the theory or concepts behind the software as they do instructions on how to use the application. Using GIMP has an almost exclusive focus on teaching the beginner how to create and edit images right from the start. You don’t have to wade through 50 or 100 pages of the history and description before getting to the part where you can use it. Start using GIMP right from the first chapter and continually build your skills as you progress through the entire book. Here’s what’s inside:
• Chapter 1: “What Is GIMP” is your formal introduction to the GIMP image editor. To make good use of GIMP, you first need to understand how the interface is organized, where to find tools, how to open a blank canvas, and what to expect out of GIMP when you launch it for the first time.
• Chapter 2: “Basic Editing” is the foundation for everything else you’ll encounter in the book. By design, GIMP is an image editor, in contrast to a paint or drawing tool, so practicing editing tasks sets the stage for your entire GIMP experience. In this chapter, you’ll learn to choose a graphic and then scale, crop, rotate, and change the color and brightness values of the image. Although GIMP isn’t a drawing tool by design, this and the following chapters also teach the skills necessary to help you create drawings from scratch.
• Chapter 3: “Managing Colors” presents GIMP’s powerful color management tools and also lets you learn color models, such as RGB, CMYK, and HSV, as you practice using the utilities that affect color in the photos and drawings you edit. Correcting color balance in a photo and accessing color channels are only two of the skills you’ll acquire in this chapter.
• Chapter 4: “Using Layers” is a particularly important skill to learn, because applying a multitude of effects in an image depends on your ability to create and manipulate a graphic’s layers. You will also begin to experience how layers and filters work together to provide whatever visual result you require.
• Chapter 5: “Selecting” different elements or portions in an image lets you affect certain areas of the graphic while allowing other parts to remain unchanged. This chapter teaches you the different GIMP selection tools, the pros and cons of each one, and how the various selection methods can be used with other utilities to add or change features in a graphic.
• Chapter 6: “Using Filters” is another key chapter that builds on the skills you will have learned up to this point. Along with image layers, the various filters available in GIMP can apply special effects that remove photographic defects, enhance images, and produce creative text and images.
• Chapter 7: “File Formats and Image Resolution” gives you the required understanding of the various image formats you can use when creating a graphic in order to preserve the qualities you require in the image. GIMP has its own native format of XCF, but there are many others you may want to select, depending on the purpose of the image. Image resolution also makes a huge difference in terms of how the graphics you create and edit are to be used, including images for the Web and for print.
• Chapter 8: “Finishing Up” presents the various methods of polishing an image that is almost ready to be published. The book up to this point has provided a series of specific exercises designed to establish and reinforce your knowledge in the use of numerous skills and techniques in GIMP. This final chapter gives you a chance to perform those small clean-up tasks on an image after the “heavy lifting” has been done. This includes using dodging and burning, smudging away small errors, cloning, and healing.
Who Can Use This Book
Anyone who wants or needs to create and edit art or photos on a computing platform can use this book. GIMP can be installed on Windows, Mac OS X, and Linux with equal ease. You don’t have to be an “artist” to use GIMP, but any experience working with digital image files certainly helps, and no expert computer knowledge is required. If you can download and launch an executable file, you can install GIMP.
How you use GIMP can vary widely depending on your goals. A lot of young (and young at heart) GIMP users have a specific focus in the creation of art for venues such as www.deviantart.com/ where fantasy, photography, and digital image manipulation combine in very interesting ways. GIMP is also no stranger to acting as the “dark room” for digital photographic work and can also be used successfully in the corporate environment to produce professional graphics.
Regardless if you are interested in digital art for the sake of digital art, if you need an image editing application to enhance the photos you post on Flickr, or if you need to produce quality graphics for your business documentation, Using GIMP will help you establish the skills necessary to achieve your ends.
How to Use This Book
The best way to use this book as a beginner with GIMP is to read it from beginning to end. The skills you will learn in subsequent chapters are built on those learned in earlier portions of the book. Later, you can go back to tutorial sections you previously experienced and use them as a reference, but for learning GIMP from the ground up, it’s best to start at the beginning.
You’ll need to download and install GIMP on your computer or have access to a computer that has GIMP already installed to make use of this book. You can install GIMP on Windows, Mac OS X, and Linux, but because most people use Windows for their home and work desktop, this book was written from the point of view of a Windows XP and Windows 7 user. If you use a different version of Windows or another computing platform, your experience with GIMP will differ just slightly, if at all, from the tutorials presented within these pages.
You’ll be making and editing quite a number of different drawings, so create one or more directories on your computer where you can save your work. Some of the tutorials require that you “reuse” a graphic you previously created for a subsequent project, so don’t throw anything away unless specifically instructed to do so.
You’ll also need access to already created art and photographs. If you have a bunch of digital photos and artwork available on your PC or Mac, that’s great, but if you don’t, there are plenty of places on the Web where you can acquire such art free for download.
You can use your favorite search engine to locate the free artwork and photographs you’ll need. There are plenty of sites to choose from. You can also take advantage of the following:
• http://desktoppub.about.com/od/freeclipart/Free_Clip_Art.htm
How to Find and Install GIMP
As I previously mentioned, you can’t do much with this book until you install GIMP on your computer. Although the book was written using Windows XP SP 3 and the videos were created using Windows 7, you can install GIMP on almost any Windows, Mac OS X, or Linux platform.
Installing GIMP on Windows
If you’ve ever installed any third-party software (software not created by Microsoft) on Windows, you know it’s as simple as downloading the software installer and then going through the installation wizard. Although installing GIMP is fairly straightforward, because using GIMP on Windows is the basis for all of this book’s tutorials, I’m going to spend a little extra time on this process, not only describing the installation, but some of minor configuration.
To find the current stable version of GIMP for Windows, go to http://gimp-win.sourceforge.net/stable.html.
![]() LET ME TRY IT
LET ME TRY IT
Installing GIMP on Windows XP
First things first. Go to the Windows computer you plan to use with this book and get ready to install GIMP.
- Go to www.gimp.org and click the Download button in the main banner of the web page.
- On the downloads page under GIMP for Windows, click the link for the most current stable version of GIMP.
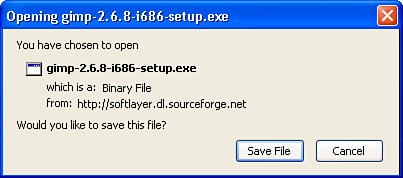
- When the Opening gimp setup.exe dialog appears as in Figure i.1, click Save File. If necessary, browse to the location where you want to save the installer, and then save the file.
Figure i.1. The Opening GIMP dialog lets you save the GIMP installation file to a directory on your computer.
- Close your web browser, navigate to the location where you saved the GIMP installer file, and then double-click the file to launch it.
- When the Open File dialog appears, click Run.
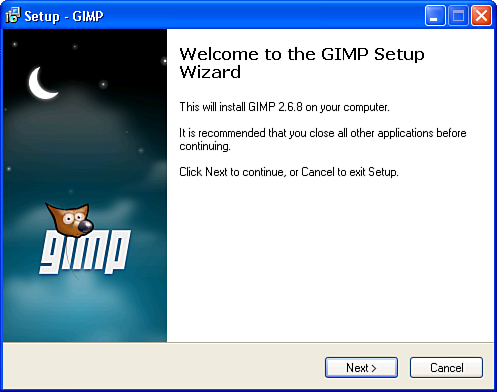
- When the Welcome to the GIMP Setup Wizard launches, click Next, as shown in Figure i.2.
Figure i.2. The Welcome to the GIMP Setup Wizard launches.
- When the License Agreement appears, read the agreement and click Next.
- On the Ready to Install dialog, click Install Now.
- When the Completing the GIMP Setup Wizard dialog appears, if you want to immediately launch GIMP after installation, click Finish. If you want to complete the installation but not immediately launch GIMP, deselect the Launch GIMP check box and then click Finish.
GIMP is now installed and the GIMP icon should appear on your Windows XP desktop.
Now that you’ve installed GIMP, it’s time to make a change to the default interface.
![]() LET ME TRY IT
LET ME TRY IT
Configuring GIMP on Windows
If you tried to use GIMP as you’ve just installed it with the examples in the book, you might actually believe you’re working with a different version of GIMP. Like many applications, the look and feel of the GIMP interface can be modified, depending on the tools you want to access. Using the following steps, you’re going to change just one detail in the overall interface, but it will make a big difference.
- Double-click the GIMP icon on the computer desktop to launch GIMP for the first time.
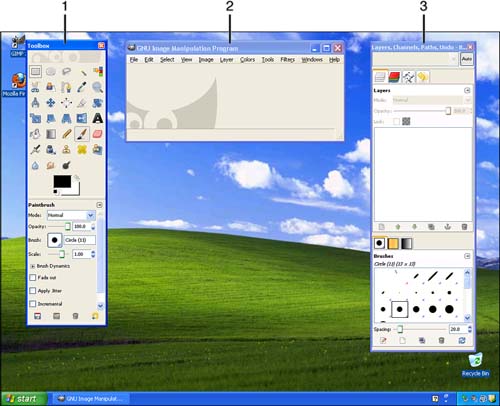
- When GIMP first launches, by default, three sections appear as shown in Figure i.3:
- Toolbox
- Image window
- Layers, Channels, Paths dialog
Figure i.3. The GIMP default interface.
- The tutorials in this book require only that the Toolbox and Image window appear, so close the Layers, Channels, and Paths dialog by clicking the X in the upper-right corner of the dialog.
- To close GIMP, go to the Image window toolbar, click File, and then click Quit.
- After GIMP has completely closed, double-click the GIMP icon on the desktop to launch GIMP again. This time only the Toolbox and Image window will open.
By default, GIMP saves the position and types of windows and dialogs that were open or closed upon exit, so closing the Layers, Channels, Paths dialog first and then exiting GIMP means when you reopen GIMP, only the required Toolbox and Image window will appear.
You can make a large number of configuration changes in GIMP, but for the sake of learning GIMP for the first time, this book will address only a few of them. To view where these changes are made, on the Image window toolbar, click Edit and then click Preferences to open the Preferences dialog.
Installing GIMP on Mac
Mac has been touted as the platform to use to produce digital art. Being mostly a PC person, I can’t attest to this one way or the other, but certainly GIMP can be installed on Mac and used quite successfully. To begin, go to www.gimp.org/macintosh/. The easiest way to get the GIMP installation file for your Mac is to click the GIMP on OS X link under the Getting and Installing GIMP section, and then find and click the download GIMP on OS X link.
Before installing GIMP, review the installation requirements at www.gimp.org/macintosh/. Mac OS X needs the X11 windowing protocol to run GIMP. A link to the XQuartz project is provided on that page. You should download and install XQuartz, which provides the required protocol, before installing GIMP. On the XQuartz site, click the version number link under the Latest Release section; under Installation, click the download link, and then follow the on-screen installation instructions.
After XQuartz is successfully installed, you can install GIMP for Mac.
After you have XQuartz and the Apple X11 files installed, you can proceed to launch the GIMP installation file for Mac.
Installing GIMP on Linux
Both GIMP and Linux are open source, so chances are GIMP is already installed on your Linux computer by default. Under most circumstances, you can open your applications menu on the desktop and look for GIMP under the Graphics submenu. Then click the GIMP icon to launch GIMP.
However, there has been quite a bit of buzz in the Ubuntu community about Canonical’s decision to not include GIMP by default in their release of Ubuntu 10.04: Lucid Lynx released in April 2010. The rationale is that “average” computer users won’t need to use a graphics editor as powerful and sophisticated as GIMP. I suppose this is analogous to not having Photoshop installed on Windows or Mac by default (although it wouldn’t be, anyway). However, GIMP will still be available for free installation on Ubuntu 10.04 via the aptitude package manager.
If you need help finding the software repository or the shell command for installing GIMP on your Linux distribution (assuming it’s not already installed), you can find those details and more at www.gimp.org/downloads/.
There’s More Online...
Periodically throughout the book, you’ll see references to online video tutorials and audio sidebars. Every tutorial in the book is also presented as a video tutorial, so you can see step-by-step how each art effect is produced. Audio sidebars contain interesting or extended information about the tools and techniques you are learning to use in GIMP.
These references are easy to find in the book. Look for messages that appear as follows:
Show Me: Media i.1—Trying Out Gimp
You can watch a free video about how to start using GIMP when you log on to my.safaribooksonline.com/9780132174602/media.
Tell Me More: Media i.1—What Is Open Source?
You can listen to a free audio describing open source software when you log on to my.safaribooksonline.com/9780132174602/media.
I’m pretty easy to find online if you have a question. You can locate references to this book and the other books I’ve written at www.wiredwriter.net as well as my email address. I also blog quite a bit (depending on how busy I am with other projects) at http://millionchimpanzees.blogspot.com/. I can’t promise to answer everyone’s questions all the time, but I do read all my emails and if I can, I’ll do my best to respond to queries.
Like most open source projects, GIMP enjoys a healthy online support community. After you have finished with Using GIMP and you want to learn more, go to www.gimp.org/ and click Documentation. The GIMP development team maintains a comprehensive set of documentation of every possible setting and feature GIMP offers. It’s definitely a reference, in contrast to something you’d read cover to cover.
There are also two GIMP related discussion forums I’d recommend:
Discussion forums are excellent venues in which to ask questions, read tutorials, and find out how other people from a variety of backgrounds experience using GIMP.
Who Is Wilber?
Wilber, as shown in Figure i.4, is the official GIMP mascot. Wilber was originally created by Tuomas Kuosmanen (tigert) at some point before September 25, 1997, and has since undergone numerous variations. The image of Wilber is used as the GIMP icon on your Windows desktop after GIMP is installed. When you launch GIMP, you can see Wilber “peeking” out of both the Toolbox and the Image window.
Figure i.4. Wilbur, the official GIMP mascot.

Getting Started Using GIMP
One more thing: Every image you see included in this book was created and edited using GIMP. Most book publishers suggest using another, proprietary image application to create screenshots and images, but a book that teaches GIMP should “walk the walk.”
Now that the introduction and the installation have been taken care of, it’s time to get your hands dirty. Turn the page, open GIMP on your computer, and start learning and having some fun.