
Navigating Your World with Maps
The Maps app can be used for a variety of navigation and address lookup tasks. The iOS 5 edition of Maps offers a handful of enhancements that make it easier to pinpoint and map out your exact location (and then share it with others), access detailed directions to any destination, choose alternate routes to that destination, determine current traffic conditions in many areas, and look up details about almost any business.
To function properly, the Maps app requires access to the Internet, and the Location Services feature must be turned on. Then, to determine your location at any given moment, the app utilizes GPS, Wi-Fi hotspots, and cellular towers, and it can display this information using highly detailed Google Maps and/or satellite imagery.
Many apps and iPhone features, including Find My iPhone, Find My Friends, Camera, Photos, Twitter, and Weather, rely on your iPhone’s Location Services features and the Maps app to pinpoint (and in some cases display) your exact location and then somehow utilize that information.
If you turn off the Location Services feature of your iPhone altogether, these and other apps don’t function properly. However, from within Settings, you can turn on or off a specific app’s usage of Location Services. How to do this is explained shortly.
When Using Maps, It’s All About Finding Locations
When you launch the Maps app from the Home screen, the main area of the screen fills with a details map. At the bottom of the screen (shown in Figure 12.1) are four icons, including

Figure 12.1 Choose how you want to use the Maps app by tapping the Search or Directions command icons displayed at the bottom of the screen.
• Location Services—Tap this icon located near the lower-left corner of the screen to pinpoint and display your exact location.
• Search—Enter the name of a company or any address to pinpoint that location on a map. When searching for a business, enter the business name, followed by its city and state. For example, enter Empire State Building, New York, NY or Empire State Building, NY, NY), and then tap the Search button.
As you enter content into the Search field (displayed at the top of the screen), your iPhone accesses your Contacts database and tries to find matches. Thus, you also can use the Search option to find the location of an individual’s address stored within your Contacts database. Alternatively, within the Search field, enter a city and state or any detailed address (street, city, state, and/or ZIP Code) to map that location.
When you use the Search feature to pinpoint a location on the map, it is tagged with a red pushpin. Your exact location is displayed on the map as a flashing blue dot.
• Directions—Tap this icon to calculate detailed directions to any other location that you enter or select starting with your current location (or any address you enter or select). If you’re an iPhone 4S user, you can use Siri to obtain directions using a command like, “Show me how to get to [insert contact name or business name].” Using Siri in conjunction with the Maps app is explained in greater detail within Chapter 14.
• Map View—Tap the Map View icon displayed near the lower-right corner of the screen to add drop pins to a map, wirelessly print the map (and/or directions) you’re currently viewing, display or hide traffic details on the map, and/or choose your map view.
The Maps app can display detailed maps using three different views, including Standard, Satellite, and Hybrid. If you’ve acquired step-by-step directions between two locations, you can display (or print) a list of those steps.
Although the Maps app is a useful tool to help you navigate your way to any location or discover where you are if you get lost, keep in mind the app utilizes a significant amount of battery power and Internet usage to accomplish these tasks. Thus, if you’re using the Maps app to serve as a GPS system to help you navigate as you drive, consider connecting your iPhone to a car charger to keep the battery charged as it’s being used.
Also, keep in mind that if you’re restricted to the amount of wireless data usage you have available by your wireless service provider, this allocation is used up much faster if you use the Maps app heavily in conjunction with a 3G Internet connection.
The Maps app is the most accurate when it has 3G Internet connectivity and the phone’s Wi-Fi feature is turned on.
Finding a Specific Destination or Location on the Map
Using the Maps app, you can find a specific business, contact, address, or location and display it on a detailed map.
![]() LET ME TRY IT
LET ME TRY IT
Finding a Specific Location Using Maps
To find and then map out a specific address, contact, or business location, follow these steps:
1. Launch the Maps app.
2. Tap the Search icon displayed at the bottom of the screen.
3. Tap the Search field displayed at the top of the screen, which causes the virtual keyboard to appear. (Alternatively, tap the book-shaped icon displayed to the right of the Search field at the top of the screen to look up any address previously stored as a Bookmark within the Maps app.)
4. Using the virtual keyboard, start typing the name of the business or the exact address you’re looking for. As you do this, you can enter
• A business name, followed by its city and state (separated by commas). For this example, enter The White House, Washington, DC.
• A complete address for any location (that is, street, city, state, and/or ZIP Code). Keep in mind, Maps offers global mapping capabilities, so you can enter addresses in almost any country worldwide.
• Just a city and state (separated by commas) to find a location within the United States.
• The name of a contact stored in your Contacts database.
5. Tap the Search key on the virtual keyboard (displayed to the right of the spacebar).
6. Within a few seconds, a map is displayed on the iPhone’s screen with the selected location centered within the map (shown in Figure 12.2). A red pushpin highlights the location, and a banner appears over the pushpin.
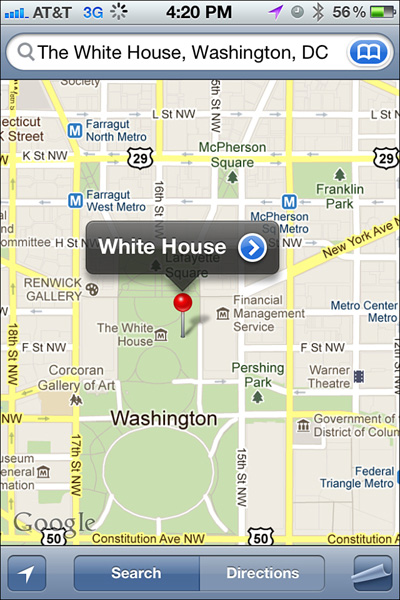
Figure 12.2 Maps showcase the location you entered with a pushpin.
7. Tap the banner displayed above the pushpin to view the Info screen related to that address (shown in Figure 12.3). To exit the Info screen and return to the map, tap the left-pointing arrow icon in the upper-left corner of the Info screen.
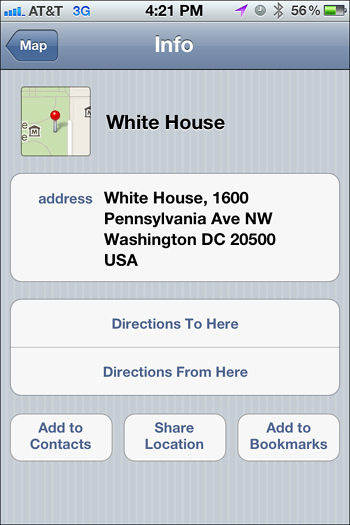
Figure 12.3 After Maps finds an address, access an Info screen for that location by tapping the banner displayed above the pushpin.
8. From the main map screen, tap the Map View icon to change the map view you’re looking at.
9. Also while looking at the map screen, double-tap any location on the map itself (or use a reverse-pinch finger motion) to zoom in. Then, double-tap the screen again (or use a pinch finger motion) to zoom out again.
What You Can Do from the Info Screen
When you tap the banner displayed above a virtual pushpin that the Maps app places on map (representing a location you looked up), an Info screen for that location appears.
Displayed within the Info screen (refer to Figure 12.3) is the complete address for that location. Below the address are the Directions to Here and Directions from Here icons. Tap either of these icons to plot turn-by-turn directions either to or from the location described within the Info screen.
Near the bottom of the Info screen are three additional command icons, labeled Add to Contacts, Share Location, and Add to Bookmarks.
Tap the Add to Contacts icon to create a new contact entry within your Contacts database for the location featured within the Info screen. You are able then to create a new contact or merge the information into an existing contact by tapping the Create New Contact or Add to Existing Contact icons that appear.
Then, edit or modify the contact entry before storing it within the Contacts app as part of your Contacts database.
Choose the Share Location option to email, text message, or tweet the location to others within the Maps app. Or tap the Add to Bookmarks option to add this address to the Maps app’s Bookmark list, which is a personalized listing of frequently accessed addresses or locations.
From the Search field displayed at the top of the main Maps screen, if you tap the Bookmarks icon, a separate Bookmarks screen appears. This screen displays the addresses you’ve previously saved as bookmarked locations.
At the bottom of the Bookmarks screen, you’ll also discover the Recents and Contacts icons. Recents displays a list of all addresses you’ve previously looked up using maps (in reverse chronological order), and the Contacts app gives you access to the Contacts app’s All Contacts listing so that you can quickly find a Contacts entry stored within your iPhone and use a listed address in conjunction with Maps.
Obtaining Detailed Directions Between Two Locations
After tapping the Directions icon displayed at the bottom of the Maps screen, you are prompted to enter two addresses to obtain detailed directions between those locations. One new feature of iOS 5 is that the Maps app can automatically plot three separate routes you can follow to your destination.
When you tap the Directions icon, at the top of the screen, five command icons appear, including
• Cancel—Remove the icons displayed at the top of the screen.
• Car—Tap the car-shaped icon to obtain driving directions between the two addresses.
• Bus—Tap the bus-shaped icon to obtain the best route to take using public transportation (if applicable) in that area.
• Walking—Tap the person-shaped icon to obtain the best route to take when walking between the two addresses.
• Route—After selecting your mode of transportation and entering a Start and End address, tap this icon (displayed near the top-right corner of the screen) to plot your route.
![]() LET ME TRY IT
LET ME TRY IT
Obtaining Directions Between Two Locations
Let’s suppose you’re visiting Washington, DC, and you’re exploring the city on foot. If you want to walk between the White House and the Lincoln Memorial, use the Maps app to help you plot the best route.
To plot directions between two locations using the Maps app, follow these steps:
1. Launch the Maps app.
2. Tap the Directions icon displayed at the bottom of the screen.
3. At the top of the screen, tap the icon appropriate to your mode of transportation (the car, bus, or person icon). For this example, tap the person icon (because you’re trying to obtain walking directions).
4. Tap the Start field to enter a starting location. By default, the Maps app uses your Current Location. If where you are right now is your starting location, skip this step. Or for this example, type The White House, Washington, DC as your starting location.
5. Tap the End field and enter your desired destination. For this example, type Lincoln Memorial, Washington, DC (shown in Figure 12.4).
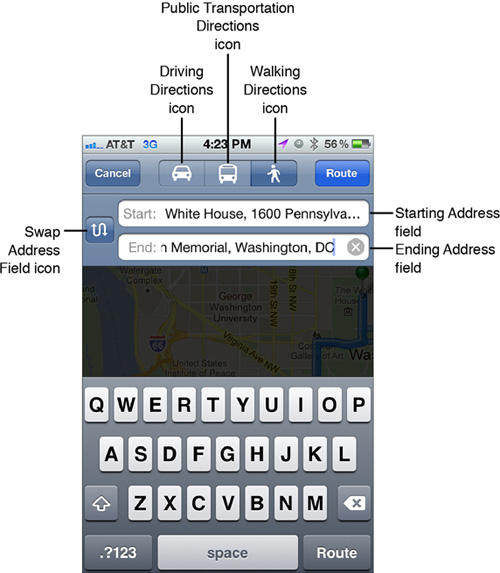
Figure 12.4 Enter the Start and End address between two locations to obtain step-by-step directions.
The squiggly shaped arrow icon displayed to the left of the Start and End fields enables you to switch the contents of these fields. When you reach your destination, return to this screen (by tapping the Edit icon), tap this squiggly shaped icon, and then tap the Route icon again to obtain new directions that will get you back to your original location.
6. Tap the Route icon (displayed near the upper-right corner of the screen) to plot your route on the map (shown in Figure 12.5). Your starting location is shown with a green pushpin. Your ending location is depicted with a red pushpin. Your current location is shown with a flashing blue dot, and the recommended route is shown with a solid blue line.
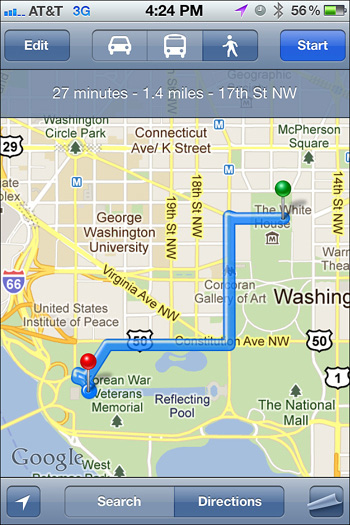
Figure 12.5 When you select a walking route, just one route between locations is displayed on a map on your iPhone’s screen.
In most situations (when driving directions are requested), the Maps app displays a second and third alternate route to your destination (shown in Figure 12.6). On the map, these routes are highlighted using light blue lines and labeled Route 2 and Route 3. Tap either of these Route tags to make it your primary route.
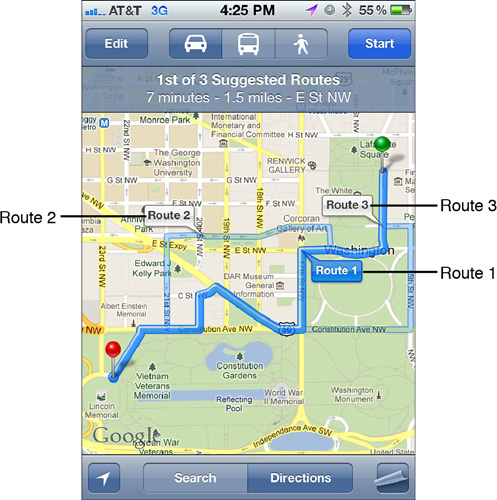
Figure 12.6 Notice that for driving routes, you may be provided with two alternative routes (labeled Route 2 and Route 3).
For example, if you have traffic conditions overlaid on the map, you may discover an alternate route has less traffic, simply by looking at the map.
7. Just below the command icons at the top of the screen, the anticipated travel time and distance between locations are displayed.
8. Tap the Start icon (which is now displayed near the top-right corner of the screen) to begin receiving real-time, turn-by-turn directions to your destination (shown in Figure 12.7).
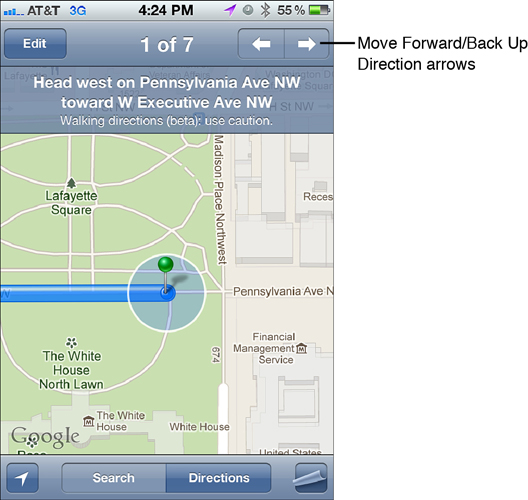
Figure 12.7 You are provided with detailed turn-by-turn directions. Tap the right-pointing arrow to proceed to the next turn directive.
9. Tap the left- or right-pointing arrow icon displayed near the upper-right corner of the screen to move forward or take a step backward in the directions. On the main screen, a zoomed-in map of that step is displayed, with your current location flashing as a blue dot. To update this information at any time, tap the Location Services icon displayed near the lower-left corner of the screen.
10. As you’re following a route, tap the Edit icon (displayed near the upper-left corner of the screen) to modify your Start or End location.
When filling in the Start or End field, you can also enter a well-known point of interest (as opposed to a business name), such as a major airport or landmark (say, the White House), followed by a city and state (separated by commas).
 SHOW ME Media 12.1—Choose from Three Route Options When Obtaining Directions Between Two Locations
Access this video file through your registered Web edition at my.safaribooksonline.com/9780132954310/media.
Choosing Your Favorite Map View
Depending on what you’re using the Maps app for, you can easily switch between map-viewing perspectives by tapping the Map View icon and then selecting between a Standard, Satellite, or Hybrid map view.
SHOW ME Media 12.2—Demonstration of the Different Map Views
Access this video file through your registered Web edition at my.safaribooksonline.com/9780132954310/media.
The Standard Maps View
The Standard view (shown in Figure 12.8) offered by Maps looks like a traditional map, with roadways, landmarks, and other topography listed. The maps displayed utilize Google Maps and are extremely detailed and accurate.
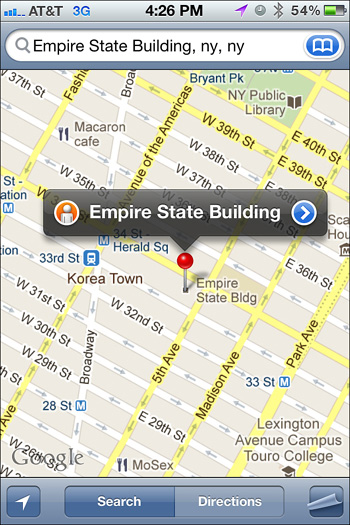
Figure 12.8 The Standard map view looks like a traditional printed map, except that it’s interactive. Shown here is the location of the Empire State Building in New York City.
While looking at any map view, tap the Map View icon and then tap the Show Traffic icon to overlay color-coded traffic conditions on the major roads in the area. To remove the traffic conditions, tap the Hide Traffic icon. This feature works in most cities and for major roadways in metropolitan areas.
 TELL ME MORE Media 12.3—Using the Show Traffic Option Within Maps
Access this audio file through your registered Web edition at my.safaribooksonline.com/9780132954310/media.
The Satellite Maps View
The Satellite viewing perspective (shown in Figure 12.9) utilizes photos taken from satellites orbiting in space. These are not real-time images, but they are extremely detailed. Using this perspective, you get an overhead view of a location. Use the zoom in (reverse pinch) finger gesture on these maps to see a lot of extra detail.
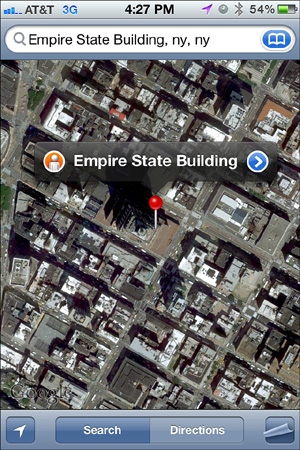
Figure 12.9 The Satellite Maps view. Be sure to zoom in when using this view to see up-close detail. Street names and other details are not labeled.
Regardless of what you’re viewing within the Maps app, tap the Location Services icon displayed at the bottom of the screen to update or switch to your current location.
The Hybrid Maps View
By combining the Standard and Satellite views into one map, the Hybrid view (shown in Figure 12.10) offers the most detail.
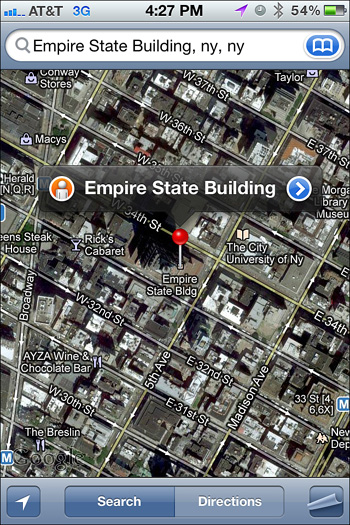
Figure 12.10 The Hybrid view offers a lot of detail. Notice here that street names are labeled within the map.
What You Should Know About Location Services
iOS 5 offers a user-controllable feature called Location Services. This feature allows you to turn on or off the GPS (location pinpointing) feature built into your iPhone, or pick and choose which specific apps can gain access to your location information (and potentially share it with others).
TELL ME MORE Media 12.4—Using Maps in Conjunction with Other Apps
Access this audio file through your registered Web edition at my.safaribooksonline.com/9780132954310/media.
Obviously, the Maps app uses your exact location information to pinpoint where you are and to help you get to wherever you’re headed. Other apps also utilize your location information and in some cases share it with others.
For example, if you have Location Services turned on and working with the Camera and Photos apps, whenever you snap a photo with your iPhone, the exact location where the photo was taken is recorded and becomes part of the photo’s digital file. That information can be displayed when people view your photos and utilized by the Photos app to showcase a map of where your photos were taken (using the Places feature).
![]() To learn more about the Camera and Photos apps, see “Taking and Viewing Photos and Videos,” (Chapter 13).
To learn more about the Camera and Photos apps, see “Taking and Viewing Photos and Videos,” (Chapter 13).
Likewise, when you use the official Twitter or Facebook apps, as you’re composing a tweet (or using the Check-In feature of Facebook), the app automatically attaches your exact location to that outgoing message, which will be seen by all your followers or friends.
![]() To learn more about using the official Twitter and Facebook apps, see “Online Social Networking Sites from Your iPhone,” (Chapter 16).
To learn more about using the official Twitter and Facebook apps, see “Online Social Networking Sites from Your iPhone,” (Chapter 16).
Or, if you’re using the new Find My Friends app (available free from the App Store), you can track the exact location of your friends and allow them to see your exact whereabouts and follow your movements in real time.
![]() To learn more about the new Find My Friends app, see “10 ‘Must-Have’ iPhone Apps Available from the App Store,” (Chapter 15).
To learn more about the new Find My Friends app, see “10 ‘Must-Have’ iPhone Apps Available from the App Store,” (Chapter 15).
The Location Services feature of your iPhone is also utilized by the Compass and Find My iPhone features, the Weather app, and a wide range of other apps. So, if you’re concerned about your privacy, you need to customize how your iPhone utilizes the Location Services feature. You do this from the Settings app.
One new feature of iOS 5 is that any time your iPhone pinpoints your exact location, a tiny, arrow-shaped Location Services icon can be displayed near the upper-right corner of the screen.
To turn on this feature, launch Settings, and from the main Settings menu, tap the Location Services option. Scroll down to the bottom of the Location Services menu screen and tap System Services. Then scroll down to the bottom of the System Services screen and tap the virtual switch associated with the Status Bar icon. Turn the switch to the on position.
Now, whenever the tiny Location Services icon turns purple, you know your iPhone is somehow utilizing (and potentially sharing) your location information. When the icon is gray, you know that Location Services utilized your location information within the last 24 hours.
You’ll probably want to keep the master switch for Location Services turned on. However, be sure to pick and choose which apps can utilize your location information.
![]() LET ME TRY IT
LET ME TRY IT
Customizing Location Services on Your iPhone
To customize the Location Services feature on your iPhone, follow these steps:
1. Launch the Settings app from the Home screen.
2. From the main Settings menu, tap the Location Services option.
3. At the top of the Location Services screen (shown in Figure 12.11), the master switch for turning on or off Location Service on your iPhone is displayed. To turn off this feature, tap the virtual switch associated with the Location Services option and change the switch to the off position.
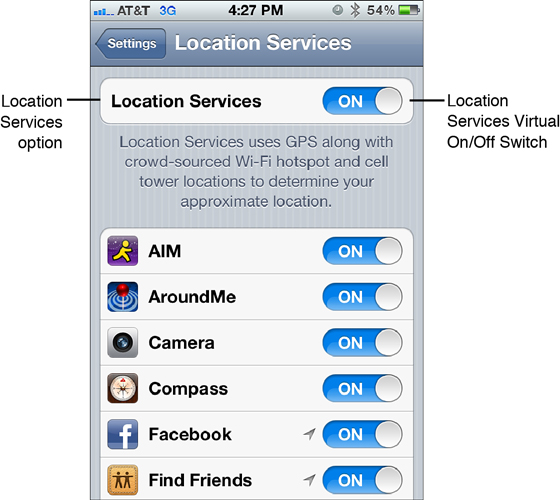
Figure 12.11 Access this Location Services menu screen within the Settings app.
4. To leave the master Location Services switch turned on but to turn on or off the Location Services access from specific apps, make sure the virtual switch associated with the master Location Services option is turned on, but then scroll down on the Location Services screen to the listing of apps that utilize Location Services.
5. One at a time, determine which apps you want to be able to access Location Services by turning the virtual switch associated with that app’s listing to the on position.
6. Scroll down to the bottom of the Location Services menu screen and tap the System Services option. A handful of additional options, each associated with a virtual on/off switch, is displayed. These options relate to specific iPhone functions that utilize your location information. The default for these options is turned on. However, you have the option to turn them off manually.