Chapter 4
Automating Storage
In this chapter, you will learn to:
- Set Up the Storage
- Setting Up Different Types of Storage
- Configuring an iSCSI Target
- Configuring the iSCSI Binding
- Rescanning for New Storage
- Adding Datastores
- Leveraging Get-EsxCli for Storage-Related Functions
- Setting a Multipath Policy
- Configuring Storage I/O Control
- Datastore Clusters
- Storage Policies
- Adding Tags to Datastores
- Creating Storage Policy Rules and Rule Sets
- Creating and Assigning Storage Policies
- vSphere APIs for I/O Filtering
- VSAN
- Configuration
- Disk Groups and Disks
- Reporting
- Maintenance Mode
- Storage Policy
Storage is another of the critical components of a virtual environment. You need storage to be able to provision virtual machines (VMs) for applications. Whether you’re deploying a new cluster with new storage, or maintaining and upgrading existing storage, automation can come to your rescue to help you save time and maintain consistency of configuration. We will also take a look at some of the advanced storage features in vSphere, such as I/O control, I/O filters, and storage policies, as well as Virtual SAN—VMware’s software-defined storage for vSphere.
Set Up the Storage
From what you learned in Chapter 1, “Automating vCenter Server Deployment and Configuration,” Chapter 2, “Automating vSphere Hypervisor Deployment and Configuration,” and Chapter 3, “Automating Network,” you will have your vCenter Server set up and your ESXi hosts added to vCenter and configured with network connections. You are now ready to be connected to storage.
Setting Up Different Types of Storage
vSphere hosts can use four types of storage to host VMs: local disk, Fibre Channel or iSCSI storage area networks (SANs), and Network File System (NFS) storage.
- Local Storage Local storage is the easiest type to get up and running. Simply slot the drives into the local ESXi host and configure local hardware RAID arrays. The storage will then be available to the host. However, advanced virtualization features, such as High Availability (HA), will not be available because they require shared storage among multiple ESXi hosts.
- Fibre Channel SAN Fibre Channel storage is connected to the ESXi host via host bus adapters (HBAs) inside the ESXi host and fiber cables via a switch to the storage fabric.
- iSCSI SAN iSCSI storage is connected to the ESXi host either via a hardware HBA inside the ESXi host or via a built-in software iSCSI adapter to ESXi. The software adapter is typically allocated dedicated standard network adapters to carry the storage traffic over the IP network. The ESXi software iSCSI adapter can be configured with PowerCLI.
- NFS Storage Finally, NFS storage can be connected to the ESXi host via the built-in NFS client to ESXi. Both iSCSI and NFS storage require at least one VMkernel port group; these are covered in the section “Adding VMkernel Port Groups” in Chapter 3.
It is possible to view the available HBAs inside a host via the Get-VMHostHba cmdlet. The following example shows the available HBAs inside an ESXi host with a local Serial Advanced Technology Attachment (SATA) controller, a Fibre Channel HBA, and a software iSCSI adapter:
Get-VMHost virtuesx02* | Get-VMHostHba

Device     Type         Model                          Status
------     ----         -----                          ------
vmhba0     Block        31xESB/632xESB/3100 Chipset... Unknown
vmhba2     FibreChannel LPe12000 8Gb Fibre Channel ... Unknown
vmhba3     FibreChannel LPe12000 8Gb Fibre Channel ... Unknown
vmhba32    Block        31xESB/632xESB/3100 Chipset... Unknown
vmhba36    IScsi        iSCSI Software Adapter         Online
Configuring an iSCSI Target
Neither local SCSI nor Fibre Channel requires any automation configuration from PowerCLI at the adapter level, but you can automate the configuration of the iSCSI connection. If you don’t have a hardware iSCSI HBA and are planning to use the built-in software iSCSI adapter, you must first enable it; it is disabled by default. To enable this adapter for all hosts in Cluster01, use the code in Listing 4-1.
Listing 4-1: Enabling an iSCSI software adapter for all hosts in a cluster
Get-Cluster Cluster01 | Get-VMHost | Get-VMHostStorage |
Set-VMHostStorage -SoftwareIScsiEnabled:$true
Your next task is to create an iSCSI target for the adapter on each host using the New-IScsiHbaTarget cmdlet. This cmdlet has many parameters, but the only required one is the address of the iSCSI target. If your organization requires the Challenge Handshake Authentication Protocol (CHAP), you will need to set specific parameters from the eight CHAP-related parameters available. You might also have to change the network port from the default of 3260 and, if you use a static target, give that target a name.
In Listing 4-2, you will create a dynamic iSCSI target with an IP address of 172.20.0.10 and configure CHAP settings for Type, Name, and Password. Note that for each host returned in the cluster, you use the Get-VMHostHba cmdlet with the Type parameter and iSCSI value to ensure that you configure the iSCSI adapter.
Listing 4-2: Adding an iSCSI target
Get-Cluster Cluster01 | Get-VMHost | ForEach-Object {$_ | `
 Get-VMHostHba -Type iSCSI | New-IScsiHbaTarget `
 -Address 172.20.0.10 -ChapType Preferred -ChapName iSCSI1 `
 -ChapPassword Password0115}
Configuring the iSCSI Binding
The iSCSI adapter needs to be bound to at least one VMkernel port that is to be used for iSCSI traffic—typically two would be used for redundancy. Chapter 3 demonstrates how to add a VMkernel port for iSCSI.
As of the 6 release, PowerCLI does not contain cmdlets for managing iSCSI binding. The functions Get-VMHostiSCSIBinding and Set-VMHostiSCSIBinding in Listing 4-3 and Listing 4-4 make use of PowerCLI’s ability to take the functionality of vSphere’s command-line tool esxcli and use it for this purpose.
Listing 4-3: Get-VMHostiSCSIBinding
function Get-VMHostiSCSIBinding {
<#
.SYNOPSIS
Function to get the iSCSI Binding of a VMHost.
.DESCRIPTION
Function to get the iSCSI Binding of a VMHost.
.PARAMETER VMHost
VMHost to get iSCSI Binding for.
.PARAMETER HBA
HBA to use for iSCSI
.INPUTS
String.
System.Management.Automation.PSObject.
.OUTPUTS
VMware.VimAutomation.ViCore.Impl.V1.EsxCli.EsxCliObjectImpl.
.EXAMPLE
Get-VMHostiSCSIBinding -VMHost ESXi01 -HBA "vmhba32"
.EXAMPLE
Get-VMHost ESXi01,ESXi02 |
 Get-VMHostiSCSIBinding -HBA "vmhba32"
#>
[CmdletBinding()][OutputType('VMware.VimAutomation.ViCore.Impl.`
 V1.EsxCli.EsxCliObjectImpl')]

    Param
    (

    [parameter(Mandatory=$true,ValueFromPipeline=$true)]
    [ValidateNotNullOrEmpty()]
    [PSObject[]]$VMHost,


    [parameter(Mandatory=$true,ValueFromPipeline=$false)]
    [ValidateNotNullOrEmpty()]
    [String]$HBA
    )

begin {


}

process {

foreach ($ESXiHost in $VMHost){

    try {

        if ($ESXiHost.GetType().Name -eq "string"){

        try {

            $ESXiHost = Get-VMHost $ESXiHost -ErrorAction Stop
        }
        catch [Exception]{
            Write-Warning "VMHost $ESXiHost does not exist"
        }
        }

        elseif ($ESXiHost -isnot [VMware.VimAutomation.`
               ViCore.Impl.V1.Inventory.VMHostImpl]){
            Write-Warning "You did not pass a string or a `
             VMHost object"
             Return
        }

        # --- Check for the iSCSI HBA
        try {

           $iSCSIHBA = $ESXiHost |
            Get-VMHostHba -Device $HBA -Type iSCSI `
            -ErrorAction Stop
        }
        catch [Exception]{
          Write-Warning "Specified iSCSI HBA does not exist `
           for $ESXIHost"
          Return
        }

        # --- Set the iSCSI Binding via ESXCli
        Write-Verbose "Getting iSCSI Binding for $ESXiHost"
        $ESXCli = Get-EsxCli -VMHost $ESXiHost

        $ESXCli.iscsi.networkportal.list($HBA)
    }
catch [Exception]{

     throw "Unable to get iSCSI Binding config"
}
}
}
end {

}
}
Listing 4-4: Set-VMHostiSCSIBinding
function Set-VMHostiSCSIBinding {
<#
.SYNOPSIS
Function to set the iSCSI Binding of a VMHost.
.DESCRIPTION
Function to set the iSCSI Binding of a VMHost.
.PARAMETER VMHost
VMHost to configure iSCSI Binding for.
.PARAMETER HBA
HBA to use for iSCSI
.PARAMETER VMKernel
VMKernel to bind to
.PARAMETER Rescan
Perform an HBA and VMFS rescan following the changes
.INPUTS
String.
System.Management.Automation.PSObject.
.OUTPUTS
VMware.VimAutomation.ViCore.Impl.V1.EsxCli.EsxCliObjectImpl.
.EXAMPLE
Set-VMHostiSCSIBinding -HBA "vmhba32" -VMKernel "vmk1" `
 -VMHost ESXi01 -Rescan
.EXAMPLE
Get-VMHost ESXi01,ESXi02 |
 Set-VMHostiSCSIBinding -HBA "vmhba32" -VMKernel "vmk1"
#>
[CmdletBinding(SupportsShouldProcess,ConfirmImpact="High")]`
[OutputType('VMware.VimAutomation.ViCore.Impl.V1.EsxCli.`
EsxCliObjectImpl')]

    Param
    (

    [parameter(Mandatory=$true,ValueFromPipeline=$true)]
    [ValidateNotNullOrEmpty()]
    [PSObject[]]$VMHost,

    [parameter(Mandatory=$true,ValueFromPipeline=$false)]
    [ValidateNotNullOrEmpty()]
    [String]$HBA,

    [parameter(Mandatory=$true,ValueFromPipeline=$false)]
    [ValidateNotNullOrEmpty()]
    [String]$VMKernel,

    [parameter(Mandatory=$false,ValueFromPipeline=$false)]
    [Switch]$Rescan
    )

begin {

}

process {

    foreach ($ESXiHost in $VMHost){
     try {

        if ($ESXiHost.GetType().Name -eq "string"){

        try {
            $ESXiHost = Get-VMHost $ESXiHost -ErrorAction Stop
        }
        catch [Exception]{
          $ErrorText = "VMHost $ESXiHost does not exist"
          throw
        }
        }

        elseif ($ESXiHost -isnot `
         [VMware.VimAutomation.ViCore.Impl.V1.Inventory.`
         VMHostImpl]){
            $ErrorText = "You did not pass a string or a `
              VMHost object"
            throw
        }

        # --- Check for the iSCSI HBA
        try {

           $iSCSIHBA = $ESXiHost |
           Get-VMHostHba -Device $HBA -Type iSCSI -ErrorAction Stop
        }
        catch [Exception]{
           $ErrorText = "Specified iSCSI HBA does not exist`
           for $ESXiHost"
           throw
        }

        # --- Check for the VMKernel
        try {

           $VMKernelPort = $ESXiHost |
            Get-VMHostNetworkAdapter -Name $VMKernel -VMKernel `
            -ErrorAction Stop
        }
        catch [Exception]{
           $ErrorText = "Specified VMKernel does not exist`
           For $ESXiHost"
           throw
        }

        # --- Set the iSCSI Binding via ESXCli
        try{

        if ($PSCmdlet.ShouldProcess($ESXiHost)){

        Write-Verbose "Setting iSCSI Binding for $ESXiHost"
        $ESXCli = Get-EsxCli -VMHost $ESXiHost

        $ESXCli.iscsi.networkportal.add($iSCSIHBA.Device, `
         $false, $VMKernel)

        Write-Verbose "Successfully set iSCSI Binding for `
         $ESXiHost"

        $iSCSIBindingOutput = $ESXCli.iscsi.networkportal.list() |
        Where-Object {$_.Adapter -eq $iSCSIHBA.Device -and `
        $_.vmknic -eq $VMKernel}
        }
        }
        catch [Exception]{

        $ErrorText = "Unable to set iSCSI Binding`
        for $ESXiHost"
        throw
        }
        # --- Rescan HBA and VMFS if requested
        try {

        if ($PSBoundParameters.ContainsKey('Rescan')){

          Write-Verbose "Rescanning HBAs and VMFS for $ESXiHost"
          $ESXiHost |
          Get-VMHostStorage -RescanAllHba -RescanVmfs `
          -ErrorAction Stop | Out-Null
        }
        }
        catch [Exception]{

        $ErrorText = "Unable to rescan HBA and VMFS `
        for $ESXiHost"
        throw
        }

        # --- Output the Successful Result
        Write-Output $iSCSIBindingOutput
    }
    catch [Exception]{
         if ($ErrorText){

         throw "Unable to set iSCSI Binding config for host `
         $($ESXiHost). Error is: $($ErrorText)"
         }
         else {

         throw "Unable to set iSCSI Binding config for host `
         $($ESXiHost)."
    }
}
}

end {

}
}
Using the Set-VMHostiSCSIBinding function from Listing 4-4, we can now automate the binding of the VMkernel ports to the iSCSI adapter. Listing 4-5 demonstrates how to do this for all hosts in Cluster 1—each host has been configured with two VMkernel ports for iSCSI, vmk2 and vmk3, and is using the software iSCSI adapter vmhba33. Preempting the next section on rescanning, we will take advantage of the -Rescan parameter of the Set-VMHostiSCSIBinding function so that the iSCSI adapter is rescanned at this point and iSCSI devices provisioned for us on the storage array are available for use.
Listing 4-5: Configuring iSCSI binding for all hosts in a cluster
Get-Cluster Cluster01 | Get-VMHost | ForEach-Object {$_ |
 Set-VMHostiSCSIBinding -HBA "vmhba33" -VMKernel "vmk2";
 $_ |  Set-VMHostiSCSIBinding -HBA "vmhba33" -VMKernel "vmk3" `
  -Rescan}
Rescanning for New Storage
Whatever the type of SCSI storage in use, a common administration task is the need to rescan the storage adapter when new storage has been provisioned. You do this either by hot-adding local disks or by providing a new logical unit number (LUN) from a Fibre Channel or iSCSI SAN. The ESXi host cannot see the newly available storage until a rescan task has been initiated on the adapter.
Prior to vSphere 4, rescanning was an onerous task in the vSphere Client. It involved navigating to the Configuration menu for the host and then moving to the Storage Adapters section and clicking the Rescan task. For a cluster with a number of hosts, this process could take a long time and was very tedious. In vSphere 4, VMware added a Rescan Storage menu item to the vSphere C# Client, which became available whenever you right-clicked a Cluster, Folder, or Datacenter object, and it is still present in the modern-day vSphere Web Client. Consequently, it’s become much easier to rescan storage for multiple hosts in the GUI. This functionality is also available from the Get-VMHostStorage PowerCLI cmdlet. An advantage of Get-VMHostStorage over the GUI client is that it is particularly useful for rescanning multiple specific clusters.
For example, the code in Listing 4-6 rescans for new storage for clusters 01 and 02.
Listing 4-6: Rescanning multiple clusters for new storage
Get-Cluster Cluster01, Cluster02 | Get-VMHost | `
  Get-VMHostStorage -RescanAllHba
Adding Datastores
Now that you have either filled your servers with some local disk drives, connected them to a Fibre Channel or iSCSI SAN, or set up an NFS server, you need to create some datastores that you can store your virtual machines on. To do this, use the New-Datastore PowerCLI cmdlet. (The New-Datastore cmdlet can be used to create datastores for any of the supported types of storage.)
The key to getting it right with this cmdlet is to understand the types of path that you must provide to New-Datastore. Paths vary based on the type of storage. The Get-ScsiLun cmdlet can prove useful in helping you identify the correct path for each type.
Local Storage
Let’s look at creating a new datastore on local storage. By using the Get-ScsiLun cmdlet, you can identify the LUN provided by the local SCSI controller. In the next example, we used the fact that we have a Dell ESXi host with a PERC 6/i integrated RAID controller to identify the LUN it provides:
$LocalLun = Get-VMHost vesxi05* | Get-ScsiLun -LunType disk |
Where {$_.Model -match "PERC 6/i"}
To create the datastore on the LUN, you need to provide what is known as the canonical name to the New-Datastore cmdlet. The $LocalLun variable includes the CanonicalName property, which you can retrieve. It will look something like this:
$LocalLun.CanonicalName
naa.60022180a9de3f001114e40d06df11de
You can now create the datastore using the New-Datastore cmdlet (Listing 4-7).
Listing 4-7: Creating a datastore on local storage
$LocalLun = Get-VMHost vesxi05* | Get-ScsiLun -LunType disk |
Where {$_.Model -match "PERC 6/i"}
New-Datastore -Vmfs -VMHost vesxi05* -Name LocalStorage `
-Path $LocalLun.CanonicalNameSAN Storage
For Fibre Channel or iSCSI SAN storage, you can use the Get-ScsiLun cmdlet to identify LUNs made available from a particular vendor. For instance if you have storage from the Vendor NetApp, the Vendor property is helpfully tagged as Netapp:
$iSCSILuns = Get-VMHost vesxi05* | Get-ScsiLun -LunType disk |
 Where {$_.Vendor -match "Netapp"}
With SAN-based datastores, you will most likely be dealing with multiple datastores. Let’s say you need to add 10 new iSCSI datastores and a naming convention for datastores in the format iSCSI_01, iSCSI_02, and so on. For these datastores, we will start with iSCSI_10. Listing 4-8 provides the code to create them.
Listing 4-8: Creating multiple iSCSI datastores
$iSCSILuns = Get-VMHost vesxi05* | Get-ScsiLun -LunType disk |
 Where {$_.Vendor -match "Netapp"}
$DatastoreName = 'iSCSI_'
10..19 | Foreach {New-DataStore -VMHost vesxi05* -Vmfs –Path `
 $iSCSILuns[$_ - 10].CanonicalName -Name ($DatastoreName + $_)}
NFS Storage
Again, the key to adding a new NFS datastore is determining the path. Once you have the path, the other requirements are a name for the datastore and the NFS host you want to connect to. Let’s add eight new NFS datastores with the path /volume6/NFSxx on the NFS host 172.20.0.10 to all hosts in Cluster01 (Listing 4-9).
Listing 4-9: Creating multiple NFS datastores
$NamePrefix = 'NFS'
10..17 | Foreach {$DatastoreName = ($NamePrefix + $_); `
 Get-Cluster 'Cluster01' | Get-VMHost | New-Datastore -Nfs `
 -Name $DatastoreName -Path "/volume6/$DatastoreName" `
 -NfsHost 172.20.0.10}
NFS 4.1
In vSphere 6, VMware introduced support for the NFS 4.1 protocol. Prior to this release NFS 3 was the protocol used for working with NFS datastores. NFS 4.1 introduces new features such as authentication with Kerberos and multipathing. As of this writing, PowerCLI does not support creating an NFS 4.1 datastore. However, we can again make use of PowerCLI’s ability to take the functionality of vSphere’s command-line tool esxcli and enable the creation of an NFS 4.1 datastore in PowerShell. The New-NFS41Datastore function in Listing 4-10 will bring us that functionality.
Listing 4-10: New-NFS41Datastore
function New-NFS41Datastore {
<#
.SYNOPSIS
Creates a new NFS 4.1 datastore
.DESCRIPTION
Creates a new NFS 4.1 datastore based on the provided parameters
The following characters cannot be used in a datastore name: `
 slash (/), backslash (), and percent (%).
.PARAMETER VMHost
Specify a host where you want to create the new datastore.
.PARAMETER Name
Datastore Name
.PARAMETER NFSHost
NFS Host. Multiple can be supplied
.PARAMETER Path
The remote path of the NFS 4.1 mount point
.PARAMETER Security
Security flavors. Acceptable values are: [AUTH_SYS, SEC_KRB5]
.PARAMETER ReadOnly
If set, this flag will make the mount point be read-only
.PARAMETER Delay
Delay in seconds to wait post datastore creation before
querying vCenter for the created datastore
.INPUTS
VMware.VimAutomation.ViCore.Impl.V1.Inventory.VMHostImpl
System.String.
.OUTPUTS
VMware.VimAutomation.Types.Datastore
.EXAMPLE
New-NFS41Datastore -VMHost ESXi01 -Name NFS01 -NFSHost `
 172.0.20.10,172.0.20.11 -Path '/volume01/NFS01' `
 -Security SEC_KRB5
.EXAMPLE
Get-VMHost ESXi01 | New-NFS41Datastore -Name NFS01 -NFSHost`
 172.0.20.10,172.0.20.11 -Path '/volume01/NFS01' `
 -Security SEC_KRB5
#>
[CmdletBinding(SupportsShouldProcess,ConfirmImpact="Low")]`
[OutputType('VMware.VimAutomation.Types.Datastore')]

    Param
    (
    [parameter(Mandatory=$true,ValueFromPipeline=$true)]
    [ValidateNotNullOrEmpty()]
    [PSObject[]]$VMHost,

    [parameter(Mandatory=$true,ValueFromPipeline=$false)]
    [ValidateNotNullOrEmpty()]
    [String]$Name,

    [parameter(Mandatory=$true,ValueFromPipeline=$false)]
    [ValidateNotNullOrEmpty()]
    [String[]]$NFSHost,

    [parameter(Mandatory=$true,ValueFromPipeline=$false)]
    [ValidateNotNullOrEmpty()]
    [String]$Path,

    [parameter(Mandatory=$false,ValueFromPipeline=$false)]
    [ValidateSet("AUTH_SYS","SEC_KRB5")]
    [String]$Security,

    [parameter(Mandatory=$false,ValueFromPipeline=$false)]
    [Switch]$ReadOnly,

    [parameter(Mandatory=$false,ValueFromPipeline=$false)]
    [Int]$Delay = 10
    )

    begin {

        if (!($PSBoundParameters.ContainsKey('ReadOnly'))){

            $ReadOnly = $false
        }

        if ($NFSHost.Count -gt 1){

            $NFSHost = $NFSHost -join ","
        }
    }

    process {
        try {

            foreach ($ESXiHost in $VMHost){

                if ($ESXiHost.GetType().Name -eq "string"){

                    try {
                        $ESXiHost = Get-VMHost $ESXiHost `
                          -ErrorAction Stop
                    }
                    catch [Exception]{
                        $ErrorText = "VMHost $ESXiHost `
                         does not exist"
                        throw
                    }
                }

                elseif ($ESXiHost -isnot [VMware.VimAutomation.`
                 ViCore.Impl.V1.Inventory.VMHostImpl]){
                    $ErrorText = "You did not pass a string or`
                     a VMHost object"
                    throw
                }

                # --- Get ESXCli Object
                try {
                $ESXCli = Get-EsxCli -VMHost $ESXiHost `
                -ErrorAction Stop
                }
                catch [Exception]{

                $ErrorText = "Unable to get ESXCli object `
                for $ESXiHost"
                throw
                }

                # --- Create NFS 4.1 Datastore
# $SecurityValue = if ($PSBoundParameters.ContainsKey('Security')) {$Security} else {$null}
# $ESXCli.storage.nfs41.add($NFSHost,$ReadOnly,$SecurityValue,$Path,$Name) | Out-Null


                try {
                    if ($PSCmdlet.ShouldProcess($ESXiHost)){

                    $SecurityValue = if ($PSBoundParameters.`
                    ContainsKey('Security')) {$Security} else `
                    {$null}
                    $ESXCli.storage.nfs41.add($NFSHost,`
                    $ReadOnly,$SecurityValue,$Path,$Name) |
                    Out-Null

                    # --- Get the Datastore Object (takes a `
                    while for vCenter to register the datastore)
                    try {

                        Start-Sleep -Seconds $Delay
                        $Datastore = Get-Datastore -Name $Name `
                        -ErrorAction Stop
                        Write-Output $Datastore
                    }
                    catch [Exception]{

                        $ErrorText = "Unable to retrieve `
                        created Datastore"
                        throw
                    }
                    }
                }
                catch [Exception]{

                     $ErrorText = "Unable to create NFS 4.1 `
                     Datastore"
                     throw
                }
            }
        }
        catch [Exception]{

            if ($ErrorText){
                 throw "Unable to create NFS 4.1 Datastore `
                 for host $($ESXIHost). Error is: $($ErrorText)"
                }
                else {

                   throw "Unable to create NFS 4.1 Datastore `
                   for host $($ESXIHost)"
                }
        }
    }
    end {
    }
}
Typical use of the function would be similar to the following:
PS C:> Get-VMHost vsanesxi01* | New-NFS41Datastore -Name NFS26`
 -NFSHost '192.168.0.106,192.168.0.107' -Path 'NFS26'

Name                               FreeSpaceGB      CapacityGB
----                               -----------      ----------
NFS26                                   22.343          29.655
Once the NFS 4.1 datastore has been created, you can use the standard PowerCLI cmdlets Get-Datastore and Remove-Datastore to manage it, just as you would for other types of datastore. For example, let’s look at our NFS 4.1 datastore NFS26 and its type (NFS41), compared to the type (NFS) reported for other NFS 3 datastores.
PS C:> Get-Datastore NFS* | Format-Table Name,Type -AutoSize

Name  Type
----  ----
NFS12 NFS
NFS26 NFS41
NFS11 NFS
NFS01 NFS
NFS10 NFS
Creating Multiple Datastores from a Data Source
Of course, using PowerCLI you can automate the creation of single or multiple datastores. Sometimes, the data used to create a datastore is supplied to you by a data source. Let’s take a look at a couple of examples to show how you can save time and effort when the information to create the datastores is available from that source.
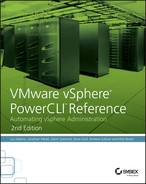
In the first example, your storage team has created some new LUNs on a Fibre Channel SAN and has supplied you with the necessary details via a CSV file. The CSV file contains the HostID, LunID, and Identifier for each LUN. You agreed earlier that it would be a good idea to include the HostIDs and LunIDs in the vSphere datastore naming convention. The CSV file looks like the one shown in Figure 4-1.
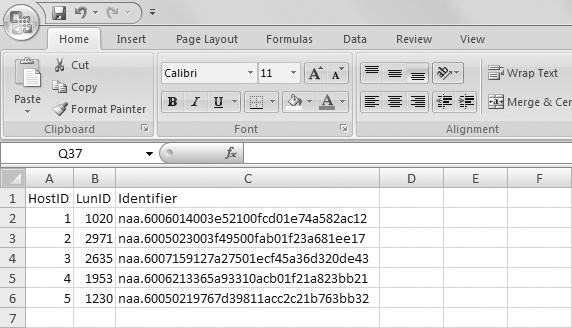
Figure 4-1: Fibre Channel LUN details
You can use the standard PowerShell cmdlet Import-CSV to access the data source and then feed that data into the New-Datastore cmdlet to create your datastores. You can also use the supplied HostIDs and LunIDs to build the name of the datastore each time, store that in the $Name variable, and use it with the Name parameter of New-Datastore (Listing 4-11).
Listing 4-11: Creating multiple Fibre Channel datastores from a data source
Import-Csv FibreLuns.csv | Foreach {$Name = 'Fibre_Host' + `
 $_.HostID + '_Lun' + $_.LunID; New-Datastore -Vmfs -VMHost `
 vesxi05* -Name $Name -Path $_.Identifier}
This code would create datastores named as follows:
Fibre_Host1_Lun1020
Fibre_Host2_Lun2971
Fibre_Host3_Lun2635
Fibre_Host4_Lun1953
Fibre_Host5_Lun1230
In this example, we used only 5 datastores, but you can use exactly the same code to create 20 or 50 datastores; the only item that will need to change is the data source. Similarly, you can take the same approach with NFS datastores to create multiple datastores across different NFS hosts from a data source. For example, take a look at the CSV data supplied by an NFS storage administrator in Figure 4-2.
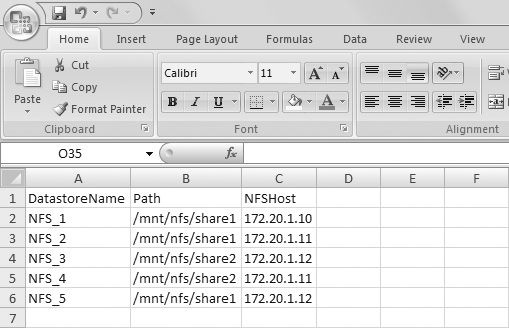
Figure 4-2: NFS storage details
To create these datastores, you can use code similar to Listing 4-12.
Listing 4-12: Creating multiple NFS datastores from a data source
Import-Csv NFSLuns.csv | Foreach {New-Datastore -NFS -Name `
$_.DatastoreName -VMHost vesxi05* -Path $_.Path -NFSHost $_.NFSHost}
You’ve seen that the process of creating datastores based on information from an accessible data source is straightforward, saves you time, and can be repeated across different types of storage.
Leveraging Get-EsxCli for Storage-Related Functions
It is possible to carry out a significant number of storage-related tasks with PowerCLI. However, should there be a task not covered out of the box, then it may well be feasible to use the extensive coverage supplied by the vSphere command-line tool esxcli via the Get-EsxCli PowerCLI cmdlet. The astute among you may well have noticed that this approach was used in the Get-VMHostiSCSIBinding, Set-VMHostiSCSIBinding, and New-NFS41Datastore functions in Listing 4-3, Listing 4-4, and Listing 4-10.
Any esxcli command is available via this approach, so let’s take a look at an example to see how to convert a well-known esxcli command to its PowerCLI equivalent.
Which VAAI Primitives Are Supported?
To query the vStorage API for Array Integration (VAAI) primitives for a LUN, the esxcli command would be as follows:
esxcli storage core device vaai status get -d naa.6001405b12d96bcdeb01d3309d878cdb To convert this to PowerCLI, we would do the following—that is, replace the spaces in the esxcli command with periods and supply a string to the Get method:
$EsxCli = Get-EsxCli -VMHost vesxi05.sunnydale.local
$EsxCli.storage.core.device.vaai.status.get('naa.6001405b12d96bcdeb01d3309d878cdb') Once the esxcli command has been converted, you might want to consider wrapping it up into a PowerShell function, similar to the Get-VMHostiSCSIBinding and Set-VMHostiSCSIBinding functions, in order to make it feel more like a native PowerCLI cmdlet is being used.
Setting a Multipath Policy
If you are using Fibre Channel SAN, it’s a good practice to have multiple HBA connections to the SAN whenever possible. With multiple HBA connections in place, should an active path to your SAN fail, a passive path is then made active so that storage traffic continues and the ESXi hosts remain connected to the storage for their VMs. Multipathing features in vSphere make it simple to use Active/Active multipathing instead of Active/Passive if the array supports it. This means that not only do you have resiliency in case of a failed path, you are also able to boost your storage performance by using multiple paths to the storage. The Native Multipathing Plug-in (NMP) module communicates with the Storage Array Type Plug-in (SATP) and the Path Selection Plug-in (PSP) to make these multipathing techniques work.
Assuming your storage array is supported for multipathing and you have chosen the correct SATP to use, you need to configure the PSP on each LUN where you wish to use multipathing. The PSP is set per LUN and can take three values: Fixed, MostRecentlyUsed, or RoundRobin—check your storage vendor documentation for which one to use. You can have a mixture of selections, so it’s a good idea to find out what is currently set. To do that, you can use the Get-ScsiLun cmdlet and select the MultipathPolicy property.
Get-VMHost vesxi05* | Get-ScsiLun | Select CanonicalName,
MultipathPolicy

CanonicalName                         MultipathPolicy
-------------                         ---------------
mpx.vmhba32:C0:T0:L0                            Fixed
naa.6006016091a934008059cb521a9bca22 MostRecentlyUsed
naa.6006016091a934003a8ec82f023a9bca22 MostRecentlyUsed
naa.6006016091a93400185f04866a9bca22 MostRecentlyUsed
Typically with Fibre Channel SANs, you will be working with many LUNs, not just three as in the previous example. Even making the change for the PSP to Round Robin via the GUI for three LUNs would soon become tedious, so being able to make this change via PowerCLI can save you a lot of time. By using the -MultipathPolicy parameter of the Set-ScsiLun cmdlet, you can make the change across all your Fibre Channel LUNs in one line of code. You can also use Where-Object to filter out any non–Fibre Channel LUNs, as we did in Listing 4-13.
Listing 4-13: Setting multipath policy for multiple LUNs
Get-VMHost vesxi05* | Get-ScsiLun | Where {$_.CanonicalName `
 -like 'naa.6006*'} | Set-ScsiLun -MultipathPolicy "RoundRobin"
Setting the Default PSP for an SATP
Once all LUNs have been updated with the correct PSP, you may wish to update the Default PSP for the SATP in use so that any additional LUNs added in the future will be set correctly at the time of creation.
We can achieve this via the Get-EsxCli method described earlier in the chapter. Listing 4-14 demonstrates how, for example, to set the default PSP for the SATP VMW_SATP_ALUA to Round Robin (VMW_PSP_RR).
Listing 4-14: Setting the default PSP for an SATP
$DefaultPSP = 'VMW_PSP_RR'
$SATP = 'VMW_SATP_ALUA'
$EsxCli = Get-EsxCli -VMHost vesxi05*
$EsxCli.storage.nmp.satp.set($null,$DefaultPSP,$SATP)
Configuring Storage I/O Control
Storage I/O Control (SIOC) uses the average latency of all virtual disks across a datastore to calculate latency. This average is then weighted by the number of input/output operations per second (IOPS). When this weighted latency goes above the configured threshold, SIOC limits throughput to the array by resizing the device queue. Therefore, SIOC only kicks in during times of congestion.
SIOC has seen significant changes since the first edition of this book. First, NFS datastores have been supported since vSphere 5.0; all types of storage protocol–based datastores can be enabled for SIOC. Next, PowerCLI version 5.0 added a StorageIOControlEnabled parameter to the Set-Datastore cmdlet. Consequently, the SIOC functions described in the first edition of this book are no longer required. SIOC can be enabled on a datastore without pre-checks for NFS and can be turned on with a simple one-line command (Listing 4-15).
Listing 4-15: Enabling SIOC on a datastore
Set-Datastore -Datastore iSCSI01 -StorageIOControlEnabled:$true |
 Select-Object Name, StorageIOControlEnabled
Datastore Clusters
Datastore clusters were introduced in vSphere 5 and enable the grouping of individual datastores into logical clusters to permit easier management. Coupled with the Storage Distributed Resource Scheduler (SDRS), datastores can now be managed by vCenter in a similar fashion to VMs with DRS. Based on available space and storage performance statistics, vCenter is able to migrate VMs around the datastore cluster to improve resource utilization.
PowerCLI introduced support for datastore clusters in version 5.1. Listing 4-16 demonstrates how to create a datastore cluster.
Listing 4-16: Creating a datastore cluster
New-DatastoreCluster -Name DatastoreCluster01 -Location Prod01Only the name and location can be specified at creation time. To configure some of the more interesting settings, such as SDRS and I/O metrics, you must use the Set-DataStoreCluster cmdlet, post-creation. Listing 4-17 demonstrates how to enable SDRS for Full Automation, enable I/O metrics with a 10-millisecond latency threshold, and set a Space Utilization Threshold value of 90%.
Listing 4-17: Enabling SDRS and I/O metrics on a datastore cluster
Set-DatastoreCluster -DatastoreCluster DatastoreCluster01 `
-SdrsAutomationLevel FullyAutomated -IOLoadBalanceEnabled:$true `
-IOLatencyThresholdMillisecond 10 `
-SpaceUtilizationThresholdPercent 90Now that the datastore cluster is configured as desired, you need to populate it with datastores. In Listing 4-18, we add three NFS datastores into DatastoreCluster01.
Listing 4-18: Adding datastores into a datastore cluster
$DatastoreCluster = Get-DatastoreCluster DatastoreCluster01

Get-Datastore NFS1[0-2] | Move-Datastore -Destination `
$DatastoreClusterDatastores in a datastore cluster have a Maintenance mode feature available, evacuating VMs from that datastore to others in the datastore cluster with no downtime. This is similar to putting an ESXi host into Maintenance mode and moving VMs to other ESXi hosts in the cluster (Listing 4-19).
Listing 4-19: Placing a datastore in Maintenance mode
Set-Datastore -Datastore NFS12 -MaintenanceMode:$trueStorage Policies
Storage Policy–Based Management (SPBM) enables vSphere administrators to better handle the demands of storage provisioning, capacity planning, and differing service levels. By allocating a VM to a storage policy rather than a specific datastore or datastore cluster, the micro-management nature of VM placement can be taken away and dealt with in a policy-based fashion. For example, allocate a VM to a Tier 1 storage policy and let the technology place the VM on a Tier 1 datastore. This is smarter than waiting for the administrator to find out which datastores are on Tier 1 storage and then manually allocating the VM to that datastore. Automation tools such as PowerCLI can take advantage of the SPBM API to take this a step further. The SPBM cmdlets are part of the VMware.VimAutomation.Storage PowerCLI module.
Adding Tags to Datastores
To be able to allocate datastore storage to a policy, you first need to distinguish your storage by one of the available methods—we will be using tags.
Listing 4-20 demonstrates how to retrieve an existing tag, Silver Storage, and assign it to each of the datastores in datastore cluster DatastoreCluster01.
Listing 4-20: Assigning a tag to all datastores in a datastore cluster
$SilverTag = Get-Tag 'Silver Storage'
Get-DatastoreCluster DatastoreCluster01 | Get-Datastore |
 New-TagAssignment -Tag $SilverTag
Creating Storage Policy Rules and Rule Sets
Before creating the storage policy, you must create at least one storage policy rule and rule set using an existing tag. (The tag will be used to identify which storage will be present in the policy.) First create the storage policy rule and then create the rule set for consumption by the storage policy. As part of the rule set creation, you will add the rule just created to the new rule set. In Listing 4-21, we create a rule and rule sets using a tag we named Silver Storage.
Listing 4-21: Creating a storage policy rule and rule set
$SilverTag = Get-Tag 'Silver Storage'
$SilverTagRule = New-SpbmRule -AnyOfTags $SilverTag
$SilverTagRuleSet = New-SpbmRuleSet -AllOfRules $SilverTagRule
Creating and Assigning Storage Policies
The prerequisites are now in place, and you can create a storage policy. In Listing 4-22, we create a policy named Silver Storage with a description of Storage Policy for Silver Storage that uses the rule set from Listing 4-21.
Listing 4-22: Creating a storage policy
$SilverTagStoragePolicy = New-SpbmStoragePolicy -Name `
 'Silver Storage' -Description `
 'Storage Policy for Silver Storage' `
 -AnyOfRuleSets $SilverTagRuleSet
To enable use of a policy, the cluster needs to be enabled for policies; then VMs must be assigned to a policy. In Listing 4-23, we enable policies for Cluster01 and assign the Silver Storage policy to any VMs named starting with Server*.
Listing 4-23: Enabling a cluster for storage policies and assigning a policy to VMs in the cluster
Get-SpbmEntityConfiguration -Cluster Cluster01 |
 Set-SpbmEntityConfiguration -SpbmEnabled:$true
Get-VM Server* | Set-SpbmEntityConfiguration `
 -StoragePolicy $SilverTagStoragePolicy
Typical output for the VMs will be similar to the following:
Entity    Storage Policy   Status          Time Of Check
------    --------------   ------          -------------
Server01  Silver Storage   nonCompliant    04/02/2015 14:35:33
Server02  Silver Storage   nonCompliant    04/02/2015 14:35:38
Server03  Silver Storage   compliant       04/02/2015 14:35:53
vSphere APIs for I/O Filtering
The vSphere APIs for I/O (VAIO) Filtering framework allows filters to process a VM’s I/O to its Virtual Machine Disk (VMDK) files. Filters are inside ESXi (and outside the VM) and are provided via a VIB file from a third party. VAIO can be used for access to a host cache or to provide replication features. There are three PowerCLI cmdlets that assist with VAIO management in the VMware.VimAutomation.Storage module, as shown here:
PS C:> Get-Command *vaio* -Module VMware.VimAutomation.Storage

CommandType     Name               ModuleName
-----------     ----               ----------
Cmdlet          Get-VAIOFilter     VMware.VimAutomation.Storage
Cmdlet          New-VAIOFilter     VMware.VimAutomation.Storage
Cmdlet Remove-VAIOFilter VMware.VimAutomation.StorageVSAN
Virtual SAN (VSAN), VMware’s software-defined storage for vSphere, combines local server disks in ESXi hosts in a vSphere cluster to create shared storage, which can be accessed by any host in the cluster. VSAN offers high performance via read/write caching using server-side flash and both capacity and performance scalability. You can scale out by adding more hosts to the cluster or scale up by adding more disks to the hosts. PowerCLI contains a number of VSAN cmdlets in the VMware.VimAutomation.Storage module. We will look at some examples of how to make use of these cmdlets, as well as show you how to use vSphere APIs to cover areas the cmdlets do not currently reach.
Configuration
VSAN has a number of networking requirements that must be met in order to be able to serve up the shared datastore. Some of these relate to physical networking and a couple must be considered for automation. vSphere Standard or Distributed Switches are supported with VSAN, so either type can be used by ESXi hosts configured for VSAN. For each network that you use for VSAN, you must configure a VMkernel port group with the VSAN port property activated.
Chapter 3 contains examples for creating VMkernel port groups. Listing 4-24 demonstrates how to create a VMkernel port group for VSAN.
Listing 4-24: Creating a VMkernel port group for VSAN
$vSwitch0 = Get-VirtualSwitch -VMHost vsanesxi01* `
 -Name "vSwitch0"
New-VMHostNetworkAdapter -VMHost vsanesxi01* -PortGroup "VSAN" `
 -VirtualSwitch $vSwitch0 -IP 172.20.0.60 `
 -SubnetMask 255.255.255.0 -VsanTrafficEnabled:$true
A minimum of three hosts for VSAN in the cluster must be configured correctly to meet the networking requirements, and they need to be contributing local disks; at least one solid-state drive (SSD) and one hard disk drive (HDD) are required.
Once all the requirements have been met, VSAN is enabled at the cluster level. In Listing 4-25, we enable VSAN for the VSAN01 cluster and set Disk Claim Mode to Automatic. With Disk Claim Mode set to Automatic, any disks added to hosts in the cluster will automatically be claimed by VSAN for consumption.
Listing 4-25: Enabling VSAN on a cluster
Get-Cluster 'VSAN01' | Set-Cluster -VsanEnabled:$true `
 -VsanDiskClaimMode Automatic -Confirm:$false
Disk Groups and Disks
Within VSAN, SSDs and HDDs are grouped together per ESXi host in disk groups. Depending on performance and capacity requirements, it may make sense to use multiple disk groups per ESXi host. There are six PowerCLI cmdlets to assist with management of disk groups and disks in the VMware.VimAutomation.Storage module, as shown here:
PS C:> Get-Command *VSAN* -Module VMware.VimAutomation.Storage

CommandType Name                 ModuleName
----------- ----                 ----------
Cmdlet      Get-VsanDisk         VMware.VimAutomation.Storage
Cmdlet      Get-VsanDiskGroup    VMware.VimAutomation.Storage
Cmdlet      New-VsanDisk         VMware.VimAutomation.Storage
Cmdlet      New-VsanDiskGroup    VMware.VimAutomation.Storage
Cmdlet      Remove-VsanDisk      VMware.VimAutomation.Storage
Cmdlet      Remove-VsanDiskGroup VMware.VimAutomation.Storage
Typically, the Get commands are used for reporting purposes. The New and Remove commands are most likely used for scenarios where VSAN disk operations are required outside of operations that are performed automatically in a cluster which has Disk Claim Mode set to Automatic. The New and Remove commands also are used for custom configurations when the Disk Claim Mode setting is Manual.
In Listing 4-26, we add a new HDD disk to an existing disk group. Note that the code is similar to the code we used to add local or SAN datastores earlier in the chapter. First, we must identify the canonical name of the disk to add to the VSAN disk group using the Get-SCSILun cmdlet.
Listing 4-26: Adding a disk to an existing VSAN disk group
Get-VMHost vsanesxi01* | Get-ScsiLun -LunType disk |
 Format-Table CanonicalName
$VSANDiskGroup = Get-VsanDiskGroup -VMHost vsanesxi01* |
 Where {$_.Name -eq 'Disk group `
 (02000000006000c29ca92f335c24818dc6a8c3577a566972747561)'}
New-VsanDisk -VsanDiskGroup $VSANDiskGroup -CanonicalName `
 naa.6000c293bb4ca806cb04bc81e069e61420
Conversely, in Listing 4-27 we remove a disk from an existing disk group. Note that this time we can retrieve the canonical name via the Get-VsanDisk cmdlet. Also note that we need to identify the correct disk group to remove the disk from by its (not particularly friendly) name.
Listing 4-27: Removing a disk from an existing VSAN disk group
$VSANDiskGroup = Get-VsanDiskGroup -VMHost vsanesxi01* |
 Where {$_.Name -eq 'Disk group `
 (02000000006000c29ca92f335c24818dc6a8c3577a566972747561)'}
$VSANDiskGroup | Get-VsanDisk | Format-Table CanonicalName
$VSANDiskGroup | Get-VsanDisk -CanonicalName `
 naa.6000c297b0328b760035b84a35d74e66 |
 Remove-VsanDisk -Confirm:$false
In Listing 4-28 we create a new VSAN disk group containing one SSD and one HDD. As usual, we will need the canonical name of both disks.
Listing 4-28: Creating a VSAN disk group
Get-VMHost vsanesxi01* | Get-ScsiLun -LunType disk |
  Format-Table CanonicalName
$VSANDiskGroup = New-VsanDiskGroup -VMHost vsanesxi01* `
 -SsdCanonicalName naa.6000c296622048072f516467bdfd1630 `
-DataDiskCanonicalName naa.6000c29c1f3e7a3428eef5cc4bfc40e081In Listing 4-29, we remove a VSAN disk group, which also will remove disks contained within the group.
Listing 4-29: Removing a VSAN disk group
Get-VsanDiskGroup -VMHost vsanesxi01* |
 Where {$_.Name -eq 'Disk group `
 (02000000006000c296622048072f516467bdfd1630566972747561)'} |
 Remove-VsanDiskGroup -Confirm:$false
Reporting
By exploring vSphere APIs, it is possible to go beyond the functionality currently shipping in the PowerCLI VMware.VimAutomation.Storage module and take it to the next level. Let’s look at two examples that demonstrate how to use the vsanSystem object for reporting purposes.
Get-VMHostVSANStatus in Listing 4-30 is a function that queries the status of an ESXi host configured for vSAN.
Listing 4-30: Get-VMHostVSANStatus
function Get-VMHostVSANStatus {
<#
.SYNOPSIS
Get the VSAN status of an ESXiHost
.DESCRIPTION
Get the VSAN status of an ESXiHost
.PARAMETER VMHost
A vSphere ESXi Host object
.INPUTS
VMware.VimAutomation.ViCore.Impl.V1.Inventory.VMHostImpl
.OUTPUTS
System.Management.Automation.PSObject.
.EXAMPLE
Get-VMHostVSANStatus -VMHost ESXi01,ESXi02
.EXAMPLE
Get-VMHost ESXi01,ESXi02 | Get-VMHostVSANStatus
#>
[CmdletBinding()]`
[OutputType('System.Management.Automation.PSObject')]

    Param
    (
    [parameter(Mandatory=$true,ValueFromPipeline=$true)]
    [ValidateNotNullOrEmpty()]
    [PSObject[]]$VMHost
    )

begin {

}

process {

try {

foreach ($ESXiHost in $VMHost){

    if ($ESXiHost.GetType().Name -eq "string"){

        try {
            $ESXiHost = Get-VMHost $ESXiHost -ErrorAction Stop
        }
        catch [Exception]{
            Write-Warning "VMHost $ESXiHost does not exist"
            continue
        }
    }

    elseif ($ESXiHost -isnot `
    [VMware.VimAutomation.ViCore.Impl.V1.Inventory.VMHostImpl]){
        Write-Warning "You did not pass a `
         string or a VMHost object"
        continue
    }

    # --- Get VSAN Host Status
    $VMHostView = Get-View $ESXiHost `
     -Property Name,ConfigManager.VsanSystem
    $VSANSystem = Get-View `
     -Id $VMHostView.ConfigManager.VsanSystem
    $VSANHostStatus = $VSANSystem.QueryHostStatus()
    # --- Create Output Object

    $Object = [pscustomobject]@{

        Name = $ESXiHost.Name
        Health = $VSANHostStatus.Health
        NodeState = $VSANHostStatus.NodeState.State
        NodeUUID = $VSANHostStatus.NodeUuid
        VSANClusterUUID = $VSANHostStatus.Uuid
    }

    Write-Output $Object
}
}
catch [Exception]{

    throw "Unable to get VMHost VSAN Status"
}
}
end {

}
}
Typical use of the function would be similar to the following example:
PS C:> Get-Cluster 'VSAN01' | Get-VMHost | Get-VMHostVSANStatus

Name            : vsanesxi01.sunnydale.local
Health          : healthy
NodeState       : agent
NodeUUID        : 54d240a0-c96a-13f9-2382-0050568aa2a0
VSANClusterUUID : 526c9db1-800a-052b-7dfd-8a7775ef0d01

Name            : vsanesxi02.sunnydale.local
Health          : healthy
NodeState       : backup
NodeUUID        : 54d241bb-8b28-19d6-b97c-0050568a354d
VSANClusterUUID : 526c9db1-800a-052b-7dfd-8a7775ef0d01

Name            : vsanesxi03.sunnydale.local
Health          : healthy
NodeState       : master
NodeUUID        : 54d24201-dd98-cc4e-52bb-0050568a9c59
VSANClusterUUID : 526c9db1-800a-052b-7dfd-8a7775ef0d01
Get-VMHostVSANDiskDetails in Listing 4-31 is a function that queries the status of the disks being used in an ESXi host configured for vSAN.
Listing 4-31: Get-VMHostVSANDiskDetails
function Get-VMHostVSANDiskDetails {
<#
.SYNOPSIS
Get VSAN Disk Details for an ESXi Host
.DESCRIPTION
Get VSAN Disk Details for an ESXi Host
.PARAMETER VMHost
A vSphere ESXi Host object
.INPUTS
VMware.VimAutomation.ViCore.Impl.V1.Inventory.VMHostImpl
.OUTPUTS
System.Management.Automation.PSObject.

.EXAMPLEPS>
Get-VMHostVSANDiskDetails -VMHost ESXi01,ESXi02

.EXAMPLE
PS> Get-VMHost ESXi01,ESXi02 | Get-VMHostVSANDiskDetails
#>
[CmdletBinding()]`
[OutputType('System.Management.Automation.PSObject')]

    Param
    (

    [parameter(Mandatory=$true,ValueFromPipeline=$true)]
    [ValidateNotNullOrEmpty()]
    [PSObject[]]$VMHost
    )

begin {
    # --- Import the VMware Storage Module
    try {

        if ( -not ( Get-Module VMware.VimAutomation.Storage ) ){

            Import-Module VMware.VimAutomation.Storage `
             -ErrorAction Stop | Out-Null
        }
        Write-Verbose "Successfully imported the VMware `
         Storage Module"
    }
    catch [Exception]{

        throw "Unable to import the VMware Storage Module"
    }

    $OutputObject = @()
}

process {


try {


foreach ($ESXiHost in $VMHost){

    if ($ESXiHost.GetType().Name -eq "string"){

        try {
            $ESXiHost = Get-VMHost $ESXiHost -ErrorAction Stop
        }
        catch [Exception]{
            Write-Warning "VMHost $ESXiHost does not exist"
            continue
        }
    }

    elseif ($ESXiHost -isnot `
    [VMware.VimAutomation.ViCore.Impl.V1.Inventory.VMHostImpl]){
        Write-Warning "You did not pass a `
         string or a VMHost object"
        continue
    }

    # --- Get VSAN Disks of Host
    $VSANDisks = Get-VsanDiskGroup -VMHost $ESXiHost |
     Get-VsanDisk


    # --- Get VSAN Disk Details
    $VMHostView = Get-View $ESXiHost `
     -Property Name,ConfigManager.VsanSystem
    $VSANSystem = Get-View `
     -Id $VMHostView.ConfigManager.VsanSystem

    foreach ($Disk in $VSANDisks){

        $VSANDisk = `
         $VSANSystem.QueryDisksForVsan($Disk.CanonicalName)

        # --- Create Output Object

        $Object = [pscustomobject]@{

            Host = $ESXiHost.Name
            DisplayName = $VSANDisk.Disk.DisplayName
            Vendor = $VSANDisk.Disk.Vendor
            Model = $VSANDisk.Disk.Model
            CanonicalName = $Disk.CanonicalName
            LocalDisk = $VSANDisk.Disk.LocalDisk
            SSD = $VSANDisk.Disk.Ssd
            State = $VSANDisk.State
            QueueDepth = $VSANDisk.Disk.QueueDepth
            Uuid = $VSANDisk.Disk.Uuid
            SerialNumber = $VSANDisk.Disk.SerialNumber
        $OutputObject +=Write-Output $Object
    }
}
}
catch [Exception]{

    throw "Unable to get VMHost VSAN Disk Details"
}
}
end {
    Write-Output $OutputObject
}
}
Typical use of the function would be similar to the next example (which is cut short for brevity):
PS C:> Get-Cluster 'VSAN01' | Get-VMHost |
 Get-VMHostVSANDiskDetails


Host         : vsanesxi01.sunnydale.local
DisplayName  : VMware Disk(naa.6000c29ca92f335c24818dc6a8c3577a)
Vendor       : VMware
Model        : Virtual disk
CanonicalName: naa.6000c29ca92f335c24818dc6a8c3577a
LocalDisk    : True
SSD          : True
State        : inUse
QueueDepth   : 32
Uuid         : 02000000006000c29ca92f335c24818dc6a8c3577a5669727
SerialNumber : unavailable

Host         : vsanesxi01.sunnydale.local
DisplayName  : VMware Disk(naa.6000c293bb4ca806cb04bc81e069e61420)
Vendor       : VMware
Model        : Virtual disk
CanonicalName: naa.6000c293bb4ca806cb04bc81e069e61420
LocalDisk    : True
SSD          : False
State        : inUse
QueueDepth   : 32
Uuid         : 02000000006000c293bb4ca806cb04bc81e069e614205669727
SerialNumber : unavailableMaintenance Mode
When placing an ESXi host belonging to a VSAN cluster into Maintenance mode, the vSphere Web Client offers some additional options for handling VSAN data: Ensure Accessibility, Full Data Migration, and No Data Migration (Figure 4-3).
Figure 4-3: VSAN Maintenance mode options
As of the current version of PowerCLI, these options are not available. The function Set-VMHostVSANMaintenanceMode in Listing 4-32 brings the three VSAN Maintenance mode options to the user.
Listing 4-32: Set-VMHostVSANMaintenanceMode
function Set-VMHostVSANMaintenanceMode {
<#
.SYNOPSIS
Put a VMHost in Maintenance Mode including VSAN options
.DESCRIPTION
Put a VMHost in Maintenance Mode including VSAN options
.PARAMETER VMHost
A vSphere ESXi Host object
.PARAMETER VSANMode
VSANMode Maintenance Mode options
Ensure = 'Ensure Accessibility', Evacuate = 'Full Data `
 Migration, NoAction = 'No data migration'
.PARAMETER PollSeconds
Amount of seconds to poll vCenter to check Maintenance Mode
task completion
.INPUTS
VMware.VimAutomation.ViCore.Impl.V1.Inventory.VMHostImpl
System.String
.OUTPUTS
VMware.VimAutomation.ViCore.Impl.V1.Inventory.VMHostImpl
.EXAMPLE
Set-VMHostVSANMaintenanceMode -VMHost ESXi01,ESXi02 `
-VSANMode Evacuate
.EXAMPLE
Get-VMHost ESXi01,ESXi02 | Set-VMHostVSANMaintenanceMode `
 -VSANMode NoAction
#>
[CmdletBinding(SupportsShouldProcess,ConfirmImpact="High")]`
[OutputType('VMware.VimAutomation.ViCore.Impl.V1.Inventory.VMHostImpl')]

    Param
    (
    [parameter(Mandatory=$true,ValueFromPipeline=$true)]
    [ValidateNotNullOrEmpty()]
    [PSObject[]]$VMHost,

    [parameter(Mandatory=$true,ValueFromPipeline=$false)]
    [ValidateSet("Ensure","Evacuate","NoAction")]
    [String]$VSANMode,

    [parameter(Mandatory=$false,ValueFromPipeline=$false)]
    [ValidateNotNullOrEmpty()]
    [Int]$PollSeconds = 5
    )

begin {

    switch ($VSANMode)
    {
        'NoAction' {$VSANModeValue = 0}
        'Ensure' {$VSANModeValue = 1}
        'Evacuate' {$VSANModeValue = 2}
    }
}

process {


try {

    foreach ($ESXiHost in $VMHost){

    if ($ESXiHost.GetType().Name -eq "string"){

        try {
            $ESXiHost = Get-VMHost $ESXiHost -ErrorAction Stop
        }
        catch [Exception]{
            Write-Warning "VMHost $ESXiHost does not exist"
            continue
        }
    }

    elseif ($ESXiHost -isnot `
    [VMware.VimAutomation.ViCore.Impl.V1.Inventory.VMHostImpl]){
        Write-Warning "You did not pass a `
        string or a VMHost object"
        continue
    }

    # --- Create Host Maintenance Spec
    try {

    $VsanHostDecommissionModeObjectAction = `
     New-Object VMware.Vim.VsanHostDecommissionModeObjectAction `
     -Property @{"value__" = $VSANModeValue}

    $VsanHostDecommissionMode = `
     New-Object VMware.Vim.VsanHostDecommissionMode `
     -Property @{"ObjectAction" = $VsanHostDecommissionModeObjectAction}

    $HostMaintenanceSpec = `
     New-Object VMware.Vim.HostMaintenanceSpec `
     -Property @{"VsanMode" = $VsanHostDecommissionMode}
    }
    catch [Exception]{

       $ErrorText = "Unable to create Host Maintenance Spec `
       for $ESXiHost"
       throw
    }

    # --- Put host in Maintenance Mode with VSAN Option
    try {
    if ($PSCmdlet.ShouldProcess($ESXiHost)){

    $MaintenanceModeTask = $ESXIHost.ExtensionData.`
     EnterMaintenanceMode_Task(0,$true,$HostMaintenanceSpec)
    $Task = Get-Task -Id $MaintenanceModeTask

    while (($Task.State -ne 'Success') -and `
     ($Task.State -ne 'Error'))
    {
        Write-Verbose "Wating for VSAN Maintenance Mode `
         task to complete ($($Task.PercentComplete)% done)"
        Start-Sleep -Seconds $PollSeconds

        $Task = Get-Task -Id $MaintenanceModeTask

    }
    if ($Task.State -eq 'Success') {

        Write-Verbose "VSAN Maintenance Mode task for $ESXiHost `
        succeeded! The timespan for the operation: `
        '$(New-TimeSpan -Start $Task.StartTime -End $Task.FinishTime)'"
        Get-VMHost $ESXiHost | Select-Object Name,ConnectionState
    }
    if ($Task.State -eq 'Error'){

            Write-Warning "VSAN Maintenance Mode `
             task for $ESXIHost failed"
    }
    }
    }
    catch [Exception]{

        $ErrorText = "VSAN Maintenance Mode task for `
        $ESXiHost failed"
        throw
    }
    }
}
catch [Exception]{

    if ($ErrorText){
        throw "Unable to set VMHost $($ESXIHost) into VSAN `
         Maintenance Mode. Error is: $($ErrorText)"
    }
    else {

        throw "Unable to set VMHost $($ESXIHost) into VSAN `
         Maintenance Mode"
    }
}
}
end {

}
}
Typical use would be similar to the following example:
PS C:> Get-VMHost vsanesxi01* |
 Set-VMHostVSANMaintenanceMode -VSANMode Evacuate
Storage Policy
Earlier in this chapter, we showed you how to create storage policies. With VSAN, you can create a storage policy using some of its capabilities. (We created vCenter tags that were used in the previous examples.) Listing 4-33 demonstrates how to create a storage policy using the VSAN capabilities VSAN.hostFailuresToTolerate and VSAN.cacheReservation and assign it to VMs with the wildcard Server*.
Listing 4-33: Creating a VSAN storage policy and assigning it to VMs
$Rule1 = New-SpbmRule -Capability (Get-SpbmCapability `
 -Name 'VSAN.hostFailuresToTolerate') -Value 1
$Rule2 = New-SpbmRule -Capability (Get-SpbmCapability `
 -Name 'VSAN.cacheReservation') -Value 10
$VSANRuleSet = New-SpbmRuleSet -AllOfRules $Rule1,$Rule2
$VSANStoragePolicy = New-SpbmStoragePolicy -Name `
 'VSAN Storage Policy 01' -Description 'VSAN Storage Policy 01'`
 -AnyOfRuleSets $VSANRuleSet
Get-VM Server* |
 Set-SpbmEntityConfiguration -StoragePolicy $VSANStoragePolicy