
4
Preprocessing Video and Audio
You have shot and edited your video, and now it’s time to compress, encode, and deliver it. But one more step is left before final encoding can begin. This step is called preprocessing, and it consists of a variety of optimizations you need to perform on the video and audio before you can hand them off to the encoder. These optimizations can include deinterlacing, inverse telecining, cropping, scaling, aspect ratio adjustments, noise reduction, brightness and color corrections, and audio adjustments.
Preprocessing of some sort is almost always necessary to get your video to look its best. The goals of preprocessing are to clean up any noise in the video and to optimize its basic elements for playback on the devices you are targeting (TVs, mobile phones, computers, and so on). Preprocessing is sometimes referred to as the “magic” part of compression because it takes a lot of practice to achieve the desired results. This is the most artistic and frequently misused part of the compression process. It’s easy to go overboard with the changes until you get a feel for how much you really need to do to your video and audio to optimize it for encoding.
Fortunately, preprocessing is a craft that can be learned, and practice will only make you better at it. Understanding why you preprocess video and audio and how the various types of optimization that occur at this stage affect your final product will help you make your preprocessing choices.
Spatial/Geometric Preprocessing
Whether it’s simply changing the frame size and aspect ratio to match the destination or reframing the video entirely, spatial preprocessing is one of the most common types of preprocessing you’ll encounter as a compressionist.
Cropping: Title and Action Safe Zones
Cropping is a way of identifying a specific region of the video to use in the compression, excluding the other areas of the source frame. Cropping can be used to change the aspect ratio of a wide-screen 16 × 9 video to the older 4 × 3 format, or it can be used to crop out unwanted picture areas at the edge of the frame.
Most TVs do not display the entire image that is transmitted. Instead, they are overscanned, meaning slightly larger than the viewable area of a consumer-grade television. This is done for several reasons, most of which culminate in needing to hide irregularities that exist in the edges of the video frames. Production people are aware of this and have created three regions of a video image that affect how they frame shots and incorporate graphic overlays: overscan, action safe, and title safe. Figure 4.1 will be familiar to anyone who has looked through a video camera viewfinder. It depicts the action- and title-safe areas that a camera operator needs to be conscious of when framing a shot.
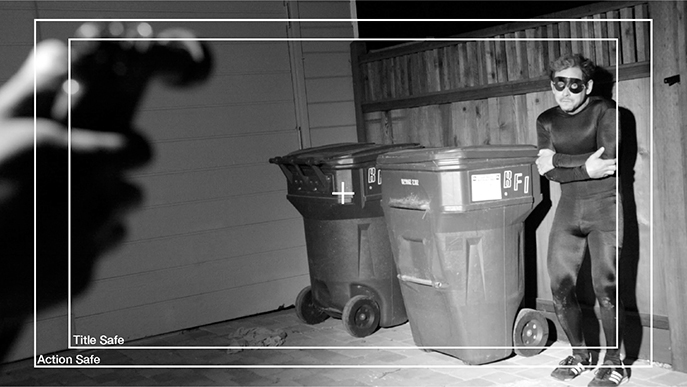
Figure 4.1 Compressionists need to be aware of the action- and title-safe regions of the frame and use them as a general guideline for cropping nonbroadcast content.
The outermost region of the video is known as the overscan region. This area may not appear on standard consumer TV screens, and it often contains the edge of the set or cables and other equipment. Professional-grade monitors have a mode that allows this overscan area to be viewed, known as underscan mode. These monitors may also include action-safe and title-safe indicators.
The action-safe area is the larger rectangle within the image area. This area displays approximately 90 percent of the video image and is where camera operators will make sure to keep the primary action framed to keep it viewable on TVs.
The smaller rectangle in the image is the title-safe area (comprising about 80 percent of the visible image). It is far enough in from the four edges of a standard TV that text or graphics should show neatly without being cut off or distorted. The title-safe area started out as a guide for keeping text from being distorted by the rounded corners on old cathode ray tube (CRT) TVs. Most modern TVs display a lot more of the area outside of the title-safe zone than their CRT counterparts. However, as a rule of thumb, text and titles should still be contained within the title-safe area.
Cropping can be a useful tool to ensure that the video displays the same regardless of delivery and playback format. While TVs routinely overscan, mobile devices and online video players do not. If you want the video to appear to display the same on all devices, it may be necessary to crop the overscan area on the formats that do not overscan.
Scaling
Scaling is another key part of the preprocessing process, and it simply means either enlarging or shrinking the frame size. A proportionate scale means that the same scaling factor is applied to both the horizontal and vertical axes. Many times you’ll crop an image and then scale it up so that the frame size stays the same as it did when you started. Other times, it may mean shrinking a video from the original size to a size more appropriate for delivery (Figure 4.2).
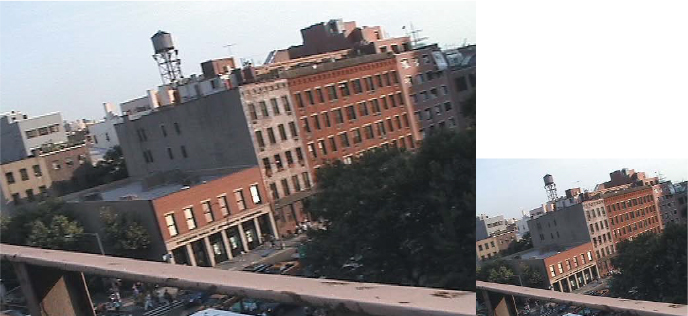
Figure 4.2 These images demonstrate how a 720 × 480 source clip (left) can be scaled down to 320 × 240 (right) for web delivery with no loss in quality.
Scaling video up is called an upconvert. Going from a small frame size to a higher frame size (as shown in Figure 4.3) is not recommended but can be necessary in certain situations. In these situations, the different scaling algorithms in different tools can produce dramatically different results. Some tools will simply scale pixels, while others will interpolate, or create new pixels. There are lots of options for tools in this area ranging from lower-cost plug-ins for After Effects all the way up to dedicated hardware for real-time SDI conversions. As always, your mileage may vary, and it’s always best to test your content against multiple tools to determine the best tool for the job.

Figure 4.3 Upscaling, unlike downscaling, is a bad idea—you can’t add pixels that weren’t in the image to begin with without compromising quality.
A key question when scaling is what size should you scale to? The answer will be determined by your destination and the frame sizes supported. As bandwidth has increased and technologies such as adaptive bitrate streaming are invented, the answers to these questions have gotten both simpler and more complex.
While there are all sorts of possibilities, there are two general facts: the larger the frame size, the bigger the output file will need to be to maintain good quality, and the slower it will play on some machines. Of course, small frame sizes could also be low quality, so you need to find a good balance that works for your projects. One thing to keep in mind, however, is that it is always best to scale down rather than scale up. That means if you have a video finished at 1920 × 1080, creating an upconverted 4k/UHD version won’t mean higher quality.
Here are some general guidelines, regardless of aspect ratio:
Height of 2160 pixels: At double the size of HD video, this is a great high-quality encode if you don’t need to worry about file size or playback speed (some older computers will have difficulty playing back files this large without dropping frames).
Height of 1080 pixels: This is probably the most common delivery size today. Most platforms and players support some version of 1080p.
Height of 720 pixels: This is a good choice if you need to prioritize file size over spatial resolution. It can also be appropriate if your target machine is older and slower.
Height of 480 pixels and smaller: What used to be called standard def, these frame sizes are pretty small. These are more suited to mobile video, given the screen resolution and bandwidth.
For more details on general guidelines for frame sizes, see Table 4.1. These ratios assume that the pixel aspect ratio is 1:1 (square).
Output |
Full-Screen (4:3) |
Wide-Screen (16:9) |
Ultra-high definition |
2880 × 2160 |
3840 × 2160 |
Extra-large broadband |
1920 × 1440 |
2560 × 1440 |
Large broadband/high definition |
1440 × 1080 |
1920 × 1080 |
Small broadband and large mobile |
960 × 720 |
1280 × 720 |
Large mobile |
640 × 480 |
854 × 480 |
Medium mobile |
480 × 360 |
640 × 360 |
Small mobile |
320 × 240 |
426 × 240 |
Temporal Preprocessing
Whatever the reason, sometimes you’ll need to adjust the frame rate of your video. Most of the time this is done to better match the source to the destination. Whatever the reason, temporal processing can be one of the most difficult steps to get right.
Easy Frame Rate Conversions
Certain frame rate conversions aren’t too hard and usually yield good-quality results. For example, when the source frame rate is a fractional frame rate, say 29.97 fps or 23.976 fps, converting to its corresponding integer frame rate—30 fps or 24 fps in this case—isn’t too hard. You’ll just change the amount of time each frame appears on the screen slightly. Audio will need to be adjusted to stay in sync, but most modern tools can do this compensation for you. Another simple conversion is when you want to go from a higher frame rate to one that is half as fast (or the other way around), such as 59.94 fps to 29.97 fps. In this conversion, you’ll simply drop (or duplicate) every other frame to get from the source rate to destination rate. Most modern nonlinear editing (NLE) systems can do these conversions in the timeline.
Telecine and Inverse Telecine
Telecine is the process of transferring motion-picture film into electronic form. The term is also used to describe the machine used in this process. Traditional motion-picture film runs at exactly 24 fps progressive scan, which doesn’t easily convert to 29.97 fps for NTSC.
Converting from film to PAL is easy. The video is sped up 4 percent to 25 fps and converted into progressive PAL.
The telecine process for NTSC is more complex: the film is first slowed down 0.1 percent to 23.976 fps and is then converted to 29.97 fps by using a process called 3:2 pulldown (Figure 4.4). In this process, the first frame of film becomes three fields of video, the next frame becomes two fields of video, the next becomes three fields, and so on, resulting in two out of five frames having fields that come from different source frames.

Figure 4.4 In the 3:2 pulldown process inherent to NTSC telecine, four frames of film become ten fields/five frames of video by using a three-then-two field pattern to maintain the smooth motion of the film in the newly created video.
To correctly compress video that has been telecined, it is crucial to be able to identify these duplicate frames and then remove them. Inverse telecine basically reconstructs the four frames from every five to turn the source back into progressive video.
The Difficult Conversion
There’s one particularly tricky conversion to be aware of. It occurs when your source is 30 fps (or 29.97) and your destination is 24 fps (or 23.976). Now when we say “tricky” or “difficult,” we mean that it’s difficult to get it to look good. Let’s dive in to see why.
When you want to get from 24 fps to 30 fps, you can add interlaced 3:2 pulldown to a clip to achieve the desired result with minimal unwanted motion artifacts. This is because you’re using fields created from a progressive image to create additional frames in a pattern that gives six additional frames per second that are distributed in an even cadence. You can reverse this process to get from 29.97i to 23.976p.
The problem arises when you start with a progressive source sequence and need to remove frames from it to lower the frame rate. To keep the dropped frames in an even cadence, you need to drop every fourth frame. The problem is that if you have smooth motion in your shot, like a car driving through the frame from left to right. The change in the car’s position between each frame is consistent, which means when you remove one of those frames, the car appears to move further between the third and fifth frames, which makes it look like it jumps. When this is repeated six times per second, the result is a really jumpy-looking video that is unpleasant to watch.
Just like with the upconversion process, the way to try to deal with this motion artifact is through interpolation. While there are a lot of standards converters on the market, there are a couple to take a look at for this specific conversion: Cinnafilm’s Tachyon and BlackMagic Design’s Teranex. But be warned, these tools can be fairly expensive and sometimes often yield subpar or unacceptable results depending on the content. Many times, the best way to deal with this situation is to manage expectations or try to find a solution that doesn’t involve this conversion.
Color and Image Preprocessing
When working with finished content that has already been color corrected, most of the time you won’t need to make further adjustments. However, certain situations where adjustments are necessary do arise from time to time. For example, if you have a show that’s being encoded for broadcast and mobile, you might need to adjust the mobile version to match the look of the broadcast version since the two formats use different color spaces. Understanding what adjustments are available will allow you to evaluate your outputs and determine whether any adjustments are necessary.
Luma Adjustments
Image adjustment is the process of using controls, similar to those in image-editing applications, to change aspects such as brightness and contrast. Digital video is described in either RGB or in Y’CbCr (aka YUV) color space. A color space (or model) is a way of describing and specifying a color. RGB and the Y’CbCr color space formulas contain three variables, also known as components or channels. RGB’s variables are red, green, and blue, while Y’CbCr breaks down as follows: Y is luma (or black and white or lightness), and CbCr is chroma or color (Cb is blue minus luma, and Cr is red minus luma).
This representation addresses the human eye’s predisposition to green-light sensitivity, which is why most of the information about the proportion of green is in the luma (Y), and only the deviations for the red and blue portions need to be represented. The Y values have twice the resolution of the other two values, Cb and Cr, in most practical applications, such as on DVDs.
Because different color spaces are used by different codecs and video playback devices, image adjustment may be required as part of preprocessing.
Luma Range Expansion
The RGB color space breaks the steps from black to white into 256 even steps (0 to 255, with 0 being black and 255 being white). Standard TV has only 220 steps from black to white, using black as 16 and white as 235 within the same scale (Figure 4.5 on the next page). Generally, modern postproduction applications automatically keep black and white consistent. However, if blacks and whites appear either crushed (too black) or faded (too white), the luma range may need to be remapped.
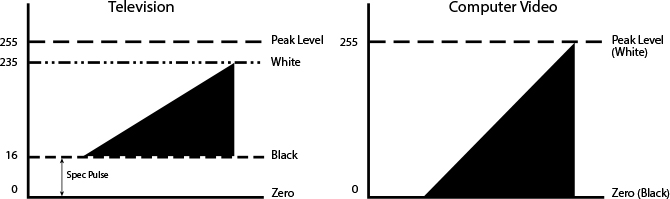
Figure 4.5 Television and computer-based video use different luma ranges to depict the range between black and white. When this is not compensated for in preprocessing, the distortion of the luma range can leave video either washed out or too dark.
The Digital Color Meter
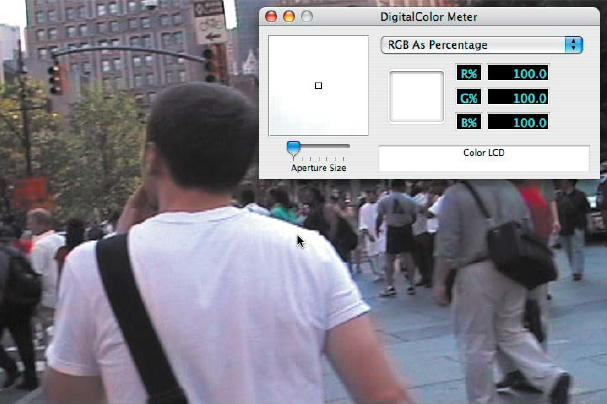
Apple users have some built-in help when figuring out luma and chroma values. In the Utilities folder (Application > Utilities) is the Digital Color Meter (Figure 4.6). This little application launches a small magnifier and a table that shows the specific RGB value of the samples part of the screen. This application is a handy way of checking values, rather than just trusting that your display is calibrated correctly. You can learn more about it here: https://support.apple.com/guide/digital-color-meter/welcome/mac.
![]() TIP
TIP
Using noise reduction in addition to adjusting the luma may make achieving proper levels easier.
Gamma Adjustments
Gamma is a measurement of how the luma range turns into brightness when it is displayed. Although black and white will look the same under different gamma values, the middle of the range will look different. Gamma correction is a complex mathematical concept that works to best encode images according to how human image perception works. Different computer platforms and TVs all have different default gammas, with the majority of gamma values falling between 2.2 and 2.4. Before OS X 10.6 Snow Leopard, Apple used a default gamma value of 1.8. CRT television sets used a gamma of 2.2, and Windows systems used gamma values ranging from 2.2 to 2.5. Modern LCD televisions use a gamma value of 2.4. If the value used to encode the video is not the same as the display/output gamma value, the image will appear either slightly darker, which will lose detail in the shadows, or slightly brighter, which will make colors appear washed out and “milky.”
If you are encoding for a mixed environment or are unsure of what playback device the end user has, it’s best to target an encode value of 2.2.
Brightness and Contrast
Brightness filters adjust the overall intensity of each pixel in a frame by a fixed amount. Contrast settings, on the other hand, increase or decrease each pixel’s value by an amount proportional to how far away from the middle value it is (the farther away, the bigger the change). These values are often used together, rather than separately, because just brightening an image without adjusting the contrast can leave the black levels too muddy gray, rather than the desired black.
Chroma Adjustments
Chroma adjustments affect the color (chrominance) of a video image, similar to the way luma affects the brightness. Changes to the color of the video aren’t commonly required. In fact, some compression tools do not even include these filters.
Saturation
![]() NOTE
NOTE
Digital video has a narrower saturation range than RGB, so slightly increasing the saturation will make video look more vibrant on computer screens.
Saturation controls the intensity of a color. Increasing saturation will brighten a color artificially, while decreasing it (or desaturating) will remove the color, all without affecting the luminosity of the image (turning it to black and white).
Hue
Hue is the way of describing a color (for example, red or blue). The hue adjustment in compression tools shifts the color spectrum of the image. It is used to do simple color correction, most often when white levels or flesh tones do not appear correctly. This is a pretty coarse adjustment and should be used with care or not at all.
Noise Reduction
Noisy video is a big headache for video compressionists. Random noise causes pixels to change rapidly and constantly, making it difficult for the codec to encode the clip correctly.
Noise reduction encompasses a variety of techniques to remove that noise from an image, making it easier to compress. Simple noise reduction algorithms are just blurs that hide grain but make the image softer, such as when a median filter is applied (Figure 4.7). More advanced algorithms try to blur only the parts of the image that have grain and may take advantage of differences among frames.
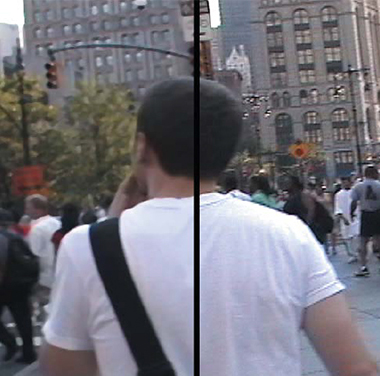
Figure 4.7 Here are two versions of a DV-NTSC clip. On the right it has had a median filter applied. Note the increased softness in the image on the left but the smoother quality of the image also.
Noise reduction is not always required. If you have a clean video source to work with, simply skip the noise reduction step when preprocessing your work. If you do have damaged footage, it may take several experiments to find the right balance of cleaning up the source without degrading the finished video image.
Legacy Video Issues
There has been a lot of change in the realm of digital video. We’ve moved from interlaced to progressive formats. The number of standard aspect ratios has exploded. So-called high-definition resolutions have gone from being in the minority to the majority. Even higher resolutions like ultra-high definition, 4k, and even 8k are now coming into play. But as a compressionist, you’ll be asked to work with all sorts of video from various periods in time. That means there’s a whole host of issues that come with older video that you’ll need to understand and be comfortable with fixing.
Deinterlacing Video
In the past, most digital video was interlaced because it was assumed that at some point it was meant for playback on a standard CRT television, which had an interlaced display. We’ve now moved to a world where most displays are progressive scan, and they are not always televisions. Because interlaced video is unacceptable for web and mobile delivery, deinterlacing video for playback on the Web or other progressive displays is a fundamental and necessary step.
If the source video is left with interlacing lines intact, the output will appear as jagged lines sometimes referred to as combing. The lines do not make for a good viewing experience and are also difficult to encode for a couple of reasons. Moving objects will keep merging and reassembling (with the two fields moving out of step), and motion estimation will become difficult, thus making the encode inefficient. The interlaced image will also have more detail than is necessary to display the image, so additional bits are wasted when relaying this redundant detail.
![]() TIP
TIP
It is rare for a compression application to offer all the deinterlacing options listed here, and each tool may have its own naming scheme for them. Experiment with the options to find the ones that work for your content.
You can perform a deinterlace in several ways. Each is designed to optimize different types of images and different types of motion within the video. All in all, there are approximately eight ways to perform a deinterlace, though those eight have several different names by which they are recognized, depending on the tools you are working with.
Blend
The first common deinterlace method is referred to as blending, also known as averaging and combining fields. This method involves both fields being overlaid. This method gives you good results when there’s no movement, but it results in unnatural, low-quality movements. The advantage of this approach is that it’s a fast way to deinterlace and is good for low-motion scenes, such as interviews, but you will get ghosting every time an image moves.
Weave
Another commonly used method is weaving, which shows both fields in each frame. This method basically doesn’t do anything to the frame, leaving you with jagged edges but with the full resolution, which can be good.
Area-Based Deinterlacing
Area-based deinterlacing blends nothing but the jagged edges. You do this by comparing frames over time or by space/position. It gives you good results in quiet scenes with little movement because in those circumstances there is nothing to blur.
Motion Blur
The motion blur method blurs the jagged edges where needed, instead of mixing (that is, blending) them with the other field. This way, you get a more filmlike look. You may have to apply motion blur with a program such as Apple Final Cut Pro or Adobe After Effects before using a compression application.
Discard
With the discarding method, you throw away every second line (leaving the movie at half the original height) and then resize the picture during playback. Because this is the same as skipping Field 2, Field 4, Field 6, and so on, you could also call this even fields only or odd fields only. Although you won’t get artifacts from trying to blend or merge the images, you’ll lose half the resolution, and motion will become less smooth.
Bob
The bob approach displays every field (so you don’t lose any information) one after the other (that is, without interlacing) but with double the frames per second. Thus, each interlaced frame is split into two frames (that is, the two former fields) at half the height. Sometimes bobbing is also called progressive scanning. However, since the bob approach doesn’t analyze areas or the differences between fields, the two approaches are not really the same (see the next section).
Progressive Scan
Progressive scanning analyzes the two fields and deinterlaces only the parts that need to be deinterlaced. The main difference between progressive scanning and area-based deinterlacing is that progressive scanning gives you a movie with twice the frames per second instead of the standard 25 fps or 30 fps movie, thus leaving you with perfect fluidity of motion. To say it more academically, it has high temporal and vertical resolution.
This method is also variously called motion adaptive, bob and weave, and intelligent motion adaptive.
Motion Compensation
![]() NOTE
NOTE
If you control the video production process for your content and know you don’t plan to distribute via a traditional broadcast, then try to keep your whole project in progressive mode to avoid issues with deinterlacing.
The motion compensation method analyzes the movement of objects in a scene when the scene consists of a lot of frames. In other words, it involves tracking each object that moves around in the scene, thus effectively analyzing a group of consecutive frames instead of just single frames.
Although effective for horizontal motion, some software for this technique does not handle vertical motion at all and may fall back on selective blending or other techniques when it is unable to resolve the motion vectors.
Image Aspect Ratio Correction
The film world has dealt with the difficulty of matching the source aspect ratio to the screen ever since movies were invented. For the video world, this is somewhat of a new challenge. Much like Henry Ford’s Model T that came in any color as long as it was black, if you worked with video, the aspect ratio was 4:3. This was a much simpler time because most of the video displays were also 4:3. We’re now living in a multiscreen/multiformat world, and it’s become a lot more complicated. Most of the time, it’s advisable to keep the aspect ratio the same as the source and allow the playback system to account for any difference in aspect ratio. An example would be if your source file is a movie trailer that was delivered to you at 2048 × 858. If you divide the width by the height, you get the result of 2.3869, which is generally rounded up and written as a ratio to one like so: 2.39:1. This is one of the standard aspect ratios for cinema. Let’s say you want to upload this to YouTube and have it look correct. You could reformat the source video to 16 × 9 by adding a letterbox, which is simply black bars that take up the remaining space between the original 2.39:1 aspect ratio and the destination 1.78:1 player aspect ratio. The problem with this approach is that if the end user plays the YouTube video full-screen on a computer or tablet that doesn’t have a 16 × 9 display, the black bars are “burned in,” and the player may not format the video optimally for that display.
The better choice is to resize the video to a standard/optimal width and keep the original aspect ratio. In the previous example, this would mean keeping the 2.39:1 aspect while resizing to 1920 wide. The end result would be a file that is 1920 × 804. The YouTube player will automatically letterbox the video with the appropriate amount of black for the final output display.
Some facilities will also ship finished content in the anamorphic format—that is, wide-screen content that is horizontally squished to fit in 4:3. During playback, specialized hardware is used to restore the wide-screen aspect ratio. When working with content that is either letterboxed or anamorphic, it’s important to correct the image appropriately. In the case of letterboxing, this probably means cropping out the black bars, and in the case of anamorphic, it means changing the aspect ratio from 4:3 to 16:9 to correct the image.
Take care when dealing with aspect ratio conversions to ensure that you aren’t losing content by accident or distorting the picture in a way not intended by the creator.
Pixel Aspect Ratio Correction
An important element of scaling is pixel aspect ratio correction. What is pixel aspect ratio? You already know that aspect ratio just means the relationship between the height and width of the image. Pixel aspect ratio is the same concept, but instead of being applied to the image as a whole, it describes the actual shape of the pixels.
Three common pixel aspect ratios are in use today. The first is taller than wide; the second is the same height and width, which makes a perfect square; and the last is wider than tall. Let’s take a closer look at where you’ll most likely run into each of these now.
You’ll find pixels that are taller than they are wide when working with legacy standard-definition content. These pixels are referred to as nonsquare pixels or 0.9 pixels. Pixels on the old CRT televisions had this shape.
Computer displays and modern HD televisions use pixels that are square. Square pixels are the most common pixel aspect ratio today and by far the easiest to work with.
A few codecs store the image in an anamorphic (squeezed) way but use a special pixel aspect ratio to stretch that squeezed image back out upon display. These codecs use pixels that are wider than tall to do this. Depending on if you’re in a standard-definition environment or an HD environment, the codec will stretch by slightly different amounts: 1.21 for SD and 1.33 for HD.
Make sure you get the aspect ratio correction right when you convert to square-pixel sources from nonsquare-pixel sources by verifying that the output frame size matches the source aspect ratio. So, if you use a 4:3 source, a 4:3 frame size such as 1440 × 1080, 960 × 720, 640 × 480, and 320 × 240 are all acceptable choices, even if the source frame size is 720 × 480, 720 × 486, 640 × 480, or 352 × 480 (all nonsquare pixels).
Audio Preprocessing
Audio is a huge part of any production and can make or break the viewing experience. There isn’t typically a lot of preprocessing that needs to be done with well-produced audio, however. Raw captured audio may need some preprocessing (sometimes referred to as sweetening) to clean it up, but this is typically done during the edit process, rather than during preprocessing for compression. When it comes to audio, the job of the compressionist is to make sure that the program’s audio is appropriate for the distribution channel.
Adjusting Volume
Volume is one of the elements easily adjusted in preprocessing, and you can do this in a few different ways. The quickest way is to raise or lower the volume, either by an absolute decibel (dB) amount or by a relative percentage amount. This is another fairly coarse adjustment, akin to turning up or down the volume on your radio. For those needing a little more finesse, there are other possibilities, such as normalization and compression.
Normalization
Normalization is the act of adjusting the audio levels in the content and then raising or lowering the volume of the entire clip so that the loudest sound matches the level you have specified. This is a global adjustment, affecting the volume of the entire track the same way, rather than affecting the relative levels.
Audio Compression
This is a totally different type of compression than what we have discussed so far in this book; with regard to audio, compression refers to a specific type of audio filter known as a compressor. Loud noises in a digital audio track can cause distortion, and likewise, quiet sounds, such as whispering, can be lost. An audio compressor can smooth out these issues in an audio track by removing dynamic range. By pulling down large spikes and lifting up those quiet parts, compression will ensure that the average loudness is fairly constant.
Noise Reduction
Just as with video, there are also noise reduction filters for audio, although these are more often found in professional audio-editing tools, not in compression tools. Unwanted noise in audio tracks is just as bad for compression because noisy video (meaning bits) will be wasted, and the end result will be lower quality than desired. Some compression tools have simple hum-removal filters that will help clean up the audio during encoding, but truly bad audio may need to be preprocessed separately in a professional application such as Avid Pro Tools or Adobe Audition.
Stereo Mixdowns of 5.1 Surround Mixes
Depending on the type of content you normally work with, you may be given source material that has a 5.1 surround sound track and asked to encode it for a destination that supports only stereo audio. Nine times out of ten, if you ask for a stereo mix, you’ll be able to get it because a typical surround mix session produces both the 5.1 and stereo mixdown. It’s almost always preferred to have an audio professional produce mixdowns, but in the rare case where you have only the 5.1 source and you’re the only resource available, you’ll need to know how to properly convert the six channels into two.
The most straightforward stereo mixdown is referred to as Lo/Ro, which stands for “left only and right only.” Sometimes referred to as an ITU downmix, the formula to create this two-channel mix from a 5.1 source is as follows:
Discard the LFE (subwoofer) channel. This channel is of little use to small speakers that will most likely be the destination and will overdrive them.
Leave the left and right channels alone, each continuing to be mapped to Ch1/Left and Ch2/Right, respectively.
Map/pan the center channel to both Ch1 and Ch2 equally while lowering its volume –3 dB.
Map the left surround channel to Ch1 while lowering its volume –3 dB.
Map the right surround channel to Ch2 while lowering its volume –3 dB.
If you are asked to deliver an Lt/Rt (which stands for “left total/right total”), this is a different type of downmix, often referred to as matrix encoding. It is much more complicated to create and is best left to an audio professional.
Conclusion
Being aware of the preprocessing techniques covered in this chapter will no doubt make you a better compressionist. However, the application you use determines how well you will succeed with your content almost as much as the skill set you’re developing. Each application, through supporting multiple formats, typically has one or two specific workflows or techniques it does better than most, so knowing how to use several applications can be crucial to successful compression.