
CHAPTER 7
Using the Camera
In the hands of even a moderately skilled photographer who knows the capabilities of the camera, even a cell phone can produce reasonable pictures. Unfortunately, owning a camera and knowing which button to push doesn’t make you a photographer, any more than owning an automobile makes you a Formula One racecar driver.
—Andy Ciddor, TV Technology
Today’s cameras can create high-quality images. With the right techniques, you can produce interesting and persuasive images. A working knowledge of the camera, lenses, depth of field, shutters, and f-stops is essential to obtain images with the maximum impact.
Key Terms
![]() Action line: Also known as an eye line, the 180 line, or the proscenium line, this is the line along the direction of the action in a scene. It is the line that separates the “stage” from the audience. Cameras should only shoot from one side of this line.
Action line: Also known as an eye line, the 180 line, or the proscenium line, this is the line along the direction of the action in a scene. It is the line that separates the “stage” from the audience. Cameras should only shoot from one side of this line.
![]() Auto-focus: Some lenses are designed to automatically focus on the subject.
Auto-focus: Some lenses are designed to automatically focus on the subject.
![]() Backlight control: When there is more light in the background than on the subject, some cameras use a backlight control button, which opens up the iris an arbitrary stop or so above the auto-iris setting to improve the subject’s exposure.
Backlight control: When there is more light in the background than on the subject, some cameras use a backlight control button, which opens up the iris an arbitrary stop or so above the auto-iris setting to improve the subject’s exposure.
![]() Black-stretch control: Some cameras include a black-stretch control menu or button that can be adjusted to make shadow detail clearer and improve tonal gradation in darker tones.
Black-stretch control: Some cameras include a black-stretch control menu or button that can be adjusted to make shadow detail clearer and improve tonal gradation in darker tones.
![]() Close-up shot: Encourages the audience to concentrate on a specific feature. Shows emotion on people and draws the viewer’s attention to a detail/aspect/ portion of an object.
Close-up shot: Encourages the audience to concentrate on a specific feature. Shows emotion on people and draws the viewer’s attention to a detail/aspect/ portion of an object.
![]() Follow focus: This technique requires the camera operator to continually change the focus as the camera follows the action.
Follow focus: This technique requires the camera operator to continually change the focus as the camera follows the action.
![]() Long shot or wide-angle shot: Helps establish the scene for the viewer.
Long shot or wide-angle shot: Helps establish the scene for the viewer.
![]() Macro: Some lenses include a macro setting, which is designed to provide a sharp image almost up to the actual lens surface.
Macro: Some lenses include a macro setting, which is designed to provide a sharp image almost up to the actual lens surface.
![]() Medium shot: The medium shot tells the story; it is close enough to show the emotion of the scene but far enough away to show some of the relevant context of the event. Generally shot from the waist up on a person.
Medium shot: The medium shot tells the story; it is close enough to show the emotion of the scene but far enough away to show some of the relevant context of the event. Generally shot from the waist up on a person.
![]() Pan shot: When the camera pivots to the left or right with the camera pivoting on a camera mount.
Pan shot: When the camera pivots to the left or right with the camera pivoting on a camera mount.
![]() Telephoto lens: A narrow-angle lens that gives a magnified view of the scene, making it appear closer.
Telephoto lens: A narrow-angle lens that gives a magnified view of the scene, making it appear closer.
![]() Tilt shot: When the camera pivots up or down on a camera mount.
Tilt shot: When the camera pivots up or down on a camera mount.
![]() Waveform monitor: An oscilloscope that displays a fluctuating line that traces the variations of the video signal, the sync pulses, and so forth. Individual picture lines can be selected and examined. Its several uses include checking for exposure errors, ensuring that the video does not exceed the system’s limits, and checking the accuracy of sync pulses.
Waveform monitor: An oscilloscope that displays a fluctuating line that traces the variations of the video signal, the sync pulses, and so forth. Individual picture lines can be selected and examined. Its several uses include checking for exposure errors, ensuring that the video does not exceed the system’s limits, and checking the accuracy of sync pulses.
![]() Wide-angle lens: Shows us a greater area of the scene than is normal. The subject looks unusually distant.
Wide-angle lens: Shows us a greater area of the scene than is normal. The subject looks unusually distant.
![]() Zone focus: Camera operators are focused on a portion of the scene. Any time the subject comes into that area, the camera has been prefocused to make sure the action is sharp.
Zone focus: Camera operators are focused on a portion of the scene. Any time the subject comes into that area, the camera has been prefocused to make sure the action is sharp.
7.1 JUST POINT AND SHOOT
Many people just point and shoot. They assume that the camera should be set on automatic, and therefore they don’t worry about it. There are times when the automatic setting is the way to go. However, most of the time the results will be disappointing. The exposure may be incorrect, the auto-iris may fluctuate, and the subject may be blurry. Many times the shots are just plain boring. The audience’s attention will wander and the picture quality varies. That’s unfortunate, considering that by mastering a few basic principles, effective images can be created that look professional.
7.2 WHAT GETS ON THE SCREEN?
Occasionally, the camera is described as the “eye of the audience.” However, that can be a misleading oversimplification. The camera can be used to deliberately create that impression, but the camera doesn’t automatically convey a true picture of any situation to the audience. If individuals are at a location, their eyes flick around, refocusing, taking in what is happening. They know where they are and can decide for themselves what they look at. Everyone makes his or her own selection from a scene. Television viewers can only see what the director chooses to show them. Only that part of the scene selected by the lens is visible on the rectangular screen in front of them. The audience can only guess at what lies outside the lens’s angle of view. Other things quite near the camera would fill the screen if the lens turned just a little, but these things remain unseen, “out of shot,” because framing is highly selective (Figure 7.1).
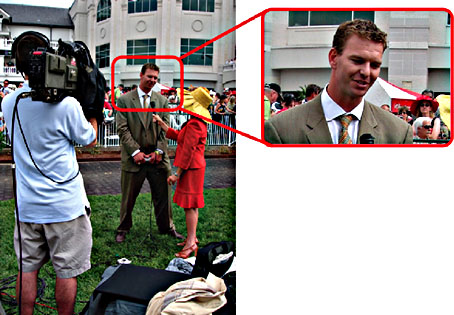
FIGURE 7.1
The camera isolates. The camera only shows what is going on in its frame of the scene. The audience does not really know what is outside the field of view.
(Photo by Josh Taber.)
A hallmark of good directors is their ability to select from moment to moment exactly the right features within the scene that suit their dramatic purpose, yet at the same time convince their audience that this is exactly what they want to see at that instant.
7.3 HOW CLOSE SHOULD YOU GET?
![]() A close-up shot (CU) is great for revealing detail, intimacy, emotion, and drama. Sometimes it can even reveal too much: It encourages the audience to concentrate on a specific feature.
A close-up shot (CU) is great for revealing detail, intimacy, emotion, and drama. Sometimes it can even reveal too much: It encourages the audience to concentrate on a specific feature.
![]() Keep in mind that restricting how much the viewers can see might frustrate them, particularly if they feel that they are missing something going on elsewhere.
Keep in mind that restricting how much the viewers can see might frustrate them, particularly if they feel that they are missing something going on elsewhere.
Be careful not to throw details at the audience too blatantly as if to say, “Pay attention! Look at these details!” Good production techniques are based on persuasion. There are many subtle ways of influencing exactly where your audience looks, without throwing out intense close-ups all the time. You can persuade with images by controlling the way the composition is arranged, such as by moving people around or positioning the lighting.
A long shot, or wide shot, shows the audience a wide view of the scene:
![]() It establishes the scene by showing the audience where the action is located.
It establishes the scene by showing the audience where the action is located.
![]() It lets viewers see how one thing relates to another (such as the various relationships between team members on a basketball team).
It lets viewers see how one thing relates to another (such as the various relationships between team members on a basketball team).
![]() It can give them a good idea of space, unless the director deliberately misleads them by using a much wider lens angle than normal to exaggerate perspective.
It can give them a good idea of space, unless the director deliberately misleads them by using a much wider lens angle than normal to exaggerate perspective.
An overall view of this type does have its disadvantages. Although HD helps this situation, the audience may not be able to see subject details clearly in a wide shot. The viewer can see the speed with which the player runs after the ball, but not the expression when he or she drops it (Figure 7.2).
CAMERA SHOTS
![]() Extreme close-up (ECU or XCU) or big close-up (BCU) is a detail shot.
Extreme close-up (ECU or XCU) or big close-up (BCU) is a detail shot.
![]() Close-up (CU) is generally framed just above the head to the upper chest. This shot is sometimes called a “head and shoulders” shot.
Close-up (CU) is generally framed just above the head to the upper chest. This shot is sometimes called a “head and shoulders” shot.
![]() Medium shot or midshot (MS) cuts the body just below or above the waist.
Medium shot or midshot (MS) cuts the body just below or above the waist.
![]() Long shot (LS) or wide shot (WS) generally features the entire person in the frame, just above and below the body. The European term for a long shot of a person is a full shot (FS).
Long shot (LS) or wide shot (WS) generally features the entire person in the frame, just above and below the body. The European term for a long shot of a person is a full shot (FS).
![]() Extreme (or extra) long shot (ELS or XLS) or very long shot (VLS) shows significant space above and/or below the subject.
Extreme (or extra) long shot (ELS or XLS) or very long shot (VLS) shows significant space above and/or below the subject.
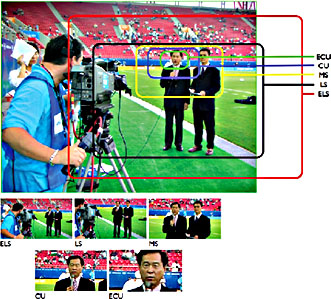
FIGURE 7.2
When shooting people, shots are classified by the amount of a person taken in.
Long shots have the advantage of allowing the viewers to select, to choose whatever attracts their attention in the wide view. But it also gives them the opportunity to look around and start thinking about whatever catches their interest rather than concentrating on the specific point that the program is trying to make at that moment.
Any well-edited program needs a series of closer and wide shots, each carefully chosen for its purpose. These shots assist the audience to establish the scene, observe what is going on, interpret action, and see details.
SHOOTING FOR THE INTERNET
Compressing video to be used on the Internet deteriorates the overall quality of the video. Any time footage is compressed, a bit of the quality has to be sacrificed. Here are a few points to keep in mind when shooting something that will be streamed on the Internet:
![]() Do not use more camera motion than you need. Whenever there is camera motion, the result is more compression.
Do not use more camera motion than you need. Whenever there is camera motion, the result is more compression.
![]() Use a tripod to give the most stable shot possible (you usually should use a tripod anyway).
Use a tripod to give the most stable shot possible (you usually should use a tripod anyway).
![]() Limit camera pans and tilts; when you do use them, make sure the motions are slow and smooth.
Limit camera pans and tilts; when you do use them, make sure the motions are slow and smooth.
![]() Light the subject well.
Light the subject well.
![]() Keep the background simple. The more detailed it is, the more the video will need to compress.
Keep the background simple. The more detailed it is, the more the video will need to compress.
7.4 HOW MUCH CAN WE SEE?
How much of the scene the camera shows will depend on several factors:
![]() The camera’s viewpoint (angle)
The camera’s viewpoint (angle)
![]() How far the camera is from the subject
How far the camera is from the subject
![]() The angle its lens covers
The angle its lens covers
As we noted earlier, the lens’s coverage (lens angle, angle of view) varies with its focal length. The zoom lens can be adjusted to any focal length within its range. If it is a 6:1 (six to one) system, then its widest angle will be six times the narrowest.
Some zoom lenses are fitted with a 2X extender (Figure 7.3). You can flip in this extender when you need a longer lens. The extender will double the focal length of the lens. However, there will be a noticeable light loss. Another way of altering the maximum or minimum angle of your lens system is to clip or screw on a supplementary lens (diopter lens). There are both telephoto and wide-angle conversion lenses available for this purpose. However, there can be some light loss, depending on the diopter (Figure 7.4).
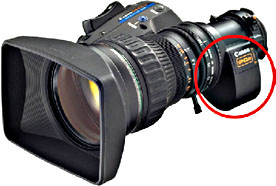
FIGURE 7.3
The 2X extender is located on the side of the lens.
(Photo courtesy of Canon.)

FIGURE 7.4
Wide-angle lens adapter.
(Photo courtesy of VF Gadgets.)
7.5 LENS ANGLES
Lens angles significantly impact the video images that the camera will capture, as well as the audience’s interpretation of those images.
If the angle from the viewer’s eyes to the sides of the TV screen is reasonably similar to that of the camera’s horizontal lens angle, the viewer will get a realistic impression of space, distance, and proportions. This is referred to as a “normal” lens angle. With today’s variety of screen sizes and shapes, this angle is by no means precise, but for all practical purposes we can assume that it is around 20 to 28 degrees.
What are the disadvantages if the camera operator shoots with a lens angle that is appreciably different from “normal”? Well, some interesting things can happen to the image. With some subjects, the audience may not even notice anything. However, wherever the audience can judge proportions and perspectives, such as looking up at a tall building or a close-up of a person, differences between images shot with different lens angles will be obvious.
A telephoto or narrow-angle lens (long focal length) will give a magnified view of the scene, making it appear closer. The telephoto lens is advantageous when the camera operator cannot move the camera closer to the subject or does not want to. But there are also disadvantages. The telephoto lens often has the effect of flattening subjects because it compresses depth. This compression can also make subjects look unnaturally close (Figure 7.5). Movements are affected as well. Even fast-moving subjects seem strangely slowed by a telephoto lens as they move toward or away from the camera. The telephoto/narrow-angle lens is also difficult to hold steady; even the slightest vibration is magnified and causes image shake. The camera needs to be mounted or rested on something firm in order to obtain a steady image.
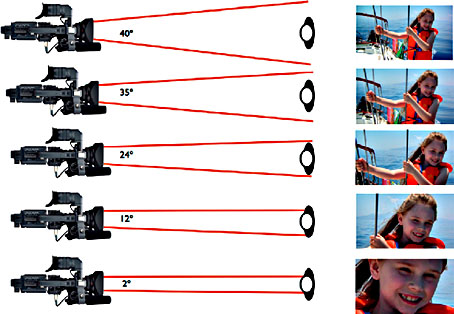
FIGURE 7.5
Changing the lens’s focal length alters its coverage proportion. In this situation, the camera stayed the exact same distance from the subject but the lens was changed.
(Camera photo courtesy of JVC.)
A wide-angle lens, on the other hand, shows us a much greater area of the scene. Everything in the image looks unusually distant. The lens seems to emphasize space and depth. Movements toward and away from the camera seem faster than they really are.
The wider the lens angle (i.e., the shorter the focal length), the easier it is to hold the camera steady and to move around smoothly while shooting. Although the wide-angle lens has many advantages, it cannot be used all of the time because there will be too many long shots. If the camera is moved in close to the subject in order to get a close-up shot, subjects will look distorted with a wide-angle lens.
7.6 SO WHY MOVE AROUND?
If the subject can appear closer and farther away by simply varying the lens angle, why bother to move the camera? Why not just zoom the lens? It is far less trouble.
Although, at first glance, changing the focal length seems to give more or less similar results to those obtained when repositioning the camera, when you look at the image critically, it becomes obvious that there are distinct differences in the results (Figure 7.6). You’ll find these differences summarized in Tables 7.1 and 7.2.
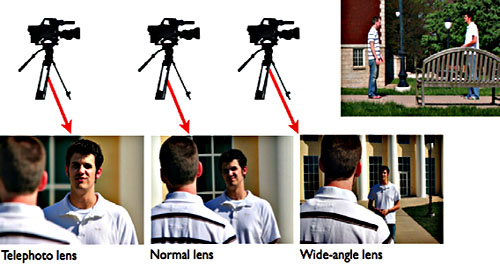
FIGURE 7.6
Changing the focal length (lens angle) of the lens significantly alters the proportions of the image. Subjects will be compressed or appear farther away. Note the impact that the telephoto and wide-angle lenses have on how the image looks.
(Photos by Josh Taber.)
Table 7.1 Selecting the Right Lens
| How much of the scene is sharp? |
|
| How prominent is the background in closer shots? |
|
| How hard is it to focus? |
|
| Camera shake |
|
| The impression of distance and depth in the picture | Because distant planes appear closer when shot with a narrow-angle lens, a distant back wall will look nearer and the room will appear smaller. Planes in the picture that are at an oblique angle to the camera (a side wall) will be shortened. Three-dimensional subjects will look squashed because their depth or thickness along the z-axis (near-to-far direction) is compressed. Conversely, a wide-angle lens will cause these same dimensions to appear stretched or deeper than usual. All planes will look abnormally far away. Impressions of size and space are exaggerated. |
| The accuracy of the shapes (geometry) | The wider the lens angle, the greater the distortion in closer shots of three-dimensional subjects. |
The lens’s focal length affects a number of areas simultaneously. How noticeable these effects are in the image depends on the subject and the scene.
The lens’s focal length affects a number of areas simultaneously. How noticeable these effects are in the image depends on the subject and the scene.
It’s a good general working principle to use a normal lens angle as much as possible and to move the camera viewpoint rather than just zooming in and out with a stationary camera. Actual camera movement gives life to an image. Whenever a camera moves, we see significant changes in the image. Various surfaces become progressively hidden as the camera moves past; others are gradually revealed. Although this effect becomes most obvious when travelling past foreground images, such as a series of columns or through a group of trees, it is one of those natural everyday phenomena that help us to interpret our three-dimensional world. It is even more pronounced when the camera trucks (or crabs) sideways.
Table 7.2 Why Change the Lens Angle?
| To adjust framing | A slight change in lens angle: When excluding or including certain objects and repositioning the camera or subject would ruin the proportions. |
| For otherwise unobtainable shots | Using a narrow-angle lens: To capture subjects that are situated a long distance from the camera and are inaccessible or where the camera cannot be moved (located on a camera platform). Using a wide-angle lens: Where the normal lens does not provide a wide enough shot because of space restrictions |
| To adjust effective perspective | Altering the lens angle and changing the distance between the camera and subject alters the subject/background proportions. Using a wider lens angle enhances spatial impression and increases the depth of field. Using a narrower lens angle reduces spatial impression and compresses the depth. |
| To provide simpler or more reliable changing operations | Zooming in/out instead of dollying may produce smoother, easier changes in shot size (but the perspective changes because of the focal lengths of the lens) (Figure 7.7). Zooming provides rapid changes in image size more safely than fast dollying (for dramatic effect or to suddenly reveal detail). Zooming in/out on a flat subject is indistinguishable from dollying, but it avoids focus-following problems. Lens angle changes can avoid close-up cameras coming into picture. |
Whenever a lens is zoomed, it simply magnifies and reduces the exact same shot. The natural effects that make shots from a moving camera so persuasive are simply not there.
There will certainly be times when the camera operator will deliberately widen or narrow the lens angle for practical or artistic reasons (Table 7.1). Don’t hesitate to vary the lens angle as needed to overcome a problem or to get an effect. Don’t just alter it casually. For example, if a camera operator is shooting a parade from a balcony and getting useful group shots with a normal lens angle, the operator may also use a wide-angle lens to take in the lengthy procession or a narrow-angle lens to show details. Using one lens angle would significantly limit the shot opportunities. The camera operator certainly couldn’t rely on running up and down to new viewpoints to provide the variety of shots needed.
If the director wants to show details on a distant statue located at the top of a building, he or she will certainly need to use a really narrow lens angle (long focal length). There will be some compromises to make. However, it’s unavoidable. Space will be squashed, and the form of the building itself may appear distorted. If you are using a narrow-angle lens when alternative camera positions are available, such distortions are unjustified.
On the positive side, the way in which a wide-angle lens exaggerates space offers invaluable opportunities in a crowded location or where the budget is limited. A wide-angle lens can make the smallest setting appear spacious. Even a couple of scenic flats linked together can create the illusion of an entire room if shot strategically with a wide-angle lens. Table 7.2 summarizes the practical advantages of the wide-angle lens.
7.7 THE ZOOMING PROCESS
There are several methods of controlling the lens’s zooming action. A camera operator working on a dramatic production may prefer a manual zoom system, which allows the shot’s coverage to be subtly readjusted as picture composition varies. But for the split-second decisions and fast zooms involved when shooting a sports event, motorized systems may prove more convenient.
Controlling the Zoom
There are three primary ways to control a zoom lens:
![]() Manual zoom control ring (or barrel ring). Turning a ring on the lens barrel varies the zoom lens’s focal length. This is a precise method, giving total control over the zoom action throughout the shot.
Manual zoom control ring (or barrel ring). Turning a ring on the lens barrel varies the zoom lens’s focal length. This is a precise method, giving total control over the zoom action throughout the shot.
![]() Power zoom. Many zoom lens systems can be controlled by a two-way rocker switch (see Figure 7.7), which activates a small motor. This will drive the zoom toward either the wide-angle or the telephoto end of its range, stopping where needed. The zoom speed may be adjustable or vary with finger pressure on the switch. The power zoom is widely used and particularly adaptable to all types of production in the studio and in the field. Zoom lenses on professional cameras generally have the switchable option of selecting between remote/manual/auto methods of iris control using the same hand.
Power zoom. Many zoom lens systems can be controlled by a two-way rocker switch (see Figure 7.7), which activates a small motor. This will drive the zoom toward either the wide-angle or the telephoto end of its range, stopping where needed. The zoom speed may be adjustable or vary with finger pressure on the switch. The power zoom is widely used and particularly adaptable to all types of production in the studio and in the field. Zoom lenses on professional cameras generally have the switchable option of selecting between remote/manual/auto methods of iris control using the same hand.
![]() Remote control. Remote control units are available for most cameras. They allow the camera operator to zoom the camera’s lens from behind the camera. This unit is generally mounted on a tripod arm (pan bar).
Remote control. Remote control units are available for most cameras. They allow the camera operator to zoom the camera’s lens from behind the camera. This unit is generally mounted on a tripod arm (pan bar).
The zoom lens can be a creative tool when used with discretion. When shooting a ballgame, zoom in to a closer shot as the action grows tenser. Zooming in rapidly so that the camera seems to swoop into a scene, particularly if it is on a jib arm arcing over the action, can produce dynamic results. But if you use a similar zooming action at the wrong time, your audience will probably get frustrated.
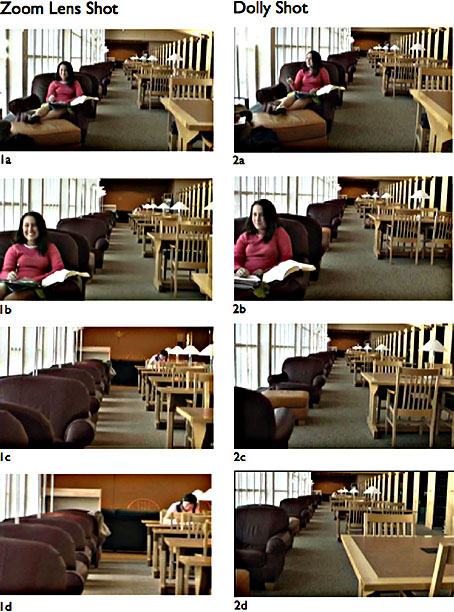
FIGURE 7.7
Zooming simply magnifies and reduces the picture. It does not produce the changes in the scene that arise as the dolly is moved through a scene. Increasing the focal length narrows the lens angle, filling the screen with a smaller and smaller section of the shot. These photographs illustrate the difference between the zoom and the dolly. Notice that there is not much of a difference between images 1b and 2b. However, as the dolly continues in 2c, it begins to show a different perspective, showing that there is a table between the two chairs on the left. Photo 1d zooms past the table, whereas the dolly perspective in 2d takes viewers up to the table and allows them to see the top of it.
To test this effect, try dollying in toward a person while zooming out at a corresponding speed and keeping the person the same size in the frame throughout. The result is bizarre, but it demonstrates the extent to which the lens angle and camera distance can affect a shot.
7.8 FOCUSING
Focus is an incredibly effective tool for directing the audience’s attention. The eye is always attracted to the part of the image that is in focus. This means that a knowledge of focus, depth of field, and lenses is essential if the camera operator and director want to use the camera creatively as a tool for storytelling.
There are a number of techniques that camera operators use to capture the action in focus.
![]() The most popular method is called follow focus. This technique requires the camera operator to continually change the focus as he or she follows the action, constantly turning the focus ring to keep the subject sharp whenever it begins to soften. However, focusing is not always as easy as that. With practice it can become a reflexive action. That does not mean it becomes easy.
The most popular method is called follow focus. This technique requires the camera operator to continually change the focus as he or she follows the action, constantly turning the focus ring to keep the subject sharp whenever it begins to soften. However, focusing is not always as easy as that. With practice it can become a reflexive action. That does not mean it becomes easy.
![]() Zone focusing refers to when camera operators are assigned a “zone” on the field of play or at a news event. They calculate the aperture so that basically everything will be in focus when the player or other subject moves into their zone. They generally do not try to shoot the subject when they are outside of their zone.
Zone focusing refers to when camera operators are assigned a “zone” on the field of play or at a news event. They calculate the aperture so that basically everything will be in focus when the player or other subject moves into their zone. They generally do not try to shoot the subject when they are outside of their zone.
![]() Prefocusing is when the camera operator focuses the camera on the subject before beginning to record. An example would be when a talk show host wants to show the audience a still photograph. Usually the host will place the photo on a stand located on his or her desk. Because one of the cameras has usually prefocused on the stand, the photo is instantly framed and in focus. Prefocusing is also required whenever a zoom lens is used. We will continue our discussion of prefocusing later in this chapter.
Prefocusing is when the camera operator focuses the camera on the subject before beginning to record. An example would be when a talk show host wants to show the audience a still photograph. Usually the host will place the photo on a stand located on his or her desk. Because one of the cameras has usually prefocused on the stand, the photo is instantly framed and in focus. Prefocusing is also required whenever a zoom lens is used. We will continue our discussion of prefocusing later in this chapter.
Many lenses also include macro systems, which are designed to provide a sharp image almost up to the actual lens surface. However, it is difficult to avoid a camera shadow when lighting such close subjects.
As the subject gets closer to the camera, the depth of field becomes shallower, so focusing is more critical. How noticeable a fall-off in sharpness is will depend on the amount of fine detail and tonal contrast in the subject.
7.9 AUTO-FOCUS
Many video cameras are fitted with an automatic focusing feature. This is a useful device for the occasions when the camera operator is preoccupied with following the action, is not sure where the subject is going to move to next, and might get the focusing wrong in the heat of the moment. But why not switch to auto-focus all the time so that we can forget about focusing altogether?
If the camera operator relies entirely on the automatic focus features in the camera, the resulting images will vary greatly. The auto-focus system simply sharpens the focus in a selected zone of the shot, irrespective of what is appearing there. So it needs to be used with care.
While auto-focusing can be very accurate, here are some situations that can be problematic:
![]() When the subject is not in the center of the picture. If two people are placed on either side of the frame, auto-focus may sharpen on an unimportant distant object in the center of the screen and leave the subjects soft-focused.
When the subject is not in the center of the picture. If two people are placed on either side of the frame, auto-focus may sharpen on an unimportant distant object in the center of the screen and leave the subjects soft-focused.
![]() The camera operator may want to focus on someone near the camera and a distant person at the same time, but auto-focus may sharpen on one or the other—or neither.
The camera operator may want to focus on someone near the camera and a distant person at the same time, but auto-focus may sharpen on one or the other—or neither.
![]() If shooting a subject through a foreground framework, such as a fence or branches, the system will focus on this foreground rather than the more distant subject (Figure 7.8).
If shooting a subject through a foreground framework, such as a fence or branches, the system will focus on this foreground rather than the more distant subject (Figure 7.8).
![]() If following someone who is moving around within a crowd, the auto-focus system is likely to readjust itself continually, focusing on nearby people instead of the intended subject.
If following someone who is moving around within a crowd, the auto-focus system is likely to readjust itself continually, focusing on nearby people instead of the intended subject.
![]() When the camera operator zooms to change the size of the shot, the autofocus system may refocus as the shot is recomposed.
When the camera operator zooms to change the size of the shot, the autofocus system may refocus as the shot is recomposed.
![]() If the camera operator is shooting a distant view and anyone (or anything) moves into the shot, closer to camera, the system may refocus on the secondary subject instead and defocus on the real subject. If, for example, the camera operator is panning around a scene and moves past a foreground tree, the system may readjust to focus on the tree.
If the camera operator is shooting a distant view and anyone (or anything) moves into the shot, closer to camera, the system may refocus on the secondary subject instead and defocus on the real subject. If, for example, the camera operator is panning around a scene and moves past a foreground tree, the system may readjust to focus on the tree.
When dealing with any of these situations, the best solution is to switch to manual focus to avoid the problems. Nevertheless, when used wisely, autofocus can be a useful tool.
7.10 DEPTH OF FIELD
Depth of field, or the focused zone, is usually defined as the distance between the nearest and farthest objects in focus. When shooting something in a distance, everything seems clearly focused. But refocus the lens onto something a few feet away, and only a limited amount of the shot will really appear sharply focused. Now focus on something very close to the camera, and sharpness becomes restricted to an even shallower zone.
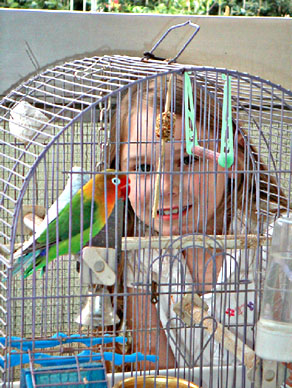
FIGURE 7.8
Auto-focus systems cannot accurately focus on subjects behind broken-up foregrounds such as fences, branches, or the cage in the photo shown here.
(Photo by Lynn Owens.)
How obvious this effect is varies with the amount of detail in the scene.
The depth of field varies with the following factors:
![]() The distance at which the lens is focused
The distance at which the lens is focused
![]() The size of the image sensors
The size of the image sensors
![]() The focal length of the lens
The focal length of the lens
![]() The lens f-stop (aperture)
The lens f-stop (aperture)
Alter any of these elements, and the depth of field changes.
Depth is greatest when any of the following is true:
![]() The lens is focused at a distance
The lens is focused at a distance
![]() A wide-angle lens is being used
A wide-angle lens is being used
![]() The lens aperture is stopped down (f/16) (Figure 7.9)
The lens aperture is stopped down (f/16) (Figure 7.9)

FIGURE 7.9
You can achieve a large depth of field by using a wide-angle lens and a large-numbered f-stop such as f/22. The bright sunlight in this photo allowed the large-numbered aperture.
Depth of field is shallow in the following situations:
![]() When you are focusing on subjects close to the camera
When you are focusing on subjects close to the camera
![]() When you are using a telephoto (narrow angle) lens
When you are using a telephoto (narrow angle) lens
![]() When you open up the lens aperture (f/2) (Figure 7.10)
When you open up the lens aperture (f/2) (Figure 7.10)
Don’t be misled into thinking that you can use a wide-angle lens to improve depth of field in a shot every time. In some situations, the wide-angle lens works well at increasing the depth of field. However, when you switch to a wide-angle lens, the subject will look smaller, and by the time the camera gets close enough to compensate, the focused depth may become the same as before—only now there may be distortion and exaggerated depth too. It all comes down to the type of shot the director is trying to capture.

FIGURE 7.10
The shallow depth of field shown here was achieved with the use of a telephoto (narrow-angle) lens along with a fairly small-numbered f-stop such as f/4.
(Photo by Chad Crouch.)
7.11 MAXIMUM SHARPNESS?
Of course, it is not necessary to always get everything in the picture as sharp as possible. There are certainly situations when the director will want to see everything in the shot clearly—for example, when showing widespread action such as in a ballgame or when presenting an interesting building. Another example is when the director wants to create depth in the picture by having the shot include a person near the camera and another some distance away, both sharply focused. Then the camera operator could use a wide-angle lens, stopped down as far as the light levels permit.
There will be other times, though, when the director wants the audience to concentrate on a specific subject and disregard the surroundings. This can be achieved by deliberately restricting the depth of field or by using a larger lens aperture or a narrower lens angle. Now, because of the limited depth of field, the subject will appear sharp against a defocused background, where anything likely to confuse or distract merges into an indistinct blur.
7.12 DIFFICULT TO FOCUS?
Sometimes there is insufficient depth of field to focus clearly on the whole subject. That is a specific problem in close-up shots. Stopping the lens down would help, of course, but there may not be enough light to do so without underexposing the image. If it is impossible to increase the light level, what can one do? Several compromise solutions are available. However, please note the word “compromise“—the results may not always be optimum (Figure 7.11).
![]() The best method may be to sharpen focus on the most important part of the subject and leave the rest defocused. Although this situation is not ideal, it is a way to show the viewers exactly what you want them to see.
The best method may be to sharpen focus on the most important part of the subject and leave the rest defocused. Although this situation is not ideal, it is a way to show the viewers exactly what you want them to see.
![]() It is possible to split focus and choose a compromise focusing distance that keeps all subjects clearly enough in focus.
It is possible to split focus and choose a compromise focusing distance that keeps all subjects clearly enough in focus.
![]() Sometimes a pull focus or throw focus is appropriate. For example, suppose that two people are being shot at different distances from the camera and it is not possible to get them both in sharp focus. The camera operator might start by focusing on the first person, and then, at the appropriate moment, change the focus to sharpen on the second person. The method successfully directs the audience’s attention, and the effect can be dramatic. So it is a technique that needs to be reserved for the right occasion.
Sometimes a pull focus or throw focus is appropriate. For example, suppose that two people are being shot at different distances from the camera and it is not possible to get them both in sharp focus. The camera operator might start by focusing on the first person, and then, at the appropriate moment, change the focus to sharpen on the second person. The method successfully directs the audience’s attention, and the effect can be dramatic. So it is a technique that needs to be reserved for the right occasion.
![]() Ideally the situation can be improved by moving the subjects or altering the camera position so that they are both about the same distance from the camera and within the available depth of field.
Ideally the situation can be improved by moving the subjects or altering the camera position so that they are both about the same distance from the camera and within the available depth of field.
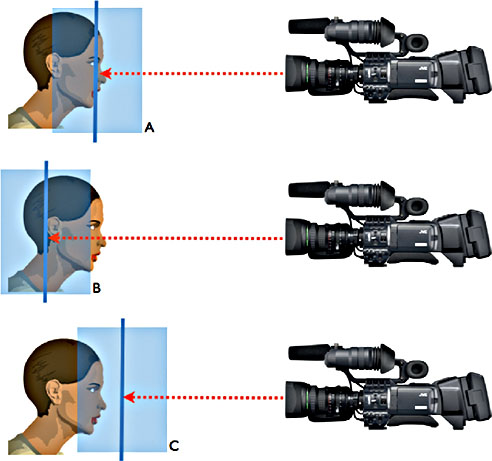
FIGURE 7.11
When accurately focused, (A), the most important part of the subject should be the sharpest. The specific focus point (as represented by the darker blue line in the illustrations) should have a large enough depth of field (represented by the light blue field) to keep the subject in focus as she moves a little forward or backward. Note that the incorrect focus point, as demonstrated in B and C, would make it easier for the subject to move out of focus.
(Camera photo courtesy of JVC.)
Limited Depth of Field
If the depth of field is too limited for your purposes, you can do the following (Figures 7.12 and 7.13):
![]() Stop down. Increasing the depth of field will require a high light level.
Stop down. Increasing the depth of field will require a high light level.
![]() Focus on one subject. Let others soften.
Focus on one subject. Let others soften.
![]() Split focus. Spread the available depth between both subjects (now none is really sharp).
Split focus. Spread the available depth between both subjects (now none is really sharp).
![]() Move subjects closer together. This way, they will be roughly the same distance from the camera.
Move subjects closer together. This way, they will be roughly the same distance from the camera.
![]() Use a wide-angle lens. The depth of field will increase, but the subject will now appear smaller.
Use a wide-angle lens. The depth of field will increase, but the subject will now appear smaller.
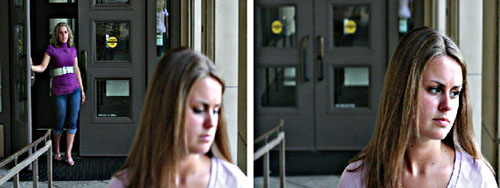
FIGURE 7.12
Pulling focus can be used to guide the viewer through a scene. Notice the change of focus in the two photos shown here.
(Photos by Josh Taber.)
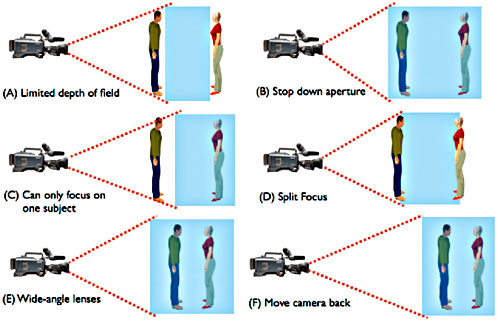
FIGURE 7.13 Dealing with a limited depth of field. When a limited depth of field creates problems (A), here are a few solutions:
![]() If the aperture is stopped down (a higher f-stop number), the depth of field will increase (B).
If the aperture is stopped down (a higher f-stop number), the depth of field will increase (B).
![]() If there is not enough depth to cover two people (C), it may be possible to split focus (D).
If there is not enough depth to cover two people (C), it may be possible to split focus (D).
![]() Wide-angle lenses have a much wider depth of field than a telephoto lens (E).
Wide-angle lenses have a much wider depth of field than a telephoto lens (E).
![]() The closer the camera is to the subject, the shallower the depth of field. By moving the camera farther back, a wider depth of field will be created. However, the subject will be smaller.
The closer the camera is to the subject, the shallower the depth of field. By moving the camera farther back, a wider depth of field will be created. However, the subject will be smaller.
(Camera photo courtesy of Panasonic.)
7.13 PREFOCUSING THE ZOOM LENS
The zoom lens is a fine tool for the creative camera operator, but it also has some nasty pitfalls for the unwary. When following fast-moving action, the camera operator may run into difficulties.
Depth of field will significantly change as a zoom lens moves through its focal length range. When zoomed out (wide-angle view), there is normally considerable depth of field available, and focusing is easy. Usually, so much looks sharp in the picture that the camera operator cannot judge exactly where the best focus is. But zoom in to a close-up shot (telephoto or narrow-angle view), and the depth of field becomes relatively shallow. In fact, there is always the danger that instead of being focused exactly on the subject, the lens was really focused some distance nearer or farther away. Consequently, when zooming in from a good, sharp long shot to a close-up, the image may be completely defocused, and then the camera operator has to hurry to correct the focus. This is especially tense for live, on-air productions (Figure 7.14).
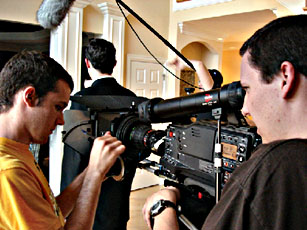
FIGURE 7.14
When focusing is extremely critical, especially in dramatic productions, a focus puller is often used to adjust the focus of the camera. This allows the camera operator to concentrate on framing.
The only solution to this dilemma is to remember to prefocus the zoom before taking the shot. The camera operator takes a trial close-up shot of the subject immediately beforehand so that the focus can be crisply adjusted; then he or she zooms back to the wide shot (without changing distance), ready to start shooting the action.
PREFOCUSING THE ZOOM
If zoom lenses have not been prefocused on the subject by zooming in for the close-up, the picture may become defocused during the zoom move from long shot to close-up.
![]() The long shot may look perfectly in focus. However, this is because of the depth of field created by the wide-angle lens.
The long shot may look perfectly in focus. However, this is because of the depth of field created by the wide-angle lens.
![]() As the lens zooms in to a telephoto (narrower angle), the depth of field becomes much more restricted, and it is possible that the shot will be totally out of focus.
As the lens zooms in to a telephoto (narrower angle), the depth of field becomes much more restricted, and it is possible that the shot will be totally out of focus.
![]() The best method of keeping zoom shots in focus is to zoom in close to the subject, focus, and then zoom out. This should allow the camera operator to zoom in and out, keeping everything in focus.
The best method of keeping zoom shots in focus is to zoom in close to the subject, focus, and then zoom out. This should allow the camera operator to zoom in and out, keeping everything in focus.
EXPOSURE
7.14 What Is “Exposure”?
Every video camera requires a certain amount of light to function effectively and produce quality images. However, the camera’s sensors can only handle a limited range of tones. When shots contain a wide range of tones (brightness values), directors cannot hope to reproduce them all absolutely accurately in the final image.
![]() If the amount of light from a surface exceeds the chip’s upper limit, it will reproduce as white in the video picture. It will burn out or clip to a blank white.
If the amount of light from a surface exceeds the chip’s upper limit, it will reproduce as white in the video picture. It will burn out or clip to a blank white.
![]() Conversely, where a surface reflects too little light, it will fall beyond the system’s lower limit and crush to an overall black tone.
Conversely, where a surface reflects too little light, it will fall beyond the system’s lower limit and crush to an overall black tone.
The average brightness of the lens image falling onto the sensor is primarily determined by the lens aperture (f-stop). The goal is to adjust the aperture so that the most important tones, usually people’s faces, are clearly visible. This process is called “adjusting the exposure.” “Correct exposure” is a subjective choice.
The video camera operator can always see the image in the viewfinder or on the screen. The operator can assess the picture continually, and if it is over- or underexposed, he or she can immediately compensate. In video/television production, the camera itself is the light meter.
Let’s take a practical example. The camera operator shoots someone who is standing out in the sunlight. He or she adjusts the exposure by altering the lens aperture until the person looks good in the viewfinder or, better still, on a high-grade picture monitor. The subject’s face tones, in particular, appear quite natural—neither too light nor too dark. However, the subject’s white shirt looks washed out and has no detail, or maybe the subject’s pants look black, with no signs of modeling in the material at all. The director might be willing to accept these results, unless this is a fashion shoot, meant to show off the quality and attractiveness of the clothing.
Don’t expect to always show good tonal gradation in everything in the scene. There will usually be something in the shot that crushes out to white or black. How successfully the shot is exposed will depend not only on the range of the tones appearing in it but also on the effect the director wants to capture. The director may want to deliberately underexpose an image to make it look more shadowy and mysterious. Or he or she might overexpose a shot of the seashore to create a high-key effect (Figure 7.15).
It is easier to control the tones in a studio by altering the lighting or by adjusting the aperture. But elsewhere, particularly on location, the camera operator may have to make the most of what is available, and at times the selected lens aperture may have to be something of a compromise.
If parts of the location scene appear as large blank white or black areas in the image, there may not be much you can do about it. The obvious remedy is to reframe the shot or change the camera position to keep the harsh white or black areas out of the picture altogether. If lighting equipment is available, it may be possible to lighten darker tones or shadowy areas (Figures 7.16 and 7.17). Occasionally, troublesome surfaces can be masked off (have someone standing in the foreground to obscure a large blank white wall). If the object that catches the eye is small, such as the sun reflected in a table mirror, it may be possible to reangle it or remove the mirror altogether. Again, choosing the optimum exposure may involve a certain amount of compromise.
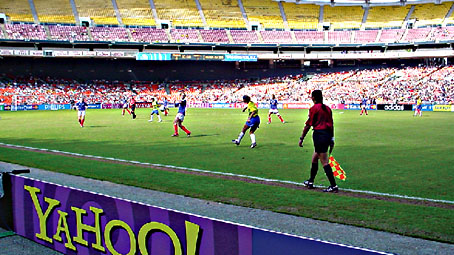
FIGURE 7.15
Directors cannot expect that every image will be captured with good tonal qualities. In this image, the director could choose to get good exposure of either the field of play or the audience.
(Photo by Shannon Mizell.)
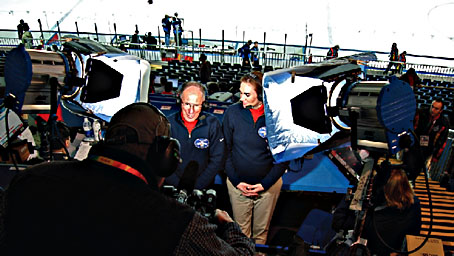
FIGURE 7.16
Lights were used to try to match the exposure of the presenter to the details on the ice of the hockey rink behind the talent. Otherwise, the ice would be entirely white or the talent would be entirely black.
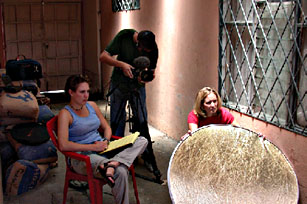
FIGURE 7.17
Additional lighting or some type of reflector can be used to lighten darker areas when working outdoors.
7.15 UNDEREXPOSURE AND OVEREXPOSURE
When a picture is underexposed, all of its tones will appear much darker. Results are usually dull and lifeless. Detail and modeling may be clear in light tones (even clearer than usual), but middle to dark areas look muddy and merge to black (Figure 7.18).

FIGURE 7.18
Taking the time to expose an image properly is essential for quality pictures.
It is worth remembering too that when the camera receives insufficient light from the scene, other image defects can also develop, such as lag (image smearing on movement) and picture noise.
To fix underexposure, open the lens aperture to provide the camera’s chips with a brighter lens image. (Of course, this will reduce the depth of field to some extent and could make focusing harder, particularly when using a narrow-angle lens.)
Increasing the video gain on a camera does not really compensate when the camera sensor is not getting enough light for maximum performance; it simply boosts the video signal. However, it will certainly enhance the picture, perhaps even making it look bright and well contrasted. The downside to video gain is that the quality of the image deteriorates the higher the gain is set.
When a picture is overexposed, all of its tones will appear unusually light. Even fairly light tones in the scene will block off, whereas darker areas of the scene will often be easier to discern than normal. Stopping down a little improves reproduction in light tones but reduces the visibility of shadows. However, it is impossible to electronically compensate for grossly over- or underexposed areas. They will have little detail. Again, lowering the video gain setting is not a good solution. It will simply reduce the overall brightness of the image (Figure 7.18).
7.16 AUTOMATIC EXPOSURE
If judging exposure is a matter of artistic choice, how is it that so many video cameras utilize an automatic iris most of the time? Leaving aside those people who would otherwise be careless about exposure, the auto-iris is a useful tool when you are in a difficult spot. It continually adjusts the lens aperture to maintain an average video signal.
Under typical location conditions, whether outside or inside, light levels can change considerably as the camera’s viewpoint changes. If you were to walk around a location with a light meter, you would probably see its needle bouncing up and down each time you repositioned. The camera may need to be stopped down to f/16 in a sunlit courtyard but opened up to f/2 inside a house.
Strictly speaking, if the camera needs to follow along with action that moves from the exterior to the interior, then the camera operator needs to keep an eye on the viewfinder and adjust the exposure to match the different light levels.
Some may wonder, if camera operators already have to follow focus as they move and keep the shot properly framed, how can they adjust the exposure at the same time? That is why even experienced camera operators under these conditions may leave exposure to the auto-iris and concentrate on focusing and composing the picture.
Ideally, the lens aperture is set for the correct exposure of the main subject. If the same subject appears in a succession of shots in the same scene, the exposure needs to be constant, not change about as incidental background tones vary. Yet changes of this kind are unavoidable when using an auto-iris.
It is easy to fool an auto-iris. If a lighter tone is brought into the shot (e.g., the subject opens a newspaper or takes off a jacket to reveal a white shirt), the iris will close down a little and darken all the other tones in the picture, including the subject’s face. Take the light area out of the shot or pan away from it, and the auto-iris will open up. Image tones will lighten. Take a long shot, and face tones may look dark, but zoom in to a close shot, and because other picture tones are now excluded, the face reproduces much lighter.
Under certain conditions, the auto-iris can also cause bad underexposure. Normally, if you are shooting inside a room, the system will open up and produce well-exposed images. However, suppose the person being filmed moves over to a window. The auto-iris will see the intense daylight and stop the lens down. As a result, the person could now appear as a silhouette, while the sky may be well exposed (Figure 7.19).
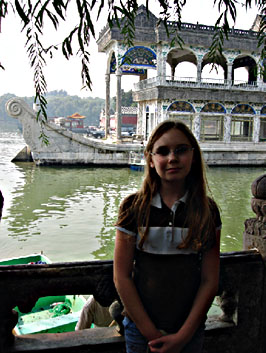
FIGURE 7.19
Brightly lit backgrounds will cause the auto-iris to underexpose the main subject.
Some cameras have a backlight control that can be switched on when the background is bright in the image. This opens up the iris an arbitrary stop or so above the auto-iris setting to improve the subject’s exposure. This may overexpose the lightest areas, but the subject would now be better exposed.
Although the auto-iris system has its own problems, these variations are often preferable to badly overexposed or underexposed images. And in practice, they may be too slight to worry about or may even pass unnoticed by the viewer. However, they are still there. Your decision about how to respond to these challenges all depends on how critical the final result is.
7.17 CAMERA ADJUSTMENTS
Manufacturers create a default that will give the camera operator the best average setting. Generally these settings produce a good image. However, there are times when a few adjustments can lead to great images. Our impressions of picture quality are very subjective. It is surprising how often we prefer a picture that looks just a little warmer or has slightly exaggerated contrast when compared with the original scene.
The most common camera adjustments relate to the lens, focus, lens aperture, shutter, video gain, and white balance. These changes can usually be completed on the camera or with a camera control unit (Figure 7.20). Within certain limitations, almost all of these areas also can be adjusted with editing software. Image quality can be altered in a number of ways, for a specific shot or perhaps for an entire scene:

FIGURE 7.20
Instead of using a white card to white-balance the camera, one can use light blue cards for the color balance process, resulting in a warmer image.
(Photos courtesy of Vortex.)
![]() Sharpness. Sharpness can be adjusted (or manipulated) by the use of special-effect filters (mist, soft focus, ripple, etc.) and by defocusing the lens.
Sharpness. Sharpness can be adjusted (or manipulated) by the use of special-effect filters (mist, soft focus, ripple, etc.) and by defocusing the lens.
![]() Brightness. Brightness can be adjusted with the lens aperture or video gain.
Brightness. Brightness can be adjusted with the lens aperture or video gain.
![]() Tonal range and contrast. Tone and contrast can be modified by adjusting the gamma (higher gamma settings produce a coarser, exaggerated contrast lower settings result in thin and reduced tonal contrasts). Lowering the pic-ture’s black level moves all picture tones toward black and crushes the lowest tones. Raising the black level lightens all picture tones but does not reveal detail in blackest tones.
Tonal range and contrast. Tone and contrast can be modified by adjusting the gamma (higher gamma settings produce a coarser, exaggerated contrast lower settings result in thin and reduced tonal contrasts). Lowering the pic-ture’s black level moves all picture tones toward black and crushes the lowest tones. Raising the black level lightens all picture tones but does not reveal detail in blackest tones.
![]() Color intensity. Increased saturation emphasizes the strength of color Reduced saturation (diluting with white) gives a more pastel effect.
Color intensity. Increased saturation emphasizes the strength of color Reduced saturation (diluting with white) gives a more pastel effect.
![]() Color fidelity. To simulate firelight or moonlight or make a picture warmei or cooler, shooting with “wrong” color temperature filters or gels may suffice Otherwise, color balance can be changed by adjusting the video gain, white balance, black level, or gamma of the separate red, green, or blue color channels (Figure 7.21).
Color fidelity. To simulate firelight or moonlight or make a picture warmei or cooler, shooting with “wrong” color temperature filters or gels may suffice Otherwise, color balance can be changed by adjusting the video gain, white balance, black level, or gamma of the separate red, green, or blue color channels (Figure 7.21).
Changing Camera Settings
Changes in black level or gamma should only be made if a waveform monitor is available. I would never suggest altering individual RGB settings in camera. These changes should be left until post. Furthermore, whatever settings you choose to alter, I would recommend that you always carefully mark the original settings of the controls so that they can be returned to their original positions/settings, thus restoring the camera to its former status (Figure 7.22).
—Tony Grant, Producer/Director
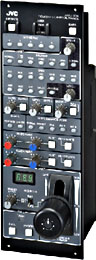
FIGURE 7.21
Camera remote control unit (CCU). The CCU can be used from a remote location to control the main electronic adjustments in the camera that affect picture quality (exposure, black level, gain, etc.).
(Photo courtesy of JVC.)

FIGURE 7.22
Waveform monitors are used when adjusting camera settings.
(Photo courtesy of Tektronix.)
7.18 PRACTICAL SOLUTIONS
When shooting a scene that contains a variety of tones, it may not be possible to accommodate the entire range. There are times when the director may have to accept that the lightest or the darkest areas will be lost in detail-less highlights or shadows. However, a few other options can be utilized to enhance the image in some limited situations.
Graduated Filters
When shooting in the field, there are times when you will find that the main subject is properly exposed, but distant skies are far too bright and distracting. This can be a particular problem when the foreground subjects are dark toned.
A graduated filter can often help you to overcome this dilemma. Its upper section has a neutral gray tint, which reduces the brightness of the image in that part of the picture. So it will “hold back” the overbright skies while leaving anything in the clear lower section unaffected.
Graduated filters have a gradual tonal transition, giving a soft blend between the treated and untreated areas. There are also graduated filters that can be used to create a deliberate effect (Figure 7.23). One-half of the filter may be orange and the other half clear or blue tinted. Some color filters have a central horizontal orange or yellow band, which, with care, may simulate the effect of a sunset.
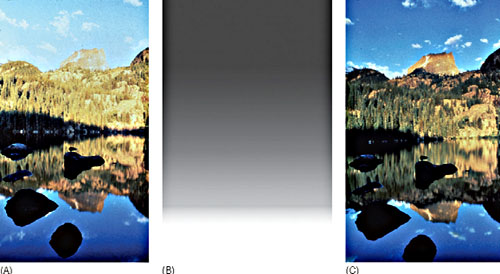
FIGURE 7.23
(A) A graduated filter. (B) A scene shown without the use of a filter. (C) Here the camera operator used a graduated filter to enhance the sky.
(Photos courtesy of Tiffen.)
The main disadvantages of this otherwise useful device are the following:
![]() The filter will not work for every shot; it only works in specific situations.
The filter will not work for every shot; it only works in specific situations.
![]() You cannot pan or tilt the camera when using this filter, or the effect will be obvious to the viewer.
You cannot pan or tilt the camera when using this filter, or the effect will be obvious to the viewer.
Tonal Adjustments
How successfully can a camera reproduce the scene that is being shot? The tones that are seen on the screen are usually expected to correspond exactly to those in the scene. However, in practice, video has a tendency to exaggerate or to reduce apparent tonal contrasts in the reproduced picture. At the lightest and darkest extremes, video cannot distinguish between subtle differences in brightness, so those tones appear merged into dense shadow or blank highlights.
As we saw earlier, if there is a difficulty in seeing detail or tonal differences in shadows, trying to improve things by opening up the lens aperture will probably overexpose the lightest tones. Extra video amplification won’t help either. Some cameras include a black stretch control, which will make shadow detail clearer and improve tonal gradation in darker tones. There may even be corresponding camera circuitry to improve reproduction of the lightest tones.
TEN COMMANDMENTS OF SHOOTING VIDEO
1. White balance must be done. Don’t forget to white balance your camera in every lighting situation.
2. Take plenty of recording material. Take two to three times as much recording medium (flash memory, hard drives, or tape) than you think you will need. It is better to have too much than not enough.
3. Take more batteries than you think you can possibly use. Also, take your power adapter and charger with you even if you think you won’t be near power … you never know.
4. Use manual focus. Since auto-focus always searches around as you move your camera or your subject moves, you have more control when you manually focus the camera. Plus, it also saves your battery for other things.
5. Don’t zoom when shooting. (Okay, you can do it sometimes.). However, zooming during the shooting of a production is often the sign of an amateur. Don’t overuse it.
6. Get a mic. Use an external microphone to capture your audio. The in-camera microphone picks up distracting camera sounds. Also, always monitor your audio with a headphone. Not listening to your sound is like not looking at your viewfinder.
7. Use a tripod. There is nothing like a steady shot. Most professionals use tripods 90% of the time.
8. Don’t use a tripod. Okay, I know that this sounds like I just contradicted #7… oh well. Video is made to capture motion—either your subject’s motion or your camera’s motion. There is nothing like a dynamic shot, such as following someone through a crowd. This movement may require more takes and is difficult to master. When successful, it really adds energy to a production.
9. Make sure that you shoot plenty of footage. You don’t want to have to go back to shoot additional cover footage. Shoot plenty of cutaways and extra material. Today’s recording medium is cheap.
10. Take care of your gear. You need it to work. Keep it in protective cases, keep it from dust, and keep the lenses clean.
HANDLING THE CAMERA
7.19 Panning and Tilting
If it is not possible to get a sufficiently wide shot of the subject to show it completely, or if the distant view does not have enough detail, there are two general solutions.
The first possibility is that a series of separate shots can be taken, which are then edited to build an overall image in the minds of your audience. However, when developing this sequence, avoid amassing a disjointed, random collection of images.
Alternatively, the camera can be panned or tilted carefully and systematically over the scene to relate various parts (Figures 7.24 and 7.25). Take care, though, to avoid a series of brief, erratic pans or long, “empty” pans that wander over unimportant things. Each pan needs to have a clear purpose and finish by settling on an interesting feature of the scene. Above all, avoid panning from side to side over the scene. Although this can be a great temptation, you are not likely to use these sequences when you see the results.
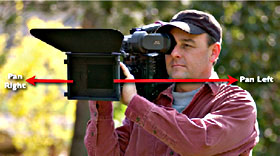
FIGURE 7.24
A pan shot is when the camera pivots left or right on a camera mount, such as a tripod, or as a handheld camera.In a pan shot, the camera mount or handheld operator pivots the camera.
(Photo courtesy of Vortex Media.)
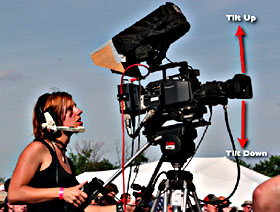
FIGURE 7.25
A tilt shot pivots the camera up or down on a camera mount. The correct command is “tilt up” or “tilt down.”
Like all camerawork, panning and tilting should be smooth and controlled. Above all, avoid overshooting, such as going beyond the final point and then having to correct the shot by reversing the pan a little. It draws attention to the error. Ideally, each movement should be brought to a smooth finish. If the pan has a jerky start or finish, is hesitant, its speed is uneven, or it wavers up and down, the result will look crude in the finished production.
Don’t be tempted to pan or tilt too quickly because the image may become an indecipherable blur. Most of us fall into that trap when first shooting a landscape. We pan briskly, trying to show everything only to find that the result on the screen is extremely disappointing as details break up (“strobe”) during the movement.
Try panning or tilting across a scene so that it takes an object roughly 5 seconds to travel from one edge of the screen to the other. That is about the fastest rate that can be used to avoid movement breakup. There are situations in which a rapid whip pan or zip pan can be used deliberately for a startling dramatic effect, but the technique is seldom used.
If a handheld camera is required to follow the action over a wide arc, camera operators should not try to turn their bodies on their heels. Instead, the body should be facing midway through the action, ready to make a smooth, balanced movement, and the camera operator will twist his or her body to follow the action. The result will be much more controlled. Keeping the knees slightly bent can also help (Figure 7.26). When using a tripod, remember to check that it is level before panning, or the framing may move upward or downward during the pan.
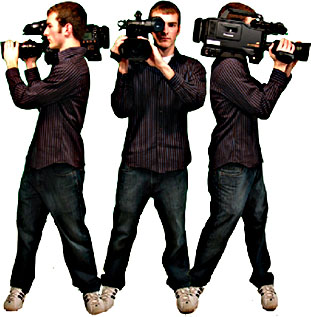
FIGURE 7.26
When following the subject in a wide arc, the camera operator’s feet should face the midpoint of the arc. This will allow the camera operator to pan smoothly with the action.
7.20 FOLLOWING MOVING SUBJECTS
There is a lot more to taking shots of a moving subject than simply keeping up with it. Dealing effectively with a moving camera is the difference between a good camera operator and a great camera operator.
When one is handholding a camera still, anything moving around in the shot can quickly reach the edge of the frame and move out of sight, particularly if it is moving quickly in a “tight” shot that is filling most of the screen. There are several ways to deal with this situation:
![]() The moving subject can be allowed to move out of the frame altogether (“exit”). This is a good idea if the director wants the audience’s attention to move on to a new subject.
The moving subject can be allowed to move out of the frame altogether (“exit”). This is a good idea if the director wants the audience’s attention to move on to a new subject.
![]() The camera operator can widen the shot by zooming out or moving back to include the movement. This is often the best solution if someone is pacing back and forth or waving his or her arms around (Figure 7.27).
The camera operator can widen the shot by zooming out or moving back to include the movement. This is often the best solution if someone is pacing back and forth or waving his or her arms around (Figure 7.27).
![]() The operator can pan or tilt the camera to keep the subject in the shot (for example, to follow somebody as the person moves around a room). However, don’t use too close a shot here. Not only will the subject itself look cramped in the frame, but it will also be difficult to follow the action smoothly.
The operator can pan or tilt the camera to keep the subject in the shot (for example, to follow somebody as the person moves around a room). However, don’t use too close a shot here. Not only will the subject itself look cramped in the frame, but it will also be difficult to follow the action smoothly.
![]() The camera position can be moved, such as an arc, so that the subject remains in shot.
The camera position can be moved, such as an arc, so that the subject remains in shot.
![]() The camera can move along with the subject, such as a tracking shot, keeping the subject in the frame throughout the action.
The camera can move along with the subject, such as a tracking shot, keeping the subject in the frame throughout the action.
![]() Instead of following the movement, you can let it leave the frame and then pick up the action from a new viewpoint.
Instead of following the movement, you can let it leave the frame and then pick up the action from a new viewpoint.
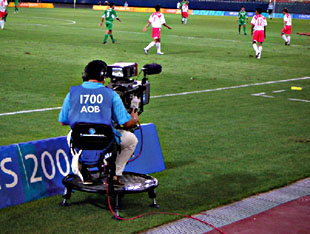
FIGURE 7.27
It can be difficult to shoot close-ups during fast-moving action. Generally the camera operator needs to zoom out a little to effectively cover the action.
If a single camera is being used to cover the action, the camera operator would need to stop recording, move to the next position, set up the new shot, and begin recording again. In the meantime, some of the action has been missed—unless, of course, the action can be repeated. In that situation, the action begins again from just before the camera was moved to the second position. If two or more cameras are being used, none of the action has to be missed; just cut to the second camera at the right moment.
All of these methods work. The camera operator or director must consider which one is most appropriate, both artistically and practically.
7.21 FRAMING MOVEMENT
At first sight, it seems logical to keep a moving subject exactly in the middle of the picture. However, the image will look unbalanced and boring. Instead, when panning with a moving subject that is running toward something, position the subject a little behind the center of the frame. If the subject is running away from something (such as a thief in a police chase scene), keep the subject just over the center frame (Figure 7.28). The image will look more dynamic; the faster the movement, the greater the offset. Most important, don’t let the subject “move around the frame” through uneven planning.
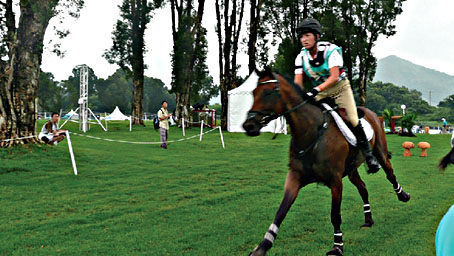
FIGURE 7.28
When shooting a fast-moving subject, keep the subject behind the center of the frame. The image will be more dynamic.
(Photo by Mark Stokl.)
7.22 WALKING
Handheld shooting is difficult. Unless the director is looking for a bouncy camera style, handholding a camera takes a lot of practice. It is not as easy as it seems to keep the camera level steady and well-composed shots in sharp focus.
When the subject moves away, the obvious response is to have the camera operator walk with the person. However, this can be a significant problem. The route has to be checked in advance to ensure that there are no carpets, steps, cables, people, or posts in the pathway. The camera operator could easily meet unseen hazards as he or she concentrates on the viewfinder image. That is why experienced camera operators develop habits of glancing around (to check out their surroundings and nearby action) and keeping both eyes open when using an eyepiece viewfinder. The safest and best strategy is to use a camera assistant who can get people out of the camera operator’s way or guide the operator around problematic obstacles (Figure 7.29).
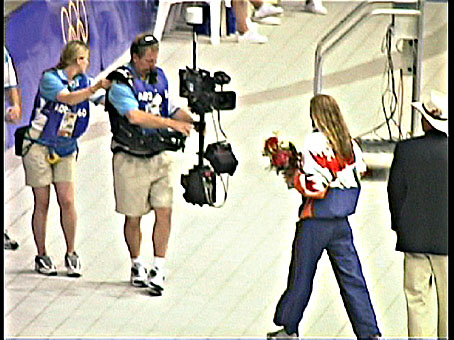
FIGURE 7.29
Camera assistants are invaluable to a handheld or Steadicam operator. The assistants can guide the operator around obstacles.
There is always a certain amount of bounce in the camera’s shot as the camera operator walks, especially if he or she is moving quickly. This unevenness may be unimportant or even dramatic if the camera is following someone’s moves over uneven ground, through a crowd, or through a forest. But it can be distracting when the operator is walking within a building.
If moving shots, particularly over rough terrain, are required, the most practical way to avoid camera bounce is to attach the camera to a stabilizer unit such as the Steadicam. This camera mount compensates for irregular movements. There are also several forms of optical or electronic image stabilization, which diminish vibrations and smooth out variations.
7.23 SHOOTING FROM VEHICLES
Whenever shooting from any vehicle, there are a number of points worth bearing in mind:
![]() Resist the temptation to rest the lens or the camera on the glass or the vehicle’s body, since vibration can damage the equipment and blur the images.
Resist the temptation to rest the lens or the camera on the glass or the vehicle’s body, since vibration can damage the equipment and blur the images.
![]() Smeary, rain-speckled, dusty, or tinted windows can significantly degrade picture quality, especially if sunlight is falling on them. The images will show a flattened contrast, defocused blurs, and changing color values that become particularly obvious when edited with other shots.
Smeary, rain-speckled, dusty, or tinted windows can significantly degrade picture quality, especially if sunlight is falling on them. The images will show a flattened contrast, defocused blurs, and changing color values that become particularly obvious when edited with other shots.
The position of the camera in the vehicle will influence the audience impact of the images. Facing forward, subjects appear to move toward the camera, getting closer and increasingly clearer. This is a powerful viewpoint that provides continual interest. A rear view, however, shows everything moving away from the camera, and the audience’s interest tends to fall. No sooner does something come into shot than it quickly becomes too small to see properly. Side windows are useful for shooting distant subjects, but anything close rapidly moves across the screen out of focus.
Shooting someone inside a moving car requires a certain amount of agility. A wide-angle (short-focus) lens is essential because it enables the camera operator to get sufficiently wide shots of the driver. Typical camera positions include the following: seated beside the driver, crouched in the passenger’s foot space, or leaning over from a rear seat. Cameras can also be mounted outside the car, using beanbags, bolt-on brackets, or suction-held pads (Figure 7.30).
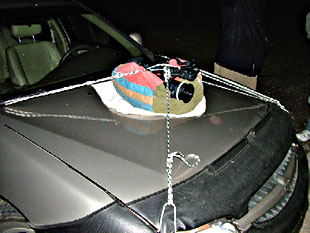
FIGURE 7.30
Many devices can be used to secure a camera to a moving car. This photo illustrates how a Cine Saddle (a sophisticated beanbag) can be tied onto a car for forward (toward the road) or backward (toward the driver) shots (also see Figure 8.15).
THE BASICS OF SHOOTING
7.24 Practical Conditions
There are no absolute “rules” for shooting effective images. In fact, if the images are arranged too systematically, the results can look boring and artificial. But there are a number of situations that need to be avoided.
During a busy shooting schedule, there generally is not time to experiment with the composition of each shot. Many times, quick decisions have to be made because a live event is unfolding, there may be production or broadcast deadlines, the crew is standing by, and, from a practical standpoint, time is money. So the pressure is generally on to make quick decisions. However, if the camera operator and director understand composition basics, they will know what to look out for and realize how to adjust the shot for the most appropriate effect. Once camera operators recognize the characteristics that make images unsuccessful, and many are a matter of common sense, they will avoid them instinctively.
Unlike a painter, who can arrange objects on the canvas to suit his or her ideas, a video camera operator usually has to make the most of what is already there. But that does not mean that what the viewer sees cannot be controlled. The director and camera operator can do a great deal to change an image’s appeal. They can select the viewpoint carefully, choose the appropriate lens angle, or control the way the shot is framed. Sometimes they can reposition the subject or some of the objects to further improve the image.
SHOOTING IN 3D
Audiences tend to want to explore a 3D frame longer than they would a 2D frame. Since there is more information to be imparted, most shots tend to stay on the screen a bit longer.
—Steve Schklaire, CEO, 3ality Digital Systems
When shooting in 3D everything is multidimensional. That means all the objects seen on the screen are typically in constant focus as they are with human vision. This is one of the reasons a rack focus effect in 3D looks uncomfortable to the eye and should be avoided.
—David Kenneth, President, I.E. Effects
7.25 SELECTING THE RIGHT SHOTS
Whether you are shooting a single-camera or a multicamera production, you must create a smooth-flowing sequence that makes sense to the audience. This will not happen automatically.
The worst thing you can do is to take a series of random “good shots” of the subject without any thought about how they are going to be interrelated on the screen. Planning is essential before the shoot begins. Thinking through the required shots and how they can be composed in advance will save time for everyone once the production begins. It also allows more production time because less time is spent experimenting and trying to make a decision.
7.26 PERSUASIVE SHOTS
Picture making is not just about creating beautiful pictures; it is about providing appropriate pictures. There may even be moments when an ugly shot is deliberately introduced in order to shock the audience with harsh reality. The camera too easily glamorizes. A scene of squalid decay can become a vision of interesting textures and hues in the evening sunlight.
A well-chosen sequence of shots should do more than just illustrate the subject for the audience. The chosen and arranged images express a point of view; they show how the director has interpreted the situation, what he or she wants to say about it. That is what creating programs is all about. It is almost as if the director were there beside the viewers, guiding their choices and interpretations of the events.
When showing the audience images of a bustling marketplace, the director is offering an unspoken invitation: “Look around at anything that happens to interest you.” More often, though, the director wants to draw the audience’s attention to certain aspects of a scene. The director is selecting shots that will invite the audience to concentrate on an interesting feature: “See how this object differs from that one. Notice the intricate details there.” Or on another occasion the director might be saying, “See how she is reacting to what he said. See what she is doing. Watch how she is doing it.”
7.27 GUIDING THE VIEWER THROUGH THE SCENE
As each shot appears on the screen, the audience is seeing and hearing it for the first time. In an instant, the audience has to interpret what the director has selected to put there. It is not surprising that viewers can occasionally become confused.
Unless the director is careful, the audience may “look at the wrong thing”— that is, the viewer’s attention might alight on something else in the picture that is more prominent, more colorful, or more interesting.
The duration of a shot is important too. If the director hangs on to any shot for too long, the audience will begin to lose interest. If the shots are too brief, they may flick past the viewer’s eyes without entering the brain.
The director’s goal is to help the viewers understand, to guide their thoughts, whether the scene is describing a technical process or telling a joke. The director does not want to confuse or distract them by irrelevancies. It is important to present a logical sequence of ideas that the audience can easily follow. The audience cannot stop to ask what the director meant or to reread what was said. Viewers have to get the point the first time around.
If the director does not take the trouble to choose shots carefully, people have to look around each picture, trying to decide what it is all about, correctly or incorrectly. If they do not have any idea of what they are supposed to be looking at (or don’t find it interesting), they will look at whatever draws their attention. Random pictures produce random thoughts.
Occasionally, the director may actually want to puzzle or intrigue the audience in order to create a dramatic or comic buildup of tension. The camera enters a quiet room. The viewers are left wondering; they see a threatening shadow of someone standing there, but a moment later they realize that it is only coming from garments on a coatrack. They have been fooled.
But, in most situations, if the audience is left puzzled, wondering where the shadow is, or what it is supposed to be, or why they have been switched away from something they found interesting to this new unexplained scene, then something is very wrong. Some directors do this all too often when they try to introduce some variety or do something different. The shot cuts to a building reflected in a puddle, or some wayside flowers, or a dog sleeping beside the road, or to some other image that seems to have nothing to do with the story. Even shooting the subject through a decorative foreground screen can be puzzling at times.
If a shot is appropriate and moves the story forward, it can be as unusual as the director likes. But if the audience is distracted by it or begins to think about how interesting the shot is rather than focusing on the subject, then the experiment has failed.
7.28 CLUTTER
If the audience’s attention is not guided to specific features of the scene, viewers are just as likely to look at the wrong thing or become bored.
When an image is absolutely full of things (a crowd of people, shelves of articles, or a wall of paintings), it is hard for the viewer to concentrate on any one of them properly, or even see them clearly. The director may be trying to say, “Aren’t there a lot of different versions?” or “See how big the collection is!” However, the viewers could end up feeling as though they missed out, especially when they can’t see any of the items clearly.
It is often far better to isolate the item the audience needs to see:
![]() Get closer (tighter framing).
Get closer (tighter framing).
![]() Change the camera’s viewpoint.
Change the camera’s viewpoint.
![]() Use a shallow depth of field so that only the main subject is in focus (Figure 7.31).
Use a shallow depth of field so that only the main subject is in focus (Figure 7.31).
![]() Move it apart from the rest.
Move it apart from the rest.
![]() Use contrasting tones.
Use contrasting tones.
![]() Use strong compositional lines.
Use strong compositional lines.
![]() Position the subject higher in the frame.
Position the subject higher in the frame.
![]() Use lighting to isolate the item (light pool, shadows).
Use lighting to isolate the item (light pool, shadows).
7.29 I CAN’T SEE IT PROPERLY
There will be times when the director will deliberately set out to intrigue, to mystify, and to keep the audience guessing. Diffusion or dramatic lighting may be used to make the subject look strange, mysterious, or just different. But these are the exceptions. Most times the director will want the audience to see the subject clearly.

FIGURE 7.31
Depth of field can be used to isolate a subject by emphasizing where the audience should look.
Look out for those moments when the viewer cannot see important aspects of the show because the shot is too distant, or something is shadowing the subject, or even someone’s thumb is over the label that the viewers are supposed to be reading.
Close-up shots are great for showing detail. But sometimes a close shot can prevent the audience from seeing enough of the subject. It may show a few cogs, when the audience really needs to see much more of a piece of machinery to understand how it works.
Although all of these situations are obvious, problems of this sort happen regularly.
COMPOSING PICTURES
7.30 Composition Rules and Guidelines
The goal of composition is to create an image that is attractive or that at least captures and keeps the audience’s attention and effectively communicates the production’s message. Throughout the years, a series of composition “rules” have been established. However, the word “rules” is not really appropriate for composition; they should be treated as guidelines. They are designed to be adapted, or even broken. Television would be boring if everyone composed every shot the same way. Your goal should be to look for imaginative ways to adapt or take advantage of these rules or guidelines. Don’t let them imprison your creativity; instead, let them motivate and inspire you.
COMPOSING THE SHOT
Good composition does not have to be difficult. However, it does take careful planning if you are to get the best image. Here are some key factors to consider that will ensure that your images effectively communicate the message of the production:
![]() Symbolism. Does the image have meaning to the viewer? When viewers see the image, what do they immediately think of? Is that what you are trying to communicate?
Symbolism. Does the image have meaning to the viewer? When viewers see the image, what do they immediately think of? Is that what you are trying to communicate?
![]() Meaningful context. The content of the image should allow the viewer to understand the subject better. Compose the shot in such a way that it includes a background, or foreground, that adds additional information or context to the image (Figure 7.32).
Meaningful context. The content of the image should allow the viewer to understand the subject better. Compose the shot in such a way that it includes a background, or foreground, that adds additional information or context to the image (Figure 7.32).
![]() Motion and emotion. The video images should give the audience the same emotional response that you had while shooting. Does the image portray emotion or motion in some way?
Motion and emotion. The video images should give the audience the same emotional response that you had while shooting. Does the image portray emotion or motion in some way?
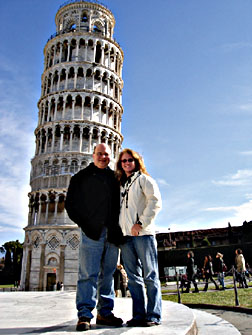
FIGURE 7.32
Because the image was shot with meaningful context, the viewer knows it was shot in Italy.
(Photo by Sarah Owens.)
7.31 THE BRIEF SHOT
When we look at a still picture, whether it is on the printed page or hung in an art gallery, there is an opportunity to linger. We can scrutinize it for as long as we want.
On a television screen, shots do not encourage browsing. Each is there for only a brief time, from a fraction of a second to perhaps half a minute at most. Then another replaces it. Each shot has to make its point quickly. Each creates its own impact.
7.32 “BORING” IS IN THE MIND
What makes a shot boring? A lot depends on the audience’s attitude toward what they are seeing. Any shot can be boring when someone personally finds little worth in looking at it or if the audience does not care to know who the people are, where they are, or what they are doing. That’s why other people’s vacation videos may lack some of the appeal for you that they have for those who took them.
A shot may seem to show just a boring stretch of ocean. But if the commentary tells us, “At this dangerous spot, after years of painstaking exploration, divers found the Spanish treasure ship,” we look at the picture with new eyes, although in reality there isn’t anything special to see! Without the influence of the commentary, such shots could be an instant yawn. But because our interest is aroused, and the images are there for only a short time, they attract and hold our attention.
So the appeal of any picture depends partly on what it shows, partly on what it is about, and partly on how interested the audience has been persuaded to be in it.
A shot of open desert may quickly pall, but when the audience sees a tiny moving shape in the distance, its curiosity is aroused. What happens if the director continues to hold that shot? Usually, people lose interest. But in different circumstances, while viewing exactly the same shot, they may be on the edge of their seats, waiting perhaps to discover which of the travelers has managed to survive.
If there is too much to see in the picture, the eye flits around hopefully but probably finishes up concentrating on nothing. If there is too little in the shot, attention soon falls.
When there are no visual accents to grab the attention, the eye wanders. But if things can be arranged so that the main subject stands out from its surroundings, then the audience will concentrate on it and is less likely to look at other things in the picture.
7.33 SHOTS THAT ARE DIFFERENT
It is tempting to devise shots that are different, shots that make the eye stop and wonder. Wildly distorted perspectives from a close wide-angle lens, very low-angle shots, or pictures using weird reflections are fine when you need them for a dramatic or comic effect. But extremely unusual viewpoints don’t just make a picture look different; they also draw attention to themselves. They may distract the audience from the real subject.
7.34 FITTING THE FRAME
The TV screen has a horizontal rectangular shape (unless you are putting cell phone video on a website), and many subjects fit comfortably into this format (Figure 7.33). So we can get quite a close-up shot of them, filling the entire screen, without losing parts outside the frame area.
Others are too tall for the screen. So they can be shown completely only through a long shot, or they can be shot in sections, either by panning over them or by cutting between a series of close-up shots. Sometimes when the subject does not fit the screen, an oblique viewpoint must be selected in order to get it all into the picture.
As the camera gets closer, parts of the subject are bound to be lost outside the frame of the picture. Most television receivers are adjusted to get the maximum picture size possible, so they cut off the edges of the shot. To make sure that the audience does not miss anything important, such as titling, it is important to compose the shot to keep these details within the “safe area” of the screen (Figure 7.34).

FIGURE 7.33
Television screen ratios: The proportions of a standard television picture are four units horizontally and three units vertically. If a picture is 18 inches wide, it is 13.5 inches high. In the HDTV 16 × 9 format, if the image is 16 inches across, it is 9 inches high.
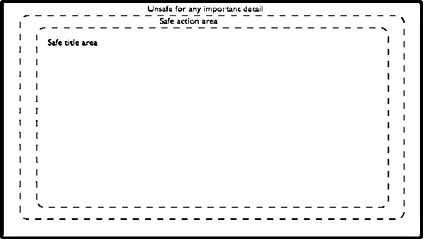
FIGURE 7.34
The picture edges are usually lost on the screen (as a result of overscanning the picture tube). To ensure that no important action or titling is lost, keep it within the borders shown.
If a person is shot so that the frame chops off their head, hands, or feet, the result looks odd. But if you alter the shot slightly so that the frame cuts partway along the individual’s limbs, the effect may seem much more natural.
FRAMING PEOPLE
![]() Don’t let the frame cut people at natural joints; it is more attractive to cut at intermediate points.
Don’t let the frame cut people at natural joints; it is more attractive to cut at intermediate points.
![]() Avoid having people seem to lean or sit on the edge of the picture.
Avoid having people seem to lean or sit on the edge of the picture.
![]() If the shot is framed too close to contain the subject’s motion, the subject will keep moving in and out of the picture. The result is disconcerting and distracting (Figure 7.35).
If the shot is framed too close to contain the subject’s motion, the subject will keep moving in and out of the picture. The result is disconcerting and distracting (Figure 7.35).
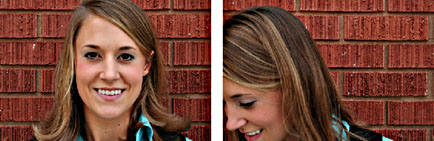
FIGURE 7.35
If shooting too close, the camera operator may not be able to keep up with the movement of the subject.
(Photo by Josh Taber.)
It is interesting to see how the frame of the screen affects how comfortable we feel with the picture. If a shot is taken in which the subject just fills the screen, it will look cramped and hemmed in by the frame. Get a little closer, so that parts of the subject are cut off, and all at once the shot looks great. Take a shot in which the subject only fills a small part of the screen, and we may get the impression that there is too much air around the subject.
7.35 WATCH THE BACKGROUND
Directors and camera operators need to be detail oriented. New directors often concentrate so much on the main subject that they miss things in the background that pop out to the audience. Items in the background of a shot can cause the audience to easily become distracted, moving them away from the program’s content. Repositioning the camera may be all it takes to create a great shot (Figure 7.36).
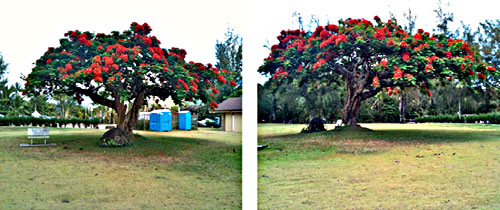
FIGURE 7.36
While the tree is beautiful, the portable restrooms in the background distract the audience. By simply moving the camera to another angle, the attention is drawn back to the tree.
In order to draw the audience’s attention to your primary subject, it is important to simplify the background of the images so that the audience knows where to look. Otherwise, they are left searching through the image, trying to figure out what they are seeing (Figure 7.37).
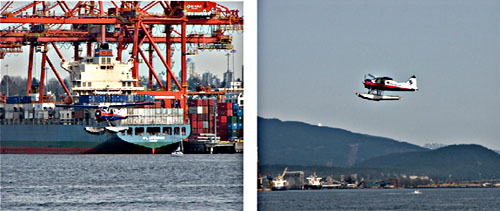
FIGURE 7.37
Simplify the background. The first photo shows an airplane in front of a ship—the airplane is difficult to see. By shooting the plane with a simple background, the audience is drawn to the airplane.
(Photos by Sarah Owens.)
7.36 DIVIDING THE IMAGE INTO THIRDS
If the screen is divided into even proportions (halves, quarters), either vertically or horizontally, the result is generally boring. For example, a horizon located exactly halfway up the frame should be avoided.
The rule of thirds is a useful aid to composing the picture. Divide the screen into thirds both horizontally and vertically (Figure 7.38). The main subject should be on one of those lines or, ideally, on the intersection of two of the lines. The thirds rule suggests that the main subject should not be in the middle of the image (Figure 7.39). Instead, it should be placed before or after the center of the image, depending on the effect the director would like. Keep in mind that the “thirds” is merely a guideline; sometimes it may be closer to a fifth or somewhere in between. Remember also that, ultimately, the subjects’ positions depend on their size, shape, tone, the background, and their relative importance. Good camera operators instinctively compose shots with these features in the back of their minds.

FIGURE 7.38
The thirds rule suggests that the main subject should not be in the exact center of the image.
(Photo by Sarah Owens.)

FIGURE 7.39
While placing the main subject in the exact center of the image allows formal balance, it can be boring. By placing the subject slightly to the left or right of the frame’s centerline, the image becomes more dynamic.
(Photo by Chad Crouch.)
7.37 SHOOTING FROM DIFFERENT ANGLES
The majority of the images seen on television have been shot at the eye level of the camera operator. Shoot from high angles looking down on the subject. Look at the scene from low angles. Try to find angles that communicate the subject to the audience and hold their attention.
When shooting people, low-angle shots make them look important (Figure 7.40). A high-angle shot, which looks down on the subject, can make the person look small and insignificant.

FIGURE 7.40
Low-angle shots portray strength while high-angle shots can make people look inferior.
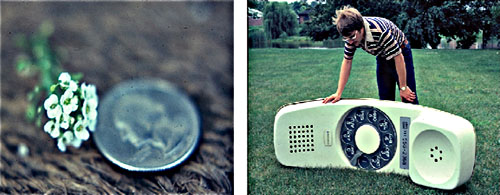
FIGURE 7.41
If shooting something unusually large or small, show it next to something that the audience is familiar with so that the audience can understand its size.
7.38 SHOWING SCALE
The audience does not always understand the size of the subject being shot. When shooting a subject that is very large or very small, it is important to compose the image in a way that puts the subject in context so that the audience can understand the size without being told (Figure 7.41).
7.39 FRAMING THE SUBJECT
Framing the subject can add depth to the scene. The frame could be a tree, a fence, or, better yet, something that adds meaningful context to the subject. It is important that the frame not detract from the subject or message (Figure 7.42).
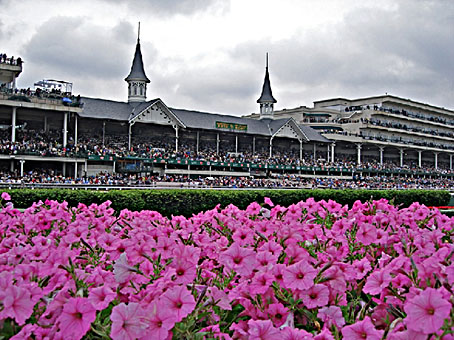
FIGURE 7.42
Flowers frame the subject.
(Photo by Josh Taber.)
7.40 LEADING LINES
Leading lines composition is when the lines within the image lead the viewers’ eyes to what the director wants them to look at. These lines can create specific feelings:
![]() Horizontal lines can portray calm and tranquility.
Horizontal lines can portray calm and tranquility.
![]() Vertical lines can show strength and dignity.
Vertical lines can show strength and dignity.
![]() Diagonal lines can show movement and speed.
Diagonal lines can show movement and speed.
![]() Curved lines can portray serenity.
Curved lines can portray serenity.
![]() Converging lines can show depth (Figure 7.43).
Converging lines can show depth (Figure 7.43).
7.41 HEADROOM
If there is not enough space between the top of a person’s head and the top of the picture (too little “headroom”), the frame will seem to crush down on the subject, and parts of the head may be cut off by the television overscan. If there is too much space, then the image becomes unbalanced and the audience’s attention goes up to the space to see what is there (Figure 7.44). The subject’s height in the frame alters the feeling of the picture’s vertical balance, so when taking shots of people, always look out for the headroom. It will be considerable in a long shot and will reduce correspondingly as the shot gets closer. As a very rough guide, keep the eyes at about a third of the screen height from the top of the picture. However, headroom is influenced by whatever else is visible in the top of the picture.
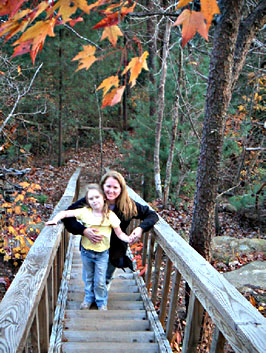
FIGURE 7.43 Converging leading lines portray depth in the image. Also, note that the leaves do provide some framing.
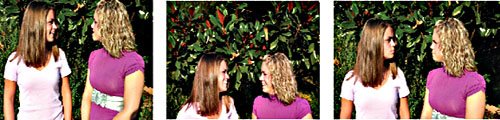
FIGURE 7.44
The first image has too little headroom, the second image has too much headroom, and the last one is correct.
(Photo by Josh Taber.)
7.42 GOOD BALANCE
Looking at a well-balanced image, we see that it has a settled, stable look. An unbalanced shot, on the other hand, has an insecure, uncertain feel to it.
Sometimes that might be just what the director wants. An unstable, incomplete look increases tension and creates dramatic impact. An easy way to achieve this is to make the picture topheavy or lopsided. Usually shots are arranged so that they look balanced and complete.
Other subjects within the frame can significantly impact the balance. The impact of other subjects depends on their relative sizes and tones. Obviously, a large subject a long distance away may appear smaller than a tiny object close to the camera. It is the effect that counts. A large subject on one side of the frame can actually be balanced with several smaller ones on the other side. It is all a matter of their relative sizes, tones, and distance from the center of the frame (Figure 7.45).
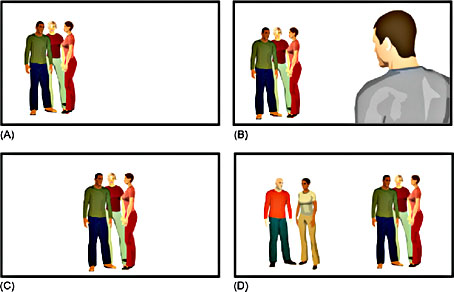
FIGURE 7.45
A group that would look lopsided and unbalance the picture (A) can be counterbalanced by another mass in another part of the screen (B). If centered (C), the picture is balanced, even without other subjects, but continual centering gets monotonous. Different-sized masses can balance each other, but take care not to split the audience’s attention (D).
The key to interesting, well-balanced images is not shots that are continually, monotonously centered every time, but shots that are balanced across the frame, depending on the tones and proportions of the subjects we see there.
7.43 CHANGING THE PERSPECTIVE
You can vary the perspective and position of things in a picture simply by doing the following:
![]() Adjusting the camera’s distance. The closer things are to the camera, the larger they appear in the frame. Even a slight change in the camera’s distance can affect the apparent size of foreground items considerably, while anything in the background can remain about the same size in the picture.
Adjusting the camera’s distance. The closer things are to the camera, the larger they appear in the frame. Even a slight change in the camera’s distance can affect the apparent size of foreground items considerably, while anything in the background can remain about the same size in the picture.
![]() Changing the camera height. Lower the camera’s viewpoint, and things in the foreground may become more prominent until they dominate the entire image. However, raise the camera a little, and it may be possible to shoot past them altogether. The viewer may not even realize that they are there.
Changing the camera height. Lower the camera’s viewpoint, and things in the foreground may become more prominent until they dominate the entire image. However, raise the camera a little, and it may be possible to shoot past them altogether. The viewer may not even realize that they are there.
![]() Adjusting the lens angle. Use a wide-angle lens and everything looks much smaller and farther away than usual. Size diminishes rapidly with distance from the camera. Even items relatively close to the lens appear farther away than normal. The wide-angle shot generally emphasizes distance and depth, noticeably distorting subjects in the foreground.
Adjusting the lens angle. Use a wide-angle lens and everything looks much smaller and farther away than usual. Size diminishes rapidly with distance from the camera. Even items relatively close to the lens appear farther away than normal. The wide-angle shot generally emphasizes distance and depth, noticeably distorting subjects in the foreground.
![]() Conversely, when a telephoto or narrow-angle lens is used, the reverse happens. Everything looks much closer than usual. Relative sizes do not seem to change much with distance. Even things that are far off still look pretty close. Depth appears reduced.
Conversely, when a telephoto or narrow-angle lens is used, the reverse happens. Everything looks much closer than usual. Relative sizes do not seem to change much with distance. Even things that are far off still look pretty close. Depth appears reduced.
So by selecting an appropriate lens and adjusting the camera’s distance, you can significantly control the perspective of the shot.
7.44 GROUPING (UNITY)
When showing a number of items in an image, avoid having them scattered around the frame. It is better to centralize the viewers’ attention by grouping subjects in some way; otherwise the audience is more likely to look around the image at random. Grouping creates a sense of unity in a picture by pulling its subjects together.
Sometimes groupings can be created by deliberately positioning the subjects to suit the composition. Other times the camera’s viewpoint is deliberately selected to frame the subjects in a way that creates unity.
7.45 CAMERA VIEWPOINT
The location of the camera, in relation to the subject, will have a strong influence on what the subject looks like to the viewers and how they feel about it. The smaller a subject appears in the frame, the less important it seems to become, and less detail is visible. Its surroundings become more prominent and can take attention from the subject.
Although closer shots emphasize the subject, care needs to be taken that they do not become so enlarged on the screen that the effect is overpowering. Really close-up shots often lose scale and make the audience forget the true size and proportions of the subject.
Looking down at any subject tends to make it look less impressive than looking up at it. Although steeply angled viewpoints are usually too dramatic for most purposes, even a slight variation from an eye-level position can affect the impact of a subject.
7.46 DISTORTIONS
Controlled distortion can be an effective camera/lens technique in appropriate situations. For example, use a close wide-angle lens to distort a Halloween mask and create a frightening effect. Or use this technique to make a small group of trees look like a threatening forest.
However, take care so that shapes do not become badly distorted by accident. Let’s use an example of shooting an oil painting situated high on the wall of a historic house. Either to avoid light reflections or to get an unobstructed view, the camera operator may decide to take close shots of it from a side position using a telephoto lens. While he or she may get the shot, the result may be a squashed version of the painting that does little justice to the original.
When shooting in a small room, you may need to use a wide-angle lens to prevent everything from looking too close. However, there is a good chance that now the room will look much larger than it really is, and if people appear in the shot, they may appear warped because of wide-angle distortions. Most people really don’t want to look as though they have gained weight (Figure 7.46)!
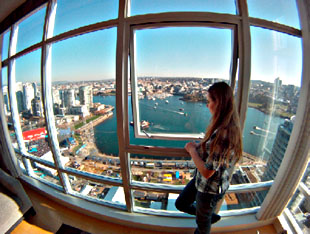
FIGURE 7.46
When using a wide-angle lens, close to the subject, the subject will distort.
ANTICIPATING EDITING
An editing session will go much more smoothly if the camera operator keeps the final postproduction editing phase in mind when shooting.
—Kathy Bruner, Producer
7.47 CONTINUITY
Every time the camera is set up to take the next action shot, think about editing; otherwise you may end up with a series of shots that do not fit together smoothly. This especially happens when repositioning the camera to shoot a repeated scene from a different location.
The most frequent problems are as follows:
![]() Part of the action is missing.
Part of the action is missing.
![]() The action shot from another angle does not match that from a previous shot of the subject.
The action shot from another angle does not match that from a previous shot of the subject.
![]() The direction of the action has changed between successive shots.
The direction of the action has changed between successive shots.
![]() The shot sizes are too similar or too extreme.
The shot sizes are too similar or too extreme.
![]() Action leaves the frame and reenters it on the same side.
Action leaves the frame and reenters it on the same side.
![]() Successive shots show continuity differences; for example, the talent is and then is not wearing eyeglasses, shows different attitudes/expressions, or is dressed differently.
Successive shots show continuity differences; for example, the talent is and then is not wearing eyeglasses, shows different attitudes/expressions, or is dressed differently.
7.48 IMPROVING EDITING FLEXIBILITY
When shooting, editing flexibility can help in various ways.
Avoid Brief Shots
![]() Always tape the run-in and run-out to an action to allow editing flexibility. Do not wait to record until the instant the action starts. Extra footage on each side of the action, or head or tails, will give the editor the opportunity to utilize dissolves and fades and will allow him or her to trim the footage in an optimal way.
Always tape the run-in and run-out to an action to allow editing flexibility. Do not wait to record until the instant the action starts. Extra footage on each side of the action, or head or tails, will give the editor the opportunity to utilize dissolves and fades and will allow him or her to trim the footage in an optimal way.
![]() Where possible, start and finish a long panning shot with a still shot.
Where possible, start and finish a long panning shot with a still shot.
Extra Editing Material
![]() Always shoot some cutaways showing the surroundings, general scene, bystanders’ reactions, and so on.
Always shoot some cutaways showing the surroundings, general scene, bystanders’ reactions, and so on.
![]() Determine whether specific reaction shots/nod shots are needed.
Determine whether specific reaction shots/nod shots are needed.
![]() It is sometimes helpful to shoot the same scene at a leisurely pace and at a faster pace (slow pan and faster pan) to allow editing flexibility.
It is sometimes helpful to shoot the same scene at a leisurely pace and at a faster pace (slow pan and faster pan) to allow editing flexibility.
Faulty Takes
![]() Do not record over an unsuccessful shot. Parts of it may be usable during the editing process.
Do not record over an unsuccessful shot. Parts of it may be usable during the editing process.
![]() If an action sequence goes wrong, it is sometimes better to retake it entirely. At other times, just change the camera angle (or shot size), and retake the action from just before the error was made (a “pickup” shot).
If an action sequence goes wrong, it is sometimes better to retake it entirely. At other times, just change the camera angle (or shot size), and retake the action from just before the error was made (a “pickup” shot).
Establishing Shots
![]() Always begin shooting with a wide shot of the scene (establishing shot), even if it is not used ultimately. This shot allows the editor to understand the placement of the other shots.
Always begin shooting with a wide shot of the scene (establishing shot), even if it is not used ultimately. This shot allows the editor to understand the placement of the other shots.
![]() Consider taking a long shot (cover shot or master shot) of all of the action in a scene, and then repeat the action while taking closer shots.
Consider taking a long shot (cover shot or master shot) of all of the action in a scene, and then repeat the action while taking closer shots.
COMMON FAULTS WHILE SHOOTING
![]() Make sure that the camera was white balanced properly and the appropriate color correction filter was used.
Make sure that the camera was white balanced properly and the appropriate color correction filter was used.
![]() The camera operator must take the time to make sure that the lens is properly focused.
The camera operator must take the time to make sure that the lens is properly focused.
![]() The camera should be mounted on a tripod or some other type of mount as much as possible. Most people cannot handhold a camera very steadily, especially for an extended period of time.
The camera should be mounted on a tripod or some other type of mount as much as possible. Most people cannot handhold a camera very steadily, especially for an extended period of time.
![]() Taking the time to level the camera may be time-consuming but is essential—the horizons need to be straight.
Taking the time to level the camera may be time-consuming but is essential—the horizons need to be straight.
![]() Each time the camera is repositioned, the headroom must be reviewed.
Each time the camera is repositioned, the headroom must be reviewed.
![]() Make sure that the subject is properly framed. Do not cut on a natural bend of a body.
Make sure that the subject is properly framed. Do not cut on a natural bend of a body.
![]() Advanced planning, possibly even including storyboarding, will help make sure that your shots are not too similar, the camera is at the right height, the focusing is on the right subject, and the necessary type of shot (CU, MS, or LS) is used.
Advanced planning, possibly even including storyboarding, will help make sure that your shots are not too similar, the camera is at the right height, the focusing is on the right subject, and the necessary type of shot (CU, MS, or LS) is used.
![]() All subjects should not be center-frame: Keep the rule of thirds in mind when shooting.
All subjects should not be center-frame: Keep the rule of thirds in mind when shooting.
![]() Think “transitions” as you select your shots.
Think “transitions” as you select your shots.
![]() Carefully review the foregrounds and backgrounds of a scene for distraction objects.
Carefully review the foregrounds and backgrounds of a scene for distraction objects.
![]() It is better to have a clip that is too long than too short. Make sure that you begin shooting before the action begins and continue shooting briefly after the action is complete.
It is better to have a clip that is too long than too short. Make sure that you begin shooting before the action begins and continue shooting briefly after the action is complete.
![]() Zoom shots must be motivated; they need to be there for a reason.
Zoom shots must be motivated; they need to be there for a reason.
![]() If panning is not smooth, the tripod may need to be adjusted.
If panning is not smooth, the tripod may need to be adjusted.
![]() When the talent has to handle an object, it is important to practice with the talent so that they understand what you need them to do.
When the talent has to handle an object, it is important to practice with the talent so that they understand what you need them to do.
MORE SHOOTING TIPS
7.49 What Does a Filter Do?
Lens filters can be used in several ways:
![]() To reduce the image brightness in strong sunlight or to allow a wider lens aperture
To reduce the image brightness in strong sunlight or to allow a wider lens aperture
![]() To give the picture an overall tint in order to:
To give the picture an overall tint in order to:
![]() correct the color temperature of the prevailing light
correct the color temperature of the prevailing light
![]() simulate lighting conditions, such as candlelight, a sunset, or firelight
simulate lighting conditions, such as candlelight, a sunset, or firelight
![]() To reduce the overall image contrast
To reduce the overall image contrast
![]() To cut through haze on location (improve image contrast)
To cut through haze on location (improve image contrast)
![]() To create an atmospheric effect, such as fog, mist, or haze
To create an atmospheric effect, such as fog, mist, or haze
![]() To create a decorative effect, such as rays around highlights (starburst)
To create a decorative effect, such as rays around highlights (starburst)
![]() To distort the image in various ways, such as creating a ripple effect
To distort the image in various ways, such as creating a ripple effect
![]() To soften the image (such as localized or overall diffusion)
To soften the image (such as localized or overall diffusion)
![]() To reduce a bright sky or to enhance clouds
To reduce a bright sky or to enhance clouds
![]() To suppress light reflections or glare
To suppress light reflections or glare
Filters also come in a number of different forms (Table 7.3). Some camera filters are made of plastic or glass and can be square or rectangular. These filters are slipped into a matt box, which is supported in front of the lens (Figure 7.47). Other glass filters are circular and screw into threads on the front of the lens. The third type of glass filter is a small piece of glass that is housed inside the camera, called a filter wheel, for quick selection. Most professional cameras include two or three filters in their filter wheel, with room for a couple of others. There are also digital filters that can be integrated into editing systems and allow the editor to experiment with a variety of filters.
7.50 CROSSING THE LINE
Camera viewpoints can easily confuse the audience’s sense of direction and their impression of spatial relationships if care is not taken when selecting camera positions. For example, during a basketball game, if cameras are placed on both sides of the court, it is confusing to see a player running toward the left side of the screen and then, when the director cuts to the camera on the other side of the court, to see the player running toward the right side of the court.
To avoid this confusion, keep in mind that there is an axis of action (also called the action line, proscenium line, or eye line) that runs along the direction of the action. The camera must be kept on one side of this “line.” It is generally not crossed when covering an action. It is possible to dolly across the line, or shoot along it, or change its direction by regrouping people, but cutting between cameras on both sides of this imaginary line produces a reverse cut or jump cut (Figures 7.48 and 7.49).
Table 7.3 The Most Common Types of Filters
| Neutral density filter | Obtainable in a series of densities from 80.0% to 0.01% transmission. These transparent gray-tinted filters reduce the amount of light but do not affect the color quality. These filters can also be purchased as gels and placed over windows or other light sources to reduce the light intensity. |
| Color correction filter | Compensates for the color quality of the prevailing light. A “daylight filter” (light blue) adjusts the orange-yellow color quality of tungsten lighting to match the bluish quality of daylight. |
| Color conversion filter | Colored filter giving the entire picture a specific color. For example, a light blue filter simulating moonlight. |
| Ultraviolet (UV) filter | A coated filter that blocks the ultraviolet light that creates glare and reduces picture contrast when shooting in the open air. |
| Fog filter | A filter that diffuses the image and simulates a foggy or misty effect. There are a number of different types of these filters available, some with an etched or finely ground surface, to open-weave net material stretched across the lens. |
| Diffusion filter | Provides overall softening of the image, from slight “defocusing” to strong diffusion. Created by ribbing, embossing, or scribing the filter’s surface. |
| Star filter | A clear disc with a closely scribed or grooved grid, which produces multiray starburst patterns (e.g., 4, 6, 8 ray) around highlights and point light-sources. On turning the filter, the ray pattern rotates. |
| Graduated ND filter | A graduated neutral density filter that reduces the brightness of the upper part of the image (possibly the sky), while remaining clear below (see Section 7.17). |
| Polarizing filter | A filter material that is selective to light direction. Rotated to the appropriate angle, found by trial and error, this filter can selectively reduce light reflections from shiny surfaces (such as glass, water, metal, road surfaces), and darken blue skies, while making clouds more prominent. |
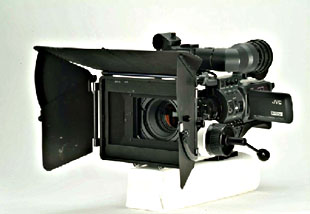
FIGURE 7.47
Square or rectangular filters can be slid into a matt box like the one pictured here.
(Photo courtesy of JVC.)
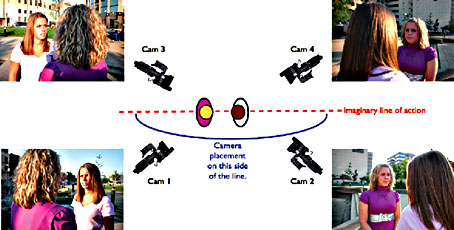
FIGURE 7.48
The line of action. Shots can be cut between cameras located on the same side of the imaginary line of action: between 1 and 2, or 3 and 4. Cutting between cameras on opposite sides of this line could cause a jump cut (1 and 3, 1 and 4, 2 and 3, and 2 and 4).
(Photos by Josh Taber.)
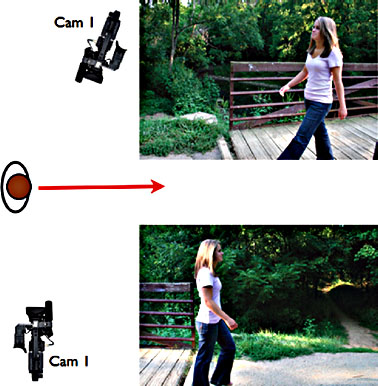
FIGURE 7.49
Crossing the line. Because the camera has been moved across the line of action, the walk appears to have changed direction, confusing the audience.
(Photos by Josh Taber.)
Nathan White, Videographer
Nathan White, Videographer
What do you like about being a videographer?
Few positions within television production can put a person in the middle of the action quite like being a vid-eographer. Whatever is unfolding in the production is literally taking place directly in front of the videographer.
An example is that of the fall of the Berlin Wall. When looking back in history, the image that demonstrates what happened is not an anchor speaking; few remember what they said. It is the video of liberated West Germans tearing down the wall and standing above the crowd with arms raised in triumph. A videographer’s work lives forever in archives and the minds of viewers. There is nothing like having people all over the world coming to a stop to look at my video. It is an experience that few others will ever have.
How do you decide what shot to use?
Shot selection for a videographer is an art. If the right angles are not shot, then the whole piece may not edit together very well at all. When I was first starting out, editors complained that my video was a series of shots that were well composed, but did not fit together in a sequence.
Every shot conveys something different to the audience. When a videographer understands what each shot can do, they can better know what shot to get. Long shots establish context, close-ups convey intimacy and emotion, and medium shots propel the piece along.
Long shots should only be used long enough to lead the viewer into a scene or away from it. If they are used too often, the audience will become bored. Dramatic vistas look better as a painting than as video.
Close-ups bring viewers in very close to the action. A CU of a pair of hands putting something together, or of gears in a machine, can show how something is done, and they are easy to use as cutaway shots. CUs of a person’s face are an excellent way to show emotion. These make excellent cutaways. Shoot as many close-ups as possible, because they are easily edited and add intimacy.
Medium shots are the most-used shot in videography. They are easily edited, close enough to show action and intimacy, and wide enough for the viewer to still see some context. If there is a single event that can only be captured once, the MS is the best shot to use.
Do you ever use auto settings on your camera?
It is best to learn how to use a camera without using any of the auto settings. It is rare that auto settings can completely ruin a shot, but manual settings put the control in the hands of the videographer. Auto settings can be very useful in situations where there is little time to make adjustments (on breaking news, for example). Or they can be used as a reference point when setting up the shot.
Nathan White is a videographer for a local television station.