
Chapter 8. Planning and deploying session-based virtual desktops
Session-based virtual desktops are widely used by organizations to provide remote access to data and applications in a centralized and controlled environment. In Windows Server 2012 R2, Remote Desktop Services (RDS) provides the infrastructure to implement session-based virtual desktops and virtual machine (VM)–based virtual desktops.
In older versions of Windows Server, session-based desktops were provided by a feature named Terminal Services. Terminal Services had the same basic functionality for session-based desktops as RDS, but RDS has been extended with additional functionality to improve the user experience and manageability.
Understanding RDS
RDS is a Windows Server role that provides much more than just remote desktops. RDS includes six role services that enable you to create a scalable and fault-tolerant RDS deployment. You can manage an RDS deployment centrally and in the same way, regardless of the number of servers in an RDS deployment. This makes RDS very scalable.
One of the most common uses for RDS is the deployment of session-based virtual desktops. In a session-based virtual desktop, all processing is performed on a Remote Desktop Session Host (RD Session Host) server, and the results are displayed on a Remote Desktop client. The communication between the client and the RD Session Host server uses Remote Desktop Protocol (RDP).
RDP is a very efficient protocol and sends a limited amount of data over the network. This makes it possible to use RDS to provide desktops and applications for users over a LAN, from branch locations over a WAN, or over the Internet.
RDS includes the following functionality:
• Provides users with a full desktop Whether you use session-based virtual desktops or VM-based virtual desktops, you can provide users with access to a full remote desktop that you can access from almost anywhere if you configure the necessary infrastructure.
• Provides users with access to applications You can use RemoteApp to provide users with access to applications running on an RD Session Host server. These applications run in a window just as regular applications do on users’ desktops. From the user’s perspective, applications delivered by RemoteApp function as if they are installed locally.
• Allows secure remote access without using a virtual private network The Remote Desktop Gateway (RD Gateway) role service is used as a proxy for accessing session-based virtual desktops or VM-based virtual desktops. This is suitable for securing access from the Internet.
The Terminal Services functionality found in older versions of Windows Server had only session-based virtual desktops and applications. In Windows Server 2012 R2, you also can use RDS to deploy VM-based virtual desktops. Connectivity to the VMs is done by using RDP, just as in a session-based deployment.
Some benefits of using RDS for virtual desktops and applications include the following:
• Easier application deployment and updates A typical application deployment requires you to install and update the application on each client computer. In all but the smallest environments, this requires you to implement some type of automated deployment tools for applications. With RDS, you only need to install and update applications on the central servers. This is significantly less work than installing and updating applications on individual client computers.
• Simplified access to data and applications When you implement RDS, applications and their data can be accessed from anywhere. You can allow users to use applications from a computer in the office, a home computer, and mobile devices.
• Faster access to remote data Access to data over a virtual private network (VPN) or WAN links often results in poor application performance. For example, an application that requires access to a SQL server may be very slow if the connectivity to the SQL server has high latency. When you use RDS, you place the central servers with the application installed close to the application data, and network latency is removed as a performance problem.
• Higher data security for mobile users Without RDS, mobile users copy data onto a mobile computer and take it with them. Or, in some cases, they use a VPN to access data remotely while offsite. In both cases, there is a risk that the mobile computer could be lost or stolen and the data accessed by unauthorized users. When you use RDS for remote access to data, there is no need to copy data to the remote device. This mitigates the risk that your organization will lose control of the data.
• Simplified client hardware management Using RDS to provide virtual desktops reduces the effort to manage client device computers because the devices are performing much less work. Computers used to access virtual desktops become essentially disposable because the only configuration information they contain is the connection information to the remote desktop. In some cases, you may be able to extend hardware life because the client device is performing very little work.
Comparing RDS and the Remote Desktop feature
Remote Desktop is a feature in Windows 8.1 and Windows Server 2012 R2 that enables you to connect to a computer remotely and to view its desktop, just as when you sign in to that computer locally. The primary intention of the Remote Desktop feature is remote administration. That is why, when you enable the feature, by default only the administrator who enables it can connect to the remote desktop. Other users can connect to the remote desktop only if you grant them permission.
RDS is a Windows Server role that is available only in the Windows Server operating system. To deploy RDS, you need to install at least three role services and perform an additional configuration. RDS provides a similar experience to the Remote Desktop feature, but the primary intention of RDS is to enable users to have a standard remote environment that is available from any device and to use remote resources while integrating remote applications on the local user desktop. Table 8-1 compares RDS and the Remote Desktop feature.

RDS architecture
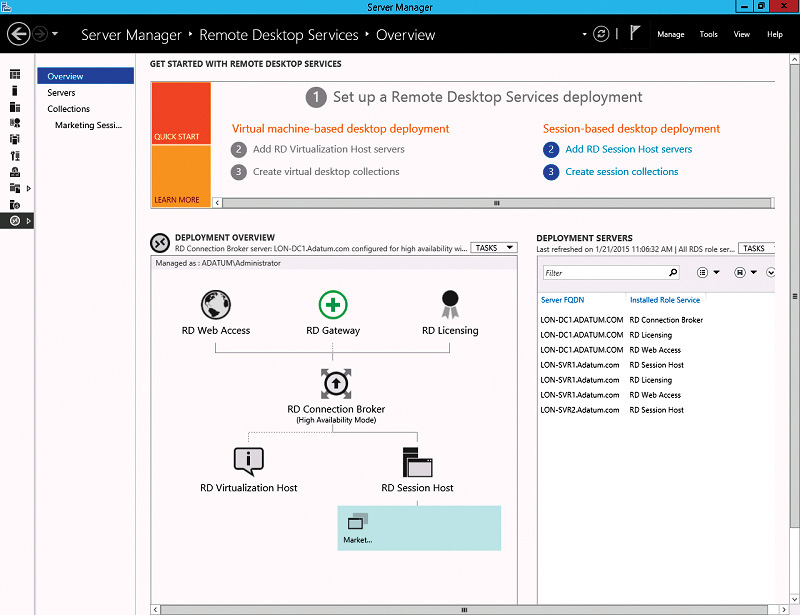
There are six RDS service roles that can be included in an RDS deployment. At minimum, you need to have the Remote Desktop Connection Broker (RD Connection Broker) role service, the Remote Desktop Web Access (RD Web Access) role service, and either the RD Session Host or Remote Desktop Virtualization Host (RD Virtualization Host) role service. You can install individual RDS role services, but you won’t be able to manage them unless they are part of an RDS deployment. Depending on your implementation goals, an RDS deployment can include additional RDS role services, and RDS role services can be installed on multiple servers for scalability and high availability.
Windows Server 2012 R2 RDS includes the following role services:
• RD Session Host This role service configures a server to provide session-based desktops and applications. Users can connect to an RD Session Host server and then run applications and use the network resources that the RD Session Host offers. RD Session Host is a required role service in a session-based desktop deployment of RDS.
• RD Virtualization Host This role service integrates with the Hyper-V role in Windows Server 2012 R2 to provide VMs that can be used as virtual desktops. The RD Virtualization Host role service also monitors and reports on established client sessions to the RD Connection Broker role service. This role service is responsible for managing the VMs that function as pooled and personal virtual desktops. If VMs are in a saved state, the RD Virtualization Host role service starts the VMs to prepare them for a user connection. For pooled virtual desktops, the RD Virtualization Host role service reverts the VMs to their initial state when users sign out. The RD Virtualization Host role service is required in a VM-based deployment of RDS.
• RD Connection Broker This role service manages connections to RemoteApp programs and virtual desktops, and it directs client connection requests to an appropriate endpoint. The RD Connection Broker role service also provides session reconnection and session load balancing. For example, when a user disconnects from a session and later establishes a connection, the RD Connection Broker role service ensures that the user reconnects to his or her existing session. This role service is mandatory in all RDS deployments, but it does not require large amounts of server resources.
• RD Web Access This role service provides a web-based interface to RemoteApp programs, session-based virtual desktops, or VM-based virtual desktops. A webpage provides each user with a customized view of all RDS resources that have been published to that user. This role service supports organizing resources in folders, which enables administrators to group remote applications in a logical manner. It also publishes available RDS resources in an RDWeb feed, which can integrate with the Start screen on client devices. RD Web Access is a mandatory role service for each RDS deployment.
• Remote Desktop Licensing (RD Licensing) This role service manages RDS client access licenses (RDS CALs) that are required for each device or user to connect to an RD Session Host server. You use RD Licensing to install, issue, and track RDS CAL availability on an RD Licensing server. You are not required to install this role service during an initial RDS deployment, but an RDS deployment without proper licensing ceases to function after 120 days.
• RD Gateway This role service allows authorized remote users to connect securely to RemoteApp programs and virtual desktops from outside the organization over the Internet. An RD Gateway server acts as a proxy for external users to connect to internal RDS resources. To increase compatibility with firewalls in public locations such as hotels, RDP traffic is encapsulated in Hypertext Transfer Protocol Secure (HTTPS) packets. Access is controlled by configuring Remote Desktop connection authorization policies (RD CAPs) and Remote Desktop resource authorization policies (RD RAPs). An RD CAP specifies who is authorized to make a connection, and an RD RAP specifies to which resources authorized users may connect.
All deployment and management of RDS is done by using Server Manager, as shown in Figure 8-1. Server Manager provides an overview of all servers in an RDS deployment and a management interface for each server. RDS in Server Manager uses a discovery process to detect the role services that are installed on each machine that is added to Server Manager.
Note
Legacy Remote Desktop administration tools such as Remote Desktop Services Manager and RD Session Host Configuration, which were used for configuring and administering RDS in Windows Server 2008 R2, are replaced with RDS in Server Manager in Windows Server 2012 and Windows Server 2012 R2.
Connecting to virtual desktops and RemoteApp programs
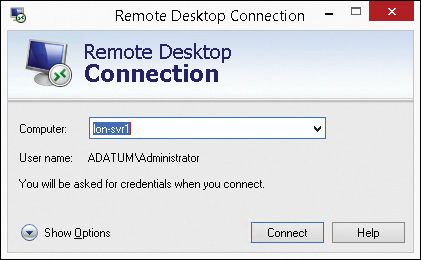
Windows client operating systems include Remote Desktop Connection (RDC), which is used to connect to virtual desktops and applications. Microsoft also provides Microsoft Remote Desktop for iOS and Android devices. All of these applications use RDP to connect to virtual desktops and RemoteApp programs.
When you use RDC to access a computer with the Remote Desktop feature enabled, you enter the IP address or DNS name of the remote computer, as shown in Figure 8-2. This type of direct connectivity doesn’t work when connecting to RDS because you are connecting through the RD Connection Broker and need to be directed to a specific collection for the RemoteApp program or virtual desktop.
After you implement servers for the RDS infrastructure, you need to create collections that define what the clients are connecting to and how it is configured. There are two types of collections:
• Virtual desktop collections This type of collection contains VMs hosted on RD Virtualization Host servers.
• Session collections This type of collection contains RD Session Host servers that provide session-based virtual desktops or RemoteApp programs.
To connect to collections in RDS, you need to have an .rdp file with the correct connectivity information for the RD Connection Broker and the collection to which you are connecting. RDC uses the connectivity information in the .rdp file.
You can create an .rdp file manually and make it available to users. When the user opens the .rdp file, RDC launches and connects to the RD Connection Broker. This method is functional but relatively complex because you need to learn the syntax for creating .rdp files and need to update them if your infrastructure changes.
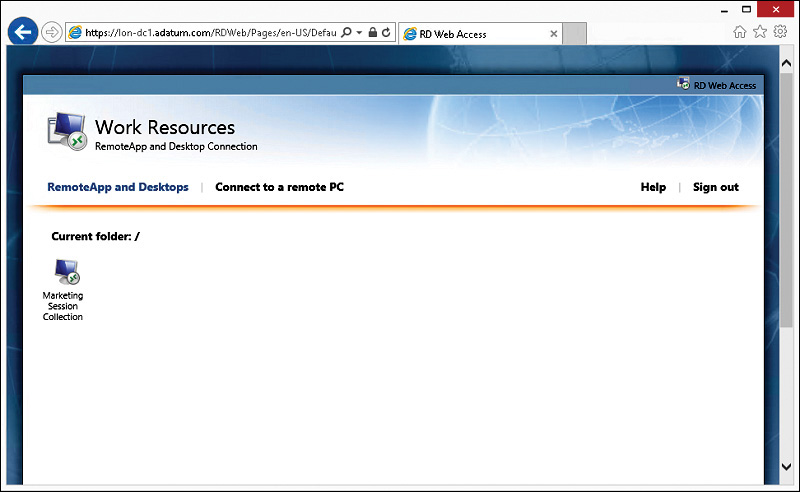
The simplest way to provide user connectivity to RDS is by using RD Web Access, shown in Figure 8-3. When users connect to RD Web Access, they are provided with a list of collections to which they have access. When they click the appropriate collection, an .rdp file with the correct configuration information is generated, and RDC launches using the information in the .rdp file. This provides a consistent access method even if the RDS deployment is modified.
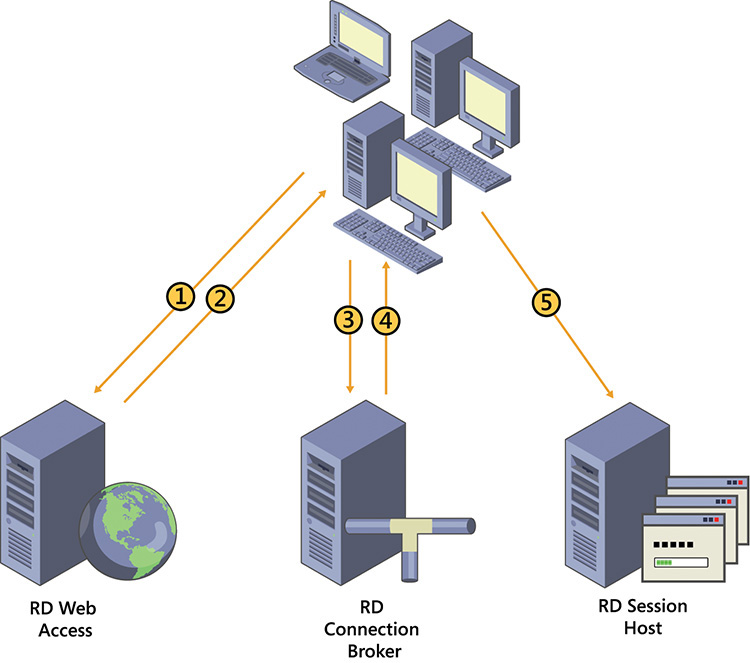
The following process, shown in Figure 8-4, is used when clients connect to a session collection by using RD Web Access:
1. Users connect to the RD Web Access portal and identify the RDS resource to which they want to connect.
2. Users click the link on the RD Web Access portal for the RDS resource they want to access. This downloads the .rdp file, which contains information about the resource to which the user wants to connect.
3. RDC is launched, and it uses the information in the .rdp file to initiate a connection with the RD Connection Broker role service. After users authenticate to the RD Connection Broker role service, the RDC passes the request about the RDS resource to which the user wants to connect.
4. The RD Connection Broker role service examines the request to find an available RD Session Host server in the desired collection and sends the connection information back to the RDC client. If the request matches a session that already is established for the associated user, RD Connection Broker redirects the client to the server in the collection where the session was established. If the user doesn’t have an existing session in the collection, the client redirects to the server that is most appropriate for the user connection, based on the RD Connection Broker load balancing algorithm—for example, weight factor, fewest connections, and least utilized.
5. The RDC client establishes a session with the RD Session Host server that RD Connection Broker provided.
RDS functionality that enhances the client experience
RDC uses the RDP protocol to connect to RDS servers. The following are some of the specific features available that enhance the client experience:
• Bandwidth reduction features When an RDP connection is established, various methods to reduce network bandwidth are used, such as data compression and caching. Caching enables an adaptive user experience over LANs and WANs. Clients can detect available bandwidth and adjust the level of graphic detail that is used.
• Full desktop or application window only When a client connects to RDS, it can display either a full remote desktop or only the window of a remotely running application (RemoteApp program). With full desktops, users can perform remote administration or run multiple applications. However, the user must deal with two desktops: local and remote. RemoteApp programs integrate with local desktops, but they still require network connectivity to RDS.
• RemoteApp programs that look and feel like locally installed applications The window displayed when you connect to a RemoteApp program looks like a locally installed application. Links to RemoteApp programs can be added to a client’s Start screen. RemoteApp program icons support pinning, tabbed windows, live thumbnails, and overlay icons. RemoteApp windows can be transparent, and the content of a RemoteApp window displays while you are moving it.
• Reconnection to existing sessions If a user disconnects from a remote desktop session, the user can reconnect to the session and continue to work from the point at which he or she disconnected. The user can connect from the same device or from a different client device. If a session disconnects for a different reason, for example, because network connectivity is lost, the user automatically reconnects to the disconnected session when network connectivity is restored.
• Redirection of local resources Client resources such as drives, printers, the Clipboard, smart card readers, and USB devices can redirect to a remote desktop session. This enables you to use locally attached devices while working on RDS and to use the Clipboard to copy content between a local and remote desktop. You even can redirect USB devices that you plug in when the remote desktop connection already is established.
• Windows media redirection This feature provides high-quality multimedia by redirecting Windows media files and streams from RDS to a client. When Windows Media Player is used in a session-based virtual desktop, the multimedia file is not rendered on the RD Session Host. Instead, the multimedia stream is redirected to the RDC client and is rendered on the client. This reduces load on the RD Session Host and provides higher quality audio and video playback on the client. If the RDC client does not have the necessary codec for the multimedia content, then the content is rendered on the RD Session Host.
• Multi-monitor support This feature enables support for up to 16 monitors of any size, resolution, and layout. Applications function just as they do when you run them locally in multi-monitor configurations.
Note
Multi-monitor support requires RDC version 7.0 or later. This software is included with Windows 7 and later. If you are connecting to a computer running Windows 7, multi-monitor support is available only for the Ultimate and Enterprise editions. If you are connecting to a computer running Windows 8 or Windows 8.1, multi-monitor support is available only for the Professional and Enterprise editions.
• Single sign-on (SSO) When users connect to RDS, they have to provide their credentials again. With SSO, a user can connect to a remote desktop or start a RemoteApp program as the user who signed in to the local computer, without reentering credentials.
• CPU, disk, and network Fair Share Fair Share features are enabled by default on RD Session Host servers to ensure even resource distribution among users. One user can’t monopolize resources or negatively affect the performance of other users’ sessions. Fair Share can distribute network, disk, and CPU resources dynamically among user sessions on the same RD Session Host server. You can control Fair Share settings through Group Policy.
RemoteFX
RemoteFX introduces a set of enhancements to RDP that enables rich graphics and video capabilities within a remote desktop session, regardless of whether you are connecting to a session-based virtual desktop, running a RemoteApp program, or connecting to a VM-based virtual desktop. In all three cases, the user experience is almost identical to using a local physical desktop. RemoteFX is included in RDS, and you don’t need to enable it explicitly unless you want to use the RemoteFX virtual graphics processing unit (vGPU) on a VM-based virtual desktop. In that case, you must add hardware to the VMs that are used for the virtual desktop.
The following is a list of some RemoteFX features:
• RemoteFX for WAN This feature delivers an improved user experience over lower-speed networks, such as at a branch office, on a wireless device, or working from home over a WAN connection. RemoteFX for WAN combines the RemoteFX Adaptive Graphics feature with intelligent WAN-aware transports. TCP and UDP can be used for remote desktop connections. The protocol that is better suited for the current connection is selected automatically, and automatic detection of network conditions to adjust the encoding of content is available.
• RemoteFX Adaptive Graphics This feature dynamically adapts to changing network conditions and optimizes encodings based on the content delivered. RemoteFX Adaptive Graphics use multiple codecs, which are optimized for different types of content, such as text, images, and video.
• RemoteFX Media Streaming This feature provides redirection of multimedia content. When a user attempts to play multimedia content in a remote session, the content is intercepted and redirected to the client. The client receives the compressed content, decodes the content, and plays it back locally.
• RemoteFX Multi-Touch This feature extends the Windows 8.1 touch experience to devices on which multi-touch is the primary means of user interaction. Windows 8.1 users are able to interact with remote desktop sessions in the same way as a local desktop, including support for multi-touch gestures and the ability to navigate between local and remote sessions by using touch.
• RemoteFX USB Redirection This feature enables devices to redirect at the USB level. Because of this, no device drivers are required on the client computer, and any USB device—including audio, storage, all-in-one printers, and scanners—can be redirected.
Remote Desktop Connection configuration options
When you connect to a virtual desktop through RDS, RDC is configured automatically by using an RDP file that is provided by the RD Web Access server. When you use RDC to connect to a server or client with the Remote Desktop feature enabled, you can configure the connectivity settings manually. The configuration options are grouped on several different tabs. Microsoft Remote Desktop for iOS and Android have similar configuration options but different user interfaces.
On the General tab, you can specify the computer to which you want to connect by using RDC and user credentials. You also can save RDC settings in a text file with an .rdp file name extension to initiate a connection later without configuring RDC settings again.
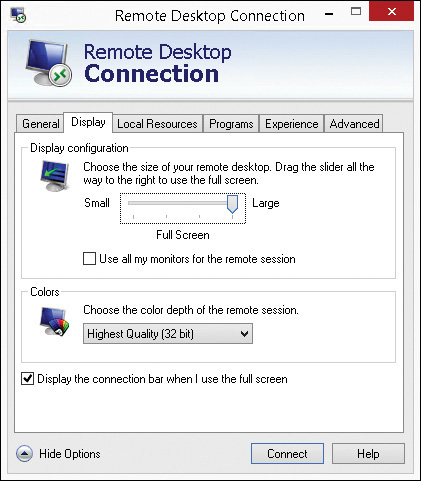
The Display tab is shown in Figure 8-5. On this tab, you can choose the size of the remote desktop window, including the option to run the remote desktop in full-screen mode. You can select to use all local monitors for a remote session, select color depth, and enable a connection bar when the remote desktop is running in full-screen mode.
The Local Resources tab is shown in Figure 8-6. On this tab, you can set remote audio settings, such as whether you want to enable remote audio playback and recording. You also can specify a location where Windows key combinations, such as Alt+Tab, are applied and whether local devices and resources in remote sessions are available. For example, you can enable the option to make the Clipboard, local drive, printers, and devices that you plug in later available in a remote session.

On the Programs tab, you can specify a program that starts automatically in a remote desktop session when you connect to a remote computer. If you configure this option, when you close the program, your session is signed out automatically.
On the Experience tab, you can select a connection speed to optimize performance. You can enable different features, such as the following:
• Desktop background
• Font smoothing or visual styles in RDC
• Show window contents while dragging
By default, RDC automatically detects connection quality and configures connection quality–dependent features accordingly. On this tab, you also can configure persistent bitmap caching and automatic reconnection if a connection drops.
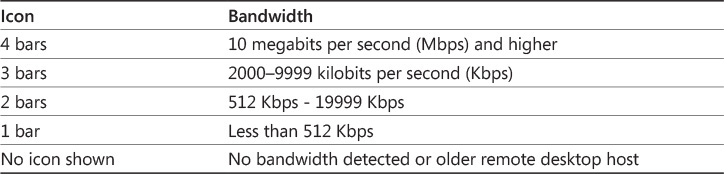
RDC displays the bandwidth with an icon on the connection bar (top of the window) that is similar to a signal strength meter. The meter is based only on bandwidth and does not take latency into account. The number of bars in the icon identify the bandwidth, as show in Table 8-2.
On the Advanced tab, you can configure server authentication and Connect From Anywhere settings. The server authentication options allow you to define what should be done if the certificate provided by the server during authentication isn’t valid. By default, a warning is displayed and you have the option to continue. If desired, you can configure this setting to connect without warning or prevent connections.
The Connect From Anywhere settings allow you to configure connectivity through an RD Gateway server. You can configure the alternate credentials for authentication to the RD Gateway server and the location of the RD Gateway server.
RDS licensing
If you want to use RDS, you need to purchase additional RDS CALs for each user or device that uses RDS. This is in addition to the typical licensing that is required for desktop computers. For example, in an environment where users have desktop computers and some applications are delivered by RemoteApp, you would need the following licenses:
• Operating system license for the desktop computer
• Server licenses for the Windows-based servers that deliver the RemoteApp programs
• Windows CALs for each user or computer that accesses the Windows servers
• RDS CALs for each user or desktop that uses RemoteApp programs
• Application licenses for each user or desktop that uses RemoteApp programs
RDS CALs provide users with access to session-based virtual desktops or RemoteApp programs. Licensing for VM-based virtual desktops is slightly more complex because the operating system for the VM also needs to be licensed. If you connect to a VM-based virtual desktop from a device that is covered by a Microsoft Software Assurance agreement, then the license includes rights to use that same operating system in a VM-based virtual desktop. If the device isn’t covered by a Microsoft Software Assurance agreement, then you need to purchase Windows Virtual Desktop Access (Windows VDA) licenses.
![]() For more information about licensing VM-based virtual desktops, see Chapter 10, “Planning and implementing pooled and personal virtual desktops.”
For more information about licensing VM-based virtual desktops, see Chapter 10, “Planning and implementing pooled and personal virtual desktops.”
When a client attempts to connect to an RDS deployment, the server that accepts the connection determines if an RDS CAL is needed. If an RDS CAL is required, then the server requests the RDS CAL on behalf of the client that is attempting the connection. If an appropriate RDS CAL is available, it is issued to the client, and then the client can connect to RDS.
RD Licensing manages the RDS CALs that are required for each device or user to connect to an RD Session Host server. You use RD Licensing to install, issue, and track the availability of RDS CALs on an RD Licensing server. At least one RD Licensing server must be deployed in the environment. The role service can be installed on any server, but for large deployments, the role service should not be installed on an RD Session Host server.
After an RDS installation, there is an initial grace period of 120 days. This grace period begins after the RD Session Host accepts the first client connection. If you have not installed valid licenses by the time the grace period expires, clients will not be able to sign in to the RD Session Host.
A single RDS deployment can be configured with only one licensing mode. If you need a mix of Per User and Per Device RDS CALs, then you need to implement two RDS deployments.
Note
If you need to provide access to RDS for multiple external users who are not employees of your organization, then you should consider using an RDS External Connector License. An RDS External Connector License allows an unlimited number of nonemployees to connect to a specific RD Session Host. If you have multiple RD Session Host servers, you need multiple RDS External Connector Licenses in addition to any required Windows Server External Connector Licenses.
Planning infrastructure for session-based desktops
The planning for implementing RDS for session-based desktops can be fairly complex compared to other Windows-based role services. Most Windows-based role services require only one server. RDS requires at least three role services and, in most cases, the role services are spread across multiple servers. You should be aware of the functionality that each role service provides. You also should be aware of how an RDS deployment uses each role service. You need to know role service requirements and which hardware resources are most critical for each role service.
Assessing RDS infrastructure requirements
Before you implement RDS, you must determine your organization’s requirements. To do so, you first must evaluate if RDS is the appropriate solution for your needs, and then you must choose between session-based and VM-based desktop deployments. If necessary, an RDS deployment can include both session-based and VM-based desktop deployments. You also must evaluate the existing server infrastructure and estimate the required server hardware, network bandwidth, client types and requirements, and connectivity needs for a successful RDS deployment.
Determine your RDS needs
To determine if RDS is an appropriate solution for your needs, you should assess and analyze the types of users, hardware, and applications in your organization. Areas of consideration include the following:
• User types Do you have users in remote locations, single-task users, contractors, and other types of users who would benefit from remote applications or virtual desktops?
• Hardware What client hardware currently is deployed in your organization? Would it be beneficial to move from traditional desktops to thin clients for some users? Do you allow users to bring their own devices into the organization’s network? Do users wish to use mobile devices to run certain applications?
• Application compatibility Can the applications run in a multiuser environment? If not, will the applications run in a virtual environment?
• Application performance How do the applications perform in a remote or virtual environment? Keep in mind that many applications perform better as RemoteApp programs on RDS because processing takes place on a server.
• Application support Do vendors support the applications in a virtual or multiuser environment? Do vendors provide support to multiple users?
• Licensing Can the applications be licensed for a virtual or multiuser environment?
• Business benefits Are there justifiable business reasons to implement this solution? Potential benefits include cost savings, reduced deployment time, centralized management, and reduced administration costs.
• Legal requirements Because of financial and legal requirements, some organizations mandate that applications and data remain on-premises. RDS enables users to connect to a standard virtual desktop to use familiar applications and to work with data from almost any device, while organizational data stays in the data center.
Choosing between session-based and VM-based desktop deployments
RDS has two deployment types:
• Session-based virtual desktop deployment This provides users the ability to connect to an RD Session Host and use a full desktop or run remote applications and present them on a client as if they were installed locally.
• VM-based virtual desktop deployment This provides users with access to a full Windows client operating system that runs on a VM, for example, Windows 7 or Windows 8.1.
You need to decide which RDS deployment type is best for your environment based on various requirements. For example, you must consider if users must be completely isolated or if they must have administrative access. You should consider whether the applications work properly in a multiuser environment. In addition, you must consider whether you can install and run applications on Windows Server. Remember that a VM-based virtual desktop deployment typically requires a more powerful server infrastructure and more disk storage than a session-based virtual desktop deployment for the same number of users. For some applications, VM-based virtual desktops might be the only viable solution.
Generally, you should choose session-based virtual desktops if possible. Session-based virtual desktops support a larger number of users than VM-based virtual desktops on the same hardware.
Determine server hardware and network resource requirements
Once you determine the RDS deployment benefits for your organization, you must consider the hardware requirements to support your users, including the following:
• Number of users How many users will use RDS, and where are they located?
• User types How many users run CPU-intensive and bandwidth-intensive applications? Will you have to provide more bandwidth and server hardware to support expected usage?
• Connection characteristics How many concurrent connections do you expect? Can your server and bandwidth resources handle peak usage times?
• Application silos Will you have to create multiple server collections to support different applications that might not be able to run on the same server?
• Load balancing Will you have to include multiple servers in a collection to spread the load among the servers? This increases available resources and provides redundancy.
• High availability What is the organization’s tolerance for downtime? Do you need close to zero downtime, or could your organization tolerate the time it would take to restore from backups?
• Expansion considerations What are the growth expectations? At what point will new resources need to be brought online?
Determine user requirements
Another aspect to consider is user requirements. A large organization with multiple locations might have a number of mitigating factors to consider, such as the following:
• Languages Organizations with a global presence need to support multiple languages. You might need to install language packs on all of your RDS servers.
• Profile management How will you store user states? Do users require the same user state when they sign in locally and to an RDS session? Which type of Windows user state virtualization will be used?
• Printing Will existing printers function properly in a remote desktop environment? Will there be problems finding printer drivers to support existing printers? Is there a budget to replace older printer models?
Determine how clients access RDS
Clients can connect to RDS in various ways. You probably will need to provide different access methods for different groups of users. Areas to consider include the following:
• Will you allow users to connect over the Internet from remote locations? If so, you will need to set up an RD Gateway and obtain certificates.
• How will you handle Secure Sockets Layer (SSL) certificates—by using certificates from non-Microsoft certification authorities (CAs) or by using certificates that an internal CA issues?
Based on your assessment results, start designing your RDS deployment. You should identify RDS role services that are required and that you will deploy. You also should determine the number and hardware configuration of servers that are required, in addition to planning required storage, connectivity, and firewall configuration.
Planning for the RD Session Host role service
The RD Session Host role service provides Windows-based apps or full Windows desktops for RDS clients. This role service is mandatory for every RDS deployment that provides users with session-based desktops or RemoteApp programs. An RD Session Host server accepts incoming RDP requests, and after a client authenticates, it provides a desktop-based or application-based session to the client. An RD Session Host server is the central location where remote applications are installed, accessed, and maintained.
To plan the deployment of an RD Session Host server, you must consider the number of installed applications, the type of applications, resource use, the number of connected clients, and the type of user interaction. While connected to one RD Session Host, users might run a simple application that has low resource utilization and rarely runs, for example, an old data entry application. On another RD Session Host, users often might run a resource-intensive graphical application that requires many CPU resources, a considerable amount of RAM, intensive disk I/O operations, and that causes a lot of network traffic. If the hardware configuration on both of the RD Session Hosts is the same, the second server is considerably more utilized and can accept fewer user connections.
RD Session Host planning focuses on the number of concurrent users and the workload they generate. A server with a particular hardware configuration might support many simultaneous users or only a few, depending on their usage patterns and the applications that they are running on the RD Session Host.
The following are the main resources that you should consider when estimating RD Session Host utilization:
• CPU Each remote application that users start runs on an RD Session Host and utilizes CPU resources on the RD Session Host. In an environment where many users are connected to the same host, CPU and memory typically are the most critical resources.
• Memory Additional memory must be allocated to an RD Session Host for each user who connects to the RD Session Host, whether connecting to a full Windows desktop or running a RemoteApp program.
• Disk Because user state typically isn’t stored on an RD Session Host, disk storage usually isn’t a critical resource. However, many applications run simultaneously on an RD Session Host, and the disk subsystem should be able to meet their disk I/O needs.
• Network The network should provide enough bandwidth for connected users and for the applications that they run. For example, applications that use a SQL database use the network to connect to that SQL database. Also remember to consider the network bandwidth required to support the user connectivity to the RD Session Host server.
• GPU Applications that are graphically intensive, especially those that include three-dimensional graphics, might require vGPU support and RemoteFX to perform well. Without such support, graphics render on the server’s CPU and may limit the number of users on the RD Session Host to a relatively small number.
When estimating the required resources for an RD Session Host, you can use one of the following methods:
• Pilot deployment This is a common and a simple approach. You first need to deploy RDS in a test environment and capture its initial performance. After that, you start increasing server load by increasing the number of users and monitoring response times and user feedback. You can find out how many users can connect to an RD Session Host and still have an acceptable user experience based on the number of users and the system response time. Based on the findings, you can estimate the number of servers that are needed for a production environment. This approach is reliable and simple, but it requires initial investments for the pilot deployment.
• Load simulation This method also uses an initial RDS deployment in a test environment. You need to gather information about applications that users operate and how users interact with the applications. After that, you can use load simulator tools to generate various levels of typical user loads against an RDS deployment. When a load simulator tool runs, you need to monitor server utilization and responsiveness. This method is similar to the pilot deployment method, but it uses a load simulation tool instead of real users to generate user load. It also requires an initial investment, and its results depend on the initial estimation of actual user usage.
• Projection based on single-user systems This method uses data that is collected from a single-user system for projecting expected utilization on an RD Session Host with multiple user sessions. This method requires detailed knowledge of applications that are used, and it usually is not very reliable because a single-user system has a different overhead than a multiuser system.
It is critical that you plan for future scalability of an RDS deployment. User needs for applications will change over time, and you need to be ready to expand your RDS deployment to meet those needs. In some cases, you may be able to scale up the capacity of the individual servers with additional processors or additional memory. Scaling up by using more powerful servers tends to be expensive. Scaling out by adding servers generally is less expensive.
Fortunately, you can scale out an RDS deployment for session-based virtual desktops and RemoteApp programs by adding RD Session Host servers. For example, if you have an RDS deployment for session-based virtual desktops that uses two RD Session Host servers, and those two servers are experiencing frequent peaks of 100 percent CPU utilization, you can add a third RD Session Host server. The RD Connection Broker then automatically load balances the connections across three servers instead of two and reduces the CPU utilization on the two existing servers.
Planning for the RD Connection Broker role service
During RDS deployment planning, you must designate a server on which to install the RD Connection Broker role service. The RD Connection Broker role service is required in each RDS deployment. It provides users with access to RemoteApp programs, session-based virtual desktops, and VM-based virtual desktops. The RD Connection Broker role service manages all aspects of session connectivity. Functions performed by the RD Connection Broker role service include the following:
• Routes connection requests Determining the most appropriate RD Session Host or virtual desktop to which to send a connection request, based on a user’s identity and the current load on RD Session Host or RD Virtualization Host servers.
• Stores information about connections to VMs and sessions By default, connection information is stored in the Windows Internal Database (WID) on an RD Connection Broker server. By storing this information, the RD Connection Broker role service can reconnect users to the same session in an RDS deployment with multiple RD Session Host servers.
• Configures RDS servers in the same group (collection) You configure settings—for example, session settings or certificates—once, and RD Connection Broker applies the settings to servers in the collection.
• Manages VM creation and deletion In VM-based desktop deployments, RD Connection Broker manages VM creation and deletion for managed collections, and it assigns personal virtual desktops to users.
• Provides information to RD Web Access servers The RD Connection Broker role service gathers collection information about RemoteApp programs, session-based virtual desktops, and VM-based virtual desktops.
When a user initiates a session, the session request is received by the RD Connection Broker role service, which queries the database to determine if there is an existing disconnected session for that user. If so, the user is directed to the disconnected session. If not, the RD Connection Broker role service determines the server in the collection that is best able to handle the new connection, based on the load-balancing algorithm.
A single RD Connection Broker server can handle a large number of connection requests, and for performance, your RDS deployment may require only one. A more critical consideration for the RD Connection Broker role service is availability.
The RD Connection Broker role service is an entry point to an RDS deployment, and it is critical that it is available all the time. If the RD Connection Broker role service isn’t available, then clients can’t connect to RemoteApp programs or virtual desktops, but existing connections to RemoteApp programs and virtual desktops continue to function properly. When an RDS deployment only has one RD Connection Broker server, the server represents a single point of failure. To make the RD Connection Broker role service highly available or to increase scalability, you can add RD Connection Broker servers.
![]() Configuring high availability for the RD Connection Broker role service is covered in more detail later in this chapter in the section titled “Understanding high availability for RDS.”
Configuring high availability for the RD Connection Broker role service is covered in more detail later in this chapter in the section titled “Understanding high availability for RDS.”
Planning for the RD Web Access role service
The RD Web Access role service is a mandatory part of each RDS deployment, and it installs the Web server role, Internet Information Services (IIS), as its prerequisite. The benefits of RD Web Access include the following:
• From almost anywhere, authorized users quickly can access a list of available RemoteApp programs, remote desktops, and virtual desktops on a webpage.
• A list of available RDS resources publishes automatically via an RDWeb feed, and it can integrate with the Start screen on the client.
• Changes in available RDS resources update automatically on clients that have subscriptions to an RDWeb feed.
• Users can launch the RDC client from the RD Web Access portal, which enables them to connect remotely to the desktop of any computer on which they have Remote Desktop access.
• RD Web Access and RDWeb feeds are personalized and show only RDS resources for which users have permissions.
• Administrators can customize an RD Web Access portal without programming.
![]() More information about customizing RD Web Access is provided in Chapter 9, “Configuring RemoteApp programs and client connectivity.”
More information about customizing RD Web Access is provided in Chapter 9, “Configuring RemoteApp programs and client connectivity.”
It’s important to remember that the RD Web Access role service only provides a link to launch RemoteApp programs or to connect to a Remote Desktop session. The RD Web Access role service doesn’t proxy client requests. When a user connects to a RemoteApp program or a virtual desktop, the client establishes a direct connection to the target server.
Performance considerations for an RD Web Access server are similar to those for an RD Connection Broker server because the RD Web Access role service provides only initial connectivity to RemoteApp programs and virtual desktops. After users are connected to requested resources, the RD Web Access role service is no longer used. Therefore, RD Web Access server performance needs to be designed to accommodate usage at peak times like morning arrivals and after lunch. If required for high availability or scalability, you can implement multiple RD Web Access servers and load balance them.
Planning for preserving user state
In a session collection with multiple RD Session Host servers, the connections from clients are load balanced across the RD Session Host servers by the RD Connection Broker server. By default, when a user connects to a specific RD Session Host server, a local profile is created for that user on the RD Session Host server. The next time a user connects, the RD Connection Broker may direct the client to a different RD Session Host server, where a different local profile is created. Each time users sign in, they may be using a different profile on a different RD Session Host server. This means that user state information such as application configuration, Desktop configuration, Favorites, and Documents are not the same across sessions. To provide a consistent user experience, you should preserve user state across multiple RD Session Host servers.
If users have desktop computers and session-based virtual desktops, you also need to consider whether you want user state to be preserved between desktop computers and the virtual desktops. This can be complicated by the fact that session-based virtual desktops may not have the same configuration as the desktop computers, and, consequently, it may not make sense to synchronize all of the user state information. For example, synchronizing Desktops may result in desktop shortcuts appearing that point to applications that are not available on the RD Session Host servers.
Roaming profiles
Roaming user profiles can be used to synchronize user state, but they synchronize entire user profiles. This typically is not desired for session-based desktops because not all user state information needs to be synchronized between desktop computers and RD Session Host servers. If you use roaming profiles for the desktop computers in your organization and you want to ensure that roaming profiles are not used on the RD Session Host servers, then you can configure the msDS-PrimaryComputer attribute for users and enable the Download Roaming Profiles On Primary Computers Only Group Policy setting.
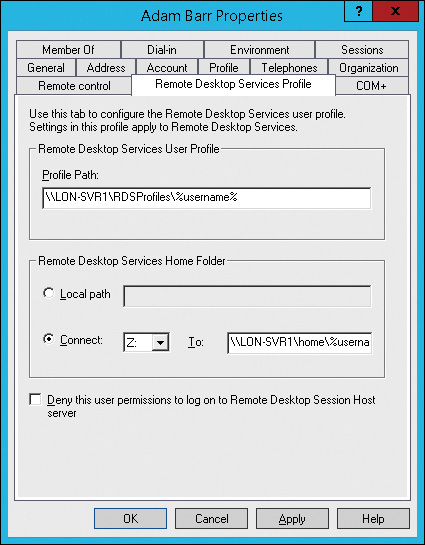
You also can set user properties for roaming user profiles that are specific to RD Session Host servers, as shown in Figure 8-7. If you configure the Profile Path, then a user connecting to a session-based virtual desktop uses the specified profile path rather than a roaming profile configured on the Profile tab. Effectively, the RDS user profile becomes a roaming profile used only when connected to an RD Session Host server.
Instead of configuring individual user accounts with RDS-specific profiles, you can use Group Policy. In a Group Policy object that applies to the RD Session Host servers, you can configure settings in Computer ConfigurationPoliciesAdministrative TemplatesWindows ComponentsRemote Desktop ServicesRemote Desktop Session HostProfiles. There are two relevant settings:
• Set Path For Remote Desktop Services Roaming User Profile Specify a UNC path for storing all user profiles. A subfolder for each user is created automatically.
• Use Mandatory Profiles On The RD Session Host Server Indicates that the path specified in the Set Path For Remote Desktop Services Roaming User Profile setting contains a mandatory profile that can’t be modified. When this setting is enabled, the UNC path for profiles does not contain subfolders for each user.
Folder redirection
Folder redirection also is an option for users with session-based virtual desktops. You can redirect only the folders that are suitable for use on the virtual desktops and desktop computers. Commonly redirected folders include Documents, Favorites, and AppDataRoaming.
If you use folder redirection for desktop computers and don’t want folder redirection used when users sign in to the RD Session Host servers, you can use the msDS-PrimaryComputer attribute in user accounts just as you can for roaming profiles. In addition to configuring the attribute, you need to enable the Redirect Folders On Primary Computers Only Group Policy setting.
User profile disks
RDS in Windows Server 2012 and newer offers the option to configure user profile disks to preserve user state across sessions. A user profile disk is a VHDX file that is mounted to the user’s profile path at C:Users\%username% on the RD Session Host. The user profile disk is mounted during sign in. During a user’s session, all changes to the profile write in his or her VHDX file, and when the user signs out, his or her profile disk is unmounted. The administrator specifies the maximum size of user profile disks and can limit which folders in a user profile are included in or excluded from a user profile disk.
User profile disks are configured individually for each session collection and can’t be shared among collections. A share is specified in the collection configuration to store the user profile disks. All RD Session Host servers in the collection have access to the user profile disks in the share. This provides users with consistent user state from any RD Session Host server in the collection.
User profile disks can be used in conjunction with folder redirection and roaming user profiles. Folder redirection will reduce the size of user profile disks and allow the redirected folders to be accessed from desktop computers. Roaming user profiles are synchronized with the user profile disk.
From a server management perspective, one benefit of user profile disks is controlling the amount of data stored on the C drive of RD Session Host servers. Large user profiles stored on RD Session Host servers can cause the C drive to run low on space and cause performance issues. Because user profile disks are stored on a network share and mounted in C:Users, the C drive never is used to store profile data.
The primary consideration when planning user profile disks is ensuring that the necessary disk space is available for network storage. To ensure that network storage is sufficient, you need to determine the average user profile size. The amount of storage that you need to allocate for user profile disks is the average user profile size times the number of users plus an allowance for growth in both the number of users and the average profile size.
User profile disks are dynamically expanding VHDX files. By default, the maximum size of a user profile disk is 20 GB, but you can set this to be larger or smaller depending on the needs of your users.
When you configure the share for user profile disks, all RD Session Host servers need to have Full Control permissions. This allows the RD Session Host servers to create and manage the user profile disks. When you configure a collection with user profile disks, these permissions are assigned automatically.
Deploying session-based virtual desktops
RDS includes multiple role services. If you use Server Manager for RDS deployment, you should be aware that if you use role-based or feature-based installation, you can install individual RDS role services. However, if you install an RDS role service in this way, you can’t manage it. If you want to manage RDS, a deployment must have at least three role services: RD Connection Broker, RD Web Access, and either RD Session Host or RD Virtualization Host. Individual RDS role services can’t be managed if they are not part of an RDS deployment.
Understanding the session-based desktop deployment process
You can deploy RDS by using Server Manager or Windows PowerShell. Server Manager has the ability to install the necessary server roles, role services, and features on multiple servers that are part of an RDS deployment. All management of RDS also can be done from Server Manager.
The high-level steps for deploying session-based virtual desktops are as follows:
1. Start the RDS installation In Server Manager, use the Add Roles And Features Wizard to select the Remote Desktop Services Installation option, shown in Figure 8-8. This option configures the wizard to collect the information necessary to perform a deployment of RDS across multiple servers.

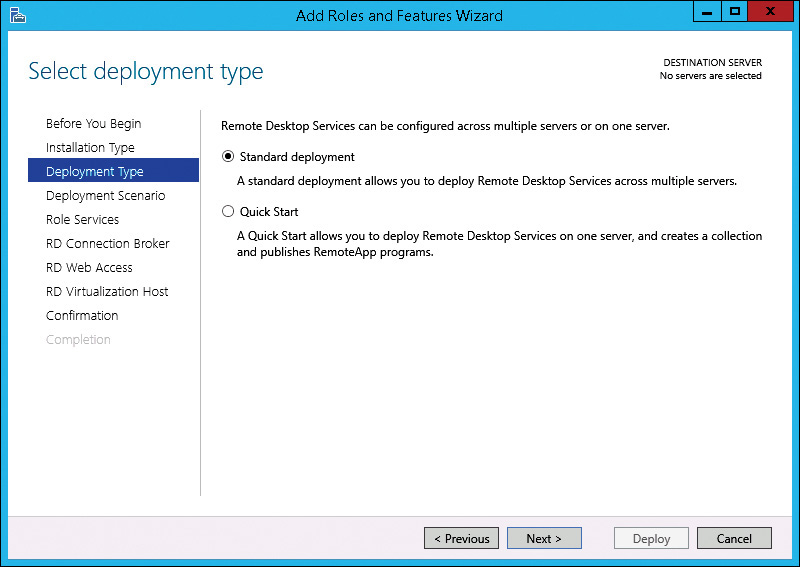
2. Select the RDS deployment type On the Select Deployment Type page, shown in Figure 8-9, select the appropriate deployment type. The Quick Start option installs the required role services on a single server and creates a session collection with several sample RemoteApp programs (Calculator, Paint, and WordPad). You only should use the Quick Start option for testing. In most cases, you want to select the Standard Deployment option because this allows you to customize the deployment for your environment.
3. Select the RD deployment scenario On the Select Deployment Scenario page, shown in Figure 8-10, select the Virtual Machine–Based Desktop Deployment option or the Session-Based Desktop Deployment option. A VM-based desktop deployment is used to deploy personal and pooled virtual desktops on computers running Hyper-V. A session-based desktop deployment uses RD Session Hosts.

4. Select servers for RDS role services In the Add Roles And Features Wizard, select the servers on which you want to install the RD Connection Broker, RD Web Access, and RD Session Host role services. As part of making RDS highly available, you can install each role service on multiple servers. In most RDS deployments, the RD Session Host role service isn’t combined with other role services. The RD Connection Broker and RD Web Access role services can be combined in smaller RDS deployments.
During the deployment, the servers on which you installed the RD Session Host role are restarted. After the installation, you can perform initial configuration of the RDS deployment. You also can add servers to the deployment. At minimum, you should add RD Licensing, because you can’t connect to an RD Session Host without valid RDS CALs after the initial grace period of 120 days expires. You also should consider installing multiple instances of the RDS role services for high availability.
Inside OUT: Using Windows PowerShell to deploy RDS
![]() You can use Windows PowerShell to manage all aspects of deploying and managing RDS. For more information about cmdlets available for deploying and managing RDS in Windows Server 2012 R2, see the Remote Desktop Cmdlets in Windows PowerShell page on TechNet at http://technet.microsoft.com/en-us/library/jj215451.aspx.
You can use Windows PowerShell to manage all aspects of deploying and managing RDS. For more information about cmdlets available for deploying and managing RDS in Windows Server 2012 R2, see the Remote Desktop Cmdlets in Windows PowerShell page on TechNet at http://technet.microsoft.com/en-us/library/jj215451.aspx.
To install a session-based deployment of RDS, perform the following steps:
1. In Server Manager, click Manage and then click Add Roles And Features.
2. In the Add Roles And Features Wizard, on the Before You Begin page, click Next.
3. On the Select Installation Type page, click Remote Desktop Services Installation and click Next.
4. On the Select Deployment Type page, click Standard Deployment and click Next.
5. On the Select Deployment Scenario page, click Session-Based Desktop Deployment and click Next.
6. On the Review Role Services page, click Next. This page provides a brief description of each role service, but there is nothing to configure. The currently logged-on account is being used to create the deployment and is displayed here as a reminder.
7. On the Specify RD Connection Broker Server page, shown in Figure 8-11, in the Server Pool box, double-click the server on which you wish to install the RD Connection Broker role service and click Next.

8. On the Specify RD Web Access Server page, shown in Figure 8-12, select the Install The RD Web Access Role Service On The RD Connection Broker Server check box and click Next. Alternatively, you can select another server on which to install the RD Web Access role service.
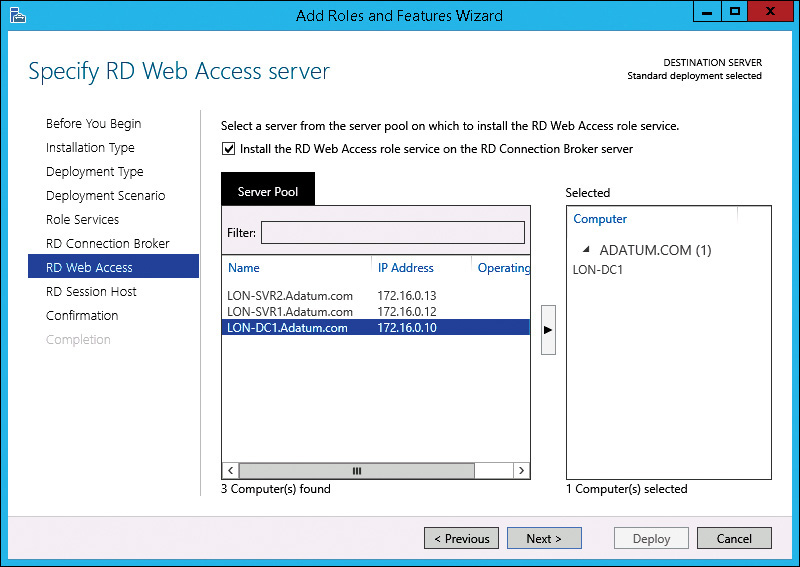
9. On the Specify RD Session Host Servers page, shown in Figure 8-13, double-click the server on which you wish to install the RD Session Host role service and click Next.

10. On the Confirmation page, review the selected servers, select the Restart Destination Server Automatically If Required check box, and click Deploy.
11. On the Completion page, wait for the installation of the RDS role services to complete and click Close. If you are installing roles on the server from which you started the installation, the server may restart and require you to sign in again.
Understanding session collections
Session collections enable you to organize and control user connectivity to RDS. Each session collection contains either RD Session Host servers for session-based virtual desktops or VMs on Hyper-V for pooled or personal virtual desktops.
Collections simplify the administration process by enabling you to manage all collection members as a unit instead of managing them individually. For example, after you configure a collection with session settings, those settings automatically apply to all the servers in the collection. If you add a server to a collection, session settings also automatically apply to the added server.
When you add multiple RD Session Host servers to a collection, connections automatically are load balanced among them. The RD Connection Broker server uses the collection configuration information to identify that there are multiple RD Session Host servers and connects an equal number of clients to each. If an RD Session Host server in a collection fails, the RD Connection Broker connects all users to the remaining RD Session Host servers in the collection.
When there are multiple RD Session Host servers in a collection, they need to be configured with identical applications. Users expect the same applications to be available each time they sign in. If RD Session Host servers have different applications installed, it will appear to users that applications are randomly appearing and disappearing with each connection.
To create a session collection, perform the following steps:
1. In Server Manager, in the navigation pane, click Remote Desktop Services.
2. In Remote Desktop Services > Overview, click Create Session Collections.
3. In the Create Collection Wizard, on the Before You Begin page, click Next.
4. On the Name The Collection page, in the Name box, type the name of the collection and click Next. Make the name something that accurately describes how the collection will be used. You also can type in a more detailed description.
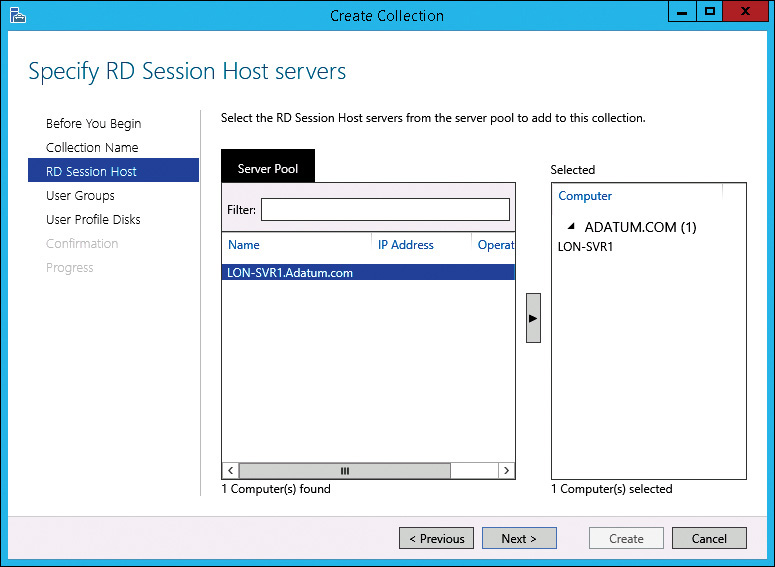
5. On the Specify RD Session Host Servers page, shown in Figure 8-14, double-click the RD Session Host server you want to add to the collection and click Next. Only RD Session Host servers already added to the RDS deployment appear in the Server Pool box. An RD Session Host server can be added to only one collection.
6. On the Specify User Groups page, shown in Figure 8-15, remove the Domain Users group, add the groups you want to have access to the collection, and then click Next. The Domain Users group is listed by default and would allow any user in your organization to access the collection. In most cases, you want to restrict collection access to a specific group of users.

7. On the Specify User Profile Disks page, shown in Figure 8-16, select the Enable User Profile Disks check box if you have decided to implement user profile disks for users. If you select this option, you need to enter the UNC path where the user profile disks will be stored in the Location Of User Profile Disks box. You also need to specify a size in the Maximum Size (In GB) box.

8. On the Confirm Selections page, click Create.
9. On the View Progress page, wait until all tasks are complete and then click Close.
Configuring session collections
The user interface for creating a session collection allows you to configure only a few of the configuration options for a session collection. After the session collection is created, you can edit the session collection and configure many more options.
To edit a session collection, perform the following steps:
1. In Server Manager, in the navigation pane, click Remote Desktop Services.
2. In Remote Desktop Services, in the navigation pane, click the collection you want to edit.
3. While viewing the collection, next to the Properties box, click Tasks and click Edit Properties.
4. In the CollectionName Properties window, edit the properties as required and click OK.
When you are editing the properties of a session collection, the editing window is divided into pages with groups of related options. The General page, shown in Figure 8-17, has the Name and Description that you entered during creation. The Show The Session Collection In RD Web Access check box was not available during creation. It is selected by default. Consider disabling this option during scheduled outages when you are performing maintenance on a session collection, for example, when you are upgrading an application on the RD Session Hosts in the collection.

The User Groups page in the properties of a session collection allows you to configure which groups of users can connect to the session collection. This is the same as the user groups configured during creation.
The Session page, shown in Figure 8-18, has a number of settings that control session limits and temporary folders.

Table 8-3 describes the session settings available on the Session page.


The Configure Security Settings page, shown in Figure 8-19, allows you to configure the Security Layer and the Encryption Level to use for the session. The Security Layer defines encryption methods that are used to encrypt communication between the RDC client and the RD Session Host. The available options for security layer are as follows:
• RDP Security Layer This is the weakest option for the security layer. It is available to support older RDP clients. This security layer does not support the use of Network Level Authentication.
• SSL (TLS 1.0) This is the strongest security layer. This security layer supports the use of network-level authentication. When this security layer is used, a certificate on the RD Session Host is used to establish the encryption channel. If the name on the certificate does not match the name used when connecting to the RD Session Host, then a warning is displayed on the client. This is supported by Windows XP SP3 and newer operating systems.
• Negotiate This is the default selection for security layer. SSL (TLS 1.0) is used if available on the server and client. If SSL (TLS 1.0) can’t be used, then RDP Security Layer is used.
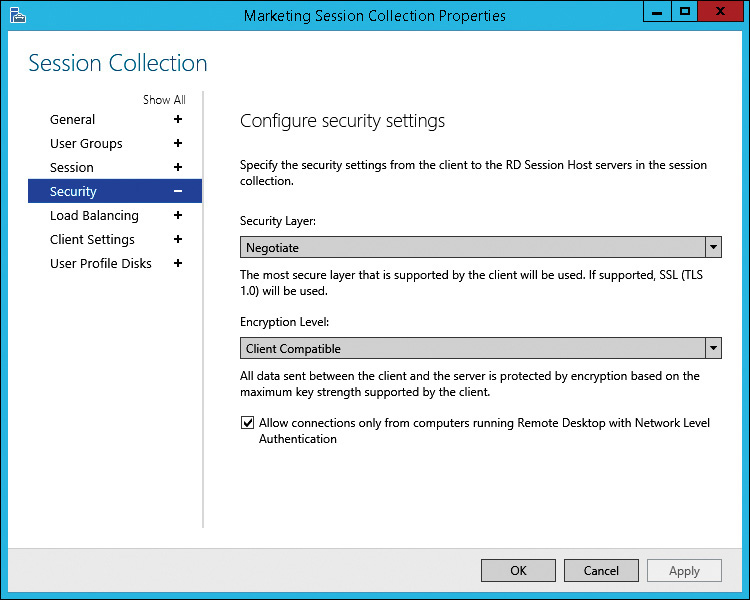
Network Level Authentication is an authentication method that requires clients to enter authentication credentials before they are connected to the RD Session Host server. The credentials are passed by the RDC client to the RD Session Host server, and if the credentials are valid, the sign-in process is performed. When Network Level Authentication isn’t used, clients can connect to the RD Session Host server and interact with the sign-in screen on the RD Session Host before they are authenticated. This is a security risk because it is possible for unauthenticated clients that have access to RD Session Host servers to see recently used user names and the operating system version.
You can force all clients to use Network Level Authentication by selecting the Allow Connections Only From Computers Running Remote Desktop With Network Level Authentication check box. This is enabled by default.
The Encryption Level setting allows you to configure the number of bits used for encryption. This setting applies for both security layers, and more bits provide stronger encryption. The options for Encryption Level are as follows:
• Low Uses 56-bit encryption for data sent from the client to the server. Data sent from the server to the client isn’t encrypted. This option is provided to support older clients and typically isn’t required.
• High Uses 128-bit encryption for all data sent between the client and server. This option can be used by Windows XP and newer operating systems. This is the preferred option.
• FIPS Compliant Uses encryption algorithms that are FIPS 140-1 or FIPS 140-2 compliant for all data sent between the client and server. Federal Information Processing Standards (FIPS) is a United States government standard for data encryption. This option typically isn’t used unless requested specifically by an organization that needs to meet FIPS requirements.
• Client Compatible Negotiates the highest level of encryption supported by the client and uses that. This is the default configuration, but it can be considered a security risk because it allows 56-bit encryption for clients that request it. Use this option only if you need to support clients that can’t use 128-bit encryption.
![]() The Configure Load Balancing Settings page in the properties of a session collection is covered later in this chapter in the section titled “High availability for RD Session Host servers.”
The Configure Load Balancing Settings page in the properties of a session collection is covered later in this chapter in the section titled “High availability for RD Session Host servers.”
The Configure Client Settings page has settings for device redirection and monitors. By default, redirection is enabled for all available options. If desired, you can select to enable or disable redirection for the following:
• Audio And Video Playback
• Audio Recording
• Smart Cards
• Plug And Play Devices
• Drives
• Clipboard
• Printers
![]() You can find more information about the client settings in Chapter 9.
You can find more information about the client settings in Chapter 9.
The User Profile Disks page, shown in Figure 8-20, allows you to configure all of the information entered during collection creation and to define what data is stored on the user profile disks. There are two options for user profile disks data settings:
• Store All User Settings And Data On The User Profile Disk Specifies that the complete user profile is stored on the user profile disk. You can add specific folders and files within the profile to exclude.
• Store Only The Following Folders On The User Profile Disk Specifies that only selected folders in the user profile are stored on the user profile disk. The folders available for selection are Contacts, Desktop, Documents, Downloads, Links, Music, Pictures, Roaming User Profile Data, and User Registry Data. You also can add specific files and folders within the profile to include.

Configuring RD Licensing servers
The initial configuration of RDS doesn’t configure licensing. However, a functional RDS deployment in production must have licensing properly configured to ensure that users can connect. To configure licensing for RDS, you need to complete the following tasks:
• Set the licensing mode
• Install an RD Licensing server
• Activate an RD Licensing server
• Install and activate CALs
To install an RD Licensing server, perform the following steps:
1. In Server Manager, in the navigation pane, click Remote Desktop Services.
2. On the Overview page, in the Deployment Overview area, click RD Licensing.
3. In the Add RD Licensing Servers Wizard, on the Select A Server page, double-click the server you want to configure as an RD Licensing server and click Next.
4. On the Confirmation page, click Add.
5. Wait until the installation is complete and click Close.
To set the licensing mode for an RDS deployment, perform the following steps:
1. In Server Manager, in the navigation pane, click Remote Desktop Services.
2. On the Overview page, in the Deployment Overview area, click Tasks and click Edit Deployment Properties.
3. In the Deployment Properties window, in the navigation pane, click RD Licensing.
4. On the RD Licensing page, select Per Device or Per User and click OK.
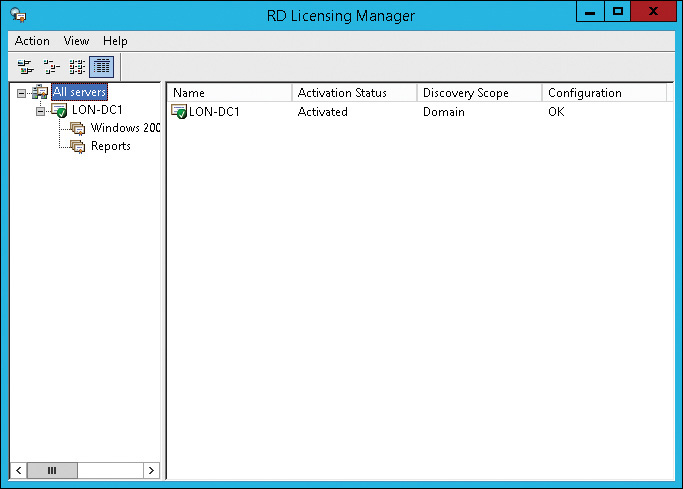
The Microsoft Clearinghouse is the service that is used to activate RD Licensing servers and RDS CALs. When you install an RD Licensing server, you need to activate it before it can be begin servicing clients. To do this, you use Remote Desktop Licensing Manager (RD Licensing Manager), shown in Figure 8-21. RD Licensing Manager is installed on each RD Licensing server.
When you activate an RD Licensing server, you need to exchange information with the Microsoft Clearinghouse. You can choose from the following connection methods:
• Automatic Connection (Recommended) Transfers the necessary information between the RD Licensing server and the Microsoft Clearinghouse over the Internet. The RD Licensing server must have connectivity to the Internet.
• Web Browser Requires you to enter a Product ID at the website https://activate.microsoft.com. Then, you type the license server ID provided by the website into the Activate Server Wizard. Use this connection method if the RD Licensing server does not have access to the Internet.
• Telephone Requires you to phone the Microsoft Clearinghouse and provide the Product ID for your server. You are then give a license server ID, which you need to enter into the Activate Server Wizard. Use this connection method if you have no access to the Internet.
Installing RDS CALs is a similar process to activating an RD Licensing server. The same connectivity methods to the Microsoft Clearinghouse are supported. The installation process automatically uses the method that you used when activating the server. You can change the connectivity method in the Properties of the server if required.
To activate an RD Licensing server over the Internet, perform the following steps:
1. In Server Manager, click Tools, point to Terminal Services, and click Remote Desktop Licensing Manager.
2. Right-click the licensing server and click Activate Server.
3. In the Activate Server Wizard, on the Welcome To The Activate Server Wizard page, click Next.
4. On the Connection Method page, in the Connection Method box, select Automatic Connection (Recommended) and click Next.
5. If you have not already configured the company information for your server, you are prompted to do so. On the Company Information page, enter the required company information and click Next.
6. On the next Company Information page, if desired, enter the optional information and click Next.
7. On the Completing The Activate Server Wizard page, deselect the Start Install Licenses Wizard Now check box and click Finish.
8. Right-click the server and click Review Configuration.
9. In the Server Configuration window, shown in Figure 8-22, click Add To Group.

10. In the RD Licensing Manager window, click Continue to acknowledge the warning about requiring Domain Admin privileges.
11. In the RD Licensing Manager dialog box, click OK to acknowledge that the server has been added to the Terminal Server License Servers Group.
12. In the Server Configuration window, click OK.
To install RDS CALs over the Internet, perform the following steps:
1. In Server Manager, click Tools, point to Terminal Services, and click Remote Desktop Licensing Manager.
2. Right-click the license server and click Install Licenses.
3. In the Install Licenses Wizard, on the Welcome To The Install Licenses Wizard page, click Next.
4. On the License Program page, select the license program used to purchase your RDS CALs and click Next. Available license programs include Open License, Enterprise Agreement, Campus Agreement, and more.
5. Enter the information requested and click Next. The information requested varies depending on the licensing program used, but it will include either a license code or an agreement number.
6. On the Product Version And License Type page, enter the product version, license type, and number of RDS CALs based on your license and click Next.
7. Wait while the Microsoft Clearinghouse processes the request and the RDS CALs are installed and then click Finish.
Understanding high availability for RDS
A highly available service is one that is available almost all of the time. High availability often is expressed numerically as the percentage of time that a service is available. For example, a requirement for 99.9 percent availability allows 8.75 hours of downtime per year, or approximately 40 minutes of downtime every four weeks. With 99.999 percent uptime, the allowed service downtime is reduced to only 5 minutes per year.
To achieve high availability for a service such as RDS, you need to identify single points of failure in the infrastructure and work to eliminate them. For example, if you have only one RD Session Host server, that is a single point of failure. There will be a service outage if that server has hardware problems or is taken offline for maintenance.
To make infrastructure highly available, you need to make it redundant. For example, within a server, using mirroring (RAID 1) for disks ensures that that failure of a single hard disk does not cause the server to fail. This principle also can be applied at other levels of infrastructure such as networking, network services, and data center power. To make RDS highly available, you need multiple servers for each of the RDS role services, but not all RDS role services automatically become highly available just because you add more servers running the role service. Some RDS role services require you to implement load balancing.
Understanding load balancing
Load balancing is a technology that you can use to achieve high availability and scalability primarily for stateless services. The term stateless refers to workloads that respond to each request independently from previous requests and without keeping client state. For example, when a client requests a webpage, a Web server gathers all of the necessary information from the request and then returns a generated webpage to the client. When the client requests another webpage, it might request the webpage from the same Web server or from any other identically configured Web server in a load-balancing cluster.
The servers that are part of a load balancing cluster are referred to as nodes. Each node is configured with the same software so that clients can connect with any node and obtain the intended service. For example, each node would have the same website configured.
Clients connect to a virtual IP address that is used to access all nodes in the cluster. To the clients, the virtual IP address behaves the same way that an IP address configured on a physical server would. Only one cluster node responds to each client request.
If a node in the cluster fails, the remaining nodes continue to service clients. This makes a load balancing cluster highly available. Adding nodes to the cluster increases the capacity of the cluster. Adding nodes is scaling out.
Windows Network Load Balancing
Windows Network Load Balancing (NLB) is a software solution for load balancing that is included in Windows Server operating systems. NLB creates a virtual IP address that all of the nodes in the load balancing cluster share. When a request comes in to virtual IP, the request is received by all nodes, but only one node responds. The nodes determine the appropriate node to respond based on an algorithm that they all use.
The most common reason organizations consider using NLB is the cost. Because it is included in Windows Server operating systems, it is effectively free. However, there are a few drawbacks to using NLB:
• It is not service aware NLB is capable of identifying when a server is no longer responding but not when a service is no longer responding. This means that some types of failures result in clients being directed to a nonresponsive service on a partially functional node.
• Scalability is limited NLB supports up to 32 nodes in a cluster, but performance peaks at 8 nodes.
• Network hardware configuration may be required Some network switches need additional configuration to work with NLB. This is required because multiple devices are sharing the same virtual IP address but are connected to different switch ports.
Hardware-based load balancing
Most large organizations use specialized hardware load balancers instead of using NLB. Hardware load balancers are more scalable than NLB, but they also are significantly more expensive. The least expensive hardware load balancers are about $2,000, and they can cost more than $40,000.
The configuration of a hardware load balancer varies depending on the vendor, but all of them provide the same basic functionality. The virtual IP address for the load balancing cluster is assigned to the load balancer, and the load balancer receives requests from the clients. The load balancer then forwards each request to a single node.
The load balancer is responsible for identifying failed nodes. Node failure can be identified at the node level, as NLB does, or at the service level. If service-level failure is used, the load balancer monitors the service on each node and stops sending client requests if the service stops responding.
High availability for RD Session Host servers
When an RDS deployment has a single RD Session Host server, that server becomes a single point of failure. When it fails, the failure will affect all users who are connected to it and who run RemoteApp programs on that server. You must consider the possibility of failure or the lack of RD Session Host server availability in your disaster recovery plan.
You can take several steps to improve RD Session Host availability. You can use reliable and redundant hardware from respected vendors to minimize the probability of hardware failure. You also should make sure that the network is reliable and that there are multiple network paths to an RD Session Host server. You should be aware, however, that failures are unavoidable, and no single server can always be available without downtime. For example, after you install Windows updates, computer restart is often required, which causes server downtime.
To make the RD Session Host server role highly available, you should have multiple RD Session Host servers in each collection. The RD Connection Broker role service automatically load balances connections to the RD Session Host servers. If the RD Connection Broker role service identifies that an RD Session Host server is unavailable, clients are not directed to the failed RD Session Host server. Clients are directed only to the remaining functional RD Session Host server.
As a best practice, all RD Session Host servers should have a similar hardware configuration. This ensures that all RD Session Host servers have similar performance and can handle a similar number of clients. The default configuration of load balancing for a collection, shown in Figure 8-23, is best suited for this scenario.
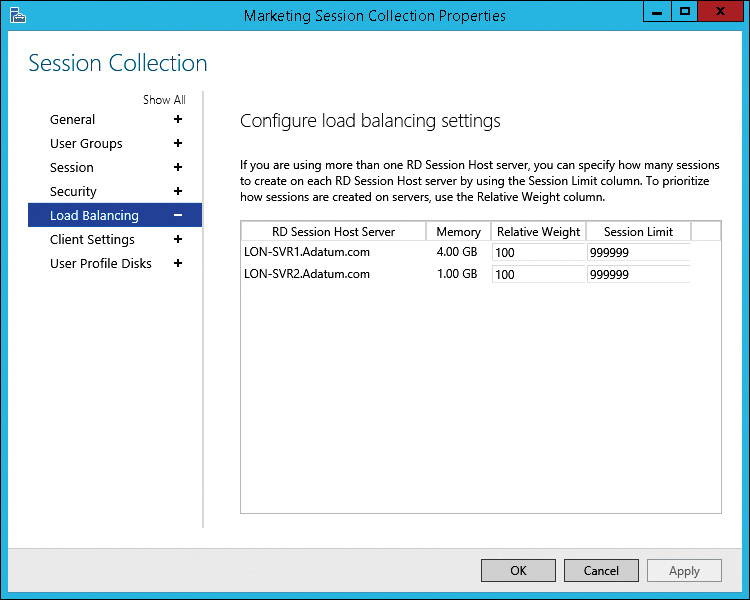
You can adjust the ratio of sessions allocated to an RD Session Host server by adjusting the Relative Weight value for that server. The default value for all servers is 100. When all servers have the same value, they all receive the same number of sessions. If you have one server with significantly better hardware and give that server a Relative Weight of 200, then it will receive twice as many sessions as a server with a Relative Weight of 100.
You also can set a Session Limit for each server. The default value for the Session Limit is 999,999, which effectively is unlimited. If you have determined that users experience performance issues when more than 80 clients are connected, then you can set a session limit of 80 to ensure that performance is satisfactory for all users.
To add a second RD Session Broker server to an RDS deployment, perform the following steps:
1. In Server Manager, in the navigation pane, click Remote Desktop Services.
2. On the Overview page, click Add RD Session Host Servers.
3. In the Add RD Session Host Server window, on the Select A Server page, in the Server Pool box, double-click the server you want to configure as an RD Session Host server and click Next.
4. On the Confirm Selections page, select the Restart Remote Computers As Needed check box and click Add.
5. Wait until the RD Session Host role service is installed on the server and click Close.
To add an RD Session Host server to a session collection, perform the following steps:
1. In Server Manager, in the navigation pane, click Remote Desktop Services.
2. In the navigation pane, click the session collection.
3. Scroll down to the Host Servers box, click Tasks, and click Add RD Session Host Servers.
4. In the Add Servers To Collection Wizard, on the Specify RD Session Host Servers page, double-click the RD Session Host server that you want to add to the session collection and click Next.
5. On the Confirm Selections page, click Add.
6. Wait until the task is complete and then click Close.
High availability for the RD Connection Broker role service
The RD Connection Broker role service is responsible for directing clients to an available RD Session Host server. If the RD Connection Broker role service is unavailable, then users are not able to access session-based virtual desktops. Having a single RD Connection Broker server creates a single point of failure.
To make the RD Connection Broker role service highly available, you need to have multiple RD Connection Broker servers. The RD Connection Broker role service uses a SQL Server database to track sessions that have been allocated to RD Session Host servers. For multiple RD Connection Brokers servers to work together, they need to share a single SQL Server database.
Note
High availability for the RD Connection Broker role service in Windows Server 2012 and newer is active/active. This means that multiple RD Connection Broker servers can respond to client requests at the same time. Older implementations of the RD Connection Broker and Terminal Services (TS) Connection Broker high availability were active/passive. A second server was used only when the first server failed. This provided high availability but not scalability.
To prepare the RD Connection Broker role service for high availability, you need to do the following:
• Configure a server running Microsoft SQL Server 2008 R2 or newer. The RD Connection Broker servers must have permission to create a database on the server.
• Install the SQL Server Native Client on all RD Connection Broker servers. The RD Connection Broker servers use this to connect to the SQL database.
• Configure a static IP address on all RD Connection Broker servers. This is required to implement DNS round robin for load balancing.
• Configure a DNS round robin record for the RD Connection Broker servers. Select a name that is meaningful, such as rds.adatum.com.
When you configure the RD Connection Broker role service for high availability, its database moves from a local WID to a computer that is running SQL Server. Even when an RDS deployment has multiple RD Connection Broker servers, SQL Server still can be a single point of failure. You should make sure that SQL Server is highly available by running it in a failover cluster.
When you configure high availability for the RD Connection Broker role service, you need to provide a Database Connection String that the RD Connection Broker servers use to connect to the SQL server. The Database Connection String has the following format:
DRIVER=SQL Server Native Client 11.0;SERVER=LON-SQL.Adatum.com;Trusted_
Connection=Yes;APP=Remote Desktop Services Connection Broker;Database=RDS-DB
There are several things to note about the Database Connection String:
• A SQL native client version is specified In this example, the SQL native client version is 11.0. This is used when your SQL server is SQL Server 2012. If your SQL server is SQL Server 2008 R2, then the SQL native client version is 10.0.
• A server name is specified In this example, the server name is LON-SQL.Adatum.com. In your deployment, you should specify the name of the SQL server that will be hosting the database for the RD Connection Broker servers.
• A database name is specified In this example, the database name is RDS-DB. This is the name of the database that will be created for the RD Connection Broker servers to use. You can select an alternate name, but it should be a meaningful name to make it easy to identify.
To configure the RD Connection Broker role service for high availability, perform the following steps:
1. In Server Manager, in the navigation pane, click Remote Desktop Services.
2. On the Overview page, in the Deployment Overview area, right-click RD Connection Broker and click Configure High Availability.
3. In the Configure RD Connection Broker For High Availability Wizard, on the Before You Begin page, click Next.
4. On the Configure RD Connection Broker For High Availability page, shown in Figure 8-24, in the Database Connection String box, type the appropriate Database Connection String for your environment.

Figure 8-24 Configure RD Connection Broker For High Availability Wizard, Configure RD Connection Broker For High Availability page
5. In the Folder To Store Database Files box, type the path for the database on the SQL server. The database will be created in this location. This folder must already exist.
6. In the DNS Round Robin Name box, type the name of the DNS round robin record that you created for the RD Connection Broker servers and then click Next.
7. On the Confirmation page, click Configure.
8. On the Progress page, click Close.
After you have configured high availability for the RD Connection Broker role service, the RD Connection Broker icon in the Deployment Overview area is updated with the text (High Availability Mode). Now you can add another RD Connection Broker server by right-clicking the RD Connection Broker icon and clicking Add RD Connection Broker server. The new RD Connection Broker server will use the central SQL database that you have configured.
High availability for the RD Web Access role service
RD Web Access servers are a critical part of an RDS deployment. The RD Web Access servers are responsible for providing clients with an .rdp file that contains connectivity information to collections. If RD Web Access isn’t available, then clients can’t obtain the necessary configuration information to connect to session-based virtual desktops. You should make RD Web Access servers highly available.
Load balancing is used to make RD Web Access servers highly available. You can use NLB, hardware-based load balancing, or DNS round robin. If you are using NLB or hardware-based load balancing, you’ll need to create a DNS record for the virtual IP address used by the load balancing cluster. For example, you could create a host (A) record for RDWeb.adatum.com that resolves to the virtual IP address. If you are using DNS round robin, then you need to create multiple host (A) records for RDWeb.adatum.com that resolve to the IP addresses of the RD Web Access servers.
To add an RD Web Access server, perform the following steps:
1. In Server Manager, in the navigation pane, click Remote Desktop Services.
2. On the Overview page, right-click RD Web Access and click Add RD Web Access Servers.
3. In the Add RD Web Access Servers Wizard, on the Select A Server page, double-click the server you want to configure as an RD Web Access server and click Next.
4. On the Confirmation page, click Add.
5. Wait until the installation is complete and click Close.
6. Configure your load-balancing solution with the IP address of the new RD Web Access server.
High availability for the RD Licensing role service
The effect of the RD Licensing role service for an RDS deployment varies, depending on the licensing mode that has been selected. When an RDS deployment is configured for Per User licensing, the RD Session Host servers contact an RD Licensing server each time a client connects. If an RD Licensing server isn’t available, then users can’t connect.
Per User licensing isn’t enforced by RD Licensing servers. If an RD Session Host server can contact an RD Licensing server, that is sufficient to allow a connection. You are responsible for ensuring that you are in compliance with licensing requirements, but they are not enforced.
To make an RDS deployment with Per User licensing highly available, you need to install multiple RD Licensing servers. If the first RD Licensing server is unavailable, then the second is contacted.
Allocation of RDS User CALs among the RD Licensing servers does not matter because they are not enforced. To simplify license management, you can install and activate all RDS User CALs on a single RD Licensing server.
High availability for an RDS deployment configured for Per Device licensing also requires multiple RD Licensing servers, but configuration is more complex because RDS Device CAL usage is enforced. If an RDS Device CAL isn’t available, then connectivity can be blocked. Because of this, you need to consider how CALs are allocated among the RD Licensing servers.
RDS client behavior for Per Device licensing varies, depending on the state of the client:
• First connection The first time a device connects, it is issued a temporary CAL that can be used only once. If an RD Licensing server is unavailable, the temporary CAL can’t be issued, and new devices are unable to connect. The temporary CAL can be issued by any RD Licensing server even if no RDS Device CALs are available on that server.
• Temporary license The second time a device connects, it is issued a permanent RDS Device CAL. For a device to be issued a permanent RDS Device CAL, an RD Licensing server with unallocated Per Device CALs must be available. If an RD Licensing server with unallocated Per Device CALs isn’t available, then the temporary CAL remains valid for 90 days.
• Permanent CAL Devices with a permanent CAL can connect to an RD Session Host when no RD Licensing server is available. Permanent RDS Device CALs are valid for 52 to 89 days and can’t be renewed if no RD Licensing server is available.
• Permanent CAL expired If the permanent CAL has expired and an RD Licensing server isn’t available, the connection is blocked. An RD Licensing server with unused Per Device CALs must be available to issue a new permanent CAL.
The simplest way to configure high availability for the RD Licensing role service when using Per Device licensing is to put all RDS Device CALs on a single RD Licensing server. The second RD Licensing server has no CALs installed and issues only temporary licenses. In this configuration, failure of the RD Licensing server with CALs has no effect on devices with a permanent or temporary license, which typically are the majority of devices. Devices connecting for the first time are issued a temporary license from the remaining RD Licensing server without CALs. The only clients unable to connect are devices with an expired license, which should be a small number of devices.
A slightly more complex way to configure high availability for the RD Licensing role service when using Per Device licensing is to split RDS Device CALs among RD Licensing servers. Most CALs are installed on the primary RD Licensing server, but some are installed on a secondary RD Licensing server. This configuration is better because if the primary RD Licensing server fails, then CALs can be issued by the secondary RD Licensing server, and no devices should be prevented from connecting.
Splitting CALs between two RD Licensing servers is slightly more expensive because you need to purchase additional CALs for the secondary RD Licensing server. In a large deployment of RDS, this likely is worth the additional cost to avoid outages. In a small deployment of RDS, it may not be worth the cost because very few users would be affected.
When you have multiple RD Licensing servers, it is critical that you configure the RDS deployment to use the RD Licensing server you have configured with the CALs as the primary RD Licensing server.
To configure the order of RD Licensing servers, perform the following steps:
1. In Server Manager, in the navigation pane, click Remote Desktop Services.
2. On the Overview page, in the Deployment Overview area, click Edit Deployment Properties.
3. In the Deployment Properties window, in the navigation area, click RD Licensing.
4. Select the server you want to be primary, click Move Up until it is at the top of the list, and click OK.
To add an RD Licensing server, perform the following steps:
1. In Server Manager, in the navigation pane, click Remote Desktop Services.
2. On the Overview page, in the Deployment Overview area, right-click RD Licensing and click Add RD Licensing Servers.
3. In the Add RD Licensing Servers Wizard, on the Select A Server page, double-click the server you want to configure as an RD Licensing server and click Next.
4. On the Confirmation page, click Add.