The Microsoft .NET Framework I/O classes fall into two basic categories. First are the classes that retrieve information from the file system and allow you to perform file system operations such as copying files and moving directories. Two examples include the FileInfo and the DirectoryInfo classes. The second and possibly more important category includes a broad range of classes that allow you to read and write data from all types of streams. Streams can correspond to binary or text files, a file in an isolated store, a network connection, or even a memory buffer. In all cases, the way you interact with a stream is the same. This chapter describes how to use the file system classes and a wide range of stream-based classes.
The recipes in this chapter describe how to do the following:
Retrieve or modify information about a file, directory, or a drive (recipes 5-1, 5-2, 5-4, 5-5, and 5-6)
Copy, move, and delete files and directories (recipe 5-3)
Show a directory tree in a Microsoft Windows-based application use the common file dialog boxes and monitor the file system for changes (recipes 5-6, 5-17, and 5-19)
Create, read, and write text and binary files; create temporary files; and use isolated storage (recipes 5-7, 5-8, 5-9, 5-15, 5-18, and 5-21)
Search for specific files and test files for equality and work with strings that contain path information (recipes 5-10, 5-11, 5-12, 5-13, and 5-14)
Write to a COM port (recipe 5-20)
Retrieve or modify the access control lists (ACLs) of a file or directory (recipe 5-22)
Compress and decompress data (recipe 5-23)
Log data to a file and process a log file (recipes 5-24 and 5-25)
Communicate between processes (recipes 5-26)
Create a new System.IO.FileInfo, System.IO.DirectoryInfo, or System.IO.DriveInfo object, depending on the type of resource about which you need to retrieve information. Supply the path of the resource to the constructor, and then you will be able to retrieve information through the properties of the class.
To create a FileInfo, DirectoryInfo, or DriveInfo object, you supply a relative or fully qualified path in the constructor. You can retrieve information through the corresponding object properties. Table 5-1 lists some of the key members that are found in these objects.
Table 5.1. Key Members for Files, Directories, and Drives
Member | Applies To | Description |
|---|---|---|
|
| Returns |
|
| Returns one or more values from the |
|
| Return |
|
| Return a string that represents the fully qualified name, the directory, or the file name (with extension), and the extension on its own. |
|
| Returns |
|
| Returns the file size as a number of bytes. |
|
|
|
|
| Return a |
|
| Creates a directory with the specified name in the directory represented by the |
|
| Returns an array of |
|
| Returns an array of |
|
| Returns an |
|
| Returns an |
|
| Returns a |
|
| Returns a |
|
| Returns an array of |
The following are a few points to note while working with these objects:
FileInfoandDirectoryInfoclasses derive from the abstractFileSystemInfoclass, which defines common methods likeCreationTime, Exists, and so on. TheDriveInfoclass does not inherit from this base class, so it does not provide some of the common members available in the other two classes.The full set of properties that
FileInfoandDirectoryInfoobjects expose is read the first time you interrogate any property. If the file or directory changes after this point, you must call theRefreshmethod to update the properties. However, this is not the case forDriveInfo; each property access asks the file system for an up-to-date value.You will not encounter an error if you specify a path that does not correspond to an existing file, directory, or drive. Instead, you will receive an object that represents an entity that does not exist—its
Exists(orIsReadyproperty forDriveInfo) property will befalse. You can use this object to manipulate the entity. However, if you attempt to read most other properties, exceptions likeFileNotFoundException, DirectoryNotFoundException, and so on will be thrown.
The following console application takes a file path from a command-line argument, and then displays information about the file, the containing directory, and the drive.
using System;
using System.IO;

namespace Apress.VisualCSharpRecipes.Chapter05
{
    static class Recipe05_01
    {
        static void Main(string[] args)
        {
            if (args.Length == 0)
            {
                Console.WriteLine("Please supply a filename.");
                return;
            }

            // Display file information.
            FileInfo file = new FileInfo(args[0]);

            Console.WriteLine("Checking file: " + file.Name);
            Console.WriteLine("File exists: " + file.Exists.ToString());

            if (file.Exists)
            {
                Console.Write("File created: ");
                Console.WriteLine(file.CreationTime.ToString());
                Console.Write("File last updated: ");
                Console.WriteLine(file.LastWriteTime.ToString());
                Console.Write("File last accessed: ");
                Console.WriteLine(file.LastAccessTime.ToString());
                Console.Write("File size (bytes): ");
                Console.WriteLine(file.Length.ToString());
Console.Write("File attribute list: ");
Console.WriteLine(file.Attributes.ToString());
}
Console.WriteLine();
// Display directory information.
DirectoryInfo dir = file.Directory;
Console.WriteLine("Checking directory: " + dir.Name);
Console.WriteLine("In directory: " + dir.Parent.Name);
Console.Write("Directory exists: ");
Console.WriteLine(dir.Exists.ToString());
if (dir.Exists)
{
Console.Write("Directory created: ");
Console.WriteLine(dir.CreationTime.ToString());
Console.Write("Directory last updated: ");
Console.WriteLine(dir.LastWriteTime.ToString());
Console.Write("Directory last accessed: ");
Console.WriteLine(dir.LastAccessTime.ToString());
Console.Write("Directory attribute list: ");
Console.WriteLine(dir.Attributes.ToString());
Console.WriteLine("Directory contains: " +
dir.GetFiles().Length.ToString() + " files");
}
Console.WriteLine();
// Display drive information.
DriveInfo drv = new DriveInfo(file.FullName);
Console.Write("Drive: ");
Console.WriteLine(drv.Name);
if (drv.IsReady)
{
Console.Write("Drive type: ");
Console.WriteLine(drv.DriveType.ToString());
Console.Write("Drive format: ");
Console.WriteLine(drv.DriveFormat.ToString());
Console.Write("Drive free space: ");
Console.WriteLine(drv.AvailableFreeSpace.ToString());
}
// Wait to continue.
Console.WriteLine(Environment.NewLine);
Console.WriteLine("Main method complete. Press Enter.");
Console.ReadLine();
}
}
}If you execute the command Recipe05-01.exe c:windowswin.ini, you might expect the following output:
Checking file: win.ini

File exists: True

File created: 31.Mar.2003 5:30:00 PM

File last updated: 24.Sep.2005 11:11:13 PM

File last accessed: 10.Nov.2005 9:41:05 PM

File size (bytes): 658

File attribute list: Archive

Checking directory: windows

In directory: c:

Directory exists: True

Directory created: 04.Jun.2005 4:47:56 PM

Directory last updated: 01.Nov.2005 10:09:45 AM

Directory last accessed: 11.Nov.2005 6:24:59 AM

Directory attribute list: Directory

Directory contains: 134 files
Drive: c:

Drive type: Fixed

Drive format: NTFS

Drive free space: 14045097984
Create a System.IO.FileInfo object for a file or a System.IO.DirectoryInfo object for a directory and use the bitwise AND (&) and OR (|) arithmetic operators to modify the value of the Attributes property.
The FileInfo.Attributes and DirectoryInfo.Attributes properties represent file attributes such as archive, system, hidden, read-only, compressed, and encrypted. Because a file can possess any combination of attributes, the Attributes property accepts a combination of enumerated values. To individually test for a single attribute or change a single attribute, you need to use bitwise arithmetic. FileInfo.Attributes and DirectoryInfo.Attributes both return values from the FileAttributes enumeration, whose most commonly used values are
ReadOnly(the file is read-only)Hidden(the file is hidden from ordinary directory listings)System(the file part of the operating system)Directory(the file is a directory)Archive(used by backup applications)Temporary(this is a temporary file and will be deleted when no longer required)Compressed(the contents of the file are compressed)Encrypted(the contents of the file are encrypted)
The following example takes a read-only test file and checks for the read-only attribute:
using System;
using System.IO;

namespace Apress.VisualCSharpRecipes.Chapter05
{
    static class Recipe05_02
    {
        static void Main()
        {
            // This file has the archive and read-only attributes.
            FileInfo file = new FileInfo(@"C:Windowswin.ini");

            // This displays the attributes.
            Console.WriteLine(file.Attributes.ToString());

            // This test fails because other attributes are set.
            if (file.Attributes == FileAttributes.ReadOnly)
            {
                Console.WriteLine("File is read-only (faulty test).");
            }

            // This test succeeds because it filters out just the
            // read-only attribute.
            if ((file.Attributes & FileAttributes.ReadOnly) ==
              FileAttributes.ReadOnly)
            {
                Console.WriteLine("File is read-only (correct test).");
            }

            // Wait to continue.
            Console.WriteLine(Environment.NewLine);
            Console.WriteLine("Main method complete. Press Enter.");
            Console.ReadLine();
        }
    }
}
When setting an attribute, you must also use bitwise arithmetic, as demonstrated in the following example. In this case, it's needed to ensure that you don't inadvertently clear the other attributes.
// This adds just the read-only attribute.
file.Attributes = file.Attributes | FileAttributes.ReadOnly;

// This removes just the read-only attribute.
file.Attributes = file.Attributes & ~FileAttributes.ReadOnly;
Create a System.IO.FileInfo object for a file or a System.IO.DirectoryInfo object for a directory, supplying the path in the constructor. You can then use the object's methods to copy, move, and delete the file or directory.
The FileInfo and DirectoryInfo classes include a host of valuable methods for manipulating files and directories. Table 5-2 shows methods for the FileInfo class, and Table 5-3 shows methods for the DirectoryInfo class.
Table 5.2. Key Methods for Manipulating a FileInfo Object
Method | Description |
|---|---|
| Copies a file to the new path and file name specified as a parameter. It also returns a new |
|
|
| Open a file (provided it exists). |
| Removes the file, if it exists. |
| Encrypt/decrypt a file using the current account. This applies to NTFS file systems only. |
| Moves the file to the new path and file name specified as a parameter. |
| Replaces contents of a file by the current |
Table 5.3. Key Methods for Manipulating a DirectoryInfo Object
Method | Description |
|---|---|
| Creates the specified directory. If the path specifies multiple directories that do not exist, they will all be created at once. |
| Creates a directory with the specified name in the directory represented by the |
| Removes the directory, if it exists. If you want to delete a directory that contains other directories, you must use the overloaded |
| Moves the directory (contents and all) to a new path on the same drive. |
One useful feature that is missing from the DirectoryInfo class is a copy method. Fortunately, you can write this logic easily enough by relying on recursive logic and the FileInfo object.
The following example contains a helper function that can copy any directory, and its contents.
using System;
using System.IO;

namespace Apress.VisualCSharpRecipes.Chapter05
{
    static class Recipe05_03
    {
        static void Main(string[] args)
        {
            if (args.Length != 2)
            {
Console.WriteLine("USAGE: " +
"Recipe05_03 [sourcePath] [destinationPath]");
Console.ReadLine();
return;
}
DirectoryInfo sourceDir = new DirectoryInfo(args[0]);
DirectoryInfo destinationDir = new DirectoryInfo(args[1]);
CopyDirectory(sourceDir, destinationDir);
// Wait to continue.
Console.WriteLine(Environment.NewLine);
Console.WriteLine("Main method complete. Press Enter.");
Console.ReadLine();
}
static void CopyDirectory(DirectoryInfo source,
DirectoryInfo destination)
{
if (!destination.Exists)
{
destination.Create();
}
// Copy all files.
foreach (FileInfo file in source.EnumerateFiles())
{
file.CopyTo(Path.Combine(destination.FullName,
file.Name));
}
// Process subdirectories.
foreach (DirectoryInfo dir in source.EnumerateDirectories())
{
// Get destination directory.
string destinationDir = Path.Combine(destination.FullName,
dir.Name);
// Call CopyDirectory() recursively.
CopyDirectory(dir, new DirectoryInfo(destinationDir));
}
}
}
}You need to calculate the size of all files contained in a directory (and optionally, its subdirectories).
Examine all the files in a directory and add together their FileInfo.Length properties. Use recursive logic to include the size of files in contained subdirectories.
The DirectoryInfo class does not provide any property that returns size information. However, you can easily calculate the size of all files contained in a directory using the FileInfo.Length property.
The following example calculates the size of a directory and optionally examines contained directories recursively.
using System;
using System.IO;

namespace Apress.VisualCSharpRecipes.Chapter05
{
    static class Recipe05_04
    {
        static void Main(string[] args)
        {
            if (args.Length == 0)
            {
                Console.WriteLine("Please supply a directory path.");
                return;
            }

            DirectoryInfo dir = new DirectoryInfo(args[0]);
            Console.WriteLine("Total size: " +
              CalculateDirectorySize(dir, true).ToString() +
              " bytes.");

            // Wait to continue.
            Console.WriteLine(Environment.NewLine);
            Console.WriteLine("Main method complete. Press Enter.");
            Console.ReadLine();
        }
static long CalculateDirectorySize(DirectoryInfo directory,
bool includeSubdirectories)
{
long totalSize = 0;
// Examine all contained files.
foreach (FileInfo file in directory.EnumerateFiles())
{
totalSize += file.Length;
}
// Examine all contained directories.
if (includeSubdirectories)
{
foreach (DirectoryInfo dir in directory.EnumerateDirectories())
{
totalSize += CalculateDirectorySize(dir, true);
}
}
return totalSize;
}
}
}You want to retrieve file version information, such as the publisher of a file, its revision number, associated comments, and so on.
The .NET Framework allows you to retrieve file information without resorting to the Windows API. Instead, you simply need to use the FileVersionInfo class and call the GetVersionInfo method with the file name as a parameter. You can then retrieve extensive information through the FileVersionInfo properties.
The FileVersionInfo properties are too numerous to list here, but the following code snippet shows an example of what you might retrieve:
using System;
using System.Diagnostics;

namespace Apress.VisualCSharpRecipes.Chapter05
{
    static class Recipe05_05
    {
        static void Main(string[] args)
        {
            if (args.Length == 0)
            {
                Console.WriteLine("Please supply a filename.");
                return;
            }

            FileVersionInfo info = FileVersionInfo.GetVersionInfo(args[0]);

            // Display version information.
            Console.WriteLine("Checking File: " + info.FileName);
            Console.WriteLine("Product Name: " + info.ProductName);
            Console.WriteLine("Product Version: " + info.ProductVersion);
            Console.WriteLine("Company Name: " + info.CompanyName);
            Console.WriteLine("File Version: " + info.FileVersion);
            Console.WriteLine("File Description: " + info.FileDescription);
            Console.WriteLine("Original Filename: " + info.OriginalFilename);
            Console.WriteLine("Legal Copyright: " + info.LegalCopyright);
            Console.WriteLine("InternalName: " + info.InternalName);
            Console.WriteLine("IsDebug: " + info.IsDebug);
            Console.WriteLine("IsPatched: " + info.IsPatched);
            Console.WriteLine("IsPreRelease: " + info.IsPreRelease);
            Console.WriteLine("IsPrivateBuild: " + info.IsPrivateBuild);
            Console.WriteLine("IsSpecialBuild: " + info.IsSpecialBuild);

            // Wait to continue.
            Console.WriteLine(Environment.NewLine);
            Console.WriteLine("Main method complete. Press Enter.");
            Console.ReadLine();
        }
    }
}If you run the command Recipe05_05 c:windowsexplorer.exe, the example produces the following output:
Checking File: c:windowsexplorer.exe

Product Name: Microsoftr Windowsr Operating System

Product Version: 6.00.2900.2180

Company Name: Microsoft Corporation

File Version: 6.00.2900.2180 (xpsp_sp2_rtm.040803-2158)

File Description: Windows Explorer

Original Filename: EXPLORER.EXE

Legal Copyright: c Microsoft Corporation. All rights reserved.

InternalName: explorer

IsDebug: False

IsPatched: False

IsPreRelease: False

IsPrivateBuild: False

IsSpecialBuild: False
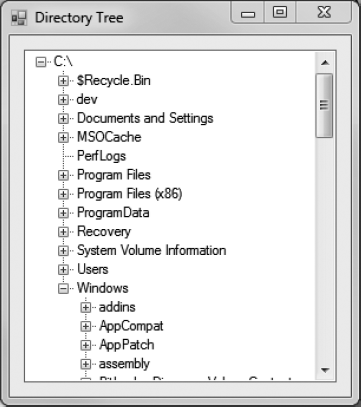
You need to display a directory tree in a TreeView control. However, filling the directory tree structure at startup is too time-consuming.
Fill the first level of directories in the TreeView control and add a hidden dummy node to each directory branch. React to the TreeView.BeforeExpand event to fill in subdirectories in a branch just before it's displayed.
You can use recursion to build an entire directory tree. However, scanning the file system in this way can be slow, particularly for large drives. For this reason, professional file management software programs (including Windows Explorer) use a different technique. They query the necessary directory information when the user requests it.
The TreeView control is particularly well suited to this approach because it provides a BeforeExpand event that fires before a new level of nodes is displayed. You can use a placeholder (such as an asterisk or empty TreeNode) in all the directory branches that are not filled in. This allows you to fill in parts of the directory tree as they are displayed.
To use this type of solution, you need the following three ingredients:
A
Fillmethod that adds a single level of directory nodes based on a single directory. You will use this method to fill directory levels as they are expanded.A basic
Form.Loadevent handler that uses theFillmethod to add the first level of directories for the drive.A
TreeView.BeforeExpandevent handler that reacts when the user expands a node and calls theFillmethod if this directory information has not yet been added.
The following shows the code element of a Windows Forms application that demonstrates this recipe. Download the source code that accompanies this book for the full Visual Studio project.
using System;
using System.Windows.Forms;
using System.IO;

namespace Apress.VisualCSharpRecipes.Chapter05
{
    public partial class DirectoryTree : Form
    {
        public DirectoryTree()
        {
            InitializeComponent();
        }

        private void DirectoryTree_Load(object sender, EventArgs e)
        {
            // Set the first node.
            TreeNode rootNode = new TreeNode(@"C:");
            treeDirectory.Nodes.Add(rootNode);
// Fill the first level and expand it.
Fill(rootNode);
treeDirectory.Nodes[0].Expand();
}
private void treeDirectory_BeforeExpand(object sender,
TreeViewCancelEventArgs e)
{
// If a dummy node is found, remove it and read the
// real directory list.
if (e.Node.Nodes[0].Text == "*")
{
e.Node.Nodes.Clear();
Fill(e.Node);
}
}
private void Fill(TreeNode dirNode)
{
DirectoryInfo dir = new DirectoryInfo(dirNode.FullPath);
// An exception could be thrown in this code if you don't
// have sufficient security permissions for a file or directory.
// You can catch and then ignore this exception.
foreach (DirectoryInfo dirItem in dir.GetDirectories())
{
// Add node for the directory.
TreeNode newNode = new TreeNode(dirItem.Name);
dirNode.Nodes.Add(newNode);
newNode.Nodes.Add("*");
}
}
}
}Figure 5-1 shows the directory tree in action.
Create a new System.IO.FileStream object that references the file. To write the file, wrap the FileStream in a System.IO.StreamWriter and use the overloaded Write method. To read the file, wrap the FileStream in a System.IO.StreamReader and use the Read or ReadLine method.
The .NET Framework allows you to write or read text with any stream by using the StreamWriter and StreamReader classes. When writing data with the StreamWriter, you use the StreamWriter.Write method. This method is overloaded to support all the common C# .NET data types, including strings, chars, integers, floating-point numbers, decimals, and so on. However, the Write method always converts the supplied data to text. If you want to be able to convert the text back to its original data type, you should use the WriteLine method to make sure each value is placed on a separate line.
The way a string is represented depends on the encoding you use. The most common encodings include the following:
ASCII, which encodes each character in a string using 7 bits. ASCII-encoded data cannot contain extended Unicode characters. When using ASCII encoding in .NET, the bits will be padded and the resulting byte array will have 1 byte for each character.
Full Unicode (or UTF-16), which represents each character in a string using 16 bits. The resulting byte array will have 2 bytes for each character.
UTF-7 Unicode, which uses 7 bits for ordinary ASCII characters and multiple 7-bit pairs for extended characters. This encoding is primarily for use with 7-bit protocols such as mail, and it is not regularly used.
UTF-8 Unicode, which uses 8 bits for ordinary ASCII characters and multiple 8-bit pairs for extended characters. The resulting byte array will have 1 byte for each character (provided there are no extended characters).
The .NET Framework provides a class for each type of encoding in the System.Text namespace. When using StreamReader and StreamWriter, you can specify the encoding you want to use or simply use the default UTF-8 encoding.
When reading information, you use the Read or ReadLine method of StreamReader. The Read method reads a single character, or the number of characters you specify, and returns the data as a char or char array. The ReadLine method returns a string with the content of an entire line. The ReadToEnd method will return a string with the content starting from the current position to the end of the stream.
The following console application writes and then reads a text file:
using System;
using System.IO;
using System.Text;

namespace Apress.VisualCSharpRecipes.Chapter05
{
    static class Recipe05_07
    {
        static void Main()
        {
            // Create a new file.
            using (FileStream fs = new FileStream("test.txt", FileMode.Create))
            {
                // Create a writer and specify the encoding.
                // The default (UTF-8) supports special Unicode characters,
                // but encodes all standard characters in the same way as
                // ASCII encoding.
using (StreamWriter w = new StreamWriter(fs, Encoding.UTF8))
{
// Write a decimal, string, and char.
w.WriteLine(124.23M);
w.WriteLine("Test string");
w.WriteLine('!'),
}
}
Console.WriteLine("Press Enter to read the information.");
Console.ReadLine();
// Open the file in read-only mode.
using (FileStream fs = new FileStream("test.txt", FileMode.Open))
{
using (StreamReader r = new StreamReader(fs, Encoding.UTF8))
{
// Read the data and convert it to the appropriate data type.
Console.WriteLine(Decimal.Parse(r.ReadLine()));
Console.WriteLine(r.ReadLine());
Console.WriteLine(Char.Parse(r.ReadLine()));
}
}
// Wait to continue.
Console.WriteLine(Environment.NewLine);
Console.WriteLine("Main method complete. Press Enter.");
Console.ReadLine();
}
}
}Running the program creates a file that contains the following content:
124.23

Test string

!
Create a new System.IO.FileStream object that references the file. To write the file, wrap the FileStream in a System.IO.BinaryWriter and use the overloaded Write method. To read the file, wrap the FileStream in a System.IO.BinaryReader and use the Read method that corresponds to the expected data type.
The .NET Framework allows you to write or read binary data with any stream by using the BinaryWriter and BinaryReader classes. When writing data with the BinaryWriter, you use the BinaryWriter.Write method. This method is overloaded to support all the common C# .NET data types, including strings, chars, integers, floating-point numbers, decimals, and so on. The information will then be encoded as a series of bytes and written to the file. You can configure the encoding used for strings by using an overloaded constructor that accepts a System.Text.Encoding object, as described in recipe 5-7.
You must be particularly fastidious with data types when using binary files. This is because when you retrieve the information, you must use one of the strongly typed Read methods from the BinaryReader. For example, to retrieve decimal data, you use ReadDecimal. To read a string, you use ReadString. (The BinaryWriter always records the length of a string when it writes it to a binary file to prevent any possibility of error.)
The following console application writes and then reads a binary file:
using System;
using System.IO;

namespace Apress.VisualCSharpRecipes.Chapter05
{
    static class Recipe05_08
    {
        static void Main()
        {
            // Create a new file and writer.
            using (FileStream fs = new FileStream("test.bin", FileMode.Create))
            {
                using (BinaryWriter w = new BinaryWriter(fs))
                {
                    // Write a decimal, two strings, and a char.
                    w.Write(124.23M);
                    w.Write("Test string");
                    w.Write("Test string 2");
                    w.Write('!'),
                }
            }
            Console.WriteLine("Press Enter to read the information.");
            Console.ReadLine();
// Open the file in read-only mode.
using (FileStream fs = new FileStream("test.bin", FileMode.Open))
{
// Display the raw information in the file.
using (StreamReader sr = new StreamReader(fs))
{
Console.WriteLine(sr.ReadToEnd());
Console.WriteLine();
// Read the data and convert it to the appropriate data type.
fs.Position = 0;
using (BinaryReader br = new BinaryReader(fs))
{
Console.WriteLine(br.ReadDecimal());
Console.WriteLine(br.ReadString());
Console.WriteLine(br.ReadString());
Console.WriteLine(br.ReadChar());
}
}
}
// Wait to continue.
Console.WriteLine(Environment.NewLine);
Console.WriteLine("Main method complete. Press Enter.");
Console.ReadLine();
}
}
}You need to read data from a file without blocking the execution of your code. This technique is commonly used if the file is stored on a slow backing store (such as a networked drive in a wide area network).
Create a separate class that will read the file asynchronously. Start reading a block of data using the FileStream.BeginRead method and supply a callback method. When the callback is triggered, retrieve the data by calling FileStream.EndRead, process it, and read the next block asynchronously with BeginRead.
The FileStream includes basic support for asynchronous use through the BeginRead and EndRead methods. Using these methods, you can read a block of data on one of the threads provided by the .NET Framework thread pool, without needing to directly use the threading classes in the System.Threading namespace.
When reading a file asynchronously, you choose the amount of data that you want to read at a time. Depending on the situation, you might want to read a very small amount of data at a time (for example, if you are copying it block by block to another file) or a relatively large amount of data (for example, if you need a certain amount of information before your processing logic can start). You specify the block size when calling BeginRead, and you pass a buffer where the data will be placed. Because the BeginRead and EndRead methods need to be able to access many of the same pieces of information, such as the FileStream, the buffer, the block size, and so on, it's usually easiest to encapsulate your asynchronous file reading code in a single class.
The following example demonstrates reading a file asynchronously. The AsyncProcessor class provides a public StartProcess method, which starts an asynchronous read. Every time the read operation finishes, the OnCompletedRead callback is triggered and the block of data is processed. If there is more data in the file, a new asynchronous read operation is started. AsyncProcessor reads 2 kilobytes (2048 bytes) at a time.
using System;
using System.IO;
using System.Threading;

namespace Apress.VisualCSharpRecipes.Chapter05
{
    public class AsyncProcessor
    {
        private Stream inputStream;

        // The amount that will be read in one block (2KB).
        private int bufferSize = 2048;

        public int BufferSize
        {
            get { return bufferSize; }
            set { bufferSize = value; }
        }

        // The buffer that will hold the retrieved data.
        private byte[] buffer;

        public AsyncProcessor(string fileName)
        {
            buffer = new byte[bufferSize];
// Open the file, specifying true for asynchronous support.
inputStream = new FileStream(fileName, FileMode.Open,
FileAccess.Read, FileShare.Read, bufferSize, true);
}
public void StartProcess()
{
// Start the asynchronous read, which will fill the buffer.
inputStream.BeginRead(buffer, 0, buffer.Length,
OnCompletedRead, null);
}
private void OnCompletedRead(IAsyncResult asyncResult)
{
// One block has been read asynchronously.
// Retrieve the data.
int bytesRead = inputStream.EndRead(asyncResult);
// If no bytes are read, the stream is at the end of the file.
if (bytesRead > 0)
{
// Pause to simulate processing this block of data.
Console.WriteLine(" [ASYNC READER]: Read one block.");
Thread.Sleep(TimeSpan.FromMilliseconds(20));
// Begin to read the next block asynchronously.
inputStream.BeginRead(
buffer, 0, buffer.Length, OnCompletedRead,
null);
}
else
{
// End the operation.
Console.WriteLine(" [ASYNC READER]: Complete.");
inputStream.Close();
}
}
}
}The following example shows a console application that uses AsyncProcessor to read a 2MB file:
using System;
using System.IO;
using System.Threading;
namespace Apress.VisualCSharpRecipes.Chapter05
{
    static class Recipe05_09
    {
        static void Main(string[] args)
        {
            // Create a test file.
            using (FileStream fs = new FileStream("test.txt", FileMode.Create))
            {
                fs.SetLength(100000);
            }

            // Start the asynchronous file processor on another thread.
            AsyncProcessor asyncIO = new AsyncProcessor("test.txt");
            asyncIO.StartProcess();

            // At the same time, do some other work.
            // In this example, we simply loop for 10 seconds.
            DateTime startTime = DateTime.Now;
            while (DateTime.Now.Subtract(startTime).TotalSeconds < 2)
            {
                Console.WriteLine("[MAIN THREAD]: Doing some work.");

                // Pause to simulate a time-consuming operation.
                Thread.Sleep(TimeSpan.FromMilliseconds(100));
            }

            Console.WriteLine("[MAIN THREAD]: Complete.");
            Console.ReadLine();

            // Remove the test file.
            File.Delete("test.txt");
        }
    }
}
The following is an example of the output you will see when you run this test:
[MAIN THREAD]: Doing some work.

        [ASYNC READER]: Read one block.

        [ASYNC READER]: Read one block.

[MAIN THREAD]: Doing some work.

        [ASYNC READER]: Read one block.

        [ASYNC READER]: Read one block.
[ASYNC READER]: Read one block.
[ASYNC READER]: Read one block.
[MAIN THREAD]: Doing some work.
[ASYNC READER]: Read one block.
[ASYNC READER]: Read one block.
[ASYNC READER]: Read one block.
. . .Use the overloaded versions of the System.IO.DirectoryInfo.GetFiles or System.IO.DirectoryInfo.EnumerateFiles methods that accept a filter expression and return an array of FileInfo objects. For searching recursively across all subdirectories, use the overloaded version that accepts the SearchOption enumeration.
The DirectoryInfo and Directory objects both provide a way to search the directories for files that match a specific filter expression. These search expressions can use the standard ? and * wildcards. You can use a similar technique to retrieve directories that match a specified search pattern by using the overloaded DirectoryInfo.GetDirectories or DirectoryInfo.EnumerateDirectories methods. You can also use the overload of GetFiles for searching recursively using the SearchOption.AllDirectories enumeration constant.
The following example retrieves the names of all the files in a specified directory that match a specified filter string. The directory and filter expression are submitted as command-line arguments. The code then iterates through the retrieved FileInfo collection of matching files and displays the name and size of each one:
using System;
using System.IO;

namespace Apress.VisualCSharpRecipes.Chapter05
{
    static class Recipe05_10
    {
        static void Main(string[] args)
        {
            if (args.Length != 2)
            {
                Console.WriteLine(
                  "USAGE:  Recipe05_10 [directory] [filterExpression]");
                return;
            }

            DirectoryInfo dir = new DirectoryInfo(args[0]);
            FileInfo[] files = dir.GetFiles(args[1]);

            // Display the name of all the files.
            foreach (FileInfo file in files)
            {
                Console.Write("Name: " + file.Name + "  ");
                Console.WriteLine("Size: " + file.Length.ToString());
            }

            // Wait to continue.
            Console.WriteLine(Environment.NewLine);
            Console.WriteLine("Main method complete. Press Enter.");
            Console.ReadLine();
        }
    }
}Calculate the hash code of each file using the System.Security.Cryptography.HashAlgorithm class, and then compare the hash codes.
You might compare file contents in a number of ways. For example, you could examine a portion of the file for similar data, or you could read through each file byte by byte, comparing each byte as you go. Both of these approaches are valid, but in some cases it's more convenient to use a hash code algorithm.
A hash code algorithm generates a small (typically about 20 bytes) binary fingerprint for a file. While it's possible for different files to generate the same hash codes, that is statistically unlikely to occur. In fact, even a minor change (for example, modifying a single bit in the source file) has an approximately 50 percent chance of independently changing each bit in the hash code. For this reason, hash codes are often used in security code to detect data tampering. (Hash codes are discussed in more detail in recipes 11-14, 11-15, and 11-16.)
To create a hash code, you must first create a HashAlgorithm object, typically by calling the static HashAlgorithm.Create method. You can then call HashAlgorithm.ComputeHash, which returns a byte array with the hash data.
The following example demonstrates a simple console application that reads two file names that are supplied as arguments and uses hash codes to test the files for equality. The hashes are compared by converting them into strings. Alternatively, you could compare them by iterating over the byte array and comparing each value. This approach would be slightly faster, but because the overhead of converting 20 bytes into a string is minimal, it's not required.
using System;
using System.IO;
using System.Security.Cryptography;

namespace Apress.VisualCSharpRecipes.Chapter05
{
    static class Recipe05_11
    {
        static void Main(string[] args)
        {
            if (args.Length != 2)
            {
                Console.WriteLine("USAGE:  Recipe05_11 [fileName] [fileName]");
                return;
            }

            Console.WriteLine("Comparing " + args[0] + " and " + args[1]);

            // Create the hashing object.
            using (HashAlgorithm hashAlg = HashAlgorithm.Create())
            {
                using (FileStream fsA = new FileStream(args[0], FileMode.Open),
                    fsB = new FileStream(args[1], FileMode.Open))
                {
                    // Calculate the hash for the files.
                    byte[] hashBytesA = hashAlg.ComputeHash(fsA);
                    byte[] hashBytesB = hashAlg.ComputeHash(fsB);
// Compare the hashes.
if (BitConverter.ToString(hashBytesA) ==
BitConverter.ToString(hashBytesB))
{
Console.WriteLine("Files match.");
}
else
{
Console.WriteLine("No match.");
}
}
}
// Wait to continue.
Console.WriteLine(Environment.NewLine);
Console.WriteLine("Main method complete. Press Enter.");
Console.ReadLine();
}
}
}You want to retrieve a portion of a path or verify that a file path is in a normal (standardized) form.
Process the path using the System.IO.Path class. You can use Path.GetFileName to retrieve a file name from a path, Path.ChangeExtension to modify the extension portion of a path string, and Path.Combine to create a fully qualified path without worrying about whether your directory includes a trailing directory separation character().
File paths are often difficult to work with in code because of the many different ways to represent the same directory. For example, you might use an absolute path (C:Temp), a UNC path (\MyServer\MyShare emp), or one of many possible relative paths (C:TempMyFiles.. or C:TempMyFiles.... emp).
The easiest way to handle file system paths is to use the static methods of the Path class to make sure you have the information you expect. For example, here is how you take a file name that might include a qualified path and extract just the file name:
string filename = @"..SystemMyFile.txt";
filename = Path.GetFileName(filename);

// Now filename = "MyFile.txt"
And here is how you might append the file name to a directory path using the Path.Combine method:
string filename = @"....myfile.txt";
string fullPath = @"c:Temp";

string filename = Path.GetFileName(filename);
string fullPath = Path.Combine(fullPath, filename);

// (fullPath is now "c:Tempmyfile.txt")
The advantage of this approach is that a trailing backslash () is automatically added to the path name if required. The Path class also provides the following useful methods for manipulating path information:
ChangeExtensionmodifies the current extension of the file in a string. If no extension is specified, the current extension will be removed.GetDirectoryNamereturns all the directory information, which is the text between the first and last directory separators ().GetFileNameWithoutExtensionis similar toGetFileName, but it omits the extension.GetFullPathhas no effect on an absolute path, and it changes a relative path into an absolute path using the current directory. For example, ifC:Tempis the current directory, callingGetFullPathon a file name such astest.txtreturnsC:Temp est.txt.GetPathRootretrieves a string with the root (for example, "C:"), provided that information is in the string. For a relative path, it returns anullreference.HasExtensionreturnstrueif the path ends with an extension.IsPathRootedreturnstrueif the path is an absolute path andfalseif it's a relative path.
Note
In most cases, an exception will be thrown if you try to supply an invalid path to one of these methods (for example, paths that include illegal characters). However, path names that are invalid because they contain a wildcard character (* or ?) will not cause the methods to throw an exception. You could use the Path.GetInvalidPathChars method to obtain an array of characters that are illegal in path names.
You have a path (in the form of a string), and you want to determine whether it corresponds to a directory or a file.
The System.IO.Directory and System.IO.File classes both provide an Exists method. The Directory.Exists method returns true if a supplied relative or absolute path corresponds to an existing directory, even a shared folder with an UNC name. File.Exists returns true if the path corresponds to an existing file.
The following example demonstrates how you can quickly determine if a path corresponds to a file or directory:
using System;
using System.IO;

namespace Apress.VisualCSharpRecipes.Chapter05
{
    static class Recipe05_13
    {
        static void Main(string[] args)
        {
            foreach (string arg in args)
            {
                Console.Write(arg);

                if (Directory.Exists(arg))
                {
                    Console.WriteLine(" is a directory");
                }
                else if (File.Exists(arg))
                {
                    Console.WriteLine(" is a file");
                }
else
{
Console.WriteLine(" does not exist");
}
}
// Wait to continue.
Console.WriteLine(Environment.NewLine);
Console.WriteLine("Main method complete. Press Enter.");
Console.ReadLine();
}
}
}Use the static GetCurrentDirectory and SetCurrentDirectory methods of the System.IO.Directory class.
Relative paths are automatically interpreted in relation to the current working directory. You can retrieve the current working directory by calling Directory.GetCurrentDirectory or change it using Directory.SetCurrentDirectory. In addition, you can use the static GetFullPath method of the System.IO.Path class to convert a relative path into an absolute path using the current working directory.
The following is a simple example that demonstrates working with relative paths:
using System;
using System.IO;

namespace Apress.VisualCSharpRecipes.Chapter05
{
    static class Recipe05_14
    {
        static void Main()
        {
Console.WriteLine("Using: " + Directory.GetCurrentDirectory());
Console.WriteLine("The relative path 'file.txt' " +
"will automatically become: '" +
Path.GetFullPath("file.txt") + "'");
Console.WriteLine();
Console.WriteLine("Changing current directory to c:\");
Directory.SetCurrentDirectory(@"c:");
Console.WriteLine("Now the relative path 'file.txt' " +
"will automatically become '" +
Path.GetFullPath("file.txt") + "'");
// Wait to continue.
Console.WriteLine(Environment.NewLine);
Console.WriteLine("Main method complete. Press Enter.");
Console.ReadLine();
}
}
}The output for this example might be the following (if you run the application in the directory C: emp):
Using: c:	emp

The relative path 'file.txt' will automatically become 'c:	empfile.txt'


Changing current directory to c:

The relative path 'file.txt' will automatically become 'c:file.txt'
Warning
If you use relative paths, it's recommended that you set the working path at the start of each file interaction. Otherwise, you could introduce unnoticed security vulnerabilities that could allow a malicious user to force your application into accessing or overwriting system files by tricking it into using a different working directory.
You need to create a file that will be placed in the user-specific temporary directory and will have a unique name, so that it will not conflict with temporary files generated by other programs.
Use the static GetTempFileName method of the System.IO.Path class, which returns a path made up of the user's temporary directory and a randomly generated file name.
You can use a number of approaches to generate temporary files. In simple cases, you might just create a file in the application directory, possibly using a GUID or a timestamp in conjunction with a random value as the file name. However, the Path class provides a helper method that can save you some work. It creates a file with a unique file name in the current user's temporary directory that is stored in a folder like C:Documents and Settings[username]Local Settings emp.
The following example demonstrates creating a temporary file:
using System;
using System.IO;

namespace Apress.VisualCSharpRecipes.Chapter05
{
    static class Recipe05_15
    {
        static void Main()
        {
            string tempFile = Path.GetTempFileName();

            Console.WriteLine("Using " + tempFile);

            using (FileStream fs = new FileStream(tempFile, FileMode.Open))
            {
                // (Write some data.)
            }

            // Now delete the file.
            File.Delete(tempFile);
// Wait to continue.
Console.WriteLine(Environment.NewLine);
Console.WriteLine("Main method complete. Press Enter.");
Console.ReadLine();
}
}
}The DriveInfo class provides members that let you find out the drive type, free space, and many other details of a drive. In order to create a new DriveInfo object, you need to pass the drive letter or the drive root string to the constructor, such as 'C' or "C:" for creating a DriveInfo instance representing the C drive of the computer. You could also retrieve the list of logical drives available by using the static Directory.GetLogicalDrives method, which returns an array of strings, each containing the root of the drive, such as "C:". For more details on each drive, you create a DriveInfo instance, passing either the root or the letter corresponding to the logical drive. If you need a detailed description of each logical drive, call the DriveInfo.GetDrives method, which returns an array of DriveInfo objects, instead of using Directory.GetLogicalDrives.
Note
A System.IO.IOException is thrown if you try to access an unavailable network drive.
The following console application shows the available free space using the DriveInfo class for the given drive or for all logical drives if no argument is passed to the application:
using System;
using System.IO;
namespace Apress.VisualCSharpRecipes.Chapter05
{
static class Recipe05_16
{
static void Main(string[] args)
{
if (args.Length == 1)
{
DriveInfo drive = new DriveInfo(args[0]);
Console.Write("Free space in {0}-drive (in kilobytes): ", args[0]);
Console.WriteLine(drive.AvailableFreeSpace / 1024);
Console.ReadLine();
return;
}
foreach (DriveInfo drive in DriveInfo.GetDrives())
{
try
{
Console.WriteLine(
"{0} - {1} KB",
drive.RootDirectory,
drive.AvailableFreeSpace / 1024
);
}
catch (IOException) // network drives may not be available
{
Console.WriteLine(drive);
}
}
// Wait to continue.
            Console.WriteLine(Environment.NewLine);
            Console.WriteLine("Main method complete. Press Enter.");
            Console.ReadLine();
        }
    }
}Note
In addition to the AvailableFreeSpace property, DriveInfo also defines a TotalFreeSpace property. The difference between these two properties is that AvailableFreeSpace takes into account disk quotas.
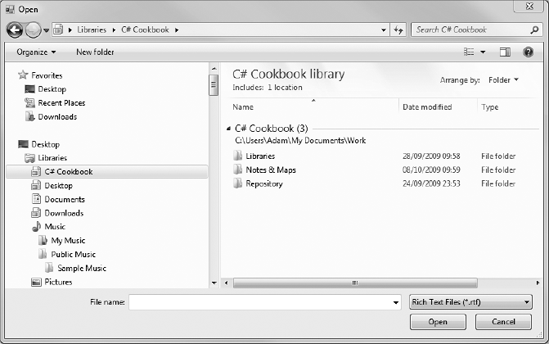
You need to show the standard Windows dialog boxes for opening and saving files and for selecting a folder.
Use the OpenFileDialog, SaveFileDialog, and FolderBrowserDialog classes in the System.Windows.Forms namespace. Call the ShowDialog method to display the dialog box, examine the return value to determine whether the user clicked OK or Cancel, and retrieve the selection from the FileName or SelectedPath property.
The .NET Framework provides objects that wrap many of the standard Windows dialog boxes, including those used for saving and selecting files and directories. These classes all inherit from System.Windows.Forms.CommonDialog and include the following:
OpenFileDialog, which allows the user to select a file, as shown in Figure 5-2. The file name and path are provided to your code through theFileNameproperty (or theFileNamescollection, if you have enabled multiple-file select by settingMultiselecttotrue). Additionally, you can use theFilterproperty to set the file format choices and setCheckFileExiststo enforce validation.SaveFileDialog, which allows the user to specify a new file. The file name and path are provided to your code through theFileNameproperty. You can also use theFilterproperty to set the file format choices, and set theCreatePromptandOverwritePromptBoolean properties to instruct .NET to display a confirmation if the user selects a new file or an existing file, respectively.FolderBrowserDialog, which allows the user to select (and optionally create) a directory. The selected path is provided through theSelectedPathproperty, and you can specify whether or not a Create New button should appear.
When using OpenFileDialog or SaveFileDialog, you need to set the filter string, which specifies the allowed file extensions. The filter string is separated with the pipe character (|) in this format:
[Text label] | [Extension list separated by semicolons] | [Text label]
| [Extension list separated by semicolons] |  . . .
You can also set the Title (form caption) and the InitialDirectory.
The following code shows the code part of a Windows Forms application that allows the user to load documents into a RichTextBox, edit the content, and then save the modified document. When opening and saving a document, the OpenFileDialog and SaveFileDialog classes are used. Download the source code that accompanies this book from www.apress.com/book/sourcecode to see the full Visual Studio project.
using System;
using System.Windows.Forms;

namespace Apress.VisualCSharpRecipes.Chapter05
{
    public partial class MainForm : Form
    {
        public MainForm()
        {
            InitializeComponent();
        }
private void mnuOpen_Click(object sender, EventArgs e)
{
OpenFileDialog dlg = new OpenFileDialog();
dlg.Filter = "Rich Text Files (*.rtf)|*.RTF|" +
"All files (*.*)|*.*";
dlg.CheckFileExists = true;
dlg.InitialDirectory = Application.StartupPath;
if (dlg.ShowDialog() == DialogResult.OK)
{
rtDoc.LoadFile(dlg.FileName);
rtDoc.Enabled = true;
}
}
private void mnuSave_Click(object sender, EventArgs e)
{
SaveFileDialog dlg = new SaveFileDialog();
dlg.Filter = "RichText Files (*.rtf)|*.RTF|Text Files (*.txt)|*.TXT" +
"|All files (*.*)|*.*";
dlg.CheckFileExists = true;
dlg.InitialDirectory = Application.StartupPath;
if (dlg.ShowDialog() == DialogResult.OK)
{
rtDoc.SaveFile(dlg.FileName);
}
}
private void mnuExit_Click(object sender, EventArgs e)
{
this.Close();
}
}
}You need to store data in a file, but your application does not have the required FileIOPermission for the local hard drive.
Use the IsolatedStorageFile and IsolatedStorageFileStream classes from the System.IO.IsolatedStorage namespace. These classes allow your application to write data to a file in a user-specific directory without needing permission to access the local hard drive directly.
The .NET Framework includes support for isolated storage, which allows you to read and write to a user-specific virtual file system that the Common Language Runtime (CLR) manages. When you create isolated storage files, the data is automatically serialized to a unique location in the user profile path (typically a path like C:Documents and Settings[username]Local SettingsApplication Dataisolated storage[guid_identifier]).
One reason you might use isolated storage is to give a partially trusted application limited ability to store data. For example, the default CLR security policy gives local code unrestricted FileIOPermission, which allows it to open or write to any file. Code that you run from a remote server on the local intranet is automatically assigned fewer permissions. It lacks the FileIOPermission, but it has the IsolatedStoragePermission, giving it the ability to use isolated stores. (The security policy also limits the maximum amount of space that can be used in an isolated store.) Another reason you might use an isolated store is to better secure data. For example, data in one user's isolated store will be restricted from another nonadministrative user.
By default, each isolated store is segregated by user and assembly. That means that when the same user runs the same application, the application will access the data in the same isolated store. However, you can choose to segregate it further by application domain so that multiple AppDomain instances running in the same application receive different isolated stores.
The files are stored as part of a user's profile, so users can access their isolated storage files on any workstation they log onto if roaming profiles are configured on your local area network. (In this case, the store must be specifically designated as a roaming store by applying the IsolatedStorageFile.Roaming flag when it's created.) By letting the .NET Framework and the CLR provide these levels of isolation, you can relinquish responsibility for maintaining the separation between files, and you do not need to worry that programming oversights or misunderstandings will cause loss of critical data.
The following example shows how you can access isolated storage:
using System;
using System.IO;
using System.IO.IsolatedStorage;

namespace Apress.VisualCSharpRecipes.Chapter05
{
    static class Recipe05_18
    {
        static void Main(string[] args)
        {
            // Create the store for the current user.
            using (IsolatedStorageFile store =
IsolatedStorageFile.GetUserStoreForAssembly())
{
// Create a folder in the root of the isolated store.
store.CreateDirectory("MyFolder");
// Create a file in the isolated store.
using (Stream fs = new IsolatedStorageFileStream(
"MyFile.txt", FileMode.Create, store))
{
StreamWriter w = new StreamWriter(fs);
// You can now write to the file as normal.
w.WriteLine("Test");
w.Flush();
}
Console.WriteLine("Current size: " +
store.UsedSize.ToString());
Console.WriteLine("Scope: " + store.Scope.ToString());
Console.WriteLine("Contained files include:");
string[] files = store.GetFileNames("*.*");
foreach (string file in files)
{
Console.WriteLine(file);
}
}
// Wait to continue.
Console.WriteLine(Environment.NewLine);
Console.WriteLine("Main method complete. Press Enter.");
Console.ReadLine();
}
}
}The following demonstrates using multiple AppDomain instances running in the same application to receive different isolated stores:
// Access isolated storage for the current user and assembly
// (which is equivalent to the first example).
store = IsolatedStorageFile.GetStore(IsolatedStorageScope.User |
  IsolatedStorageScope.Assembly, null, null);

// Access isolated storage for the current user, assembly,
// and application domain. In other words, this data is
// accessible only by the current AppDomain instance.
store = IsolatedStorageFile.GetStore(IsolatedStorageScope.User |
  IsolatedStorageScope.Assembly | IsolatedStorageScope.Domain,
  null, null);
You need to react when a file system change is detected in a specific path (such as a file modification or creation).
Use the System.IO.FileSystemWatcher component, specify the path or file you want to monitor, and handle the Created, Deleted, Renamed, and Changed events.
When linking together multiple applications and business processes, it's often necessary to create a program that waits idly and becomes active only when a new file is received or changed. You can create this type of program by scanning a directory periodically, but you face a key trade-off. The more often you scan, the more system resources you waste. The less often you scan, the longer it will take to detect a change. The solution is to use the FileSystemWatcher class to react directly to Windows file events.
To use FileSystemWatcher, you must create an instance and set the following properties:
Pathindicates the directory you want to monitor.Filterindicates the types of files you are monitoring.NotifyFilterindicates the type of changes you are monitoring.
FileSystemWatcher raises four key events: Created, Deleted, Renamed, and Changed. All of these events provide information through their FileSystemEventArgs parameter, including the name of the file (Name), the full path (FullPath), and the type of change (ChangeType). The Renamed event provides a RenamedEventArgs instance, which derives from FileSystemEventArgs, and adds information about the original file name (OldName and OldFullPath). If you need to, you can disable these events by setting the FileSystemWatcher.EnableRaisingEvents property to false. The Created, Deleted, and Renamed events are easy to handle. However, if you want to use the Changed event, you need to use the NotifyFilter property to indicate the types of changes you want to watch. Otherwise, your program might be swamped by an unceasing series of events as files are modified.
The NotifyFilter property can be set using any combination of the following values from the System.IO.NotifyFilters enumeration:
AttributesCreationTimeDirectoryNameFileNameLastAccessLastWriteSecuritySize
The following example shows a console application that handles Created and Deleted events, and tests these events by creating a test file:
using System;
using System.IO;
using System.Windows.Forms;

namespace Apress.VisualCSharpRecipes.Chapter05
{
    static class Recipe05_19
    {
        static void Main()
        {
            // Configure the FileSystemWatcher.
            using (FileSystemWatcher watch = new FileSystemWatcher())
            {
                watch.Path = Application.StartupPath;
                watch.Filter = "*.*";
                watch.IncludeSubdirectories = true;

                // Attach the event handler.
                watch.Created += new FileSystemEventHandler(OnCreatedOrDeleted);
                watch.Deleted += new FileSystemEventHandler(OnCreatedOrDeleted);
                watch.EnableRaisingEvents = true;

                Console.WriteLine("Press Enter to create a file.");
                Console.ReadLine();

                if (File.Exists("test.bin"))
                {
                    File.Delete("test.bin");
                }

                // Create test.bin.
                using (FileStream fs = new FileStream("test.bin", FileMode.Create))
                {
                    // Do something.
                }

                Console.WriteLine("Press Enter to terminate the application.");
                Console.ReadLine();
            }
// Wait to continue.
Console.WriteLine(Environment.NewLine);
Console.WriteLine("Main method complete. Press Enter.");
Console.ReadLine();
}
// Fires when a new file is created in the directory being monitored.
private static void OnCreatedOrDeleted(object sender,
FileSystemEventArgs e)
{
// Display the notification information.
Console.WriteLine(" NOTIFICATION: " + e.FullPath +
"' was " + e.ChangeType.ToString());
Console.WriteLine();
}
}
}Use the System.IO.Ports.SerialPort class. This class represents a serial port resource and defines methods that enable communication through it.
The .NET Framework defines a System.IO.Ports namespace that contains several classes. The central class is SerialPort. The SerialPort class also exposes properties that let you specify the port, baud rate, parity, and other information.
The following example demonstrates a simple console application that writes a string into the COM1 port:
using System;
using System.IO.Ports;

namespace Apress.VisualCSharpRecipes.Chapter05
{
static class Recipe05_20
{
static void Main(string[] args)
{
using (SerialPort port = new SerialPort("COM1"))
{
// Set the properties.
port.BaudRate = 9600;
port.Parity = Parity.None;
port.ReadTimeout = 10;
port.StopBits = StopBits.One;
// Write a message into the port.
port.Open();
port.Write("Hello world!");
Console.WriteLine("Wrote to the port.");
}
// Wait to continue.
Console.WriteLine(Environment.NewLine);
Console.WriteLine("Main method complete. Press Enter.");
Console.ReadLine();
}
}
}The System.IO.Path class includes a new GetRandomFileName method, which generates a random string. You could use this string for creating a new file or folder.
The difference between GetRandomFileName and GetTempFileName (discussed in recipe 5-15) of the Path class is that GetRandomFileName just returns a random string and does not create a file, whereas GetTempFileName creates a new zero-byte temporary file and returns the path to the file.
The following example demonstrates using a random file name. Note that this example differs from that in recipe 5-15 in that we have to ensure that the file exists before opening it—we do this be using the FileMode.OpenOrCreate enumeration value as an argument to the constructor of FileStream.
using System;
using System.IO;

namespace Apress.VisualCSharpRecipes.Chapter05
{
    static class Recipe05_21
    {
        static void Main()
        {
            string tempFile = Path.GetRandomFileName();

            Console.WriteLine("Using " + tempFile);

            using (FileStream fs = new FileStream(tempFile, FileMode.OpenOrCreate))
            {
                // (Write some data.)
            }

            // Now delete the file.
            File.Delete(tempFile);

            // Wait to continue.
            Console.WriteLine(Environment.NewLine);
            Console.WriteLine("Main method complete. Press Enter.");
            Console.ReadLine();
        }
    }
}The .NET Framework includes support for ACLs for resources like I/O, registry, and threading classes. You can retrieve and apply the ACL for a resource by using the GetAccessControl and SetAccessControl methods defined in the corresponding resource classes. For example, the File and Directory classes define both these methods, which let you manipulate the ACLs for a file or directory.
To add or remove an ACL-associated right of a file or directory, you need to first retrieve the FileSecurity or DirectorySecurity object currently applied to the resource using the GetAccessControl method. Once you retrieve this object, you need to perform the required modification of the rights, and then apply the ACL back to the resource using the SetAccessControl method. Access rights are updated using any of the add and remove methods provided in the security class.
The following example demonstrates the effect of denying Everyone Read access to a temporary file, using a console application. An attempt to read the file after a change in the ACL triggers a security exception.
using System;
using System.IO;
using System.Security.AccessControl;

namespace Apress.VisualCSharpRecipes.Chapter05
{
    static class Recipe05_22
    {
        static void Main(string[] args)
        {
            FileStream stream;
            string fileName;

            // Create a new file and assign full control to 'Everyone'.
            Console.WriteLine("Press any key to write a new file...");
            Console.ReadKey(true);

            fileName = Path.GetRandomFileName();
            using (stream = new FileStream(fileName, FileMode.Create))
            {
                // Do something.
            }
            Console.WriteLine("Created a new file " + fileName + ".");
            Console.WriteLine();


            // Deny 'Everyone' access to the file
            Console.WriteLine("Press any key to deny 'Everyone' " +
                "access to the file...");
            Console.ReadKey(true);
            SetRule(fileName, "Everyone",
                FileSystemRights.Read, AccessControlType.Deny);
Console.WriteLine("Removed access rights of 'Everyone'.");
Console.WriteLine();
// Attempt to access file.
Console.WriteLine("Press any key to attempt " +
"access to the file...");
Console.ReadKey(true);
try
{
stream = new FileStream(fileName, FileMode.Create);
}
catch (Exception ex)
{
Console.WriteLine("Exception thrown: ");
Console.WriteLine(ex.ToString());
}
finally
{
stream.Close();
stream.Dispose();
}
// Wait to continue.
Console.WriteLine(Environment.NewLine);
Console.WriteLine("Main method complete. Press Enter.");
Console.ReadLine();
}
static void AddRule(string filePath, string account,
FileSystemRights rights, AccessControlType controlType)
{
// Get a FileSecurity object that represents the
// current security settings.
FileSecurity fSecurity = File.GetAccessControl(filePath);
// Add the FileSystemAccessRule to the security settings.
fSecurity.AddAccessRule(new FileSystemAccessRule(account,
rights, controlType));
// Set the new access settings.
File.SetAccessControl(filePath, fSecurity);
}
static void SetRule(string filePath, string account,
FileSystemRights rights, AccessControlType controlType)
{
// Get a FileSecurity object that represents the
// current security settings.
FileSecurity fSecurity = File.GetAccessControl(filePath);// Add the FileSystemAccessRule to the security settings.
fSecurity.ResetAccessRule(new FileSystemAccessRule(account,
rights, controlType));
// Set the new access settings.
File.SetAccessControl(filePath, fSecurity);
}
}
}Use the System.IO.Compression.GZipStream or System.IO.Compression.DeflateStream to compress or decompress data.
The GZipStream and DeflateStream classes allow you to use the popular ZIP and Deflate compression algorithms to compress or decompress data. The constructors for both classes accept a System.IO.Stream instance (which is where data should be written to or read from) and a value from the CompressionMode enumeration, which allows you to specify that you wish to compress or decompress data. Both of these classes only read and write bytes and byte arrays—it is often convenient to combine these classes with streams that are able to read and write other data types, such as in the example for this recipe.
The following sample creates a new file and uses the GZipStream class to write compressed data to it from a StreamWriter instance. The file is closed and then opened in read mode so that the compressed data can be decompressed and written to the console:
using System;
using System.IO;
using System.IO.Compression;
namespace Recipe05_23
{
    class Recipe05_23
    {
        static void Main(string[] args)
        {
            // Create the compression stream.
            GZipStream zipout = new GZipStream(
                File.OpenWrite("compressed_data.gzip"),
                CompressionMode.Compress);
            // wrap the gzip stream in a stream writer
            StreamWriter writer = new StreamWriter(zipout);

            // Write the data to the file.
            writer.WriteLine("the quick brown fox");
            // Close the streams.
            writer.Close();

            // Open the same file so we can read the
            // data and decompress it.
            GZipStream zipin = new GZipStream(
                File.OpenRead("compressed_data.gzip"),
                CompressionMode.Decompress);
            // Wrap the gzip stream in a stream reader.
            StreamReader reader = new StreamReader(zipin);

            // Read a line from the stream and print it out.
            Console.WriteLine(reader.ReadLine());

            // Wait to continue.
            Console.WriteLine(Environment.NewLine);
            Console.WriteLine("Main method complete. Press Enter.");
            Console.ReadLine();
        }
    }
}The File.WriteAllLines method takes a file name and a collection or array of strings as parameters, and writes each entry on a separate line in the file specified. You can select which entries in the collection or array are written by applying a LINQ expression before calling the WriteAllLinesMethod.
The following example creates a List that contains a number of strings, representing two kinds of logging data. All of the entries are written to one file, and LINQ is used to query the collection so that only certain entries are written to a second file. See Chapter 2 for recipes that use LINQ to query collections.
using System;
using System.Collections.Generic;
using System.Linq;
using System.Text;
using System.IO;

namespace Recipe05_24
{
    class Recipe05_24
    {
        static void Main(string[] args)
        {
            // Create a list and populate it.
            List<string> myList = new List<string>();
            myList.Add("Log entry 1");
            myList.Add("Log entry 2");
            myList.Add("Log entry 3");
            myList.Add("Error entry 1");
            myList.Add("Error entry 2");
            myList.Add("Error entry 3");

            // Write all of the entries to a file.
            File.WriteAllLines("all_entries.log", myList);

            // Only write out the errors.
            File.WriteAllLines("only_errors.log",
                myList.Where(e => e.StartsWith("Error")));
        }
    }
}Use the static System.IO.File.ReadLines method to read lines from the file. Apply a LINQ expression to select specific lines.
The File.ReadLines method reads the contents of a file, returning a string array containing one entry for each line in the file. You can filter the contents by using LINQ with the results—for example, using the Where method to select which lines are included in the results, or the Select method to include only part of each string.
The following example reads lines from one of the files created in the previous recipe. In order to demonstrate how to read entries and be selective with LINQ, the program reads all of the entries, just the entries that begin with "Error" and the first character of entries that do not begin with "Error."
using System;
using System.Collections.Generic;
using System.Linq;
using System.Text;
using System.IO;

namespace Recipe05_25
{
    class Program
    {
        static void Main(string[] args)
        {
            // Read all of the entries from the file.
            IEnumerable<string> alldata = File.ReadAllLines("all_entries.log");
            foreach (string entry in alldata)
            {
                Console.WriteLine("Entry: {0}", entry);
            }

            // Read the entries and select only some of them.
            IEnumerable<string> somedata
               = File.ReadLines("all_entries.log").Where(e => e.StartsWith("Error"));
foreach (string entry in somedata)
{
Console.WriteLine("Error entry: {0}", entry);
}
// Read selected lines and write only the first character.
IEnumerable<char> chardata = File.ReadLines("all_entries.log").Where(e
=> !e.StartsWith("Error")).Select(e => e[0]);
foreach (char entry in chardata)
{
Console.WriteLine("Character entry: {0}", entry);
}
}
}
}Use named pipes. You create an instance of System.IO.Pipes.NamedPipeServerStream and call the WaitForConnection method in one of your processes. In the other process, create an instance of System.IO.Pipes.NamedPipeClientStream and call the Connect method. This creates a two-way data stream between your processes that you can use to read and write data.
Named pipes are an interprocess communication mechanism that allows processes to exchange data. Each pipe is created by a server and can accept multiple client connections—once the connection is established (using the WaitForConnection and Connect methods described previously), the server and client can communicate using the normal .NET Framework streams mechanism—see the other recipes in this chapter to learn more about streams. You must use the same name for both the server and client pipes.
The following example contains both a pipe server and a pipe client in one class—if the executable is started with the command-line argument client, then the pipe client will operate; otherwise, the pipe server will run. The server creates a named pipe and waits for a client to connect. When the client connects, the server writes ten messages to the client, and then reads ten responses.
Note
Named pipes can be used to communicate between processes running on different computers. See the .NET Framework documentation for details.
using System;
using System.Collections.Generic;
using System.Linq;
using System.Text;
using System.IO;
using System.IO.Pipes;

namespace Recipe05_26
{
    class Recipe05_26
    {
        static void Main(string[] args)
        {
            if (args.Length > 0 && args[0] == "client")
            {
                pipeClient();
            }
            else
            {
                pipeServer();
            }
        }

        static void pipeServer()
        {
            // Create the server pipe.
            NamedPipeServerStream pipestream = new
 NamedPipeServerStream("recipe_05_26_pipe");
            // Wait for a client to connect.
            Console.WriteLine("Waiting for a client connection");
            pipestream.WaitForConnection();

            Console.WriteLine("Received a client connection");
            // Wrap a stream writer and stream reader around the pipe.
            StreamReader reader = new StreamReader(pipestream);
            StreamWriter writer = new StreamWriter(pipestream);

            // Write some data to the pipe.
            for (int i = 0; i < 10; i++)
            {
                Console.WriteLine("Writing message ", i);
                writer.WriteLine("Message {0}", i);
                writer.Flush();
            }
// Read data from the pipe.
for (int i = 0; i < 10; i++)
{
Console.WriteLine("Received: {0}", reader.ReadLine()); ;
}
// Close the pipe.
pipestream.Close();
}
static void pipeClient()
{
// Create the client pipe.
NamedPipeClientStream pipestream =
new NamedPipeClientStream("recipe_05_26_pipe");
// connect to the pipe server
pipestream.Connect();
// Wrap a reader around the stream.
StreamReader reader = new StreamReader(pipestream);
StreamWriter writer = new StreamWriter(pipestream);
// Read the data.
for (int i = 0; i < 10; i++)
{
Console.WriteLine("Received: {0}", reader.ReadLine());
}
// Write data to the pipe.
for (int i = 0; i < 10; i++)
{
Console.WriteLine("Writing response ", i);
writer.WriteLine("Response {0}", i);
writer.Flush();
}
// Close the pipe.
pipestream.Close();
}
}
}