One of the most remarkable aspects of the Microsoft .NET Framework is its deep integration with XML. In many .NET applications, you won't even be aware you're using XML technologies—they'll just be used behind the scenes when you serialize a Microsoft ADO.NET DataSet, call a web service, or read application settings from a Web.config configuration file. In other cases, you'll want to work directly with the System.Xml namespaces to manipulate Extensible Markup Language (XML) data. Common XML tasks don't just include parsing an XML file, but also include validating it against a schema, applying an Extensible Stylesheet Language (XSL) transform to create a new document or Hypertext Markup Language (HTML) page, and searching intelligently with XPath.
In .NET 3.5, Microsoft added LINQ to XML, which integrates XML handling into the LINQ model for querying data sources. You can use the same keywords and syntax to query XML as you would a collection or a database.
The recipes in this chapter describe how to do the following:
Read, parse, and manipulate XML data (recipes 6-1, 6-2, 6-3, and 6-7)
Search an XML document for specific nodes, either by name (recipe 6-4), by namespace (recipe 6-5), or by using XPath (recipe 6-6)
Validate an XML document with an XML schema (recipe 6-8)
Serialize an object to XML (recipe 6-9), create an XML schema for a class (recipe 6-10), and generate the source code for a class based on an XML schema (recipe 6-11)
Transform an XML document to another document using an XSL Transformations (XSLT) stylesheet (recipe 6-12)
Use LINQ to XML to load, create, query and modify XML trees (recipes 6-13, 6-14, 6-15, and 6-16).
Load the XML document using the System.Xml.XmlDocument class. Create a reentrant method that converts a single XmlNode into a System.Windows.Forms.TreeNode, and call it recursively to walk through the entire document.
The .NET Framework provides several different ways to process XML documents. The one you use depends in part upon your programming task. One of the most fully featured classes is XmlDocument, which provides an in-memory representation of an XML document that conforms to the W3C Document Object Model (DOM). The XmlDocument class allows you to browse through the nodes in any direction, insert and remove nodes, and change the structure on the fly. For details of the DOM specification, go to www.w3c.org.
Note
The XmlDocument class is not scalable for very large XML documents, because it holds the entire XML content in memory at once. If you want a more memory-efficient alternative, and you can afford to read and process the XML piece by piece, consider the XmlReader and XmlWriter classes described in recipe 6-7.
To use the XmlDocument class, simply create a new instance of the class and call the Load method with a file name, a Stream, a TextReader, or an XmlReader object. It is also possible to read the XML from a simple string with the LoadXML method. You can even supply a string with a URL that points to an XML document on the Web using the Load method. The XmlDocument instance will be populated with the tree of elements, or nodes, from the source document. The entry point for accessing these nodes is the root element, which is provided through the XmlDocument.DocumentElement property. DocumentElement is an XmlElement object that can contain one or more nested XmlNode objects, which in turn can contain more XmlNode objects, and so on. An XmlNode is the basic ingredient of an XML file. Common XML nodes include elements, attributes, comments, and contained text.
When dealing with an XmlNode or a class that derives from it (such as XmlElement or XmlAttribute), you can use the following basic properties:
ChildNodesis anXmlNodeListcollection that contains the first level of nested nodes.Nameis the name of the node.NodeTypereturns a member of theSystem.Xml.XmlNodeTypeenumeration that indicates the type of the node (element, attribute, text, and so on).Valueis the content of the node, if it's a text or CDATA node.Attributesprovides a collection of node objects representing the attributes applied to the element.InnerTextretrieves a string with the concatenated value of the node and all nested nodes.InnerXmlretrieves a string with the concatenated XML markup for all nested nodes.OuterXmlretrieves a string with the concatenated XML markup for the current node and all nested nodes.
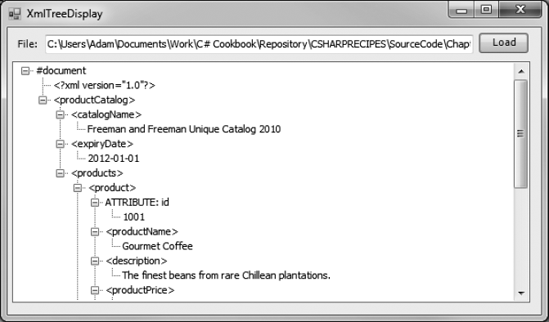
The following example walks through every element of an XmlDocument using the ChildNodes property and a recursive method. Each node is displayed in a TreeView control, with descriptive text that either identifies it or shows its content.
using System;
using System.Windows.Forms;
using System.Xml;
using System.IO;

namespace Apress.VisualCSharpRecipes.Chapter06
{
    public partial class Recipe06_01 : System.Windows.Forms.Form
    {
        public Recipe06_01()
        {
            InitializeComponent();
        }

        // Default the file name to the sample document.
        private void Recipe06_01_Load(object sender, EventArgs e)
        {
            txtXmlFile.Text = Path.Combine(Application.StartupPath,
               @"....ProductCatalog.xml");
        }

        private void cmdLoad_Click(object sender, System.EventArgs e)
        {
            // Clear the tree.
            treeXml.Nodes.Clear();

            // Load the XML document.
            XmlDocument doc = new XmlDocument();
            try
            {
                doc.Load(txtXmlFile.Text);
            }
            catch (Exception err)
            {
                MessageBox.Show(err.Message);
                return;
            }
// Populate the TreeView.
ConvertXmlNodeToTreeNode(doc, treeXml.Nodes);
// Expand all nodes.
treeXml.Nodes[0].ExpandAll();
}
private void ConvertXmlNodeToTreeNode(XmlNode xmlNode,
TreeNodeCollection treeNodes)
{
// Add a TreeNode node that represents this XmlNode.
TreeNode newTreeNode = treeNodes.Add(xmlNode.Name);
// Customize the TreeNode text based on the XmlNode
// type and content.
switch (xmlNode.NodeType)
{
case XmlNodeType.ProcessingInstruction:
case XmlNodeType.XmlDeclaration:
newTreeNode.Text = "<?" + xmlNode.Name + " " +
xmlNode.Value + "?>";
break;
case XmlNodeType.Element:
newTreeNode.Text = "<" + xmlNode.Name + ">";
break;
case XmlNodeType.Attribute:
newTreeNode.Text = "ATTRIBUTE: " + xmlNode.Name;
break;
case XmlNodeType.Text:
case XmlNodeType.CDATA:
newTreeNode.Text = xmlNode.Value;
break;
case XmlNodeType.Comment:
newTreeNode.Text = "<!--" + xmlNode.Value + "-->";
break;
}
// Call this routine recursively for each attribute.
// (XmlAttribute is a subclass of XmlNode.)
if (xmlNode.Attributes != null)
{
foreach (XmlAttribute attribute in xmlNode.Attributes)
{
ConvertXmlNodeToTreeNode(attribute, newTreeNode.Nodes);
}
}// Call this routine recursively for each child node.
// Typically, this child node represents a nested element
// or element content.
foreach (XmlNode childNode in xmlNode.ChildNodes)
{
ConvertXmlNodeToTreeNode(childNode, newTreeNode.Nodes);
}
}
}
}As an example, consider the following simple XML file (which is included with the sample code as the ProductCatalog.xml file):
<?xml version="1.0" ?>
<!--This document is a sample catalog for demonstration purposes-->
<productCatalog>
    <catalogName>Freeman and Freeman Unique Catalog 2010</catalogName>
    <expiryDate>2012-01-01</expiryDate>

    <products>
        <product id="1001">
            <productName>Gourmet Coffee</productName>
            <description>Beans from rare Chillean plantations.</description>
            <productPrice>0.99</productPrice>
            <inStock>true</inStock>
        </product>
        <product id="1002">
            <productName>Blue China Tea Pot</productName>
            <description>A trendy update for tea drinkers.</description>
            <productPrice>102.99</productPrice>
            <inStock>true</inStock>
        </product>
    </products>
</productCatalog>
Figure 6-1 shows how this file will be rendered in the Recipe06_01 form.
You need to modify an XML document by inserting new data, or you want to create an entirely new XML document in memory.
Create the node using the appropriate XmlDocument method (such as CreateElement, CreateAttribute, CreateNode, and so on). Then insert it using the appropriate XmlNode method (such as InsertAfter, InsertBefore, or AppendChild).
Inserting a node into the XmlDocument class is a two-step process. You must first create the node, and then you insert it at the appropriate location. You can then call XmlDocument.Save to persist changes.
To create a node, you use one of the XmlDocument methods starting with the word Create, depending on the type of node. This ensures that the node will have the same namespace as the rest of the document. (Alternatively, you can supply a namespace as an additional string argument.) Next, you must find a suitable related node and use one of its insertion methods to add the new node to the tree.
The following example demonstrates this technique by programmatically creating a new XML document:
using System;
using System.Xml;

namespace Apress.VisualCSharpRecipes.Chapter06
{
    public class Recipe06_02
    {
        private static void Main()
        {
            // Create a new, empty document.
            XmlDocument doc = new XmlDocument();
            XmlNode docNode = doc.CreateXmlDeclaration("1.0", "UTF-8", null);
            doc.AppendChild(docNode);

            // Create and insert a new element.
            XmlNode productsNode = doc.CreateElement("products");
            doc.AppendChild(productsNode);

            // Create a nested element (with an attribute).
            XmlNode productNode = doc.CreateElement("product");
            XmlAttribute productAttribute = doc.CreateAttribute("id");
            productAttribute.Value = "1001";
            productNode.Attributes.Append(productAttribute);
            productsNode.AppendChild(productNode);

            // Create and add the subelements for this product node
            // (with contained text data).
            XmlNode nameNode = doc.CreateElement("productName");
            nameNode.AppendChild(doc.CreateTextNode("Gourmet Coffee"));
            productNode.AppendChild(nameNode);
            XmlNode priceNode = doc.CreateElement("productPrice");
            priceNode.AppendChild(doc.CreateTextNode("0.99"));
            productNode.AppendChild(priceNode);

            // Create and add another product node.
            productNode = doc.CreateElement("product");
            productAttribute = doc.CreateAttribute("id");
            productAttribute.Value = "1002";
            productNode.Attributes.Append(productAttribute);
            productsNode.AppendChild(productNode);
nameNode = doc.CreateElement("productName");
nameNode.AppendChild(doc.CreateTextNode("Blue China Tea Pot"));
productNode.AppendChild(nameNode);
priceNode = doc.CreateElement("productPrice");
priceNode.AppendChild(doc.CreateTextNode("102.99"));
productNode.AppendChild(priceNode);
// Save the document (to the console window rather than a file).
doc.Save(Console.Out);
Console.ReadLine();
}
}
}When you run this code, the generated XML document looks like this:
<?xml version="1.0"?>

<products>

   <product id="1001">

     <productName>Gourmet Coffee</productName>

     <productPrice>0.99</productPrice>

   </product>

   <product id="1002">

      <productName>Blue China Tea Pot</productName>

      <productPrice>102.99</productPrice>

</product>

</products>Create a helper function that accepts a tag name and content, and can generate the entire element at once. Alternatively, use the XmlDocument.CloneNode method to copy branches of an XmlDocument.
Inserting a single element into an XmlDocument requires several lines of code. You can shorten this code in several ways. One approach is to create a dedicated helper class with higher-level methods for adding elements and attributes. For example, you could create an AddElement method that generates a new element, inserts it, and adds any contained text—the three operations needed to insert most elements.
Here's an example of one such helper class:
using System;
using System.Xml;

namespace Apress.VisualCSharpRecipes.Chapter06
{
    public class XmlHelper
    {
        public static XmlNode AddElement(string tagName,
          string textContent, XmlNode parent)
        {
            XmlNode node = parent.OwnerDocument.CreateElement(tagName);
            parent.AppendChild(node);

            if (textContent != null)
            {
                XmlNode content;
                content = parent.OwnerDocument.CreateTextNode(textContent);
                node.AppendChild(content);
            }
            return node;
        }

        public static XmlNode AddAttribute(string attributeName,
          string textContent, XmlNode parent)
        {
            XmlAttribute attribute;
            attribute = parent.OwnerDocument.CreateAttribute(attributeName);
            attribute.Value = textContent;
            parent.Attributes.Append(attribute);
return attribute;
}
}
}You can now condense the XML-generating code from recipe 6-2 with the simpler syntax shown here:
public class Recipe06_03
{
    private static void Main()
    {
        // Create the basic document.
        XmlDocument doc = new XmlDocument();
        XmlNode docNode = doc.CreateXmlDeclaration("1.0", "UTF-8", null);
        doc.AppendChild(docNode);
        XmlNode products = doc.CreateElement("products");
        doc.AppendChild(products);

        // Add two products.
        XmlNode product = XmlHelper.AddElement("product", null, products);
        XmlHelper.AddAttribute("id", "1001", product);
        XmlHelper.AddElement("productName", "Gourmet Coffee", product);
        XmlHelper.AddElement("productPrice", "0.99", product);

        product = XmlHelper.AddElement("product", null, products);
        XmlHelper.AddAttribute("id", "1002", product);
        XmlHelper.AddElement("productName", "Blue China Tea Pot", product);
        XmlHelper.AddElement("productPrice", "102.99", product);

        // Save the document (to the console window rather than a file).
        doc.Save(Console.Out);
        Console.ReadLine();
    }
}
Alternatively, you might want to take the helper methods such as AddAttribute and AddElement and make them instance methods in a custom class you derive from XmlDocument.
Another approach to simplifying writing XML is to duplicate nodes using the XmlNode.CloneNode method. CloneNode accepts a Boolean deep parameter. If you supply true, CloneNode will duplicate the entire branch, with all nested nodes.
Here is an example that creates a new product node by copying the first node:
// (Add first product node.)

// Create a new element based on an existing product.
product = product.CloneNode(true);
// Modify the node data.
product.Attributes[0].Value = "1002";
product.ChildNodes[0].ChildNodes[0].Value = "Blue China Tea Pot";
product.ChildNodes[1].ChildNodes[0].Value = "102.99";

// Add the new element.
products.AppendChild(product);
Notice that in this case, certain assumptions are being made about the existing nodes (for example, that the first child in the item node is always the name, and the second child is always the price). If this assumption is not guaranteed to be true, you might need to examine the node name programmatically.
You need to retrieve a specific node from an XmlDocument, and you know its name but not its position.
Use the XmlDocument.GetElementsByTagName method, which searches an entire document and returns a System.Xml.XmlNodeList containing any matches.
The XmlDocument class provides a convenient GetElementsByTagName method that searches an entire document for nodes that have the indicated element name. It returns the results as a collection of XmlNode objects.
The following code demonstrates how you could use GetElementsByTagName to calculate the total price of items in a catalog by retrieving all elements with the name productPrice:
using System;
using System.Xml;

namespace Apress.VisualCSharpRecipes.Chapter06
{
    public class Recipe06_04
    {
        private static void Main()
        {
// Load the document.
XmlDocument doc = new XmlDocument();
doc.Load(@"....ProductCatalog.xml");
// Retrieve all prices.
XmlNodeList prices = doc.GetElementsByTagName("productPrice");
decimal totalPrice = 0;
foreach (XmlNode price in prices)
{
// Get the inner text of each matching element.
totalPrice += Decimal.Parse(price.ChildNodes[0].Value);
}
Console.WriteLine("Total catalog value: " + totalPrice.ToString());
Console.ReadLine();
}
}
}You can also search portions of an XML document by using the XmlElement.GetElementsByTagName method. It searches all the descendant nodes looking for matches. To use this method, first retrieve an XmlNode that corresponds to an element. Then cast this object to an XmlElement. The following example demonstrates how to find the price node under the first product element:
// Retrieve a reference to the first product.
XmlNode product = doc.GetElementsByTagName("products")[0];

// Find the price under this product.
XmlNode productPrice
    = ((XmlElement)product).GetElementsByTagName("productPrice")[0];
Console.WriteLine("Price is " + productPrice.InnerText);
If your elements include an attribute of type ID, you can also use a method called GetElementById to retrieve an element that has a matching ID value.
Use the overload of the XmlDocument.GetElementsByTagName method that requires a namespace name as a string argument. Additionally, supply an asterisk (*) for the element name if you want to match all tags.
Many XML documents contain nodes from more than one namespace. For example, an XML document that represents a scientific article might use a separate type of markup for denoting math equations and vector diagrams, or an XML document with information about a purchase order might aggregate client and order information with a shipping record. Similarly, an XML document that represents a business-to-business transaction might include portions from both companies, written in separate markup languages.
A common task in XML programming is to retrieve the elements found in a specific namespace. You can perform this task with the overloaded version of the XmlDocument.GetElementsByTagName method that requires a namespace name. You can use this method to find tags by name or to find all the tags in the specified namespace if you supply an asterisk for the tag name parameter.
As an example, consider the following compound XML document, which includes order and client information, in two different namespaces (http://mycompany/OrderML and http://mycompany/ClientML):
<?xml version="1.0" ?>
<ord:order xmlns:ord="http://mycompany/OrderML"
 xmlns:cli="http://mycompany/ClientML">

  <cli:client>
    <cli:firstName>Sally</cli:firstName>
    <cli:lastName>Sergeyeva</cli:lastName>
  </cli:client>

  <ord:orderItem itemNumber="3211"/>
  <ord:orderItem itemNumber="1155"/>

</ord:order>
Here is a simple console application that selects all the tags in the http://mycompany/OrderML namespace:
using System;
using System.Xml;

namespace Apress.VisualCSharpRecipes.Chapter06
{
    public class Recipe06_05
    {
        private static void Main()
{
// Load the document.
XmlDocument doc = new XmlDocument();
doc.Load(@"....Order.xml");
// Retrieve all order tags.
XmlNodeList matches = doc.GetElementsByTagName("*",
"http://mycompany/OrderML");
// Display all the information.
Console.WriteLine("Element Attributes");
Console.WriteLine("******* **********");
foreach (XmlNode node in matches)
{
Console.Write(node.Name + " ");
foreach (XmlAttribute attribute in node.Attributes)
{
Console.Write(attribute.Value + " ");
}
Console.WriteLine();
}
Console.ReadLine();
}
}
}The output of this program is as follows:
Element         Attributes

*******         **********

ord:order       http://mycompany/OrderML  http://mycompany/ClientML

ord:orderItem   3211

ord:orderItem   1155
You need to search an XML document for nodes using advanced search criteria. For example, you might want to search a particular branch of an XML document for nodes that have certain attributes or contain a specific number of nested child nodes.
Execute an XPath expression using the SelectNodes or SelectSingleNode method of the XmlDocument class.
The XmlNode class defines two methods that perform XPath searches: SelectNodes and SelectSingleNode. These methods operate on all contained child nodes. Because the XmlDocument inherits from XmlNode, you can call XmlDocument.SelectNodes to search an entire document.
For example, consider the following XML document, which represents an order for two items. This document includes text and numeric data, nested elements, and attributes, and so is a good way to test simple XPath expressions.
<?xml version="1.0"?>
<Order id="2004-01-30.195496">
  <Client id="ROS-930252034">
    <Name>Remarkable Office Supplies</Name>
  </Client>

  <Items>
    <Item id="1001">
      <Name>Electronic Protractor</Name>
      <Price>42.99</Price>
    </Item>
    <Item id="1002">
      <Name>Invisible Ink</Name>
      <Price>200.25</Price>
    </Item>
  </Items>
</Order>
Basic XPath syntax uses a pathlike notation. For example, the path /Order/Items/Item indicates an <Item> element that is nested inside an <Items> element, which in turn is nested in a root <Order> element. This is an absolute path. The following example uses an XPath absolute path to find the name of every item in an order:
using System;
using System.Xml;

namespace Apress.VisualCSharpRecipes.Chapter06
{
    public class Recipe06_06
    {
        private static void Main()
        {
// Load the document.
XmlDocument doc = new XmlDocument();
doc.Load(@"....orders.xml");
// Retrieve the name of every item.
// This could not be accomplished as easily with the
// GetElementsByTagName method, because Name elements are
// used in Item elements and Client elements, and so
// both types would be returned.
XmlNodeList nodes = doc.SelectNodes("/Order/Items/Item/Name");
foreach (XmlNode node in nodes)
{
Console.WriteLine(node.InnerText);
}
Console.ReadLine();
}
}
}The output of this program is as follows:
Electronic Protractor

Invisible Ink
XPath provides a rich and powerful search syntax, and it is impossible to explain all the variations you can use in a short recipe. However, Table 6-1 outlines some of the key ingredients in more advanced XPath expressions and includes examples that show how they would work with the order document. For a more detailed reference, refer to the W3C XPath recommendation, at www.w3.org/TR/xpath.
Table 6.1. XPath Expression Syntax
Expression | Description | Example |
|---|---|---|
| Starts an absolute path that selects from the root node. |
|
| Starts a relative path that selects nodes anywhere. |
|
| Selects an attribute of a node. |
|
| Selects any element in the path. |
|
| Combines multiple paths. |
|
| Indicates the current (default) node. | If the current node is an |
| Indicates the parent node. |
|
| Defines selection criteria that can test a contained node or an attribute value. |
|
| Retrieves elements based on what text a contained element starts with. |
|
| Retrieves elements based on position. |
|
| Counts elements. You specify the name of the child element to count or an asterisk ( |
|
Note
XPath expressions and all element and attribute names you use inside them are always case-sensitive, because XML itself is case-sensitive.
You need to read XML from a stream or write it to a stream. However, you want to process the information one node at a time, rather than loading it all into memory with an XmlDocument.
To write XML, create an XmlWriter that wraps a stream and use Write methods (such as WriteStartElement and WriteEndElement). To read XML, create an XmlReader that wraps a stream, and call Read to move from node to node.
The XmlWriter and XmlReader classes read or write XML directly from a stream one node at a time. These classes do not provide the same features for navigating and manipulating your XML as XmlDocument, but they do provide higher performance and a smaller memory footprint, particularly if you need to deal with large XML documents.
Both XmlWriter and XmlReader are abstract classes, which means you cannot create an instance of them directly. Instead, you should call the Create method of XmlWriter or XmlReader and supply a file or stream. The Create method will return the right derived class based on the options you specify. This allows for a more flexible model. Because your code uses the base classes, it can work seamlessly with any derived class. For example, you could switch to a validating reader (as shown in the next recipe) without needing to modify your code.
To write XML to any stream, you can use the streamlined XmlWriter. It provides Write methods that write one node at a time. These include the following:
WriteStartDocument, which writes the document prologue, andWriteEndDocument, which closes any open elements at the end of the document.WriteStartElement, which writes an opening tag for the element you specify. You can then add more elements nested inside this element, or you can callWriteEndElementto write the closing tag.WriteElementString, which writes an entire element, with an opening tag, a closing tag, and text content.WriteAttributeString, which writes an entire attribute for the nearest open element, with a name and value.
Using these methods usually requires less code than creating an XmlDocument by hand, as demonstrated in recipes 6-2 and 6-3.
To read the XML, you use the Read method of the XmlReader. This method advances the reader to the next node and returns true. If no more nodes can be found, it returns false. You can retrieve information about the current node through XmlReader properties, including its Name, Value, and NodeType.
To find out whether an element has attributes, you must explicitly test the HasAttributes property and then use the GetAttribute method to retrieve the attributes by name or index number. The XmlTextReader class can access only one node at a time, and it cannot move backward or jump to an arbitrary node, which gives much less flexibility than the XmlDocument class.
The following console application writes and reads a simple XML document using the XmlWriter and XmlReader classes. This is the same XML document created in recipes 6-2 and 6-3 using the XmlDocument class.
using System;
using System.Xml;
using System.IO;
using System.Text;

namespace Apress.VisualCSharpRecipes.Chapter06
{
    public class Recipe06_07
    {
        private static void Main()
        {
            // Create the file and writer.
            FileStream fs = new FileStream("products.xml", FileMode.Create);

            // If you want to configure additional details (like indenting,
            // encoding, and new line handling), use the overload of the Create
            // method that accepts an XmlWriterSettings object instead.
            XmlWriter w = XmlWriter.Create(fs);

            // Start the document.
            w.WriteStartDocument();
            w.WriteStartElement("products");

            // Write a product.
            w.WriteStartElement("product");
            w.WriteAttributeString("id", "1001");
            w.WriteElementString("productName", "Gourmet Coffee");
            w.WriteElementString("productPrice", "0.99");
            w.WriteEndElement();

            // Write another product.
            w.WriteStartElement("product");
            w.WriteAttributeString("id", "1002");
            w.WriteElementString("productName", "Blue China Tea Pot");
            w.WriteElementString("productPrice", "102.99");
            w.WriteEndElement();
// End the document.
w.WriteEndElement();
w.WriteEndDocument();
w.Flush();
fs.Close();
Console.WriteLine("Document created. " +
"Press Enter to read the document.");
Console.ReadLine();
fs = new FileStream("products.xml", FileMode.Open);
// If you want to configure additional details (like comments,
// whitespace handling, or validation), use the overload of the Create
// method that accepts an XmlReaderSettings object instead.
XmlReader r = XmlReader.Create(fs);
// Read all nodes.
while (r.Read())
{
if (r.NodeType == XmlNodeType.Element)
{
Console.WriteLine();
Console.WriteLine("<" + r.Name + ">");
if (r.HasAttributes)
{
for (int i = 0; i < r.AttributeCount; i++)
{
Console.WriteLine(" ATTRIBUTE: " +
r.GetAttribute(i));
}
}
}
else if (r.NodeType == XmlNodeType.Text)
{
Console.WriteLine(" VALUE: " + r.Value);
}
}
Console.ReadLine();
}
}
}Often, when using the XmlReader, you are searching for specific nodes rather than processing every element, as in this example. The approach used in this example does not work as well in this situation. It forces you to read element tags, text content, and CDATA sections separately, which means you need to explicitly keep track of where you are in the document. A better approach is to read the entire node and text content at once (for simple text-only nodes) by using the ReadElementString method. You can also use methods such as ReadToDescendant, ReadToFollowing, and ReadToNextSibling, all of which allow you to skip some nodes.
For example, you can use ReadToFollowing("Price"); to skip straight to the next Price element, without worrying about whitespace, comments, or other elements before it. (If a Price element cannot be found, the XmlReader moves to the end of the document, and the ReadToFollowing method returns false.)
When you call XmlReader.Create, supply an XmlReaderSettings object that indicates you want to perform validation. Then move through the document one node at a time by calling XmlReader.Read, catching any validation exceptions. To find all the errors in a document without catching exceptions, handle the ValidationEventHandler event on the XmlReaderSettings object given as parameter to XmlReader.
An XML schema defines the rules that a given type of XML document must follow. The schema includes rules that define the following:
The elements and attributes that can appear in a document
The data types for elements and attributes
The structure of a document, including what elements are children of other elements
The order and number of child elements that appear in a document
Whether elements are empty, can include text, or require fixed values
XML schema documents are beyond the scope of this chapter, but you can learn much from a simple example. This recipe uses the product catalog first presented in recipe 6-1.
At its most basic level, XML Schema Definition (XSD) defines the elements that can occur in an XML document. XSD documents are themselves written in XML, and you use a separate predefined element (named <element>) in the XSD document to indicate each element that is required in the target document. The type attribute indicates the data type. Here is an example for a product name:
<xsd:element name="productName" type="xsd:string" />
And here is an example for the product price:
<xsd:element name="productPrice" type="xsd:decimal" />
The basic schema data types are defined at www.w3.org/TR/xmlschema-2. They map closely to .NET data types and include string, int, long, decimal, float, dateTime, boolean, and base64Binary—to name a few of the most frequently used types.
Both productName and productPrice are simple types because they contain only character data. Elements that contain nested elements are called complex types. You can nest them together using a <sequence> tag, if order is important, or an <all> tag if it is not. Here is how you might model the <product> element in the product catalog. Notice that attributes are always declared after elements, and they are not grouped with a <sequence> or <all> tag because order is never important:
<xsd:complexType name="product">
  <xsd:sequence>
    <xsd:element name="productName" type="xsd:string"/>
    <xsd:element name="productPrice" type="xsd:decimal"/>
    <xsd:element name="inStock" type="xsd:boolean"/>
  </xsd:sequence>
  <xsd:attribute name="id" type="xsd:integer"/>
</xsd:complexType>
By default, a listed element can occur exactly one time in a document. You can configure this behavior by specifying the maxOccurs and minOccurs attributes. Here is an example that allows an unlimited number of products in the catalog:
<xsd:element name="product" type="product" maxOccurs="unbounded" />
Here is the complete schema for the product catalog XML:
<?xml version="1.0"?>
<xsd:schema xmlns:xsd="http://www.w3.org/2001/XMLSchema">

   <!-- Define the complex type product. -->
   <xsd:complexType name="product">
      <xsd:sequence>
         <xsd:element name="productName" type="xsd:string"/>
         <xsd:element name="description" type="xsd:string"/>
         <xsd:element name="productPrice" type="xsd:decimal"/>
         <xsd:element name="inStock" type="xsd:boolean"/>
      </xsd:sequence>
      <xsd:attribute name="id" type="xsd:integer"/>
   </xsd:complexType>

   <!-- This is the structure the document must match.
        It begins with a productCatalog element that nests other elements. -->
   <xsd:element name="productCatalog">
      <xsd:complexType>
         <xsd:sequence>
            <xsd:element name="catalogName" type="xsd:string"/>
            <xsd:element name="expiryDate" type="xsd:date"/>

            <xsd:element name="products">
               <xsd:complexType>
                  <xsd:sequence>
                     <xsd:element name="product" type="product"
                      maxOccurs="unbounded" />
                  </xsd:sequence>
               </xsd:complexType>
            </xsd:element>
</xsd:sequence>
</xsd:complexType>
</xsd:element>
</xsd:schema>The XmlReader class can enforce these schema rules, providing you explicitly request a validating reader when you use the XmlReader.Create method. (Even if you do not use a validating reader, an exception will be thrown if the reader discovers XML that is not well formed, such as an illegal character, improperly nested tags, and so on.)
Once you have created your validating reader, the validation occurs automatically as you read through the document. As soon as an error is found, the XmlReader raises a ValidationEventHandler event with information about the error on the XmlReaderSettings object given at creation time. If you want, you can handle this event and continue processing the document to find more errors. If you do not handle this event, an XmlException will be raised when the first error is encountered, and processing will be aborted.
The next example shows a utility class that displays all errors in an XML document when the ValidateXml method is called. Errors are displayed in a console window, and a final Boolean variable is returned to indicate the success or failure of the entire validation operation.
using System;
using System.Xml;
using System.Xml.Schema;

namespace Apress.VisualCSharpRecipes.Chapter06
{
    public class ConsoleValidator
    {
        // Set to true if at least one error exists.
        private bool failed;

        public bool Failed
        {
            get {return failed;}
        }

        public bool ValidateXml(string xmlFilename, string schemaFilename)
        {
            // Set the type of validation.
            XmlReaderSettings settings = new XmlReaderSettings();
            settings.ValidationType = ValidationType.Schema;

            // Load the schema file.
            XmlSchemaSet schemas = new XmlSchemaSet();
            settings.Schemas = schemas;
            // When loading the schema, specify the namespace it validates
            // and the location of the file. Use null to use
// the targetNamespace value from the schema.
schemas.Add(null, schemaFilename);
// Specify an event handler for validation errors.
settings.ValidationEventHandler += ValidationEventHandler;
// Create the validating reader.
XmlReader validator = XmlReader.Create(xmlFilename, settings);
failed = false;
try
{
// Read all XML data.
while (validator.Read()) {}
}
catch (XmlException err)
{
// This happens if the XML document includes illegal characters
// or tags that aren't properly nested or closed.
Console.WriteLine("A critical XML error has occurred.");
Console.WriteLine(err.Message);
failed = true;
}
finally
{
validator.Close();
}
return !failed;
}
private void ValidationEventHandler(object sender,
ValidationEventArgs args)
{
failed = true;
// Display the validation error.
Console.WriteLine("Validation error: " + args.Message);
Console.WriteLine();
}
}
}Here is how you would use the class to validate the product catalog:
public class Recipe06_08
{
    private static void Main()
    {
        ConsoleValidator consoleValidator = new ConsoleValidator();
        Console.WriteLine("Validating ProductCatalog.xml.");
bool success = consoleValidator.ValidateXml(@"....ProductCatalog.xml",
@"....ProductCatalog.xsd");
if (!success)
Console.WriteLine("Validation failed.");
else
Console.WriteLine("Validation succeeded.");
Console.ReadLine();
}
}If the document is valid, no messages will appear, and the success variable will be set to true. But consider what happens if you use a document that breaks schema rules, such as the ProductCatalog_Invalid.xml file shown here:
<?xml version="1.0" ?>
<productCatalog>
    <catalogName>Acme Fall 2003 Catalog</catalogName>
    <expiryDate>Jan 1, 2004</expiryDate>

    <products>
        <product id="1001">
            <productName>Magic Ring</productName>
            <productPrice>$342.10</productPrice>
            <inStock>true</inStock>
        </product>
        <product id="1002">
            <productName>Flying Carpet</productName>
            <productPrice>982.99</productPrice>
            <inStock>Yes</inStock>
        </product>
    </products>
</productCatalog>
If you attempt to validate this document, the success variable will be set to false, and the output will indicate each error:
Validating ProductCatalog_Invalid.xml.

Validation error: The 'expiryDate' element has an invalid value according to

its data type. [path information truncated]

Validation error: The 'productPrice' element has an invalid value according to
its data type. [path information truncated]


Validation error: The 'inStock' element has an invalid value according to its

 data type. [path information truncated]


Validation failed.
Finally, if you want to validate an XML document and load it into an in-memory XmlDocument, you need to take a slightly different approach. The XmlDocument provides its own Schemas property, along with a Validate method that checks the entire document in one step. When you call Validate, you supply a delegate that points to your validation event handler.
Here is how it works:
XmlDocument doc = new XmlDocument();
doc.Load(@"....Product_Catalog.xml");

// Specify the schema information.
XmlSchemaSet schemas = new XmlSchemaSet();
schemas.Add(null, @"....ProductCatalog.xsd");
doc.Schemas = schemas;

// Validate the document.
doc.Validate(new ValidationEventHandler(ValidationEventHandler));
You need to use XML as a serialization format. However, you don't want to process the XML directly in your code—instead, you want to interact with the data using custom objects.
Use the System.Xml.Serialization.XmlSerializer class to transfer data from your object to XML, and vice versa. You can also mark up your class code with attributes to customize its XML representation.
The XmlSerializer class allows you to convert objects to XML data, and vice versa. This process is used natively by web services and provides a customizable serialization mechanism that does not require a single line of custom code. The XmlSerializer class is even intelligent enough to correctly create arrays when it finds nested elements.
The only requirements for using XmlSerializer are as follows:
The
XmlSerializerserializes only properties and public variables.The classes you want to serialize must include a default zero-argument constructor. The
XmlSerializeruses this constructor when creating the new object during deserialization.All class properties must be readable and writable. This is because
XmlSerializeruses the propertygetaccessor to retrieve information and the propertysetaccessor to restore the data after deserialization.
Note
You can also store your objects in an XML-based format using .NET serialization and System.Runtime.Serialization.Formatters.Soap.SoapFormatter. In this case, you simply need to make your class serializable—you do not need to provide a default constructor or ensure all properties are writable. However, this gives you no control over the format of the serialized XML.
To use XML serialization, you must first mark up your data objects with attributes that indicate the desired XML mapping. You can find these attributes in the System.Xml.Serialization namespace and include the following:
XmlRootspecifies the name of the root element of the XML file. By default,XmlSerializerwill use the name of the class. You can apply this attribute to the class declaration.XmlElementindicates the element name to use for a property or public variable. By default,XmlSerializerwill use the name of the property or public variable.XmlAttributeindicates that a property or public variable should be serialized as an attribute, not an element, and specifies the attribute name.XmlEnumconfigures the text that should be used when serializing enumerated values. If you don't useXmlEnum, the name of the enumerated constant will be used.XmlIgnoreindicates that a property or public variable should not be serialized.
For example, consider the product catalog first shown in recipe 6-1. You can represent this XML document using ProductCatalog and Product objects. Here's the class code that you might use:
using System;
using System.Xml.Serialization;

namespace Apress.VisualCSharpRecipes.Chapter06
{
    [XmlRoot("productCatalog")]
    public class ProductCatalog
    {
        [XmlElement("catalogName")]
        public string CatalogName;

        // Use the date data type (and ignore the time portion in the
        // serialized XML).
        [XmlElement(ElementName="expiryDate", DataType="date")]
        public DateTime ExpiryDate;

        // Configure the name of the tag that holds all products
        // and the name of the product tag itself.
        [XmlArray("products")]
        [XmlArrayItem("product")]
        public Product[] Products;

        public ProductCatalog()
        {
            // Default constructor for deserialization.
        }

        public ProductCatalog(string catalogName, DateTime expiryDate)
        {
            this.CatalogName = catalogName;
            this.ExpiryDate = expiryDate;
        }
    }

    public class Product
    {
        [XmlElement("productName")]
        public string ProductName;

        [XmlElement("productPrice")]
        public decimal ProductPrice;

        [XmlElement("inStock")]
        public bool InStock;

        [XmlAttributeAttribute(AttributeName="id", DataType="integer")]
public string Id;
public Product()
{
// Default constructor for serialization.
}
public Product(string productName, decimal productPrice)
{
this.ProductName = productName;
this.ProductPrice = productPrice;
}
}
}Notice that these classes use the XML serialization attributes to rename element names (using Pascal casing in the class member names and camel casing in the XML tag names), indicate data types that are not obvious, and specify how <product> elements will be nested in the <productCatalog>.
Using these custom classes and the XmlSerializer object, you can translate XML into objects, and vice versa. The following is the code you would need to create a new ProductCatalog object, serialize the results to an XML document, deserialize the document back to an object, and then display the XML document:
using System;
using System.Xml;
using System.Xml.Serialization;
using System.IO;

namespace Apress.VisualCSharpRecipes.Chapter06
{
    public class Recipe06_09
    {
        private static void Main()
        {
            // Create the product catalog.
            ProductCatalog catalog = new ProductCatalog("New Catalog",
              DateTime.Now.AddYears(1));
            Product[] products = new Product[2];
            products[0] = new Product("Product 1", 42.99m);
            products[1] = new Product("Product 2", 202.99m);
            catalog.Products = products;

            // Serialize the order to a file.
            XmlSerializer serializer = new XmlSerializer(typeof(ProductCatalog));
            FileStream fs = new FileStream("ProductCatalog.xml", FileMode.Create);
            serializer.Serialize(fs, catalog);
            fs.Close();

            catalog = null;

            // Deserialize the order from the file.
            fs = new FileStream("ProductCatalog.xml", FileMode.Open);
catalog = (ProductCatalog)serializer.Deserialize(fs);
// Serialize the order to the console window.
serializer.Serialize(Console.Out, catalog);
Console.ReadLine();
}
}
}You need to create an XML schema based on one or more C# classes. This will allow you to validate XML documents before deserializing them with the XmlSerializer.
Use the XML Schema Definition Tool (xsd.exe) command-line utility included with the .NET Framework. Specify the name of your assembly as a command-line argument, and add the /t:[TypeName] parameter to indicate the types you want to convert.
Recipe 6-9 demonstrated how to use the XmlSerializer to serialize .NET objects to XML and deserialize XML into .NET objects. But if you want to use XML as a way to interact with other applications, business processes, or non–.NET Framework applications, you'll need an easy way to validate the XML before you attempt to deserialize it. You will also need to define an XML schema document that defines the structure and data types used in your XML format so that other applications can work with it. One quick solution is to generate an XML schema using the xsd.exe command-line utility.
The xsd.exe utility is included with the .NET Framework. If you have installed Microsoft Visual Studio .NET, you will find it in a directory like C:Program FilesMicrosoft Visual Studio .NETFrameworkSDKBin. The xsd.exe utility can generate schema documents from compiled assemblies. You simply need to supply the file name and indicate the class that represents the XML document with the / t:[TypeName] parameter.
For example, consider the ProductCatalog and Product classes shown in recipe 6-9. You could create the XML schema for a product catalog with the following command line:
xsd Recipe06-09.exe /t:ProductCatalog
You need to specify only the ProductCatalog class on the command line because this class represents the actual XML document. The generated schema in this example will represent a complete product catalog, with contained product items. It will be given the default file name schema0.xsd. You can now use the validation technique shown in recipe 6-8 to test whether the XML document can be successfully validated with the schema.
You need to create one or more C# classes based on an XML schema. You can then create an XML document in the appropriate format using these objects and the XmlSerializer.
Use the xsd.exe command-line utility included with the .NET Framework. Specify the name of your schema file as a command-line argument, and add the /c parameter to indicate you want to generate class code.
Recipe 6-10 introduced the xsd.exe command-line utility, which you can use to generate schemas based on class definitions. The reverse operation—generating C# source code based on an XML schema document—is also possible. This is primarily useful if you want to write a certain format of XML document but you do not want to manually create the document by writing individual nodes with the XmlDocument class or the XmlWriter class. Instead, by using xsd.exe, you can generate a set of full .NET objects. You can then serialize these objects to the required XML representation using the XmlSerializer, as described in recipe 6-9.
To generate source code from a schema, you simply need to supply the file name of the schema document and add the /c parameter to indicate you want to generate the required classes.
For example, consider the schema shown in recipe 6-8. You can generate C# code for this schema with the following command line:
xsd ProductCatalog.xsd /c
This will generate one file (ProductCatalog.cs) with two classes: Product and ProductCalalog. These classes are similar to the ones created in recipe 6-9, except that the class member names match the XML document exactly. Optionally, you can add the /f parameter. If you do, the generated classes will be composed of public fields. If you do not, the generated classes will use public properties instead (which simply wrap private fields).
Use the System.Xml.Xsl.XslCompiledTransform class. Load the XSLT stylesheet using the XslCompiledTransform.Load method, and generate the output document by using the Transform method and supplying a source document.
XSLT is an XML-based language designed to transform one XML document into another document. You can use XSLT to create a new XML document with the same data but arranged in a different structure, or to select a subset of the data in a document. You can also use it to create a different type of structured document. XSLT is commonly used in this manner to format an XML document into an HTML page.
XSLT is a rich language, and creating XSL transforms is beyond the scope of this book. However, you can learn how to create simple XSLT documents by looking at a basic example. This recipe transforms the orders.xml document shown in recipe 6-6 into an HTML document with a table, and then displays the results. To perform this transformation, you'll need the following XSLT stylesheet:
<?xml version="1.0" encoding="UTF-8" ?>
<xsl:stylesheet xmlns:xsl="http://www.w3.org/1999/XSL/Transform"
    version="1.0" >

  <xsl:template match="Order">
    <html><body><p>
    Order <b><xsl:value-of select="Client/@id"/></b>
    for <xsl:value-of select="Client/Name"/></p>
    <table border="1">
    <td>ID</td><td>Name</td><td>Price</td>
    <xsl:apply-templates select="Items/Item"/>
    </table></body></html>
  </xsl:template>
<xsl:template match="Items/Item">
<tr>
<td><xsl:value-of select="@id"/></td>
<td><xsl:value-of select="Name"/></td>
<td><xsl:value-of select="Price"/></td>
</tr>
</xsl:template>
</xsl:stylesheet>Essentially, every XSLT stylesheet consists of a set of templates. Each template matches some set of elements in the source document and then describes the contribution that the matched element will make to the resulting document. To match the template, the XSLT document uses XPath expressions, as described in recipe 6-6.
The orders.xslt stylesheet contains two template elements (as children of the root stylesheet element). The first template matches the root Order element. When the XSLT processor finds an Order element, it outputs the tags necessary to start an HTML table with appropriate column headings and inserts some data about the client using the value-of command, which outputs the text result of an XPath expression. In this case, the XPath expressions (Client/@id and Client/Name) match the id attribute and the Name element.
Next, the apply-templates command branches off and performs processing of any contained Item elements. This is required because there might be multiple Item elements. Each Item element is matched using the XPath expression Items/Item. The root Order node is not specified because Order is the current node. Finally, the initial template writes the tags necessary to end the HTML document.
If you execute this transform on the sample orders.xml file shown in recipe 6-6, you will end up with the following HTML document:
<html>
  <body>
    <p>
    Order <b>ROS-930252034</b>
    for Remarkable Office Supplies</p>
    <table border="1">
      <td>ID</td>
      <td>Name</td>
      <td>Price</td>
      <tr>
        <td>1001</td>
        <td>Electronic Protractor</td>
        <td>42.99</td>
      </tr>
      <tr>
        <td>1002</td>
        <td>Invisible Ink</td>
        <td>200.25</td>
      </tr>
    </table>
  </body>
</html>
To apply an XSLT stylesheet in .NET, you use the XslCompiledTransform class. The following code shows a Windows-based application that programmatically applies the transformation and then displays the transformed file in a window using the WebBrowser control:
using System;
using System.Collections.Generic;
using System.ComponentModel;
using System.Data;
using System.Drawing;
using System.Text;
using System.Windows.Forms;
using System.Xml.Xsl;
using System.Xml;

namespace Apress.VisualCSharpRecipes.Chapter06
{
    public partial class TransformXml : Form
    {
        public TransformXml()
        {
            InitializeComponent();
        }

        private void TransformXml_Load(object sender, EventArgs e)
        {
            XslCompiledTransform transform = new XslCompiledTransform();

            // Load the XSTL stylesheet.
            transform.Load(@"....orders.xslt");

            // Transform orders.xml into orders.html using orders.xslt.
            transform.Transform(@"....orders.xml", @"....orders.html");

            webBrowser1.Navigate(Application.StartupPath + @"....orders.html");
        }
    }
}
Figure 6-2 shows the application.
In this example, the code uses the overloaded version of the Transform method that saves the result document directly to disk, although you could receive it as a stream and process it inside your application instead. The following code shows an alternate approach that keeps the document content in memory at all times (with no external results file). The XslCompiledTransform writes the results to an XmlWriter that wraps a StringBuilder. The content is then copied from the StringBuilder into the WebBrowser through the handy WebBrowser.DocumentText property. The results are identical.
StringBuilder htmlContent = new StringBuilder();
XmlWriter results = XmlWriter.Create(htmlContent);
transform.Transform(@"....orders.xml", results);
webBrowser1.DocumentText = htmlContent.ToString();
The System.Xml.Linq.XElement class represents an XML element. LINQ represents XML as a tree of XElements, such that one class is used for every element from the root nodes to the terminating child nodes. The static XElement.Load method will load and parse an XML document from a number of sources, returning an instance of XElement representing the root node. The Load method is overloaded to support a range of data sources, as shown in Table 6-2.
Table 6.2. Overloads of the XElement.Load Method
Method | Description |
|---|---|
| Loads the XML data from a stream |
| Loads the XML from a file, the name of which is obtained from the string |
| Loads the XML from a |
| Loads the XML from a |
You can control some of the load options by using the System.Xml.Linq.LoadOptions enumeration as an additional argument to the Load method—see the .NET Framework documentation for details.
The following example demonstrates using the four different data sources accepted by the XElement.Load method:
using System;
using System.IO;
using System.Xml;
using System.Xml.Linq;
namespace Recipe06_13
{
    class Recipe06_13
    {
        static void Main(string[] args)
        {
            // Define the path to the sample file.
            string filename = @"....ProductCatalog.xml";

            // Load the XML using the file name.
            Console.WriteLine("Loading using file name");
            XElement root = XElement.Load(filename);
            // Write out the XML.
            Console.WriteLine(root);
            Console.WriteLine("Press enter to continue");
            Console.ReadLine();

            // Load via a stream to the file.
            Console.WriteLine("Loading using a stream");
            FileStream filestream = File.OpenRead(filename);
            root = XElement.Load(filestream);
            // Write out the XML.
            Console.WriteLine(root);
            Console.WriteLine("Press enter to continue");
            Console.ReadLine();

            // Load via a textreader.
            Console.WriteLine("Loading using a TextReader");
            TextReader reader = new StreamReader(filename);
            root = XElement.Load(reader);
            // Write out the XML.
            Console.WriteLine(root);
            Console.WriteLine("Press enter to continue");
            Console.ReadLine();

            // Load via an xmlreader.
            Console.WriteLine("Loading using an XmlReader");
            XmlReader xmlreader = new XmlTextReader(new StreamReader(filename));
            root = XElement.Load(xmlreader);
            // Write out the XML.
            Console.WriteLine(root);
            Console.WriteLine("Press enter to continue");
            Console.ReadLine();

        }
    }
}
Create a new instance of System.Xml.Linq.XElement for the root element. Child nodes and attributes can be added by passing instances of XElement or XAttribute as constructor arguments or by calling the Add instance method.
There are two ways to create an XML tree using LINQ to XML. The first is to create an instance of XElement and pass in instances of XElement for child nodes and XAttribute for attributes of the root node as constructor arguments. A simple example follows:
XElement root = new XElement("myrootnode",
    new XAttribute("first_attribute", "first_attribute_value"),
    new XAttribute("second_attribute", "second_attribute_value"),
    new XElement("first_element", "first_element"),
    new XElement("second_element", "second_element",
        new XAttribute("nested_attribute", "nested_attribute_value"))
);
This approach looks confusing, but starts to make sense once you start to write code yourself. You can supply any number of constructor arguments, and each XElement you create to represent a child node will accept constructor arguments itself to represent its own children and attributes. The preceding example is equivalent to the following XML:
<myrootnode

   first_attribute="first_attribute_value" second_attribute="second_attribute_value">

<first_element>first_element</first_element>

<second_element

   nested_attribute="nested_attribute_value">second_element</second_element>

</myrootnode>
The second approach to create an XML tree with XML to LINQ is to create individual instances of XElement and XAttribute and add them to their parent node using the XElement.Add instance method. See the example in this recipe for a demonstration.
In addition to XElement and XAttribute, the System.Xml.Linq namespace includes classes that represent other XML types—including XComment, XDeclaration, and XCData. The .NET Framework contains a full description of each type available, but of particular interest are XDocument and XDeclaration—these classes allow you to create the standard XML declaration at the start of your data.
The following example creates one element using the constructor arguments and adds another using the XElement.Add method. The root element is then added to an instance of XDocument along with an XDeclaration. The XDocument is written out to the console via an XMLTextWriter, which ensures that the XML header is included (it is omitted if the XDocument instance is passed to Console.WriteLine).
using System;
using System.Xml.Linq;
using System.Xml;

namespace Recipe06_14
{
    class Recipe06_14
    {
        static void Main(string[] args)
        {

            XElement root = new XElement("products",
                new XElement("product",
                    new XAttribute("id", 1001),
                    new XElement("productName", "Gourmet Coffee"),
                    new XElement("description",
                        "The finest beans from rare Chillean plantations."),
                    new XElement("productPrice", 0.99),
                    new XElement("inStock", true)
                ));

            XElement teapot = new XElement("product");
            teapot.Add(new XAttribute("id", 1002));
            teapot.Add(new XElement("productName", "Blue China Tea Pot"));
            teapot.Add(new XElement("description",
                "A trendy update for tea drinkers."));
            teapot.Add(new XElement("productPrice", 102.99));
            teapot.Add(new XElement("inStock", true));
            root.Add(teapot);

            XDocument doc = new XDocument(
                new XDeclaration("1.0", "", ""),
                root);
doc.Save(Console.Out); }
}
}The output of the example is as follows (formatted for easier reading):
<?xml version="1.0" encoding="ibm850"?>

<products>

<product id="1001">

<productName>Gourmet Coffee</productName>

<description>The finest beans from rare Chillean plantations.</description>

<productPrice>0.99</productPrice>

<inStock>true</inStock>

</product>

<product id="1002">

<productName>Blue China Tea Pot</productName>

<description>A trendy update for tea drinkers.</description>

<productPrice>102.99</productPrice>

<inStock>true</inStock>

</product>

</products>

Press any key to continue . . .
You need to query an XML tree to find elements with a given name, attribute, or other characteristic.
The System.Xml.Linq.XElement class is a valid data source for LINQ queries. The basic sequence for querying an XML tree is the same as the one we used in Chapter 2 when querying a collection:
Start a new LINQ query using the
fromkeyword, providing a variable name that you will use to make selections (for example,from element in root.Elements()).Identify the conditions to use in selecting elements with the
wherekeyword.Indicate what value will be added to the result set from each matching element using the
selectkeyword.Specify the way in which you wish the results to be sorted using the
orderbykeyword.
When using XElement as the LINQ source, the result is an IEnumerable of XElements, containing those elements from your XML tree that match your search criteria. LINQ queries can be written using the keywords that have been added to C# (from, where, select, etc.), or by using instance methods that fulfill the same purpose—in the case of XElement, you should call the Elements instance method to obtain an IEnumerable<XElement> to use as the basis for your queries.
To select an element, you use the properties and methods of the XElement class. For example, to find all elements in an XML tree that have an attribute color with value blue, you would call
from element in root.Elements() where (string)element.Attribute("color")

    == "blue" select element;
To achieve the same result using instance methods, you would call
root.Elements().Where(e => (string)e.Attribute("color") == "blue").Select(e => e);The result type from a LINQ query depends on what kind of element you retrieve with the select keyword, but will always return an instance of IEnumerable, which you can use in a foreach loop to run through the matched elements, or as the basis for further LINQ queries. The preceding example calls (which are functionally equivalent) return an IEnumerable<XElement>. If you use the select keyword to obtain a value representing a characteristic of an element, such as an attribute value, then the generic type of IEnumerable will be different.
The following example loads an XML tree from the file store.xml, which is included in the sample code. Elements that are named Products and that have a value of 16 for the child element CategoryID are selected, and the value of the ModelName child element is printed out. The query is performed once using the LINQ keywords and again using the instance methods and lambda expressions—it is a matter of preference as to which technique you adopt.
using System;
using System.Collections.Generic;
using System.Linq;
using System.Text;
using System.Xml.Linq;


namespace Recipe06_15
{
    class Recipe06_15
    {
        static void Main(string[] args)
        {
            // Load the XML tree from the sample file.
            XElement rootElement = XElement.Load(@"....store.xml");

            // Select the name of elements who have a category ID of 16.
            IEnumerable<string> catEnum = from elem in rootElement.Elements()
                                          where (elem.Name == "Products" &&
                                            ((string)elem.Element("CategoryID"))
                                                == "16")
                                          select ((string)elem.Element("ModelName"));

            foreach (string stringVal in catEnum)
            {
                Console.WriteLine("Category 16 item: {0}", stringVal);
            }

            Console.WriteLine("Press enter to proceed");
            Console.ReadLine();

            // Perform the select again using instance methods.
            IEnumerable<string> catEnum2 = rootElement.Elements().Where(e
                => e.Name == "Products"
                && (string)e.Element("CategoryID") == "16").Select(

e => (string)e.Element("ModelName"));


            foreach (string stringVal in catEnum2)
            {
                Console.WriteLine("Category 16 item: {0}", stringVal);
            }
        }
    }
}The first step to add, remove, or modify an XML tree is to select the element you wish to change. You can do this by using a LINQ query, or through the Attribute and Element methods of XElement.
To add a new element, call the Add method of the XElement you wish to use as the parent.
To modify elements, perform a LINQ query to select the elements of interest and enumerate the results, calling the ReplaceAttributes or ReplaceNodes methods to modify the XElement you have selected, or the ReplaceWith method to replace the selected element with a new element.
To remove an element, call the Remove method on the XElement instance that you no longer require.
The following example loads an XML file called ProductCatalog.xml, which is included with the source code for this chapter. After printing out the XML that has been loaded, the following tasks are performed:
Find all elements called
productand modify the value of the attributeid.Remove all elements that contain the word tea in a child node called
description.Create a new element and add it to a suitable parent.
using System;
using System.Collections.Generic;
using System.Linq;
using System.Xml.Linq;

namespace Recipe06_16
{
    class Recipe06_16
    {
        static void Main(string[] args)
        {
            // Load the XML tree from the file.
            XElement rootElem = XElement.Load(@"....ProductCatalog.xml");
// Write out the XML.
Console.WriteLine(rootElem);
Console.WriteLine("Press enter to continue");
Console.ReadLine();
// Select all of the product elements.
IEnumerable<XElement> prodElements
= from elem in rootElem.Element("products").Elements()
where (elem.Name == "product")
select elem;
// Run through the elements and change the ID attribute.
foreach(XElement elem in prodElements)
{
// Get the current product ID.
int current_id = Int32.Parse((string)elem.Attribute("id"));
// Perform the replace operation on the attribute.
elem.ReplaceAttributes(new XAttribute("id", current_id + 500));
}
Console.WriteLine(rootElem);
Console.WriteLine("Press enter to continue");
Console.ReadLine();
// Remove all elements that contain the word "tea" in the description.
IEnumerable<XElement> teaElements = from elem in
rootElem.Element("products").Elements()
where (((string)elem.Element("description")).Contains("tea"))
select elem;
foreach (XElement elem in teaElements)
{
elem.Remove();
}
Console.WriteLine(rootElem);
Console.WriteLine("Press enter to continue");
Console.ReadLine();
// Define and add a new element.
XElement newElement = new XElement("product",
new XAttribute("id", 3000),
new XElement("productName", "Chrome French Press"),
new XElement("description",
"A simple and elegant way of making great coffee"),
new XElement("productPrice", 25.00),
new XElement("inStock", true));rootElem.Element("products").Add(newElement);
Console.WriteLine(rootElem);
}
}
}