
IN THIS CHAPTER
Data is the heart of a FoxPro developer's mission. We design tables and indexes, provide keys for fast data retrieval and updating, and build screens to connect our users to their treasures.
The single most important issue for FoxPro developers contemplating migrating to Visual Basic .NET is this: How hard is it to work with data? .NET has dozens of wonderful capabilities in many other areas. But by and large, we don't care. How does it do data? That's our first and most urgent question.
The answer is, as Shakespeare said of love, “not wisely but too well.” It does everything we want and more; but jeez, why did they do it that way?
If I had never used FoxPro, I wouldn't be nearly so critical. But we know better than any other segment of the database community how simple data access can be. Why can't there be simple defaults that work if you don't specify anything? There are equivalents—sort of; there are things that do a lot of work for us, but often where there was no work to do in FoxPro. And from time to time we'll get a pleasant surprise. But my overall impression as a Fox guy is frankly that it isn't supposed to be this hard. And I'm pretty sure that in a not-too-distant future it won't be.
There is a reason for some of the difference. FoxPro data access is connected; in Visual Basic .NET, data access is disconnected. You connect, get a record, and disconnect. After making modifications, you connect, send the update, and disconnect. The fact that the “connection” is maintained is irrelevant. In your database applications, you can open a connection when the program starts up and then use that same connection until the user closes the program. That would be an expensive modus operandi. What is more commonly done is to open a connection, get some data from SQL or send an INSERT, UPDATE, or DELETE command, and immediately close the connection. (In fact, you can build an Internet data server that connects to MSDE with a single connection, and then pool calls to it, so that dozens or hundreds of users can use a single connection. Microsoft will tell you that this violates your license agreement.) The server program is connected to the SQL database, but your client program isn't.
Regardless of the nature of the disconnected access, each new method of access involves a little more work. In Visual Basic .NET, all data access methods are disconnected. That's why it's no harder to work with XML data services in .NET than it is to work with an MDB database.
FoxPro was built for connected data access, which is very simple. As soon as you build a disconnected data access strategy, all of the implications have to be dealt with. .NET, on the other hand, starts with disconnected data access, so the problems have to be dealt with immediately.
Let's look at data issues, first at Visual FoxPro, then at the Visual Basic side. We'll look at the Data Application Blocks, hastily issued after the release of Visual Studio .NET 1.1 to answer the alarmed requests for a simpler way to access data. And we'll speculate (within the bounds of a putative NDA) as to what might be coming from Redmond.
In earlier versions of FoxPro, we had a few ways to access data: DBFs, views, remote views, and SQL Pass-Through. The advent of the Internet allowed us to add HTTP and remote data servers to that list, including new HTTP data access to SQL Server.
Local tables with the extension .dbf are the best-known identifying characteristic of FoxPro applications. The DBF, described in an earlier chapter, is a disk file with a header of 512 bytes if part of a database or 256 bytes if a free table, followed by 32 bytes to describe each field in the table, followed by fixed-length records preceded by a delete byte, which contains an asterisk if it has been marked for deletion with the DELETE command. (Tables that are members of a database have the name of the database container file [DBC] stored in the additional 256 bytes of the header.) Cursors (described later in this chapter) have the same format as free tables because they can't be created as members of a database. Part of the header information is stored in hexadecimal format, including LSB (least-significant byte first) format, so that reading cursors is a skill in itself. However, it is almost never necessary to do so, unless you're Paul Heiser and you sell a tool to fix them when they get damaged.
You can create a table either interactively or in code. Usually, when I'm building a system, I simply type
CREATE CUSTOMER
A Table Designer window opens up and allows me to begin describing the table, as shown in Figure 6.1.
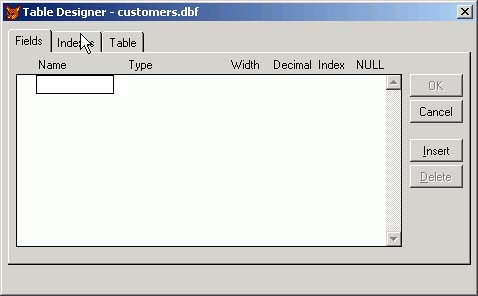
Field names are limited to 10 characters if the table is not part of a database container. If a database container is open, the table is automatically added to it and can have long field names.
Tables can also be created using the CREATE TABLE command, which has this syntax:
CREATE TABLE SUBS (  ;
 SubNumber Integer,  ;
 StartDate Date,     ;
 Cost Numeric(6,2),  ;
 Expires Date,       ;
 CustomerID Char(10) )
Typically, you would use some data source, perhaps a table of possible fields to be included in a particular survey, and then generate a string containing the command. Then you would use macro expansion, (for example, &Cmd) to execute the command and create the table.
To use a DBF, you, well, USE a DBF:
USE ( TableName )
This command opens the named DBF in the current work area and moves the record pointer to the first record. In VB, there is no current select area as there is in FoxPro, and the position of the record pointer within a dataset serves as a surrogate for RECNO() (record number). In FoxPro, the current select area (SELECT()) and the current record number (RECNO()) are managed by the FoxPro environment, so that we can use them without resorting to the methods or properties of some data handling class. They're just there.
This notion of a current work area is not without its problems, and we've all experienced them. If you already have a table open, say in select area 1, USE ( TableName ) will close it and open the new table in select area 1. So you usually use the following syntax to ensure that you haven't just closed a table that you still needed:
SELECT 0    && get the next available work area
USE ( TableName )
You can also use abbreviated syntax:
USE ( TableName ) IN 0
However, this doesn't select the new table; that requires a separate SELECT command. So you would ordinarily use this:
USE CUSTOMERS IN 0
SELECT CUSTOMERS
The USE command can also specify an ALIAS. In a FoxPro program, when you issue the SELECT ( TableName ) command, you actually select the table's ALIAS. The alias is by default the table's name; however, if you're working with a class of tables that might have other names but represent a single type of data, for example timesheets, you can specify an alias, as shown in Listing 6.1.
Example 6.1. Specifying an Alias
FName = GETFILE ( [DBF], Where is the timesheet to import?]
IF EMPTY ( FName )
   RETURN
  ELSE
   USE ( FName ) IN 0 ALIAS TIMESHEET
   SELECT TIMESHEET
ENDIF
When a table is open, the command LIST STRUCTURE provides a list of the fields (columns) in the table. To save the resulting list to a file, use LIST STRUCTURE TO ABC.TXT. You can also use LIST STRUCTURE TO PRINTER NOCONSOLE to send it straight to a printer.
The contents of a field in a table are referred to using the syntax TABLENAME.FIELDNAME, for example, CLIENTS.PHONE. You can also SELECT a table, and then refer simply to the PHONE field because the alias of the current work area is assumed by default.
Visual Basic .NET doesn't have the concept of a default alias. You can't type Phone and assume that it will know what table to look in. In fact, it won't look in any table.
TIP
Here's a little preview: The only way that an expression like CLIENTS.Phone will have any meaning in Visual Basic .NET is if you have a Clients object that has a property named Phone. The Clients object is exactly like any other object; it's based on a class, consisting of a CLASS definition containing PUBLIC PROPERTY declarations that have the same names as the fields in your table. You're responsible for building the class and for moving the data from the XML structure that holds it to the class. More about this later.
Cursors are temporary tables. You get a cursor when you issue a SQL SELECT statement to retrieve records from a DBF. You also get a cursor when you return records from SQL Server. And as we've seen, you can use XMLToCursor() to build a cursor from an XML string.
There is also a CREATE CURSOR command, which looks exactly like the CREATE TABLE command. It creates a temporary structure like that of a DBF, typically with the extension .tmp, which you won't see unless you use the DBF ( cursorname ) function to return the name. I've only come up with one use for this, in conjunction with the APPEND FROM ( tablename ) command, which requires a table name rather than a cursor name.
Cursors, unlike tables, can have long field names. This makes them perfect for storing the contents of cursors returned from SQL Server because few SQL database administrators limit themselves to 10-character field names.
There are a number of commands and functions that are meaningful while a table is open.
Table 6.1. Commands and Functions for Working with Open Tables
If buffering mode is set to 2, 3, 4, or 5, two versions of changed records are maintained. If the TableUpdate() function is called, the changes become permanent. If TableRevert() is called, the changes are discarded.
When you've enabled buffering, something strange happens; as you change records, FoxPro maintains two copies of each changed record—one before and one after the change. If you issue the TableUpdate() function, changes are made permanent. If you issue the TableRevert() function, changes are not saved.
After you make changes to a buffered table, you can't close the form that's using it unless you call TableUpdate() or TableRevert(). That's why, in your form templates where you use buffering, you either have to set ControlBox to False to eliminate the possibility of a user trying to close a form with pending changes, or automatically call TableUpdate() or TableRevert() if a form is closed after changes have been made, depending on which you want to be the default behavior. It's a little messy, but it's unavoidable when you begin using buffering.
FoxPro has a record pointer, which tells it which is the current record. When you use APPEND BLANK, FoxPro jumps to the end of the alias and adds a blank record. However, it's not actually added until you use TABLEUPDATE(), if buffering is enabled. If you use TABLEREVERT(), where is the record pointer? The answer is, it's one record beyond the number of records in the file. So you would have a RECCOUNT() of, say, 12, and a RECNO() of 13.
One of the consequences of this is that if you cancel an add, you have to tell FoxPro what record you were pointing to before the APPEND. That's why the FoxPro template in Chapter 2, “Building Simple Applications in Visual FoxPro and Visual Basic .NET,” had a property named BeforeAdd, so that after a canceled add we could go back to the record that was showing before the APPEND BLANK was issued.
Indexes are implemented in FoxPro either as single-index IDX files (compact or not compact) or as tags in CDX (compact multiple index) files. To create a simple index, you use the command
INDEX ON ( Expression ) TO ( NameWithoutTheExtension ) COMPACT
To create a tag in a CDX file you issue the command
INDEX ON ( Expression ) TAG ( TagName )
To attach an index, you use the command SET INDEX TO ( IdxFileName ). You can attach several IDX and CDX files in a single SET INDEX statement. However, when you open a DBF, if a CDX file of the same name exists, it is automatically opened, although no tag order is set. To do that, you issue the command
SET ORDER TO TAG ( TagName )
or simply
SET ORDER TO ( TagName )
After an index has been selected, a SEEK command for a value that's in the index will find any matching record. Depending on the SET NEAR and SET EXACT commands, the record pointer can be set to the next record following the place where the record would have been had it existed, or to the end of the alias.
So far we've talked about free tables, which are not contained in a database. Many of the features of FoxPro tables and cursors require the use of a database container (DBC), a sort of metatable containing references to tables and their fields and indexes. It also holds transactional information, stored procedures and triggers (including generated relational integrity triggers), and the SELECT statements and connection information needed to build local and remote views. You can't use any of the advanced features without including a database container in your project. And if you do, consider buying Doug Hennig's Stonefield Database Toolkit (SDT) (www.Stonefield.com), which adds a ton of additional functionality to the DBC.
In FoxPro, DBFs can either be free tables or can belong to a database container. In the latter case, the table headers include an additional 254 bytes for the name of the DBC file used as the database container. Additional details of the DBC are stored in a memo file with the extension DCX, and an index file with the extension DCT.
The DBC file is itself a DBF. Its structure is shown in Listing 6.2.
Example 6.2. The Structure of the DBC File
Structure for table:PINTER.DBC
Field  Field Name  TypeWidthDec   Index   Collate Nulls
1  OBJECTIDInteger 4 No
2  PARENTIDInteger 4 No
3  OBJECTTYPE  Character  10 No
4  OBJECTNAME  Character 128 No
5  PROPERTYMemo (binary)   4 No
6  CODEMemo (binary)   4 No
7  RIINFO  Character   6 No
8  USERMemo4 No
** Total **  165
When you create the database, five records are added, containing five records with the following values in the ObjectName field:
 OBJECTIDPARENTID OBJECTTYPE OBJECTNAME
1   1 Database   Database
2   1 Database   TransactionLog
3   1 Database   StoredProceduresSource
4   1 Database   StoredProceduresObject
5   1 Database   StoredProceduresDependencies
Transactions in progress are stored in the database. When transactions are committed, they are removed from the DBC and put into tables and removed from the DBC; if rolled back, they are simply removed from the DBC. Stored procedures, including relational integrity triggers, are stored here. So if you want to use transactions, stored procedures, and relational integrity constraints, you must use a database. Otherwise, the database may not be necessary or even useful. However, if you intend to use local and/or remote views, you must use a DBC.
Local views are cursors created based on SQL SELECT statements stored in database containers. They don't have indexes, although if the SQL SELECT statement has an ORDER BY statement, it determines the order of the records. Views can be marked as updateable either in the database container or by using CursorSetProp() settings. When a view is marked as updateable, as the view is changed, the records in the underlying table are updated.
Remote views are the same as local views except that their data sources are not FoxPro tables. The sources can be SQL Server, or any ODBC data source. In fact, you can create a remote view to a FoxPro table using an ODBC driver, although as Nixon once said, it would be wrong. (He did it anyway, as some of us recall.) Remote views can also be updateable.
At one time, many of us hoped that remote views would provide a way to use SQL Server. We were wrong. Remote views work, but barely. So, instead, we use SQL Pass-Through (SPT).
SQL is supported directly in FoxPro. The name is meant to imply that if for some reason you don't want to use remote views, real men use SQL Pass-Through (SPT). The reason for the clear distinction is that for FoxPro people, having to build an INSERT or UPDATE string seemed incredibly difficult. After all, if we use DBFs, there's nothing to do; leave the record, or issue TableUpdate() if you used buffering, and the change is permanent. Issue APPEND BLANK on an unbuffered DBF, and you have inserted a blank record, a truly unnatural act in SQL.
As long as we're quoting Nixon, let me make one thing perfectly clear: To add a record in SQL, you must create and send a complete, syntactically correct INSERT statement to SQL, using SQL delimiters. SQL's syntax is slightly different than that of FoxPro's twangy dialect, and SQL Server makes no effort to understand its distant cousin. Similarly, the UPDATE and DELETE commands must be expressed in their full glory.
SQL offers several things that DBFs don't provide. BACKUP and RESTORE are easier in every way. User access control is built in, and it's virtually impossible to damage SQL tables or index files. We've all had to build our own mechanisms to deal with these three problems, although the excellent Stonefield Database extensions written by Doug Hennig do a great job in these areas and, therefore, are part of the essential FoxPro toolkit.
The ability to back up and restore a database is essential. A SQL database consists of only two files; the database itself and a log file where transactions are stored. To back up a FoxPro application, you have to get all users to close their applications, and then copy all DBF, FPT, and CDX files to a backup location. In SQL, BACKUP is a single command, and users don't have to exit the application.
When a backup is done, the log file is erased. The theory is that if it is necessary to restore a database from the last good backup, the transactions log that has accumulated since that backup can be used to restore the database up to the moment that the database failed. It is also possible to use the BACKUP command to simply erase the transactions log, and in fact that's how it is often used.
SQL only returns a handle to a user when a valid user ID and password are supplied. You can either provide a single user ID and password for all users of your application, or issue one to each user. In either case, you don't have to write a single line of code to manage database access. That can be the single reason that justifies using SQL Server instead of DBFs.
Finally, SQL Server supports indexes that are remarkably similar to those in FoxPro; in fact, the indexing technology used by Microsoft in the latest versions of SQL Server came from FoxPro, and uses the Rushmore technology first developed years ago by the Fox Software team in Toledo. FoxPro indexes can be corrupted; SQL Server indexes are almost impossible to damage, and can be rebuilt automatically by SQL Server.
If any of these three features are important to your client, SQL Server is well worth the additional cost. However, SQL requires knowing more than is required to use DBFs. If you want to use SQL Server, you're going to have to cozy up to the Query Analyzer and get to know it. Help is available, from the Help, Transact-SQL Help menu pad. Transact-SQL is the actual name of the command language used in SQL Server, just as it was when they bought it from Sybase. (Did I mention that Microsoft bought some of its products from other companies rather than developing them in-house? Even Word.) A quick primer follows.
The SQLConnect() command is used to supply the parameters necessary to connect to a connection previously defined in a database container (DBC), including (if desired) a user ID and password. If the UID and PWD are not supplied, SQL asks for them. This is necessary because a SQL connection consists at a minimum of the name of the server and the name of the database, and the SQLConnect() function provides no mechanism for naming them.
My preference is to use the SQLStringConnect command, which requires a complete connection string. If you don't know what connection strings look like, create an empty text file with the extension .udl, and double-click on it in Windows Explorer. The dialog that appears will allow you to build one, and will store it in the .udl file. Don't forget to select Microsoft OLE DB Provider for SQL Server on page 1 of the dialog. The usual server name is “(local)” if you've got SQL Server Developer Edition on your computer, and the default user ID of “sa” and a blank password are still there unless you changed them. Click the Test button to see if it worked. If you choose the Northwind database that is installed for testing purposes, your connection string will look like this:
Provider={SQL Server};Server=(local);Database=Northwind;UID=sa;PWD=;
To use it, do this:
Str = [Provider={SQL Server};Server=(local);Database=Northwind;UID=sa;PWD=;]
Handle = SQLStringConnect( str )
Either of these two commands returns an integer called a Handle. I used Handle as the variable name here, but use whatever you like.
SQLExec(Handle, Cmd) executes the string defined in the variable Cmd. The command can be any of the four SQL commands: SELECT, INSERT, UPDATE, or DELETE. It can also be a SQL stored procedure, or one of the built-in SQL stored procedures that begin with the letters sp.
If the command is a SELECT, the matching records are returned in a cursor named SQLResult by default. If a third parameter, a string containing a cursor name, is supplied, the result is returned in a cursor of that name.
Finally, SQLDisconnect(Handle) closes the connection. For convenience, SQLDisconnect(0) closes any and all open connections.
As we saw in full detail in Chapter 2, you can't bind the controls on your forms to the cursor returned by SQL because it breaks the data binding. The ControlSource property of each control must be the name of an alias and field that exist at the end of the Load event of the form. That's why we create a cursor in the Load event, and then “pour” the data form that the cursor returned either by a call to SQLEXEC() or by a call to a Web service into the previously defined cursor.
FoxPro also provides a few other SQL functions to return useful information about tables. You can do the same thing by instantiating an object based on the SQLDMO.DLL (SQL Data Management Objects) component that comes with SQL. On my computer, it's located in the following directory:
Program filesMicrosoft SQL Server80ToolsBin
It even comes with a pair of help files. The one called SQLDMO80.hlp is of absolutely no use unless you're already a SQLDMO expert. The other one, SQLDMO.CHM, is pretty cool and contains excellent examples. Look for how-to articles on the Internet, or visit my Web site.
Table 6.2 lists a few FoxPro functions that are available for use with SQL Server.
Table 6.2. SQL Functions in FoxPro
Some of these merit a few comments. SQLSetProp() can be used to establish asynchronous access to SQL Server, so that the program can request data and allow the user to go on doing other things. SQLMORERESULTS() returns the next N records, where N is the number of records you've specified to be returned in each packet of records in this “progressive fetch” scheme.
TIP
This should give you pause. I've done a query against a million records, and returned the few dozen that matched the query, in a few milliseconds. FoxPro tables are free. SQL Server isn't. Is it possible that a free data storage mechanism is hundreds of times faster than one that, to put it one way, isn't free? Try it yourself.
Transactions are considered by some to be the difference between trivial and serious database applications. I don't agree; I've built applications for some of the most important companies and nonprofit organizations in the world in which transactions were completely irrelevant. However, if you want to be able to commit both the header and the detail records of a purchase order, or commit neither if some problem occurs, transactions are how you do it. SQL Server supports transactions. To begin a transaction, issue the following command:
= SQLSETPROP(gnHandle, 'Transactions', 2) && manual
FoxPro includes an Upsizing Wizard, which will “automatically” create tables in SQL Server corresponding to the DBFs in your application, migrate the data in your DBFs to SQL Server, and create remote views to be used in place of DBFs throughout your application. It sounds great, but it isn't.
SQL Server is a different technology. The data is kept elsewhere, and the supposition is that you'll bring only the record or group of records that are needed for the current form. In FoxPro, you get all of the records all the time. The SQL equivalent of USE CUSTOMERS is SELECT * FROM CUSTOMERS, which brings the entire table to each workstation. The slowdown can be glacial. So unless you change the architecture of each and every screen, performance will be awful, and your users will be outraged.
On the other hand, if your queries are properly constructed to minimize data traffic, SQL performance for very large numbers of records and a large number of users will actually improve. Index traffic is the single greatest cause of poor performance in DBF-based applications, and SQL Server completely eliminates it.
FoxPro 8 is in my opinion the most important Visual FoxPro upgrade since FoxPro 2.6 for Windows. It includes the Task Pane, which adds all sorts of new features and makes it easier to use features both new and old. It adds the CursorAdapter and DataAdapter classes, which greatly simplify access to any sort of data store, including SQL Server and XML Web Services.
The CursorAdapter class permits us to deal with data of any sort, from DBFs to SQL Server to other ODBC data sources to XML Web Services, in a single way. Two new builders ease the transition, although when you know what's required, you may prefer to write the few required lines of code yourself.
When you open the Data Environment of a form and right-click anywhere on the design surface, the context menu will appear. It contains an option to Add CursorAdapter. When you know what properties are required and how to code them, you'll use this. For the moment, click on the Builder option.
The dialog shown in Figure 6.2 will appear.
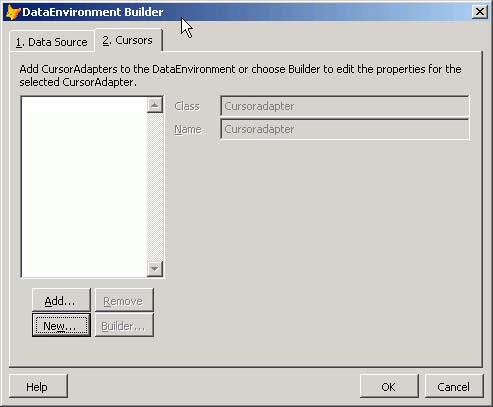
On the DataEnvironment Builder dialog screen shown in Figure 6.2, there are four data source types: ADO, Native (DBF), ODBC, and XML. This time, choose ADO. Click on the Use Connection String radio button and fill in the connection string shown. The Build button will walk you through the process. If your server isn't “(local)”, substitute the correct name; if you've changed the UserID and Password, change them as well. Test the connection, and then select Page 2, Cursors.
Note that the connection strings for ADO and for ODBC are different. The ADO connection string to connect to the Northwind database is this:
Provider=SQLOLEDB.1;Persist Security Info=False;User ID=sa;
Initial Catalog=Northwind;Data Source=(local)
whereas the ODBC connection string is this:
Driver={SQL Server};Server=(local);Database=Northwind;UID=sa;PWD=;
Figure 6.3 shows the resulting dialog.
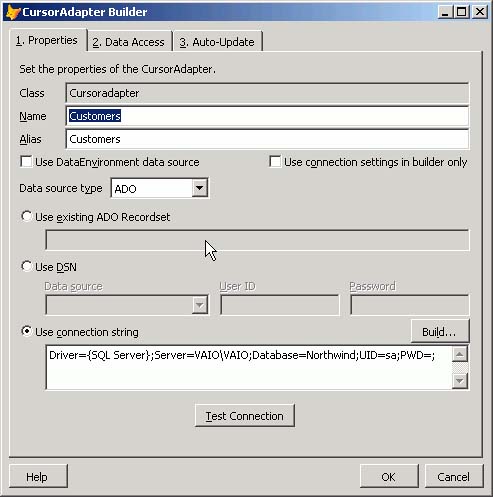
Click on New to start up the CursorAdapter Builder. A cursor named Cursor1 with a single field named F1 will be added to the Data Environment in preparation for specifying the fields that we want, and the modal CursorAdapter Builder will appear. I'm going to supply the name Customers for both the Cursor and its Alias. I again specify ADO as the Data Source Type.
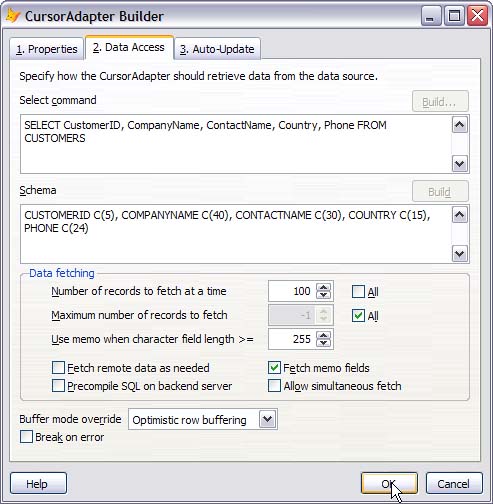
I'm going to specify customers from California for this screen, so I select tab 2, Data Access, and enter the following SELECT command:
SELECT                   ;
  Customers.CustomerID,  ;
  Customers.CompanyName, ;
  Customers.ContactName, ;
  Customers.Country,     ;
  Customers.Phone        ;
 FROM Customers          ;
 WHERE Region='CA'
The Schema edit box is instantly populated with the body of a CREATE CURSOR command:
CUSTOMERID C(5), COMPANYNAME C(40), CONTACTNAME C(30), COUNTRY C(15), PHONE C(24)
The Data Access page should look like the one shown in Figure 6.4.
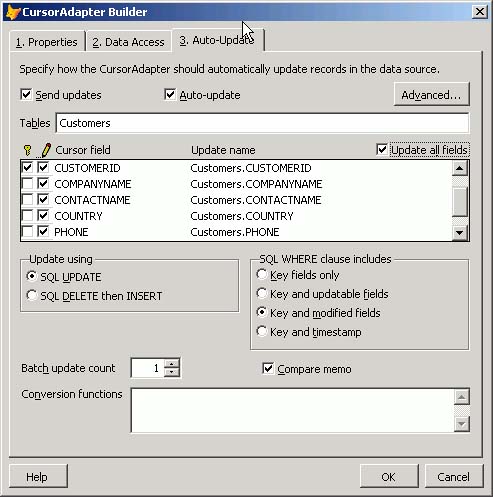
Page 3 of the CursorAdapter Builder allows me to instruct the CursorAdapter to automatically send UPDATE and/or INSERT commands to SQL Server as changes are made. If you're only using the records for display, you can leave this page unchanged. Click OK to save the changes.
Updates can either be done one row at a time, or as a batch for all records in the cursor. The only issue is performance; if sending all changes at once will cause an unacceptable delay, send one each time a row changes. I've selected all fields and specified that CustomerID is the key field, as shown in Figure 6.5.
Add a grid, change the RecordSource to Customers, and use Ctrl+E to run the form. Change the ContactName from Jaime Yorres to Joe Smith and close the form. Run the form again to verify that your changes were indeed saved to SQL Server. You can also open the Query Analyzer, select the Northwind database, and enter the same SELECT command we used to populate the CursorAdapter. Sure enough, you just updated a SQL table without using any code.
Recall from Chapter 2 that we can write our own CommandBuilder to create an UPDATE command. The BuildUpdatecommand function shown in Listing 6.3 will build the command string, and SQLExec ( Handle, Cmd ) will execute it.
Example 6.3. The BuildUpdateCommand Function
FUNCTION BuildUpdateCommand
PARAMETERS pTable, pKeyField
Cmd = [UPDATE ]  + pTable + [ SET ]
FOR I = 1 TO FCOUNT()
    Fld = UPPER(FIELD(I))
    IF Fld = UPPER(pKeyField)
       LOOP
    ENDIF
    IF TYPE ( Fld ) = [G]
       LOOP
    ENDIF
    Dta = ALLTRIM(TRANSFORM ( &Fld ))
    IF Dta = [.NULL.]
       DO CASE
          CASE TYPE ( Fld ) $ [CMDT]
               Dta = []
          CASE TYPE ( Fld ) $ [INL]
               Dta = [0]
       ENDCASE
    ENDIF
    Dta = CHRTRAN ( Dta, CHR(39), CHR(146) )
* get rid of single quotes in the data
    Dta = IIF ( Dta = [/  /], [], Dta )
    Dta = IIF ( Dta = [.F.], [0], Dta )
    Dta = IIF ( Dta = [.T.], [1], Dta )
    Dlm = IIF ( TYPE ( Fld ) $ [CM],['],;
      IIF ( TYPE ( Fld ) $ [DT],['],;
      IIF ( TYPE ( Fld ) $ [IN],[],    [])))
    Cmd = Cmd + Fld + [=] + Dlm + Dta + Dlm + [, ]
ENDFOR
Dlm = IIF ( TYPE ( pKeyField ) = [C], ['], [] )
Cmd = LEFT ( Cmd, LEN(Cmd) -2 )            ;
    + [ WHERE ] + pKeyField + [=]         ;
    + + Dlm + TRANSFORM(EVALUATE(pKeyField)) + Dlm
RETURN Cmd
ENDFUNC
Which would you rather use?
If you want to manually code the CursorAdapter class, it's not difficult. Use the Properties sheet to see which properties were set by the builder:
Alias = [Customers]
DataSourceType = [ADO]
Name = [Customers]
Tables = [Customers]
Tag = [Driver={SQL Server};Server=VAIOVAIO;Database=Northwind;UID=sa;PWD=;]
Flags = 0
Three additional properties contain the notation See Init:
SelectCmd: See Init
UpdatableFieldList: See Init
UpdateNameList: See Init
The code written by the builder and placed in the Init of the DataEnvironment, shown in Listing 6.4, explains these three entries.
Example 6.4. The Init Code Generated by the Builder in Our Example
local llReturn
do case
    case not pemstatus(This, '__VFPSetup', 5)
        This.AddProperty('__VFPSetup', 0)
    case This.__VFPSetup = 2
        This.__VFPSetup = 0
        return
endcase
llReturn = dodefault()
*** Setup code: DO NOT REMOVE
***<SelectCmd>
text to This.SelectCmd noshow
SELECT                   ;
  Customers.CustomerID,  ;
  Customers.CompanyName, ;
  Customers.ContactName, ;
  Customers.Country,     ;
  Customers.Phone        ;
 FROM Customers          ;
 WHERE region='CA'
endtext
***</SelectCmd>
***<KeyFieldList>
text to This.KeyFieldList noshow
CUSTOMERID
endtext
***</KeyFieldList>
***<UpdateNameList>
text to This.UpdateNameList noshow
CUSTOMERID Customers.CUSTOMERID, COMPANYNAME Customers.COMPANYNAME, CONTACTNAME ;
Customers.CONTACTNAME, COUNTRY Customers.COUNTRY, PHONE Customers.PHONE
endtext
***</UpdateNameList>
***<UpdatableFieldList>
text to This.UpdatableFieldList noshow
CUSTOMERID, COMPANYNAME, CONTACTNAME, COUNTRY, PHONE
endtext
***</UpdatableFieldList>
*** End of Setup code: DO NOT REMOVE
*** Select connection code: DO NOT REMOVE
local loConnDataSource
set multilocks on
loConnDataSource = createobject('ADODB.Connection')
***<DataSource>
loConnDataSource.ConnectionString = ;
 [Driver={SQL Server};Server=VAIOVAIO;Database=Northwind;UID=sa;PWD=;]
***</DataSource>
loConnDataSource.Open()
This.DataSource = createobject('ADODB.RecordSet')
This.DataSource.CursorLocation   = 3  && adUseClient
This.DataSource.LockType = 3  && adLockOptimistic
This.DataSource.ActiveConnection = loConnDataSource
*** End of Select connection code: DO NOT REMOVE
if This.__VFPSetup = 1
    This.__VFPSetup = 2
endif
return llReturn
This looks a little complicated, but it's not bad when you understand what's happening. Note the enhancements to the TEXT TO <propertyname> command that allow you to populate properties on the fly.
If you use a cursor, you can use SELECT ( cursorname) and you're there. But a CursorAdapter is a class, not a cursor. So how do you find it?
The new GetCursorAdapter function is the answer. To find the CursorAdapter for a cursor and fill the cursor, you can use this:
oCA = GetCursorAdapter ( [Customers] )
oCA.CursorFill
There are a number of properties that you can set to determine how the CursorAdapter operates. As you look at them, you will be reminded of the settings for remote views in FoxPro 7. That's because the CursorAdapter is the replacement for remote views. Table 6.3 shows the most important CursorAdapter properties.
Table 6.3. CursorAdapter Properties
Table 6.5 shows the most important CursorAdapter methods.
Table 6.5. CursorAdapter Methods
FoxPro 7 had three functions (CursorToXML(), XMLToCursor(), and XMLUpdateGram()), which constituted collectively the entire toolkit for dealing with XML. The XMLAdapter class added in Visual FoxPro 8 greatly enhances FoxPro support for XML.
You can use the XMLAdapter to read XML and convert it to a FoxPro cursor. You can also use it to create XML strings. Using an object instantiated from an XMLAdapter, you can store one or more table objects and describe XML tables as cursors. The XMLADapter is based on MSXML 4.0 Service Pack 1 or later, which is installed in the “Install Prerequisites” phase of the installation of Visual FoxPro 8.
Using the XMLAdapter, you can
Read XDR, ADO recordset, and XSD schemas
Read XML and related schemas from an XML source using the
LOADXMLorATTACHmethodsBuild a
DiffGramor use one to update a table using theApplyDiffgrammethodAdd
XMLTableobjects to theXMLAdapter Tablescollection, using theLoadXML,Attach, orAddTableSchemamethods
You can use an XMLAdapter to read an XDR and convert it to an XSD. XDR is the proprietary XML schema developed by Microsoft and used internally. However, it's not used elsewhere, so you usually need to send XML with an XSD schema. The example in Listing 6.5 shows how to do this. In the example, the TEXT command is used to build the sample XDR. If you ever needed to do this, you would probably be reading it from a file sent by an application that was only able to create XDR output.
Example 6.5. Converting an XDR Schema to XSD Using an XMLAdapter Object
TEXT TO cXML NOSHOW
<xml xmlns:s='uuid:BDC6E3F0-6DA3-11d1-A2A3-00AA00C14882'
   xmlns:dt='uuid:C2F41010-65B3-11d1-A29F-00AA00C14882'
   xmlns:rs='urn:schemas-microsoft-com:rowset'
   xmlns:z='#RowsetSchema'>
<s:Schema id='RowsetSchema'>
   <s:ElementType name='row' content='eltOnly'>
  <s:AttributeType name='xmlfield' rs:number='1'
 rs:writeunknown='true' rs:nullable='true'>
   <s:datatype dt:type='number' rs:dbtype='currency' dt:maxLength='8'
  rs:scale='4' rs:precision='6' />
</s:AttributeType>
  <s:extends type='rs:rowbase'/>
   </s:ElementType>
</s:Schema>
<rs:data>
   <z:row xmlfield='12.12'/>
</rs:data>
</xml>
ENDTEXT

CLOSE DATABASES ALL
CLEAR
LOCAL oXMLAdapter as XMLAdapter
oXMLAdapter = NEWOBJECT('XMLAdapter')
oXMLadapter.LoadXML(cXML)
IF oXMLAdapter.Tables.Item(1).Fields.Item(1).DataType <> "Y" THEN
   ? 'Failed'
ELSE
   oXMLAdapter.Tables.Item(1).ToCursor()
   oXMLAdapter.XMLNamespace=""
   oXMLAdapter.ReleaseXML(.F.)
   oXMLAdapter.XMLSchemaLocation='c:myxmlfile.xsd'
   oXMLAdapter.ToXML('c:myxmlfile.xml',,.T.)
   oXMLadapter2 = NEWOBJECT('xmladapter')
   oXMLAdapter2.XMLSchemaLocation='c:myxmlfile.xsd'
   oXMLAdapter2.LoadXML('c:myxmlfile.xml',.T.,.T.)
ENDIF
The XMLAdapter contains a Tables collection, which uses an XMLTable object to create a cursor. Previously, we used an MSXML2.DOMDocument object to load an XML string, and then used the XMLToCursor() function to create a cursor (see the example in Chapter 5, “Adding Internet Access”). In Visual FoxPro 8, the corresponding code would be as shown in Listing 6.6.
FoxPro 7 had an XMLUpdateGram() function that got me really excited until I read the documentation. What it says is essentially: If you want to use this to update a table, write the function to do so yourself.
In its online documentation, Microsoft explains the difference between a diffgram and an updategram. In an MSDN article, Rich Rollman explains (and I'm paraphrasing here) that an updategram is an XML string that documents changes made to a SQL Query result. However, updategrams are not supported by ADO, SQL Server, SQLXML, or the XMLDOM. They can't call stored procedures, and there are no ADO or DOM methods that know how to process them. They're just data.
Diffgrams are what we thought updategrams were. The ADO.NET DataSet object knows how to apply them, as does XML 4. That's what the XMLAdapter implements.
Listing 6.7 demonstrates how to implement a diffgram. In this code, I simulate a client program that changes the data, and a server that receives the changes and applies them. (The code in the following three listings is actually part of a single program, called DiffgramDemo.PRG in the source code.)
Example 6.7. Client-Side Code to Return a Record and Edit It
LOCAL loXMLHTTP AS       [MSXML2.IXMLHTTPRequest]
loXMLHTTP = CREATEOBJECT ( [MSXML2.XMLHTTP.4.0] )
Cmd = [SELECT * FROM CLIENTS WHERE ClID = 1]
Cmd =  CHRTRAN ( Cmd, [ ], [+] )
loXMLHTTP.Open([GET], [http://localhost/Fox/GetClientRecord.asp?cmd=] + Cmd )
loXMLHTTP.Send()
XMLTOCURSOR (loXMLHTTP.ResponseBody)
CursorSetProp([Buffering],5)
BROWSE TITLE [Make changes and press Ctrl+W to save them]
This is where the user changes the data. I've used a browse, although a nice edit screen would accomplish the same goal. Pressing Ctrl+W ends the editing phase, and the program continues (see Listing 6.8).
Example 6.8. Client-Side Code to Generate a Diffgram and Return It to the Server
LOCAL oXML  AS XMLAdapter
oXML = CREA ( "XMLAdapter" )

oXML.AddTableSchema ( "Clientes" )
oXML.IsDiffGram  = .T.
oXML.UTF8Encoded = .T.
oXML.ToXML  ( "lcXML", "", .F., .T., .T. )
LOCAL loXMLHTTP AS       [MSXML2.IXMLHTTPRequest]
loXMLHTTP = CREATEOBJECT ( [MSXML2.XMLHTTP.4.0] )
loXMLHTTP.AddPostVar ( lcXML )
loXMLHTTP.Open([POST], [http://localhost/Fox/ActualizarRegistroCliente.asp] )
loXMLHTTP.Send()
At this point, we'll assume that the server has received the contents of the post buffer. You could use an XML Web Service written in FoxPro, or a WebConnection server. In either case, assume that you're now in the server code shown in Listing 6.9.
NOTE
I'm going to use MessageBox to display the data in this example. This is just for instructional purposes; you can't use MessageBox in a Web service.
Example 6.9. Server-Side Code to Receive and Process the Diffgram
oXML.LoadXML ( lcXML )
MESSAGEBOX( "Diffgram loaded", 48, "Received by Web Service" )

LOCAL oCA AS CursorAdapter
oCA = CREATEOBJECT ( [CursorAdapter] )

oCA.DataSource =   "Native"
oCA.CursorAttach ( "Clients" )

LOCAL oTable AS XMLTable
oTable = CREATEOBJECT ( [XMLTable] )
oTable = oXML.Tables.Item(1)
oField = oTable.Fields.Item(1)
oField.KeyField = .T.

oTable.ApplyDiffGram ( "Clients", oCA, .T. )
CLOSE TABLES
CLOSE DATABASE
That's all it takes to use diffgrams to update remote tables. This is undoubtedly easier than building an INSERT, DELETE, or UPDATE string at the client and sending it to the server. And notice that we're using FoxPro tables here, which means no royalties for accessing our data.
Of course, you can update a cursor here, then pass the changes on to SQL Server. I personally believe that the combination of a FoxPro middle tier and a SQL Server database is the best way to build Internet-enabled database applications. But if the cost of licensing by the seat is an issue, there are solutions for everyone. Don't tell Microsoft; it might reduce their enthusiasm for FoxPro.
Converting a FoxPro table to XML requires only four lines of code:
USE customers
loxml.addTableSchema("Customers")
loxml.ToXML("lcxml")
MESSAGEBOX(  lcxml )
You can build a Web service in FoxPro 8 in minutes. Create a project named WebProject in a directory called WebProject. Add a code file called WebClass, and enter the following code:
* WebClass.PRG
DEFINE CLASS WebClass AS Custom OLEPUBLIC

Function StateList AS String
SELECT * FROM D:WebProjectStates INTO CURSOR XStates
CURSORTOXML( "XStates", "lcXML" )
USE IN States
USE IN XStates
RETURN lcXML
ENDFUNC

ENDDEFINE
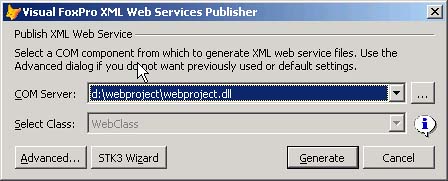
Compile it as a multithreaded DLL. Then, open the Task Pane and select Publish Your XML Web Service. Click on the button with the three little dots and select the DLL you just created. The dialog should look like Figure 6.6.
TIP
If you're recompiling after trying to use the service, the Internet Information Server will have it in use, and you'll get the message file access is denied (dllname); open a command window and type IISRESET to free it.
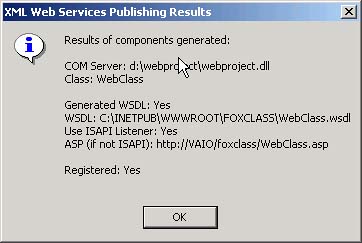
Click on the Advanced button and verify that the only checked methods are the ones you want to expose, and then click on the Generate button. You should see the message box shown in Figure 6.7.
If you instantiate the DLL directly, you can see the output. This code
oWS = CREATEOBJECT ( "WebProject.WebClass" )
? oWS.StateList
produces this output (I didn't list all of the states):
<?xml version = "1.0" encoding="Windows-1252" standalone="yes"?>
<VFPData>
    <xstates>
        <stateabbr>AL</stateabbr>
        <statename>Alabama</statename>
    </xstates>
    <xstates>
        <stateabbr>CA</stateabbr>
        <statename>California</statename>
    </xstates>
    <xstates>
        <stateabbr>DE</stateabbr>
        <statename>Delaware</statename>
    </xstates>
    <xstates>
</VFPData>
Using this code remotely is extraordinarily easy in Visual FoxPro 8. Open a form on another machine, put a grid on the form, and set the RecordSource to States. It doesn't exist yet, but it will. Open the Load event of the form. Now, open the Toolbox, and click on My Web Services. The WebClass service you just registered is there! Drag and drop it into the load event, and you'll only have to add the two shaded lines in the following code:
LOCAL loWebClass AS "XML Web Service"
* LOCAL loWebClass AS "MSSOAP.SoapClient30"
* Do not remove or alter following line.
* It is used to support IntelliSense for your XML Web service.
*_VFPWSDef:loWebClass=http://localhost/WebClass.wsdl,WebClass,WebClassSoapPort
LOCAL loException, lcErrorMsg, loWSHandler
TRY
    loWSHandler = NEWOBJECT("WSHandler",IIF(VERSION(2)=0,"",;
                          HOME()+"FFC")+"_ws3client.vcx")
    loWebClass = loWSHandler.SetupClient("http://localhost/WebClass.wsdl", ;
                        "WebClass", "WebClassSoapPort")
                Call your XML Web service here.
                       * ex: leResult = loWebClass.SomeMethod()
         lcXML = loWebClass.StateList           && ADD THIS LINE
         XMLToCursor ( locXML, "States" )      && ADD THIS LINE
CATCH TO loException
    lcErrorMsg="Error: "+TRANSFORM(loException.Errorno)+" - "+loException.Message
    DO CASE
    CASE VARTYPE(loWebClass)#"O"
        * Handle SOAP error connecting to web service
    CASE !EMPTY(loWebClass.FaultCode)
        * Handle SOAP error calling method
        lcErrorMsg=lcErrorMsg+CHR(13)+loWebClass.Detail
    OTHERWISE
        * Handle other error
    ENDCASE
    * Use for debugging purposes
    MESSAGEBOX(lcErrorMsg)
FINALLY
ENDTRY
Press Ctrl+E, and the form runs as advertised. You can use an XMLAdapter to move this data to a cursor, then save changes as a diffgram and send the diffgram back to another function in the Web service, which uses the code shown there to update the original data table.
For me, the ability to quickly and easily build FoxPro Web services is the biggest improvement in version 8.
In FoxPro, we saw how we could open a DBF and refer to its fields in the ControlSource property of controls on a form. This may be called a connected recordset.
In Visual Basic .NET, all recordsets are disconnected. You must create a cursor, bring the data into the cursor, and show it to the user. After any changes are made, you construct a command to send the data back to the source from whence it came. This is the case regardless of the data source. There are no discounts for local tables in Visual Basic .NET.
Visual Basic .NET uses datasets in the same way that we use cursors in FoxPro. You create a dataset, then call the Fill method of the associated DataAdapter to pour the data into the dataset. After any changes, you call a CommandBuilder object to create an UPDATE, INSERT, or DELETE command to be sent to the driver that actually updates the data source. It's the only way it works.
Connections are strings that tell the driver how to connect to a data source. Data sources can be OLEDB or ODBC, or they can be managed providers. Managed means “written in .NET,” and for this reason they are more efficient (faster) than their OLEDB counterparts. ODBC drivers are just dreadful and are usually used only if there's nothing else available. There's a pretty good third-party market in ODBC drivers, and if you must use a data source supported by ODBC, you should look into them. Microsoft gives away several ODBC drivers for free, and as you might expect, their price is a good indication of their value.
A connection string to the Northwind database on SQL Server accessed from FoxPro was shown earlier in Listing 6.4. It's the same for Visual Basic .NET:
Driver={SQL Server};Server=VAIOVAIO;Database=Northwind;UID=sa;PWD=;
However, you can also register a SQL Server database as an ODBC data source by running ODBCAD32.EXE from the command line or by clicking on the ODBC Data Sources icon in the Control Panel. The resulting dialog lets you select the driver, specify the database, and optionally provide a user ID and password. If the user ID and password aren't supplied in the connection definition, the user will have to specify them every time a connection is made. Experiment with this a few times and talk to whoever is paying for it before you decide how to proceed. It makes a difference.
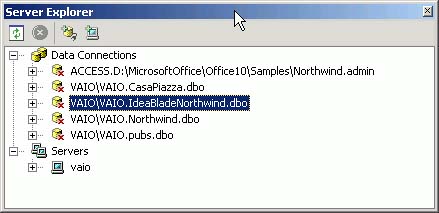
In the Visual Studio IDE, there is a Server Explorer. You can open it by selecting View, Server Explorer from the menu, or by pressing Ctrl+Alt+S, whether a project or solution is open or not. The Server Explorer is shown in Figure 6.8.
You can define connections in advance. Because a project will often deal with only two databases, the test version and the production version, this simplifies the process of switching between one and the other.
To create a new connection, right-click on Data Connections and select Add Connection. You'll see the Data Link Properties dialog. This is exactly the same dialog that is produced if you create an empty text file with the extension UDL, as we saw earlier.
Page 1 of the dialog is the Provider page. There are about 20 that have been installed on my laptop by various product installations that I've done. If you buy and install drivers from third parties, there will be a few more. Notice that there is a Microsoft OLE DB Visual FoxPro driver, so if you wondered whether Visual Basic .NET will support your FoxPro tables, now you know. Note that the FoxPro driver option supports either a DBC or a Free Tables Directory. Experiment with both and verify that your choice does what you want it to do.
If you select a provider that has password protection, you'll be asked to supply a password. For most applications, a single user ID and password combination for all users is perfectly adequate. You can go to the Enterprise Manager in the Start, Programs, SQL Server drop-down menu to add a user.
You can also add categories of users and give different rights to each, although the granularity of SQL Server database access may not be adequate for your requirements if you want to control access down to the pageframe or field level. However, if your purpose is to keep users from updating records that they're only supposed to read, producing an error message when they click Save is a pretty blunt instrument compared to simply disabling the Edit button to begin with if they don't have editing rights. Users appreciate subtlety.
Notice on the third page of the Data Link Properties dialog that you can limit access to read-only, read-write, read-write share, read-write exclusive, or write-only. Again, these are probably more than you need in most cases. The default Share Deny None is probably just what you need. It supports optimistic buffering, which means that you're responsible for ensuring that one user's changes don't overwrite another's.
After you save a connection, you can drag and drop it onto a form, and it will be used to connect to the data source. It's used either directly by a command object or by a data adapter.
A DataAdapter is a mechanism that opens a connection and executes a SQL SELECT statement. It also automatically creates UPDATE, INSERT, and DELETE statements if a unique key is specified in the SELECT statement. That's why it's so terribly important in the SQL world to have a single unique key. Many FoxPro developers have developed the nasty habit of using compound keys, for example, InvoiceNum + LineNum for a detail record of an invoice. That's a spectacularly bad idea even in FoxPro; in SQL Server, it's unthinkable. So before you try to use a DataAdapter to connect to your data, add a unique integer key or a GUID to each of your data tables. I'll wait right here.
Good, you're back. Let's continue.
Create a connection to the Customers table. If you didn't download the code, just copy the Customers table that comes with the FoxPro Northwind samples to a directory where you can play with the data without doing any permanent damage. Be sure to use COPY TO Customers WITH CDX because without an index, the DataAdapter doesn't have a clue, as you'll see. Create a connection to the directory as a Free Table directory in the Solution Explorer.
Next, open the Visual Basic .NET IDE and select File, New Project from the menu. Choose Visual Basic, Windows Application. Make sure that the project is going where you want it to go, and note that the project name is also the name of a new directory that Visual Studio is going to create for you. Visual Studio will create a project with five standard .NET namespace references needed to build a forms project: System, System.Data, System.Drawing, System.Windows.Forms, and System.XML. Remember that last one. It's there because forms need data, and XML spells data in .NET. It also adds an AssemblyInfo.vb file (like a project information file) and Form1.vb.
That first form is usually your Main form, which will contain your logo and your application's main menu. However, you can also build an application consisting of just a single form, and that's what we'll do here. Use F4 to open the Properties window and change the Text property to "My customers".
Next, open the Solution Explorer and add the connection you just created by dragging and dropping it on the form. Visual Basic .NET will ask you if you want to add a user ID and password. For now, ignore it.
Next, open the Toolbox with Ctrl+Alt+X and add an OleDBDataAdapter from the Data toolbox category. The resulting wizard asks what connection to use, and defaults to the one we had added previously Next, the wizard needs to know from which fields, and from which tables you want to generate data (see Figure 6.9).
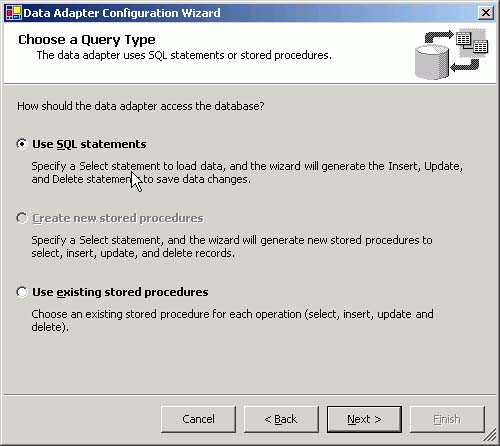
The wizard will offer to use SQL statements, create new stored procedures, or use existing stored procedures. You'd be surprised how many shops don't build the screens until some database guy has approved the SELECT, INSERT, UPDATE, and DELETE code and written procedures for them in advance. Select Use SQL Statements and click the Next button.
RANT
<rant>The advantage in stored procedures is that after you've built them, migrating to another vendor's SQL is harder. Uh, sorry, that's the advantage for the vendor. The advantage for us is—uh, sorry, there isn't any.</rant>
In Figure 6.10, the DataAdapter Configuration Wizard is looking for a SELECT statement that returns the records you want.
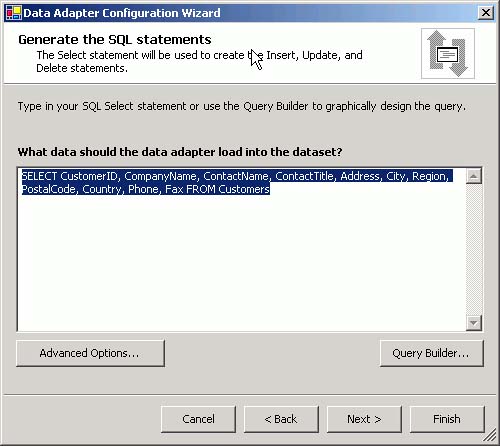
If you want all customers from California, type this:
SELECT * FROM Customers WHERE Region = 'CA'
SQL can use the SELECT statement and the unique index values to generate the code for the INSERT, UPDATE, and DELETE commands. However, if you only want a SELECT statement, click on the Advanced Options button and uncheck the Generate Insert, Update and Delete Statements check box. Also, if you don't want the code-generated SQL statement to verify that no fields have been changed since the SELECT, uncheck the Use Optimistic Concurrency check box. It improves performance, and in many cases it's not necessary. You be the judge of the probability that two people will try to change the same record on two workstations at the same exact instant. It's usually infinitesimal.
If you want to add a parameter to a query, write the SELECT statement as follows:
SELECT * FROM Customers WHERE (CustomerID=?)
This will cause the IDE to build a parameterized query. To execute it, you'll need to supply a value for the parameter in code before executing the Fill command:
OledbDataAdapter1.SelectCommand.Parameters(0).Value = 1
If this looks a lot like a local view in FoxPro, it should. When you open a view in FoxPro, you're executing a SELECT command. When you close the view, the view itself uses the SELECT command and the unique index key to build and execute INSERT, UPDATE, and DELETE commands as needed to update the source table. That's exactly how the DataAdapter works. You just get to see all of the details.
Right-click on the DataAdapter and select Generate Dataset. Select New, and provide the name dsCustomers. This builds an XSD file describing the schema and a .vb file containing property procedures for all fields. We'll look at this in more detail a few pages ahead, under the heading “Datasets.” For now, we'll just build one and use it.
Finally, add a grid to the form. Open the Toolbox using Ctrl+Alt+X, click on the Windows Forms controls section heading, and drag a DataGrid to the form. Open the Properties sheet, click on DataSource, and from the pull-down list select dsCustomers1.Customers. You can also use the Properties window to specify the dataset name dsCustomers1 as the DataSource, and the table name Customers as the DataMember, for the data grid.
This is necessary because a dataset can contain several tables, and we just want one for the grid. (If you like, select dsCustomers1 and you'll see a little plus sign, which you have to expand manually to pick the table and display the table in the grid. Grids know how to work with datasets, even if they have multiple tables or hierarchical datasets.)
But we're not done. We have to write some code—one line of code. Double-click anywhere on the form except the grid, and the code window will open with a first and last line of a Form_Load event wired to the Load event of the form via a Handles clause. Type in the following line of code:
Me.OleDbDataAdapter1.Fill(DsCustomers1)
You don't need the “Me.”, but it brings up IntelliSense and saves you some typing. Use the Tab key to select the current suggestion and move to the end of the selected text; or, use a period to do the same thing and add a period at the end. The Fill command of the DataAdapter was built when we constructed the SELECT command, and the dsCustomers1 dataset was constructed from the DataAdapter's SELECT command, so they're guaranteed to be conformable.
Press F5 to run the application. That's one line of code. In FoxPro, it also takes one line of code—a USE statement in the LOAD event of the form. So far, it's a close race.
NOTE
I've had a few problems with the FoxPro OLE DB driver in Visual Basic .NET. During the writing of this chapter, the DataAdapter Configuration Wizard began inserting double quotes around my table name, so that not even the SELECT command would work. And many times it failed to generate UPDATE and DELETE commands for unspecified reasons. I had no such problem with the SQL Server or Access drivers.
You've probably already done this, but open up the code for the form. You'll see a little box that contains the text
Windows Form Designer Generated Code
Click on the plus sign to the left of it, and scroll through the code. You'll see a block of code declaring a series of objects named SQLDataAdapter1, SQLSelectCommand1, SQLInsertCommand1, SQLUpdateCommand1, SQLDeleteCommand1, and SQLConnection1. Each of these is defined in the generated code, including the command that SQL Server will need to do its magic. Each field is generated as a parameter, which is filled in when the function is called. Listing 6.10 is an example. The generated code produces long lines, so they look pretty bad on the screen and on the page. Thankfully, we seldom look at this code.
Example 6.10. Generated SQLUpdateCommand Code
Me.SqlUpdateCommand1.CommandText = "UPDATE Customers SET CustomerID = @Customer
ID, CompanyName = @CompanyName, Contac" & _
"tName = @ContactName, ContactTitle = @ContactTitle, Address = @Address, City =
 @" & _
"City, Region = @Region, PostalCode = @PostalCode, Country = @Country, Phone =
@P" & _
"hone, Fax = @Fax WHERE (CustomerID = @Original_CustomerID) AND (Address = @Ori
gi" & _
"nal_Address OR @Original_Address IS NULL AND Address IS NULL) AND (City = @Ori
gi" & _
"nal_City OR @Original_City IS NULL AND City IS NULL) AND (CompanyName = @Origin
a" & _
"l_CompanyName) AND (ContactName = @Original_ContactName OR @Original_ContactNa
me" & _
" IS NULL AND ContactName IS NULL) AND (ContactTitle = @Original_ContactTitle O
R " & _
"@Original_ContactTitle IS NULL AND ContactTitle IS NULL) AND (Country = @Origi
na" & _
"l_Country OR @Original_Country IS NULL AND Country IS NULL) AND (Fax = @Origin
al" & _
"_Fax OR @Original_Fax IS NULL AND Fax IS NULL) AND (Phone = @Original_Phone OR
 @" & _
"Original_Phone IS NULL AND Phone IS NULL) AND (PostalCode = @Original_PostalCo
de" & _
" OR @Original_PostalCode IS NULL AND PostalCode IS NULL) AND (Region = @Origin
al" & _
"_Region OR @Original_Region IS NULL AND Region IS NULL); SELECT CustomerID, Co
mp" & _
"anyName, ContactName, ContactTitle, Address, City, Region, PostalCode, Country
, " & _
"Phone, Fax FROM Customers WHERE (CustomerID = @CustomerID)"
That's one line of code. I really didn't need to see this. In Visual FoxPro, we're blissfully unaware of what's needed to make things happen; Visual Basic .NET shows you everything.
There's also a DSCustomers1 object based on DSCustomers. What is DSCustomers? It's a generated typed dataset, located in another generated code file, as you'll see shortly.
A dataset is a cursor. Want to see how it works? Open a new Visual Basic blank project, and then open the Solution Explorer using Ctrl+Alt+L, right-click on the project name, and select Add New Item. Select Dataset from the available selections (others include XML file and XML Schema and others). When the designer opens, use Ctrl+Alt+S to open the Server Explorer, and then pick any connection, expand it to reveal its tables, expand Tables, and drag any table name to the designer surface. You can view the result either as XML or as a table.
To build a dataset, click on the Data tab in the Toolbox and drag an OLEDBDataAdapter (or a SQLDataAdapter) to a form surface. There are small differences, but essentially the SQLDataAdapter works only with SQL Server, whereas the OLEDBDataAdapter works with SQL Server plus many other data sources that have OLEDB drivers. The SQLDataAdapter has less overhead, and is therefore faster and more efficient.
The DataAdapter Configuration wizard asks you to supply a SQL SELECT statement to determine where to get the data. After it's configured, you can use it to add a dataset to your project. This named dataset will be used as a cursor. The DataAdapter will fill it with data using the Fill method and present it to your form; later, when you save data, the changed rows can be sent back through the DataAdapter to the data source to update it.
When the DataAdapter has been configured, right-click on it and select Generate Dataset from the context menu. Change the dataset name to the prefix “ds” plus the name of the table and click OK. The resulting wizard will ask you for a SELECT statement, and will build the container in which the data will be stored in an XML format with the extension .xsd. XSD means “I'm a dataset.” It's an empty cursor. Actually, because a dataset can hold multiple tables, it's more like “one or more cursors.” But we'll keep it simple for now.
XML is not a dataset, and a dataset is not a schema. And even though a dataset can start with a schema, the first half-dozen lines of a dataset and an XML schema file created from the same SQL table are quite different. And XML is generic, while a dataset is a particular structure in XML.
Here's how it works: XML is a technology for storing things. A dataset is one or more tables stored in XML format, with (optionally) one or more schemas. A schema describes a data table in an XML file, either inline or in a separate XML file. A dataset can contain multiple schemas and multiple tables. I hope that proves easy to remember. Each piece of the puzzle has its purpose.
Typed datasets in Visual Basic .NET are defined by
An XML schema that describes the tables, columns, keys, and relationships in the dataset
A class file (written as a Visual Basic class) that inherits from
System.Data.DataSetand implements properties and methods that provide access to a dataset with the specified schema
Use Ctrl+Alt+L to open the Solution Explorer, and then click on the Show All Files icon at the top of the window. Notice that the dataset you just created has a plus sign, indicating that there's more below it. Click on the plus sign to expand the tree, and you'll see a file with the same name and a .vb extension. Double-click on it to open the file. It's a Visual Basic class that describes the tables in the dataset.
Use the View, Class View menu option to open the Class View window. Select the DsCustomers.vb class that was generated automatically by the Generate Dataset Wizard from the DataAdapter object, and you're in for a shock. There are dozens and dozens of properties, events, and methods in the generated code.
Most of them are prototypes; that is, you can add code wherever you want to. For example, for each field there's a SetFaxNull subroutine. The Customers table has a Fax column. In the database, Nulls are permitted in this column. VB hates nulls. In fact, it will crash if you return one. So, the typed dataset has provided a routine where you can write code to specify what you want to return as a value if you add a record and don't specify a value for the Fax column. The generated routine inserts DBNull, but you might want to insert “N/A”. The SetFaxNull subroutine is where you would do so.
Go a little further and you begin to see how this works. The IDE has generated a class definition called a CustomersDataTable, which inherits from the .NET DataTable class. That means that it comes with all of the properties, events, and methods of the DataTable class, which you probably should learn about. The declaration is followed by a declaration of a private variable called column&ColumnName (to use FoxPro syntax—columnFax would be created for the Fax column in the table, for example) as DataColumn for each of the columns in your original data table. These are called fields, and for the first time, the name makes sense in this context.
A property procedure called Count is added, which returns the value of Me.Rows.Count. Then follow a raft of property procedures named &Field.Column (again using FoxPro syntax—an example would be FaxColumn), which is supplied by returning the value stored in Classname.ColumnFax, the class's corresponding field name. Visual Basic .NET creates one field (that is, one local variable) for each column, then uses these fields to store the values that are actually available to the user as properties via property procedures named with the word “Column” as a suffix for the property procedures. Confused yet?
It gets more complicated. The last declaration in this class definition is tableCustomers, which is actually an object derived from CustomersDataTable. What is returned is the tableCustomers object, not the CustomersDataTable object. When you refer to dsCustomers, you're actually referring to an object based on the tableCustomers object, which is in turn based on the CustomersDataTable class, which is based on the DataTable class.
When I drive to the store to buy a loaf of bread, I'm exploding gasoline thousands of times per minute. I know this is true, and in fact it would be pretty dramatic to be down inside the engine watching all of it happen. But I just want a loaf of bread, and I don't care about the exploding gasoline.
I feel exactly, precisely the same way about all of this stuff. The less I know about it, the better. All you need to know is that if you create a dataset, you can bind the Text property of your onscreen controls to Dataset.FieldName and it will work.
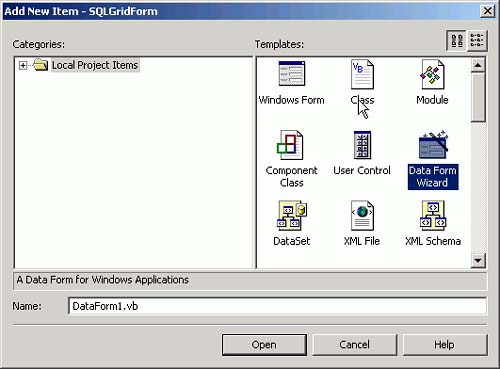
When you right-click on the Windows form project and select Add, Add New Item, one of the options is Data Form Wizard, as shown in Figure 6.11.
When you select Data Form Wizard, the screen shown in Figure 6.12 appears. Click on the Next button to proceed.

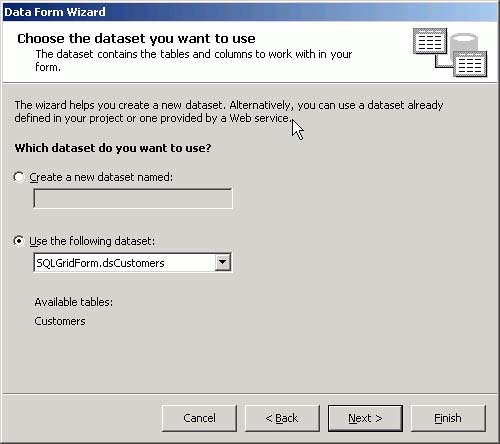
If I've already created a typed dataset, I can use it in the form that the Data Form Wizard is building, as shown in Figure 6.13. Typed datasets belong to the project, not to a form, and can be shared by several forms.
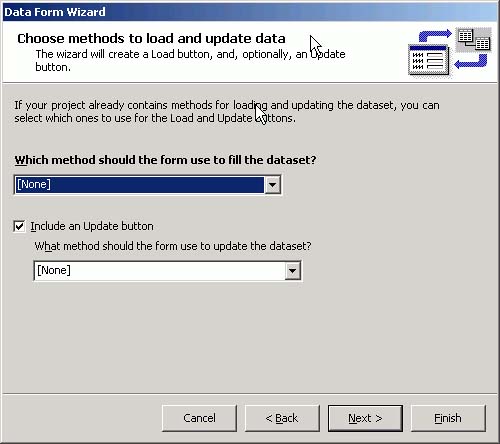
The wizard will include a Load and (optionally) an Update button if you check the check box (see Figure 6.14, about halfway down the dialog form).
Finally, the customer table and all of its fields are selected by default. Click the Next button to go to the next step (see Figure 6.15).

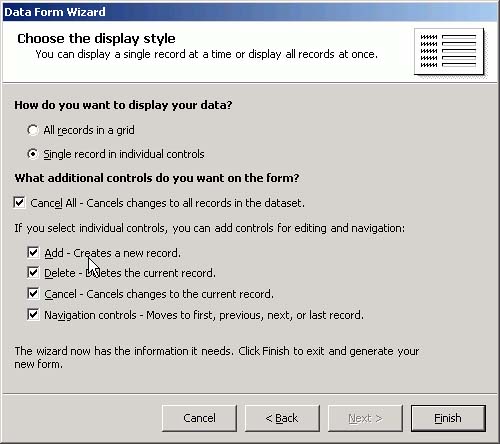
The next screen (see Figure 6.16) is the one that I was waiting for. Do I want to present data to my users as a grid (no) or as a record (yes). I don't even know why they offer the first option, although I suppose it's easy to code. But editing records in a grid is almost never a desirable technique. So, pick Single Record in Individual Controls and click Finish. In about three seconds, you've got screen! Forms like the one shown in Figure 6.16 are where I spend most of my day, and this one was written for me in a few seconds. All I have to do is go in and tweak it.
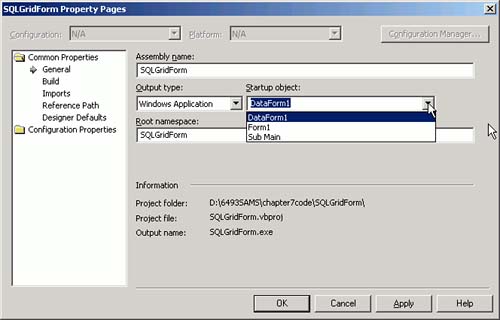
Before we can run this, there's one thing we have to do. I started this project with another form, then added this one. When you press F5 to compile and run a project, you have to tell the project which is the startup form—like FoxPro's SET MAIN selection on the Project menu popup. To do this, click on the solution, then on the project, to make sure it's selected. Next, right-click on the project and select Properties from the context menu. You should see the screen shown in Figure 6.17. Pick the form that you want to use as the startup for the executable.
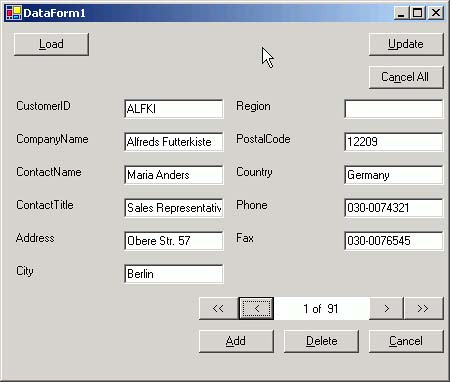
Press F5 to run the application. As shown in Figure 6.18, you can indeed move from one record to another, make changes and save them, and add and delete records.
However, when I click the Load button, nothing happens! It turns out that because I told the wizard to use my existing dataset, it left me with the responsibility of loading the dataset. No big deal, right?
The code for this generated screen is 360 lines long. It returns all of the records in the table from SQL, then uses the VB equivalent of SKIP to move backward and forward through the tables. It also assumes that my users can just start typing in any field whenever they want, and that they'll know that they need to “update” before they can go to another record—their wrist will be slapped with an error message if they don't. So it has little to commend it as a database application. But it works, and it only took a few seconds.
Here's the code generated by the Data Form Wizard:
Private Sub btnCancel_Click( _
 ByVal sender As System.Object, ByVal e As System.EventArgs) _
 Handles btnCancel.Click
  Me.BindingContext(objdsCustomers, "Customers").CancelCurrentEdit()
  Me.objdsCustomers_PositionChanged()
End Sub

Private Sub btnDelete_Click( _
 ByVal sender As System.Object, ByVal e As System.EventArgs) _
  Handles btnDelete.Click

  If (Me.BindingContext(objdsCustomers, "Customers").Count > 0) Then
    Me.BindingContext(objdsCustomers, "Customers").RemoveAt( _
    Me.BindingContext(objdsCustomers, "Customers").Position)
    Me.objdsCustomers_PositionChanged()
  End If
End Sub

Private Sub btnAdd_Click( _
 ByVal sender As System.Object, ByVal e As System.EventArgs) _
 Handles btnAdd.Click
Try
'Clear out the current edits
  Me.BindingContext(objdsCustomers, "Customers").EndCurrentEdit()
  Me.BindingContext(objdsCustomers, "Customers").AddNew()
  Catch eEndEdit As System.Exception
   System.Windows.Forms.MessageBox.Show(eEndEdit.Message)
   End Try
  Me.objdsCustomers_PositionChanged()
End Sub

Private Sub btnNavFirst_Click( _
 ByVal sender As System.Object, ByVal e As System.EventArgs) _
 Handles btnNavFirst.Click
  Me.BindingContext(objdsCustomers, "Customers").Position = 0
  Me.objdsCustomers_PositionChanged()
End Sub

Private Sub btnLast_Click( +
 ByVal sender As System.Object, ByVal e As System.EventArgs) _
 Handles btnLast.Click
  Me.BindingContext(objdsCustomers, "Customers").Position = _
 (Me.objdsCustomers.Tables("Customers").Rows.Count - 1)
  Me.objdsCustomers_PositionChanged()
End Sub

Private Sub btnNavPrev_Click( +
 ByVal sender As System.Object, ByVal e As System.EventArgs) _
 Handles btnNavPrev.Click

  Me.BindingContext(objdsCustomers, "Customers").Position = _
 (Me.BindingContext(objdsCustomers, "Customers").Position - 1)
  Me.objdsCustomers_PositionChanged()
End Sub

Private Sub btnNavNext_Click( _
 ByVal sender As System.Object, ByVal e As System.EventArgs) _
 Handles btnNavNext.Click
  Me.BindingContext(objdsCustomers, "Customers").Position = _
 (Me.BindingContext(objdsCustomers, "Customers").Position + 1)
  Me.objdsCustomers_PositionChanged()
End Sub

Private Sub objdsCustomers_PositionChanged()
  Me.lblNavLocation.Text = (((Me.BindingContext(objdsCustomers,
  "Customers").Position + 1).ToString _
  + " of  ") + Me.BindingContext(objdsCustomers, "Customers").Count.ToString)
End Sub

Private Sub btnCancelAll_Click( _
 ByVal sender As System.Object, ByVal e As System.EventArgs) _
 Handles btnCancelAll.Click
  Me.objdsCustomers.RejectChanges()
End Sub
This is interesting code. There's something called a BindingContext that apparently belongs to the form (I didn't instantiate it, so it must be a part of Windows.Forms.Form). BindingContext takes two parameters, a dataset and a tablename, and contains a count property (like RECCOUNT()) and a position (like RECNO()). To skip to the next record, all you have to type is
 Me.BindingContext(objdsCustomers, "Customers").Position = _
(Me.BindingContext(objdsCustomers, "Customers").Position + 1)
That's the equivalent of FoxPro's
SKIP
It looks as if the BindingContext is also responsible for deleting records. Here's the command:
Me.BindingContext(objdsCustomers, "Customers").RemoveAt( _
Me.BindingContext(objdsCustomers, "Customers").Position)
and here's the FoxPro equivalent:
DELETE
How about adding? I found it. It's this:
Me.BindingContext(objdsCustomers, "Customers").AddNew()
That's not much harder than FoxPro's equivalent:
APPEND BLANK
I'm starting to like Visual Basic .NET. But I still like FoxPro better.
But it still isn't loading my table from SQL into my dataset. And it needs to be a table named Customers, because datasets can have multiple tables, and by default the first one is named Table. It took me about 30 seconds to write the following code:
Private Sub btnLoad_Click( _
 ByVal sender As System.Object, ByVal e As System.EventArgs) _
 Handles btnLoad.Click
  Dim c As New SqlClient.SqlConnection
  c.ConnectionString = "Server=VAIOVAIO;Database=Northwind;UID=sa;PWD=;"
  c.Open()
  Dim da As New SqlClient.SqlDataAdapter("SELECT * FROM CUSTOMERS", c)
  da.Fill(Me.objdsCustomers, "Customers")
End Sub
Retrieving a dataset requires opening a connection, then defining a DataAdapter and giving it a SELECT command, and then finally calling the DataAdapter's Fill method to fill the dataset and providing the correct name for the table contained in the dataset. It's harder than opening a DBF, but it's easier than creating a cursor in a FoxPro form and dumping a SQL cursor into it. The dataset was declared up at the top of the form, so it has scope throughout the form. The connection and DataAdapter do their job and fade away.
I ran the form, and it worked just fine, except that I don't want to load the entire table from SQL or across the Internet into a table in my form. But this will do for now.
In FoxPro, if you open the Data Environment, click on a cursor name, and drag the word Fields onto the surface of the form, you get all of the fields in the table, using your classes, with a label to the left of them with a name for the field to the right of the label. The controls that are used are your own subclassed controls from your own VCX file, based on your settings on the Field Mappings page of the Tools, Options dialog. The labels are the text stored in the corresponding records in the database container, if you used one. The ControlSource property of each control is automatically filled in, and when you open the form and navigate through your data, a simple THISFORM.Refresh shows you that the record pointer has moved.
In Visual Basic .NET, if you create a dataset from a DataAdapter, then drag the dataset onto the form, you get bupkis—nothing. No controls are placed on the form.
Open up the form generated by the Data Form Wizard, right-click on any of the text boxes, and look at the DataBindings property. You'll have to click on the plus sign to expand the property and see its Text property.
TIP
Just to clarify, the Text property is the equivalent of the Value property of a text box, combo box or check box, or the caption property of a label.
I've opened the drop-down for the Text property so that you can see how it has been populated, as shown in Figure 6.19.
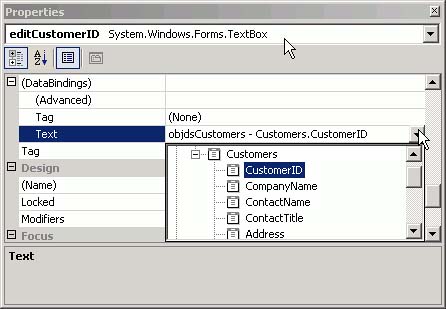
Now you know that you can define a dataset, then drop controls on the form and fill in the Text DataBindings property with individual fields from the dataset, and it will work.
However, if you open up the code, you'll find this:
Me.editCustomerID.DataBindings.Add(New System.Windows.Forms.Binding("Text", _
Me.objdsCustomers, "Customers.CustomerID"))
It seems that data binding is actually the result of a command that we can write ourselves. The syntax in pseudocode is this:
Control.DataBindings.Add ( Binding("Text", ds, "table.field"))
where ds is our dataset, Control is an object reference to each control on the form, and "table.field" is a string containing the table and field names as part of a typed dataset. It's possible to refer to them in some other way, but this is the easiest.
That's one of the reasons why we'll want to use typed datasets. If I can loop through all of the controls on the form and bind them to my dataset using names from a typed dataset, I don't have to go through dozens of controls on dozens of forms clicking and selecting the field name for each one. This is a good thing.
Typed datasets are the tip of the iceberg. At a minimum, a typed dataset contains one property procedure for each column in the corresponding schema, so that, for example, an expression like Customers.Name is meaningful. Otherwise, unlike FoxPro, it has no intrinsic meaning in Visual Studio 1.1.
Many developers have taken the notion of typed datasets far, far further. By adding events that other objects can respond to, it's possible (for example) to detect when data changes, look for “save” and “cancel” command buttons on the form and enable them, without writing any screen-specific code. The DataSet object itself does this. And many very sophisticated extensions are possible. IdeaBlade from ObjectWare, for example, can save data either back to the server, or to a local XML cache for subsequent synchronization with the server whenever a connection can be established. This is done using methods built into a generated DataSet object. There's no limit to what they can be designed to do except our imaginations.
Datasets contain a tables collection. When you return a dataset, if you want to show it in a grid, you have to specify both the DataSource (the dataset) and DataMember (the table). Otherwise, it shows you a little plus sign, which is your cue that you have to drill down and specify which table in the dataset—even though you and I know there's only one. Computers aren't really all that bright.
Technically, you can do this:
Dim oTable as DataTable
For each oTable in MyDataset.Tables
    Debug.WriteLine oTable.TableName
End For
Of course, the Table object itself has properties, events, and methods. Some of them will be useful. So expect to see code like this:
Dim oTable As New DataTable = MyDataSet.Tables(0)
followed by calls to methods on the oTable object. If you ever get used to referring to table number zero as the first table, you've outdone me. It just creeps me out.
By the same token, tables have rows. So we can also write this:
For Each oTable In objdsCustomers.Tables
    Dim oRow As DataRow
    For Each oRow In oTable.Rows
        Dim I As Integer
        For I = 0 To oRow.ItemArray.Length - 1
            Debug.WriteLine(oRow.ItemArray(I))
        Next
        Debug.WriteLine(oTable.TableName)
    Next
Next
Row objects give you access to their columns via overloading. You can assign a value to the first column in a row, a column named CustomerID, using either the column name or its number (starting with zero, of course):
Row("CustomerID") = 1234
or
Row(0) = 1234
Each row contains a columns collection. The following code prints all of the rows in a table:
Private Sub PrintValues(ByVal myTable As DataTable)
    Dim myRow As DataRow
    Dim myColumn As DataColumn
    For Each myRow in myTable.Rows
       For Each myColumn In myTable.Columns
          Console.WriteLine(myRow(myColumn))
       Next
    Next
 End Sub
XML Web services in .NET are as easy as they are in Visual FoxPro 8, and a heck of a lot easier than they are in earlier versions of Fox. Create a new project, and pick ASP.NET Web Services from the Visual Basic New Project dialog, as shown in Figure 6.20.

Notice that the location of the project is http://localhost/Chapter6WebService. That means that the location is actually C:InetPubWWWRootChapter6WebService. IIS is only allowed to see virtual directories that have been expressly added. The only exception is that it can also see any subdirectory under the C:InetPubWWWRootdirectory that's not hidden from it. So by placing Web service projects there, Visual Studio .NET publishes them in the most logical place. And, because I've probably created 300 Web service projects on my computer since the early beta of .NET, I really appreciate anything that makes them easier to find. Then there's that whole “senior moment” thing.
I also changed both the external filename of Service1.asmx and the internal class name of the service to MyWebService. Changing the filename is easy; just right-click on Service1.asmx in the Solution Explorer, select Rename, and then type the new name. Then select the Web service design surface, then right-click and select Properties, and change the Service1 name to MyWebService as shown in Figure 6.21.
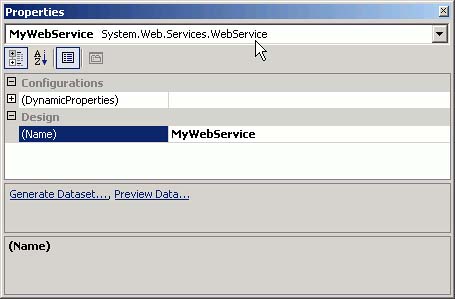
To write the code, double-click on the design surface, or select View, Code from the IDE menu. You'll see some commented code (probably lime green text) with placeholder code that looks like this:
'<WebMethod()> _
'Public Function HelloWorld() As String
'   Return "Hello World"
'End Function
The <WebMethod()> attribute prefix exposes your new Web service for testing on a Web page test bed that's automatically generated by Visual Studio. We'll need that, but everything else has got to go.
But first, we need a connection and a DataAdapter. Open the toolbox and drag a SQLDataAdapter to the design surface. As before, select the Northwind connection, pick the Customers table with a SELECT * FROM Customers statement, and click Finish to end the process.
Next, right-click on the DataAdapter and select Generate Dataset. Use dsCustomers as the name.
dsCustomers is a typed dataset. It's a type, as are integers and dates. Functions return types. So we'll return an XML string of type dsCustomers.
Now we're ready. Double-click on the form to open the code window. Replace the entire sample function with this:
<WebMethod> Public Function GetCustomers() As dsCustomers
   Dim Customers As New dsCustomers()
   SqlDataAdapter1.Fill(Customers)
   Return Customers
End Function
So we instantiate a dsCustomers object named Customers, use the built-in SELECT statement in the DataAdapter to fill the Customers dataset (which, as we know, is XML), and return the selected records in an XML string to the requestor.
Press F5 to run this, and the screen shown in Figure 6.22 appears.
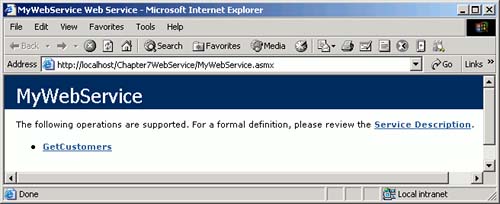
Visual Studio has created a test bed to test our Web service. This test bed page will list all of your Web service's functions, and will allow you to test any of them that have parameters that are primitive types and can, therefore, be entered on a Web page for use in testing. Thus any calls that require a dataset as input (such as an update routine) will be listed, but not testable.
Our new function GetCustomers is testable, so click on it. This brings up the next screen, shown in Figure 6.23. This screen appears in case we have parameters to enter. There aren't any in this case, so just click on the Invoke button, and you'll see the results in a browser window shown in Figure 6.24. I scrolled down to a customer in Venezuela, which is where I am at this instant, in a restaurant in Caracas, having cake and eating it too (I've never understood that statement…).

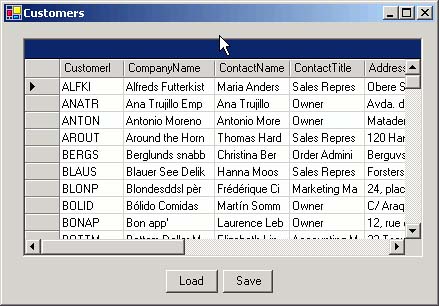
Open the Web service code again and add the following code:
<WebMethod> Public Function UpdateCustomers( _
  ByVal CustChanges As dsCustomers) _
  As dsCustomers
   If Not (CustChanges Is Nothing) Then
      SqlDataAdapter1.Update(CustChanges)
      Return CustChanges
   Else
      Return Nothing
   End If
End Function
This function expects a diffgram, which it will call custChanges. It will use the SQLDataAdapter method Update to apply the diffgram to the source table that the DataAdapter is charged with updating, then return the diffgram to the caller. If there are no changes, it returns nothing. The reason for this is that if the Update method isn't able to process some of the records in the diffgram, it sends the ones it couldn't apply back to the source, presumably to try again later.
We'll need a Windows form application to test this Web service, so add a Windows Form project to the solution. Call it WinClientCustomers. On the form, add a DataGrid and two buttons named LoadData and SaveData.
To use this Web service, you need one method in your client form to get the records, and a command button to extract any changed records from the dataset and send them back. You'll need a dataset and a data source. But in this case, it's coming from a Web service. We need to write code that goes to the Internet for the data. And that's exactly where we go for the data connection as well.
Right-click on the project and select Add Web Reference from the context menu. You'll see the screen shown in Figure 6.23.
Click on the Web Services on Local Machine link. Pick your new Web service from the resulting list. A Web References item will be added to the WinClientCustomer project, right under References.
Next we need to add a dataset. What about the connection and DataAdapter components? We don't need them. Add a dataset from the Data tab of the Toolbox, and a dialog will appear asking if you want to use the Typed Dataset with the Web Reference shown in the combo box. Click OK to accept it.
Listing 6.11 has the code for the Load event of the form:
Example 6.11. Client Form Code to Load Data from a Web Service
Private Sub LoadData_Click(ByVal sender As System.Object, _
    ByVal e As System.EventArgs) Handles LoadData.Click
    Dim ws As New WinClientCustomers.localhost.MyWebService
    ws.Credentials = System.Net.CredentialCache.DefaultCredentials
    DsCustomers1.Merge(ws.GetCustomers())
End Sub
Listing 6.12 contains the code needed to save changes to the dataset.
Example 6.12. Client Form Code to Save Changes to a Web Service
Private Sub SaveData_Click(ByVal sender As System.Object, _
    ByVal e As System.EventArgs) Handles SaveData.Click
    If DsCustomers1.HasChanges() Then
       Dim ws As New WinClientCustomers.localhost.MyWebService
       Ws.Credentials = System.Net.CredentialCache.DefaultCredentials
       Dim diffCustomers As New WinClientCustomers.localhost.dsCustomers
       diffCustomers.Merge(DsCustomers1.GetChanges())
       diffCustomers = ws.UpdateCustomers(diffCustomers)
       DsCustomers1.Merge(diffCustomers)
    End If
End Sub
The only thing remaining is to enter the DataSource for the grid. Open the drop-down and select DsCustomers1.Customers, the typed dataset. Now we're ready to give it a try.
Press F5 to run this application. This will bring up the screen shown in Figure 6.24.
Change something and click the Update button, and then close the form and run it again to see if the changes were saved. Worked on mine the first time.
You can hardly beat a Web service that only takes 14 lines of code, and a client form that acquires remote data and saves the changes back to the data source in another 15 lines of code. That's less coding that it takes in FoxPro.
To be fair, there are other issues that need to be addressed in a commercial application. Concurrency, one record per form, data binding, and a nice search screen are all things that take time and code. But with this simple foundation we can build great structures. And if this recession ever ends, we might even get paid for it.