Chapter 2. Scaffolding Projects With Vue CLI 3
The Vue CLI (command line interface) is a utility tool created by Evan You and the core team to scaffold your Vue.js applications. Every front-end framework has their own version of a CLI: NG CLI for Angular and Create React App for React. Vue CLI 3 was released on August of 2018 and even comes with an intuitive user interface created by Guillaume Chau.
Getting Started With Vue CLI 3
To get started with Vue CLI 3, you should have NPM installed. If you do not have NPM installed, you should go ahead and download it as it’s needed for the CLI to run; it’s crucial for modern front-end web development these days. Once installed, run the following commands.
Note: You have the choice of using either NPM or Yarn. Yarn is like NPM but faster, more secure, and has offline compatibility; it’s created by Facebook and is compatible with NPM.
$npm install -g @vue/cli# or$yarn global add @vue/cli$vue create project-name
From here, you can select the default configuration, which contains a simple Webpack boilerplate with Babel and ESLint. It should ask you if you want to install all of the packages with either NPM or Yarn.
Note: Whichever you decide to use, stick with it!
If you scaffold your project with the custom option, you should see an array of options to choose from.

To navigate up and down, use the arrow keys, and to select an option, press the space bar. After you select some options, press Enter and depending on the selections, Vue CLI 3 should ask you additional questions, which will further define your configuration. You can even save your configuration and use it later as a preset if you want!


The CLI tool is even smart enough and will detect if you try to start a new project with the same directory and name. It’ll ask if you want to overwrite or merge your configuration. Pretty neat stuff.

A Quick Tour of the Generated Project
As mentioned in the previous chapter, all projects in this book will be generated from Vue CLI 3.
When a project is generated with Vue CLI, components are bootstrapped into a centralized Vue Instance. These Vue components are singular files that contain all of the HTML, JavaScript, and CSS that the component needs in order to render and function.
The Directory Structure
After you selected your configuration options, a new window with the Vue.js logo should open up in your default browser.
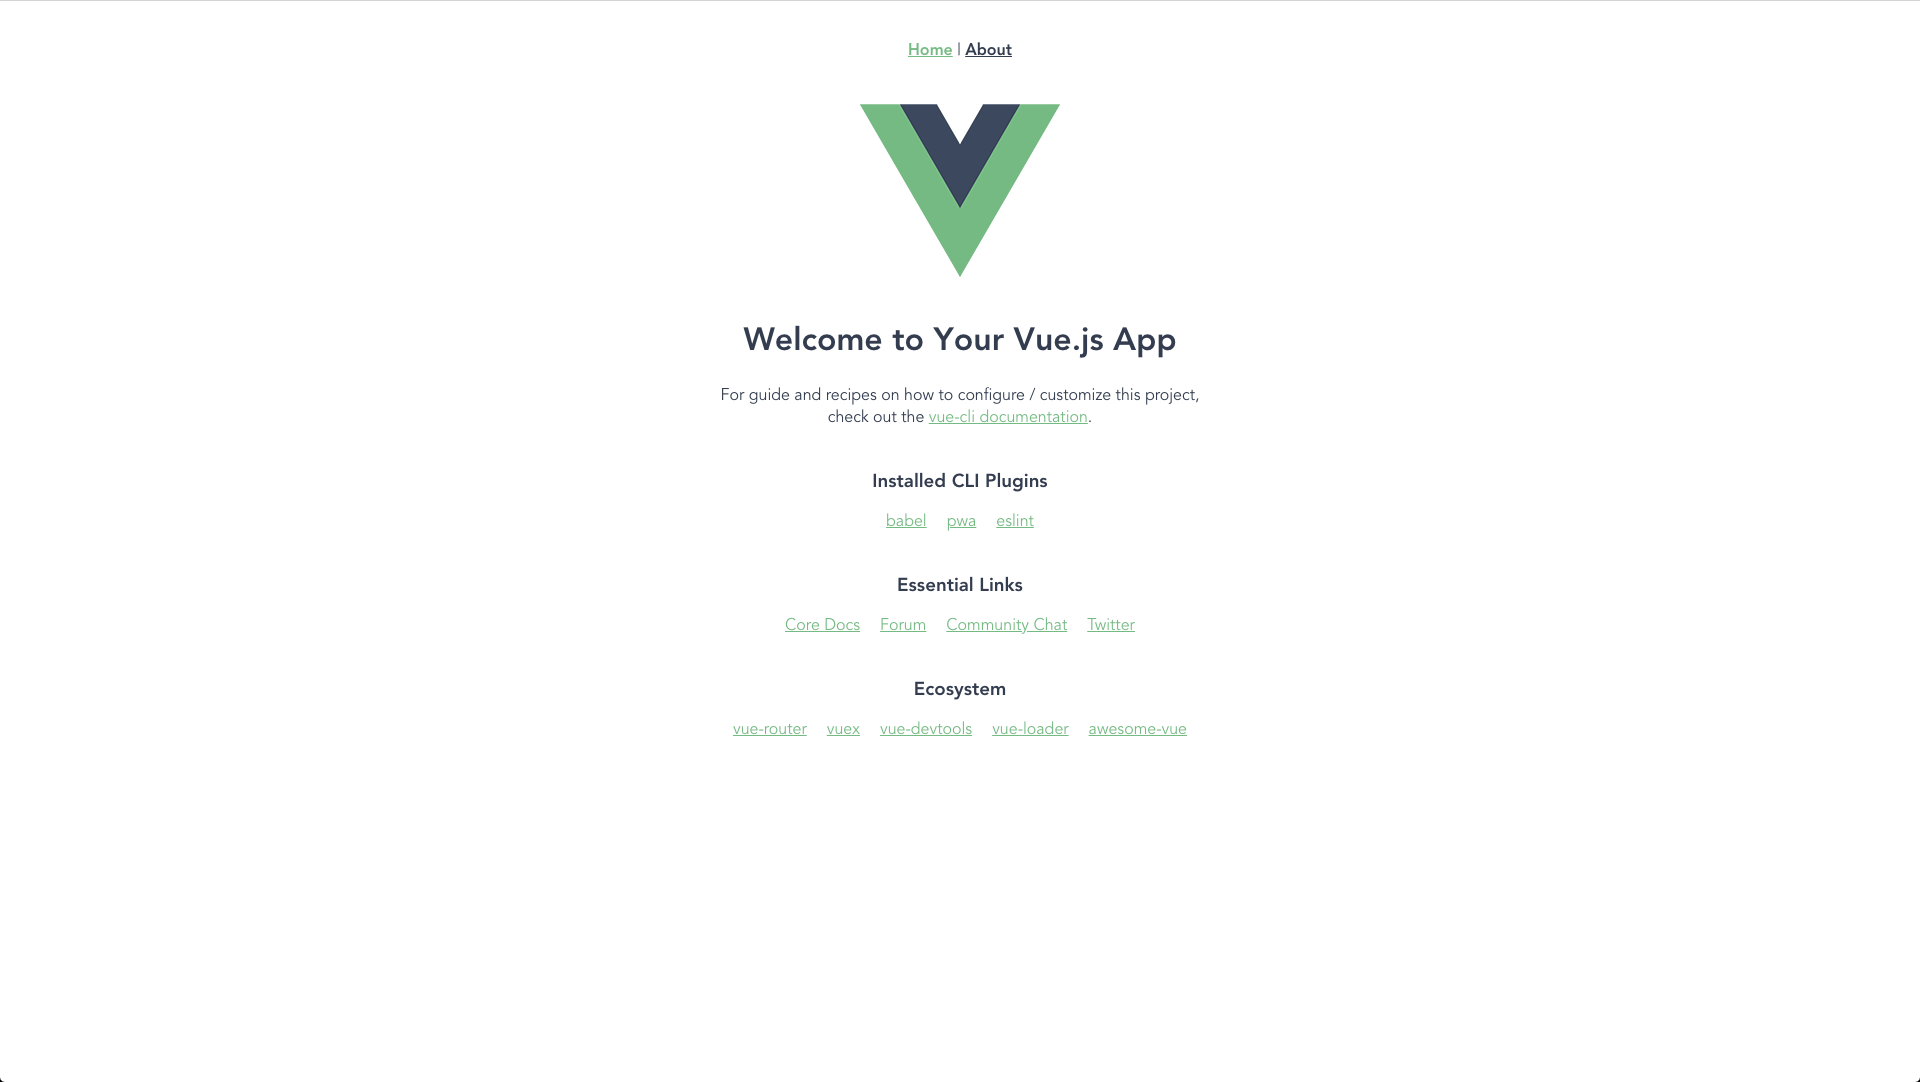
If you see something similar, Vue CLI successfully generated your project! Delving further into the project, your directory structure should resemble the figure below. All of your work will be done within the src directory.
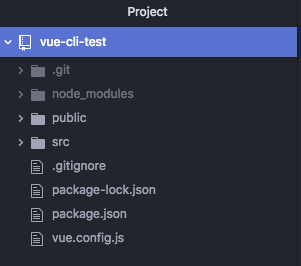
Note: This project example has Vuex, CSS pre-processors, and Vue-Router installed. Your directory structure may be different.
The Node Modules Directory
The node_modules directory contains all of the npm packages needed for your application to run. Every time you run the command npm install some-package; the package some-package will download and be stored in this folder. From here, you can import dependencies into your Vue.js project or reference them manually in an HTML page.
The Public Directory
The public directory contains your index.html file that everything gets bootstrapped and injected in to. If you ever have the need to add a dependency like Bootstrap 4 into your application via a CDN, for example, you can add it’s respective tags in this file. However, it’s best practice to always import them via the node_modules folder.
In this directory, you also have the favicon.ico image, an img directory to store static assets like app icons, and the manifest.json file that contains some basic meta information about your application.
The Source Directory
This is the most important directory in the generated project. In this folder, all of your single file components, stylesheets, assets and more are stored here. This is where you will be working in 99.99% of the time during your application’s development.
Let’s dive a little deeper in the src directory and see what’s new in Vue CLI 3.
assets/: Stores all of your application’s assets like images, CSS, and scripts.components/: Stores all of the application’s components. These components are single.vuefiles, which contain<template>,<script>, and<style>.views/: Views are single file components that act as “pages” or containers that structure their child components.App.vue: The single component in which all other views and components get injected into. This is a great place to add global components that should be shared across the app likeHeader.vueandFooter.vue.main.js: This is your single Vue Instance in which theApp.vue, routes, and all their components get injected into.router.js: A file to define your URL routes and which component get’s loaded when the URL address is visited.store.js: Your Vuex store that containsstate,mutations, andactions. More on Vuex in a later chapter.package.json: A JSON file that lists your NPM dependencies and small project configurations.vue.config.js: A file to add Webpack configs without ejecting!
The Single File Vue Component
Each single file Vue component is treated as its own “mini application” within itself. You can, of course, nest components within components. In fact, that is what is really happening under the hood. The Vue.js application is one large component that is bootstrapped and injected into one single Vue component. which is then bootstrapped into a single Vue instance.
<template><div><!-- must have one root element, the template tag does not count as a root element --><h1>I am one component of many!</h1><p>{{ framework }} is a great JavaScript framework! I can import and nest other components!</p><another-component></another-component></div></template><script>importAnotherComponentfrom'@/components/AnotherComponent';exportdefault{name:'MyComponent',components:{AnotherComponent},data(){return{framework:'Vue.js',}},};</script><stylescoped>/* You can scope a component's styles just by adding an attribute! */h1{color:blue;}p{color:green;}</style>
Note: PascalCase converts to kebab-case. You can reference AnotherComponent as either <AnotherComponent /> or <another-component>.
If you’ve followed through Chapter 1: Getting Started With Vue.js, some of this should look familiar. This single file component is similar to a Vue instance, but with some differences. For example, your HTML is not in a separate file; you don’t need to define an el for Vue.js to control. Instead, the logic in the script tag and the CSS in the style tag directly affect the HTML above in the template tag.
Also note, the data in the single file component must be a function that returns an object. Unlike in a single Vue Instance, the data is a single object with properties.
Importing Child Components
In the code example above, you are importing another component called AnotherComponent as a child component. It’s important to note that when importing a child component, you need to also reference the name of the component in the components object property in your <script> tag.
Let’s look at this simple import statement:
importAnotherComponentfrom'@/components/AnotherComponent';
What’s going on here?
Import is an ES6 keyword that imports the code (or part of the code) from the file defined to be used in the file or component it’s being imported too. The text AnotherComponent is a variable name. This variable name does not need to match the component file’s name. You can import AnotherComponent.vue as CompletelyDifferentName if you really want to. However, it’s best practice to keep the variable name and the file name the same. The last line of text, '@/components/AnotherComponent'; is the file path where the component is being imported from. The @ is an alias that is mapped to the src directory.
Note: When importing components, it’s considered best practice to use absolute paths with the @ alias.
Props
If you’re coming from the React.js world, props will be familiar to you. What made React so popular was the Virtual DOM and the ability to pass data down to child components via props. With props, you can pass any amount of data, whether it be a simple string or a large complex object, down to another component. You cannot transfer data up the component tree. For that, you will need to $emit actions up, or better yet, leverage Vuex to manage your state.
Let’s pass some data down to a child component via props in it’s simplest form. For this example, there are two components 1) Profile.vue and 2) ProfileCard.vue. This component is going to be the user profile card of a hypothetical app. You can add all of this HTML into the root Profile.vue component, however, you may want to reuse the ProfileCard.vue component somewhere else in your application. Plus, with props, you can pass in data into a child component and make it completely reusable.
Below, both components are set up with initial data and HTML structure. Let’s pass in the data from Profile.vue to ProfileCard.vue via props.
Profile.vue
<template><div><h1>Welcome, {{ name }}</h1><ProfileCard/></div></template><script>importProfileCardfrom'@/components/ProfileCard';exportdefault{name:'Profile',components:{ProfileCard,},data(){return{user:{name:'Tony Stark',username:'ironman',age:47,citizenships:['American','Bulgarian'],profilePicture:'images/tony.png',description:'Tony Stark is a self-made super hero, known as Iron Man. He is a super genius and develops his own suits. He is currently CEO of Stark Industries and a founding member of the Avengers.'}}}}</script>
ProfileCard.vue
<template><divclass="card"><h2></h2><img:src=""/><ul><li>Name:</li><li>User Name:</li><li>Age:</li><li>Citizenship(s):</li><li>Description:</li></ul></div></template><script>exportdefault{name:'ProfileCard'}</script><style>.card{padding:15px;border:1pxsolid#ccc;border-radius:2px;background:#ccc;}</style>
To pass in data, first, you need to add an attribute to the child component that is referenced in the parent component. In this example, you will add an attribute to ProfileCard.vue from Profile.vue. The attribute that we’re assigning will be called, user. The value of the attribute will be the data that you want to pass in to the child component. This attribute name is friendly and can be named anything that is meaningful to you and your project.
Reminder, since you are trying to pass in data in your data object, you need to use v-bind or : to bind the prop attribute to the data.
Profile.vue
<template><div><h1>Welcome, {{ name }}</h1><ProfileCard:user="user"/></div></template><script>...</script>
Next, you’ll need to define the prop in the child component. If you do not define the prop in the child component, the child component will not “see” or have access to that data. To differentiate the difference between the parent and child components, let’s give the prop a name of singleUser in the child component. You define the prop with a props property in the child component. The props property can be an array of strings that correspond to the prop name from the parent.
ProfileCard.vue
<template><divclass="card"><h2>{{ singleUser.name }}</h2><img:src="user.profilePicture"/><ul><li>Name: {{ singleUser.name }}</li><li>User Name: {{ singleUser.username }}</li><li>Age: {{ singleUser.age }}</li><li>Citizenship(s):<spanv-for="citizenship in singleUser.citizenships">{{ citizenship }}</span></li><li>{{ singleUser.description }}</li></ul></div></template><script>exportdefault{name:'ProfileCard',props:['singleUser'],// Down here!}</script><style>/* styles */</style>
Prop Validation
Components can also validate the props that are being passed. Much like typecasting in traditional programming languages like Java or Swift (or with JavaScript using TypeScript for Flow.js), you can specify the data type that each prop is. This is very useful, especially for large-scale applications, as it helps reduce errors and bugs. In fact, this is preferred and recommended no matter the type or size of prop.
To validate props, instead of using an array with strings, make each prop and object with different properties and values. The more information that you can provide on the prop, the better.
To build off of the example above, we can validate the user prop as an object coming in to ProfileCard.vue.
ProfileCard.vue
<template><!-- html --></template><script>exportdefault{name:'ProfileCard',props:{singleUser:Object,}}</script>
You can do more than just specify the prop type, you can also make it required and define a default value. To do this, make your singleUser prop an object.
ProfileCard.vue
<template><!-- html --></template><script>exportdefault{name:'ProfileCard',props:{singleUser:{type:Object,required:true,default:()=>{return{name:'Tony Stark'}}},}}</script><style>/* styles */</style>
Slots
Vue.js uses a content distribution API that is modeled after the current W3C web components spec. You can use the <slot> element to inject content from what’s in between the custom component tags inside of the component where the <slot> tags are.
ComponentOne.vue
<template><div><h1>A Code Sample Using Slots</h1><component-two><p>The HTML that is in between these component tags will be injected into ComponentTwo where the slot tags are!</p></component-two></div></template><script>importComponentTwofrom'@/components/ComponentTwo';exportdefault{name:'ComponentOne',components:{ComponentTwo,},}</script>
ComponentOne.vue
<template><div><h2>Component Two</h2><slot></slot><!-- HTML from ComponentOne is injected here! --></div></template><script>exportdefault{name:'ComponentTwo',...}</script>
Named Slots
You can name your slots as well, in case you have the need to have one or many HTML code blocks that you need to add in different places within the component. Much like generic slots, these slots still reside between the custom component tags; they’re just specified. To define a named slot, the slot attribute is needed for the parent component’s template, and the name attribute is needed on the <slot> in the child component. In other words, the slot attribute is a direct correlation to the <slot> element with an attribute of name with the same value.
ComponentOne.vue
<template><div><h1>A Code Sample Using Slots</h1><component-two><pslot="content">The HTML that is in between these component tags will be injected into ComponentTwo where the slot tag with the corresponding name attributes are!</p><h3slot="heading">A Heading for the component content</h3></component-two></div></template><script>importComponentTwofrom'@/components/ComponentTwo';exportdefault{name:'ComponentOne',components:{ComponentTwo,},}</script>
ComponentOne.vue
<template><div><slotname="heading"></slot><slotname="content"></slot></div></template><script>exportdefault{name:'ComponentTwo',...}</script>
You may also notice that the order of the slots in the parent component doesn’t matter. The things that do matter are the slot and name attributes. Each pair must match and must be unique. The order of the slots in the child component does matter. It should read as you would expect it to when it is rendered. In addition to named slots, you can also have a default slot in the component. To have a default slot, just omit the slot and name attributes.
Slots can be a very convenient thing to use. They can save you from duplicating your code or duplicating components just to have different content within them.
Using Pre-Processors
One of the main advantages that Vue.js has over its competitors is the ease of installing and using CSS pre-processors like SASS/SCSS, LESS, Stylus or HTML pre-processors like Pug (Jade). This ease of use is thanks to Vue Loader.
In other frameworks, there’s generally a lot more setup and concentration involved. I find it extremely useful and easy to import packages and define the preprocessor in a component. Since pre-processors are defined via an attribute in each component, you could have some components with a pre-processor or without one. You can even have one component use SCSS and another use LESS. It’s not recommended to have multiple preprocessors in a single component (or in an app for that matter), but it’s nice to have the option.
CSS Pre-Processors
Let’s take a look at some CSS pre-processors.
SASS/SCSS
If you did not choose SASS during the initial setup or opted out of a pre-processor for the default template, you can still add it and use it. You will need to install a few packages with the NPM or Yarn command.
$npm install sass-loader node-sass style-loader --save-dev# or$yarn add sass-loader node-sass style-loader --save-dev
Once the packages are installed, just add the lang="scss" (or sass) attribute to your <style> tag and start using it right away.
LESS
If you did not choose LESS during the initial setup or opted for the default template, you can still add it and use it. You will need to install a few packages with an NPM or Yarn command.
$npm install -D less less-loader# or$yarn add less less-loader
Once the packages are installed, just add the lang="less" attribute to your <style>. Just like SASS.
Stylus
If Stylus is your cup of tea, the installation process is very similar to that of SASS or LESS.
$npm install stylus stylus-loader --save-dev# or$yarn add stylus styles-loader --save-dev
Just remember to add the lang="stylus" attribute to your <style> tag so you can use Stylus right away.
HTML pre-processors
You aren’t limited to just CSS pre-processors, you can also use HTML pre-processors like PUG (formally known as Jade).
PUG
$npm install -D pug pug-plain-loader# or$yarn add pug pug-plain-loader
<templatelang="pug">div h1 Hello world!</template>
Modifying Webpack Configs Without Ejecting
If you are not familiar with the term “ejecting” in the framework sense, that’s good because it can be a bit terrifying. Ejecting is a term that was coined by the React.js community when referring to Webpack configs and their CLI, Create React App. In order to make Create React App “config-less” and updateable on the Webpack end, the Webpack configs are not accessible to the user. It’s not a bad thing because 1) Webpack is intimidating and can be confusing and 2) you do not have to manage the configuration files.
However, there are times, scratch that, there will be times where you want to modify Webpack yourself. You might want to create an alias to a node module that doesn’t have one. As soon as you want to touch configuration files, you need to run npm run eject, and just hope for the best. The ejection process is irreversible and blocks you from being able to upgrade your scripts. Essentially, when ejecting, configuration and build dependencies are moved from the scripts folder and are placed directly into your project. One of the most praised changes in Vue CLI 3 is the ability to make Webpack configs without ejecting your application.
Part of the success of this is the ability to add plugins to your Vue CLI project. The flexible plugin APIs and Webpack scripts make Vue CLI flexible, future-proof, and updatable. Unlike in its predecessor, Vue CLI 2, your project can be updated and receive the latest updates to plugins and to the CLI itself as they become available.
To config, your application without ejecting, create a new file in the root directory and name it vue.config.js. In this new file, you need to export a Webpack module and provide a configureWebpack object. Let’s use the default Webpack configuration.
vue.config.js
module.exports={configureWebpack:{plugins:[// List plugins that you will be using],},};
You can also specify certain plugins for specific environments. In the past, after ejecting your application, you would need to add different configurations in different files. For example, to modify the development build of your project, you would modify the webpack.dev.config.js file or the webpack.prod.config.js file for the production build. With Vue CLI 3, all configurations are stored in one file and environments are differentiated with a conditional.
vue.config.js
module.exports={configureWebpack:config=>{if(process.env.NODE_ENV==='production'){// Add configurations or modifications for the production build}else{// Add configurations or modifications for the development build}},};
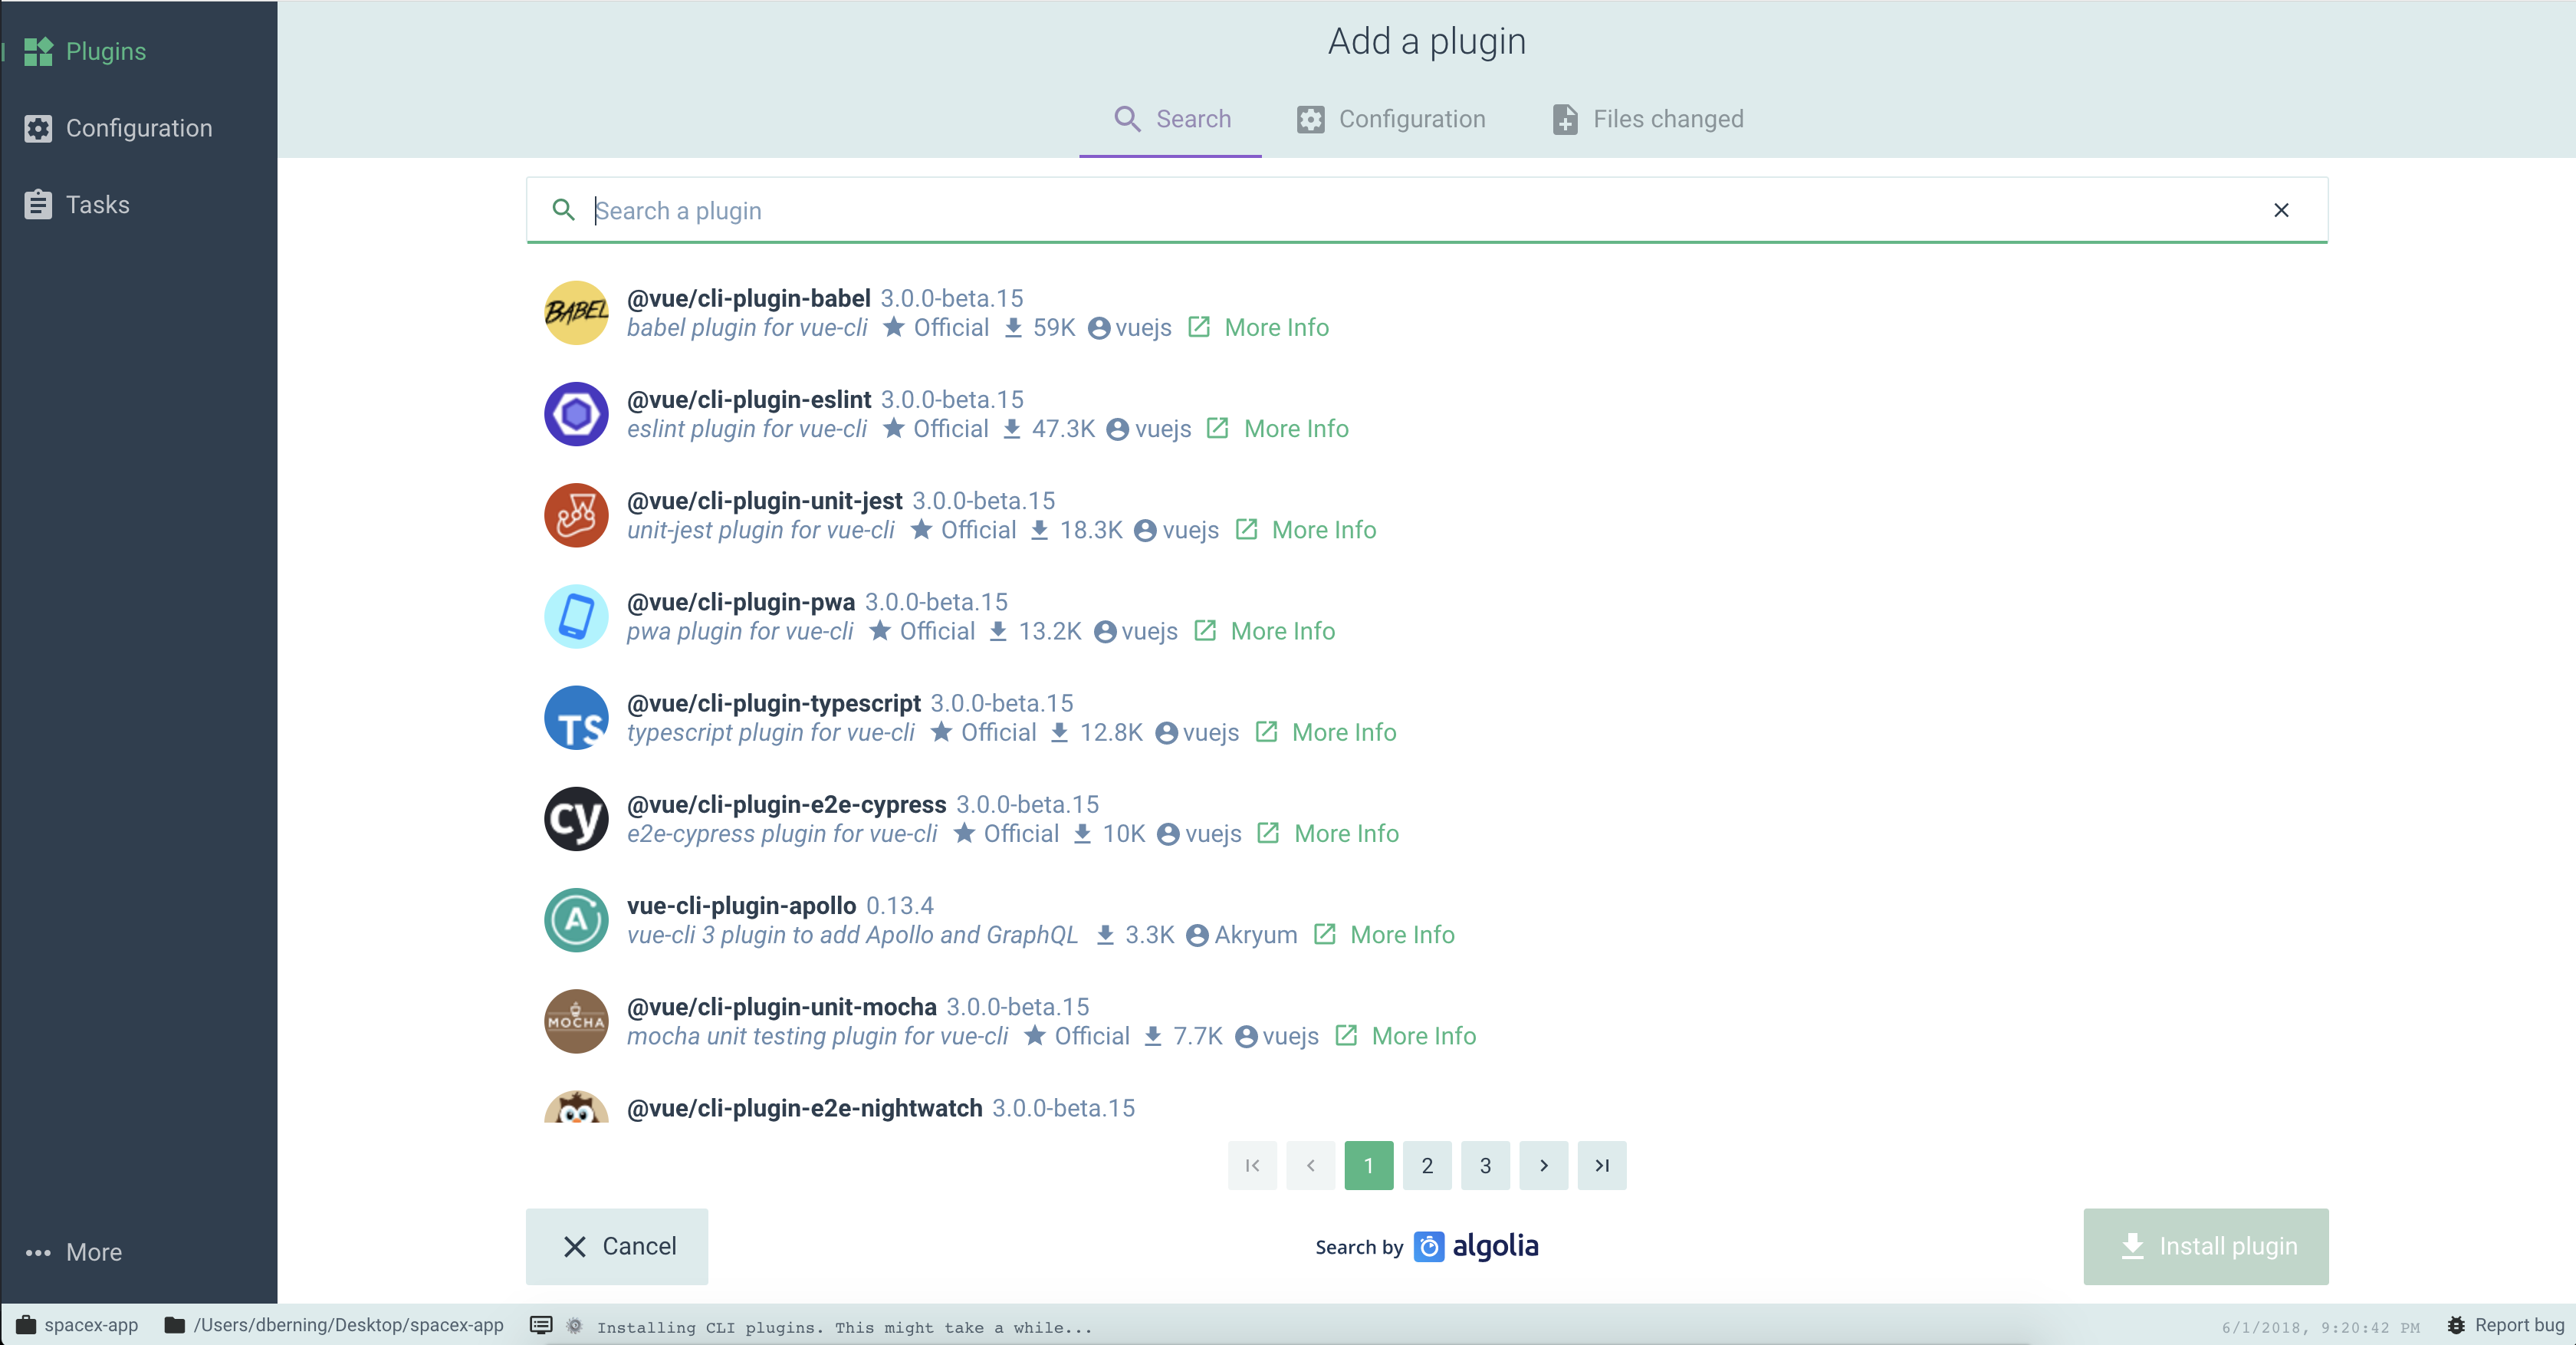
Using the Vue CLI GUI
Now that you’ve learned how single file Vue components and how to scaffold a Webpack project, you can learn how to do all that again in a fancy GUI. It’s important that you understand concepts and how to do something before jumping straight into a user interface.
The Vue CLI UI is created and developed by Core Vue Team Member, Guillaume Chau. He’s been working hard for months to deliver a unique experience to not only scaffold Vue.js projects, but managing them and their dependencies.
If you downloaded the Vue CLI while following along with the book, then you already have the UI installed. If you installed the Vue CLI before June of 2018, then you will need to update Vue CLI to at least version 3.0.0.
# Update Vue CLI 3$npm install @vue/cli# or$yarn add @vue/cli
After updating to at least version (> 3.0.0), you now have access to the vue ui command. The command is global and will launch the UI regardless of the project folder that you are in; you can launch this anywhere on your machine.
To get started, run the following command:
$ vue ui
This will launch the UI on localhost:8000. You should see the project screen with no listed projects.

From here, you can create a new project or import a project if you have a previously generated Vue CLI 3 project. Let’s create a new project by clicking on the “Create” tab. From here, you can navigate through your computer’s directory structure. Once in your working directory, click on the green “Create a new project here” button.

Fill out the information and click on “Next” when ready. From here, these options should seem familiar to you. That’s because these are the same options that you selected from the CLI earlier in this chapter. After selecting the options, you can choose to save the configuration if you wish.
At the bottom of the page, you’ll see a small notification that the CLI is installing the project dependencies. When you click on that, a console appears at the bottom of the page.

Now that the project is created, you can see it in the “Projects” view. If you imported a project, you will see it in the “Projects” view as well.
From here, you can add additional NPM or Yarn plugins to your project, modify configurations, or modify project tasks like npm run serve or others.
This new product from the Vue Core Team is brand new and can greatly improve your workflow and managing project dependencies. With the additional of the Vue CLI GUI, Vue’s CLI is proving to be a big contender and a serious tool for scaffolding single page applications. In my opinion, Vue’s CLI offers more out-of-the-box than React’s create-react-app CLI and is on par with Angular’s.
Conclusion
If there is any indicator of the maturity rate of Vue.js as a whole, it’s Vue CLI 3. As stated before, the new command line interface tool is a huge upgrade from its predecessor, Vue CLI 2. The CLI is also another tool that is developed and maintained by Evan You and the Vue.js Core Team, so it gets updated regularly in order to keep up with developer’s needs and the Vue.js library itself.
This latest updated to the CLI is huge with many welcome additions. In the past, if you needed to modify Webpack, you needed to commit to updating the config files yourself via “ejecting”. However, with Vue CLI 3, the configurations are hidden but can also be expanded upon with a vue.config.js file.
This means you will not have access to the original Webpack configuration. In the past, configurations in Vue CLI 2 were exposed for developer’s to see, which could intimidate developer’s regardless of skill level. Configurations were also very difficult to maintain because Webpack receives updates fairly regularly. And if you were to download a project template via the CLI, like the Nuxt.js template, for example, your forked template and the source template both needed to be synced in order for your forked template to receive updates. This can lead to user errors, breaks to your code, and numerous headaches. You also had to add different libraries like Vuex, Vue Router, and SCSS separately; now, you can install them during start-up.
With Vue CLI 3, templates are much easier to update now, you can choose which libraries you want to add during setup up (and even save as a preset), and Webpack configurations are hidden. The Webpack configurations are hidden because you don’t need to modify them at all. As stated above, the Vue CLI project is configurable without ejecting. Anything that needs to be configured can be, and anything that needs to be added like sass-loader can be done as a plugin.