3. Explore a Muse Site
In the previous section, you learned the process for designing a Web site in Muse.
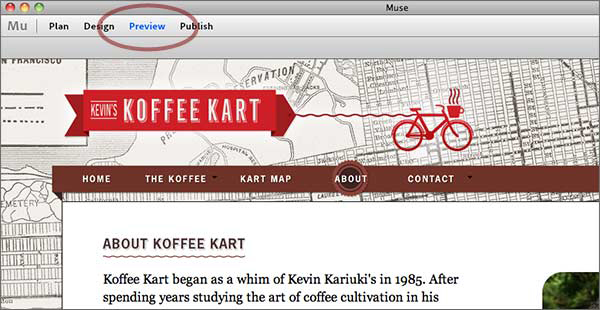
Next, let’s explore a multipage site for a local business designed entirely in Muse (Figure 3.1). The site was designed and created for a fictitious business, Kevin’s Koffee Kart.
The site has a Twitter feed on the home page, contact form, Google Map, slideshows, menu for navigation, and much more. It was all created and customized in Muse without ever touching code.
Figure 3.1 The Kevin’s Koffee Kart site.

Note
• If you want to see the live site, check it out at: http://www.kevinskoffeekart.com
In this chapter, you’ll step through the features and process to create the Kevin’s Koffee Kart site. You’ll get a birds-eye view of the different features available when designing your site in Muse and learn some of the basic Web-design principles we all follow.
Let’s start from the beginning, after the site file is created (File > New), and open in the default Plan view.
Note
• When it comes to workflow, like InDesign, Muse is very flexible. You can set up the site organization, work with master pages, and start your design in almost any order. You’ll figure out quickly what works best for you.
Add and Organize Pages
In Plan view, Muse starts your site with a single page. You can add pages by clicking the plus (+) icons that appear when you hover your cursor over the page thumbnail.
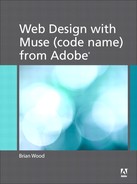
You can add pages to the right and left of the original page or below it. When you click the plus (+) sign icon below a page, you create a sublevel page to create a page or a series of pages. So in Kevin’s Koffee Kart site, there are two pages beneath the “KOFFEE” page. Those two pages are considered a subsection of that “KOFFEE” page (Figure 3.2).
Figure 3.2 Add and organize pages in Plan view.
As an example, suppose you were creating a site for a sporting goods store that sold products for three sports: baseball, badminton, and golf. In the main navigation menu, you would usually only show the three main categories: baseball, badminton, and golf. The products for each sport could be under each menu item in a submenu, called a “child page” in Muse. That way, someone browsing the site could more easily find what they are looking for instead of just surfing through a bunch of linear pages. This type of page site map would look more like a tree in the Plan view of Muse.
Later, if you add one of the menu bars that Muse offers, the pages you add in Plan view will appear automatically in the menu. So, how you add and organize the pages can dictate how your navigation looks.
Note
• You don’t have to add all of your pages at the start. You can always edit the number of pages or organize them later.
Master Page Content
If you are used to working with master pages in InDesign, you’ll feel right at home with Muse master pages.
Most Web-page designs contain content areas called header and footer. The header may contain the site navigation, links to social media, a logo, etc. The footer may contain other subnavigation or a repeat of the main navigation, contact info, social media content, and much more. The master page is where most of us will add that content so that it’s consistent across all the pages in our site.
Note
• Like InDesign, by default, master content cannot be edited in the main pages of your site, only on the master page itself.
In Muse, to edit a master page, you need to be in Plan view. You can then double-click a master page to open it in the Document window. Next, you’ll see some of the typical content and formatting applied to a master page in Muse.
Set Page Guides
On the master page, you will see a series of blue guides, called page guides, that span the width of the viewable area. Those guides are how you set the size of the header and footer areas, the top and bottom of the page content, and the bottom of the browser window (Figure 3.3).
Figure 3.3 Set up page guides.

The position of the guides on your master page depends on your design. If you want a large footer area, for instance, you can drag the left end of the footer guide up, away from the bottom of the page to leave more room for that content. You can edit these guides later as well.
Page guides in Muse are really important. Since they determine the size of the header and footer they need to be set properly. Why? Because if they aren’t, and you start adding content to a page (not a master page), that content can start to run over the header and/or footer and won’t be positioned properly. For those of us who work in the print world, this is something you’ll get used to.
Add a Background Image and Color
The Koffee Kart site has an image of an old map in the background of each page. That means that it’s positioned behind the page content and, in this case, centered in the browser window.
You can add a background image or background color to almost anything in Muse—a master page, a page, a box, a button, and more.
Here are a few things to think about when considering applying a background image and/or color to content in Muse:
• The color you apply to content on the Web will be RGB, rather than CMYK or Spot.
• If you apply a background image and a background color to content, the image appears on top of the color and both appear behind the content itself.
• Make sure that you test your page in a larger screen resolution when adding a background image to a master page. An image that fills your browser window may appear cut off or too small in a larger monitor.
• Background images can tile (repeat). If you want to make a pattern in the background of the page, consider making an image that contains the repeating part of the pattern in a program like Photoshop, then telling Muse to repeat that image to save download time.
• Be careful with the file size of a background image you create. Know that all images need to load from a machine out on the Web called a server, into the user’s browser cache before they can appear on the page.
Armed with an image that was created in a program like Illustrator or Photoshop, then either saved in Web format (.jpg, .gif, or, .png) or as a Photoshop file (.psd), we added the image to the background of the master page in the Kevin’s Koffee Kart site so that it showed up on every page.
With nothing selected on the master page, you can click the “Browser Fill” text in the Control panel above the page and choose a background color, an image, position the image, and more from the options that appear (Figure 3.4).
Figure 3.4 Add a background image to the master page.

Note
• The Control panel in Muse works like it does in Adobe Creative Suite programs like InDesign. Different options show in the Control panel depending on what is selected (or not selected) on the page.
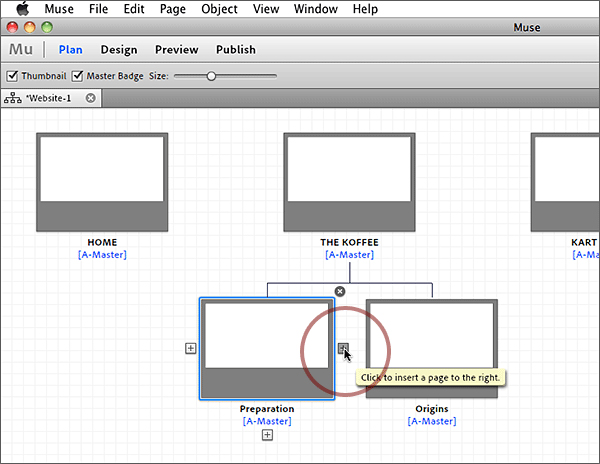
As was stated earlier, background images and color can be added to other content as well. In the Footer of the page for the Kevin’s Koffee Kart site, you can see a serrated edge at the top of the brown rectangle in the footer area.
Here are the steps that were taken to add a background image to a drawn object:
1 To add the serrated edge to the brown frame, a frame was drawn with the Rectangle tool.
2 In the Control panel, clicking the word “Fill” shows options for applying a background image and/or color to the frame. After choosing an image for the background of the frame by clicking the folder icon and choosing “Tile Horizontally” from the Fitting menu (Figure 3.5), you can see that the background image repeats horizontally in the rectangle. The rectangle was then dragged into position above the brown rectangle in the footer and stretched to fit the width of the footer.
Tip
• The image we inserted into the background of the rectangle was a simple brown triangle created in a program like Illustrator. It was saved in a Web file format (.jpg, .gif, or .png) using File > Save for Web & Devices (.gif was chosen in this case).
No matter how wide the frame is made, it will be filled with the repeating image.
Figure 3.5 Add a background image to other content.

Create 100 Percent Width Content
By default, content created or placed in Muse has a specific width in pixels. For some design elements, like the brown rectangle in the footer of the Kevin’s Koffee Kart site, you may want it to stretch to fit the width of the browser window no matter how wide the browser window is. This is accomplished by making that content 100 percent the width of the browser window.
On the Web, you’ll see lots of sites that will create 100 percent width content for the header and footer.
In Kevin’s Koffee Kart site, a rectangle was created using the Rectangle tool and placed in the footer (below the rectangle with the triangle background image). Using familiar features like Fill and Stroke in the Control panel, you can change the appearance of the rectangle, like adding the brown fill color.
Tip
• Muse allows you to sample color from artwork on the page using the Eyedropper tool, as well as save colors in the Swatches panel just like Adobe Creative Suite applications like InDesign and Photoshop.
By dragging the right edge of the rectangle to the right with the Selection tool and snapping it to the edge of the viewable area, and then doing the same for the left edge, you can make it stretch to fit (100 percent) the width of the browser window (Figure 3.6).
Note
• A red guide indicates when the content is snapped to the edge of the viewable area.
Figure 3.6 Set the width of content to 100 percent.
Place Images
In Muse, you can place images typically found in Web sites, like .png, .jpeg, and .gif, as well as Photoshop files (.psd). You can also copy and paste image content from programs like Adobe Fireworks and Photoshop into your Muse pages.
Here are a few things to keep in mind when working with images to be used in your Web site:
• Images used on the Web are saved with a resolution of 72 pixels per inch (ppi). It’s best to save your images at the correct size (dimensions) and resolution in Photoshop (or other program) before placing them in Muse.
• If you place a print resolution image (with a resolution of around 300 ppi) in Muse, it will be resampled (changed) to 72 ppi. What you see placed in Muse may be smaller in dimension than you expected if the resolution is higher than 72 ppi.
• Images in Muse can’t be wider or taller than 8,192 pixels and can’t be larger than 16 MB in size.
• When saving your images, remember that images destined for the Web should be RGB. If you place a CMYK image, Muse will convert it to RGB.
• If you place Photoshop images, Muse will optimize the Photoshop file (.psd) in the correct Web format (.jpg, .gif, .png) when you export or upload the site.
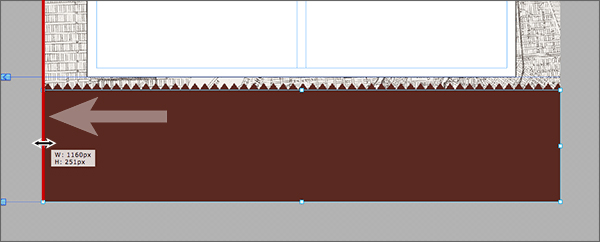
To add the logo to the header (top of the page), for instance, you can choose File > Place with the master page open. If you place a Photoshop file, and the file has layers, the Image Import Options dialog box appears (Figure 3.7). In the Image Import Options dialog box, you can choose to import the composite image (flattened) or a specific layer.
Figure 3.7 Place Photoshop images (.psd) in Muse.

Tip
• Muse has lots of production features you may have used in InDesign, like smart guides that you can turn on and off, fitting commands, and much more.
The images that you place are linked to the images on your hard drive or external drive. The Assets panel (Window > Assets), which is similar to the Links panel in InDesign or Illustrator, lists all the images used throughout the entire site. The Assets panel allows you to relink images, embed them, and round-trip edit with a program like Photoshop to make updates that are reflected immediately, among other things (Figure 3.8).
Figure 3.8 Linked and embedded images in the Assets panel.
Tip
• As you insert content into your Muse pages, you will quickly learn that Muse pages have a stacking order like InDesign or other Creative Suite applications. You can arrange items in the Object menu (bring to front, send to back, etc.), even locking and grouping content like you’re used to.
Insert a Menu for Navigation
If your site has more than one page, you will need a way for people to navigate between those pages. Muse gives you several menu systems to drag and drop on your page that are easily customizable in appearance and functionality—even allowing drop-down menus. The menus are found in the Widgets Library panel (Window > Widgets Library) along with lots of other very useful and powerful features.
Here are some things to consider when you begin working with a menu for navigation in Muse:
• The header and footer usually contain the main “global navigation,” which refers to navigation that runs across the top and bottom of every page. This navigation typically contains links to the major sections of that Web site, sort of like the sporting goods example you read about in the “Add and Organize Pages” section.
• The navigation is tied directly to your design. When starting to design Web sites, most of us consider navigation as an afterthought, but it should be one of the more important things you consider when designing. At the same time, good navigation should be “invisible” and let the user focus on the great content in your pages.
The menu in Kevin’s Koffee Kart was inserted in the header of the master page so that it shows up on every page. In the Widgets Library panel, you can drag and drop the menu you prefer from the “Menus” category (Figure 3.9). The names of the pages you create in Plan view will appear automatically in the menu. Even if you delete or add pages in Plan view, from this point forward, the menu will automatically reflect those changes.
Figure 3.9 Insert a “smart” menu.
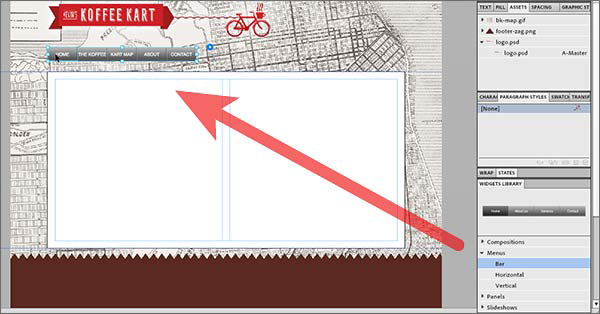
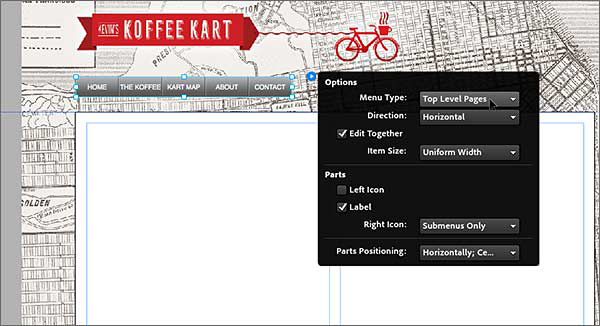
After dragging and dropping a menu on your page, you can easily edit the appearance and functionality using the panels in the workspace or by clicking the blue arrow to the right of the selected menu on the page to access the menu options (Figure 3.10). The Kevin’s Koffee Kart site required a simple menu that didn’t require much appearance editing. In the Kevin’s Koffee Kart site, an image of a brown bar was also placed and arranged behind the menu bar (Object > Send Backward) along with a few other formatting options.
Figure 3.10 Edit the menu properties.
Add Links and Buttons
In addition to the navigation that appears in the header or footer, you’re going to want to apply links to the content on the page. These links can be used to add a link to create an email or links to other Web sites. With Muse, you can apply links to almost anything, including text and images.
On the master page for the site, a link was added to the header logo image to link to the home page. By selecting an image (it could also be text or other content you select) then entering an email address, URL, or choosing a page from the list in the menu to the right of Hyperlink in the Control panel, you can easily create a link (Figure 3.11).
Figure 3.11 Create hyperlinks to URLs, pages, and more.

Muse also allows you to create multiple link styles and set link options by clicking the “Hyperlink” text in the Control panel. This is a great way to make styles in the body of text look or act differently from those in the footer, for instance.
If you decide to edit link options by clicking the “Hyperlink” text in the Control panel, think about this:
• By default, links on the Web will open the page or site they are linking to in the same browser window. In other words, they replace the page that the link is on with the new content. You can make a link open in a new window or tab by selecting the option after clicking the “Hyperlink” text in the Control panel.
• In those same hyperlink options, you can also change the appearance of your text links by clicking the “Edit Link Styles” button. There are four “states” you can change the appearance of: normal, hover, visited, and active link “states.” Normal is what the link looks like before it’s been clicked, visited is a link that users have clicked, hover is a link that users position their cursor over, and active is a link the moment it’s clicked.
Muse also lets you create buttons with states that change appearance, depending on how the user is interacting with it.
Essentially, a button is a fancy link that can link to a Web page, another site, or trigger something to happen on your page (like submit a form). It’s usually used instead of a text link for an action, whereas links are used for navigation. They cam also be used if you want to add more “design” to a link with an image you create, or to draw more attention on the page.
With a button, you can show a visual change when the user interacts with it (positions the cursor over it, for instance). A button has four “states” or appearances, similar to a plain old link. The states for a button are:
• Normal (what the button looks like when the page first appears)
• Rollover (what the button will look like if the user positions the cursor over the button)
• Mouse Down (what the button will look like when the user clicks on the button)
• Active (normal) (what the button will look like from the point at which the mouse button’s pressed down until the point at which it’s released again)
You can easily create buttons from images already on the page or by creating your button with layers (one for each state) in Photoshop, then placing that .psd file in Muse.
By choosing File > Place Photoshop Button to place a Photoshop image with layers in Muse, you can choose which layer will be used for which state in the button (Figure 3.12). Once the button image is on the page and selected, you can easily add a link to it by typing in a Web address or choosing a page from the menu to the right of “Hyperlink” in the Control panel.
Figure 3.12 Place buttons from Photoshop.

You can also change the appearance of each button state with the States panel (Window > States). By clicking each state in the States panel, you can see what users will see when they interact with the button. You can also add different formatting to the button in each state, like a drop shadow, for instance (Figure 3.13).
Figure 3.13 Edit the states of a button using the States panel.

Create the About Page
Add Text
Text can be added to your pages by typing directly in Muse, copying and pasting from another application, or placing text files. When you set up the site initially, you set the number of column guides that appear. Like InDesign, these guides are there to aid you as you add content, such as text.
Tip
• At any time, you can change the column guides on a page by choosing Page > Page Properties, or open the master page and set them there using the same command.
To get text on a page (like the About page) using the Text tool, you can either copy and paste text from another application (like InDesign, Word, or even from an email), or click and drag to create a frame and type your text directly into it, just like InDesign.
With text selected on the page with the Text tool, the Control panel and Text panel show current type-formatting options. For instance, clicking the menu to the right of “Font” in the Control panel or the menu in the Text panel shows Web-safe and system fonts in the list that appears (Figure 3.14). At the top of the list are Web-safe fonts. Fonts that appear in the list below the line are referred to as system fonts.
Figure 3.14 Add and format text.

When building a Web page in Muse, there are a few things about fonts that are different from creating print content:
• If you apply a font to text on your page, users who look at your published site later will need that font installed on their machine.
• Font sizing in Muse is measured in pixels, not points, as in InDesign. They are similar in size, but it may take a little getting used to.
Most of us will use Web fonts because they are installed on most computers, and because search engines can read this text. If you apply a system font, the text will be converted to an image when the site is uploaded, which means search engines will not be able to read that text on the site.
Work with Text Styles
How many of us have heard over the past few years that we need to learn CSS? Working with Muse, the CSS for our pages is automatically created for us. Using familiar paragraph and character styles in Muse, you can control the formatting of your text throughout your site easily. Those styles then become the CSS of the site.
If you’ve created character or paragraph styles in InDesign or Illustrator, then you will feel right at home creating styles in Muse.
Styles in Muse are created by formatting text on your page first using the Control panel or Text panel, then, in the Character Styles or Paragraph Styles panel (depending on which type you’d like to create), creating a new style based on the selected text (Figure 3.15).
Figure 3.15 Create text styles in Muse.

Much like InDesign or Illustrator, you can also edit style names, redefine styles, and much more.
Apply Effects and Rounded Corners
I’m sure lots of us have at least heard of CSS3. You may have even heard or seen some of the really cool formatting options that you can apply to content on your Web pages. Muse lets you add CSS3 formatting like drop shadows, transparency, or rounded corners to your content as easily as you add effects to content in InDesign (Figure 3.16).
Figure 3.16 Apply effects and rounded corners to an image.

If you want to apply these effects consistently to other content, you can save this object formatting using a third type of style called a graphic style. Graphic styles in Muse are similar to object styles in InDesign, and are created, edited, and applied in the Graphic Styles panel (Window > Graphic Styles).
So that the drop shadow and rounded corners applied to the About page image in the Kevin’s Koffee Kart site can be reused, the image was selected, and a new graphic style was created in the Graphic Styles panel (Figure 3.17).
Figure 3.17 Save image formatting as a graphic style.

Create the Koffee Page
Add a Panel Widget
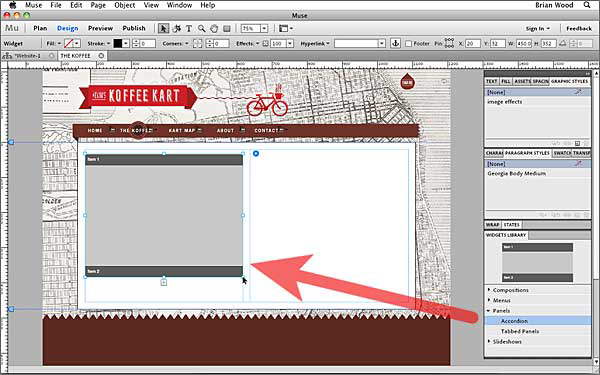
If you have a page with lots of content, but you want to display that content in a small space to minimize scrolling, you can use panel widgets found in the Widgets Library panel. There are two panel widgets to choose from: Accordion and Tabbed. The Accordion panel is what was used on the Koffee page of the Kevin’s Koffee Kart site. A tabbed panel has tabs along the top of a content area. As you click the tabs, a new content area (with new content) appears beneath them.
On the Koffee page, three types of coffee need to be displayed: House Blend, Espresso, and American Roast. Instead of simply listing that content on the page and making the user scroll down, an accordion panel was added to the page.
In the Widgets Library panel, you can choose the panel you want to use, then drag it into position on the page (Figure 3.18).
Figure 3.18 Drag an accordion panel widget onto a page.
Not only can you add content to the new panel easily, but you can also set options specific to each panel widget.
Muse also makes it easy to edit the appearance of the widget to match your own design (Figure 3.19). By clicking on each part of the menu, you can edit the backgrounds, borders, text formatting, rollover appearance, and much more using a variety of panels, including the Control panel for appearance, and the States panel for controlling the appearance of the different panel “states.”
Figure 3.19 Format the panel widget.

Create the Preparation Page
Pin Content
Muse makes it easy to pin content to a point in the browser window.
That means you can select content, like a Twitter follow button for instance, and make it float above the rest of the content. If the page is scrolled, that pinned content sticks to a specific position in the browser window and the other page content scrolls beneath it.
In Kevin’s Koffee Kart site, you can see pinned content on the Preparation page. In this example, several text frames with links applied are grouped together. They are then pinned to the top center of the browser window so that they scroll on top of other content as the page is scrolled vertically. This means that they are always visible and accessible.
Pinning content is as easy as selecting content on the page, like the grouped text frames on the Kevin’s Koffee Kart site, then selecting the pin position in the Control panel (Figure 3.20).
Figure 3.20 Pin content to the browser window.

Create Link Anchors
When you have a long page that has a lot of content and requires vertical scrolling, like the Preparation page on the Kevin’s Koffee Kart site, you want to make it easy for people to jump from one part of the page to another. That’s where creating links to anchors you insert on the page are useful.
To make it easy for people to click and go to other parts of a long page, you must first insert an anchor by clicking the Link Anchor button in the Control panel. Then, click the area on the page where you want to insert the anchor and name it in the dialog box that appears (Figure 3.21).
Figure 3.21 Insert an anchor into a page.

You can then select text or other content and choose the anchor to link to from the menu to the right of Hyperlink in the Control panel (Figure 3.22). When you preview the page and the link is clicked, Muse scrolls smoothly to the anchor instead of simply jumping to it.
Figure 3.22 Link to an anchor on the same page.

Create the Origins Page
Add a Slideshow
Muse comes with a bunch of ready-made, drag-and-drop widgets like tooltips, lightboxes, and slideshows that rival the coolest content you’ve seen on the Web. Each of these widgets uses jQuery under the hood, and allows you to add the latest cool and functional features to your page without touching code.
After deciding where you want to add a widget like a slideshow, then dragging whichever you choose from the Widgets Library onto the page, you can begin to set unique options and change its appearance.
Here are a few pointers for adding images to a slideshow and editing it:
1 After dragging one of the three slideshows onto the page (we dragged the “Thumbnails” slideshow out), click the blue arrow in the upper-right corner to show its options (Figure 3.23).
Figure 3.23 Edit slideshow options.

The options are different for each type of slideshow available in the Widgets Library panel. For the Thumbnails slideshow, you can choose images, set viewing options like transitions, opt to hide or show parts like text captions, or even convert the slideshow into a lightbox that plays the slideshow in sort of a “full-screen” mode.
Note
• The images you add to the slideshow should be saved in either one of the Web formats (.jpg, .gif, or .png) or as Photoshop (.psd) files that Muse will later convert to the correct Web format. They should be sized properly to match roughly the size of the large slideshow image (the thumbnail is generated automatically), and can be linked to from almost anywhere on your machine. Muse will collect all of those images together into an image folder when you finish the site and upload it.
2 With the Selection tool, you can click on each part of the menu and edit the backgrounds, borders, text formatting, rollover appearance, and much more. A slideshow acts like a group of objects in InDesign CS5 or later (or Illustrator). With nothing on the page selected, if you click once, you select the entire slideshow. If you click again on, say, the thumbnails on the left side of the slideshow, you select and can edit or move them separately.
3 To delete a thumbnail (and the larger image associated with it), you can click three times on one of the thumbnails and press Delete. That also deletes the larger image automatically (Figure 3.24).
Figure 3.24 Select part of the slideshow to edit.

4 To change a caption for an image in the slideshow, click on a thumbnail to show the larger image. With the Text tool selected, select the text “[Insert Caption Here]” and edit it. Click the next thumbnail and repeat the process.
Create a Map Page
Embed HTML
With the rise of social media, video, and forms, among other things, lots of us want to include maps, YouTube video, and other content on our sites. Muse makes it easy to add that type of content without getting your hands dirty in code.
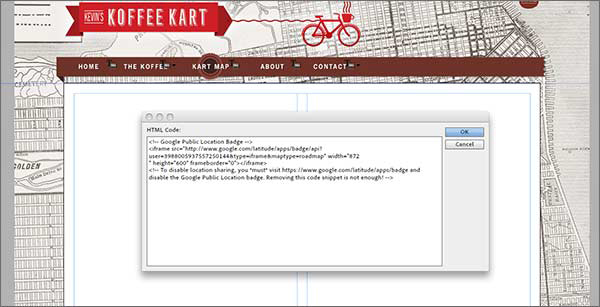
On the map page of Kevin’s Koffee Kart site, we wanted to insert a map (called a Google Public Location Badge). The map, from Google, shows the location of Kevin’s cart so users could see an updated location throughout the day.
Lots of sites like maps.google.com, youtube.com, and others offer code that you can copy and paste into the HTML of a Web page, which then embeds the map or video into your Web page.
Here’s how you add this type of HTML content to your page in Muse:
1 After visiting a site like maps.google.com or YouTube.com and finding the “embed” code they offer, you can usually set a few options, then copy it.
Note
• Not all videos on YouTube can be embedded in your Web page. The author of the video determines that.
2 Returning to Muse you can choose Object > Insert HTML. In the dialog box that appears, delete the default content and paste the code you just copied (Figure 3.25). After clicking OK, a placeholder box appears on the page. You can position it where you want in your design.
3 You can then preview the content by clicking Preview below the Control panel.
Figure 3.25 Embed HTML like a Google Map into a page.
It really is that easy.
Preview Your Design
Designing for print, you typically print a proof of some kind—even if it’s on your desktop printer—before you commit to outputting the final version. We test our Web designs also, but in different browsers and on different platforms to ensure consistency.
Muse has a built-in Preview that will give you a quick preview of your pages using the WebKit engine that powers browsers like Safari and Google Chrome.
With a page open, or just the site file open, you can click Preview toward the top of the workspace to preview and navigate the site and its features (Figure 3.26).
Figure 3.26 Preview your site within Muse.
If you want to preview in the default browser installed on your machine instead, you can choose File > Preview Page In Browser to test just the open page (or the home page if no pages are open) or File > Preview Site In Browser to be able to preview and navigate the entire site.
After previewing your pages, and you feel confident in the site, you can then publish your site, which is what you’ll see next.