
| Recipe 14 | Snappier Client-Side Interfaces with Knockout.js |
Problem
When developing modern web applications, we often try to update only part of the interface in response to user interaction instead of refreshing the entire page. Calls to the server are often expensive, and refreshing the entire page can cause users to lose their place.
Unfortunately, the JavaScript code for this can quickly become difficult to manage. We start out watching only a couple of events, but eventually we have several callbacks updating several regions of the page, which becomes a maintenance nightmare. We need an easy-to-use tool that keeps track of all of this for us.
Ingredients
-
Knockout.js[30]
Solution
Knockout.js is a simple yet powerful framework that lets us bind objects to our interface and can automatically update one part of the interface when another part changes, without lots of nested event handlers. Knockout.js uses view models, which encapsulate much of the view logic associated with interface changes. We can then bind properties of these models to elements in our interface.
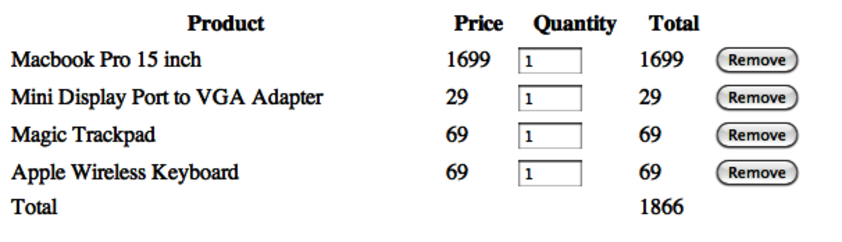
We want our customers to be able to modify the quantity of items in their shopping carts and see the updated total in real time. We can use Knockout’s view models and data bindings to build the update screen for our shopping cart. We’ll have a line for each item, a field for the customer to update the quantity, and a button to remove the item from the cart. We’ll update the subtotal for each line when the quantity changes, and we’ll update the grand total whenever anything on the line changes. When we’re done, we’ll have an interface that looks like the following figure:
Knockout Basics
Knockout’s view models are regular JavaScript objects with properties, methods, and a few special keywords. Here’s a simple Person object with methods for first name, last name, and full name:
| knockout/binding.html | |
| | (function(){ |
| | var Person = function(){ |
| | this.firstname = ko.observable("John"); |
| | this.lastname = ko.observable("Smith"); |
| | this.fullname = ko.computed(function(){ |
| | return( |
| | this.firstname() + " " + this.lastname() |
| | ); |
| | }, this); |
| | }; |
| | |
| | ko.applyBindings( new Person ); |
| | })(); |
We use HTML5’s data- attributes to bind this object’s methods and logic to elements on our interface:
| knockout/binding.html | |
| | <p>First name: <input type="text" data-bind="value: firstname"></p> |
| | <p>Last name: <input type="text" data-bind="value: lastname"></p> |
| | <p>Full name: |
| | <span aria-live="polite" data-bind="text: fullname"></span> |
| | </p> |
When we update either the first-name or the last-name text box, the full name shows up on the page. Since the update happens dynamically, this can cause troubles for blind users with screen readers. To solve that issue, we use the aria-live attribute to give the screen readers a hint that this part changes dynamically.
That’s a relatively trivial example, so let’s dig into Knockout a little more by building a single line of our cart, getting the total to change when we update the quantity. Then we’ll refactor it so we can build the entire shopping cart. We’ll start with the data model.
We’ll represent the line item by using a simple JavaScript object called LineItem with properties for name and price. Create a new HTML page and include the Knockout.js library right above the page’s closing <body> tag:
| knockout/item.html | |
| | <!DOCTYPE html> |
| | <html> |
| | <head> |
| | <meta charset="utf-8"> |
| | <title>Update Quantities</title> |
| | </head> |
| | |
| | <body> |
| | <script src="http://ajax.aspnetcdn.com/ajax/knockout/knockout-3.3.0.js"> |
| | </script> |
| | </body> |
| | |
| | </html> |
Add a new <script> block at the bottom of the page, above the closing <body> tag and below the <script> tag we just added. Add the following code between the <script> tags:
| knockout/item.html | |
| | (function(){ |
| | var LineItem = function(product_name, product_price){ |
| | this.name = product_name; |
| | this.price = product_price; |
| | }; |
| | })(); |
In JavaScript, functions are object constructors, so we can use a function to mimic a class. In this case, the class’s constructor accepts the name and the price when we create a new LineItem instance.
Now we need to tell Knockout that we want to use this lineItem class as our view model, so that its properties are visible to our HTML markup. We do that by adding the following call to our script block:
| knockout/item.html | |
| | var item = new LineItem("Macbook Pro 15", 1699.00); |
| | ko.applyBindings(item); |
We’re creating a new instance of our LineItem to Knockout’s applyBindings method, and we’re setting the product name and price. We’ll make this more dynamic later; for now we’ll hard-code these values.
With the object in place, we can build our interface and pull data from the object. We use an HTML table to mark up our cart, and we use <thead> and <tbody> tags to give it a little more structure:
| knockout/item.html | |
| | <div role="application"> |
| | <table> |
| | <thead> |
| | <tr> |
| | <th>Product</th> |
| | <th>Price</th> |
| | <th>Quantity</th> |
| | <th>Total</th> |
| | </tr> |
| | </thead> |
| | <tbody> |
| | <tr aria-live="polite"> |
| | <td data-bind="text: name"></td> |
| | <td data-bind="text: price"></td> |
| | </tr> |
| | </tbody> |
| | </table> |
| | </div> |
Since our table row updates based on user input, we use the aria-live attribute on the table row so screen readers know to watch that row for changes. We also wrap the whole cart within a <div> with the HTML5 ARIA role of application, which tells screen readers that this is an interactive application. You can learn about these in the HTML5 specification.[31]
Pay special attention to these two lines:
| knockout/item.html | |
| | <td data-bind="text: name"></td> |
| | <td data-bind="text: price"></td> |
Our LineItem instance is now a global, visible object on our page, and its name and price properties are visible as well. So with these two lines we’re saying that we want the text of each element to get its value from the property we specify.
When we load the page in our browser, we see the row of our table start to take shape, and the name and price are filled in!
Let’s add a text field to the table so that the user can update the quantity:
| knockout/item.html | |
| | <td><input type="text" name="quantity" |
| | data-bind='value: quantity, valueUpdate: "keyup"'> |
| | </td> |
In Knockout, we reference data fields within regular HTML elements with text, but HTML form elements like <input> have value attributes. This time we bind the value attribute to a quantity property in our view model, which we need to define next.
The quantity property isn’t only for displaying data; it’ll set data as well. And when we set data, we need events to fire. We do that by using Knockout’s ko.observable function as the value of our quantity property in our class:
| knockout/item.html | |
| | this.quantity = ko.observable(1); |
We’re passing a default value to ko.observable so the text field has a value when we bring the page up for the first time.
Now we can enter the quantity, but we need to show the row’s subtotal. Let’s add a table column to print out the subtotal:
| knockout/item.html | |
| | <td data-bind="text: subtotal "></td> |
As with our name and price columns, we set the text of the table cell to the value of our view model’s subtotal property.
This brings us to one of the more powerful features of Knockout.js: the computed method. We defined our quantity property as observable, which means that other elements notice when that field changes. We declare a computed method, which executes code whenever our observed field changes, and we assign computed to a property on our object so it can be bound to our user interface:
| knockout/item.html | |
| | this.subtotal = ko.computed(function() { |
| | return( |
| | this.price * parseInt("0"+this.quantity(), 10) |
| | ); //<label id="code.subtotal" /> |
| | }, this); |
But how does the computed method know which fields to watch? It looks at the observable properties we access in the function we define! Since we’re adding the price and quantity together, Knockout tracks them both and runs the preceding code when either one changes.
The computed method takes a second parameter that specifies the context for the properties. This is necessary because of how JavaScript’s functions and objects work; you can read more about this in the Knockout.js documentation.
And that’s it for a single row. When we change the quantity, our price updates in real time. Now let’s take what we learned here and turn this into a multiple-line shopping cart with line totals and a grand total.
Interfaces that rely heavily on JavaScript often raise a red flag when it comes to accessibility, but the use of JavaScript alone doesn’t make a site inaccessible to the disabled.
In this recipe, we made use of the HTML5 ARIA roles and attributes to help screen readers understand the application we’re developing. But accessibility is about much more than screen readers; it’s about making our applications usable by the widest audience possible.
Knockout is a JavaScript solution and will work only when JavaScript is enabled or available, so you need to take that under consideration. We recommend that you build applications to work without JavaScript and then use Knockout to enhance your application. Our example uses Knockout to render the cart’s contents, but if we were using a server-side framework we could render the HTML for the cart and use Knockout’s binding features on top of the rendered HTML. The accessibility of a site depends much more on the implementation than on the library or technology used.
Using Control Flow Bindings
Binding objects to HTML is handy, but users will likely have more than one item in their carts, and duplicating all that code will get tedious—not to mention more difficult—since we’ll have more than one LineItem object to bind. We need to rethink the interface a bit.
Instead of working with a LineItem as the view model, let’s create another object that represents the shopping cart. This Cart object will hold all of the LineItem objects. Using what we know about Knockout’s computed method, we can give this new Cart object a property that computes the total when any item in the cart changes.
But what about the HTML for the line item? Well, we can reduce duplication by using a control-flow binding and tell Knockout to render our line-item HTML once for each item in our cart. Let’s get started.
First, let’s define an array of items we’ll use to populate the cart:
| knockout/update_cart.html | |
| | var products = [ |
| | {name: "Macbook Pro 15 inch", price: 1699.00}, |
| | {name: "Mini Display Port to VGA Adapter", price: 29.00}, |
| | {name: "Magic Trackpad", price: 69.00}, |
| | {name: "Apple Wireless Keyboard", price: 69.00} |
| | ]; |
In a real-world situation, we would get this data from a web service or Ajax call or by generating this array on the server side when we serve up the page.
Now, let’s create a Cart object that holds the items. We define it the same way we defined our LineItem:
| knockout/update_cart.html | |
| | var Cart = function(items){ |
| | this.items = ko.observableArray(); |
| | |
| | for(var i in items){ |
| | var item = new LineItem(items[i].name, items[i].price); |
| | this.items.push(item); |
| | } |
| | } |
We also need to change the binding in our templates from using the LineItem class to using the Cart class:
| knockout/update_cart.html | |
| | var cartViewModel = new Cart(products); |
| | ko.applyBindings(cartViewModel); |
The items are stored in the cart using an observableArray, which works like observable but has the properties of an array. When we created a new instance of our cart, we passed in the array of data. Our object iterates over the items of data and creates new LineItem instances that get stored in the items array. Since this array is observable, our user interface will change whenever the array’s contents change. Of course, now that we’re dealing with more than one item, we need to modify the user interface.
Next we modify our HTML page and tell Knockout to repeat the table rows by using a Knockout data-bind call on the <tbody> tag:
| knockout/update_cart.html | |
* | <tbody data-bind="foreach: items"> |
| | <tr aria=live="polite"> |
| | <td data-bind="text: name"></td> |
| | <td data-bind="text: price"></td> |
| | <td><input type="text" name="quantity" data-bind='value: quantity'></td> |
| | <td data-bind="text: subtotal "></td> |
| | </tr> |
| | </tbody> |
We tell Knockout to render the contents of the <tbody> for each entry in the items array. We don’t have to change anything else in that row.
At this point, we have multiple lines displaying on the page, each subtotaling correctly. Now let’s handle computing the grand total and removal of items.
The Grand Total
We saw how Knockout’s computed method works when we used it to calculate the subtotal for each item. We can use the same approach to calculate the total for the entire cart by adding a computed to the Cart itself:
| knockout/update_cart.html | |
| | this.total = ko.computed(function(){ |
| | var total = 0; |
| | for (item in this.items()){ |
| | total += this.items()[item].subtotal(); |
| | } |
| | return total; |
| | }, this); |
Any time any of the items in our array changes, this code will fire. To display the grand total on the form, we simply need to add the appropriate table row. Since it’s the total for the cart and not for a line item, it doesn’t go in the <tbody>. Instead, we’ll put it in a <tfoot> tag, which we place right above the closing <thead> tag. Placing the footer above the table body can help some browsers and assistive devices more quickly identify the table structure.
| knockout/update_cart.html | |
| | <tfoot> |
| | <tr> |
| | <td colspan="4">Total</td> |
| | <td aria-live="polite" data-bind="text: total()"></td> |
| | </tr> |
| | </tfoot> |
When we refresh our page, we can change any quantity and update both the line total and the cart total simultaneously. Now, about that Remove button...
Removing Items
To wrap up this project, we need to add a Remove button to the end of each row that removes the item from the row. Thanks to all the work we’ve done, this is a simple task. First, we add the ability to remove an item from the cart by adding a remove method to our Cart:
| knockout/update_cart.html | |
| | this.remove = function(item){ |
| | this.items.remove(item); |
| | }.bind(this); |
Notice the use of bind(this) after the declaration of the function. We need that so the function can reference the scope of the Cart. If we omit it, the remove function can’t figure out where this.items is.
With the remove method in place, we modify the table to add the Remove button:
| knockout/update_cart.html | |
| | <td> |
| | <button |
| | data-bind="click: $parent.remove">Remove |
| | </button> |
| | </td> |
This time, instead of binding data to the interface, we bind an event and a function we want to call—in this case, the remove method of our cartViewModel instance. But at this point in our code, we’re within the context of a specific item. Knockout lets us use the $parent property to reference the parent view model. And best of all, it automatically passes a reference to the current item to the function.
That’s it! Since the items array is an observableArray, our entire interface gets updated. Even our grand total changes!
Further Exploration
Knockout is great for situations where we need to build a dynamic single-page interface. And because it’s not tied to a specific web framework, we can use it anywhere.
More important, the view models Knockout uses are ordinary JavaScript, so we can use Knockout to implement many commonly requested user interface features. For example, we could very easily implement an Ajax-based live search, build in-place editing controls that save the data back to the server, or even update the contents of one drop-down field based on the selected value of another field.
Also See
-
Recipe 11, Rendering HTML with Handlebars Templates
-
Recipe 15, Creating a Search Interface with React
-
Recipe 16, Creating Client-Side Apps with Angular.js