Putting It All Together
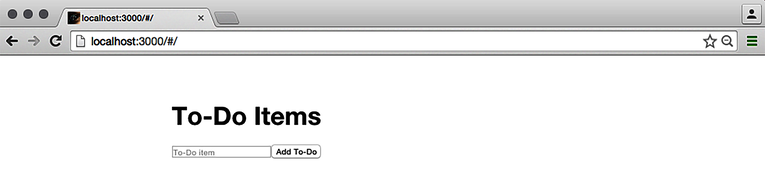
Let’s look at an example of a service that has a couple of resources that allow the client to read and write some data. The application will display a list of to-do items and allow the user to add additional items to the list.
The client will be implemented in ClojureScript and use Ajax to communicate with the service. The client code will consist of a few functions to retrieve, render, and save to-do items. Let’s look at each of these in turn.
The first function renders the items in our list.
| | (defn item-list [items] |
| | (when (not-empty items) |
| | [:ul |
| | (for [item items] |
| | ^{:key item} |
| | [:li item])])) |
Next we add a function called get-items to grab the items from the server as a string, and a function called parse-items to parse it into a list. The parse-items function expects to receive data as a newline-separated string, generating a vector from nonempty items.
| | (defn parse-items [items] |
| | (->> items |
| | clojure.string/split-lines |
| | (remove empty?) |
| | vec)) |
| | |
| | (defn get-items [] |
| | (GET "/items" |
| | {:error-handler |
| | #(session/put! :error (:response %)) |
| | :handler |
| | #(session/put! :items (parse-items %))})) |
Note the function is calling session/update-in! to store the result. This function is provided by the reagent-utils library. The session namespace contains a Reagent atom and provides several utility functions for managing its state.
The session provides a way to represent the global state for the application, such as the user information. It should not be used for any component-specific data, however. Since our application is extremely simple, it’s a convenient way to track the to-do items.
If we receive an error, the :error-handler is invoked and it populates the :error key in the session.
We also need to add a function for adding new items to the list. Let’s call this function add-item!; its code looks as follows:
| | (defn add-item! [item] |
| | (session/remove! :error) |
| | (POST "/items" |
| | {:headers {"x-csrf-token" |
| | (.-value (.getElementById js/document "__anti-forgery-token"))} |
| | :format :raw |
| | :params {:item (str @item)} |
| | :error-handler #(session/put! :error (:response %)) |
| | :handler #(do |
| | (println "updating") |
| | (session/update-in! [:items] conj @item) |
| | (reset! item nil))})) |
This function looks for the anti-forgery token on the page and sets it as the header, as we’ve done before. It also sets the :format key to the :raw value, indicating that we don’t wish to do any processing on the data we send and receive. The success handler updates the session to conj the value to the list and resets the item atom to nil. Errors are handled the same way as for the previous component.
To use the add-item! function, we have to create a UI component; let’s call it item-input-component and put the following code in it:
| | (defn item-input-component [] |
| | (let [item (atom nil)] |
| | (fn [] |
| | [:div |
| | [:input |
| | {:type :text |
| | :value @item |
| | :on-change #(reset! item (-> % .-target .-value)) |
| | :placeholder "To-Do item"}] |
| | [:button |
| | {:on-click #(add-item! item)} |
| | "Add To-Do"]]))) |
The component creates a local state to hold the value of the item as it’s being typed in by the user and then calls the add-item! function to send it to the server.
Finally, we create the error-component that displays itself whenever the :error key is present in the session.
| | (defn error-component [] |
| | (when-let [error (session/get :error)] |
| | [:p error])) |
Let’s update the home-page component to display the components that we just created.
| | (defn home-page [] |
| | [:div |
| | [:h2 "To-Do Items"] |
| | [error-component] |
| | [item-list (session/get :items)] |
| | [item-input-component]]) |
Now let’s update the init! function to fetch the initial list of to-do items from the server when the page loads.
| | (defn init! [] |
| | (clerk/initialize!) |
| | (accountant/configure-navigation! |
| | {:nav-handler |
| | (fn [path] |
| | (let [match (reitit/match-by-path router path) |
| | current-page (:name (:data match)) |
| | route-params (:path-params match)] |
| | (reagent/after-render clerk/after-render!) |
| | (session/put! :route {:current-page (page-for current-page) |
| | :route-params route-params}) |
| | (clerk/navigate-page! path) |
| | )) |
| | :path-exists? |
| | (fn [path] |
| | (boolean (reitit/match-by-path router path)))}) |
| | (accountant/dispatch-current!) |
| | (mount-root)) |
Now we’ll create corresponding resources to handle each of the operations. Let’s start by adding a reference to clojure.java.io to read and write the to-do file and to ring.util.anti-forgery for handling CSRF.
| | (ns liberator-service.routes.home |
| | (:require ... |
| | [clojure.java.io :as io] |
| | [ring.util.anti-forgery :refer [anti-forgery-field]])) |
Next let’s change the home-page and add the anti-forgery-field to it. This is necessary to ensure that a fresh anti-forgery value is generated for each session. We also have to update the home resource accordingly.
| | (def mount-target |
| | [:div#app |
| | [:h2 "Welcome to liberator-service"] |
| | [:p "please wait while Figwheel is waking up ..."] |
| | [:p "(Check the js console for hints if nothing exciting happens.)"]]) |
| | |
| | (defn head [] |
| | [:head |
| | [:meta {:charset "utf-8"}] |
| | [:meta {:name "viewport" |
| | :content "width=device-width, initial-scale=1"}] |
| | (include-css (if (env :dev) "/css/site.css" "/css/site.min.css"))]) |
| | (defn loading-page [request] |
| | (html5 |
| | [:html |
| | (head) |
| | [:body |
| | (anti-forgery-field) |
| | [:p (str (anti-forgery-field))] |
| | mount-target |
| | (include-js "/js/app.js")]])) |
| | |
| | (defresource home |
| | :allowed-methods [:get] |
| | :handle-ok loading-page |
| | :etag "fixed-etag" |
| | :available-media-types ["text/html"]) |
Let’s create a resource that responds to GET requests and returns the contents of the items file found in the root directory of the project. Note that when we’re working with mutable resources such as files, we don’t wish to place them in the resources folder. Once the application is packaged as a JAR, then the resources become read-only. Therefore, we need to reference these from an external location.
| | (defresource items |
| | :allowed-methods [:get] |
| | :handle-ok (fn [_] (io/file "items")) |
| | :available-media-types ["text/plain"]) |
In the resource, we use the :allowed-methods key to restrict it to only serve GET requests. We use the available-media-types declaration to specify that the response is of type text/plain. The resource then reads the items file from disk and returns its contents to the client.
Next, we update the resource to support POST requests that will allow adding an item contained in params to the list of items on disk.
| | (defresource items |
| | :allowed-methods [:get :post] |
| | :handle-ok (fn [_] (io/file "items")) |
| | :available-media-types ["text/plain"] |
| | |
| | :post! |
| | (fn [context] |
| | (let [item (-> context :request :params :item)] |
| | (spit (io/file "items") (str item " ") :append true))) |
| | :handle-created (io/file "items")) |
The updated resource checks that the method is either GET or POST and uses the post! action to update the existing list of items. We then use the handle-created handler to return "ok" upon success.
You’ll notice that nothing is preventing us from adding a blank item. Let’s add a check in our service to validate the request to add a new item:
| | (defresource items |
| | :allowed-methods [:get :post] |
| | :handle-ok (fn [_] (io/file "items")) |
| | :available-media-types ["text/plain"] |
| | |
| | :post! |
| | (fn [context] |
| | (let [item (-> context :request :params :item)] |
| | (spit (io/file "items") (str item " ") :append true))) |
| | :handle-created "ok" |
| | |
| | :malformed? (fn [context] |
| | (-> context :request :params :item empty?)) |
| | :handle-malformed "item value cannot be empty!") |
Now, if the value of the item parameter is empty, we’ll be routed to handle-malformed to inform the client that the item name cannot be empty. Next time we try to add an empty user, we’ll see a 400 error in the browser:
| | POST http://localhost:3000/add-user 400 (Bad Request) |
If you click the Add To-Do button without filling in the item field, you’ll see the following error:
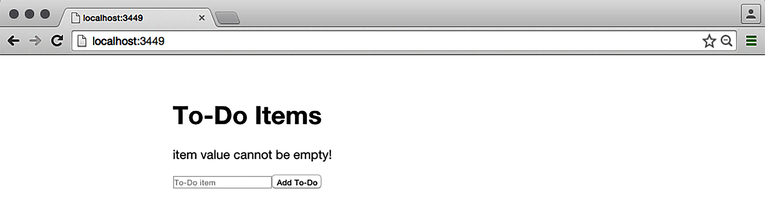
As you can see, Liberator ensures separation of concerns by design. With the Liberator model, you’ll have small, self-contained functions, each of which handles a specific task.