
Report Generation
In this section we’ll cover how we can easily generate reports from the data we collect in our database using the clj-pdf library.[43] Then we’ll discuss how to serve the generated PDF to the browser using the appropriate response type.
Our application will have an employee table that will be populated with some sample data. We’ll use this data to create a couple of different PDF reports and allow the users to select the type of report they wish to view.
The first thing we’ll need to do is configure our database. For this example we’ll be using the PostgreSQL database.
Setting Up the PostgreSQL Database
Installing PostgreSQL is very easy. If you’re using OS X, then you can simply run Postgres.app.[44] On Linux, you can install PostgreSQL from your package manager. For example, if you’re using Ubuntu you can run sudo apt-get install postgresql.
Once installed, we set the password for the user postgres using the psql shell. The shell can be invoked by running the psql command from the console.
| | sudo -u postgres psql postgres |
| | password postgres |
With the default user set up we’ll create an admin user with the password set to admin.
| | CREATE USER admin WITH PASSWORD 'admin'; |
Then we can create a schema called REPORTING to store our reports by running the following command:
| | CREATE DATABASE REPORTING OWNER admin; |
Note that we’re using the admin user here to save time. You should always create a dedicated user and grant only the necessary privileges for any database you wish to run in production.
With the database configuration out of the way, let’s create a new application called reporting-example using the compojure-app template.
We’ll now open the project.clj file and add the necessary dependencies to it:
| | :dependencies [... |
| | [postgresql/postgresql "9.1-901.jdbc4"] |
| | [org.clojure/java.jdbc "0.2.3"] |
| | [clj-pdf "1.11.6"] |
Let’s start the read-evaluate-print loop (REPL) by running (start-server) in the reporting-example.repl namespace.
With the REPL running, let’s create a new namespace called reporting-example.models.db and add our database configuration there.
We’ll navigate to the db namespace and create our database connection using clojure.java.jdbc.
| reporting-example/src/reporting_example/models/db.clj | |
| | (ns reporting-example.models.db |
| | (:require [clojure.java.jdbc :as sql])) |
| | |
| | (def db {:subprotocol "postgresql" |
| | :subname "//localhost/reporting" |
| | :user "admin" |
| | :password "admin"}) |
Then we’ll make an employee table and populate it with the sample data:
| reporting-example/src/reporting_example/models/db.clj | |
| | (defn create-employee-table [] |
| | (sql/create-table |
| | :employee |
| | [:name "varchar(50)"] |
| | [:occupation "varchar(50)"] |
| | [:place "varchar(50)"] |
| | [:country "varchar(50)"])) |
| | (sql/with-connection |
| | db |
| | (create-employee-table) |
| | (sql/insert-rows |
| | :employee |
| | ["Albert Einstein", "Engineer", "Ulm", "Germany"] |
| | ["Alfred Hitchcock", "Movie Director", "London", "UK"] |
| | ["Wernher Von Braun", "Rocket Scientist", "Wyrzysk", "Poland"] |
| | ["Sigmund Freud", "Neurologist", "Pribor", "Czech Republic"] |
| | ["Mahatma Gandhi", "Lawyer", "Gujarat", "India"] |
| | ["Sachin Tendulkar", "Cricket Player", "Mumbai", "India"] |
| | ["Michael Schumacher", "F1 Racer", "Cologne", "Germany"])) |
Finally, we’ll write a function to read the records from the table:
| reporting-example/src/reporting_example/models/db.clj | |
| | (defn read-employees [] |
| | (sql/with-connection db |
| | (sql/with-query-results rs ["select * from employee"] (doall rs)))) |
Let’s run read-employees to make sure everything is working as expected. We should see something like the following:
| | (read-employees) |
| | |
| | ({:country "Germany", |
| | :place "Ulm", |
| | :occupation "Engineer", |
| | :name "Albert Einstein"} |
| | {:country "UK", |
| | :place "London", |
| | :occupation "Movie Director", |
| | :name "Alfred Hitchcock"} |
| | ...) |
You’ll notice that the result of calling read-employees is simply a list of maps where the keys are the names of the columns in the table.
Let’s see how we can use this to create a table listing the employees in our database.
Report Generation
The clj-pdf library uses syntax similar to Hiccup’s to define the elements in the document. The document itself is represented by a vector. The document vector must contain a map representing the metadata as its first element. The metadata is followed by one or more elements representing the document’s content.
Let’s create a namespace called reporting-example.reports and look at a few examples of creating PDF documents. We’ll use the pdf function to create the reports, and the template function to format the input data.
| | (ns reporting-example.reports |
| | (:require [clj-pdf.core :refer [pdf template]])) |
The pdf function accepts two arguments. The first can be either a vector representing the document or an input stream from which the elements will be read. The second can be a string representing the output file name or an output stream.
Let’s generate our first PDF by running the following in our reports namespace:
| | (pdf |
| | [{:header "Wow that was easy"} |
| | [:list |
| | [:chunk {:style :bold} "a bold item"] |
| | "another item" |
| | "yet another item"] |
| | [:paragraph "I'm a paragraph!"]] |
| | "doc.pdf") |
As you can see, the report consists of vectors, each starting with a keyword identifying the type of element, followed by optional metadata and the content. In the preceding report we have a list that contains three rows, followed by a paragraph. The PDF will be written to a file called doc.pdf in our project’s root. The contents of the file should look like the following figure.

Figure 14. Our first PDF
Next, let’s see how we can use the template macro to format the employee data into a nice table. This macro uses $ to create anchors to be populated from the data using the keys of the same name.
The template returns a function that accepts a sequence of maps and applies the supplied template to each element in the sequence. In our case, since we’re building a table, the template is simply a vector with the names of the keys for each cell in the row. We’ll add the following template to the reporting-example.reports namespace.
| | (def employee-template |
| | (template [$name $occupation $place $country])) |
Let’s add the reference to our db namespace and try running our template against the database:
| reporting-example/src/reporting_example/reports.clj | |
| | (ns reporting-example.reports |
| | (:require [clj-pdf.core :refer [pdf template]] |
| | [reporting-example.models.db :as db])) |
We should see the following output after running (employee-template (take 2 (db/read-employees))) in the REPL:
| | (["Albert Einstein" "Engineer" "Ulm" "Germany"] |
| | ["Alfred Hitchcock", "Movie Director", "London", "UK"]) |
Looks like our template works as expected. Let’s use it to generate a report containing the full list of our employees:
| | (pdf |
| | [{:header "Employee List"} |
| | (into [:table |
| | {:border false |
| | :cell-border false |
| | :header [{:color [0 150 150]} "Name" "Occupation" "Place" "Country"]}] |
| | (employee-template (db/read-employees)))] |
| | "report.pdf") |
The resulting report should look like the following figure.
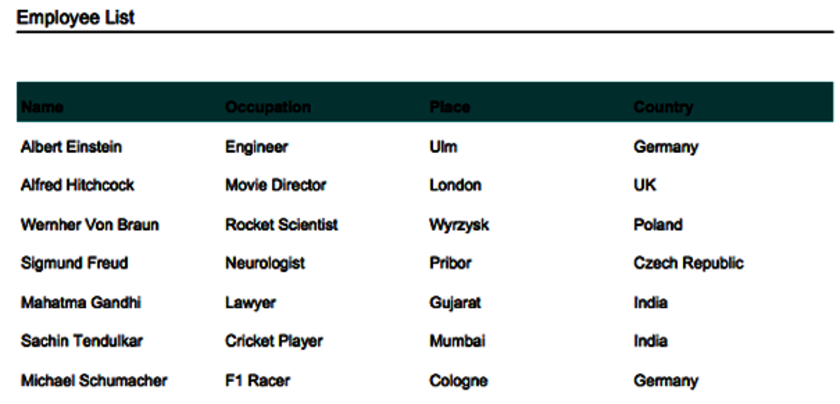
Figure 15. Employee table report
Of course, the template we used for this report is boring. Let’s look at another example. Here we’ll output the data in a list and style each element:
| reporting-example/src/reporting_example/reports.clj | |
| | (def employee-template-paragraph |
| | (template |
| | [:paragraph |
| | [:heading {:style {:size 15}} $name] |
| | [:chunk {:style :bold} "occupation: "] $occupation "
" |
| | [:chunk {:style :bold} "place: "] $place "
" |
| | [:chunk {:style :bold} "country: "] $country |
| | [:spacer]])) |
Now let’s create a report using the employee-template-paragraph by running the following:
| | (pdf |
| | [{} |
| | [:heading {:size 10} "Employees"] |
| | [:line] |
| | [:spacer] |
| | (employee-template-paragraph (db/read-employees))] |
| | "report.pdf") |
Our new report will look like the following figure.
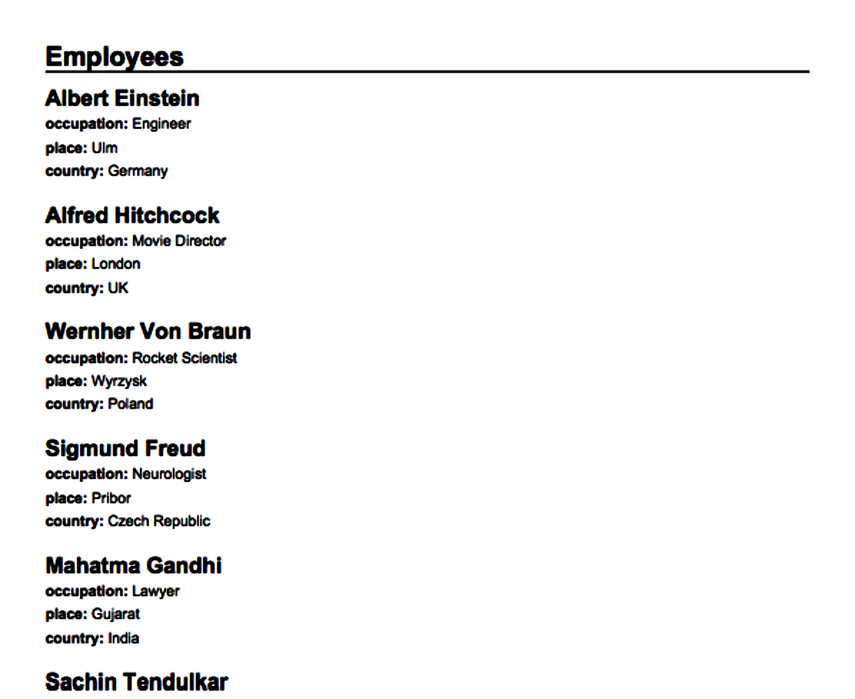
Figure 16. Employee list report
Displaying the Reports
Now that we’ve created a couple of reports on our data, let’s see how we can serve them from our application. We’ll write the functions to create a list and table reports using the preceding examples:
| reporting-example/src/reporting_example/reports.clj | |
| | (defn table-report [out] |
| | (pdf |
| | [{:header "Employee List"} |
| | (into [:table |
| | {:border false |
| | :cell-border false |
| | :header [{:color [0 150 150]} "Name" "Occupation" "Place" "Country"]}] |
| | (employee-template (db/read-employees)))] |
| | out)) |
| | |
| | (defn list-report [out] |
| | (pdf |
| | [{} |
| | [:heading {:size 10} "Employees"] |
| | [:line] |
| | [:spacer] |
| | (employee-template-paragraph (db/read-employees))] |
| | out)) |
Next, we’ll navigate to reporting-example.routes.home and add some references needed to generate the report route.
| reporting-example/src/reporting_example/routes/home.clj | |
| | (ns reporting-example.routes.home |
| | (:require [hiccup.element :refer [link-to]] |
| | [ring.util.response :as response] |
| | [compojure.core :refer [defroutes GET]] |
| | [reporting-example.reports :as reports] |
| | [reporting-example.views.layout :as layout])) |
We’ll update the home function to provide links to each of the reports:
| reporting-example/src/reporting_example/routes/home.clj | |
| | (defn home [] |
| | (layout/common |
| | [:h1 "Select a report:"] |
| | |
| | [:ul |
| | [:li (link-to "/list" "List report")] |
| | [:li (link-to "/table" "Table report")]])) |
Now we’ll write a function to generate the response. We’ll create an input stream using a supplied byte array and set it as the response. We’ll also set the appropriate headers for the content type, the content disposition, and the length of the content.
| reporting-example/src/reporting_example/routes/home.clj | |
| | (defn write-response [report-bytes] |
| | (with-open [in (java.io.ByteArrayInputStream. report-bytes)] |
| | (-> (response/response in) |
| | |
| | (response/header "Content-Disposition" "filename=document.pdf") |
| | (response/header "Content-Length" (count report-bytes)) |
| | (response/content-type "application/pdf")) )) |
We’ll write another function to generate the report. This function will create a ByteArrayOutputStream that will be used to store the report. Then it will call one of our report-generation functions with it. Once the report is generated we’ll call write-response with the contents of the output stream.
| reporting-example/src/reporting_example/routes/home.clj | |
| | (defn generate-report [report-type] |
| | (try |
| | (let [out (new java.io.ByteArrayOutputStream)] |
| | (condp = (keyword report-type) |
| | :table (reports/table-report out) |
| | :list (reports/list-report out)) |
| | (write-response (.toByteArray out))) |
| | |
| | (catch Exception ex |
| | {:status 500 |
| | :headers {"Content-Type" "text/html"} |
| | :body (layout/common |
| | [:h2 "An error has occured while generating the report"] |
| | [:p (.getMessage ex)])}))) |
Last but not least, we’re going to create a new route to serve our reports.
| reporting-example/src/reporting_example/routes/home.clj | |
| | (defroutes home-routes |
| | (GET "/" [] (home)) |
| | (GET "/:report-type" [report-type] (generate-report report-type))) |
You should now be able to navigate to http://localhost:3000 and select a link to one of the reports. When you click on the link the corresponding report will be served.