chapter 3
WORKING THE GETTING-READY ROOMS
It’s showtime! Your first performance under pressure occurs in the rooms where the couple gets ready. Why am I including a chapter on these getting-ready rooms? It’s because this is where the wedding really begins. Most importantly, what you do and say and how you behave in these rooms determines how the couple, the immediate family, and the wedding party will judge you for the entire wedding and thereafter.
In this chapter, we will spend time looking at the challenges and opportunities all rooms present to us. Sometimes, couples get ready at home or at their parents’ residences, or both bride and groom get ready at the same hotel. But one thing is certain: the numerous room angles, lighting decisions, and composition decisions are quite overwhelming.
So what do we do to cope with all these possibilities? Typically, we photographers run to the window, position our clients near it, start shooting with that “oh so familiar” window light, and ignore the rest of the room. Does that get the job done? Absolutely! But will your work be just a carbon copy of the work of hundreds of thousands of wedding photographers around the world? You guessed it: yes, it will. All aspects of a wedding are challenging, but from a creative point of view, the bride and groom getting-ready portion is the most challenging. During this segment of the wedding, the photographer has the most decisions to make, the most interactions with close family members and the wedding party, and the most equipment on hand. Many wedding photographers have no idea what they are walking into as they enter the room.
That said, it is likely that you will have more time to unleash your creative side, because the getting-ready portion of the wedding offers unique opportunities that allow you to distinguish yourself from other photographers. Think about it: If you study the ceremony coverage of a hundred random wedding photographers, most of their work will blend together and look rather similar, particularly the reception and family photos. What remains are the getting-ready photos and the bride-and-groom portraits, and this is where your skills can truly flourish.
THE FIVE KEY PHOTOGRAPHIC ELEMENTS IN ROOMS
As soon as I walk into a room to begin my getting-ready coverage, I look around and assess the following elements to analyze the room, to harness its creative possibilities, and to develop a game plan to deal with its challenges. Otherwise, the room would just be any other room. A master wedding photographer walks into a room, and his or her training kicks into gear in order to figure out how to take advantage of the following five elements to their maximum potential. These elements will yield the most beautiful and creative photographs.
Light and Circumstantial Light Modifiers
Where is the strongest light in the room coming from? Is the light coming through the window directly or indirectly? (Note: Direct light means that if you look out the window, you see the sun’s rays penetrating straight through the window. If the sun is on the opposite side of the building, then you are dealing with indirect light.) I also take notice of all the lampshades in the room. These lamps usually cast a warm color and could be used to create mood lighting. Circumstantial light modifiers are anything in the room that can be used to control, shape, diffuse, or reflect light.
Walls
What color are the walls? This determines whether you use the walls as a reflector or as a background. A light-colored wall can be used as both, but a red wall would create an unflattering color cast and thus would make a poor reflector. However, a red wall could make a great contrasting background. I also look for clean patches of wall that are free of décor. These clean patches of wall make great distraction-free backgrounds for portraiture.
Reflective Surfaces
It is also important to consider all reflective surfaces. Some are as obvious as mirrors, but other items are reflective as well. For example, glossy tabletops, the glass from framed art hanging on the walls, even the TV when it’s turned off can be a possible source for reflections.
Compositional Elements
I quickly scan the room for all its compositional elements—anything that can be used to frame a story. Examples include door frames, arched entryways, and window frames. This is also when I try to find two rooms that can be seen with a single glance. This architectural element can be used to show two or more stories happening simultaneously in a single photograph.
Posing Props
The final major element I look for is all the posing props present in the room such as sofas, chairs, beds, and tables. These objects can be used to create natural-looking posing variations for groups and individuals.
At first, you will use these elements in a somewhat rudimentary way. Basically, you most likely will be drawn to the most obvious use for that particular item. For example, if you notice a mirror, you might ask the groom to look at himself in the mirror while getting ready, and you take a photo of his reflection. That is fine, but it is obvious.
A more creative way to use the mirror would be to tap into its reflective qualities to tell a story. For example, when the groom is putting on his suit jacket or adjusting his cufflinks, you could take a photo of this action by placing the groom on the left side of the frame, while on the right side you include the mirror in your composition to show a hint of the groom’s father reacting emotionally to this moment. Now you are telling a great visual story instead of just stating the obvious.
THE PLAYERS IN THE ROOM
Beds and Pillows
Beds: To the average person, a bed is a piece of furniture used for sleeping (Figure 3.1). To a trained wedding photographer, a bed is a posing prop. The large surface area raised two or three feet above the ground provides a great prop to spread out individuals for a group photo, such as the bridesmaids or the groomsmen. The bed’s height can be used to seat some people on the bed while others are on the ground. This allows for a more interesting group shot due to the height difference. When the heads of a group are at different heights, the eyes of the viewer travels up and down to notice all their faces.

FIGURE 3.1
Pillows: A pillow can become a portable reflector. This works especially well if you are dealing with strong, direct window light. A white pillow can be valuable by providing some much-needed fill light on a tight portrait. A pillow won’t be able to help much if there is weak window light coming into the room, but you can also fire a flash onto a pillow to bounce its light. Furthermore, you can remove the pillowcase and place a flash inside it to shoot through it and diffuse the light, creating beautiful soft light on a subject. If you need the light from the flash to be even softer, simply fold the pillowcase in half or use two pillowcases. You’ll never look at a pillowcase in the same way again.
Heavy Curtains
Heavy curtains can be opened and closed to control the amount of light coming into the room (Figure 3.2). Curtains behave no differently than the black flags used in studio setups to control the spread of light. When the curtains are all the way open, the maximum amount of window light enters the room and bounces around the walls, floors, furniture, etc. This softens the intensity of light, giving you a low-contrast look, because the light must spread throughout the whole room.
However, by closing the curtains almost all the way and leaving just a narrow gap for the light to travel through, you highly increase the intensity of light coming in through that slit. If you place a subject near the window in the direct path of this high-intensity light, that part of the subject’s face will be strongly lit, and the rest of the room will appear pitch black. This creates a high-contrast portrait.
So, just to review: Open window curtains yield a lower-contrast look, and nearly closed curtains yield a high-contrast look if your subject is near the window.

FIGURE 3.2
Sheer Curtains
Sheer curtains are made from a thin, translucent material (Figure 3.3). Sheers are an example of a circumstantial light modifier. These ultra-thin curtains are perfect for softening direct window light that’s hitting the room too strongly, making them effective for providing the bride with a very soft quality of light. You can also shoot through these sheer curtains to create a dreamy effect on your subject. This is another perfect way to create something unique for the bridal portraits in the getting-ready room.

FIGURE 3.3
Sofas
Like beds, sofas are a perfect posing prop for a single subject or a group (Figure 3.4). With a sofa, some in the group can sit on the floor and rest their backs against the seat cushions, and some can sit on the sofa itself. You can also have someone sit on the armrests. Again, by having a height variation in your subjects’ positions, you create a much more interesting composition. Additionally, I often use sofas to show brides or grooms getting ready, because they look much more relaxed when they are sitting down. If the sofa location is not receiving optimum window light, I can always supplement the light with a flash bounced off a wall so that they blend together seamlessly.

FIGURE 3.4
Tables
Tables can be used as an in-between sitting and standing posing prop (Figure 3.5). If the goal is for the subject to appear relaxed, a table like this is at the perfect height to allow the subject to rest his or her backside on it. This will most likely force the subject to bend one knee and therefore look much more relaxed than if he or she were just standing with locked knees. Once resting on the table, the subject can proceed with normal getting-ready activities, such as putting on cufflinks, etc. Another benefit of using tables as posing props is that by resting his or her buttocks on the table, the subject can more easily attain great posture.
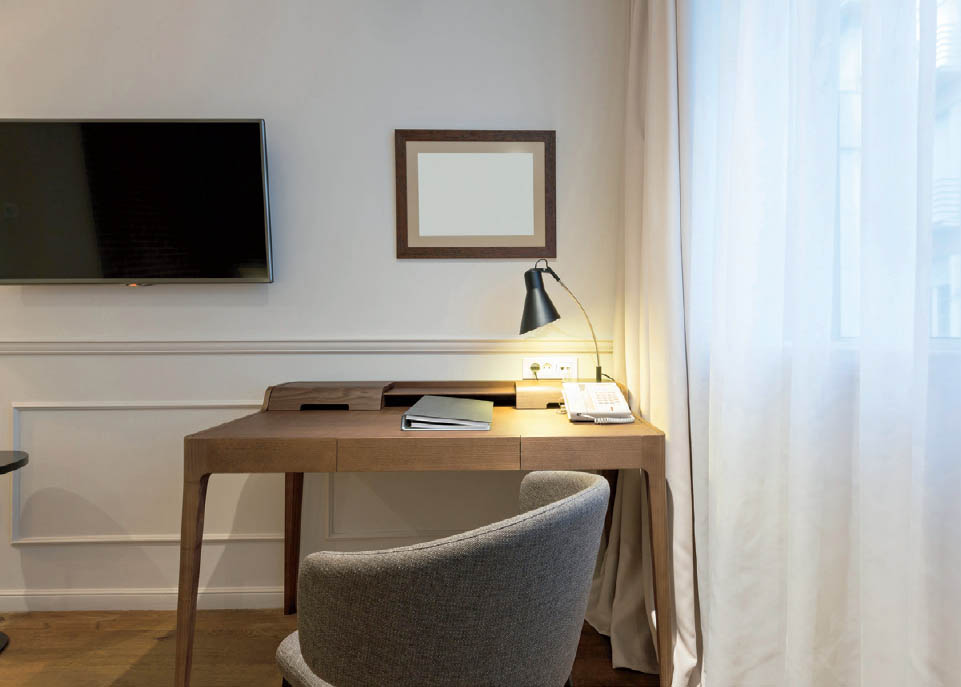
FIGURE 3.5
Besides being used as a posing prop, tables such as this can also be used to arrange some getting-ready details with an interesting and pleasing background, such as the table’s wood grain. When you use a macro lens, details such as cufflinks, wedding bands, and bowties appear much more refined with a beautiful non-distracting background.
Framed Wall Art
Framed wall art works as a hidden source of reflection (Figure 3.6). Most rooms have some sort of framed wall art in glass. This piece of glass, if viewed from the correct angle, can reveal a hidden reflection, just like a mirror. To achieve this, you must place your camera parallel to the surface of the framed work and the side of the lens hood near or actually touching the glass. At this angle, the art disappears, leaving behind an imaginative reflection. What you do with that reflection is up to your creativity. This technique really impresses people, because to them, it feels like magic. I’ve gotten some pretty interesting reactions when people see the results of such an odd thing to do.
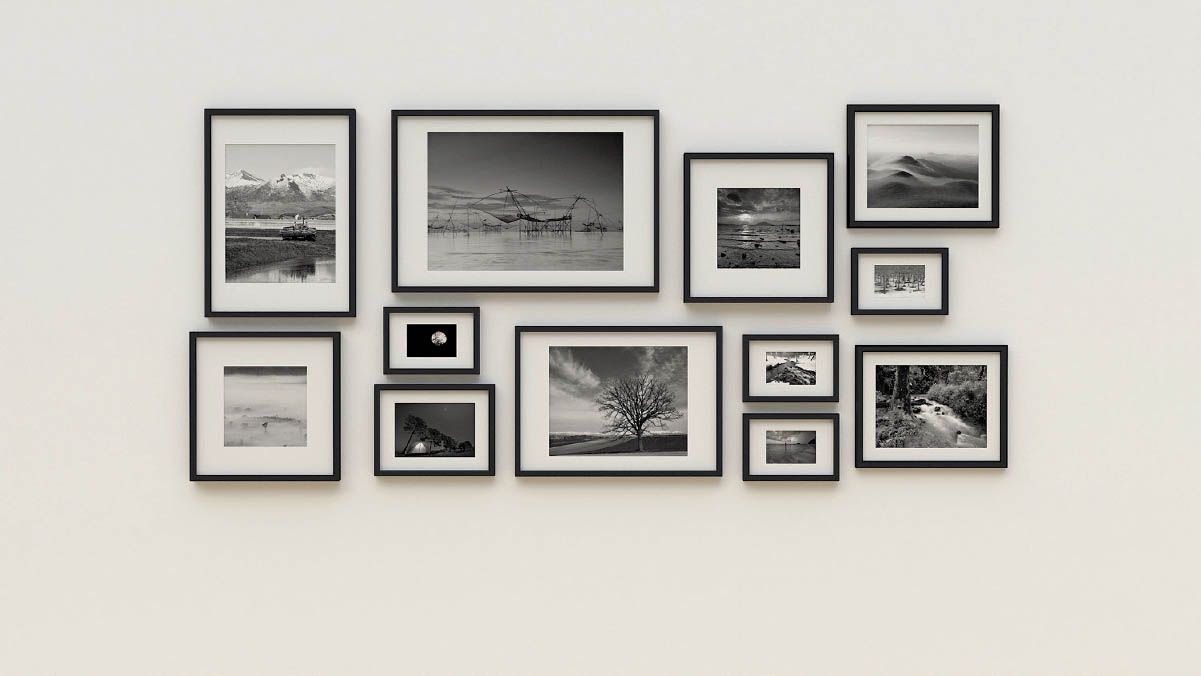
FIGURE 3.6
Floor or Table Lamps
Floor or table lamps are frequently found in all rooms (Figure 3.7). They are usually fitted with a warm tungsten light bulb. Both the warm tone and the shape of the light that the lampshade creates provide an opportunity to shoot some great, moody portraits. A portrait lit with tungsten light is so far from the color temperature of the usual window light that it gives the viewer a much-needed variation of moods during the getting-ready coverage. When using a tungsten lamp to take a portrait, be particularly vigilant about the camera’s white balance settings. I usually avoid the preset white balance options and choose an exact Kelvin temperature number, such as 2200K, to balance out the warm tungsten light.
Mirrors/Reflective Surfaces
Mirrors are the most obvious kind of reflective surfaces (Figure 3.8). For this reason, you should try to find a more creative way to use a mirror’s reflection so that you avoid doing what every other photographer does. As I mentioned earlier, it is possible to use the mirror to show the reflection of a special relative reacting to the bride or groom getting ready in the room.
If you look closely, most mirrors have a bevel around the edge. This bevel is important, because with the right lens and angle, this bevel can yield a very interesting reflection instead of a standard one. Now let’s look at the table. For this particular situation, I would start by removing all the items from the table and placing them on the floor to clean up the entire surface. The glass top is basically another mirror with a less prominent reflection. You could use the clean glass tabletop to photograph and capture reflections of details, such as rings, shoes, cufflinks, necklaces, bowties, earrings, or even written wedding vows.
Piano tops or turned-off televisions are also somewhat reflective. For a television, be sure not to show its outer edges. It is far better to keep the viewer wondering how you achieved that reflection. Look for any glossy surface and envision what you can do with it. Use its reflective qualities to convey part of a story instead of just a reflection of the obvious.
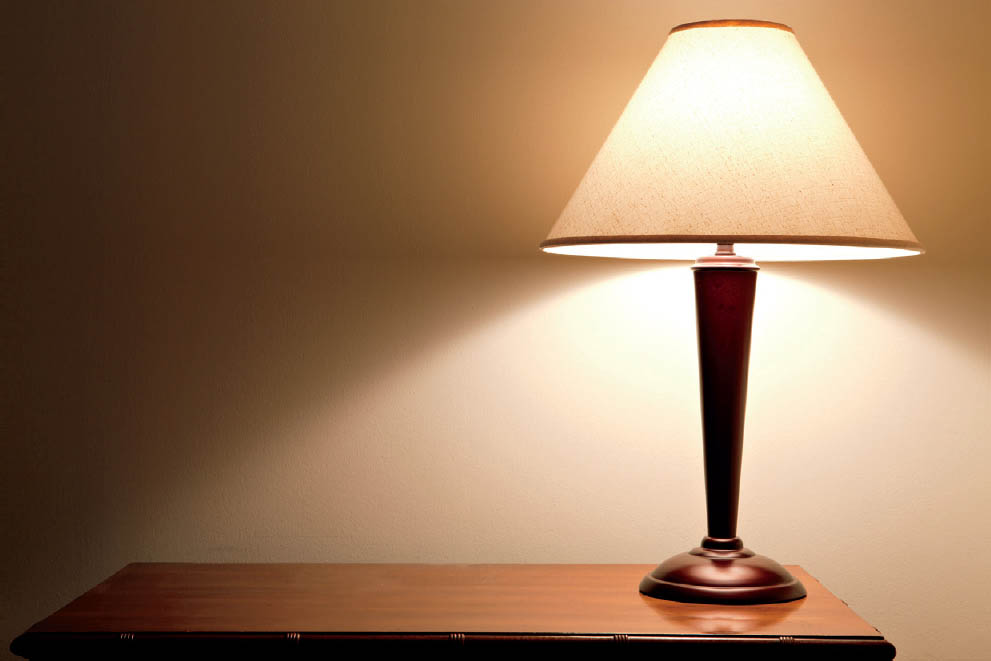
FIGURE 3.7
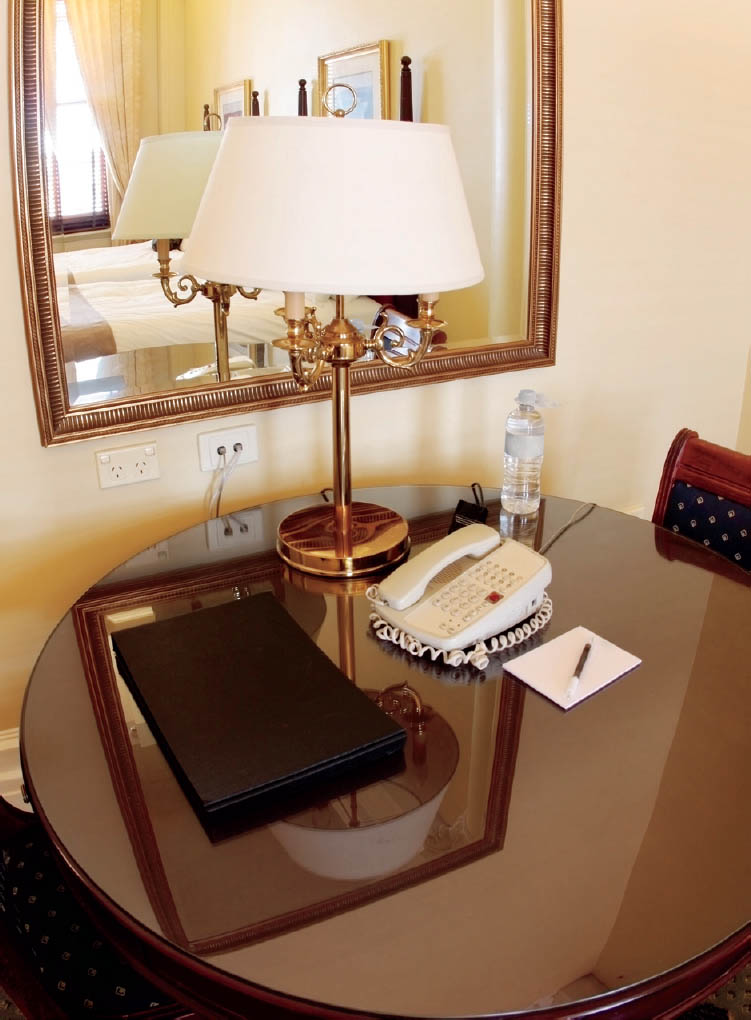
FIGURE 3.8
Two or More Rooms in a Single Glance
This is, hands down, one of my favorite architectural attributes to tell stories in a more compelling way (Figure 3.9). When you can see two or more rooms at the same time in front of you, it is a great opportunity to show a story in each room happening simultaneously. For example, in one room, you might have the bride adjusting her bracelet or reading a note from her husband-to-be, and in the other room, the bride’s parents or bridesmaids could be engaged in a different activity.

FIGURE 3.9
This kind of image is a real crowd-pleaser. Clients love seeing how their photographer used the architecture in the room to convey two stories happening simultaneously. Combine this technique with great lighting, and you have achieved a photographic winner.
ROOM ANALYSIS
For the last section of this chapter, I will show you a few kinds of getting-ready rooms that are commonly used by the bride or groom. The numbered callouts in each of the photographs represent something I would have spotted as a photographic element of interest.
I recommend looking at these photos and not only taking what I say into account, but studying the rooms and asking yourself what you would do there. Try to imagine five groomsmen getting ready. Where would you place them for a group portrait based upon that particular room? Where would you stand? What lenses would you use? Then, do the same exercise with the groom or the bride alone in the room. It is far better to prepare your brain to become used to these questions while in the comfort of your home, rather than during the pressure of a real wedding.
Please note that what I have noted with respect to each of the rooms is my own analysis of the elements that I observe. There is no right or wrong, just my own personal opinion. I am conveying these notes in exactly the same way I would think about them inside my head. Let’s start with Figure 3.10.

FIGURE 3.10
1. TV: The TV turned off can provide a subtle reflection. The TV is at the perfect height to make the reflection work.
2. Wallpaper: The wallpaper is a nice tan color. If I were to bounce a flash on that wall, the resulting color cast would be flattering to my subjects.
3. Lamp: A tungsten lamp could be used to create a moody portrait. I could also open or close the curtains (6) to subtract or add fill light to the portrait.
4. Table: The table has a glass top. These glass tabletops are highly reflective and could be used to shoot some interesting photos of the wedding details. The table is also at the perfect height to be used as a standing/resting prop. The table is also close enough to the window light to produce attractive lighting on the subject.
5. Chair: The chair can be used as a posing prop. The subject could sit on the armrests or on the chair normally. The chair can be moved closer to the window to create a more relaxed portrait of the subject.
6. Heavy curtains: These curtains are heavy enough to block most of the light coming into the room. By manipulating the curtains, I could greatly change the light characteristics of the room, especially because the window is the main light source.
7. Carpet: The room has carpet. This means that the light coming into the room will be mostly absorbed by the carpet and not reflected back up. However, the carpet colors blend well with the rest of the room. If I had to show the carpet in any of my photos, it wouldn’t be unsuccessful.
8. Sheer curtains: With the sheers closed, the light coming in from the sun would be greatly diffused and softened. This could be a good move if I wanted to create a lower-contrast portrait. I can also tightly place the diffused material over my lens and create a dreamy or painterly portrait.
9. Beds: The bed closer to the window can be used as a posing prop. The bed further away from the window can be used to hold my flash and bounce it against the opposite wall from the window to provide fill flash across the room. There are also plenty of pillows that could be used as reflectors or diffusers.
10. Metal piece on the wall: That rectangular metal piece on the wall is unfortunately on the best part of a clean patch of wall next to the window. Therefore, I should move the chair from the other side of the room and use that portion of clean wall as a possible background for some of the photos.
11. Ceiling: The ceiling is painted a lighter color than the wallpaper. In fact, the ceiling color is off-white, which is perfect for bounced flash without the risk of introducing an unwanted color cast in the room.
12. Art: The hanging art has a reflective glass top. However, it is hanging far too high to be useful.
Now let’s move on to the next room (Figure 3.11).
1. Wallpaper: The wallpaper has great dark colors with a cool pattern that could be used for a higher-contrast background. However, at this location near the window, there is not enough space to fit a person between the bed and the window. The solution is to create my own window light using a flash shot through a diffuser. If I moved the couch (9) out of the way, I would have plenty of space.
2. Red curtains: Red is a nice accent color for a room. But for photography, you must be careful not to create a red color cast on the subject if he or she is photographed close to the curtains. Red is also very difficult to print. Most printers don’t reproduce the red color correctly, and the result is a strange off-red color. I would most likely avoid it.
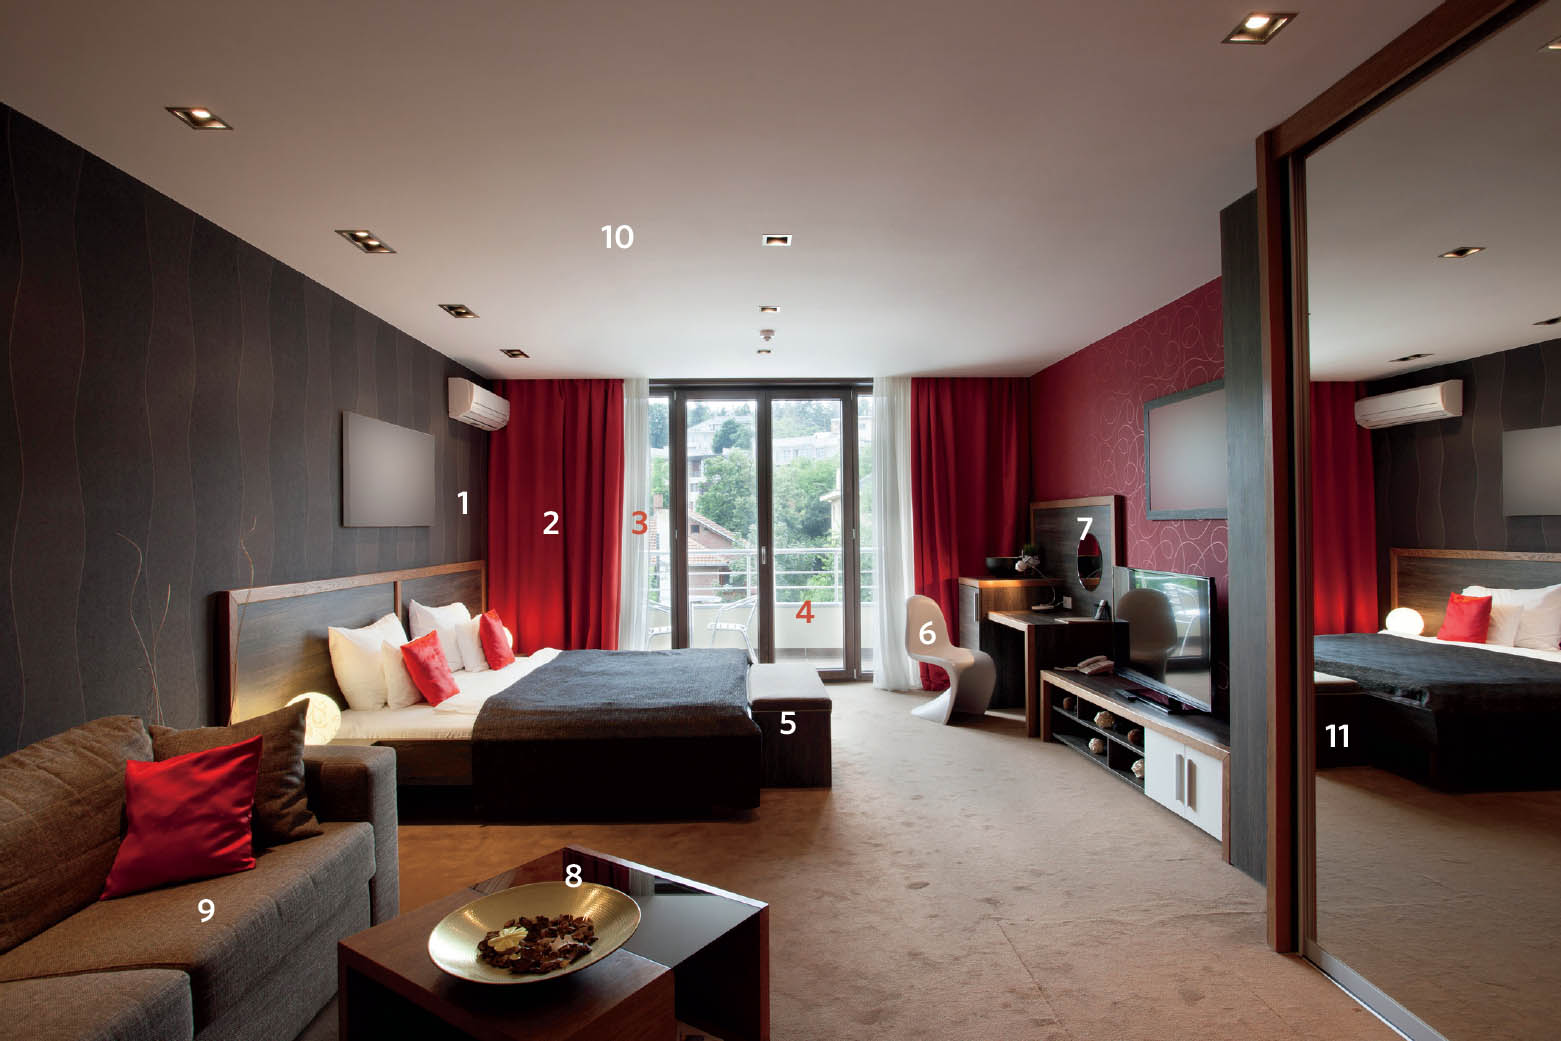
FIGURE 3.11
3 and 4. Sheer curtains and balcony: In this room, we have a unique opportunity that most rooms don’t offer. There is a balcony and sheer curtains between the balcony and the room. That’s awesome! This means that I could place one to three flashes outside facing the room and close the sheers completely. The light from the flashes traveling through the sheer curtains would look very much like nice, strong window light. For this to work, I would have to shoot near the window into the room, so that the flashes weren’t visible (they would be behind me). I would take a few photos with this lighting setup, and then pick up my flashes and move on to something else.
5. Bed bench: With the lighting setup I just discussed, I could move this piece of furniture around to fit my desired angle by considering the light from the flashes coming inside. There are some amazing opportunities in this room.
6 and 7. Chair and mirror: The white chair near the circular mirror above that piece of furniture could be used to create something special. Use a flash or an LED light on the subject and capture the couple involved in a realistic activity in the reflection. The composition you choose would make or break this opportunity.
8. Reflective table: Unlike in the previous room, this table is easily moveable. The black glass on the table is highly reflective. Therefore, I could have the groom sitting on the sofa and enhance the light on him by using a flash or an LED light. To finish the photo, I would move the table or angle it in such a way that I would capture the subject’s reflection. I would make sure that the subject is genuinely engaged in a real activity, instead of faking it for the camera. If it appeared as if the photographer arranged this shot, it would ruin the photo very quickly.
9. Sofa: This sofa can be used as a great posing prop for an individual or a group. Remember that there are many ways to use the sofa as a posing prop. I could have people lean against it while sitting on the floor, sit on it, stand behind it, or sit on the armrests.
10. White ceiling: The ceiling, being large and white, makes a perfect surface to bounce the light from a flash to increase the light in the room.
11. Large mirror: This mirror is so large that it covers the entire height of the room. In this situation, I would embrace its size and include it in my composition by shooting with a wide-angle lens. The difficult part would be deciding who is being photographed in the room and who is shown only in the reflection of the large mirror. But such a large mirror certainly provides great storytelling opportunities.
Finally, let’s tackle one more! See Figure 3.12.
1. Window light and curtain sheers: Judging from the soft light in this room, I recognize that it is being lit by indirect window light. There are no heavy curtains present, so there is no way to block out the light by closing the curtains, as we have done before. This room is really incredible. However, the soft, weak light illuminating it will cause the photos to look rather flat. Flash is needed to help the window light and give the photos a much-needed pop. Lastly, the large window frame can be used to frame the bride or groom.
2 and 3. Doorframes: These two small windows can be used to either tell two stories or show two people at the same time with each person inside his or her small frame. This photo would have to be taken from outside the room and shooting through the doors. One idea I have is that the bride could be framed by window #2 while her maid of honor or mother could be framed by window #3, helping the bride put on her necklace or veil. Again, the subjects would be standing inside the room while I’m standing outside the room capturing that story.
4. Moveable mirror: The room has a medium-size mirror that can be picked up and moved around. This allows for greater chances of achieving a more creative story told partially by the reflection.
5. Ottoman: The ottoman is a neutral gray color and can also be moved around and positioned anywhere in the room. This piece of furniture could be used as a versatile posing prop.
6. Wall: The wall panels are also a light neutral color and are cleared of hanging art. Therefore, I could bounce the light from my flash anywhere on these panels with a great deal of efficiency and predictability.
7. Floor lamp: This floor lamp could be used to bring attention to something directly beneath it, such as the bride sitting on the bed under the lamp. The shape of this lamp also creates a slight half frame that could be used to frame a moment.

FIGURE 3.12
8. Fireplace: This fireplace could be turned into a great softbox. I could place a flash inside the fireplace and fire it against the back of the firebox. When the light bounces back into the room, it would be much more directional, almost mimicking a studio softbox. With that light in place, I could then have the bride sit on the ottoman in the direct path of the light coming from the fireplace. Of course, I would crop out the fireplace to hide it from view. To the viewer, the beautiful light would appear as if it were coming from another window.
9. Floor: This flooring is magnificent! From whatever angle I might photograph, it would look good. This dark wood floor would also contrast beautifully with a white dress or veil. This floor is interesting enough to be used as a great background for all the wedding details.
10. White ceiling: The ceiling in this room is flat and white. This is a perfect surface to shoot a flash toward, and the room would be lit by the beautiful, soft, reflected light. Although this room is incredibly beautiful, it would be a challenge to determine how to use my flashes to give the light some directional quality.
To close this chapter, I would like to reiterate what a great training opportunity analyzing rooms from the comfort of your home can be. On the day of a wedding, it is a strenuous mental exercise to enter a room and immediately be able to break it down and discover the room’s gifts and challenges. Practicing will help you use the common objects in most rooms in a more creative way to tell your visual story. After all, being able to visualize photographic possibilities, while others are completely oblivious to them, is a testament of genuine photographic skills.