One of the major overhauls in the Vista user interface is the ability to search for (and locate) information on your hard drive. Good thing. With hard drives commonly ranging in the 250GB to 1TB for personal storage, chances are pretty fair that you're now managing as much sheer data as many large companies, and indeed even entire governments, did a mere quarter century ago.
In this section, we'll look at some of the new Search capabilities built into the Vista operating system.
For starters, there's the Start menu. This is certainly nothing new to Windows users - it's still there waiting to help you in the desktop's lower-lefthand corner by default, but it has been updated with some new features.
In general, the Start Menu is designed so that your searches for files and folders on your computer are less "mouse driven" than they were before. If you hold your mouse pointer over the All Programs folder, for example, the Programs submenu opens in the same navigation pane rather than in a cascading menu/submenu scheme. In other words, you'll spend less time (and aggravation) chasing submenus all over your monitor's screen.
But the biggest change is how Vista directs you to the new Search. Click the Start menu and the cursor blinks in the Search entry box, ready to help retrieve a program, a file, or just about anything stored on your computer. In other words, Search is Vista's mechanism to accomplish the goal of reducing "mouse-driven" navigation.
To use the new Start Menu's Search, just start typing. The best way to get a feel for how this works is to see it in action. Let's say, for example, you're looking for a Word document about a new medicine that was emailed to you a few months back. There are some questions that can arise, however, that make retrieving that file problematic. These questions include:
Is the title of the file Medicine, New Medicines, or some derivation thereof? What if it's named Prescriptions or something like that?
Where did you store it? Is it in your Documents folder, or has it been moved elsewhere on your hard drive?
Is it possible that you remember it being called "medicines" or something like that, but really the word only appears in the body of the document?
Alternatively, what if you're a doctor or pharmacist, and you have 300 Word documents with "medicine" somewhere in the title? How are you going to locate the one file that's relevant to your search?
You remember it being emailed to you. Are you sure you saved the attachment in the first place? Are you even sure it came as an attachment? Maybe someone just emailed you information about a new medicine, but never typed it up formally in a Word document.
Are you sure it's even a Word document at all? Could it have been a PowerPoint presentation instead?
The Start menu's Search can address all of this uncertainty and more. With the new Search feature, you can focus on what you're looking for and not worry about where it's stored.
Using the medicine example we've just agonized over, you can just start typing the word into the Search entry box and see what comes up. You don't even have to use the entire word. Typing "med," for example, brings up the following results shown in Figure 4.
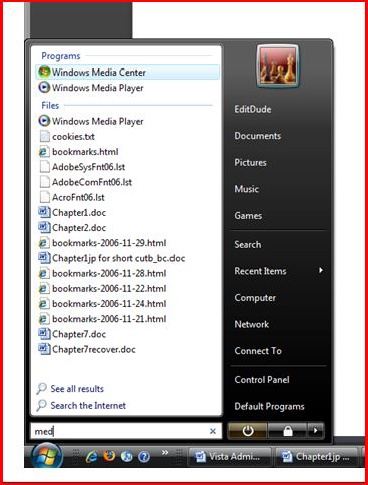
Search uses the Indexing Service to quickly build a list of everything with "med" somewhere in it. Notice what the Start menu comes up with, handily divided into sections:
The programs Media Center and Media Player (I'm using Vista ultimate; the Media Center is included.)
In the next section, you see a list of files with "med" either in the title or in the body of the document itself. The Search gathers all files indexed, but you could have limited your search to just Word documents.
In the next section, if applicable, you'll see a list of all communications containing "med." These will include items such as emails, appointments, and even RSS feeds. If your information was in just the email and not a Word document after all, the Communications section would help you pinpoint that file here.
If you don't see your item in the Start Menu right away, it may be because there are more search results than can be displayed there. For a full listing, simply click the "See All Results" link from the Search results listing. The full tally will then be shown in an Explorer window.
And, of course, the more letters you type in your search, the greater the chance that you'll be narrowing your search. If you keep typing the word medicine, for example, the Media Center will be eliminated from the search results by the time you get to the c in medicine.
These same principals will carry forward to the discussion of the Search integration into Windows Explorer, which is covered a little later in this section. For now, let's look at how to modify the Start menu to suit your needs.
Other than the new Search function, much of the new Start Menu should look fairly familiar. The left side contains a list of frequently used programs, and the right pane contains a list of frequently accessed places such as the Control Panel, the user's documents folder.
And, like before, it's fairly easy to customize what appears. Follow these steps to customize the Start menu appearance.
Right-click the Start button and choose Properties from the context menu.
Choose the Start Menu tab and then click the Customize button.
You'll see the customize Start Menu dialog box as shown in Figure 5.
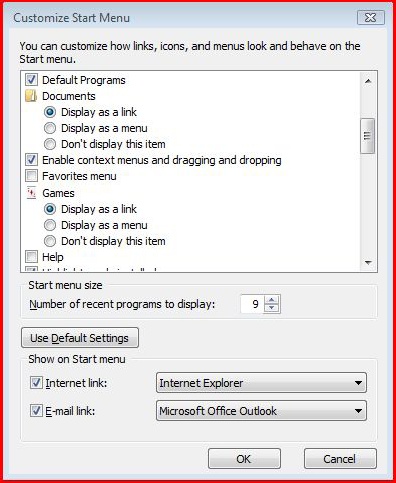
Notice that most of the options here—Documents, Computer, Games, Pictures, and so on—are turned on by default, and that they are displayed as "links." If you're thinking hyperlinks, however, this is not exactly the case. If you've clicked on the Start button already, you've noticed by now that a Start Menu link is really more of a button.
If you'd like to reset the Start menu back to the default settings, just click the "Use Default Settings" button in the middle of the Customize Start Menu dialog box.
Another way to locate information on a Vista computer is through Windows Explorer, another feature that has been around on Windows computers for a while, and that has been almost completely redesigned.
Windows Explorer includes search capabilities in almost every nook and cranny. To see what I mean, let's take a look around the Windows Explorer in Figure 6.
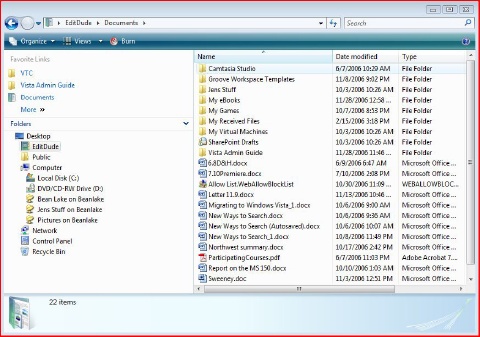
So then, meet the new Explorer. Same as the old Explorer, right? Actually, there's been a major overhaul, and almost all enhancements are designed to help you search faster and more intuitively. There are six features you can utilize to help you find what you're looking for:
Navigation Pane
Forward and Back buttons
Address Bar
Headings
Search box
File list
And while it may seem a bit elementary to use Windows Explorer, it is completely redesigned, so we'll spend a brief moment here looking at each of the search features individually.
If you're looking for something in a specific location, the Search box is probably the fastest way to find that information. Thanks to the Windows Indexing Service, the Search box quickly locates files based on file name, text within the file, metadata tags (explained in a bit), and other data associated with that file.
Let's say, for example, you have a document in your Documents folder that's about auditing. But the file's actual title is something like Important Accounting Info.docx. Can you still locate what you're looking for?
Yes, just follow these two easy steps:
Choose the Documents folder using either the Navigation pane or the list of Favorites (still technically in the Navigation pane).
Type "audit" in the Search box. If audit—or any derivation thereof—appears anywhere in the body of the document, the Search is able to retrieve the file. Alternatively, someone may have entered a metadata tag to help associate that file with a word or two.
This capability frees you from having to create an elaborate naming convention for all of your computer's folders and files. You don't have to have any naming system at all, in fact. You can just use a metadata tag to identify the subject of some file, and let the Indexing Feature take care of the rest.
Take any file on your computer, and there's lots of information that's associated with that file. Vista keeps track of the creation data, the author, the size, and the last time it was changed. Even the title itself is information referring to the file. It's metadata.
Metadata is information about a document—data that refers to the file itself. And Windows Explorer makes it easy to add your own custom metadata tags that the indexing service will track along with everything else. Here's what to do:
Make sure the Details pane is showing. To double-check, click on Organize in the upper-lefthand side of the Explorer window and choose Layout from the menu.
If not selected, choose Details Pane from the submenu.
You should now see a heading called "Tags" in the Details pane, and next to it you should see the text "Add a tag," as shown in Figure 7.
You can probably take it from there. Just click on the "Add a tag" text, and it turns into an editable text box. Enter whatever you think will best help you locate the file later on.
Warning
You need to have the proper administrative privileges to do this. Any user working in his own Documents folder should be able to add metadata tags to his own files, though.
Typing a word into the Search bar and then hitting "'Enter" is usually a pretty good way to quickly find what you're looking for. Every once in a while, though, the search returns too many items. To continue with the previous example, if you're working at an accounting firm and type "audit" in the Search box, you might get hundreds of documents returned.
There are a few Search tricks to help you, however, so that the net you cast isn't quite so wide. The Search box lets you modify your searches to specify an exact file property to search for. To use this feature, just type the property (metadata) you're searching for, a colon, and then the search item itself. If you're looking for documents with "audit" in the title only, you can perform a search like this:
| Name: audit |
If you just wanted the files with the metadata tag of "audit," you can use
| Tag: audit |
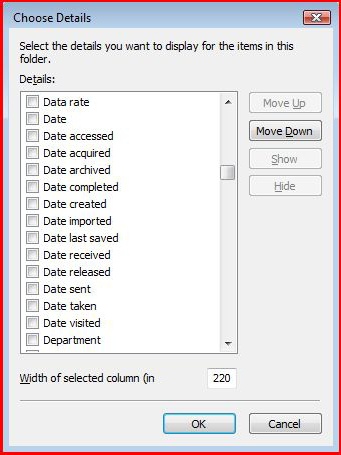
And so on and so on. How many file properties can you search for this way? All of them. Right-click on an Explorer file listing heading and choose More from the menu, as shown in Figure 8. Keep in mind, though, that just a few of the dizzying list of searchable file properties can be shown in a single screenshot.
I know. You want to use Booleans, right? Just like your web searches. Well, guess what? You can. For those who haven't used this kind of language specificity to help narrow down a web search from 30,000 results into a mere 3,000, Booleans let you combine multiple search words or options using a simple logic tree. It can be a big help when searching a more finite storage location like a single hard drive. Booleans include the following:
-
AND Looks for files that contain both words used in the search
-
NOT Locates files that contain the first search word, but not the second
-
OR Looks for files that contain either word used in the search
- Quotation marks
Finds the exact phrase within the " "
And there's a reason I put the Boolean operators in all capitals when building the list. When conducting a Boolean search, you need to use all caps to let Vista know the word is a search argument, not a search word.
Another cool new Explorer feature is that it doesn't require you to speak to the computer using language the computer likes. You can use natural language instead. Once enabled, natural-language searches let you use everyday speech to ask the computer to locate information for you almost the way you would ask a real person.
But as mentioned, it must first be enabled. To use the natural-language search:
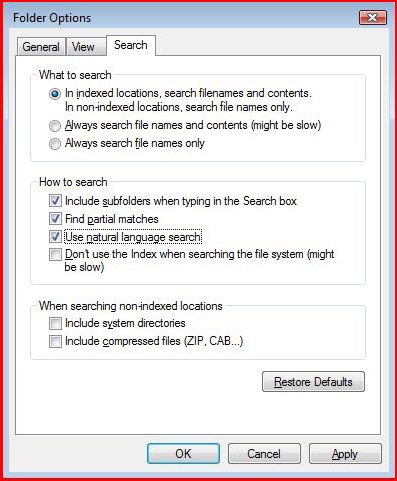
From the Explorer window, click Organize → Folder and Search options.
Click the Search tab.
Select the checkbox called "Use natural language search," as shown in Figure 9.
The following table illustrates a few Boolean phrases turned into natural-language requests:
|
Boolean searches |
Natural-language searches |
|---|---|
|
Kind:pictures Author:Brian |
pictures by Brian |
|
Kind:email Subject:board meeting |
email about the board meeting |
|
Kind: music Artist:Pepe Deluxe |
music by Pepe Deluxe |
Here's a feature you could use—more or less—in Windows XP, but only if you had the Details folder view enabled. Now it's available using all the Explorer views.
The File List headings are the items called Name, Date Modified, Type, Size, etc., that appear across the top of the Explorer file listings. Again, these appear even if you're using the Extra Large icons as an Explorer view (Views → Extra Large icons).
To sort using one of the headings, simply click it. Clicking Date Modified once, for example, stacks your file list in chronological order with the most recent items at the top. Clicking Date Modified again reverses the order.
And not only does Vista allow you to sort items with a click, it also facilitates more sophisticated listings that allow you to filter and stack your views. The filter and stacking options vary by heading. You can use the filter and stacking options by using the drop-down menu that appears when hovering the mouse over one of the List headings.
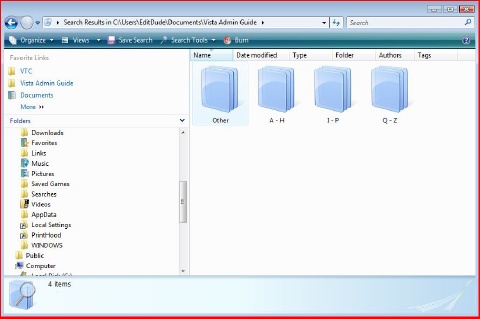
To use a listing filter, for example, you can click the drop-down arrow next to the Name File List heading. Selecting the "Q–Z" name filter narrows down the document listing to just those whose title, quite obviously, starts with the letters Q through Z.
Using a stack is a bit similar, although no filtering is applied to the view. Stacking a folder according to name, for example, places all documents in the folder into discreet piles (or stacks), and you'll get a better understanding of it from Figure 10.