The Task Scheduler makes computing life easier by letting you automate certain routine jobs. This ability is not new to Windows Vista, although the Vista Task Scheduler application most certainly is.
As you will note, Task Scheduler's "pane" appearance is much like that of Outlook 2003/2007, with a Console Tree in the left pane, the Task List in the middle pane, and an Actions pane on the right. The Task List is further divided into top and bottom panes, with the Task Preview (Properties) pane showing below a selected task in the top. So even though, in the interest of thoroughness, I describe how to access a task's Properties dialog box in the instructions that follow, there's really no need.
Further, the Task Scheduler panes can be shown/hidden with the toolbar buttons and the View menu options.
Here's how to use the Task Scheduler to make life easier:
Open the Task Scheduler from the system tools list located under the Accessories grouping. You may be prompted for an administrative password if you're not already logged on as an administrator.
In the Task Scheduler's program window, look at the Actions pane on the righthand side. These are the same actions you'd find under the Action menu. Choose Create Basic Task.
Give the task a name, and, optionally, a description. Note that every task must have a name and the name must be unique to the task. Click Next.
You're now presented with several options:
For a calendar-based task, choose Daily, Weekly, Monthly, or One time. Click Next to specify the exact dates for the task.
For tasks based on particular events, such as "When the computer starts" or "When I log on," choose one of the next two options.
For scheduling based on other non-recurring events, choose the "When a specific event occurs," option. You'll then specify the event information after clicking Next.
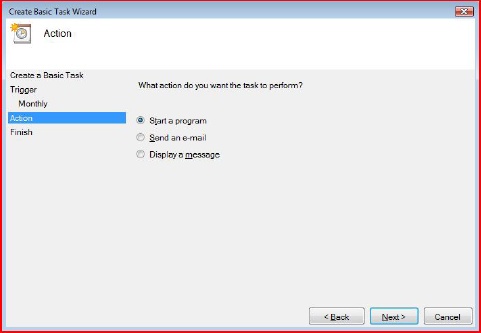
As shown in Figure 11, the task can then perform one of three distinct actions. It can:
Start a program automatically. Choose "Start a program," and then Next, where you'll choose which program will run.
Send an email. Select and click Next to specify both the message and recipient. For example, you might use this kind of task to remind several users to submit reports for end-of-month activities.
Send a message. This message displays on the Vista desktop. Again, it's best used for reminders. Maybe you want to perform regular backups, but you want to perform them manually. You can configure this task to remind you and then perform the backup at a convenient time.
Click Finish.
You should now be able to review and edit any user-created tasks by going to the Task Scheduler's left pane and choosing the Task Scheduler Library folder. To edit your task, right-click the task name and choose Properties. Other options, such as running the task manually or deleting the task, are also available by right-clicking or by selecting the desired action in the Task Scheduler's right pane.
Note
You can export and import tasks that have been created on other computers so you don't have to recreate tasks that might run on multiple systems, but the Vista tasks contain options and features that are more robust than in previous versions. For this reason, you cannot use a Vista-created task on a non-Vista computer. You can, however, use a task created on a Windows XP machine, for example, and import it into Vista's Task Scheduler.
Now let's look at one specific example where the Task Scheduler can be put to use.
One of the most common routine maintenance chores is to keep your hard drive free from clutter by removing files you no longer need. This task has two clear benefits: it frees up disk space for other applications, and usually improves system performance. The Task Scheduler makes it easy to automate this task so you never have to remember to do it.
Here are the necessary Task Scheduler steps:
Open the Task Scheduler. Try this: click Start and then type "task." The Task Scheduler should be displayed in the Start menu by the time you've finished typing. Provide administrative credentials if prompted.
In the Actions pane, click Create Basic Task.
Type "disk cleaning" in the task name dialog box, although you can use any name that suits your fancy. Add a description if you'd like, and click Next.
You'll now see the Task Trigger section of the Create Basic Task dialog box. Choose your desired calendar option and click.
Specify the exact schedule in the Trigger subsection and click Next.
In the Action section, choose the "Start a program" option and click Next.
Click the Browse button, and then type cleanmgr.exe in the File Name box. Click Open to be returned to the "Start a program" subsection. Click Next.
Now you're done. Click Finish to exit the wizard. Select the checkbox to immediately open the Properties dialog box for the task. (Doing so lets you immediately change some of the parameters you just set.)

