Part 1 The Basics

Chapter 1 Equipment
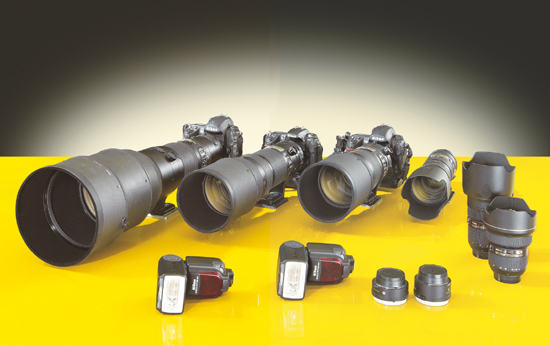
A Complete Professional Wildlife Photography Kit
A high-resolution, full-frame camera body for landscapes, animal portraits, and non-moving subjects; a low-noise, high-speed, full-frame camera body for action and “available light” photography; an APS-C camera body with 50 percent reserve range; 600mm f/4, 200-400mm f/4, 300mm f/2.8, 70-200mm f/2.8, 24-70mm f/2.8, and 14-24mm f/2.8 professional lenses; a 1.4x teleconverter and a 1.7x teleconverter. Depending on your choice of subject, you can also include macro lenses for close-ups and bright prime lenses (such as a 200mm f/2 or a 400mm f/2.8) for forest shots or other dark scenes.
1.1 Choosing Your Equipment
The gear you use for wildlife photography must combine three important criteria: high speed, the best possible image quality, and lenses that shorten the effective distance between photographer and subject. Additional useful features are robustness; reliable exposure metering systems that continue to function effectively under rapidly changing lighting conditions; and reliable autofocus.
It is of course possible, under appropriate lighting conditions, to capture an important moment using an old SLR camera and a manual telephoto lens. However, recent advances in camera and lens technology make using older equipment uneconomic for today’s professional photographer, and older gear won’t help amateur photographers achieve satisfactory results either. Many of today’s “normal” digital images are created under lighting conditions that would have been impossible to capture with analog technology. For this reason, this book does not address “one-in-a-million” images of extremely rare creatures, and instead limits itself to discussing the general needs of the modern wildlife photographer. Choice of equipment is key, especially for professional photographers who have to fulfill the high image quality demands of photo agencies, publishers, and magazines.
The speed of a camera is defined by the sensitivity of its image sensor and lens, the number of frames per second (fps) that the camera’s motor drive can shoot, and the size and speed of the camera’s data buffer (i.e., the number of images the camera can shoot and store in a single sequence without slowing down its other systems). The light sensitivity of the image sensor is defined by the amount of light necessary for the camera to produce low-noise or noise-free images. The best currently available cameras are 12-megapixel 24 × 36 mm full-frame models, which can have an exposure advantage of up to two full stops (2 EV) compared to cameras with APS-C (16 × 24 mm) sensors or cameras with much higher megapixel values. Photo agencies generally insist that photographers use a maximum ISO value of 400 if their APS-C images are to be used for a double-page magazine spread, whereas images shot using full-frame cameras are acceptable even at ISO values of 1600 and more. Simply put, full-frame cameras can produce usable results under much worse lighting conditions and with shutter speeds up to four times as fast as those used by other cameras. This is, however, only possible if you also use appropriately high-resolution lenses with large maximum apertures.
Professional lenses are generally two stops (2 EV) brighter (i.e., have a maximum aperture that is two stops larger) than the value lenses aimed at the amateur end of the market. Professional lenses are also often equipped with image stabilizing technology, which increases the brightness of the lens by up to four additional f-stops. This is an especially important feature if you want to be sure of getting shake-free results, even if you are using short shutter speeds. A fast motor drive will enable you to capture fast movements in sequences or individual images. A general rule of thumb says that your camera should be capable of buffering a sequence of 25 shots at maximum resolution without slowing down the motor drive or the camera’s other systems.
If you have no budget limits, your choice of equipment is simple. You should acquire two professional, high-speed, full-frame cameras, plus a “super-camera” with a resolution of 20 megapixels or more. You can then round out your kit with the best and brightest lenses you can find with focal lengths between 14 and 600 mm.
If, however, your budget is limited, you will have to strike a compromise between money and your own photographic aspirations. A fast, high-quality APS-C camera is a good choice, and has the advantage of providing 50 percent more range than the same lenses can produce when used with a full-frame camera. A 400 mm lens used with an APS-C camera will magnify your subject just as much as a 600 mm lens used with a full-frame camera. Another advantage is that you can achieve very good image quality at high burst speeds (5 fps and more) for about a third of the price of a professional, full-frame camera with similar specifications. Your choice of lenses will depend on the type of image you will be shooting most. If big cats, birds of prey, and action photography are your favorite themes, you should purchase the best 300 mm (or better, 400 mm) lens you can afford, complete with an appropriate teleconverter. You can then use less expensive lenses for your shorter focal length shots.
If you prefer shooting nature and landscapes, or if you spend more time photographing slower-moving animals from shorter distances, you should make sure your shorter focal length lenses are of optimum quality. You can then save some money by purchasing a mid-range telephoto zoom (a 70-300 mm plus teleconverter, for example). If possible, you should always carry a reserve camera body too.
My favorite themes are action and predator photography. In the period between 2004 and the end of 2007 (before the first high-speed, full-frame cameras became available), I used only professional-level APS-C cameras. This generation of digital cameras was already of equivalent quality to 4.5 × 6 roll film (i.e., better than 35mm film) and produced images that were well suited to offset printing in books and calendars.
The theoretical resolution of low-sensitivity film is high, but it is often cancelled out by subsequent digital grain reduction processes. There are also increasingly fewer companies that maintain the drum scanners needed to extract maximum resolution out of slide material for subsequent digitization, and use of this antiquated technology can quickly increase printing costs by up to a third. Digital images have already become the standard for reportage, action, and advertising photography, and agencies nowadays only use slides if they are first converted into high-quality digital copies. Analog film photography was a beautiful invention, but it has already been consigned to the history books in most contemporary fields of professional photography.

Shot using a full-frame camera (Nikon FX) and a 400 mm lens
Shot using an APS-C camera (Nikon DX) and a 400 mm lens
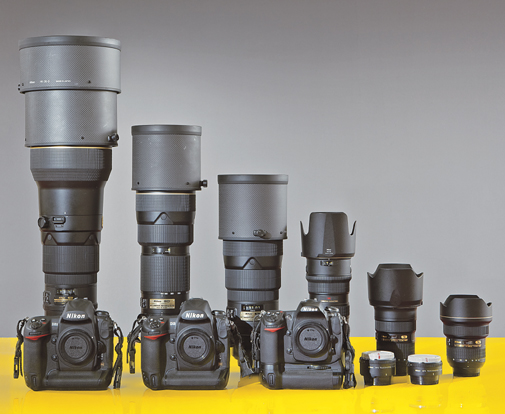
Size comparison
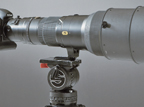
An APS-C camera (Nikon DX) with a 200-400 mm lens.
Both cameras shown here produce the same reproduction ratio and the same image crop.
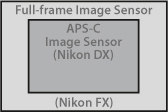
Image sensor comparison
The actual size and naming convention of images sensors vary from manufacturer to manufacturer. The following rule of thumb is valid for the present and the foreseeable future: The smaller the sensor for the same resolution (i.e., number of megapixels), the greater the increase in image noise.

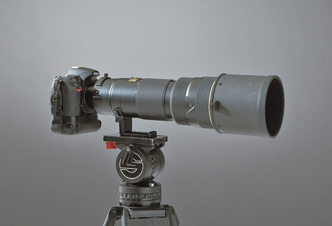
A full-frame camera (Nikon FX) with a 600 mm lens. This camera/lens combination is 50 percent heavier and almost twice as expensive as its APS-C counterpart.
An APS-C kit is a good value alternative to a full-frame camera if you are starting out as a professional or semi-professional wildlife photographer. Approximately 80 percent of the photos in this book were shot using APS-C equipment.
An APS-C camera with a couple of bright, high-resolution lenses is a great basic tool for your start as a professional or semi-professional wildlife photographer. The latest semi-professional-level APS-C cameras are already 15–20% more powerful than the ones I used to shoot the images in this book, and are only really inferior to their full-frame counterparts when it comes to the amount of image noise they produce under poor lighting conditions. I have collated the data relating to the focal lengths I have used on a number of trips through East Africa over the past four years in the table below. The lens names relate to the Nikon system that I prefer to use. With the exception of the AF-S VR Zoom-NIKKOR 200-400mm f/4 lens, most of the focal lengths mentioned are also available from other camera and lens manufacturers. The values noted in red are the equivalent full-frame focal lengths.
APS-C format focal length |
Equivalent full-frame focal length |
Lens used for which proportion of shots |
200-400 mm f/4 |
approx. 300-600 mm |
approx. 75% |
*200-400mm f/4 with 1.4x teleconverter **200-400mm f/4 with 1.7x teleconverter
The table shows that you can cover virtually all important focal lengths using an APS-C camera with a 400 mm lens and a teleconverter. The AF-S VR Zoom-NIKKOR 200-400mm lens mounted on an APS-C camera represents the cream of the currently available super-telephoto lenses, and its closest focusing distance of about six feet makes it ideal for close-ups too. Good value alternatives are either the much slower 80-400 mm lens, or the even cheaper 70-300 mm lens used with a teleconverter.
If you want to use a full-frame camera, you will need either the classic 500mm f/4 or the much heavier 600mm f/4 lens—although this model has a close focus distance of only about 15 feet, and thus has limited use when it comes to shooting close-ups. Generally, full-frame gear is about twice as expensive as APS-C systems. If, however, you intend to work professionally or semi-professionally as a wildlife photographer, sooner or later you will have to bite the bullet and invest in top-flight equipment. And continuing “pixelmania” ensures that the useful working life of a camera body is two years or less.
1.2 Tripods and Other Accessories
You will generally need a tripod, a monopod, a window mount tripod, or a beanbag for your wildlife shots. Manfrotto Super Clamps attached to the roof rails of your vehicle are also a useful alternative mount for your tripod head when shooting long sequences. Beanbags are the most flexible option, but are less useful for pans or other shots that involve camera movement. Whether tripod or head, you should always use the tool with which you feel most comfortable. If you travel by jeep either alone or with a single companion, you should remove the front row of passenger seats. This allows you to permanently set up a heavy tripod as a stable camera platform inside your vehicle, which you can then adjust horizontally with an additional tilt head mounted underneath the main tripod head. You can also use the corners of the sunroof (if necessary with tripod heads mounted on Super Clamps on the roof rails) as extra platforms. Rubber tethers are ideal for securing all your tripod heads to your vehicle. The jolts caused by East African dirt roads and tracks can loosen even half-inch grub screws, and once you have lost a screw in the savannah, it stays lost!

Gimbal head
This type of tripod head has recently become very popular among wildlife photographers. It can be simply set up around the camera’s center of gravity, making it relatively easy to track moving subjects and to shoot shake-free photos. The camera itself is attached to the head using an Arca Swiss-compatible plate. The illustration shows a value model manufactured by Kirk Enterprises. The best-known (and most expensive) gimbal head on the market is the Wimberley, which was unfortunately not available at the time of my purchase.
Personally, I use a heavy carbon monopod when I am shooting running animals or chase scenes, and I find it to be more stable and precise than the beanbags favored by many of my colleagues.
Shooting from the side window of a vehicle generally gives you a better perspective on your subject and allows you to use either a car window tripod or a short monopod to support your camera. If you shoot from a kneeling position on the floor of your vehicle, make sure you wear kneepads. A foldable rain jacket is useful not only for keeping out the cold in the mornings, but also for serving as an improvised beanbag or dust cover for your camera.
Fluid tilt head
This type of tripod head comes from the movie world and is extremely smooth and shake-free. Fluid heads are more compact than gimbal heads, but are significantly heavier and more expensive. The camera is attached using a quick-release plate.
There are only a few places in the national parks where you are allowed to use a tripod outside of your vehicle. There are, however, walking safaris available along the borders of the parks, and you can easily hire a porter to carry your gear for about $10 per day.

Car window tripod with a ball head
Manfrotto Super Clamp with a ball head
1.3 Using Flash
The basic rule of thumb regarding tripods and tripod heads is: The best and most stable unit that you can easily transport and use at your intended location is good enough.
Today’s flash technology is more intelligent than ever before. TTL or iTTL flash control systems are capable of such subtle flash effects that it is often impossible to tell that flash was used at all. You can use diffusers to shoot virtually shadow-free fill flash photos, and tele attachments can increase flash range to 100 yards and more.
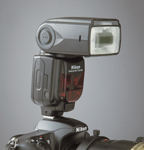
Nikon Speedlight SB-900
This unit’s flash characteristics and angle of coverage mean it can be automatically or manually adjusted for use with just about all lenses, from super-wide-angle to telephoto.
In spite of all these technological aids, I am not a big fan of flash in a wildlife context. Flash often gives an artificial, technical look to natural scenery and lighting. I only use flash for a very few shots where fill flash is unavoidable, or when I am taking shots of nocturnal animals that cannot be photographed any other way. I am also skeptical about using flash for animal welfare reasons. You should only really use flash in the daytime for fill-in effects or when you need rear-curtain flash to create movement effects using longer shutter speeds.
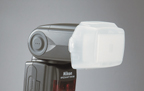
Speedlight with diffuser
A diffuser can be used for producing shadow-free fill flash and for brightening foregrounds when you shoot into direct backlight.
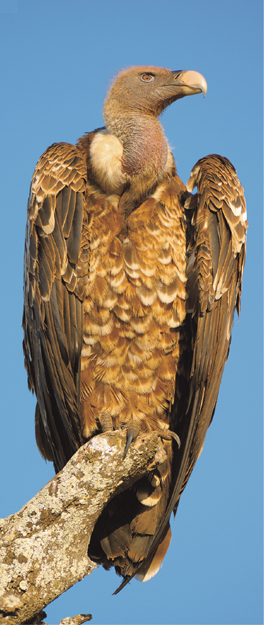
Predators, especially the nocturnal big cats and hyenas, have very light-sensitive eyes. Their pupils become large at dusk and before dawn, making their eyes defenseless against bright light. Using flash can render these animals blind for periods of several minutes or more, which can endanger their lives. You will also find that if you do photograph these animals head-on with flash, the image will show two unusable white circles where the animal’s eyes should be. Film teams and night photographers use night lights with special red filters, while photographers use night sights to view the scene and shoot on infrared film. That said, you can use flash at dusk to photograph animals with eyesight similar to or weaker than that of humans. These include elephants, rhinoceroses, and just about all ungulates (hoofed animals).
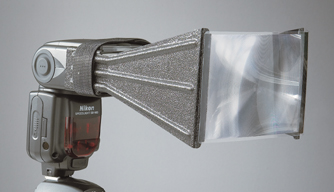
Speedlight with tele flash attachment
This accessory increases flash range up to 80 yards. Do not fire this type of unit directly at anyone’s eyes, as it can result in temporary blindness.
1.4 Transporting Your Gear
Transporting large amounts of gear as carry-on baggage is becoming increasingly difficult due to airline restrictions. Generally, African inland flights in small aircraft allow a maximum of 15 kg (33 pounds) of luggage. My photo kit alone often weighs more than 20 kg (40 pounds) without any personal items or clothing. Always clarify baggage questions with your airline or tour operator before leaving home. Checking in a photo backpack nearly always results in damaged equipment. A good trick is to simply hang your camera and your heaviest lens around your neck for check-in. This might make you look as if you are trying to show off, but airlines do not have any restrictions regarding the weight of cameras carried by passengers themselves. In Africa, well-placed $5 or $10 tips can often help things along at the airport, but try to make sure you are not the fourth or fifth person to give a tip, as this can result in a light aircraft not being able to take off at all due to the amount of excess baggage that has been “allowed”! I try to avoid taking inland flights wherever possible, and I am prepared to make longer journeys in a jeep for the sake of simplicity.
When I am travelling alone internationally, I use a normal hand trolley for my camera bodies and a few lenses. I wrap my largest telephoto lens in clothing and pack it in a hard case. Unfortunately, my PELI™Case wasn’t up to the job, and some of my equipment was damaged when it was checked in. Always transport your camera bodies without lenses attached, as heavy telephoto lenses can exert enough leverage to deform a camera’s bayonet flange and skew the auto-focus system without causing visible damage. If you are travelling with a companion, most baggage allowance problems can be solved by dividing your gear between you.
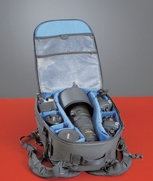
Unfortunately, the perfect gear bag simply doesn’t exist. Specialized backpacks are easiest to carry, but are often too large to be used as hand baggage—especially if the carry straps cannot be removed. PELI™Case solutions are great for storing gear, or for transport in a car, but PELI™Case wheels are too small for real outdoor use. Most trolleys will require you to customize the padding and compartment sizes yourself.

Standard commercially available trolley
Lowepro backpack system
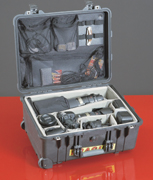
PELI™Case
1.5 Data Management on the Road
Recent years have seen significant advances in memory card capacities, as well as in read/write speeds. Until recently, it was necessary to continually download image data to a mobile data storage unit if you didn’t want to carry your laptop with you on safari. This often resulted in hours of work emptying 4 GB cards and stand-alone storage units with constantly dead batteries. Nowadays, memory cards are large enough and cheap enough to make temporary storage unnecessary. I don’t know of any currently available mobile data storage solution that can cope with the high speeds and large amounts of data stored on today’s 8, 16, and (soon) 64 GB cards. The RAW image files produced by professional and semi-professional cameras can only really be effectively processed using FireWire hardware or similar high-speed slots on a laptop. Affordable (and safer) alternative storage media are the increasingly popular SSD hard disks offered with many laptops. Whichever solution you choose, sort your day’s material every evening to make the amount of data manageable once you get home. Everyone sorts his/her images differently, depending on their intended use. Reportage photographers save many more images than a wildlife photographer who is on the lookout for a single, special photo. Always delete technically poor images immediately, and it is a good idea to make a backup copy of all your material every evening to a separate medium. Here, you can use an external hard disk, (slow) DVDs, or high capacity CF cards and USB flash drives. If you are camping or travelling in remote areas where there is no guaranteed power source, you will need a power adapter for your vehicle’s cigarette lighter, especially if you are using a laptop. Remember to make sure your vehicle’s cigarette lighter works before you head out!
Stand-alone mobile data storage
These devices were a useful solution between 2003 and 2008. However, today’s CF and SDHC card capacities have made them all but redundant. The USB versions are too slow in comparison to FireWire devices and are generally still equipped with conventional hard disks rather than safer, faster SSDs.

Backup for your wallet
USB flash drives are currently available in capacities of up to 128 GB.
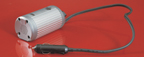
Ansmann vehicle adapter
This accessory connects to the cigarette lighter in your vehicle, and is indispensable for trips to remote areas. It’s great for recharging your laptop or your camera batteries.

Powerbook with image browser
A professional laptop with an SSD hard disk is essential for processing the amounts of image data produced by modern, professional cameras shooting at up to 10 fps. If you don’t take the trouble to delete unusable photos and to sort your work every evening, you will most likely end up with too much data for processing and use at home.
Chapter 2 Shooting Techniques
2.1 Basic Camera Settings
In order to maximize your camera’s technical potential, you should usually set its exposure control system to matrix metering mode. Matrix metering compares the scene you are viewing with up to 20,000 sample scenes stored in the camera’s memory and ensures that blooming effects (washed-out highlights) are kept to a minimum. Matrix metering also ensures that the brightest parts of your image contain image data, even when you are shooting into backlight. This exposure mode also preserves the greatest possible tonal range and fine color gradation in your images. In 90 percent of all situations, matrix metering produces well-exposed images, or at least images that can be easily corrected later at the RAW processing stage.
In situations that matrix metering cannot cope with easily, you will need a lot of skill and experience to improve the final image at all. It’s best to concentrate on the most important part of the image and simply ignore the rest. Spot metering mode (with its very narrow metering angle) can help, but also requires great skill to be used effectively. With spot metering, you need to manually estimate the gray scale value of your main subject in order to prevent the camera from automatically selecting 18 percent gray, or “white minus 1 EV”. Then you must estimate the result this value will have on other parts of your image. You can also use bracketing sequences in matrix mode or HDR techniques to improve exposure, although it has to be said that HDR is extremely difficult to apply to moving subjects.
As you become more experienced and develop your own technique, your choice of manual or automatic exposure metering will be based on the results you want to achieve. When you are starting out, it is advisable to use as few settings as possible that require continual monitoring. For this reason, I recommend shutter-priority auto, ideally combined with auto ISO (if your camera has this functionality). This way, you can limit motion blur in direct relation to the focal length of the lens. Auto ISO does, however, involve the risk of increasing image noise, especially if you cannot limit the values auto ISO sets.
Optimum image quality can be best achieved if you use manual exposure metering together with auto ISO and/or exposure compensation. This way, you can choose the ideal aperture and shutter speed for your particular subject and lens. This method can cause irretrievable overexposure if you select a shutter speed for a shaded subject which you then track into direct sunlight. Here too, auto ISO can cause significant image noise if you don’t limit its range in advance.
Using aperture-priority auto metering increases the risk of camera shake in changing light, and it can cause excessive motion blur in your image. You have to keep a careful eye on the settings selected automatically by the camera. Programmed auto mode is only really useful for shooting campfire photos after a glass or two of wine.
Your choice of lens should cover the safest focal length for your chosen scene, especially if you are using only one camera body and fixed focal length lenses. Swapping cameras in the few seconds a lion or cheetah hunt lasts is virtually impossible. “Safe” focal length here means that, if you can’t be sure your subject won’t overfill the frame due to a change in its direction of movement, you should select a shorter focal length. The 16-bit mode, RAW, and TIFF capabilities that most modern digital cameras offer make it possible to do very tight crops later on, but no image processing trick can replace the head of a lion that you have accidentally “cut off”.
2.2 Image File Formats
Even if you are using a beginner’s camera or a semi-professional model, you should still select RAW as your main shooting format if you have the option. RAW is the equivalent of a digital negative and allows you the most flexibility when making corrections to your images. The JPG image file format is roughly equivalent to an instant photo, and corrections made to JPG images nearly always result in a significant loss of image data.
You should only shoot in JPG format with a mid-range camera if you have to use the camera’s highest shooting speed and largest data buffer to avoid slowing the system down with RAW. Shooting directly in TIFF format will slow your camera down significantly and uses unnecessary memory capacity. Most RAW files can be converted automatically to JPG or TIFF using a batch process in an image browser such as ViewNX. Images shot under tricky lighting conditions should be presorted for further processing using more complex tools. This way, you can correct poorly exposed images by up to two f-stops, and save otherwise acceptable images from going to waste.
The superiority of the camera RAW format is especially clear when you are correcting blown-out highlights (or “blooming”) using Highlight Recovery, D-Lighting, or the Shadow/Highlight tool in Photoshop. When a JPG image is corrected, the exposure values for the highlights increase, and fine detail is simply lost.
If you shoot JPG or TIFF images directly in the camera, the camera processes the image data internally using a tonal value curve that increases image contrast according to the lighting present in the original scene. This increase in contrast, which is necessary to produce vibrant-looking images, reduces the dynamic range of the image data that the camera can capture by one full f-stop or more. If you shoot RAW images, this difference in dynamic range—the so-called “RAW headroom”—is preserved in the final image. Because the full dynamic range is present in the RAW file, you can then use a RAW converter to increase contrast and luminance and restore lost highlights and shadows without a further loss of image quality. The original RAW file is preserved during all corrections and remains saved as a separate file. All changes made to a RAW file only become irreversible once the image is saved as a JPG or TIFF file, and RAW originals can always be used to generate new versions of a corrected image.
The examples opposite illustrate the difference between a JPG image shot directly in the camera, a RAW image that uses its full “RAW headroom”, and the final version of a processed RAW image. The camera was set to “Vivid” while shooting the JPG image—the typical basic setting for producing bright, lively images.
JPG image shot directly in the camera. Due to the very high contrast in this scene, many of the highlights in the water and on the backs of the gnus are blown out. The dark portions to the left of the image, the animals’ faces, and the gnus’ flanks have also lost most of their detail. Changing the camera setting from “Vivid” to “Normal” or “Softer” would only have slightly improved this low-contrast image.
Non-processed RAW image downloaded directly from the camera. In order to preserve as much shadow and highlight detail as possible, I reduced contrast and saturation as far as possible while shooting. This produced a very low-contrast original, but preserved the camera’s entire dynamic range and the image file’s complete “RAW headroom”.

Corrected RAW image. Much more highlight and shadow detail is preserved than in the JPG image above. Post-processing using a RAW converter makes it possible to correct the image without losing highlight and shadow detail. Even the high degree of contrast and saturation adjustment that this image required hasn’t caused a significant loss of detail in the final image.
Shooting Images in JPG Format
In order to improve the quality of JPG images shot directly in the camera, you will often have to make corrections while you are shooting. Such corrections will influence the contrast and saturation settings, which in turn influence the brilliance of the final image. The softer (i.e., the more low-contrast) your scene, the more you will have to compensate by using the camera’s “Vivid” or “More vivid” settings. You should, however, always keep an eye on the image histogram when making this type of correction and, if necessary, set an exposure compensation value of between -0.3 and -0.5 EV in order to prevent the highlights from burning out. The converse is also true, and you should reduce contrast in-camera for high-contrast scenes, such as animals in water in bright sunlight. At first, the resulting images appear to be very dull, but they can be easily corrected using the contrast and saturation correction tools found in many high-quality image processing programs. This is the only way forward in such situations, as your camera will not be able to capture the full dynamic range of bright and dark tones in extreme lighting situations.
The Nikon D-Lighting function (usually called “higher dynamic range” or similar by other manufacturers) is a great help in such situations, but it can also produce images that cannot be enlarged easily due to increased shadow noise. Shadow noise takes on the form of visible borders between areas of differing color or gray tones. It can also cause a “posterization” effect, which produces blocks of non-matching, similar-colored pixels in the middle of enlarged portions of an image. For these reasons, shooting in camera RAW format is always the best choice. Today’s RAW converters are extremely user-friendly, even for hobby photographers who are not too technically-minded.
Shooting Images in RAW Format
In order to optimize RAW image files while shooting, you should only use as much exposure compensastion as necessary to avoid burnt-out highlights (between -0.3 and -0.5 EV), or a loss of shadow detail (between +0.3 and +1.0 EV). Your camera will automatically capture the greatest possible dynamic range, and you should only attempt to make complex corrections while shooting if you are experienced enough to quickly interpret an image histogram and its relevance to post-processing.
Most RAW converters, such as Nikon Capture NX2 or Adobe Photoshop Light-room, are capable of much more complex image processing than the electronics crammed into your camera body. If you find yourself shooting in a situation that lies outside your camera’s dynamic range, a three- or five-shot bracketing sequence shot at maximum motor drive speed is often a good workaround. At speeds of up to 10 frames per second (fps), a three-second scene such as “back-lit running lion” or “gnu jumping from riverbank” will usually yield enough material to produce a usable, correctable image.
D-Lighting and similar functions applied to RAW images work the same way as when they are applied to JPG images. Such settings can be deactivated later, but the image itself will be saved using a gradation curve optimized for the D-Lighting tool, which in turn reduces the camera’s effective dynamic range. This type of in-camera correction tool certainly has its uses for press photographers, who need to produce highly-compressed images for fast transfer and immediate use. If, however, you are shooting for fine art printing or professional-level magazine purposes, you should always deactivate D-Lighting while shooting. You can apply the function later in a more controlled, data-preserving fashion during post-processing. Most images that require corrections to their dynamic range can be more effectively processed by combining exposure compensation with Photoshop Levels and masking techniques.
These three images illustrate a “blooming” effect (i.e., burnt-out highlights in an already slightly overexposed image). This effect occurs in high-contrast lighting situations that exceed the camera’s dynamic range. It can be reduced in JPG images by using a negative exposure compensation value, while RAW images that are overexposed by up to one f-stop (1 EV) can be easily corrected later at the post-processing stage.
Saving compressed JPG images is a destructive process. Each new “save” destroys additional image data. If you have to save your image as a JPG, for whatever reason, only do so once you have finished your processing.

Original image Burnt-out highlights, little color contrast
Recovered JPG highlights Little color contrast, image duller
Recovered RAW highlights Authentic color contrast and highlights
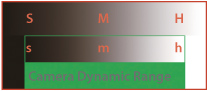
2.3 Camera Dynamic Range
The photographer’s favorite enemy—limited dynamic range and contrast—can only be represented theoretically, as no film, digital camera, or printer paper can reproduce the actual range of image contrast that occurs in most real-world photographic situations. We don’t notice these limitations as long as the camera captures the brightest and darkest tones in our subject without losing too much detail. But, as soon as the dynamic range of a subject exceeds the dynamic range of the camera by two stops or more, these effects become immediately and painfully obvious. The illustrations on the following pages represent an image with a dynamic range that exceeds that of the camera (or theoretical film) by more than 2 EV, while the sample photos illustrate the corrective effects of exposure compensation or bracketing sequences. The upper gray areas in the graphs represent available light that cannot be captured by the camera, while the smaller gray areas above the colored bars represent the light that can be captured by the camera using various exposure settings or compensation values under the same lighting conditions. The result is always a compromise between shadow noise and lost highlight detail. Your chances of being able to rescue such JPG or TIFF images at the processing stage are significantly less than if you shoot allowing for the “RAW headroom” described earlier.
You can set the contrast-increasing “contrast” and “saturation” parameters for a RAW image to their lowest values either before shooting or later using a RAW converter. If you set these parameters in the camera, the histogram shows which additional tonal values are retained in the image, and the image will appear dull and very low-contrast in the camera monitor. Because the monitor is only capable of displaying JPG-quality images, the monitor image displays the camera’s full dynamic range but does not include the “RAW headroom”. You can now decide whether you would prefer to preserve shadow detail using a positive exposure compensation value, or whether you would prefer to preserve highlight detail (while sacrificing some shadow detail) using a negative value.
HDR techniques cannot be used for fast-moving subjects, but bracketing sequences can be effectively used to maximize your choice of source images for later processing. Bracketing often gives you more than 1 EV “rescue headroom”—a great aid during subsequent correction processes.
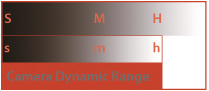
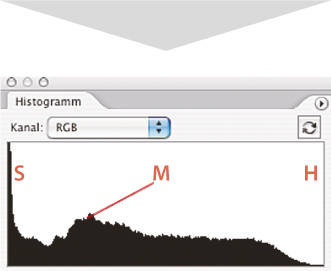
The shadows (S) are correctly exposed, the midtones (M) are too bright and are overexposed. Neutral gray (H) becomes white and is therefore overexposed. All the brighter parts of the image are completely burnt out.
B. Exposing for the midtones
Dark gray (S) becomes black and is underexposed. The midtones (M) are correctly exposed. Bright gray (H) is white and overexposed. All the brighter parts of the image are also burnt out.
C. Exposing for the highlights

Dark gray (S) becomes black and is underexposed. The midtones (M) are too dark and are underexposed. The highlights (H) are correctly exposed.
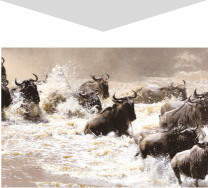
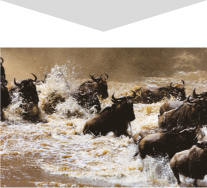
The highlights in the foaming water show virtually no detail, the midtones are too bright, but the dark faces of the gnus (at least those in the foreground) are well depicted.
The highlights in the foaming water show virtually no detail, the midtones are OK, but the gnus’ faces are too dark and show no detail.
The highlights in the foaming water show adequate detail, but the midtones are much too dark, and the gnus’ faces and other shadow areas show no detail at all.
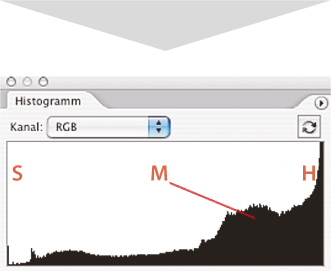
The histogram shows that the shadows (S) are only slightly clipped, but are already tending toward the midtones. The midtones (M) have shifted towards the highlights, and the highlights themselves (H) are irreversibly burnt out.
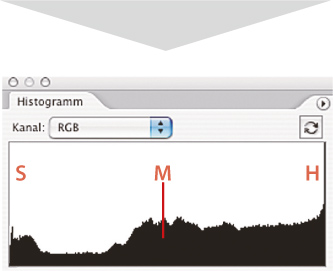
Here, the shadow detail (S) can be partially recovered. The midtones (M) are OK, but the highlights (H) are nevertheless still lost.
Here, the shadow detail (S) is irreversibly clipped and therefore lost. The midtones (M) have shifted towards the shadows, but the highlights (H) are OK.
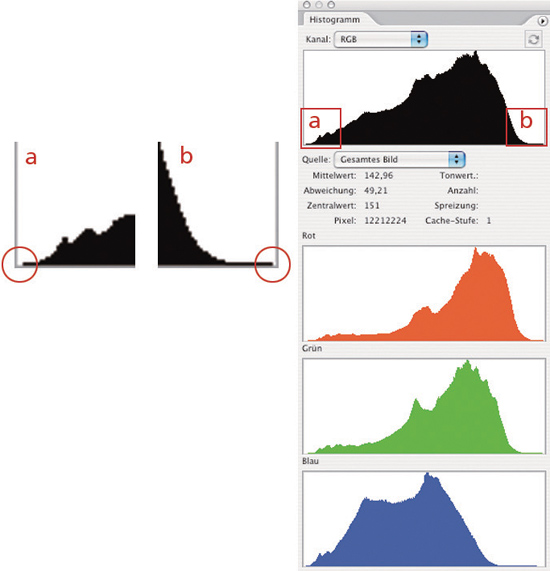
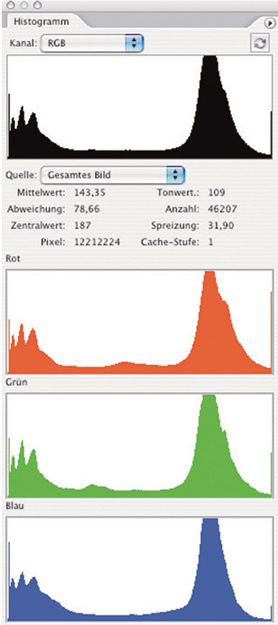
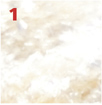
2.4 Image Histograms
Before we address the practicalities of shooting conditions in East Africa and the challenges these present, we need to take a look at the less exciting subject of image histograms. You can only really judge whether you need to correct your selected exposure values once you have evaluated some test shots of your scene.
The image histogram displays the distribution of tonal values in your image graphically and, more importantly, shows whether the exposure values lie within an acceptable range. We will address this second aspect here. You cannot rely on the image in the camera monitor to judge image quality, simply because the ambient light is too variable. So, even if you are not keen to learn photo-related physics, please take the time to check out our histogram examples. You will quickly learn that the worst type of everyday exposure error is overexposure, which leads to burnt-out highlights or “blooming”. Photographers who recommend always shooting with a “safety” compensation value of -0.3 or -0.5 EV only catapult their image quality back to that of a previous generation of digital cameras.
Burnt-out highlights can be displayed on most modern camera monitors using the “Clipped highlights” (or similar) function. But remember, your camera’s monitor is small and not very accurate. Say, for example, you shot your dream image of a running lion with its mane waving in the wind in early-morning backlight. Your monitor will probably display blinking clipped highlights over large parts of the image area, and your photographer’s heart will sink. However, a glance at the image histogram will show that the highlights are only very slightly clipped off to the right due to the thousands of (unimportant) dewdrops in the frame. Your image is, in reality, perfectly exposed, and even has a little “RAW headroom” in reserve.
The best approach is to test for yourself what degree of clipped highlights you are prepared to accept. Take a series of test shots of your subject at 1/3-stop compensation intervals and up to two stops total overexposure. If you then check the clipped highlights display in the image histogram and compare it with the appropriate image, you will quickly develop a feel for histogram curves and their relation to image exposure. Highlight recovery performed later using a RAW converter can only recreate detail for up to one stop of overexposure. Even if the highlight recovery slider in your program has a scale that covers, or even exceeds, two f-stops, this is usually not practically usable, and applying higher values only overlays overexposed areas with badly mixed color in your final image. Lost detail in the fine, white hairs on a lion’s nose cannot be recovered, and his whole nose will turn out gray if you try to overcompensate.
You will only end up with seriously burnt-out (i.e., glaringly overexposed) images on rare occasions when you are shooting directly into the sun or under very bright skies. Digital cameras are generally programmed to retain detail in the brightest parts of an image. Highlights only begin to burn out if the dynamic range of your subject exceeds that of the camera, making exposure compensation necessary. Overexposed images are often a result of incorrect use of the camera, too much flash, or inappropriate use of spot metering mode.
Every photo has its own unique histogram representing the distribution of tonal values within the image. Here, we will only address the basic differences between histogram curves. So, let’s get started interpreting this odd-looking display. Histograms often appear incomprehensible to the inexperienced eye, but, once understood, they are one of the best exposure aids available to the digital photographer.
The deeper you delve into the subject, the more you will find that the degree of automation promised by your camera manufacturer only holds true under perfect shooting conditions. Like nature and landscape photographers, wildlife photographers tend to shoot a large proportion of their photos in early morning sunlight and in the evening just before sunset. In order to produce well-exposed images under such high-contrast conditions, you often need to use precisely metered exposure compensation values. Landscape photographers often use bracketing sequences and HDR techniques to get the results they need, but as a wildlife photographer, you often have only one chance to capture a moment. Everything has to work perfectly right there and then.
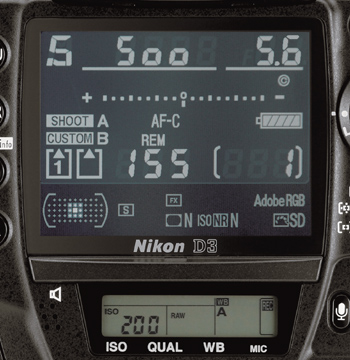
Remember, even if you set your camera to RAW shooting mode, the camera monitor will display a simulated JPG-based image histogram. The “RAW headroom” described above will NOT be displayed. You can, however, find out just how much RAW headroom your camera has at camera review websites, such as dpreview.com. Today’s digital cameras (and especially the Nikon D3) expose very aggressively towards the highlight end of the tonal value curve, leading to the JPG-based histogram displaying a degree of recoverable highlight clipping that is not present in the original RAW image file. This causes photographers who are not aware of the “RAW headroom” phenomenon to constantly (and unnecessarily) use exposure compensation of up to 1 full stop (1 EV) when shooting with the Nikon D3. This behavior significantly reduces the usable dynamic range of this (and other) cameras. So: Know your RAW headroom!
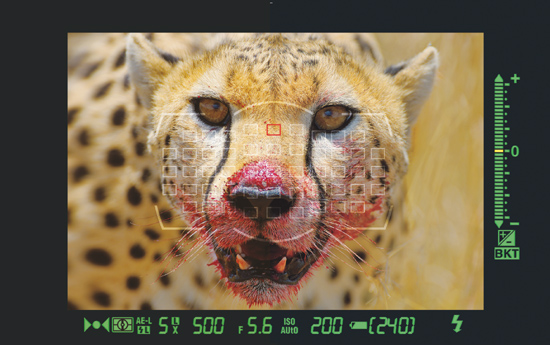
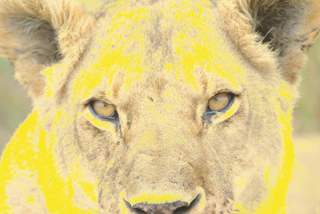
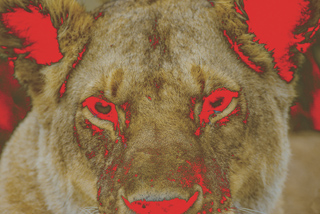
In order to illustrate the point, I have used Photoshop to divide this image of a lion into three basic areas. We will ignore the visible part of the image during the following steps. If the midtones are not spoiled by incorrect camera settings or technical defects, they can nearly always be satisfactorily processed to correct image areas that are too bright, too dark, too dull (i.e., low-contrast), too brilliant (i.e., high-contrast), or that show color casts. These common errors can be addressed quickly and easily. For simplicity’s sake, we will discuss the yellow (highlight) and the red (shadow) portions of the image histogram.
The original image
A slightly negative exposure compensation value is advisable when photographing most animals with light-colored fur, as this helps to preserve bright details. For dark-colored animals, you often have to accept a slight loss of highlight detail (if necessary, through use of a positive exposure compensation value). Shadow detail that is recovered at the post-processing stage always displays increased noise. Shadow detail is generally not recoverable for underexposure of 1.5 stops or more.
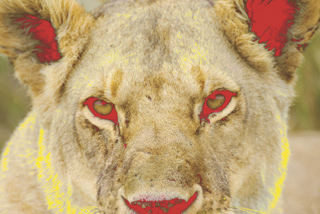
The yellow-colored highlights are the critical factor in this image, and they would make the photo unusable if they were to burn out. This can occur in high-contrast lighting situations where the highlights are overexposed. Here, you should set your camera’s exposure compensation to a negative value, even if this results in a loss of some shadow detail. Lost shadow detail can often be recovered later, but white, burnt-out sections of an image can only be recovered by retouching.
Correctly exposed, the shadow and highlight curves reach almost to the ends of the histogram axes
The same image, this time heavily overexposed. The yellow-colored areas appear snow-white in the actual image and are unusable.

Overexposure: The highlights are clipped right down to the midtones, and the histogram displays no shadow tones. The midtones are shifted to the highlightarea of the curve, and shadow tones are displayed as midtones.
The same image, this time heavily underexposed. The red-colored areas appear pitch black and without visible detail in the actual photo. This image is partially recoverable, but at the cost of increased noise in the recovered shadow areas.

Underexposure: The shadows are heavily clipped, and the histogram shows virtually no highlight tones. The midtones are interpreted as shadows, and the highlights are shifted to the midtone area of the curve.
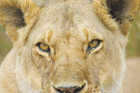
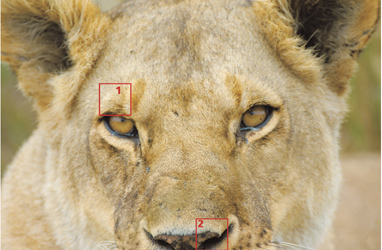
The samples below are unprocessed RAW images that help to show the types of problems you might encounter while shooting. In an ideal world, you will be shooting under a slightly cloudy sky, as was the case in this portrait of a lioness. This type of light is easiest to handle, but it can produce slightly dull-looking results.
Sample image showing balanced exposure. The highlights (1) and shadows (2) show adequate detail and are not clipped in the histogram.
Shadow detail.
The shadow curve (a) and the highlight curve (b) don’t go beyond the limits of the histogram.

Highlight detail
Early morning sunlight is much more intense, but this image of a gnu is already showing some signs of overexposed highlights in the dewdrops on the grass. This effect is visible to the right end of the histogram, in the narrow range where the highlight curve meets the axis. It is virtually impossible to use just the clipped highlights display to decide whether an image has been correctly exposed. Here, the display would probably show a degree of overexposure that would lead you to use negative exposure compensation, which would in turn cause an unnecessary loss of shadow detail.
1. Burnt-out highlights
2. Highlights with detail
3. Shadows with detail
Shadow detail
Burnt-out highlights
Highlights showing detail
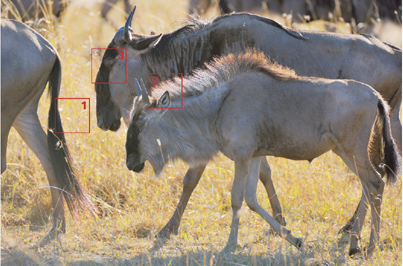
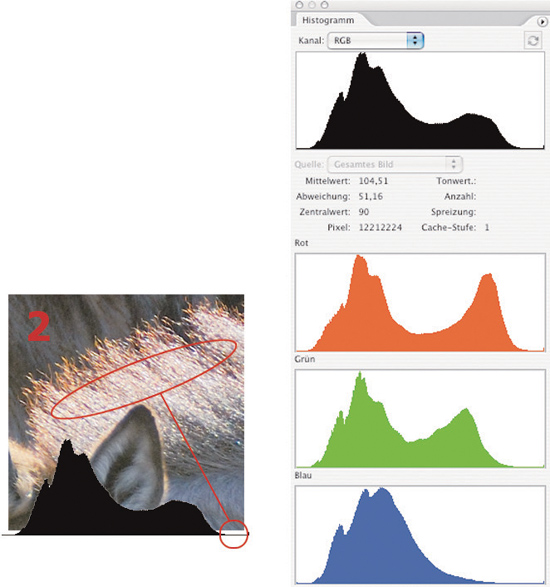
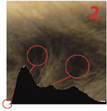
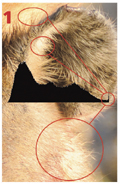
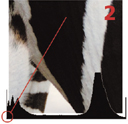
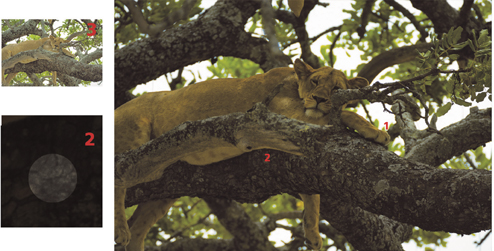
The lighting in this photo of a hyena is more critical. The strong, lateral morning sunlight would cause uncontrollably high contrast if shot without exposure compensation. The histogram shows that exposure compensation of 1 EV would lead to the loss of only unimportant shadow detail under the vulture’s wings and the hyena’s nostrils. This would then make subsequent recovery of the highlight detail in the animal’s fur a relatively simple task.
Shadow showing detail
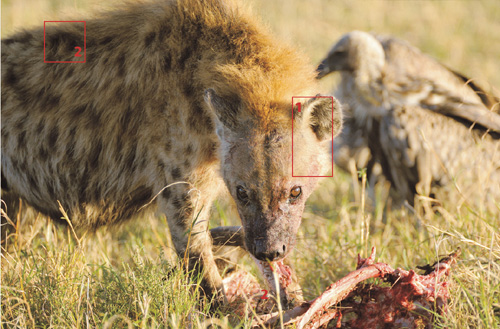
Shadow detail in the fur (1) is OK, but the highlights (2) are hardly recoverable.
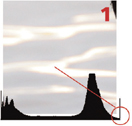
Burnt-out highlights
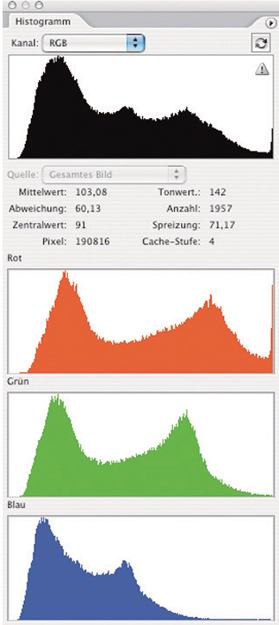
The red channel is clipped by more than one stop. Green and blue are OK.
In this image of drinking zebras, the reflections in the water cause the camera’s exposure meter to underexpose by one full stop in order to preserve highlight detail. Exposure compensation of +1 EV is necessary to preserve detail in the animals’ faces and other, brighter portions of the image. Again, it is often a good idea to take several test shots of a scene to determine which compensation value works best. Even photographers who are not technically-minded should know about the RAW headroom available for their camera, as this helps to determine how much apparently lost highlight detail can be recovered later.
Lost shadow detail
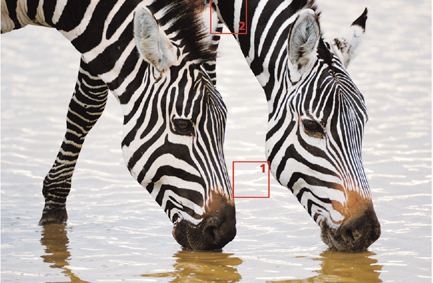
1. Lost (negligible) highlights
2. Lost (negligible) shadow detail
Burnt-out highlights
The highlights are clipped by about 1 EV for the red channel, while shadow details are clipped by about 1.5 EV for all three channels.
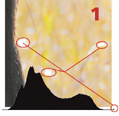
This typical backlit situation is comparable with many tropical “monkeys in trees” situations. Such scenes always exceed the dynamic range of the camera. The camera’s exposure system automatically attempts to preserve as much highlight detail as possible, but will probably fail, even when using heavy underexposure. The only real solution is to use a high exposure compensation value of +2 EV or more, which will always cause the loss of some of the brightest detail in the sky. In this case, you can only expose the main subject adequately and preserve shadow detail by using exposure compensation or spot metering. Image #3 was corrected using a factor of +2 EV.
Shadow noise
No highlight tones
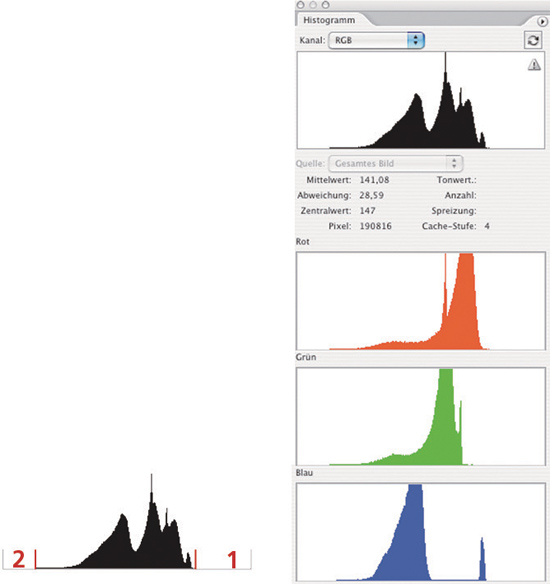
Except when the subject itself is very dark, a tonal value curve with a strong left shift is a sign of serious underexposure.
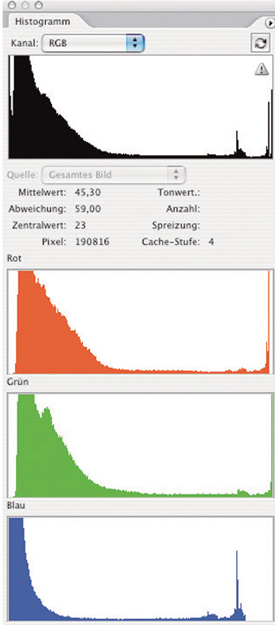
Generally speaking, it is correct to increase the contrast setting for hazy subjects, although this rule can differ if the sun is directly above your subject, or if your scene includes foaming water. This causes a loss of shadow or highlight detail for scenes that exceed your camera’s dynamic range. The ideal solution, as shown in thumbnail #3, is to set both contrast and saturation to their lowest possible levels, and to correct the image later. If possible, it is always preferable to make several test shots of tricky scenes.
Shadow noise
Lost highlight tones
Here, the shadows and highlights are irreversibly lost.
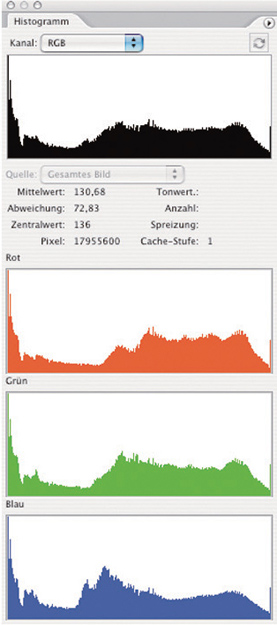
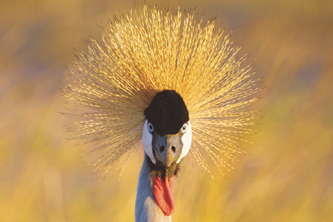
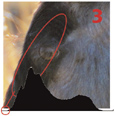
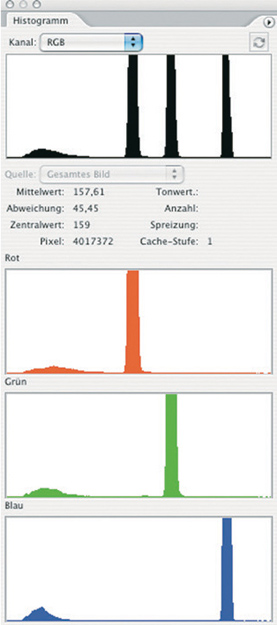
Single, dominant colors often occur in photos of birds. In this case, the histogram no longer has a typical “mountain” shape, and a first glance could lead you to think that the image contains nearly no color at all. However, this is not the case—the dominant blue of the image simply doesn’t encompass many tonal values, and all of the other tonal values in the image are represented by the flat “foothills” of the histogram curve.
Tones that are brighter than the dominant blue are displayed by the highlight curve (1). The three columns represent the blue base and color value crossover in the bird, while the darker tones are displayed in the “foothills” of the curve (3).
The greater the range of tonal values present in the dominant color, the broader the columns will be. Conversely, a dominant gray would only produce one column. Two similar sized columns often result from an incorrect white balance setting, or infer that the color represented probably cannot be reproduced in print.
The high degree of magnification produced by long telephoto lenses often leads us to imagine that telephoto images are especially sharp. This is, however, not the case. A long telephoto lens increases the density of an image, causing the distances between individual animals, for example, to appear much shorter than they are in reality. In just the same way, a long lens also increases the density of dust and haze in your shot, which can lead to your image appearing blurred.
Increasing contrast has made this image more vibrant, but not sharper. Additional sharpening doesn’t really help, either.
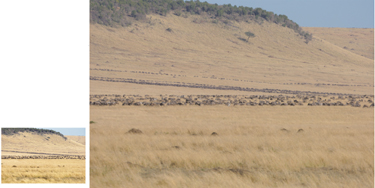
The highlight (1) and shadow detail (2) in the image histogram do not even approach the limits of the axis. The resulting empty spaces represent areas without any image information (i.e., without pixel values).
The image histogram can help here too. If the curve displays a dominant midtone “hump”, and shadow and highlight curves that don’t even approach the limits of the axis, you are most likely looking at an image that is hazy and/or blurred. The human eye compensates automatically for this type of haze, but a photographic lens cannot—at least, not for the visible parts of the electromagnetic spectrum.
2.5 The Camera’s Autofocus System
If set up correctly, modern autofocus systems are faster and more precise than the human eye. To function properly, contemporary systems require there to be significant differences in color between the subject and the background. (Older systems rely on visible differences in contrast within the frame.) You also have to let your camera know which part of the frame you are photographing. The direction of your aim is usually sufficient, but the correct choice of autofocus mode helps the camera to focus accurately. For example, a color-based 3D autofocus system cannot reliably track a beige-colored lion moving through beige-colored grass, and you would need to select Single-area AF autofocus mode in order to get good results. Conversely, Single-area AF does not make it easier for you to accurately track an approaching bird through a 500 mm or 600 mm lens. Here, you should use either Dynamic-area AF or 3D Focus Tracking mode. You can also use Matrix autofocus, which covers almost the entire frame; but it is often too slow, as it has to coordinate information from too many focus areas in too short a period of time to be really effective.
There are additional focus features which you can use, but they are often buried too deep within the camera’s menu tree to be quickly and easily selected or deselected while shooting. One such feature is “Lock-on AF”, which ensures that the autofocus system is not confused by blades of grass, tree stumps, or other foreground objects that might appear in the frame while you are tracking a moving subject. Lock-on AF can, however, also lead to blurred photos if your subject changes direction suddenly.
Another useful feature is the ability to combine focus priority and release priority autofocus modes, which ensures that the shutter can only be released if the subject is acceptably sharp from the outset. This feature doesn’t slow down autofocus significantly, but it can nevertheless cost you the relevant hundredth of a second when an attacking crocodile breaks water. This slight lag is especially relevant if you are not using ultra-fast, professional telephoto lenses, or if you are using lenses with maximum apertures smaller than f/4. Teleconverters can reduce the speed of your lens by up to 75 percent, which also slows down the camera’s autofocus system. Autofocus sensors begin to lose sensitivity at apertures of f/8 and less; if you are using such small apertures, you can only focus accurately by hand.
If you already have 10 great shots of your subject in the bag, deliberately modify your autofocus settings before you continue shooting. This way, you can find out exactly which settings best suit your personal technique. While experimenting, pay special attention to the “Lock-on” function and the combined Focus Priority/Release Priority setting.
You can only use the full potential of your camera’s autofocus system if you anticipate your subject’s movements. Just as in a football game, it is important to know where the ball is coming from, but it is critical to be able to predict where it is going to land. For a photographer it is even more important to know which route the ball is going to take. For example, 3D Tracking will have problems focusing on a beige-colored animal that moves from short, green grass into a dry, brown-colored landscape. Dynamic-area AF covering between 9 and 21 focus areas would be a better solution. If the path your subject takes includes bushes or low grass, even Single-area AF might work, but only if you are in a position to keep your subject fixed within one small focus area during the entire pan.
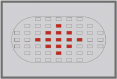
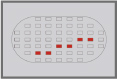
We will use the pictograms below to explain the practical examples in the chapters that follow. The color codes next to the sample images are applied according to the following criteria:
Green: Ideal setting
Yellow: slightly less favorable alternative
Red: unusable, or too slow for most situations
Two-color: choose settings depending on your own technical preference
Half-color: evaluate the surroundings and change settings if necessary
Sample pictogram
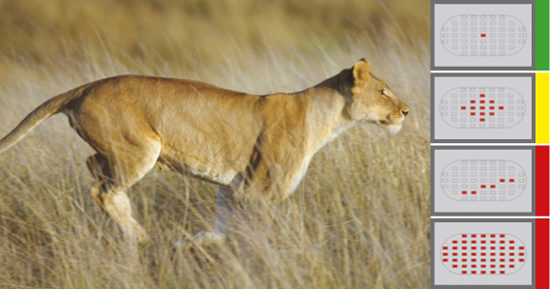
The pictograms represent the autofocus settings detailed below:

Single-area AF Very fast
The focus areas can be accessed individually. The cross-type sensor in the center of the frame is the fastest and most sensitive. Applications: single-point subjects, or subjects whose movements can be accurately predicted and tracked. The ability to track focus areas manually makes this mode almost universally applicable when photographing birds.
Dynamic-area AF Fast
A preselected set of focus areas reacts to the subject’s movements. Applications: Subjects whose movements cannot be easily predicted. This is a useful default setting that can be used to capture running cheetahs, leaping gnus, flying birds, and much more besides. Its functionality can, however, be easily disrupted by random foreground elements, such as grass or bushes.
Autofocus with 3D Tracking Fast
The AF sensors automatically track the preselected subject using color-based information. Applications: Use as Dynamic-area AF. Results are often better, provided the subject’s color can be clearly differentiated from the color of the background. 3D Tracking is currently only available in professional and semi-professional cameras.
Matrix Autofocus Slow
All focus areas react to potential subjects, including random objects that happen to be near to the camera. Applications: Use for subjects whose direction of movement is completely unpredictable (flying birds, for example). Use only where neither 3D Tracking nor Dynamic-area AF is available.
Chapter 3 Image Composition

3.1 Image Composition
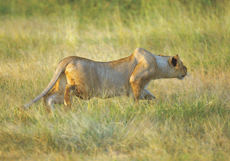
Image composition in the wildlife arena follows the same basic rules that exist for other photographic genres or the world of painting. Perspective, the “rule of thirds”, lighting mood, color, and background are the basic elements that make up an image. A great photo is defined by its intensity and the emotions it evokes, and by the single, decisive moment it portrays. A running cheetah captured pin sharp using an ultra-short 1/8000 second shutter speed makes a technically perfect shot, but it lacks the intensity that the same subject displays when photographed at 1/30 or 1/250 second while panning the camera. An animal portrait shot in passing can make a nice snapshot, but never equals the wonder of the moment you can capture if you observe your subject at length. Many animals only lose their timidity once you observe them quietly for long periods of time. You can then use their almost childlike curiosity to capture fascinating gestures and portraits. Some animals even pose, almost like models.
When you compose photos with a view to using them commercially, remember that the traditional 3:2 Leica format is no longer the worldwide print standard for books and magazines. Always leave a little “room for maneuver” when you frame your subject.

Shot in the morning sun: Vulture, Serengeti National Park, June 2005, Nikon D2x, AF-S VR 200-400mm f/4 lens, ISO 125, 1/400 sec. at f4
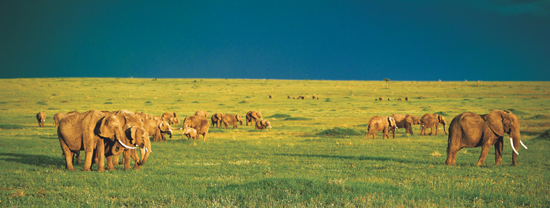
Stormy weather:
Elephants in the Masai Mara, December 2000, Mamiya 7 (slide film), 150mm lens, ISO 100, 1/250 sec. at f11
Successful wildlife photography is, of course, highly dependent on action. Events in the wild often develop so quickly that you do not have time to consider your composition or your zoom setting, and you frequently have to crop your images down to size later. You won’t always be able to shoot from the optimum viewpoint either, which limits the amount of control you have over perspective and the mood of the lighting. Always aim to get the best you can out of every given situation.
Wildlife photography is an intuitive subgenre within the field of photography. You need to develop your intuition not only for the technical side of your work, but also with respect to the animals you are photographing. Your learning curve will become less steep with increasing experience, although every time you try to increase the quality and intensity of your work you will find yourself facing invisible barriers that dampen your initial feelings of success. It is often necessary to spend years familiarizing yourself with animals and their environments, and your own body needs to adapt to new environments too. If you spend several months of the year for several years in the Antarctic, you will need time to adapt if you want to produce excellent photos in the tropical rain-forests of Borneo.
This is why there is no “best wildlife photographer in the world”. Some of my colleagues are perhaps the best in their own specialized areas, but no one can claim to be the best in the entire animal kingdom.
3.2 The Rule of Thirds
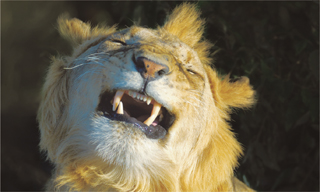
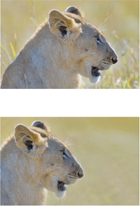
The so-called “rule of thirds” (or “golden ratio”) is an effective image composition tool. In order to save ourselves the complicated math that artists have used since Renaissance times, we use the simpler method of dividing the frame vertically and horizontally into thirds. Important details—here, the lion’s eye—are then placed at one of the intersections (marked here with a circle).
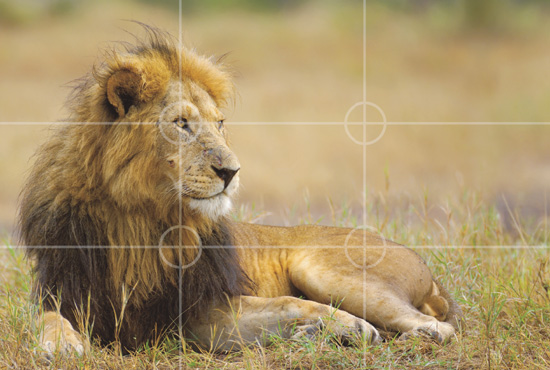

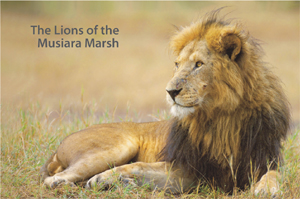
Black maned lion:
Leader of the marsh pride, Masai Mara, September 2007, Nikon D2x, AF-S VR 200-400mm f/4 lens, ISO 220, 1/125 sec. at f4.0
Photos shot using the “rule of thirds” can be printed uncropped in landscape format, as a mirror image, or cropped in portrait format without losing their proportions. If you tip up this page of the book at 90 degrees, you will see that a “thirded” image can also be very effective when printed in a square format.
Try to keep potential future layouts in mind while shooting. The free space in the area the lion is looking towards makes this image ideal for text insertion. Always remember to leave enough space around your actual subject when composing your images, as the historically-based 3:2 format is no longer appropriate for most of today’s magazine and book formats.
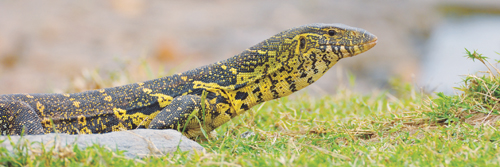

Nile monitor lizard: Masai Mara, September 2007, Nikon D2x, AF-S VR 200-400mm f/4 lens, ISO 100, 1/250 sec. at f5.6
3.3 Perspective
Image perspective is defined by the angle of view, subject distance, and camera angle relative to the subject. Along with subject placement, perspective is the single most important factor in the composition of an image. Always try to find the optimum, or even an extreme perspective for your wildlife photos. Photograph animals at “eye level” whenever possible; the side windows of your vehicle or topographic features such as hollows or gullies can help you find the right camera angle. If photographed from above (for instance, from the open sunroof of a jeep), many animals appear rather two-dimensional. If you must shoot from above, try to wait for your subject to raise its head, which helps to neutralize the negative effects of a raised viewpoint. Many wildlife photographic competitions are currently being won by photos shot from ground level using a remote control.

“Mohawk” lion: Young lion in the Masai Mara, October 2005, Nikon D2x, AF-S VR 200-400mm f/4 lens, ISO 100, 1/400 sec. at f4.2
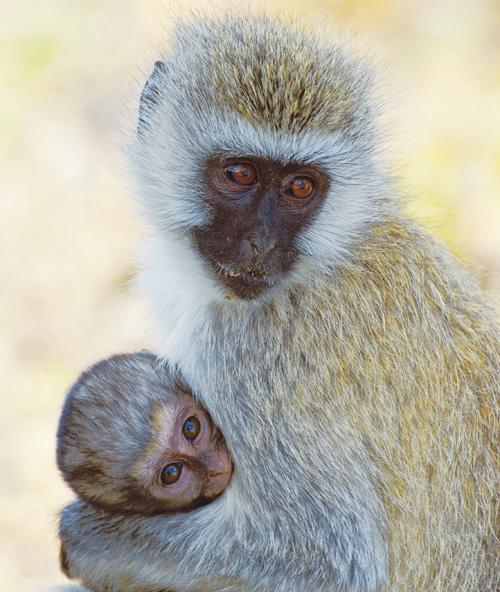

Photo opposite
Long-tailed monkey with young: Serengeti National Park, February 2006, Nikon D2x, AF-S VR 200-400mm f/4 lens, ISO 100, 1/200 sec. at f5.0
It is important to use a straight perspective when photographing small animals. Oblique or overhead perspectives tend to make small creatures appear squat and unnatural.
3.4 Free Your Subject
The focus sensors in the center of the viewfinder of many modern autofocus cameras often tempt you to compose an image around the center of the frame. If you give your subject a little more freedom to move around within the frame, or to change the direction it is looking, the result is often a more interesting and/or dramatic image.
Pair of lappet-faced vultures: Masai Mara, October 2005, Nikon D2x, AF-S VR 200-400mm f/4 lens, ISO 100, 1/400 sec. at f7.6

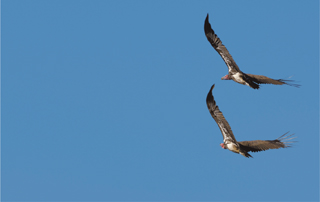
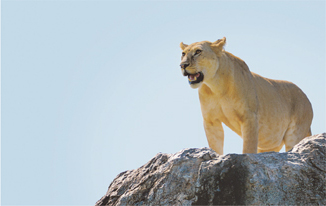
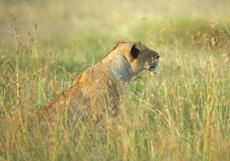
Photo below right
Lioness on a lookout kopje: Serengeti National Park, June 2005, Nikon D2x, AF-S VR 200-400mm f/4 lens, ISO 100, 1/400 sec. at f5.0

A slight change in composition can often turn a dull photo into a useful image.
3.5 Cropping Images
Wildlife photography often involves heavy cropping. This can be the case if the focal length you are using doesn’t produce the result you were planning, or if you can’t pan your camera far enough, or if you simply can’t get near enough to your subject. Fortunately, today’s cameras have significant reserves of resolution, allowing you to make generous use of your digital scissors during post-processing. Don’t be afraid to crop your images to get the results you require. The example below still contains approximately six megapixels of image data, which is quite enough for an A4 magazine page or an A3 digital print. For reasons that I don’t understand, images that are cropped by more than 15 to 20 percent don’t seem to win competitions and are sometimes not even allowed entry. If you use a Nikon full-frame camera, you can avoid this Catch-22 situation simply by switching to DX format, allowing you to fight nonsense with nonsense until the rules get changed.
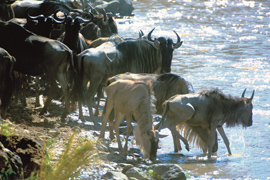
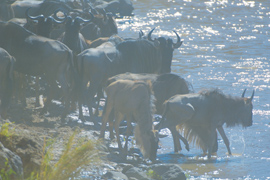
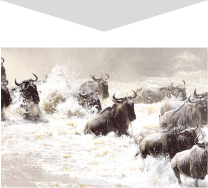
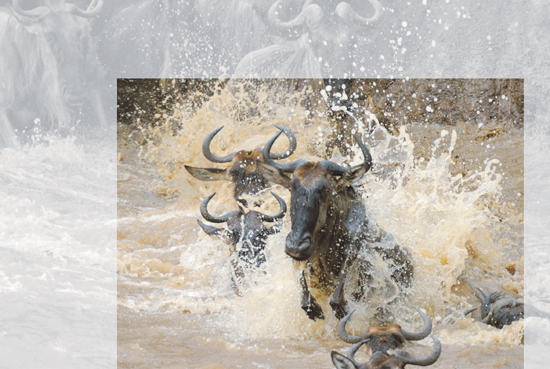
River crossing: Herd of gnus in the Mara River, Masai Mara, September 2007, Nikon D2x, AF-S VR 200-400mm f/4 lens with 1.4x teleconverter, ISO 360, 1/500 sec. at f5.6

3.6 Animal Portraits
A great animal portrait should be well composed and punchy, while still portraying the character of the animal itself. Portraits, however, also live from the intensity of the moment and shouldn’t be afraid to shock. The close-up technique used here (with the subject less than 30 feet away) intensifies the effect of the image. Shooting this type of image can nevertheless be dangerous, even if you are working inside a vehicle, and should only be risked by photographers who are experienced in dealing with predators. Sharp, in-focus eyes are an absolute necessity in this type of shot, and you should immediately send all shots which aren’t up to the mark to the great digital graveyard in the sky.

Close-up: Young lion, Masai Mara, November 2005, Nikon D2x, AF-S VR 200-400mm f/4 lens, ISO 110, 1/320 sec. at f4.0

Unlike other fields of nature and landscape photography, we only need to address the “bokeh” aspect of depth-of-field for the background when shooting wildlife photos. The typical shooting distances that result from the use of long telephoto lenses produce a phenomenon that could be best called “shallowness-of-field”, as the depth of focus involved ranges between a few inches and about three feet.
Close-up: Leopard at the kill, Masai Mara, September 2006, Nikon D2x, AF-S VR 200-400mm f/4 lens, ISO 100, 1/500 sec. at f4.0

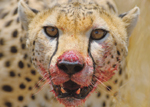
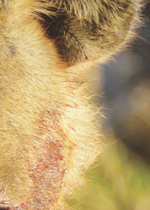
The blood around its mouth and the leopard’s aggressive expression shock and fascinate viewers of this image in just about equal numbers. “Eat or get eaten” is daily reality in the wild.
The wider you set your aperture, the more your subject will stand out from its background, but you should nevertheless select an aperture that keeps other relevant details in focus. If your shutter speed is fast enough, switch off any image stabilization (VR or IS) lens functionality in order to keep your background as smooth and uncluttered as possible. If you leave your image stabilizer switched on, the oscillating lens elements and camera sensors can cause out-of-focus background objects to be duplicated in the final image.
The right lighting (here, golden evening light) is very important to the success of an animal portrait, and it is worth waiting for the right moment. The blades of grass around the lioness’s neck and body spoil this otherwise perfect image.

Lioness in golden evening light: Masai Mara, September 2006, Nikon D2x, AF-S VR 200-400mm f/4 lens, ISO 110, 1/400 sec. at f4.0
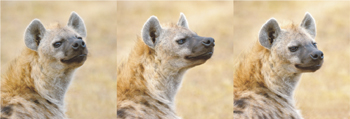
Wait until your subject loses its timidity. Even hyenas, which are generally thought to be “ugly” creatures, can pull funny poses if you let them. You simply have to be patient and wait for the right moment.

Hyena portrait sequence: Masai Mara, September 2007, Nikon D2x, AF-S VR 200-400mm f/4 lens, ISO 500, 1/250 sec. at f4.0
3.7 Panning the Camera
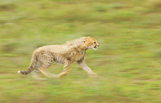
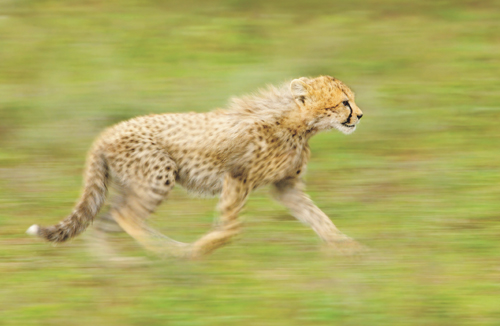
If you want to take sharp photos of running animals, you can avoid unnecessary motion blur by following your subject’s movement with the camera. If you then increase your shutter speed to 1/30 second or longer, the result is often a dramatic pan- or blur-effect image. If you do use blur effects, always make sure that your subject is still recognizable. The high running speeds that cheetahs can reach make them ideal subjects for panning shots, although running cheetah shots are 10-a-penny at most photo agencies and are freely available on the Internet. One reason for this ubiquity is that earlier slide films were seldom light-sensitive enough to accommodate ultra-short shutter speeds necessary for fast-moving subjects.
If you want to switch from movement-freezing, ultra-short shutter speeds to the longer shutter speeds suitable for blur effects during a shoot, set your shutter speed dial increment (EV Step) to full f-stop clicks. You then only need to note the number of clicks (for example, between 1/4000 second and 1/30 second), allowing you to make the change without moving your eye away from the viewfinder. The default 1/3-stop EV Step setting makes switching from fast to slow too time-consuming. The safest way to bag your shot is to decide in advance whether you want to use a short shutter speed to freeze the action, or a longer shutter speed to create motion blur.

Panned shot with motion blur: Young leopard running, Ngorongoro Conservation Area, February 2009, Nikon D3x, AF-S VR 200-400mm f/4 lens, ISO 320, 1/30 sec. at f16
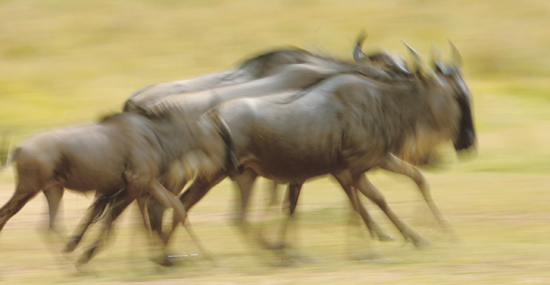

Running gnus: Masai Mara, September 2007, Nikon D2x, AF-S VR 200-400mm f/4 lens, ISO 100, 1/15 sec. at f18
Successful use of panning techniques requires a lot of practice. The best way to gain experience is simply to continue shooting while increasing your shutter speed once you have your planned shot in the bag. If you have time, try increasing your shutter speed right up to 1/8 second. The running gnus in the photo above show the amount of motion blur that a 1/15 second shutter speed produces.
The photo of the running lioness clearly demonstrates the necessity of panning for moving subjects, even when using a short (here 1/320 second) shutter speed. If I hadn’t panned during this shot, the grass would have been in focus, but the lioness would have been blurred.

Hunting lioness: Masai Mara, September 2006, Nikon D2x, AF-S VR 200-400mm f/4 lens, ISO 100, 1/320 sec. at f4.0
3.8 Reportage Photography
Complete reportage stories (or “sequences”, as they are called by the agencies) are a great additional format for marketing your wildlife images.
Sequences can be sold best if they tell a short, complete story that is of interest to specialist magazines. Always label sequences as sequences, and include a description of the action.
Reportage stories should come across as complex and interesting sequences of events, rather than as a number of individual, well-exposed images. A sequence doesn’t always have to cover a complete hunt from beginning to end, as this requires patience, intuition, advanced study of an animal’s behavior, and luck. There are many other, more compact scenarios that sell well if they have been well photographed and tell a gripping story. A good reportage sequence documents a story graphically and includes an overview as well as details of the action.
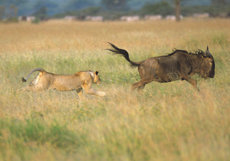
If you find yourself watching a “one-in-a-million” hunting scene like this one, decide quickly whether you have time to swap cameras or change a lens during the action. It helps to have two camera bodies ready with medium and long telephoto lenses mounted. Some photographers even have a third camera body with a wide-angle zoom continually ready for action. And, unless you are a really cool operator, increase your shutter speed a little while shooting this type of scene—the emotions evoked are sure to cause your body to produce some excess adrenalin and some camera shake to go with it.
Reportage:
Lioness hunting solo, Serengeti National Park, July 2005, Nikon D2x, AF-S VR 200-400mm f/4 lens, ISO 200–520, 1/400 sec. at f4.0
3.9 HDR and Panorama Stitching Techniques
Bracketing sequence showing four of the seven original shots:
The first image (+ 4 EV) has exposed the lions correctly for the mood of the evening light, but has completely burnt out the highlights. The subsequent exposures were shot between +3 EV and +/–1 EV in order to capture the highlights and midtones effectively. The bottom image has brought the highlights in the sun back to within an acceptable range. Every camera has its own exposure characteristics, and you will need to increase or decrease the base exposure setting for your sequence accordingly. Practice bracketing at home on less important subjects before you go “live”.
Both of these techniques involve combining multiple exposures into a single image using image processing tools. They offer huge creative potential, but the complexity of the processes and the specialized software they require are beyond the scope of this book. The following is a brief description of the basic techniques involved.
HDR (High Dynamic Range) techniques help us in our battle against the photographer’s old archenemy: limited sensor (or film) dynamic range. Although this technique is normally applied to non-moving subjects photographed from a tripod, it can also be used effectively for slow-moving subjects photographed with a fast motor drive. The photos in our sample sequence were shot in seven increments between -1 EV and +5 EV; the slight movements of the animals between shots were corrected later using other image processing tools.
Applied correctly, digital photographic techniques are vastly superior to analog techniques for this type of application. You can use HDR techniques to virtually double your camera’s dynamic range. In the analog world, you can use gradation filters to (more or less) invisibly extend your range by up to 4 EV.
Stitching (or “merging”) techniques are used to produce images with higher resolution and more detail than you could usually achieve in a single image. Panoramas are best shot using a tripod and a specialized panorama head; the technique can be applied in a wildlife context in combination with a fast motor drive. Merging the resulting images (see the example below) is a complex process, and the automatic merging tools built into Photoshop or other image processing programs are not always an effective solution. The animals that appear in the overlaps between shots must fit together perfectly from the outset or be appropriately retouched.
Source images for stitching applications need to be identically exposed, and are therefore best taken using fixed or manually selected exposure and white balance values. In order to keep vignetting to a minimum, close down your aperture by at least two stops while shooting. The more source images you shoot, the better chance you have of achieving a perfect fit at the merging stage. There is a mass of specialist literature available on these subjects for those of you who want to delve a little deeper, with some of the better examples coming from the publisher of this book.
Cropping a single 12-megapixel image to produce an image in this format would leave only 3.5 megapixels of image data. This panorama image consists of four 12-megapixel photos, and the resulting 48-megapixel image can be enlarged to a length of over six feet without losing detail.
Chapter 4 Planning Your Trip

4.1 The Right Place at the Right Time
This is the most important topic in this book. We will use this chapter to address the timeframe for events within the Serengeti ecosystem step by step. But how should you go about photographing something very specific, such as an animal that you have seen illustrated in a magazine? Independent of what or where, the approach is always the same. The first step is to find out if anyone you know has specialized knowledge of your chosen subject—although some wildlife photographers do like to keep their exact locations secret. The next step is to do some library or Internet research, and if you find a relevant website, don’t be afraid to email the author for assistance. I have received a lot of help this way on my Asian tours; one Asian photographer had a good laugh when I confessed that my tour operator had recommended that I photograph primates in the Borneo rainforest during the dry season. Photographing orangutans as they dance through the treetops against a clear, bright sky would have been impossible, and my photographer friend immediately told me the best time of year to go: when there is little rain and the skies are cloudy. So you see—good information is extremely important when you are planning a trip.
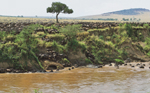
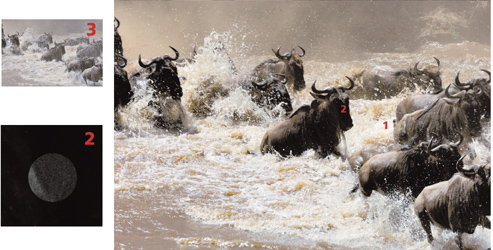
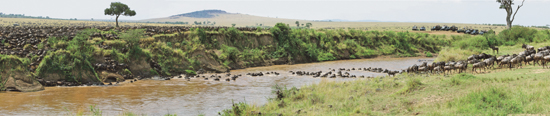
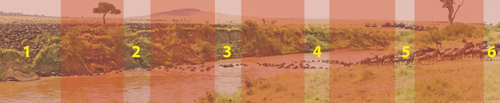
The most time-consuming way to find your subject is to note any distinct characteristics that you can see in the original photo and then to search the most likely area gridwise on the ground—a method I have often used myself. I had seen the place illustrated in the small photo at top right years ago in a book (albeit with fewer gnus at the riverbank), but I only found and photographed the same place myself in 2005. Most organized tours stick to the region of the Masai Mara on the eastern side of the Mara River because there are usually more animals there. Very few drivers choose routes that take you south to the other side of the Masai Mara, in part because this area also has an additional US$60 daily entrance fee. My driver and I searched the Mara river from end to end until we found the place I was looking for in the southeastern Masai Mara, and we were immediately rewarded for our efforts by a herd of gnus crossing the river.
With a few notable exceptions, don’t rely on information from tour operators when planning your trip. They tend to recommend the time of year with the best weather for a trip, which often doesn’t coincide with the best time of year for photographing wildlife. This is especially true in the Arctic and Antarctic regions. Many of nature’s most compelling spectacles do not occur in the tourist season at the earth’s poles, and you will probably need to take part in an expensive ice-breaker trip if you really want to get the best polar wildlife images. Wherever in the world you want to photograph your chosen subject, the quality of your advance information will determine the quality of the images you bring home.

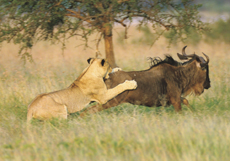
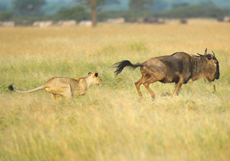
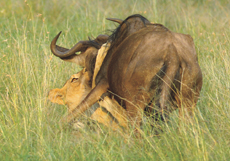
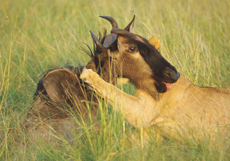
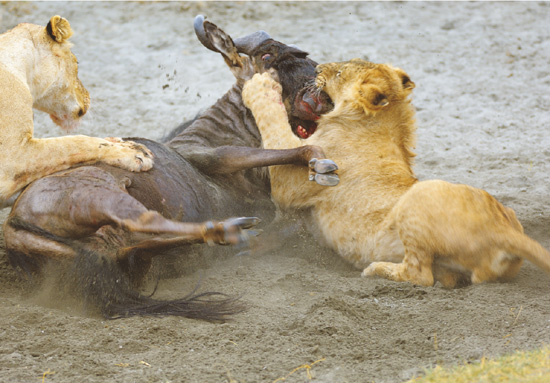
Young lion fighting a gnu: Ngorongoro Crater, June 2005, Nikon D2x, AF-S VR 200-400mm f/4 lens, ISO 180, 1/200 sec. at f4.0

In the following chapters, this symbol tells you best time of year for photographing the most interesting events in the indicated region within the Serengeti ecosystem. Most regions can also be visited at other times of year but will provide you with less exciting subject matter.
4.2 The Serengeti Ecosystem
The Serengeti is one of the largest and best known nature reserves in the world. Not only the diversity, but also the sheer number of animals that live there—especially the enormous herds of ungulates—make the area a unique spectacle for nature lovers and wildlife photographers alike. And where huge herds of potential prey are underway, predators are never far behind. The basis of the entire ecosystem are the annual ungulate migrations, and the gnus especially cover enormous distances on their continual search for fresh and varied grass.
Gnus and zebras migrate in single lines that often stretch from one horizon to the other. During these migrations, herds of up to 100,000 animals collect at water holes, fords, and places where the grass is still fresh. The total gnu population is estimated at around two million, half of which are continually on the move. These animals not only graze the ecosystem, but also revitalize it with millions of tons of natural fertilizer, which is in turn distributed over a wide area by dung beetles. Such huge numbers of grazing animals and the thousands of predators that live off them could tempt you to think that you can find large numbers of wild animals at any time of year, anywhere in the region. This is, however, not the case.
The Serengeti itself is about 125 miles wide from east to west, and about 112 miles long from north to south. But the animals don’t, of course, always move within the borders of the Serengeti National Park or the Masai Mara. If you go on a “standard” safari, you are sure to see a lot of wild animals, but the real spectacle and drama play out at very specific times of year in a relatively limited geographic area, which can be many miles from the locations chosen (often randomly) by tour operators. It can also be difficult to persuade the five or six strangers in your jeep to spend hours driving with you to the specific area you want to visit.
The best way to create optimum conditions for wildlife photography (including optimizing vehicle space) is to organize your own private tour, if possible with a maximum of two like-minded colleagues. Here, we will describe a whole year’s migratory patterns, helping to ensure that you are “in the right place at the right time”, and thus also helping you to maximize your safari experience and your crop of images.
The annual migrations begin after the massed birth of gnu calves (in the Ngorongoro Crater and in the South Serengeti) after the start of the short rainy season in January/February. We will begin our journey in the Ngorongoro Conservation Area and the South Serengeti as the gnu births begin. Both of these areas remain interesting for us right up to the beginning of the rainy season in April. The massed gnu births are a truly unique natural spectacle, but the hundreds of thousands of calves that are born within just a few weeks also attract many predators to the area. From the moment they are born, newborn calves become the prey of big cats, hyenas, jackals, and other carnivores, and only the sheer number of young prevents the species from being wiped out. About two-thirds of all newborn gnus survive each year. This sometimes nightmarish spectacle can be upsetting for the sensitive (especially children), and it might be advisable to travel at a different time of year if you feel this applies to you.
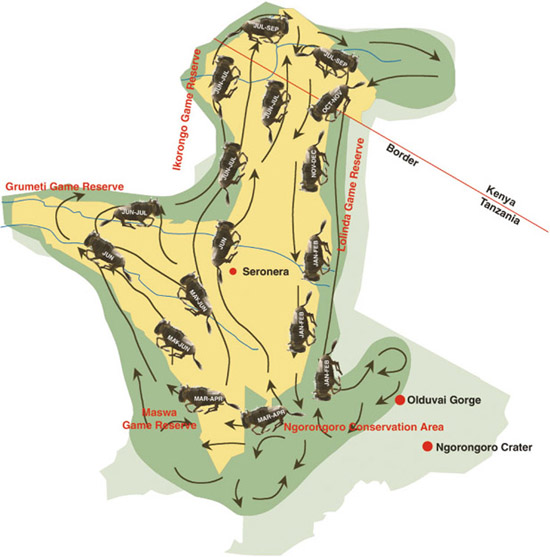
Illustration © Uwe Skrzypczak
The Serengeti ecosystem covers an area of nearly 11,600 square miles between the eastern bank of Lake Victoria and the Ngorongoro Crater in Tanzania. The northernmost part of the Serengeti, the Masai Mara, lies within Kenya. The central Serengeti National Park covers an area of nearly 5,800 square miles, while the Masai Mara in Kenya covers approximately 650 square miles.
* The running gnu symbol charts the annual migratory routes of the major ungulate herds.
The timings mentioned in the text can vary by as much as two weeks for climatic or other scientifically inexplicable reasons. The appendix includes links to various East African websites that update their climate data on a regular basis.
In May, at the end of the rainy season, bull gnus in the South and Central Serengeti fight for their right to mate. In order to secure their harems, the bull gnus go through bitter but often comical-looking battles. The presence of the gnu herds at this time also attracts predators. At the beginning of June, as the dry season progresses, the gnus begin gathering in earnest in the South and Central Serengeti. Once the famous “Moru Crush” is over, the Moru region sees the start of the “Great Migration”. The herds divide into a central phalanx that moves northward through the Central Serengeti toward the Masai Mara in Kenya, and a western phalanx that moves through the Western Corridor towards the Grumeti River, just 20 miles from Lake Victoria. The herds crossing the Grumeti River in the Kirawira region are eagerly awaited by the largest African crocodiles, who get to eat their single biggest meal of the year during the Great Migration.
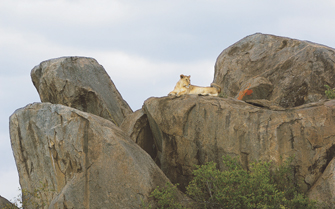
The South Serengeti is littered with rock outcrops like this one. These rock islands, called “kopjes” by 19th century Dutch settlers, are the peaks of mountains buried by volcanic ash over a period of millions of years. These micro-environments are populated by dassies, snakes, and scorpions, and are often used by lions as lookout posts during a hunt, or as hiding places for their newborn young.
The herds then move further north towards the Masai Mara during July. This is when the extreme dry season begins, and your chances of spotting large numbers of animals (and with them your photo opportunities) become less with every passing day. This is why I prefer to wait for the gnu, zebra, and gazelle herds to arrive in the Kenyan Masai Mara in August. The Masai Mara Nature Reserve in the North Serengeti has one of the densest predator populations of all wildlife reserves on the planet, and these predators can only survive thanks to the year-round presence of the ungulates and warthogs that make up their diet. The Mara river (which never runs dry), with its large numbers of crocodiles and hippos, is the main source of life in the region, and additional evening and night rains are precipitated by nearby Lake Victoria. Apart from its predators, the Masai Mara’s main attraction is the arrival from July onwards of the massed ungulates migrating from the Serengeti. The river crossings of up to 100,000 animals are one of the most breathtaking natural spectacles our planet has to offer, and it is for good reason that the Great Migration is counted among the “New Seven Wonders of the World”.
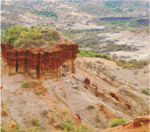
Olduvai Gorge
A journey through the Serengeti is also a journey back to the origins of the human race. The area in and around the Great Rift Valley is considered by many scientists to be the cradle of humankind. On the way to the Serengeti National Park, you pass the Olduvai Gorge where Louis Leakey excavated early human remains in the 1950s. The Serengeti region is of volcanic origin and is geologically relatively young at a mere 100 million years old. The volcanoes of the East African Rift (which includes the Ngorongoro Crater) showered the Serengeti with volcanic ash for millions of years, producing the vast, flat savannahs of the East and South Serengeti. These areas are covered with the nourishing, calciumrich grasses that help great herds of ungulate mothers produce enough milk to feed their newborn young.
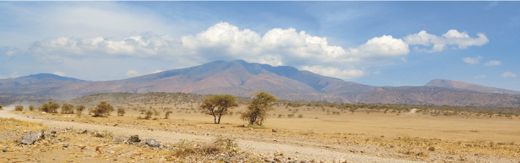
The Crater Highlands seen from Olduvai
4.3 Preparing to Travel and Conditions on the Road
Traveling in tropical environments always involves health risks. This is also true in the Serengeti, although the higher altitude makes the climate relatively pleasant. Check with your physician well in advance to make sure you are fit enough to acclimatize to the region. Also make sure that you are well informed about all necessary precautionary measures and inoculations before you leave. Inoculations against hepatitis A and B, yellow fever, polio, rabies, tetanus, and meningitis are recommended. Most of these inoculations need to be refreshed at specific intervals. I also recommend taking prophylactic malaria medication—the best tablets currently available are Malarone, which have very few side-effects but are unfortunately expensive. You should, of course, also pack a sufficient amount of any prescription medications you need. If you are prone to infections, take a strong broad-spectrum antibiotic along too.
Some form of antidote to bacterial gastrointestinal infections is also highly recommended. Foreign bacteria that our bodies are not used to are more often the cause of stomach infections than the famous “unwashed lettuce”, especially for people visiting Africa for the first time. Africans in Europe have to deal with similar problems when acclimatizing to a foreign diet. If you are planning an extended stay in Africa, or if you are planning regular trips, make sure your health insurance covers the “Flying Doctor” service. If you tend to travel often and/or spontaneously in the tropics, make sure that all of your prescribed inoculations are automatically refreshed at the appropriate intervals. This way, you are always ready to board the next plane without having to visit a doctor first.
Travelling in Kenya and Tanzania is generally no more dangerous than driving at home, but these are still developing countries with a relatively high crime rate, especially in the urban centers of larger cities. Keep a careful eye on your baggage and photo equipment, especially at airports. Never give your baggage to someone who claims to be a porter—the driver hired by your tour operator or your lodge will look after your baggage. Insure your photo gear against theft, loss, and breakage, although the risk of theft at most lodges is extremely low, even if they don’t have a safe.

A typical East African turboprop airplane, used for inland flights
As of this writing, the following are some of the travel options for a Serengeti safari. There are daily direct flights from Amsterdam, Netherlands (AMS) to Kilimanjaro, Tanzania (JRO) on KLM Royal Dutch Airlines. The return flights are overnight with a stop in Dar Es Salaam, Tanzania (DAR). There are also departures every Tuesday on budget carrier Condor Airlines from Frankfurt, Germany (FRA). The outbound Condor flight is overnight; therefore, when you arrive in the morning at the Kilimanjaro airport you can get a head start directly into the Serengeti ecosystem. The return flight is during the day and requires a stop in Mombasa, Kenya (MBA). On Condor Airlines there is “premium economy class”, which is between coach and the expensive first-class, that provides more comfort. If you have not booked a connecting inland flight to your final destination, the next stage of your journey will be a 125-mile jeep ride on tarred roads along the banks of Lake Manyara towards the Ngorongoro Crater. Above the crater you will find not only the burial site of the famous German naturalist Bernhard Grzimek and his son Michael, but also a number of attractive lookout points with views into the crater. The Serena Lodge at the edge of the crater (about four hours’ drive from the airport) offers an excellent lunch for about US$15. If you have not planned to stay in the crater area, you will carry on from here to the Ngorongoro Conservation Area, which is where the massed ungulate births take place in January and February.
Spending time in or simply travelling through this area currently costs US$60 per person per day. The Serengeti National Park (where the entrance fee is also currently US$60 per day) is another one-and-a-half hours drive away along dirt roads. Depending on which area you are visiting and which lodge you are staying in, it can take another two or three hours to actually reach your final destination.

Jeeps and Land Rovers are the standard means of transport for most wildlife photographers in East Africa
If you are heading to the Masai Mara in the North Serengeti, fly into Jomo Kenyatta airport in Nairobi. There you can connect to the Wilson Inland Airport by car and then fly for about an hour to the Masai Mara in a small turboprop airplane. The jeep drive into the Rift Valley in the Masai Mara takes between four and six hours, depending on the weather conditions. You can also reach the Masai Mara by way of a two-and-a-half hour inland flight from Mombasa, or by jeep. The overland route takes between 10 and 12 hours and is only possible in the dry season. The current entrance fee in the Masai Mara is US$60 per person per day.
You should obtain a current entry visa for Kenya and Tanzania in advance of traveling, as this saves valuable time at passport control on arrival and reduces the risk of missing your connecting flight. A three-month tourist visa costs US$50 in Tanzania and US$25 in Kenya. Your movements in Africa will depend on the specific areas you want to visit and what you want to photograph. Standard safaris generally leave for the nearest nature reserve every two or three days, but lose a lot of time due to long outward and return journeys. If you are serious about your wildlife photography, a privately organized tour is a much better way to get around. With the exception of a few rainy season bargains, organizing your own itinerary is often only slightly more expensive than most organized tours.
Every wildlife photographer’s basic mode of transport is a jeep or Land Rover. You will usually have to share a jeep with up to five other people, but if you want to improve your working conditions, you can arrange to share with one or two others. This is the only way to make sure that your daily timetable runs according to your own schedule, and the additional cost is minimal compared to the advantages you gain from being able to use your vehicle how you want. It is often easier (and cheaper) to plan a private tour once you are in Africa, and you will find some useful East African addresses in the appendix.
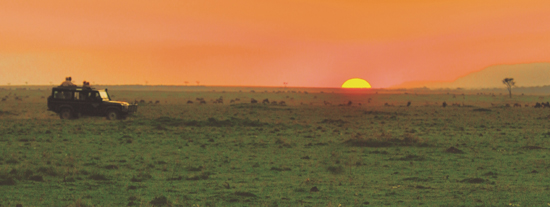
A privately organized tour: Traveling this way means you decide yourself when and where you take your “sundowner”.
If you are planning to visit several nature reserves along your route, you will be met at your destination airport or at your hotel by your driver/guide. If you are only visiting a single destination and have booked just one lodge, it is often simpler to fly direct. Most lodges have their own vehicles and drivers with good local knowledge, and some of the vehicles are even customized for use by photographers and camera teams. The private use of a vehicle and driver can, however, cost as much as US$250 extra per day, and is not always possible in the high season. Even if everything seems to be booked out, your tour operator should be able to organize a vehicle and driver for you.
The level of your driver’s experience is important to the success of your wildlife photography. A driver should not only know his way around the area, but also have extensive knowledge of the indigenous animals and their behavior. Wild animals are nearly always on the move, and your driver should be motivated enough to put up with long drives while following your chosen subject. A good driver expects to be tipped US$15-20 per day, and tips go a lot further towards feeding a driver’s family than his basic salary. Taking an evening meal with your driver now and again is a also good way to ensure that he keeps up his good work. Remember, you are a guest in Africa. Respect its people, and help to protect the environment that all Africans respect in spite of the sometimes extreme poverty that predominates in many areas.
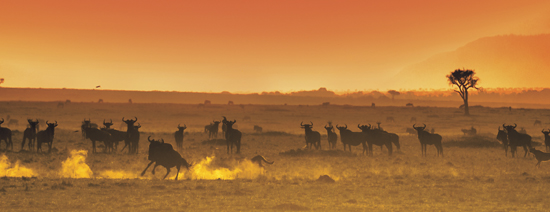
4.4 Where to Stay
The most common accommodations in the Serengeti are “tented camps”. Luxury tents are often 400 square feet or more, and are equipped with bathrooms, showers, and huge, comfortable beds.
There are also good, middle-range lodges available. Basic lodges have simple tents and shared outside bathrooms and showers. The development of African tourism has also led to the appearance of brick or concrete lodges, but these have a less authentic feel than the traditional camps. The first few nights in a tent can be unnerving, but once you get used to the wonderful sounds and smells of the African night, you won’t want to sleep any other way.
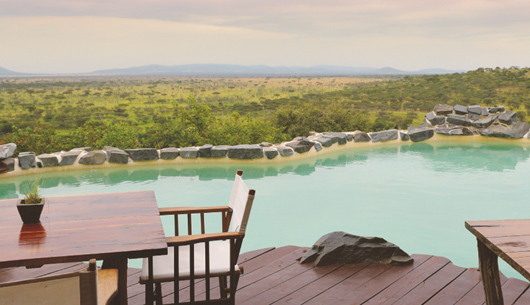
Mbalageti Serengeti: This is the ideal lodge for all wildlife photographers who want to take a few days out from camp life to relax and get really clean. It is located on a hilltop far from the center of the action in the southern part of the Western Corridor near the Mbalageti River.
Some camps have recently begun to erect electric fences around their perimeters. This is not an environmentally friendly thing to do, and it also means that you no longer have the chance to shoo away a herd of buffalo or elephants before leaving your tent in the morning. Most lodges and camps are located directly within the animals’ habitat and are guarded by Masai warriors. After nightfall, a Masai will always escort you to the campfire or restaurant, and for your own safety, you shouldn’t wander around unaccompanied. The food and general level of service in most lodges are very good indeed, and the staff are generally friendly and helpful. A lack of water is often a problem, so try to avoid taking long showers. Those with more wilderness experience can also make use of simpler camps and campsites, and take a break for a day or two in a higher-class lodge when limited personal hygiene gets to be a strain.
Tent in a luxury camp:
“Governors’ II Moran” camp, Masai Mara, Kenya
If you set out before sunrise or plan to spend the whole day on the road, you will be given breakfast- and lunch-boxes by your lodge, and it is important to always carry enough to drink in your vehicle. The climate in the Serengeti is pleasant, with daytime temperatures reaching between 73°F and 82°F in the shade. Night temperatures range between 54°F and 64°F, depending on the season. The coolest temperatures are in June and July. However, the savannah regions provide virtually no shade and daytime temperatures often reach as high as 105°F. Always wear a hat and sunglasses, and follow the example of the animals you are photographing by taking a long siesta in the midday heat. The Ngorongoro Crater Highlands are an exception: nighttime temperatures at the crater rim (over 7,000 feet) can be as low as 50°F. The floor of the crater lies more than 2,000 feet lower, and temperatures there are much warmer.
Mbuzi Mawe Serena:
Luxury camp, central North Serengeti
The midday temperatures tempt many tourists to wear shorts and flip-flops, but remember, if you are not a regular visitor to Africa, you will not be acclimatized to the local conditions. You should generally always wear sturdy, closed shoes and long trousers, especially during picnics or on visits to the “bush bathroom”. The collected smells of a day in the bush are quickly forgotten after an evening shower.
Economy tented camp:
Masai Mara
The risk of accidents involving animals is very low on safari and at lodges, and most of the accidents that do occur are due to simple tourist high spirits. Most wild animals always keep a safe distance from humans, or simply flee, and things only become dangerous if you get too near an animal while you are outside your tent or vehicle. With the exception of (almost prehistoric) crocodiles, who will eat anything they can get their jaws on, humans are not part of the normal diet for African predators. You should nevertheless avoid trying to prove the theory by stroking a lion. Most accidents among local people involve hippos, which tend to react aggressively when disturbed, especially while eating. Horrific movie scenes involving poisonous snakes are not realistic, and you will hardly ever see a snake in Africa. If you should be confronted by a snake, keep your distance. Without specific knowledge of the species, it is difficult to judge how quickly a snake can move when attacking or retreating. The best approach is simply to avoid all risks for your entire stay in this unfamiliar environment.
Serena Lodge:
Mid-range brick lodge, Central Serengeti
4.5 Daily Routine
You should adjust your daily routine to suit that of the animals you are photographing. Most animal activity takes place in the early morning and late afternoon. Unusual daily rhythms mean that you will often miss out on the regular meals that other tourists are served at their lodges, so you will only be able to spend your time this way if you travel alone or with like-minded photographers. Your day will start with a wake-up call and tea or coffee at around 5 a.m., and you should set out at around 6 a.m. to get into position near your subject before sunrise. Your first “targets” will probably be lions or leopards, as both of these big cats hunt into the early morning if they haven’t already eaten their fill during the night. Around 9:30 a.m. is time for a bush breakfast, either inside or outside the car, depending on your surroundings. If some nearby animal action occurs during your meal, you will probably have to collect the remains of your food from all around your vehicle afterwards!
Your next subjects will probably be daytime hunters, such as cheetahs. In some areas, cheetahs have already learned to hunt at the times when humans are taking a break in order to avoid being disturbed. You will most probably be on a constant lookout for other spectacular events; you can sometimes find lions and leopards hunting in the daytime, as both tend to hunt whenever an opportunity for a catch arises.
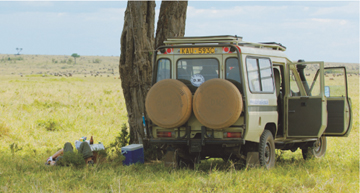
Bush picnic
As of around 12:30 p.m., depending on the heat and the level of animal activity, it is time for a one- or two-hour lunch picnic, which is best enjoyed in the shade of a tree. If you are taking a break in the open, sit back-to-back with your driver or companion, so that you have a better overview of your surroundings and can react quickly if you need to get back in your vehicle. A short nap in your jeep after a meal is never a bad idea, as your working day will probably only end once you have sorted your day’s photos following an 18-hour shift. Wild animals are always less active in the afternoons until it gets a little cooler, around 4:30 p.m. This is when the famous “golden light” of the early African evening sets in, and it is once again time to look for lions and leopards to photograph while they hunt for their dinner. Once the sun has set, you can head back to camp. A shower, a sundowner at the campfire, supper, and then camera maintenance and image selection make up the evening’s activity until you collapse into bed—so tired that you probably wouldn’t notice if you had to share your tent with a lion. If you are traveling with a partner, you might occasionally be reminded that life also consists of things that have nothing to do with wildlife photography, and which can sometimes make early starts a little more complicated.
During the day, the “bush bathroom” is your only hygiene option, and you should always follow your guide’s instructions during breaks, especially in unfamiliar territory. Always remain within the shade of your vehicle, and never wander off into the bush or too near a riverbank. Never leave your vehicle when leopards are around, or when you are following leopards. If you are inexperienced, it is quite possible to simply overlook these big cats in high grass or in the bush at distances of three feet or less. A leopard will run away from humans that it spots at a distance, but it can be very dangerous if surprised close up. And don’t get lulled into a false sense of security by the apparent inactivity of animals surrounding your vehicle. You should always make sure you are at a safe distance from any predators before you leave your vehicle, as many of these creatures can reach running speeds of up to 45 mph in a matter of seconds.
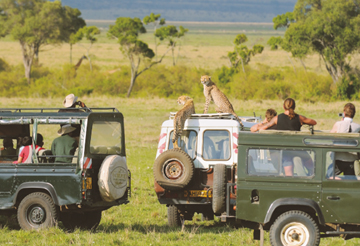
Cheetah on board: Cheetahs in the Masai Mara have become so used to tourist jeeps that they even use the roofs as lookout platforms while hunting.
Our jeeps are our photographers’ “cloak of invisibility”, but they are used by some cheetahs as lookout posts while hunting. Leaving your vehicle in cheetah territory causes the animals to flee, and often to lose their prey, or even their young. You should only make use of the “bush bathroom” if any nursing cheetahs in the area cannot see you. Otherwise, a cheetah mother will hide her young or chase them off in various directions, which then endangers the young animals’ lives.
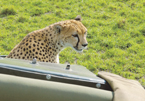
Some animals let you take wide-angle close-ups.