
Windows 11 is very easy on the eye, but that doesn’t mean it’s not really easy to personalize how it looks and make it more to your own liking. There can be good reasons for this too, such as making text on your screen easier to read and even reducing the power consumption of your laptop or tablet.
Settings is also where you can add, remove, and manage accounts on your PC, for everything from your email, to letting your children use your PC and get online safely.
Introducing Settings
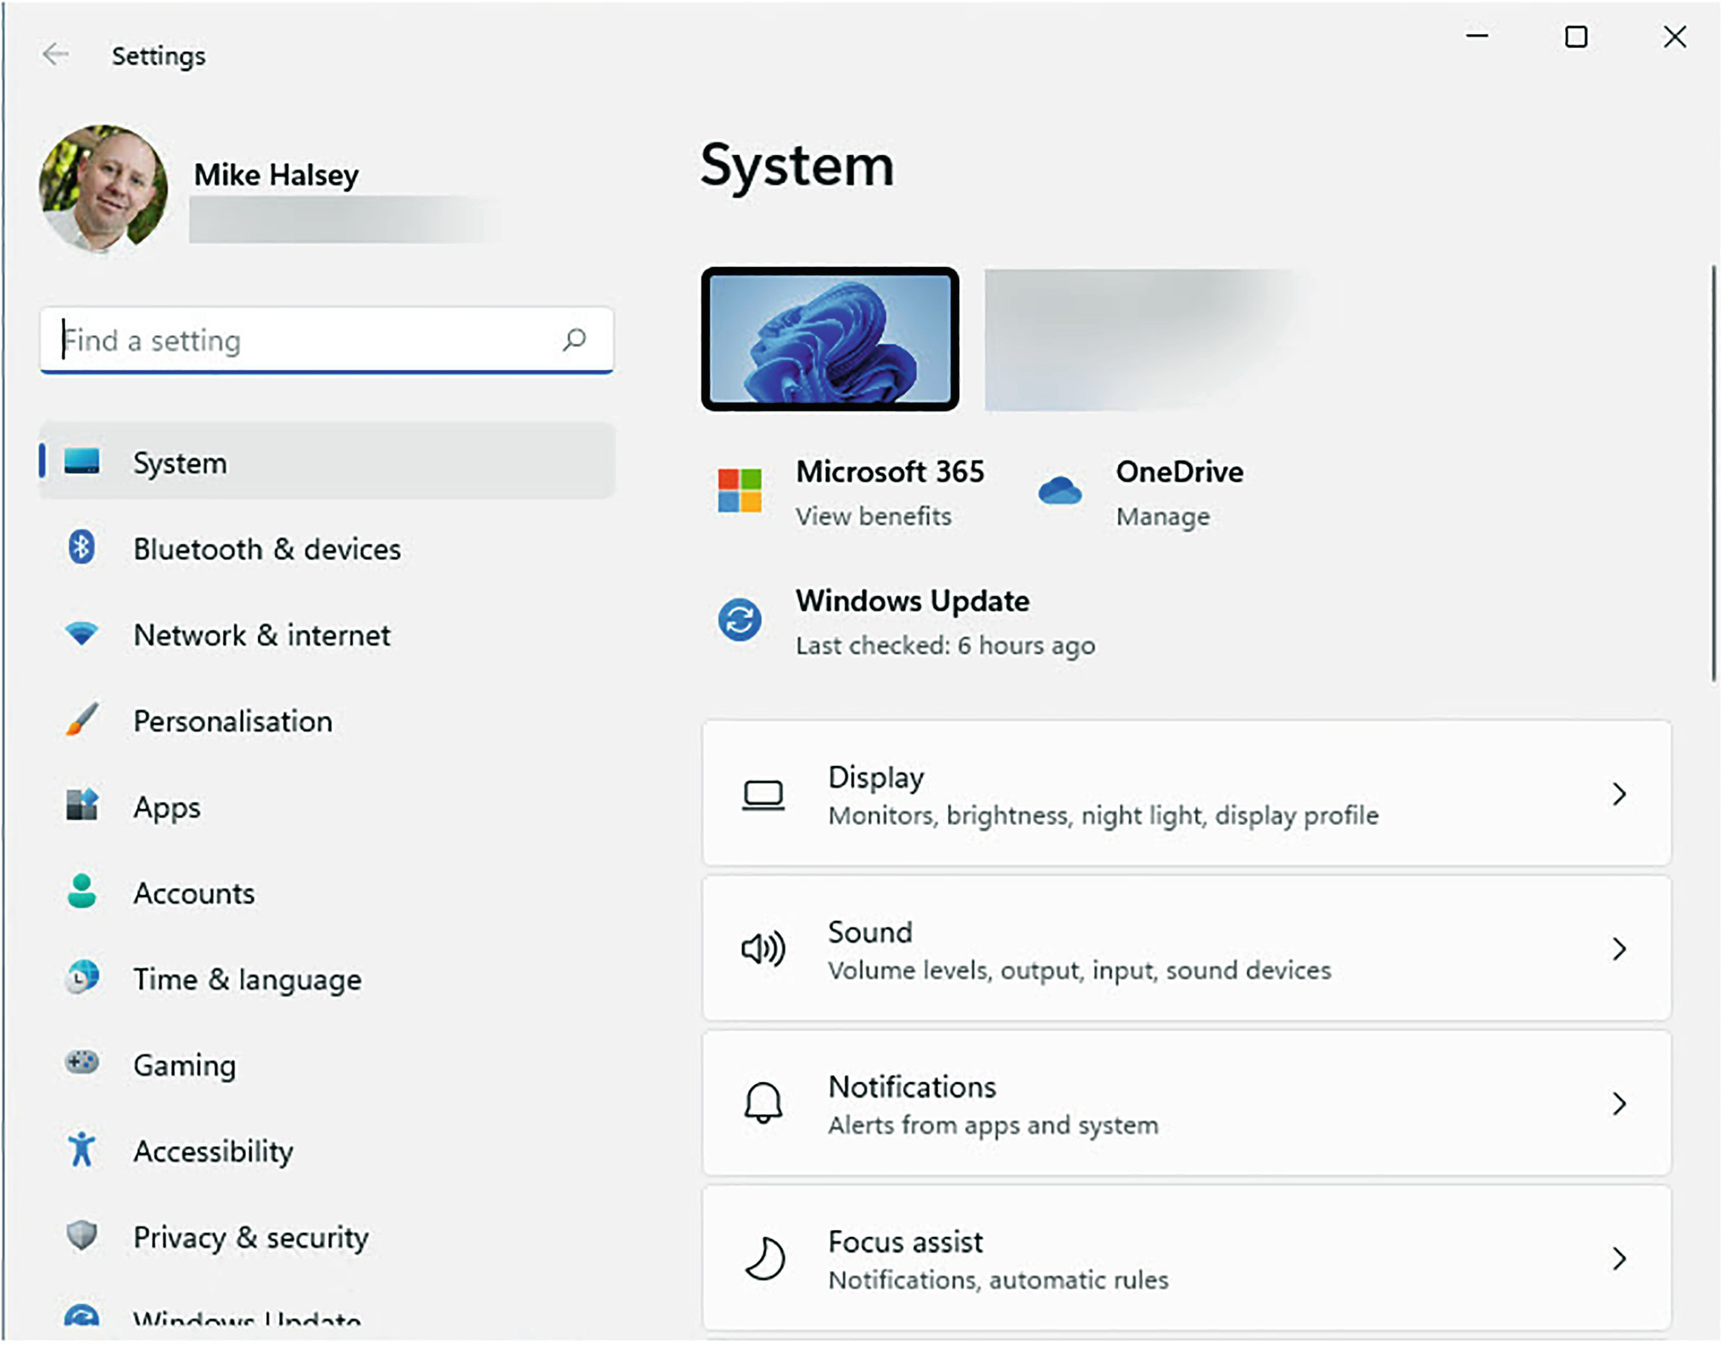
Settings is available from the Start Menu
It is here that you will perform every task from configuring and customizing your Windows installation to managing user accounts, work accounts, printers and Bluetooth headphones, privacy, accessibility, and more.
Personalizing Your Desktop
Let’s start with your desktop and Start Menu. There are two ways to access the personalization options in Windows 11. You can either open Settings and click Personalization on the left of the settings panel, or you can right-click (tap and hold) anywhere in an unused place on the desktop and from the menu that appears click Personalize.
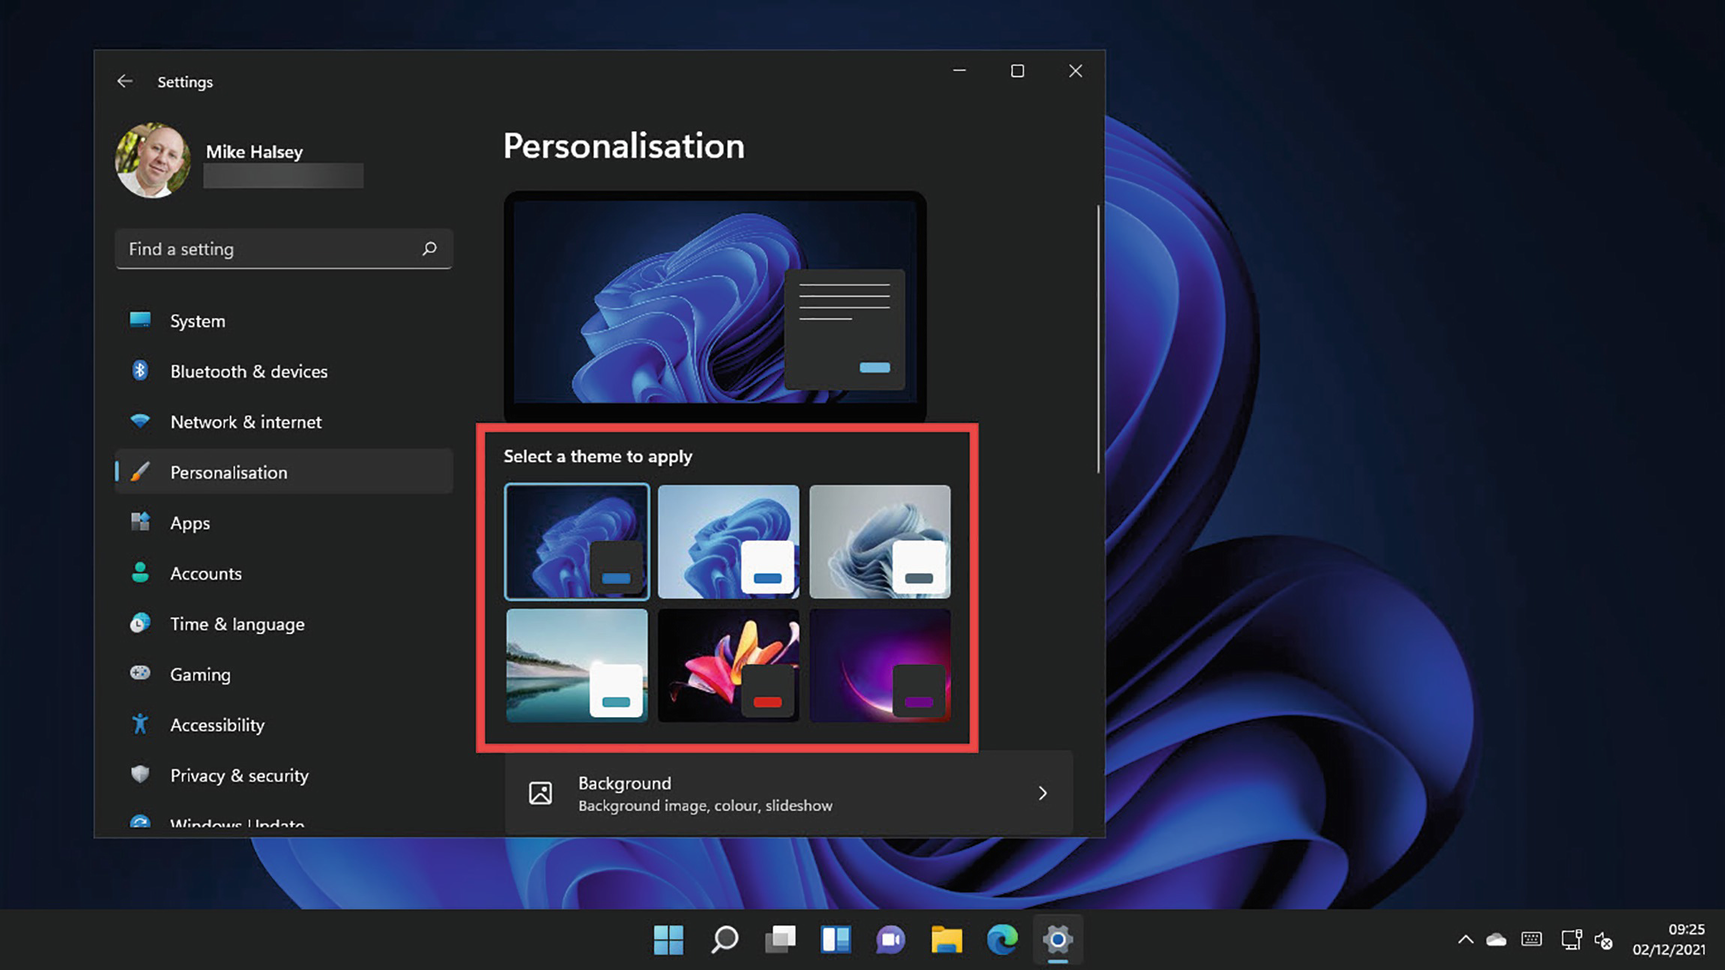
Windows 11 comes with a selection of desktop themes
Some of these themes, such as the one seen in Figure 2-2, will change the whole desktop from a light theme to a dark one. Others will change the colors of specific desktop items such as the Taskbar and Start Menu.
Dark themes, often called Dark Mode, can make your PC screen easier to read and help reduce eyestrain. If your laptop or PC has a screen with an OLED or an AMOLED display (refer to the device specifications to see if it has one of these display types), then dark mode can also help reduce power consumption, as if a pixel on the screen is black, it draws no power from the battery at all.
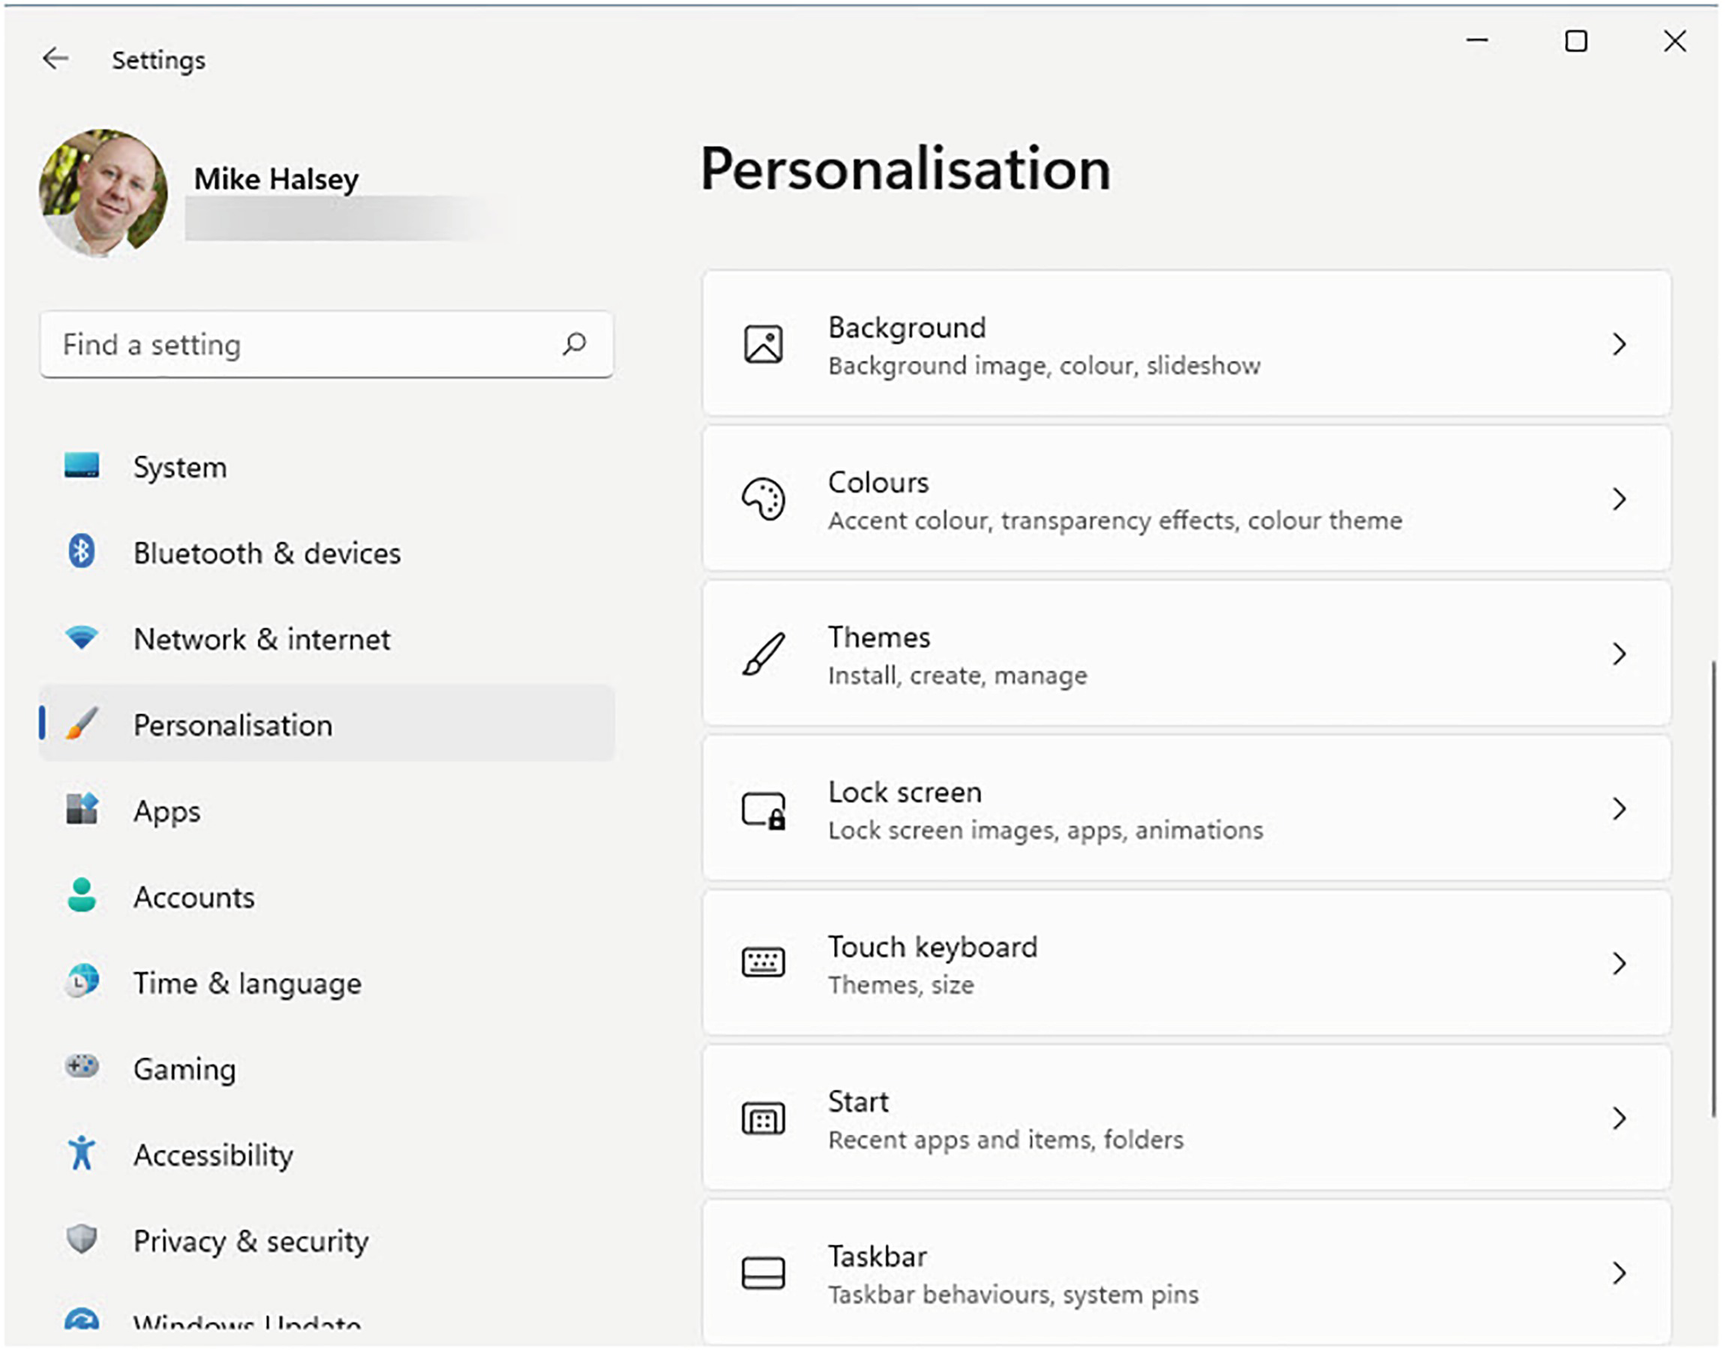
You can personalize any aspect of a desktop theme
Background is where you can change the desktop background (often known as a wallpaper) between a picture, a solid color, or a slideshow of photos and choose your own photo from your file library as your desktop background.
Colors lets you switch between light and dark modes, turn transparency effects off (which can make the desktop easier for some people to see), and change the accent color for your desktop (which will affect the Taskbar, Start Menu, and open apps, allowing you to personalize your desktop further).
Themes is where you can further personalize the current desktop theme by changing Windows 11’s sounds and the mouse cursor (we’ll look at this more in Chapter 6). Additionally, you can get more desktop themes from Microsoft from these settings.
Lock Screen allows you to choose a background picture, or a solid color for the Lock Screen, as well as choose if additional information such as the weather, and any new email or current calendar events are displayed.
Start is where you can personalize the Start Menu by having it highlight your most often used apps and by hiding your recent files and documents from being displayed.
At the bottom of the Start options is a section called Folders. This allows you to pin additional quick link icons to the Start Menu for Windows features such as Settings, File Explorer, and your Personal Files folder. These will appear next to the power button at the bottom right of the Start Menu.
If you prefer the Start Button and Start Menu to appear on the left of the Taskbar as they did with earlier versions of Windows, you can select this option in the Taskbar behaviors options, along with turning notification badges off for the app icons on the Taskbar.
Changing Windows Desktop Scaling
One of the problems with modern computer displays is they come with a very high resolution. While this can make apps, games, photos, and videos look pin sharp, it can also make everyday items on the desktop such as text and icons very small and difficult to read.
In Settings, select System in the left panel, and then Display on the right side (you can also get to this by right-clicking the desktop and selecting Display settings from the menu that appears).
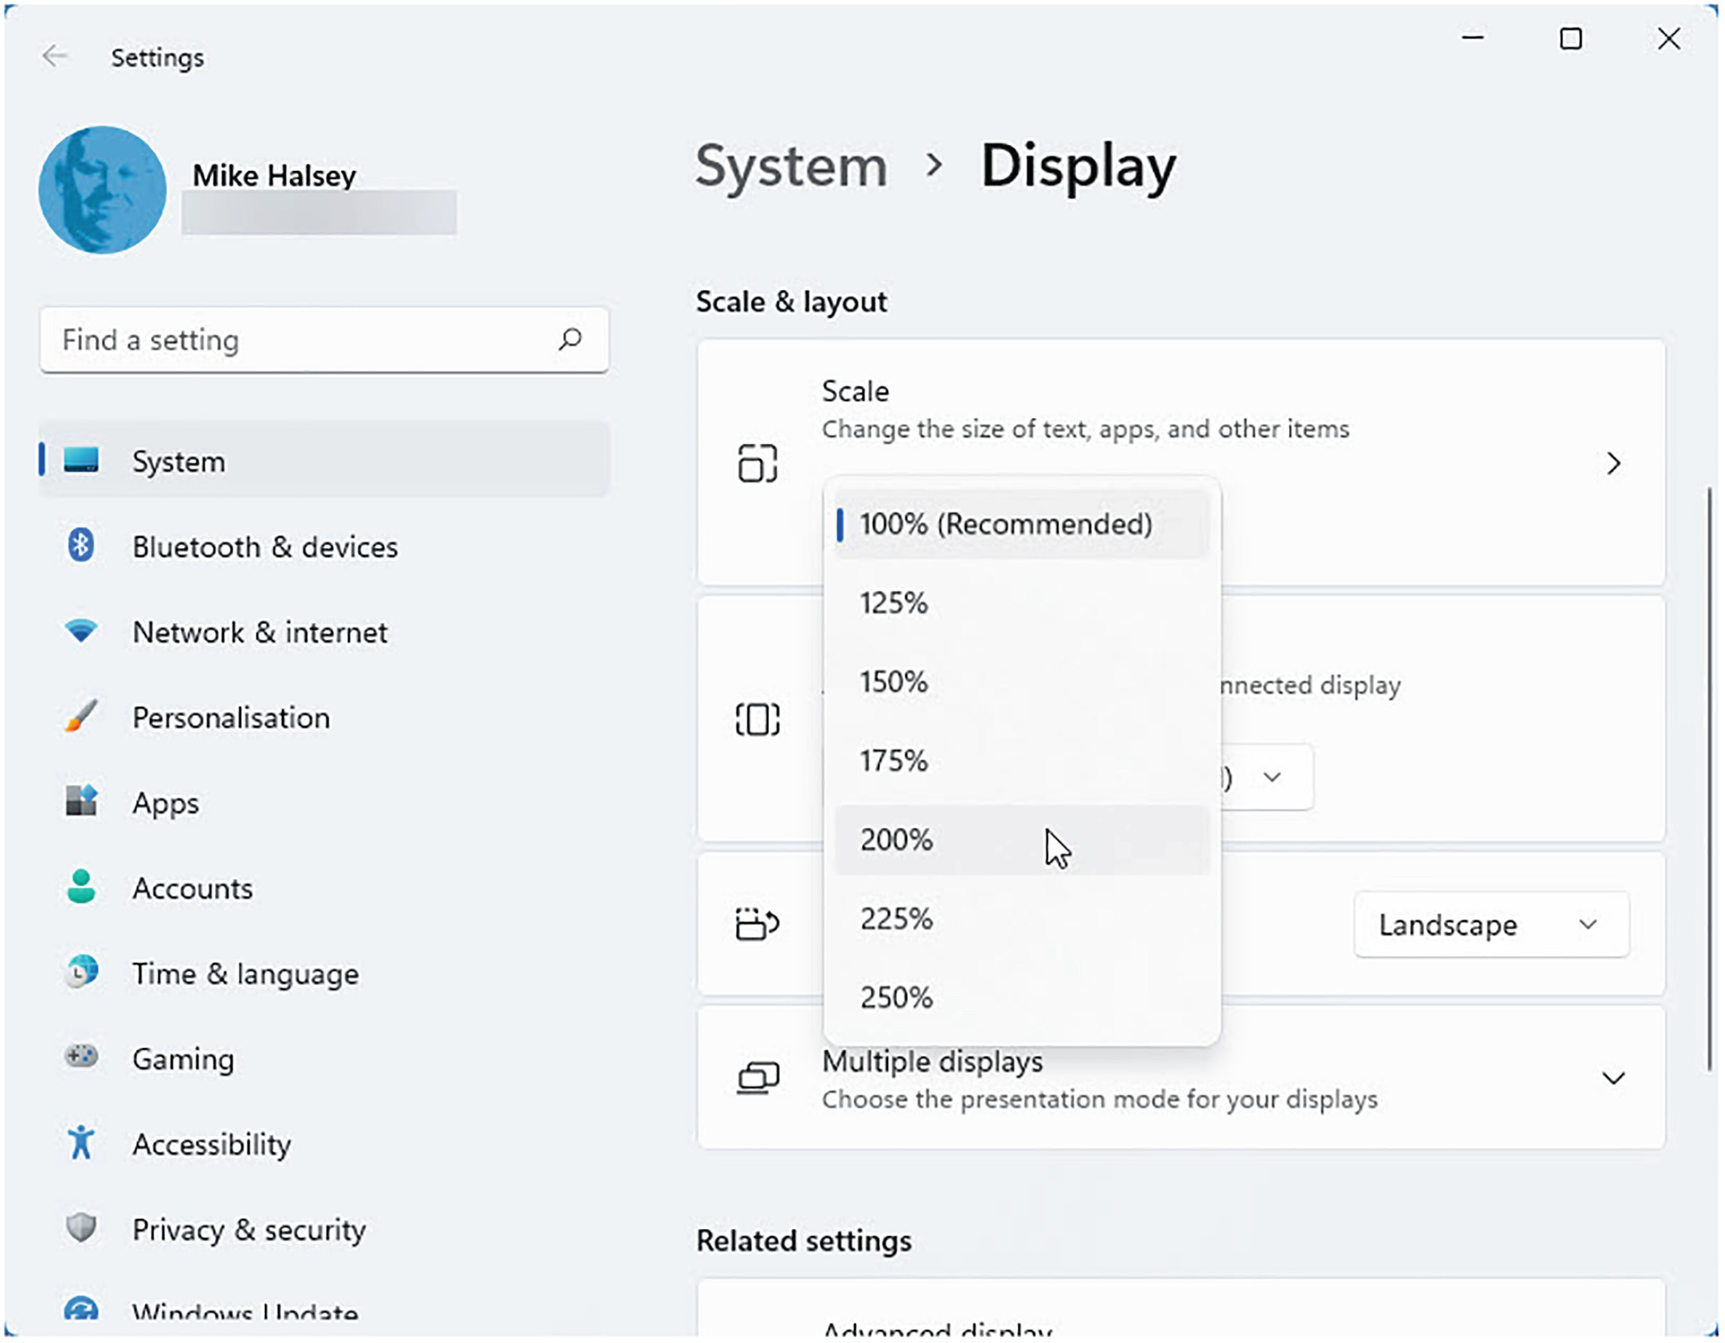
You can change the size of text and icons using scaling
Changing the scaling options doesn’t change how pin sharp apps, games, photos, and video can look as they still stay the same. What it changes is the size of text and icons on your desktop, making them much easier to see and read (if you zoom upward) or to give you more available desktop space overall (if the zoom level goes downward).
Changing your desktop scaling options is not the same thing as changing the Display resolution, as the latter will make your display blocky and difficult to use. Display resolution should always be set to the native resolution of your PC’s monitor.
Personalizing Your Sound Options
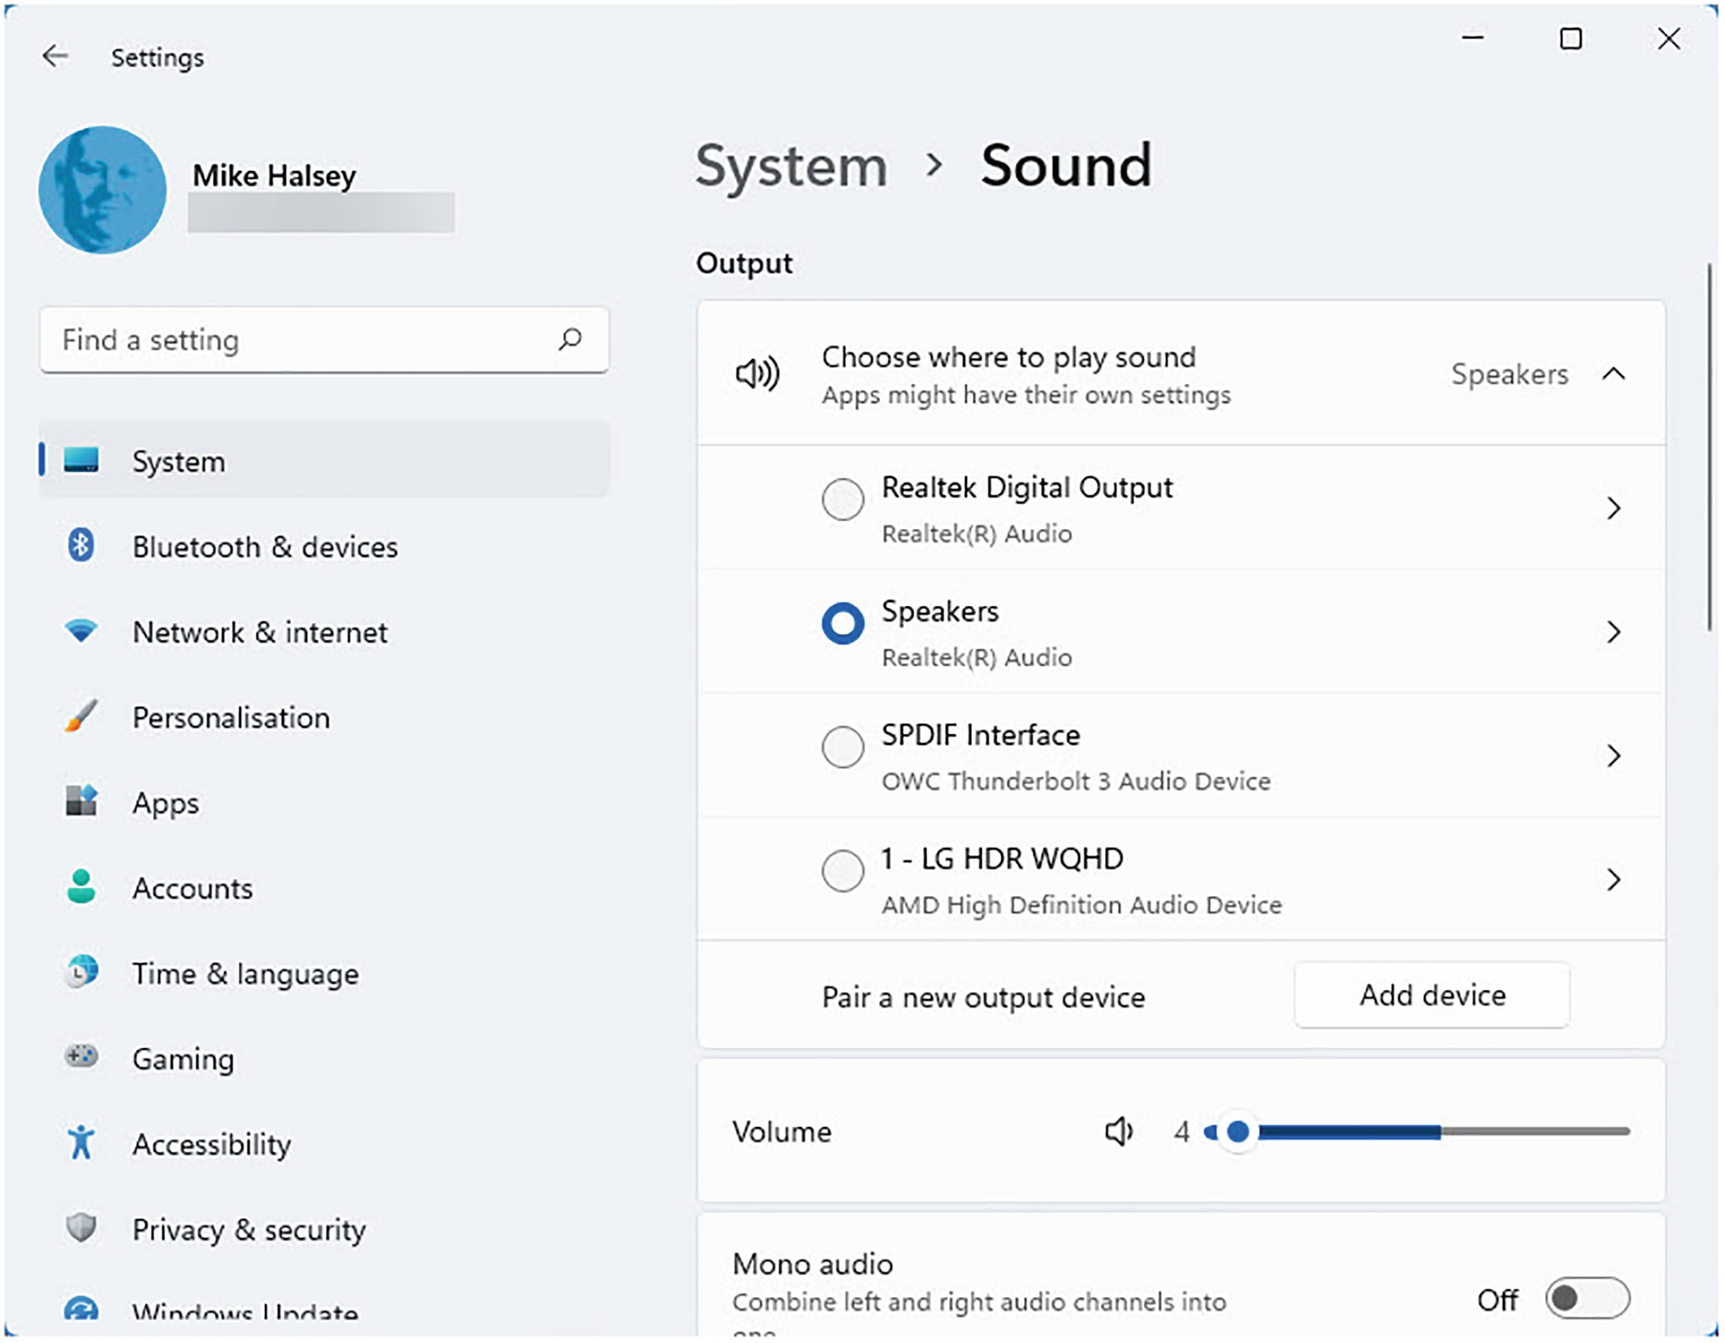
You can control sound and audio in Settings
In the section Choose where to play sound, you can select which audio device to use with your PC. This can come in useful if you plug headphones into your PC, perhaps for an online call or meeting, but they’re not recognized.
You will see a volume slider below this where you can select the volume for your PC, and further down the page is also a Choose a device for speaking and recording panel, and you can use this to select the correct microphone to use for online calls and meetings.
Note that if you are using Bluetooth headphones or speakers and they are not visible in the list, I will show you how to connect and manage them in Chapter 10.
Personalizing Quick Settings
In Chapter 1, I detailed the Quick Settings panel, which pops out when you click the network and volume icons in the System Tray to the right side of the desktop Taskbar. This menu contains quick on/off switches for features like Bluetooth, flight mode (on laptops and tablets), the Night Light feature, Accessibility settings, and more.
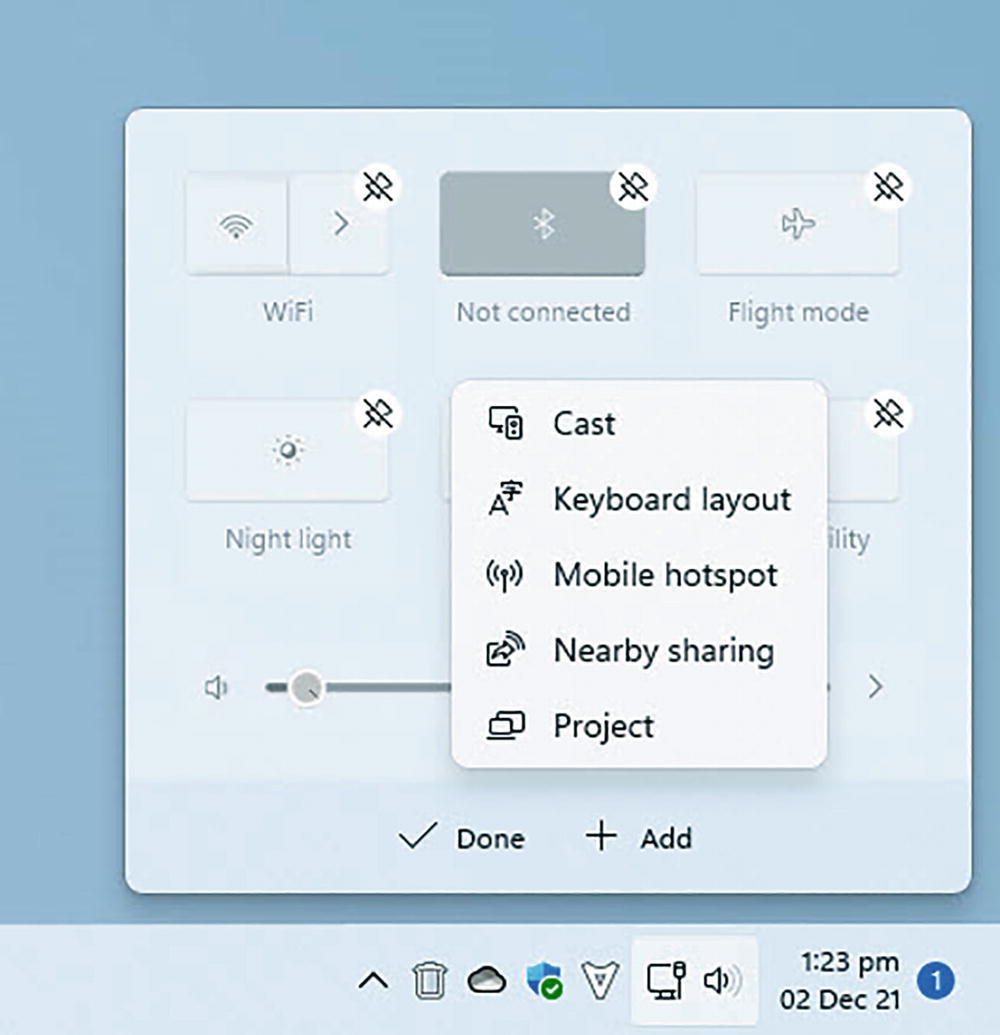
You can personalize the Quick Settings menu
You can click the unpin icon in the top-right corner of any item to remove it and also click the Add button to display a list of additional settings you can add. These will vary from one PC to another depending on the hardware and features you have installed. When you are finished customizing Quick Settings, click the Done button.
Adding and Managing User Accounts
You might not be the only person that wants to use your PC. Perhaps a friend or another member of your family wants to use the PC too, or maybe you want your children to be able to use it safely.
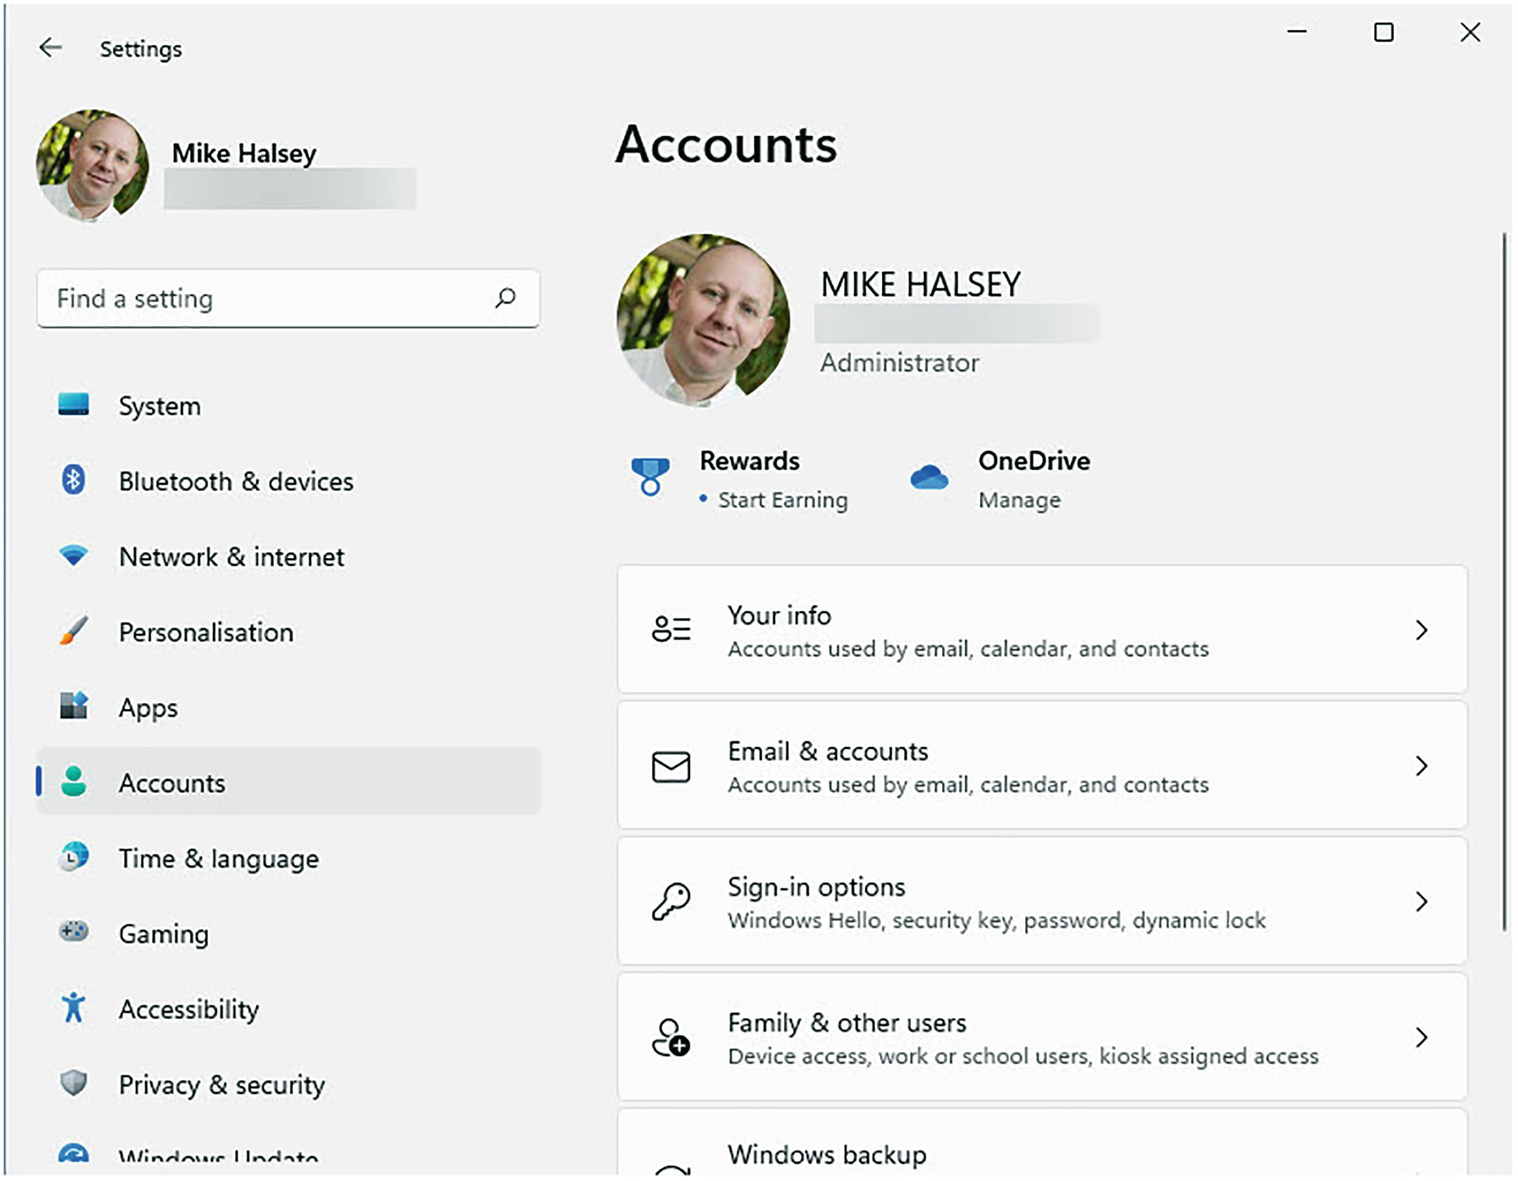
You manage your and other user accounts in Settings
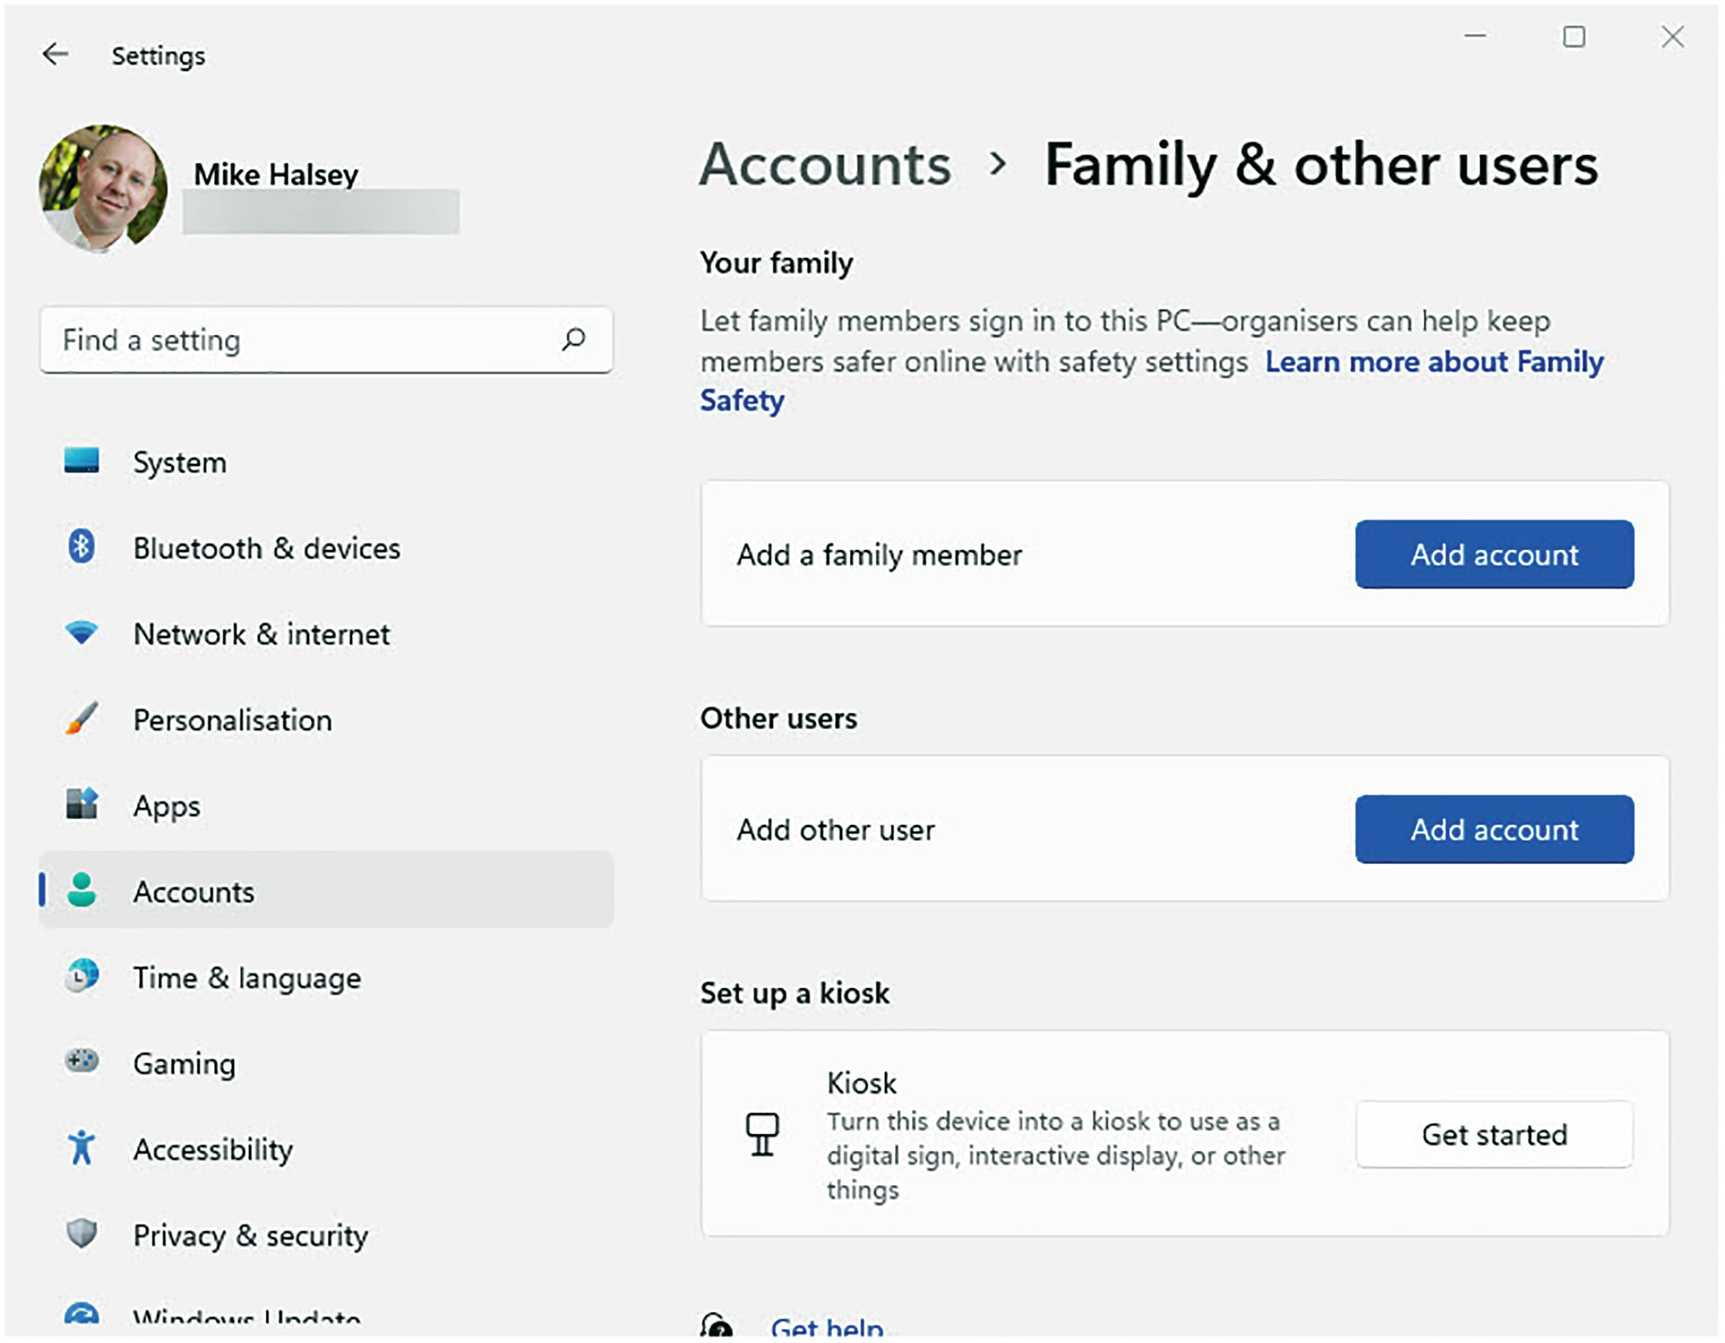
You can add users to the PC in Settings
Family accounts are normally used for children, and Windows includes family safety features that we will look in detail in Chapter 3. When you add somebody to your PC, Windows 11 will ask for the email address associated with their Microsoft Account. You don’t need to know their password though, so they don’t need to be with you at the time. Their account will appear at the Lock Screen and be available from the Start Menu and will be configured the first time they sign into the PC.
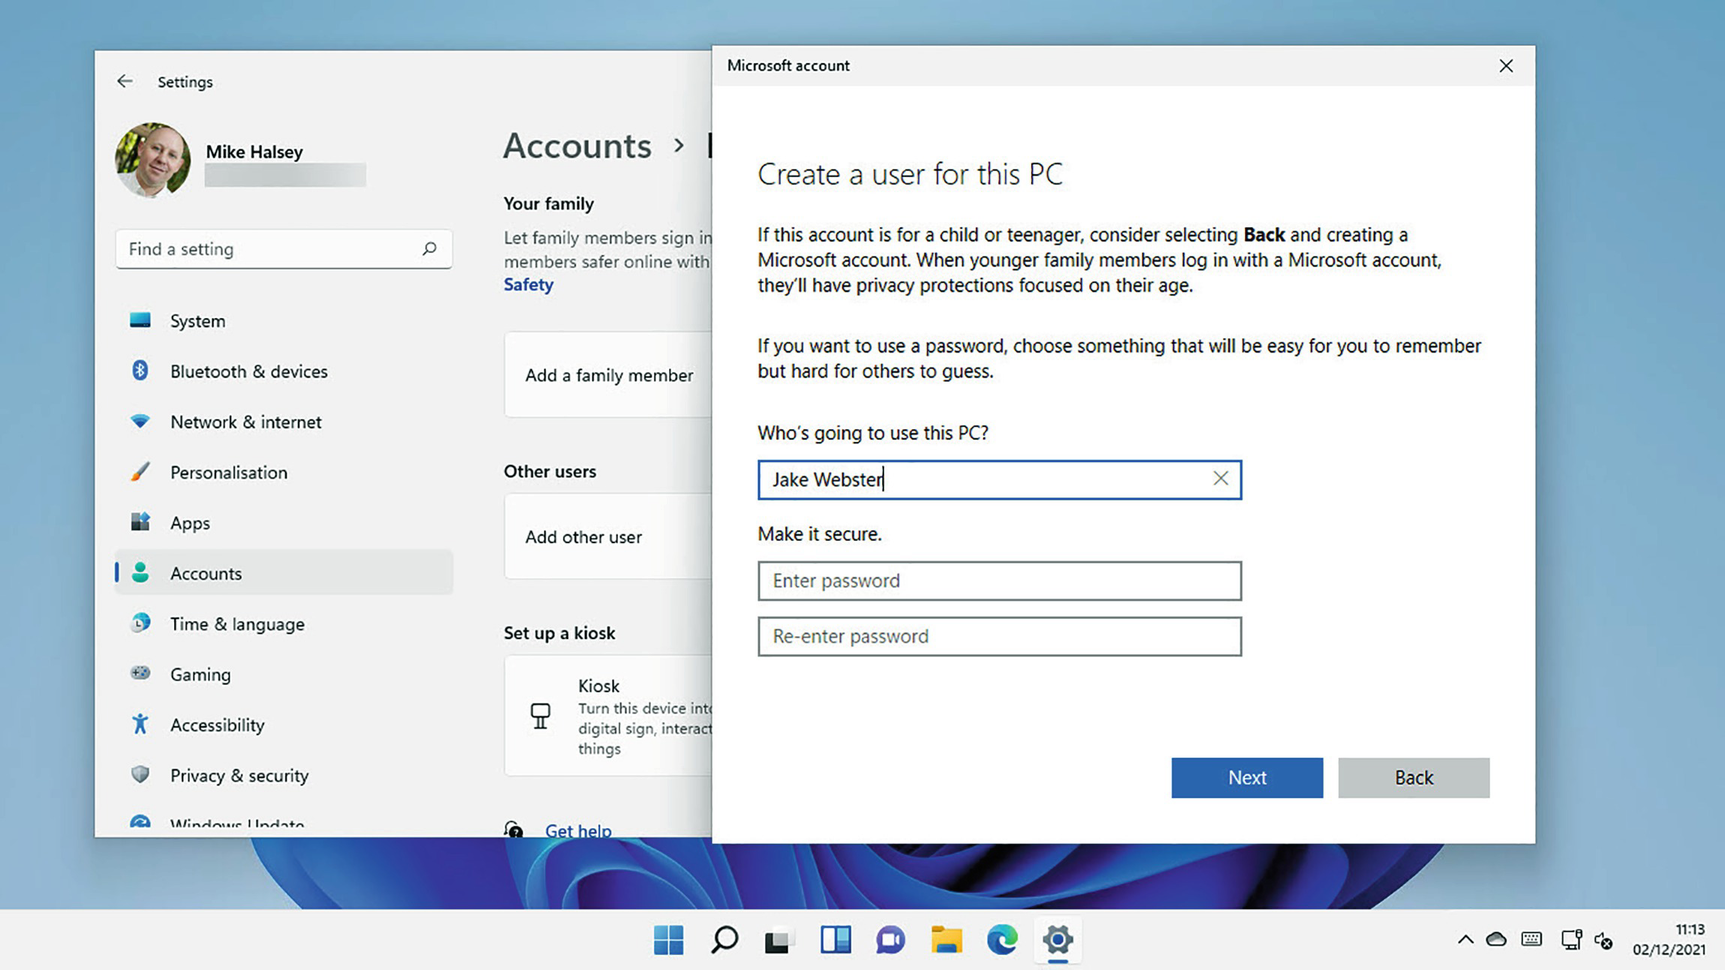
There are different ways to add a user to your PC
If you really want to use local accounts on your PC but are using Windows 10 Home, you can upgrade in Settings by going to System, About and clicking Product key and activation. This will give you an upgrade option where you can purchase an in-place upgrade to Windows 10 Pro in the Microsoft Store.
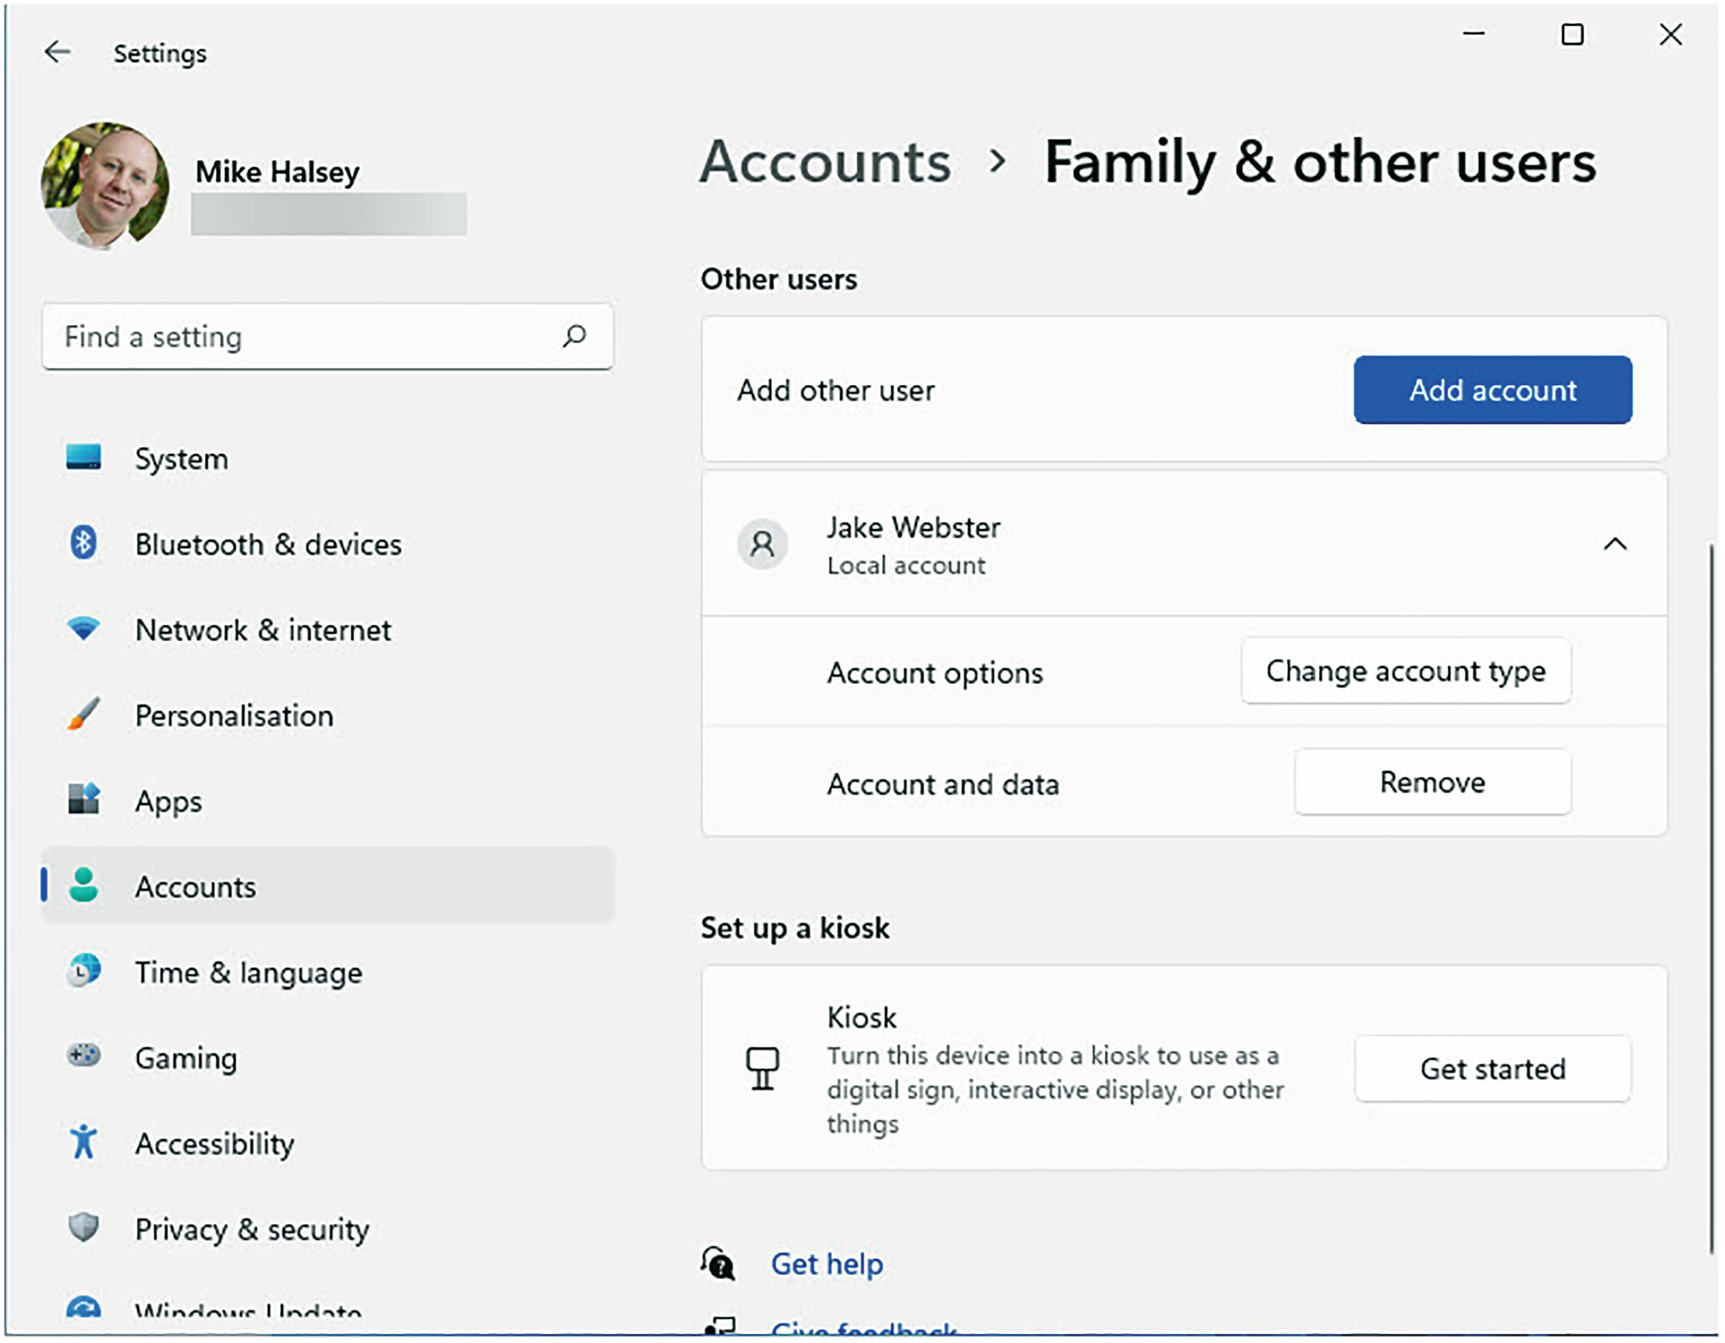
You can change a user between two account types
Standard user can only make changes to the PC that don’t affect other user accounts. They can install apps from the Microsoft Store but not ones downloaded from websites or installed from another disk like a USB flash drive. They also cannot add or manage users or change any settings on the PC except for their own personalization options.
Administrator is a user like your own account that can change anything on the PC. People should only be administrators if you can trust they won’t change things you don’t want them to.
Managing Accounts for Children
I’m going to begin this section with a caveat. Microsoft do change the child account and family safety options in Windows and on their Family Safety website from time to time as they introduce new features or update existing ones. This means that what you see might vary slightly from what I detail here, though the functionality will always remain broadly the same.
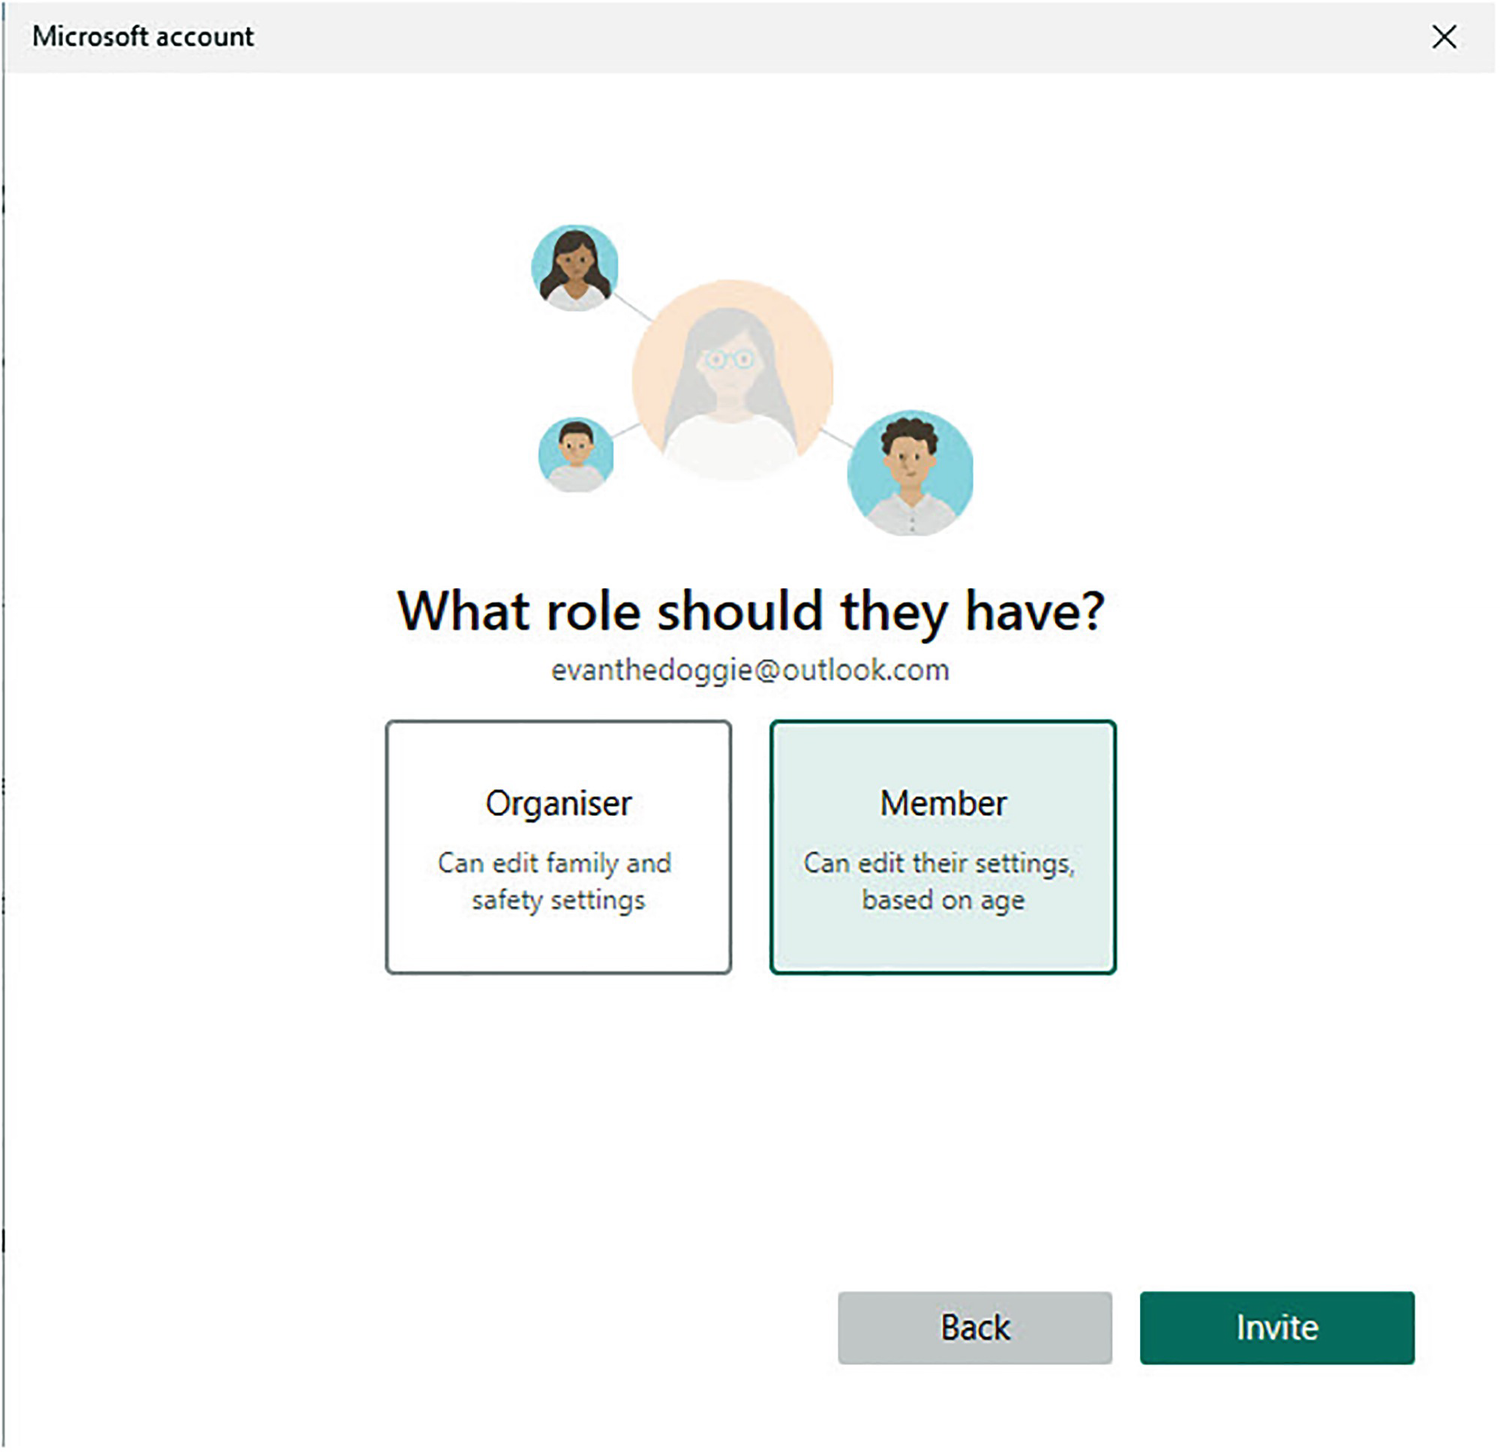
You can choose from a parent of the child in the Family settings
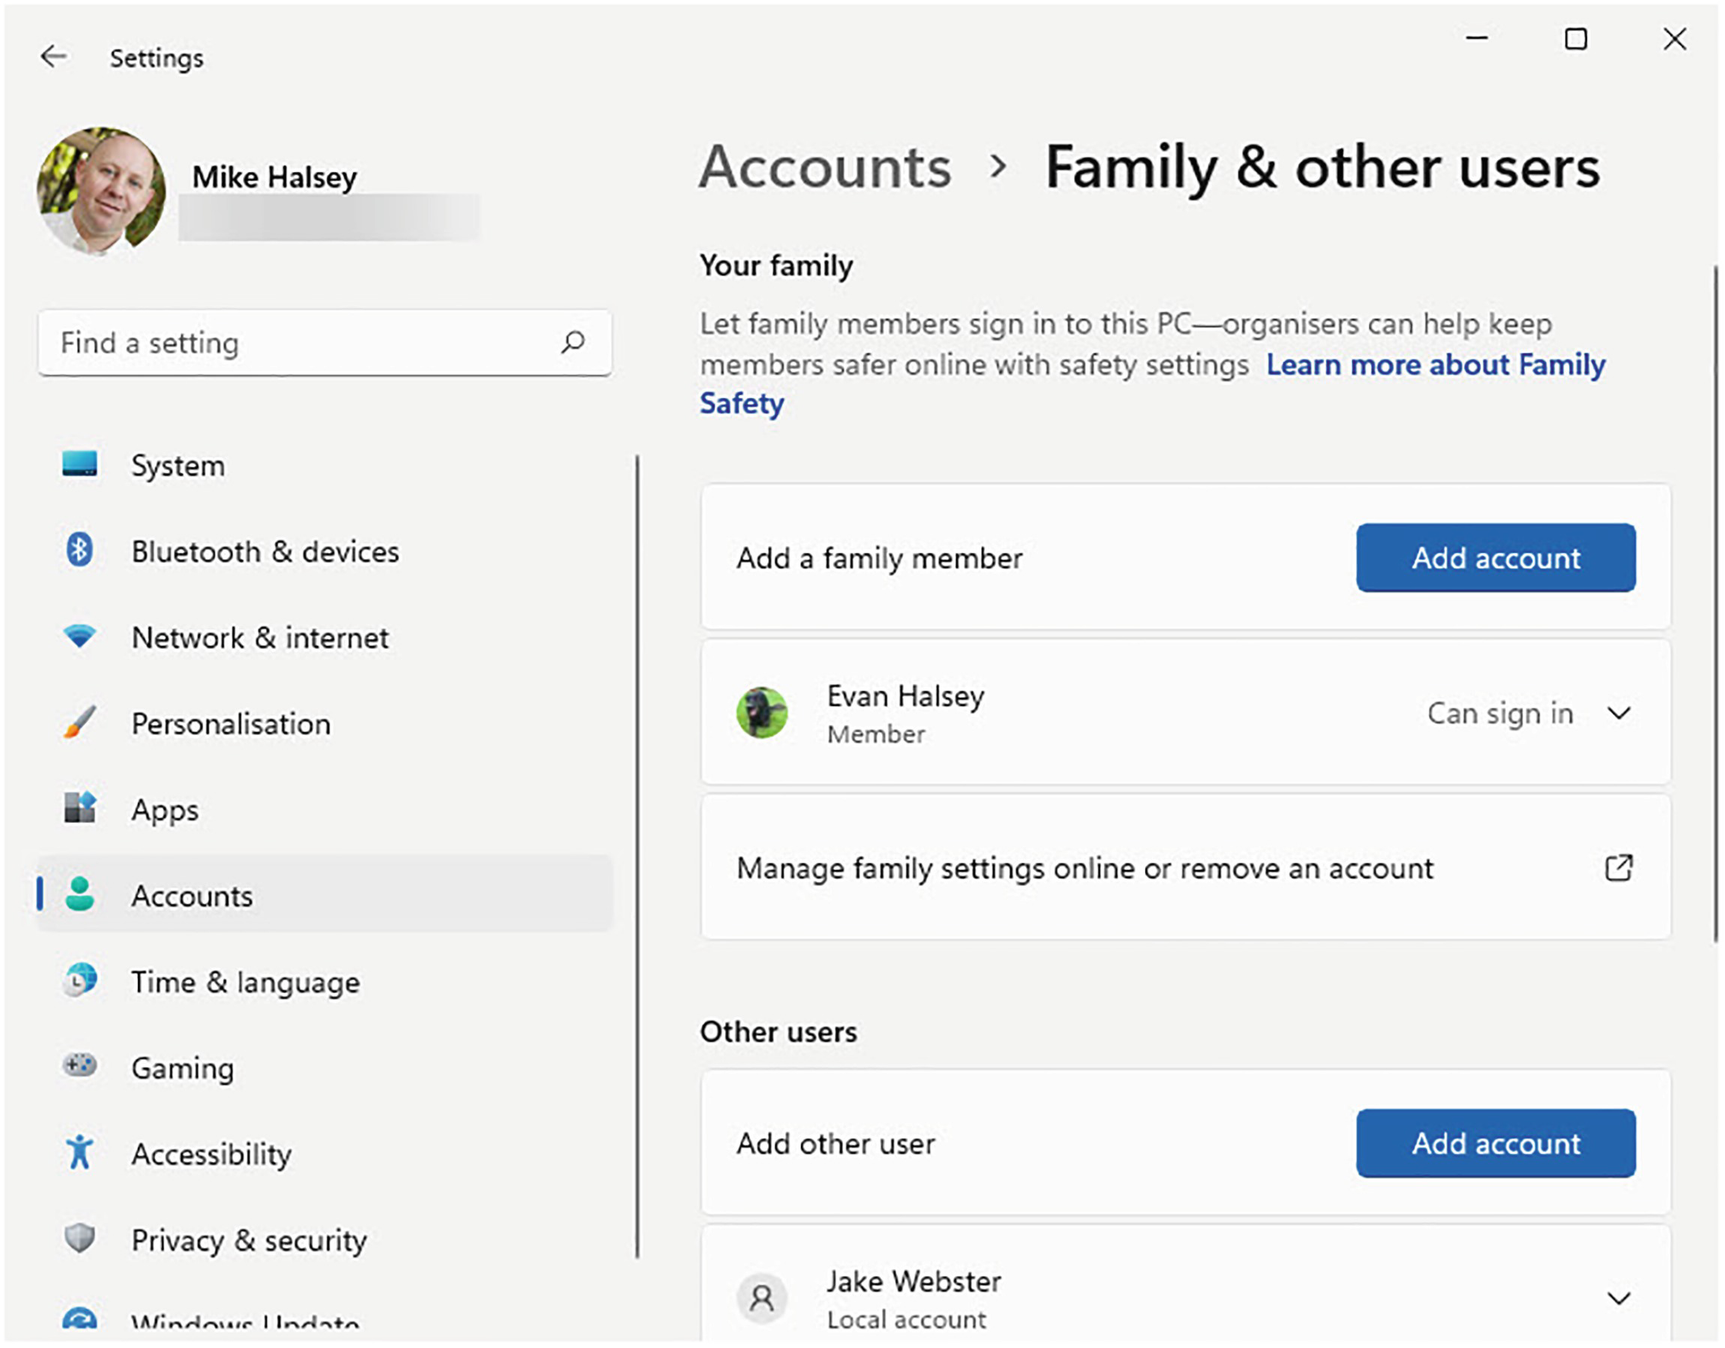
You can access family options from the Settings panel
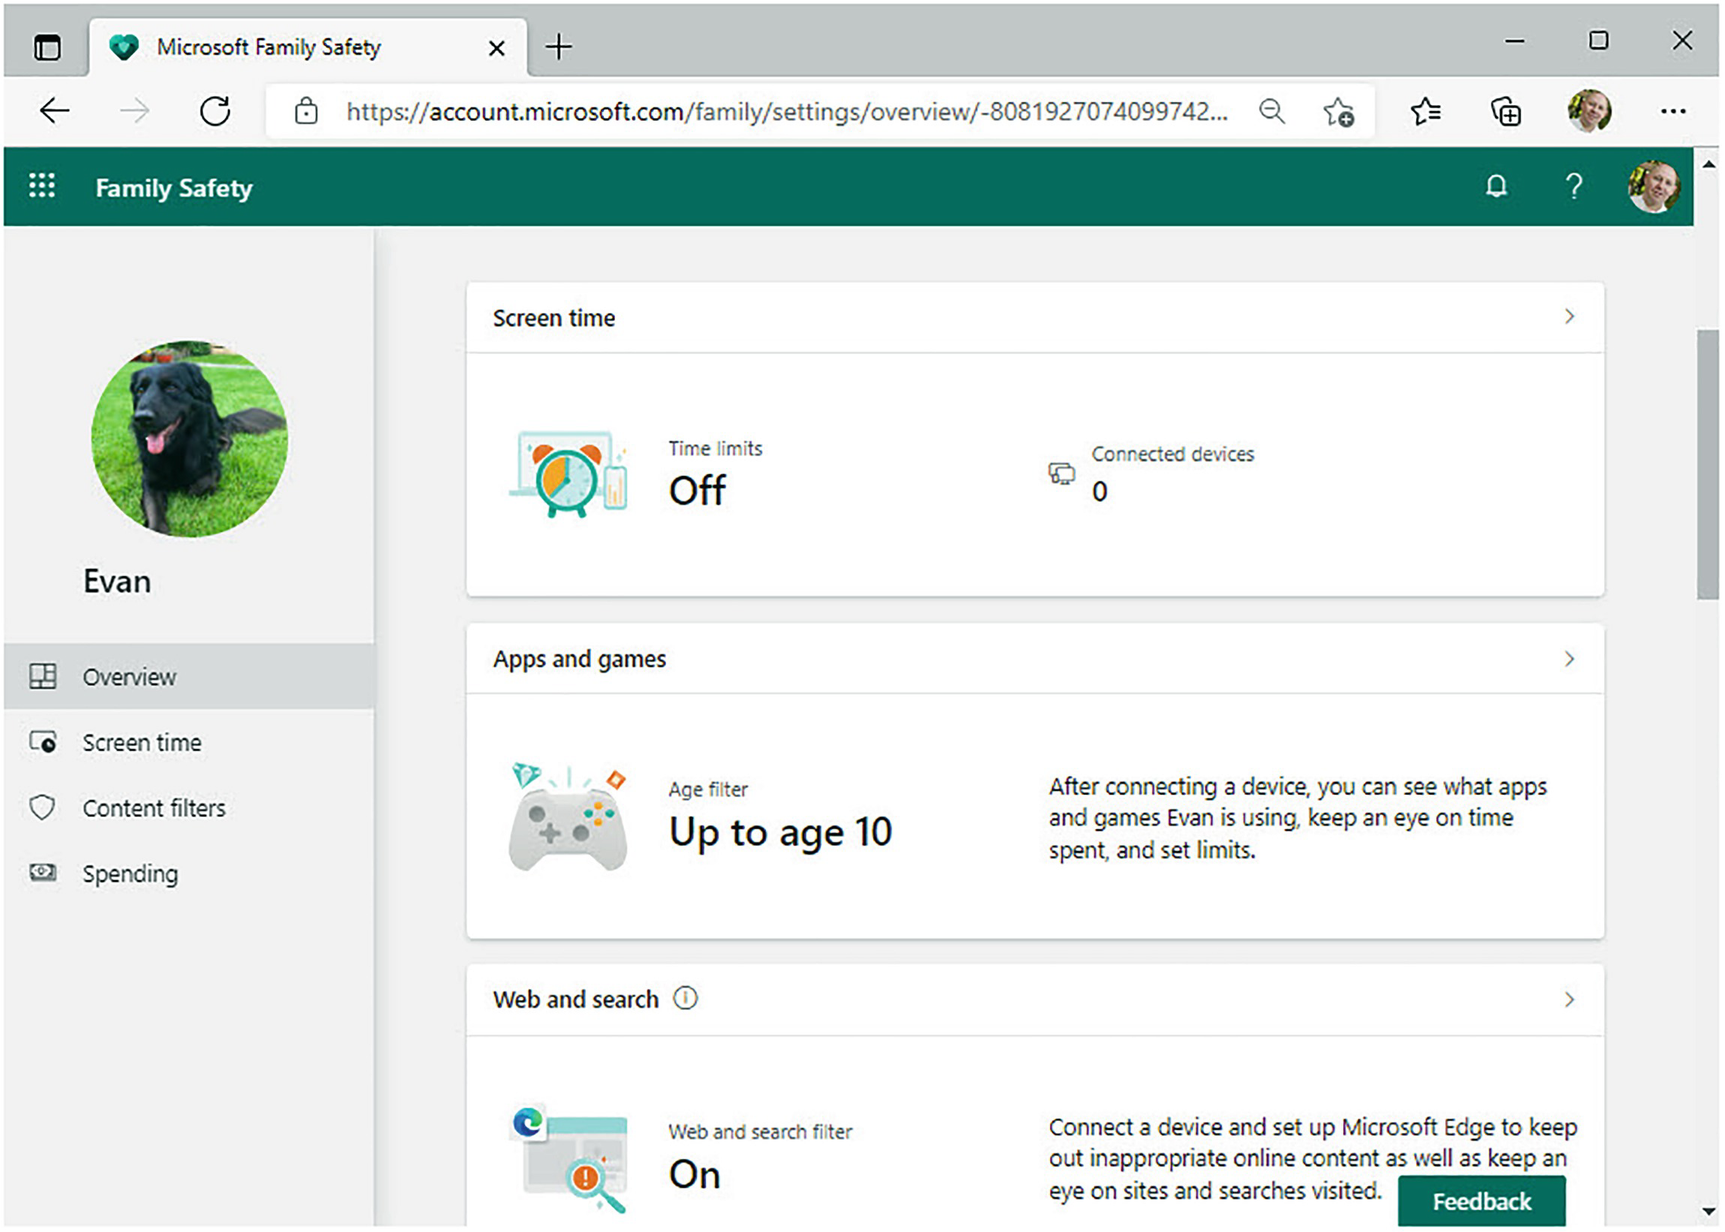
You manage family safety features online
Screen time is where you can manage the amount of time and times of the day when the child can use Windows 11 and other Microsoft devices such as an Xbox games console.
Apps and games is where you can set an age rating for games; 10 in the case of Evan as he had his tenth birthday a few months ago. This works with online game age rating systems to help make sure your child does not play inappropriate games.
Please note that the game age rating system online is not foolproof, and some games and gaming platforms have been known to allow children to play age-inappropriate games. It is always advisable to check what games your child is playing from time to time.
Web and search allows you to set safe search options for the child, which include the automatic blocking of age-inappropriate websites such as gambling, shopping, and social media. Alternatively, you can specify what websites the child is allowed to visit, and which ones should be blocked.
As with gaming ratings, these online systems are not completely foolproof, and it is always good advice to discuss with your child what websites they like to use, what they do online, and why certain types of websites can be harmful to them.
Spending is where you can set the child a budget of what they are allowed to spend on apps and on in-app purchases (which have been known to bankrupt a few people when it all goes horribly wrong), or you can specify that you must give permission whenever your child wishes to make a purchase online.
Xbox online gaming is an additional set of options that are part of the Xbox online gaming system, which allow you to help shield your child from inappropriate games and online spending.
Setting Up Email and Online Accounts
Windows 11 comes with in-built email and calendar apps, but you might use a non-Microsoft Account for these, such as an account from Google. Additionally, you might also use your PC for work and want access to your work email and calendar, and we will look at working on your PC in detail in Chapter 8.
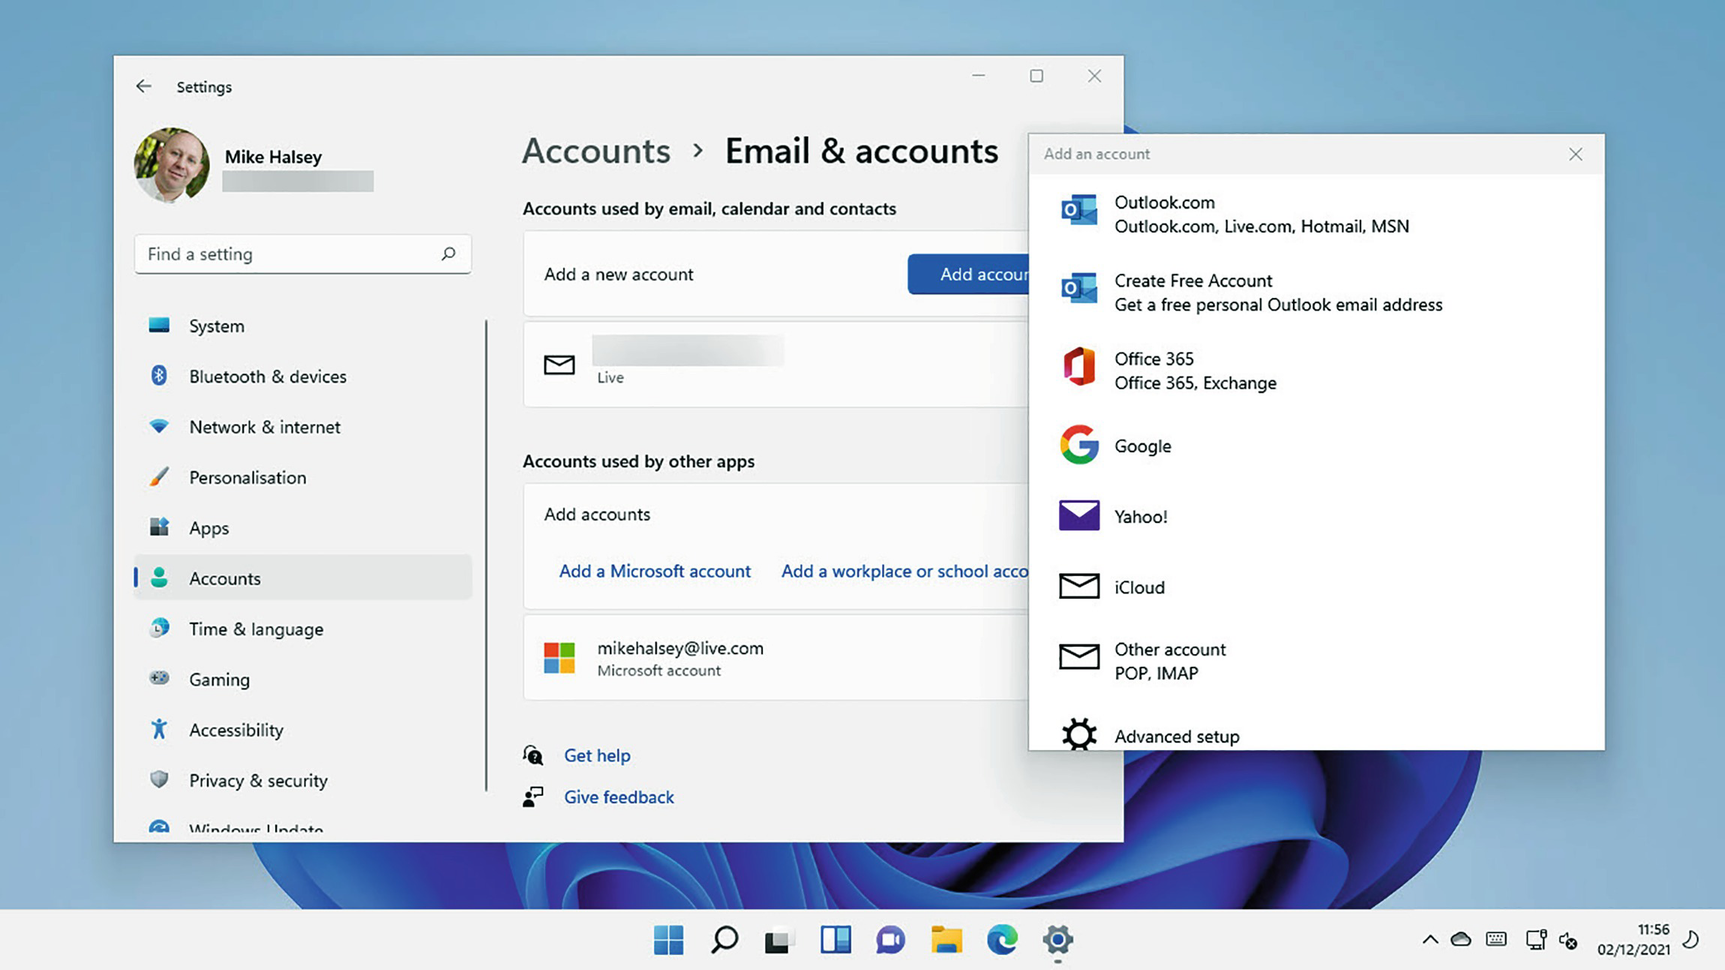
You can add email and other accounts to your PC
You can add as many accounts as you need and these will be available in appropriate apps, such as email and calendar.
The Email and Calendar Apps
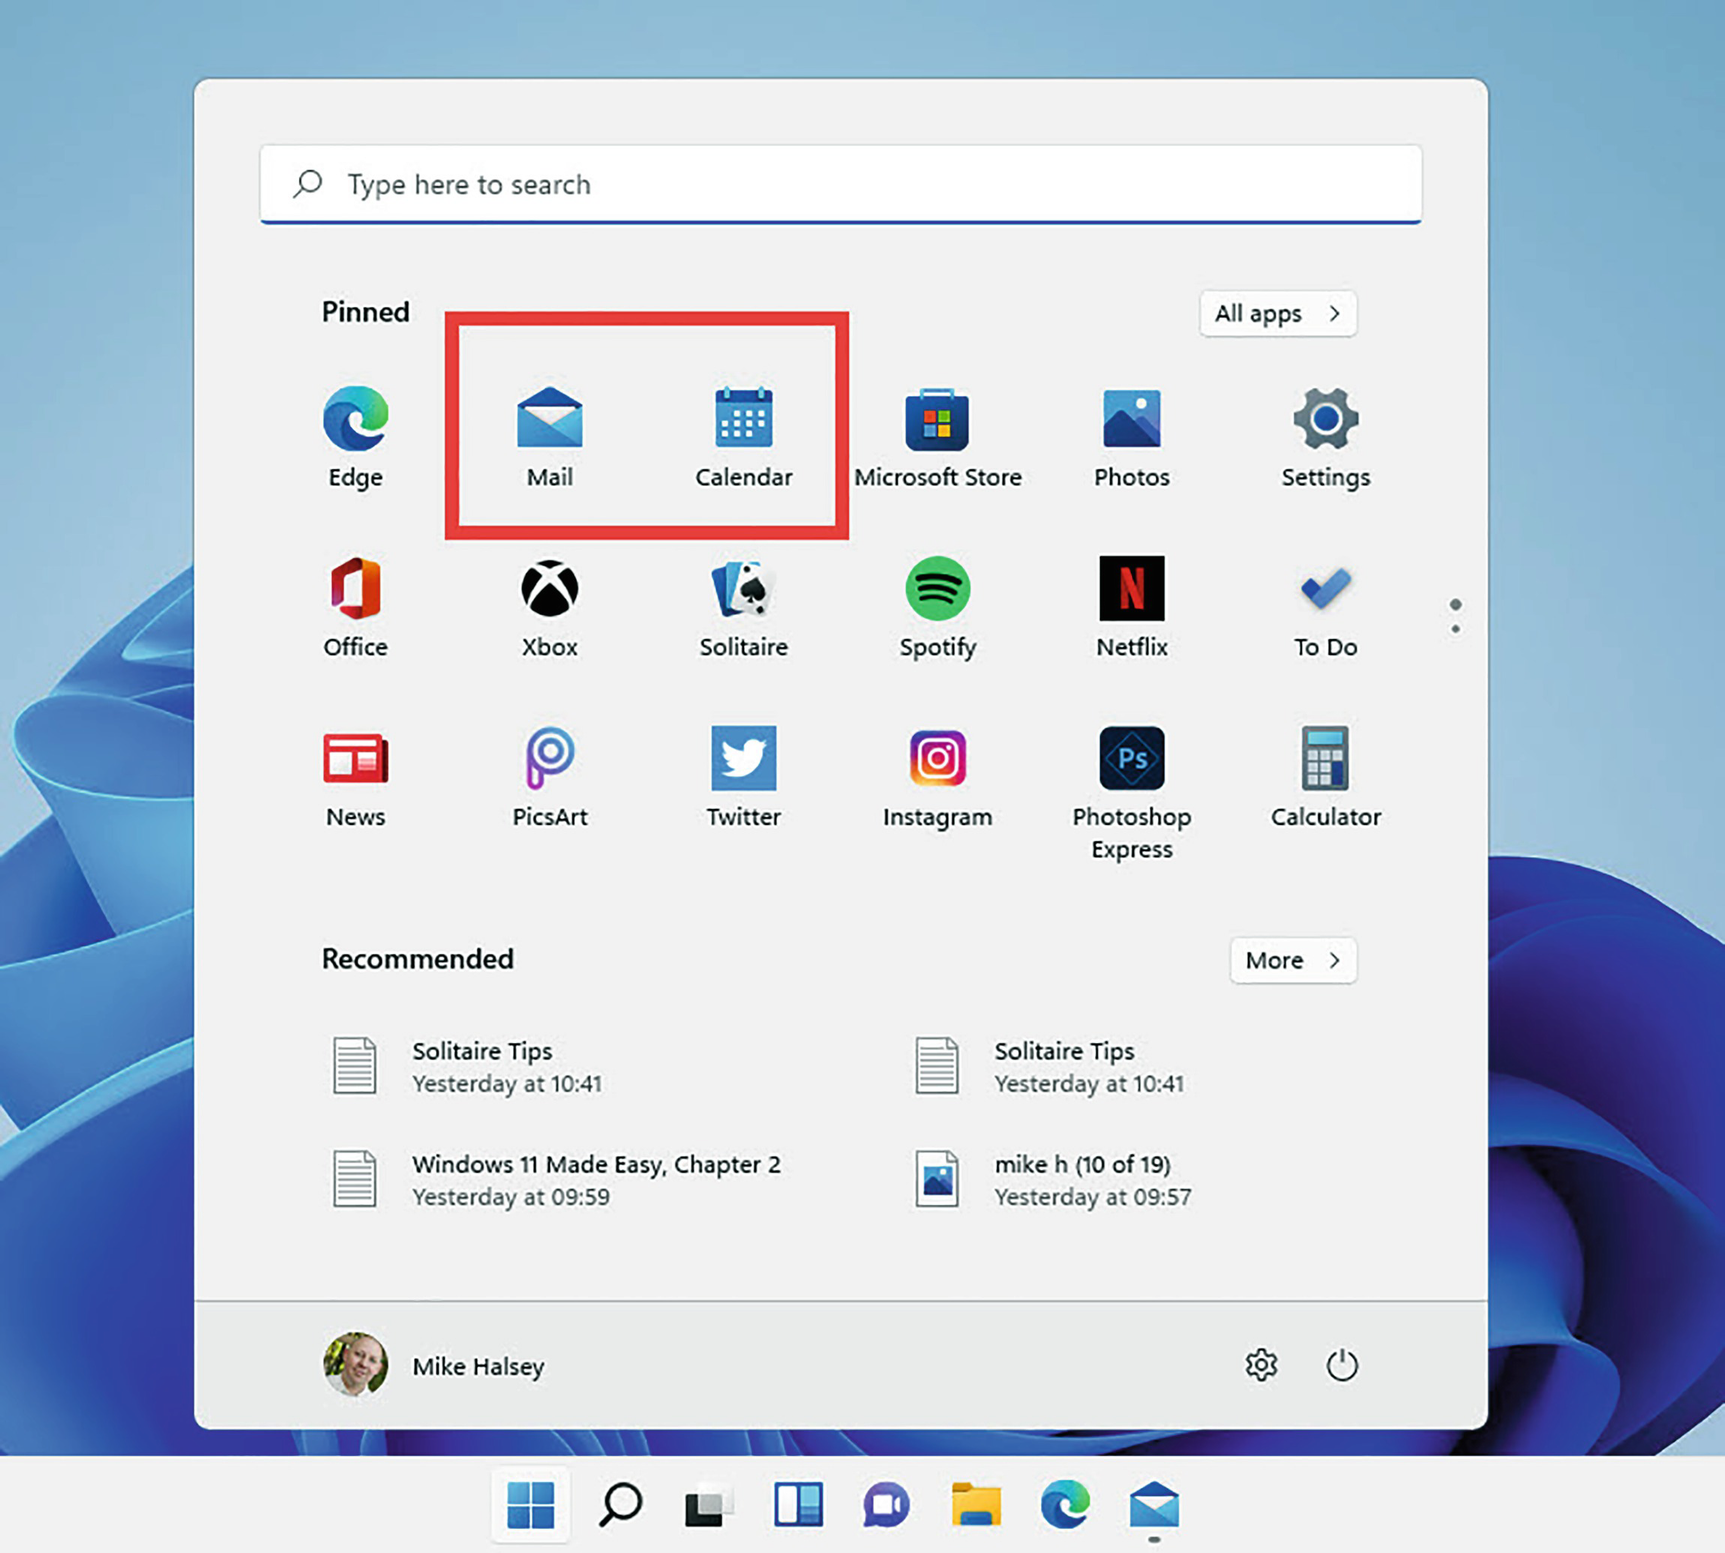
You can find the email and calendar apps in the Start Menu
Summary
It’s very easy to work with multiple people on a PC, and when you have your own files, documents, settings, and saved games on the PC, it’s a good idea for each person to have their own account too, or else they might change something in your account you would prefer they didn’t. Microsoft do make this very easy to do, though remember you will need Windows 10 Pro to use a local account.
The very next thing you will want to do with your PC though is to get online and to start browsing the Internet. In the next chapter then we’ll look at how you connect your PC to Wi-Fi and local networks, how to get started with Microsoft’s Edge web browser, and how to set up your online experience to be safe and secure.