Years ago, setting up and running a network in a large enterprise meant purchasing lots of computers. Each computer had a single job to do. Client computers ran an operating system and either were assigned to single users or were configured for multiple users through additional user accounts. Servers ran a single operating system and were configured to manage something specific. Some were created for Active Directory management only, some managed data, and others managed resources.
Nowadays, though, that’s not the way it’s done. Enterprises purchase fewer machines, and the machines they do purchase are powerful. They virtualize on those machines to use their resources more wisely. There’s virtualization in the cloud too; not all resources need be on-site.
In this chapter, we’ll focus on virtualization technologies. We’ll discuss Hyper-V for the most part. Hyper-V is a role in Windows Server that lets you create the virtualized environments on your own computers. We’ll also offer a brief introduction to Windows Azure, which offers cloud computing platform and services, and can also be used to create virtual machines.
Understanding Hyper-V
Microsoft’s solution to virtualization is Hyper-V. You use Hyper-V to create and manage virtual machines. A virtual machine acts and feels like a single, physical, stand-alone computer but is generally hosted by a computer that also supports other virtual systems. By virtualizing resources in this manner, companies save time, money, and even space when creating and managing networks. Imagine being able to take, say, a dozen physical machines and virtualize them into one. Not only are you limiting the hardware you use, but you’re making it easier to manage those systems by making them available from a single location. Each of the virtual machines can have one or multiple roles as well, so the need for specialty servers is reduced.
With Hyper-V you can also establish a virtual desktop infrastructure when you add the Remote Desktop Virtualization Host on the same server. This enables you to create virtual desktop pools for workers. You can then have users log in to these virtual workstations, again freeing up resources and reducing the need for additional hardware. Additionally, you manage those desktops from a single location, making them easier to reinstall and update when needed.
Of course, there are other reasons to use virtualization. You can create a virtual system for testing and research and development. Virtual systems are isolated from other systems, so there’s no chance you’ll disrupt the network. You can incorporate cloud virtualization with on-site virtualization as well and grow your business effectively. You can easily reinstall operating systems or revert to a previous, stable time through the use of checkpoints too.
Features of Hyper-V
There are some features of Hyper-V that we don’t want to go unnoticed. One is that each virtual machine includes options you can configure for memory, processor, storage, and networking. A virtual server, for instance, could be configured to have access to a lot of memory and hard drive space, while a virtual desktop could be configured to use much less. It’s like building your own physical machine—you pick the specs!
Hyper-V offers optimization features too. Each guest operating system can be migrated even when live and so can its storage areas. This means you don’t have to take the machine offline to move it. There are commands inside the virtual machine interface for both importing and exporting to make this easy. Each virtual machine has a set of integration services too, which includes various services and drivers to assist in integration processes between the virtual machine (VM) and the host. Additionally, Hyper-V Replica creates copies of your machine for backup.
If desired, administrators can access the Hyper-V machines remotely. This isn’t just Remote Desktop, which you might be used to; this type of connection offers a console you can use to be more effective and allows you to access the machine even if it isn’t booted.
Note
Virtual machines are a great option for running legacy operating systems in a safe space.
Hyper-V Requirements and Compatible OSs
You can install Hyper-V on both Server OSs and some 64-bit Windows clients. Here’s a summary of the host machines that support Hyper-V and can thus serve as hosts for multiple virtual machines:
Hyper-V is available on 64-bit versions of Windows Professional, Enterprise, and Education in Windows 8 and later.
Hyper-V is not available on any Windows Home edition.
Hyper-V is available on Windows Server 2008; Windows Server 2008 R2 Standard, Enterprise, and Datacenter editions; and Windows Server 2012 Standard and Datacenter editions.
Hyper-V is available in Server 2016 Standard and Datacenter editions.
Hyper-V is not available on any pre-Server 2012 OSs.
Hyper-V is available on Microsoft Hyper-V Server 2016, which is a stand-alone product that contains only the Windows hypervisor and other necessary virtualization components. It can also support virtual machines and serve as a host computer.
Note
At the time this book was written, you could opt to move your on-site Windows Server licenses with Software Assurance to Windows Azure to enable a hybrid cloud model at a reduced rate. If you’re thinking of using Azure, consider checking for specials like these before making any new investments in server licenses.
Additionally, the computers that run Hyper-V and serve as virtual machine hosts must meet the following requirements and have the following components:
A 64-bit processor with second-level address translation (SLAT).
VM Monitor Mode extensions.
At least 4GB of RAM. More is better. Remember, you’ll be sharing this memory among your virtual machines.
Virtualization support enabled in the BIOS or UEFI.
Hardware-assisted virtualization and hardware-enforced Data Execution Prevention (DEP) must be enabled.
Regarding the guest OSs, you can install just about any guest operating system on the virtual machines you create. In Server 2016, supported guest operating systems include OSs from Windows 7 and Windows Server 2008 with Service Pack 2 forward. Additionally, Hyper-V supports Linux and FreeBSD virtual machines .
To see whether a specific computer can support Hyper-V, follow these steps:
Open Windows PowerShell or a command prompt.
Type Systeminfo.exe and press Enter.
In the resulting report, scroll to the Hyper-V Requirements section.
Verify that a hypervisor has been detected, as shown in Figure 6-1.

Figure 6-1. This shows that a hypervisor has been detected
Installing Hyper-V
You need to install Hyper-V before you can use it. So, once you know you are running a compatible operating system and that a hypervisor is available, you’re just about ready to go. Take a minute first to make sure you enable virtualization support in the BIOS or UEFI if it isn’t enabled already and that the other virtualization requirements outlined earlier have been met as well.
Installing on Server 2016
There are several steps to installing Hyper-V on Server 2016, and installing on other server editions is similar. You install Hyper-V through Server Manager by following these steps:
Open Server Manager.
Click Manage and then Add Roles and Features, as shown in Figure 6-2.

Figure 6-2. Adding roles and features in Server Manager
Verify the computer meets the requirements and is configured correctly and then click Next.
Select “Role-based or feature-based installation.” Click Next.
Select a server and then click Next.
Select Hyper-V.
Click Add Features and click Next.
On the next three pages (Create Virtual Switches, Virtual Machine Migration, and Default Stores), select the appropriate options.
Select “Restart the destination server automatically if required.”
Click Install.
Installing on Windows 10
There are several ways to install Hyper-V on Windows 10. One is to use the following command in an elevated PowerShell window: Enable-WindowsOptionalFeature -Online -FeatureName:Microsoft-Hyper-V -All. Another is to use a graphical interface. We prefer the interface option because it’s easy to tell just what kind of Hyper-V support the computer has.
To enable Hyper-V on a Windows 10 machine , follow these steps:
Navigate to Control Panel ➤ Programs ➤ Programs and Features.
Select Turn Windows Features on or off.
Click the + sign next to Hyper-V.
If you can select the first option, Hyper-V is supported. If you can select all three, the computer can host its own Hyper-V machines. See Figure 6-3.

Figure 6-3. Install Hyper-V support and/or the Hyper-V Management Tools and Platform
Click OK.
Restart the computer.
Creating a Virtual Machine
With the Hyper-V Platform and Hyper-V Management Tools installed, you can now create your first virtual machine. We prefer the graphical user interface over any other options, such as PowerShell, so that’s what we’ll outline here.
Let’s start with Windows 10. (Creating a virtual machine on any Windows Server is almost the same.)
On Windows 10
To create a virtual machine on Windows 10, you work through a wizard. During this process, you will be prompted to make choices about the machine you want to configure. Some of the decisions you’ll make depend on the type of operating system you want to install, what kind of hardware you have access to, the amount of resources available (RAM, HD, etc.), and similar confines. Although we could spell out each option in paragraph form here, we believe the best way to learn about these options is to go through the wizard.
To create a virtual machine on a Windows 10 computer, explore the default settings and install an OS.
Open Hyper-V Manager. You can search for it from the Search window on the taskbar.
Click Action ➤ New ➤ Virtual Machine. See Figure 6-4.
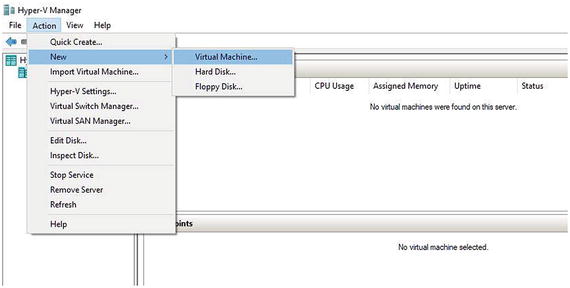
Figure 6-4. Create a new virtual machine from the Action menu
Click Next to begin.
Type a name for your virtual machine. This could be the name of the operating system you’ll install on it. Click Next.
Read what’s offered and choose Generation 1 or Generation 2, as shown in Figure 6-5. Generation 1 is always a safe bet. Generation 2 requires newer virtualization features and a 64-bit guest OS. Click Next.

Figure 6-5. Choose the generation type for the virtual machine
Type how much memory to allot. The default is 1024MB. We suggest at least doubling that.
Accept the Connection option of Not Connected unless you already have a network adapter configured for use with a virtual machine. If you do, select it. You’ll learn to create an adapter later in this chapter if you don’t see one here. Click Next.
Review and then accept the defaults for connecting a virtual hard disk (unless you have a specific reason not to) and click Next.
Click Install an Operating System from a Bootable CD/DVD and do one of the following:
Choose Physical CD/DVD Drive and select the drive to use.
Choose Image File (.iso) and click Browse to locate the file to open. Click Open when you find it.
Review the settings and click Finish.
In the Hyper-V Manager window, verify the new virtual machine exists. Right-click to access the options. See Figure 6-6.

Figure 6-6. Hyper-V Manager shows the new virtual machine
To complete the installation of the operating system, follow these steps:
As shown in Figure 6-6, right-click the virtual machine to access the options.
Click Connect.
Click Start.
The operating system installation file will load. Complete the installation as prompted. See Figure 6-7.

Figure 6-7. Install the operating system on the virtual machine
Note
Performing an OS installation on a virtual machine is exactly like performing one on a physical machine.
On Server 2012 and Server 2016
Creating virtual machines hasn’t changed much over the years. Creating them on Server 2016 is almost exactly like creating them on Server 2012 and Windows 10. When you’re ready, return to the steps for Windows 10 shown earlier and open Hyper-V Manager on your server. Work through the wizard as prompted, configuring the generation type, memory settings, and so on, and installing an operating system.
Creating a Virtual Switch
A virtual switch is what allows your new virtual machine to connect to other virtual machines, your local network, or the Internet. Thus, creating a virtual switch is the next step in the creation process. Before you create a switch, you need to decide what type you want. There are three types of switches .
External: This allows virtual machines to access a physical network. Use this switch to connect to servers, clients, and the Internet through the host’s network adapter. This also allows the virtual machine to communicate with the other virtual machines hosted on the same Hyper-V server.
Internal: This allows virtual machines to communicate with other virtual machines on the same Hyper-V server and communicate with the server too. Use this when the virtual machine doesn’t need access to the Internet or external network but still needs access to the host computer.
Private : This only allows communication between the virtual machines on the host Hyper-V server. It is isolated from all other networks and network traffic. Use this option in test environments.
Create a Switch in Windows 10 and Other Editions
Once you know what type of switch you want, you can create it in Hyper-V Manager. The steps are virtually the same from Server 2012 and up and Windows 8.1 and up. To create a switch, follow these steps:
Open Hyper-V Manager and in the left pane click the computer host to configure.
Click Action ➤ Virtual Switch Manager, as shown in Figure 6-8.

Figure 6-8. Use the Virtual Switch Manager to create a switch
Choose the type of switch you want.
Click Create Virtual Switch.
Type a name for the switch.
If you have chosen to create an external switch, you’ll have to select a network adapter to use. It’s likely already selected. Read the other information offered and make changes if desired; usually the defaults are fine.
Click OK.
Click Yes if prompted that you might lose network connectivity.
If the switch can’t be created, return to step 6 and select another network adapter, if one is available.
To view your new switch, follow these steps:
Right-click the Network icon on the taskbar.
Click Open Network and Sharing Center.
Click Change Adapter Settings.
Note the new switch in the Network Connections window. See Figure 6-9.
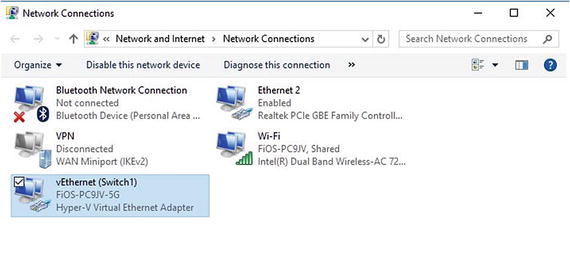
Figure 6-9. The new switch appears in the Network Connections window
Exploring Hyper-V Management Tools
Once you’ve set up Hyper-V and configured a virtual machine, you have several management options. If you want to use a graphical interface, you should opt for Hyper-V Manager. The most common settings are available from Hyper-V Settings, and it’s fairly easy to perform tasks on the machines you create.
There are also tools for connecting to and managing virtual machines, specifically the Virtual Machine Connection options. With these, you can start and shut down the machine, connect to a DVD image or USB drive for installation, create checkpoints, and modify settings, among other things.
Additional options for managing your virtual machines include Hyper-V for Windows PowerShell and Windows PowerShell Direct. These tools involve learning commands and syntax, but as you might suspect, they also provide a way to perform tasks that aren’t available using any other method.
Hyper-V Settings
You’ve been introduced to Hyper-V Manager . It’s where you created your first virtual machine and where you created its virtual switch. There are other settings you haven’t explored yet, though. Those are available from the Hyper-V Settings option either from the Action menu or from the right pane of Hyper-V Manager. Figure 6-10 shows the option in the right pane and the resulting window that appears after clicking there.

Figure 6-10. Hyper-V Settings are available from the right pane of Hyper-V Manager
In Figure 6-10, notice that Virtual Hard Disks is selected in the left pane. To the right of that you’ll see the default folder for storing virtual hard disk files. Yes, they are files! This means you can choose where you’d like to save them if you don’t like the default location. Simply click Browse.
As you work your way down the list, you’ll see some other things you can do. The second entry enables you to specify the default folder for the virtual machine’s configuration files. The third entry, Physical GPUs, lets you choose which graphics processing units (GPUs) you want to use. Many computers come with more than one.
Here are the highlights of the remaining entries under Server:
NUMA Spanning: Non-Uniform Memory Architecture (NUMA) is a technology you can enable that allows virtual machines to span available NUMA nodes to provide additional computing resources. This helps you run more than one virtual machine at a time and can provide them with more memory than what is available on a single node.
Storage Migrations: A storage migration lets you move, service, and upgrade storage resources even if the virtual machine affected is running. Here you specify how many simultaneous migrations are allowed.
Enhanced Session Mode: This offers support for the redirection of local resources to a virtual machine session. It’s like the redirection you might be used to from a Remote Desktop (RDP) session. This enables the virtual machine to access the required or desired resources such as printers, the clipboard, or USB drives. If you enable this, you can configure settings for the resources you want to access as outlined next.
Under User, there are additional settings and options. Click Keyboard to configure the following options for the VM:
Keyboard: The settings here apply to key combinations such as Alt+C and Ctrl+Alt+Del. You can opt to apply the key combinations you use to the local computer (host), to the virtual machine, or to the virtual machine only when it’s in full-screen mode.
Mouse Release Key: Specify the key combination you want to use to release the mouse when the virtual machine drivers are not installed. You use this with the virtual machine connection. Figure 6-11 shows the options.
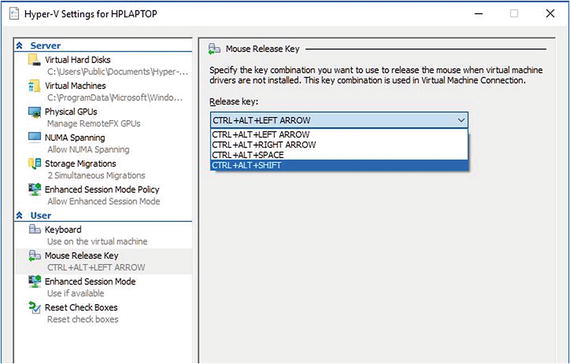
Figure 6-11. Mouse Release Key settings in Hyper-V Settings
Enhanced Session Mode: As noted earlier, this enables enhanced session mode for the virtual machine.
Reset Check Boxes: Click Reset here to return all check boxes, warning boxes, confirmation messages, and so on, to their original states.
Virtual Machine Settings
If you’ve installed an operating system on your virtual machine, there are settings available to you for working with that OS. These include the option to add hardware, create checkpoints, reconfigure memory settings, and so much more. There are various ways to access these options, but one way is, again, from inside Hyper-V Manager and from the right pane.
Before we start, look back at Figure 6-10. Under HP Laptop in the right pane you see the option Hyper-V Settings. We just explored those settings. Notice that there is nothing listed under the HPLaptop Help option. Now look at Figure 6-12. While writing these last few pages, we’ve installed an operating system on the virtual disk we created earlier. Now you can see that there are more entries in that right pane. Specifically, they are entries related to the operating system installed on the disk, Windows 8.1.
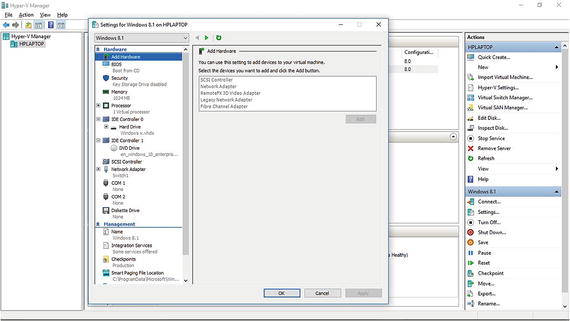
Figure 6-12. Settings for the OS are available from the right pane (under the name of the virtual machine) and the resulting Settings window
To access the settings for Windows 8.1 (or whatever OS you installed), click Settings. You’ll see the window shown in Figure 6-12. As you can see, there are lots of options. Let’s look at each of these briefly.
Under the Hardware section you’ll find the Add Hardware option listed first. This lets you install hardware onto your virtual machine. Click anything you’d like to add. Yes, it looks like it’s grayed out, but you can still click there. You could, for instance, install a network adapter if you were unable to create a switch earlier.
Here are the additional options with short descriptions of their purpose:
The BIOS option lets you select the order in which the virtual machine should look for boot devices. This is just what a “real” computer does, and the settings are the same. As far as the host machine or virtual machine knows, it is a real, physical computer. If you can’t access these settings, in the virtual machine select File ➤ Exit and then close and reopen the Settings window. This holds true for some of the other settings too.
The Security option lets you secure the virtual machine with encryption, provided you’ve also installed a key storage drive. There’s an option here to learn more about key encryption security, if that’s something you’d like to set up.
The Memory option lets you set the minimum and maximum RAM that the virtual machine can use. You can also set a memory buffer limit and specify a priority setting for this virtual machine.
The Processor option lets you configure what processors are used and how, if more than one processor exists on the host. You can configure the limits as well as relative weight for the processors you select.
IDE Controller options let you add hard drives and DVD drives, inspect media, point to image files, and select specific drives for installations and even remove drives if desired. You can also add drives to a SCSI controller, if applicable.
The Network Adapter option lets you manage the virtual switches you create. You can enable virtual LAN identification, which specifies the virtual LAN that the machine will use, and enable bandwidth management. For the latter, you can configure minimum and maximum bandwidth.
COM 1, COM2, and Diskette Drive options let you specify and configure these communication and connection options.
Under the Management section, the first entry is Name. There’s not much to see here, just the option to change the name of the virtual machine and write some notes about it.
The Integration Services option lets you select services that you want Hyper-V to offer the virtual machine. The Guest OS must support these options, and they include the following:
Operating System Shutdown: This allows the Hyper-V administrator to shut down the virtual machines without having to log into it.
Time Synchronization: This lets the machine synchronize its time with its host.
Data Exchange: This allows for the sharing of information (data) between the host and the virtual machine.
Heartbeat: This allows the Heartbeat service to monitor the virtual machine at regular intervals. It can detect downed virtual machines and report them to the host.
Backup: This allows for backing up the virtual machine with resources from the host.
Guest Services: The guest service allows the Hyper-V administrator to copy files to a running virtual machine without using a network connection. This is the only feature disabled by default.
The Checkpoints tab , shown in Figure 6-13, lets you configure checkpoints for the virtual machine. Checkpoints are akin to System Restore, in that they allow you to create snapshots of the virtual machine’s state for the purpose of returning to a state quickly should something happen to the machine.
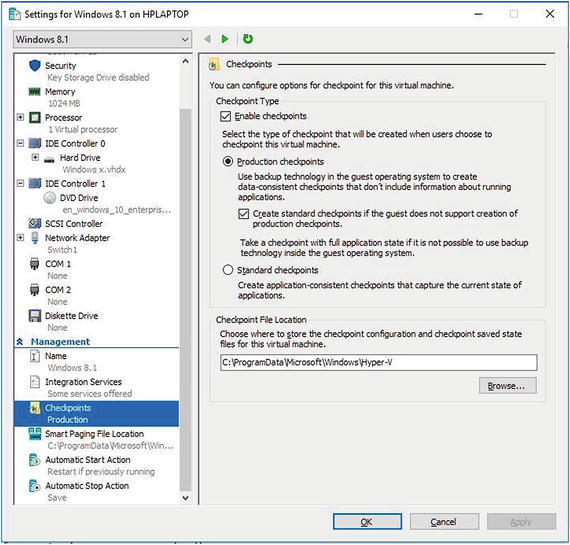
Figure 6-13. Checkpoints are snapshots of the system state and are stored at the default checkpoint file location, which can be changed
The Smart Paging option lets you choose where the paging file for the virtual machine resides. By default it’s in Program Data ➤ Microsoft ➤ Windows ➤ Hyper-V.
The Automatic Start and Automatic Stop options let you state what should happen to the virtual machine when the host is restarted (or started). Options include Nothing, “Automatically start if it was running when the service stopped,” and “Always start this virtual machine automatically.” You can also specify a startup delay.
Virtual Machine Connection
The Virtual Machine Connection settings are available from inside the running virtual machine. You’ll use these settings when you are in a virtual machine session to manage the session. This isn’t a place to add hardware or reconfigure memory options; as you learned earlier, you perform those tasks from the Settings options in Hyper-V Manager.
The options you’ll find here are available from a menu that runs across the top of the virtual machine window. You can see this in Figure 6-14. You can access Settings from the File menu, for instance, and you can access Turn Off, Shut Down, Checkpoint, and others from the Action menu. The Media menu offers access to available drives, including DVD drives shared on the host. The Clipboard menu offers access to clipboard settings. There’s a View menu too, with options to disable enhanced session mode, view or hide the toolbar, and view in full-screen. There’s not much to see really, but these options do allow you to work efficiently inside the machine.

Figure 6-14. Use the virtual machine’s menu to perform session tasks Virtual Machine Connection
Hyper-V Module for Windows PowerShell
The Hyper-V module for Windows PowerShell offer lots of Hyper-V cmdlets. You can use these cmdlets to automate Hyper-V tasks. The cmdlets are meant to be user-friendly, with commands and parameters created from words that describe the task you’d like to perform. There are too many cmdlets to list here, however, so we’ve compiled a list that you can use to perform basic tasks to give you an idea of how they work and what’s available.
As you read through this list, think about the entries. Cmdlets like Import-VM and Export-VM let you manage the virtual machines (VMs) you create. Mount, Merge, and Move commands also offer insight into how you can work with these disks. New-VM lets you create a virtual machine right inside a PowerShell session and forgo Hyper-V Manager altogether. As you get more adept at these cmdlets, you might find yourself returning here again and again, discovering what else you can do!
Some of the common Hyper-V cmdlets include the following:
Add-VMDvdDrive: Adds a DVD drive to a virtual machine
Add-VMDvdDrive: Adds a DVD drive to a virtual machine
Add-VMNetworkAdapter: Adds a virtual network adapter to a virtual machine
Checkpoint-VM: Creates a checkpoint of a virtual machine
Dismount-VHD: Dismounts a virtual hard disk
Export-VM: Exports a virtual machine to disk
Get-VMReplication: Gets the replication settings for a virtual machine
Import-VM: Imports a virtual machine from a file
Merge-VHD: Merges virtual hard disks
Mount-VHD: Mounts one or more virtual hard disks
Move-VM: Moves a virtual machine to a new Hyper-V host
New-VHD: Creates one or more new virtual hard disks
New-VM: Creates a new virtual machine
Remove-VMSwitch: Deletes a virtual switch
Rename-VM: Renames a virtual machine
Resize-VHD: Resizes a virtual hard disk
Restart-VM: Restarts a virtual machine
Set-VMBios: Configures the BIOS of a generation 1 virtual machine
If you find this interesting and don’t have much experience with PowerShell, you can find all the commands on the various Microsoft web sites. A quick Internet search will provide the links you need.
Windows PowerShell Direct
If you need to remotely manage a Windows 10 or Server 2016 virtual machine from a Windows 10 or Server 2016 host, you can do so with PowerShell Direct. This makes it possible for administrators to better automate tasks and more efficiently manage remote virtual machines.
Note
Windows PowerShell Direct doesn’t require either the host or the VM to have a specific network configuration.
One way to initiate a PowerShell Direct session (after opening PowerShell with administrative privileges) is to type Enter-PSSession -VMName <VMName> or Enter-PSSession -VMGUID <VMGUID>. Then, type commands as desired. When you’re finished, type Exit-PSSession.
Another way is to use the Invoke-Command cmdlet. This runs a set of commands on the virtual machine. Here is an example of how you can use this command where VM2 is the virtual machine name and VMTask.ps1 is the script to run. The script is located on the C: drive.
Invoke-Command -VMName VM2 -FilePath C:scriptVMTask.ps1 If this sounds like something you’d like to do, give it a try. Start with the PowerShell Direct session option by invoking the Enter-PSSession command with the desired parameters. That’s likely the easier choice. Then, type a few commands to run on the remote machine.
Troubleshooting Hyper-V Connections
On occasion, you’ll be called on to troubleshoot Hyper-V connections. As with any networked resource (even if it’s virtual), there are physical issues that arise. Host computers and accompanying servers can be powered off, routers can restart or stop working, physical adapters can malfunction, and cables can get crimped. Before you get too far into troubleshooting, make sure you have checked out the most common problems that occur within the “regular” network, especially complications with the host. Although you’d likely know of these types of problems because of some other issue that’s more obvious (like a subnet or network outage), it never hurts to check.
If you believe the problem lies inside the virtual machine, you can verify that the virtual machine’s TCP/IP stack is functioning properly using familiar commands including ping and ipconfig, outlined earlier in this book. If problems arise with one VM being unable to connect to another (if they were configured that way to begin with), you can use these tools there too. Figure 6-15 shows a VM running on a Windows 10 Enterprise computer, and inside the VM is a command prompt and the results of ipconfig.
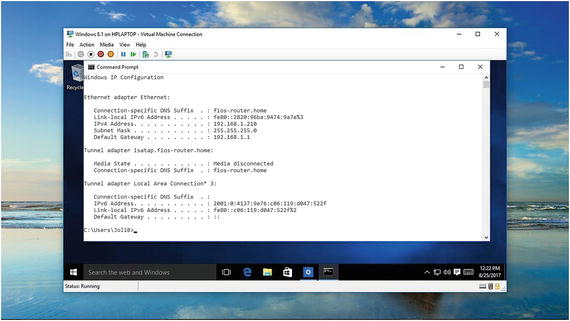
Figure 6-15. Use TCP/IP commands to troubleshoot a VM
Enable Enhanced Session Mode
Once you rule out physical issues and problems with the virtual machine’s adapter, the next step in solving many Hyper-V connection problems involves making sure that enhanced session mode is enabled and that it’s available to the user.
To verify enhanced session mode is enabled on the virtual machine (or to enable it), follow these steps:
On the computer that hosts the virtual machines, open Hyper-V Manager.
Click Hyper-V Settings.
Click Enhanced Session Mode Policy.
Verify Allow Enhanced Session Mode has a check by it. If it doesn’t, select it.
Click OK.
To verify that enhanced session mode is enabled for the user, follow these steps:
Repeat the previous steps 1 to 3.
Under User, click Enhanced Session Mode.
Verify Use Enhanced Session Mode has a check by it. If it doesn’t, select it.
Click OK.
Locate Missing Local Resources
If the problem with your virtual machine is that you can’t access a specific local resource, you need to verify the user has permission to access it from the connection dialog box. This is the box that appears after you opt to connect to a VM from Hyper-V Manager. A resource could be something physical like a printer or virtual like the clipboard. Other options include smart cards, physical or virtual drives, and plug-and-play devices.
Common complaints that can be resolved with this technique include the user complaining that they cannot do the following:
Copy and paste files between machines and hosts
Sign in to the VM with a smart card
Print to a local printer
Access the host’s USB ports
Troubleshoot a VM without a network connection
To troubleshoot access to local resources and to also resolve problems listed earlier, follow these steps:
On the host, open Hyper-V Manager.
Right-click the VM to troubleshoot and click Connect.
In the Connect To dialog box, click Show Options.
Click the Local Resources tab. See Figure 6-16.

Figure 6-16. Give access to local resources in the “Connect to” dialog box
If you want the user to have access to printers and the clipboard, place a check beside those entries.
Click More.
Place a check in any resource listed here and click OK.
If an option is available to save the settings for the virtual machine, select it.
Click Connect.
More Troubleshooting Tips
There are lots of other, less common ways VMs can cease to function or stop communicating with the user or the host. These are more difficult to resolve because of their uniqueness. In such cases, you need to pinpoint the problem first and then search for the appropriate resolution. We’ve compiled a random list of not-so-common problems, which are listed in no particular order, that you can peruse if you are at a loss.
Switches
Connection problems can occur if the administrator created the wrong type of switch for the virtual machine. Remember, there are three types: internal, external, and private. Each offers a specific type of connectivity as outlined earlier in this chapter. If you are having trouble connecting to the Internet from a VM, for instance, you’ll need to verify that the VM is configured with an external switch. An internal switch won’t work. As far as not-so-common problems go, this one happens more often than most.
VM Doesn’t Start
There are many reasons why a VM won’t start, but if it’s a new VM, it’s generally that the host’s hypervisor isn’t running. The host must meet specific hardware requirements, which were outlined earlier. If your computer meets these requirements but the VM still won’t start, enter the BIOS and enable virtualization and DEP.
VM Pauses Randomly
Sometimes VMs pause or stop working because the virtual hard disks are out of storage space. This can happen if you’ve saved several snapshots or otherwise filled the drive with data. You’ll need to create some space on that virtual drive.
VM Doesn’t Integrate Well with Host
If you see problems with mice, keyboards, video, network components, or even SCSI controllers, you likely have an issue with Integration Services . These services can replace generic operating system driver files with those that are more effective for the VM. It also synchronizes the time between the guest and host and allows for file interchanges. If you have problems like these, install Integration Services.
Error Messages
Finally, if you see error messages, read them carefully. If they have to do with the VM not having enough memory, change the memory settings. If you see errors related to an unsupported operating system, heed the warning to install a compatible one. If you get an error code, look it up on Microsoft’s web sites. Chances are you’ll find an answer there.
Introducing Windows Azure
In this book, we’ve been discussing networks and network hardware, sometimes with the premise that the hardware is on-site, physically available, or remotely manageable, but also making sure to note that computing can be cloud based as well. It’s possible to have a hybrid environment where both on-site and cloud-based computing models exist within the same company. Relating this to what we’ve been talking about in this chapter, a company may host some VMs on local servers while others are hosted in the cloud by a third party. Cloud-based technologies like this are referred to as cloud computing.
Technically, cloud computing offers the delivery of network and computer services, including the hardware and software you have on-site like servers, databases, applications, and more, over the Internet. Cloud computing providers offer these services and charge you based on how many services you use and at what rate.
One popular service that is facilitating this change is Microsoft Azure. Azure is a growing assortment of integrated cloud services that is available to companies and hosted via a global network of datacenters. Azure supports almost all operating systems, programming languages, database programs, and hardware devices. There are tools and professionals to help with applications development and management, security, and data administration.
Azure also offers hybrid solutions to help companies make the move to the cloud. Applications can be used on-site or from the cloud, and backups can be performed in both places as well. Azure offers disaster recovery, cloud migration tools, data warehouses, and high-performance computing too. It’s ever-changing as well. Each day that passes brings more and more innovation. If you haven’t started looking into Azure yet, we highly suggest you do.
Note
With regard to this chapter and virtual machines, Azure lets you create virtual machines in seconds, and they are on-demand and scalable. You need to pay only for what you use.
Summary
Virtual machines make it possible for enterprises to get more bang for their buck. A single, powerful server can host multiple virtual machines. This helps reduce the physical space needed for computer hardware and reduces the costs associated with it. Virtual machines are fairly easy to create too, provided you know the nuances of the configuration options. We covered those in this chapter along with some troubleshooting tips.
Finally, as noted at the end of this chapter, Microsoft Azure can help you move from on-site to the cloud, and you can take your virtual machines with you. We believe the future is here and encourage you to continue your studies there.