CHAPTER 17
Managing Microsoft Deployment Toolkit 2010
IN THIS CHAPTER
Creating deployment shares
Adding applications
Adding drivers
Creating task sequences
Generating media
Microsoft Deployment Toolkit (MDT) is Microsoft's solution for automating the delivery of Windows 7 and Windows Server 2008 R2. MDT is actually a “Solution Accelerator” from Microsoft. Solution Accelerators are tools that are provided by Microsoft for free and are fully supported. This chapter covers MDT 2010 Update 1.
Installing and Using the Cmdlets
The MDT PowerShell snap-in is installed as part of the overall MDT installation and does not require any special installation procedure. The snap-in is certified to work with both Windows PowerShell and Windows PowerShell V2.
To enable remote management, install MDT on a workstation to install the snap-in. You can then add the remote Deployment Share by specifying the UNC path to the remote Deployment Share folder.
MDT does not create a shortcut for launching the snap-in, so you will need to load it manually:
Add-PSSnapIn -Name Microsoft.BDD.PSSnapIn
If you use the snap-in often, you can create a console file to load it from a shortcut, or you can add it to your profile to have it always loaded.
Read more about adding items to your profile in “Customizing Windows PowerShell with Profiles” in Chapter 1, “Introduction to Windows PowerShell.” ![]()
Exploring the MDT Windows PowerShell Provider
The MDT snap-in includes a Windows PowerShell provider called MDTProvider that is used to present the Deployment Share as a Windows PowerShell drive. It enables you to navigate the Deployment Share as you would a file system or registry. The following code snippet demonstrates the ability to change to the Applications directory and list the contents as you would a folder on your file system.
Set-Location DS001:
  Get-ChildItem
Name
 ----
 Applications
 Operating Systems
 Out-of-Box Drivers
 Packages
 Task Sequences
 Selection Profiles
 Linked Deployment Shares
 Media
Set-Location .Applications
  Get-ChildItem
Name
 ----
 Microsoft Security Essentials 2.0.657.0
Each object in this Provider has its own corresponding properties. Just as a file has a length property that indicates its size, an MDT application has a version property that indicates the version of the software. The properties are covered in more detail in other chapters, but it is important to remember that they exist, because in certain cases, the Provider is the only way to change the properties.
Using the GUI to Create Your Scripts
The Deployment Workbench, MDT's graphical console, has an excellent facility built into it that helps you develop automated solutions against MDT. At the end of most of the wizards, there will be a button labeled View Script. If you click this button, Notepad opens with the actual Windows PowerShell script needed to duplicate the action you just completed with the wizard. You can use this to duplicate the configuration on another system or use it as a base to explore different options.
Creating and Populating the Deployment Share
In MDT, the deployment share is the physical repository for all the media and configuration information for the deployment environment. The deployment share is a folder, usually on a server, that MDT and clients use to deploy operating systems and software.
Initializing the Deployment Share
In Listing 17-1, you create the folder in which you are going to store the Deployment Share. Then, you use New-PSDrive to create the Deployment Share using the MDTProvider. Instead of a specialized cmdlet for creating a Deployment Share, the developers of the cmdlets chose to use the Provider framework.
LISTING 17-1 Creating the Deployment Share
Mkdir “S:SharedMDTDeploymentShare”
New-PSDrive -Name “DS001” `
  -PSProvider “MDTProvider” `
  -Root “S:SharedMDTDeploymentShare” `
  -Description “MDT Deployment Share” `
  -NetworkPath “\ProcyonMDTDeploymentShare$” `
  -Verbose |
  Add-MDTPersistentDrive -Verbose
New-PSDrive is the built-in command for creating Windows PowerShell drives. Normally, this command just creates a shortcut to a file system or a registry location. In this case, it not only creates a shortcut to a Deployment Share, but it also creates the share. When you call New-PSDrive specifying the PSProvider parameter with MDTProvider and there is not an existing Deployment Share at that location, it proceeds with the code to initialize the Deployment Share. This includes setting up the basic structure of the Deployment Share.
The NetworkPath parameter is a custom parameter that allows you to specify the share path that clients will use to connect to the Deployment Share. The cmdlet creates this network share so that it is available to clients. To connect to a remote Deployment Share, simply use the UNC path to the share.
Note
The NetworkPath parameter is a custom parameter that is specific to the MDT Provider type. It is not discoverable with Get-Help or Get-Command. ![]()
The Add-MDTPersistentDrive cmdlet registers the new Deployment Share into your profile so that it is automatically reopened either by the Deployment Workbench or by issuing the Restore-MDTPersistentDrive cmdlet in Windows PowerShell. When you reopen Windows PowerShell at a later time, you can simply load the module and execute Restore-MDTPersistentDrive to restore all of the Deployment Shares that you had opened. To permanently remove a Deployment Share so that it should not be opened again, the Remove-MDTPersistentDrive is the command you want.
Creating the MDT Database
MDT also includes the ability to utilize a database for configuration settings that can be used in various deployment scenarios. The database is essentially a centralized version of the CustomSettings.ini file used to store configuration information.
Before creating the database, you have to create a share on your SQL Server system. This is required to make a Windows integrated security connection from Windows PE. The Windows PE image first needs to establish a secure connection to the server and uses this share access to accomplish that.
To create the database, you use the New-MDTDatabase cmdlet, specifying the SQL Server, database, and share name. Other parameters can be used to specify connection details such as port and connection method. The relevant parameters are as follows:
- Path: Path to the deployment share.
- SQLServer: Name of the SQL Server.
- Instance: Name of the SQL Server instance.
- Port: The TCP/IP port number for the SQL Server instance.
- NetLib: The network library that is used for communication. “DBNMPNTW” for Named Pipes and “DBMSSOCN” for TCP/IP Sockets.
- Database: The name of the database that will be created.
- SQLShare: The file share that will be used for authentication by Windows PE.
The following command shows an example of the cmdlet accepting some of the default values for parameters, which are not specified:
New-MDTDatabase -Path “DS001:” `
  -SQLServer SQLServer `
  -Database MDT `
  -SQLShare MDTShare
Importing Operating Systems
What good would a deployment solution be if you didn't have any operating systems to deploy? Your next step is to add the operating systems to the Deployment Share. In Listing 17-2, you see two different types of operating systems that can be imported into your Deployment Share. Although not shown in this example, you can also import images from a Windows Deployment Services (WDS) server. The first line of the listing imports the Windows 2008 R2 operating system from the expanded DVD source files, and the second example imports a custom Windows 7 image file in the Windows Imaging Format (WIM).
Note
When you import the Windows 7 and Windows 2008 R2 operating systems, you will notice numerous entries in the Operating Systems tab in the Deployment Workbench. This is because Microsoft puts every edition of a product on a single DVD. When you import the operating systems, you will have an entry for each edition. ![]()
LISTING 17-2 Adding Operating Systems
Import-MDTOperatingSystem -Path “DS001:Operating Systems” ` -SourcePath “S:SoftwareOperating Systems2008R2” ` -DestinationFolder “Windows Server 2008 R2” ` -Verbose Import-MDTOperatingSystem -Path “DS001:�perating Systems” ` -SourceFile “S:SoftwareOperating Systemscustom.wim” ` -DestinationFolder “Windows 7 x64 (Custom)” ` -Verbose
For this cmdlet, you should note the following relevant parameters:
- Path: Path to the deployment share
- SourcePath: Path to the operating system source files
- DestinationFolder: Name of the folder that should be created in the Deployment Share for the operating system
- Move: Switch indicating that the files should be moved instead of copied
When you execute this cmdlet, MDT pulls the operating system files and extracts and copies them to the Deployment Share. During this process, you will see a progress bar indicating the current status of the task.
The operating system entries in the Provider do not contain any properties you can set, but you can retrieve properties of the operating systems like Size, Build, and Language for reporting.
Importing Device Drivers
After importing the operating systems, you now need to import drivers to make all of that hardware work properly. Listing 17-3 shows how to add drivers to the Deployment Share. This listing adds the drivers from our company's driver repository.
LISTING 17-3 Adding Drivers
Mkdir “DS001:Out-of-Box DriversLaptops”
Import-MDTDriver -Path “DS001:Out-of-Box DriversLaptops” `
  -SourcePath “\ServerDrivers” -Verbose
MDT starts at the specified path and navigates through it and every child folder, searching for drivers, including ones located within .cab files. It then imports each driver into the Deployment Share. This saves time because you don't have to add each driver individually. MDT detects the driver type and what hardware it is applicable to.
Although you could easily add all drivers into a single folder, that could end up unwieldy. By separating the drivers into manageable folders, you can separate the drivers, which will be immensely helpful when you need to create media and limit the driver detection to speed up the build process. You could even create targeted driver folders that only contain drivers for targeted hardware platforms.
The Driver entries do not contain any settable properties, but you can retrieve properties of the drivers like Manufacturer, Version, Platform, and Plug-And-Play IDs.
Importing Applications
In MDT, there are three basic types of applications that are available to your deployed operating systems, with source files, without source files, and bundles. Each of these types is explored within this section, and you learn how to use Windows PowerShell to add them to your deployment share.
With Source Files
Now, you will add the applications. For this step, you use the Import-MDTApplication cmdlet. In Listing 17-4, you add the Microsoft Security Essentials antivirus software. For the cmdlet, you specify the information identifying the software as well as the command line to install the software and where to get the source files from. The DestinationFolder indicates where on the disk the package will exist. The Path is what node the application will exist in within the Deployment Workbench.
The relevant parameters for this example are:
- Path: Path to the deployment share.
- Enable: Whether the application is available to deployment wizards.
- Name: Name of the application.
- ShortName: Name of the folder in which the application resides.
- Version: Version number of the application.
- Publisher: Publisher of the application.
- Language: Language of the application.
- CommandLine: The complete command line that is used to install the application.
- WorkingDirectory: The relative directory to perform the installation from.
- ApplicationSourcePath: The folder containing the source files for the application you are importing.
- DestinationFolder: This is the physical folder on the file system where the source files should be placed. This is not the same as what is shown in the Deployment Share.
LISTING 17-4 Adding Software with Source Files
$MDTApplication = @{
  Path = “DS001:Applications”
  Enable = “True”
  Name = “Microsoft Security Essentials 2.0.657.0”
  ShortName = “Microsoft Security Essentials”
  Version = “2.0.657.0”
  Publisher = “Microsoft”
  CommandLine = “mseinstall.exe /s /runwgacheck”
  WorkingDirectory = “.ApplicationsMicrosoft Security Essentials 2.0.657.0”
  ApplicationSourcePath = “\DFSShareMicrosoftSecurity Essentials”
  DestinationFolder = “Microsoft Microsoft Security Essentials 2.0.657.0”
  Verbose = $True
}
Import-MDTApplication @MDTApplication
The interesting thing to note with this example is that some of these properties such as Version, Publisher, and Language are not actually parameters of the cmdlet. They are the properties of the application object itself as demonstrated in the following code:
Get-ItemProperty '.Microsoft Microsoft Security Essentials 2.0.657.0'
PSPath            : Microsoft.BDD.PSSnapInMDTProvider::DS001:Applications
  Microsoft Microsoft Security Essentials 2.0.657.0
PSParentPath      : Microsoft.BDD.PSSnapInMDTProvider::DS001:Applications
PSChildName       : Microsoft Microsoft Security Essentials 2.0.657.0
PSDrive           : DS001
PSProvider        : Microsoft.BDD.PSSnapInMDTProvider
guid              : {3d569334-a0e5-4b9b-84a4-1fa1c952f4fc}
hide              : False
enable            : True
Comments          :
CreatedTime       : 1/17/2011 10:20:42 PM
CreatedBy         : MILKYWAYMeson
LastModifiedTime  : 1/22/2011 12:48:08 PM
LastModifiedBy    : MILKYWAYMeson
DisplayName       : Microsoft Security Essentials
ShortName         : Microsoft Security Essentials
Version           : 2.0.657.0_biteme
Publisher         : Microsoft
Language          :
Source            : .ApplicationsMicrosoft Microsoft Security Essential
CommandLine       : mseinstall.exe /s /runwgacheck
WorkingDirectory  : .ApplicationsMicrosoft Security Essentials 2.0.657
UninstallKey      :
Reboot            : True
SupportedPlatform : {}
Dependency        : {}
To modify the parameters after creation, you use Set-ItemProperty like this:
Set-ItemProperty -Path “.Microsoft Microsoft Security Essentials 2.0.657.0” `
  -Name Version `
  -Value “2.0.657.01”
In this example, you set the Version property of the application object.
Without Source Files
If you maintain a central storage repository and don't want to copy all of your files into the Deployment Share, you can add the link to the software without actually copying the software. The difference between Listing 17-5 and Listing 17-4 is the addition of the NoSource parameter. This tells MDT not to copy the software and to leave it in its current location.
LISTING 17-5 Adding Software Without Source Files
$MDTApplication = @{
  Import = $True
  MDTApplication = $True
  Path = “DS001:ApplicationsRequired”
  Enable = $true
  Name = “Citrix ICA Client”
  ShortName = “ICA Client”
  Version = “12.0”
  Publisher = “Citrix”
  Language = “English”
  CommandLine = “\DFSShareCitrixCitrixOnlinePluginWeb.exe /silent”
  WorkingDirectory = “”\DFSShareCitrix”
  NoSource = $true
  Verbose = $true
}
import-MDTApplication @MDTApplication
If you add the software without copying the source files, you must guarantee that the account used for the installation has the required permissions to access the software. ![]()
Bundles
The third application type that can be added is a bundle. Bundles are not actually software that is installed on a system, but merely a collection of software. For example, Listing 17-6 creates a bundle that represents all of the required software packages for your environment. Envision this as all the software that must be loaded on each and every computer in your environment. You could add each individual component, but it is much easier to add a single bundle.
LISTING 17-6 Adding a Bundle
Import-MDTApplication -Name “Required Software” `
  -ShortName Required `
  -Bundle `
  -Dependency “{3d569334-a0e5-4b9b-84a4-1fa1c952f4fc}”
Dependency indicates which software in the deployment share is contained in the bundle. In this case, the value listed here is the GUID of the Microsoft Security Essentials software that added to the Deployment Share in Listing 17-4. You could just as easily have used a script to dynamically populate the GUID(s).
Creating Task Sequences
Now, you have all of the components required to deploy your operating system in your MDT environment. You just need to give it the instructions so that everything can be connected. You do this with Task Sequences. Task Sequences are the steps or instructions for deploying the operating systems and applications, and performing whatever custom scripts are needed.
In Listing 17-7 you create a Task Sequence for deploying a Windows 7 operating system. You specify the required parameters for the sequence, including the operating system.
LISTING 17-7 Creating a Task Sequence
$MDTTaskSequence = @{
Path = “DS001:Task Sequences”
Name = “Windows 7 Ultimate Base Build”
Template = “Client.xml”
Comments = “”
ID = “Win7_Build” Version = “1.0” OperatingSystemPath = “DS001:�perating Systems
Windows 7 ULTIMATE in Windows 7 x64 install.wim”
FullName = “Windows User”
OrgName = “Windows Org”
HomePage = “about:blank”
ProductKey = “XXXXX-XXXXX-XXXXX-XXXXX-XXXXX”
AdminPassword = “password”
Verbose = $true
}
Import-MDTTaskSequence @MDTTaskSequence
The template field is used to specify the deployment template for the task sequence. Templates are XML files that describe all of the steps required to complete the task sequence. Some templates are included with the product and are described in Table 17-1.
TABLE 17-1 Task Sequence Template
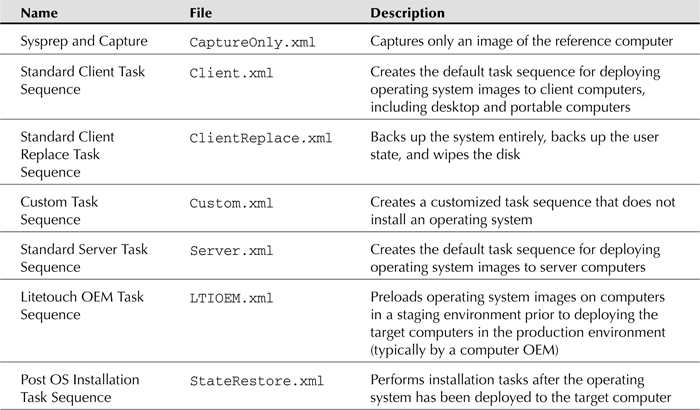
Most of these templates can be used as is for system deployment. However, as you progress, you will want to define custom templates to perform such tasks as installing software. If you use any of the provided templates, you only need to specify the filename to the Template property. For custom templates, you will need to specify the full path to the template file.
Managing the Deployment Share
Now that you have created the deployment share and have added operating systems and applications, you need to be able to perform maintenance on your deployment share.
Configuring the Deployment Share
Once you have created your Deployment Share, you then need to configure it. If you have been looking around, you might have noticed that there is no cmdlet for configuring the Deployment Share, or any component for that matter. This is where the MDT custom Windows PowerShell Provider comes in.
For each component in the MDT Deployment Share, custom properties are exposed via the Windows PowerShell Provider. For example, to see all of the Deployment Share properties, execute:
Get-ItemProperty DS001:
When you execute the command, you will get a listing similar to Figure 17-1.
FIGURE 17-1 Deployment share properties
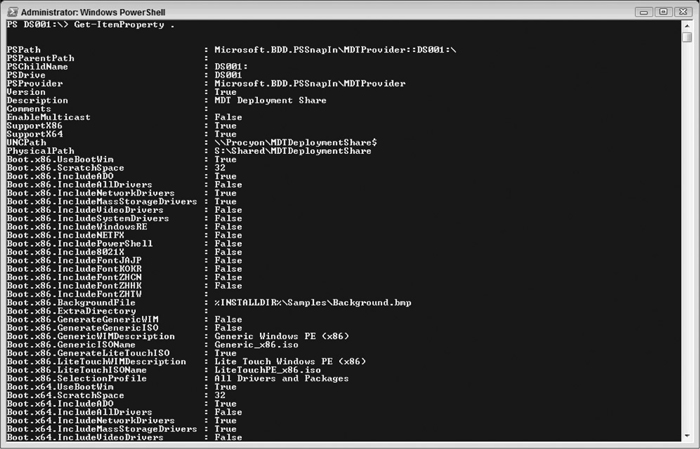
Each property listed is associated with the Deployment Share and corresponds to a property that is accessible from the Deployment Toolkit. For example, there is a property, Boot.x86.BackgroundFile, which corresponds to the image that is used for the background in the Windows PE image. Your company wants to use a customized image instead of the default image. You can simply use the following command to make the change:
Set-ItemProperty -Path DS001: `
  -Name Boot.x86.BackgroundFile `
  -Value “\ServerImagesCustom.bmp”
The change is made immediately; however, you may have to close and reopen the Deployment Toolbox console if you have it open in order for it to recognize the changes. There is also no documentation provided for each property. If you want to know more, you will have to match the property to the corresponding entry in the Deployment Toolbox and then use the help to get the information.
Note
If you receive the message “The MDT Drive is being opened” when you open the drive or try and set a property, make sure you opened the PowerShell console as an administrator. The following code snippet can be used to verify:
$User = [Security.Principal.WindowsIdentity]::GetCurrent() $UserPrincipal = New-Object Security.Principal.WindowsPrincipal $user $UserPrincipal.IsInRole([Security.Principal.WindowsBuiltinRole]::Administrator)Updating the Deployment Share
When you update the deployment tool files, such as those included from the Windows Automated Installation Kit (AIK), you need to update your Deployment Share to include those files. Also, if you tweak any of the Windows PE files, you need to regenerate the boot files. To accomplish this, use the Update-MDTDeploymentShare cmdlet, specifying the Windows PowerShell Provider path to the Deployment Share:
Update-MDTDeploymentShare -Path DS001:
Note
The boot media is not created when you create the Deployment Share, so you have to update the Deployment Share at least once before you can deploy any operating systems. ![]()
Managing Media
Once the deployment share has been created and populated, you need to create the media. The media will contain the bootable image that will build your target systems.
Creating Media
MDT enables you to generate media images that contain all or a subset of the Deployment Share contents so that you can perform stand-alone deployments from removable media when access to the Deployment Share does not exist or is very poor.
The first step is to create the media entry in the Deployment Share as demonstrated in Listing 17-8. The relevant parameters for this example are:
- Path: The location within the Deployment Share's logical structure.
- Name: Name you want to give to your media location.
- SelectionProfile: The content you want copied to the media when you generate. Possible values are Everything, Nothing, Sample, All Packages, All Drivers, All Drivers and Packages.
- SupportX86: Whether or not you want to generate 32-bit boot image.
- SupportX64: Whether or not you want to generate 64-bit boot image.
- GenerateISO: Whether or not you want to generate the boot ISO. If you didn't make any changes that need to be updated, excluding this step can shorten the update process.
- ISOName: If you chose to generate the ISO, this is the name that you want given to the ISO.
LISTING 17-8 Creating the Deployment Media
$item = @{
Path = “DS001:Media”
Name = “MEDIA001”
Comments = “”
Root = “S:Media”
SelectionProfile = “Everything”
SupportX8 6 = “True”
SupportX64 = “True”
GenerateISO = “True”
ISOName = “LiteTouchMedia.iso”
Verbose = $True
}
New-Item @item
Generating Media
When you “create media,” the boot images aren't actually created. You are essentially just creating a record of the media location and its properties in the deployment share as well as creating a blank folder structure. To actually generate the media, you need to perform another step:
Update-MDTMedia -Path “DS001:MediaMedia001”
Update-MDTMedia performs the work of copying all of the data and generating boot images as described when you created the media. Once you complete this step, the media is ready to be burned to removable media.
When you add applications, drivers, or any other content to your Deployment Share, you are going to want to update your media to make sure those updates get pushed out. The following line iterates through all of the media in the Deployment Share and updates each of the media locations:
Get-ChildItem -Path DS001:Media |
  ForEach-Object { Update-MDTMedia -Path DS001:Media$($_.Name) }
Depending on your environment, this is probably a good line to add to your scripts whenever you update the Deployment Share so that you can be assured that at least the media share is up-to-date. You still have to burn new media, of course.
Summary
In this chapter, you explored the Microsoft Deployment Toolkit and how to manage it with Windows PowerShell. Starting with creating a deployment share, you progressed through adding operating systems and applications. Finally, you generated the media to build your target systems.
In the next chapter, you learn about the Citrix XenApp 6 platform. XenApp is Citrix's solution for server-based computing and provides enhancement to Microsoft's Remote Desktop Services.