Word Processing in Pages ’09: The Mini Missing Manual
by Josh Clark
Copyright © 2010 O’Reilly Media, Inc. All rights reserved.
Published by O’Reilly Media, Inc., 1005 Gravenstein Highway North,
Sebastopol, CA 95472.
O’Reilly Media books may be purchased for educational, business, or sales promotional use. Online editions are also available for most titles: safari.oreilly.com. For more information, contact our corporate/institutional sales department: 800-998-9938 or [email protected].
February 2010: First Edition.
The Missing Manual is a registered trademark of O’Reilly Media, Inc. The Missing Manual logo, and “The book that should have been in the box” are trademarks of O’Reilly Media, Inc. Many of the designations used by manufacturers and sellers to distinguish their products are claimed as trademarks. Where those designations appear in this book, and O’Reilly Media is aware of a trademark claim, the designations are capitalized.
While every precaution has been taken in the preparation of this book, the publisher assumes no responsibility for errors or omissions, or for damages resulting from the use of the information contained in it.
If you do lots of word processing, your Mac probably sports Microsoft Word, maybe even the entire Office suite. But for only $99, you can have a suite—word processing, number crunching, and presentation programs—that was designed to run on your Mac and work in concert with your other programs, including iPhoto, Address Book, and so on.
Tip: If you’ve never used iWork before, you can download a free 30-day trial version at www.apple.com/iwork.
Whether you’re a Word maven, a recent Windows convert, or new to computers entirely, you’ll get up to speed in Pages much more quickly with the help of this e-Book. You’ll learn how to launch your first Pages document, use all of Pages’ text-editing tools, how to dress up your words with styles, and how to save time with power wordsmithing tools for proofreading, auto-correction, and more.
Tip: This e-Book covers the full version of Pages that runs on MacBook, iMac, and Mac Pro computers. If you have an iPad, your version of Pages and the other iWork programs will look and feel quite different.
Your First Word-Processing Document
As soon as you launch Pages, the program greets you with the Template Chooser (Figure 1-1), a document smorgasbord with a left-hand menu divided neatly into categories. Here you can choose to start your creation from scratch with a blank page (choose a template from one of the Blank categories) or use one of the starter documents (choose any of the other templates).
Note: Under Page Layout, you’ll see templates for fully formatted, complex documents like newsletters, brochures, and flyers. These kinds of documents are covered in Layout in Pages ’09: the Mini Missing Manual. The text-editing skills you learn in the e-Book you’re reading now will stand you in good stead; they work the same in both Word Processing and Page Layout documents.
To help you make your choice, the Template Chooser shows miniature previews, or thumbnails, of the design for each document template. Double-click a thumbnail when you’ve made your choice, or click the thumbnail once to select it and then click Choose.
For example, click the Letters category under Word Processing, and select your preferred template in the right pane. For this example, choose Modern Letter. Pages fills your new document window with the template design, including a few paragraphs of dummy text, ready to be replaced with your own mellifluous prose, as shown in Figure 1-2.
Tip: Pages’ letter templates include merge fields, smart placeholders for sender and recipient address info which—you guessed it—merge info from Address Book into your letter. Sure enough, you can use Address Book to grab your recipient’s contact info, too. Launch Address Book, and drag the address card into your document. Presto! The name, address, and even the salutation fill in automatically.
Pages adds your own home or work address, which you entered when you first set up your Mac, to your letter automatically as well. If you don’t see the correct information, choose Card➝Go to My Card and edit the info. If that’s not the card you want to use, select a different card and choose Card➝Make This My Card.
In Your Own Words
Pages’ templates include placeholder text to show where you should type the body of your letter within the template’s layout. Just click anywhere in the placeholder text and Pages highlights the entire text block. Start typing, and the block disappears to be replaced with your new text.
Click to place the insertion point where you want to add or delete text. Type the text of your letter, and as you reach the end of each line, Pages automatically takes care of the line breaks for you—there’s no need to press Return like you would on a typewriter (reserve the Return key for starting a new paragraph or adding a blank line).
When your text grows too long to fit on a single page, Pages automatically adds another page, jumping your text over to the next sheet automatically. Use the vertical scroll bar on the right side of the window to move up and down through the text, as you would in any computer program.
Save and Print
When you’re ready, save the document so you can come back later and continue working on it:
1. Choose File➝Save or press ⌘-S.
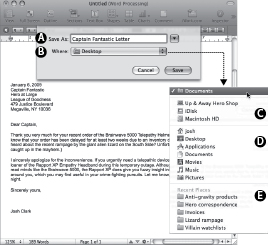
The Save dialog box appears (Figure 1-3).
2. Type a title for the document in the Save As box.
This box is already highlighted, so you can just start typing. Click the Where pop-up menu and choose Documents (if it doesn’t already say Documents) to store this Pages file in your Documents folder.
3. Click Save.
The Save dialog box retracts, and Pages stores your document on your computer’s hard drive. You can continue to work on your letter, periodically choosing File➝Save (or, more quickly, ⌘-S) to update the saved file with any changes.
Tip: Save often! Pages doesn’t offer an option to save your document automatically for you, so it’s a good habit to save your document every few minutes, just in case.
Print your document when you’re ready to commit your correspondence to paper and send it on its way to your customer:
1. Choose File➝Print or press ⌘-P.
The Print dialog box appears.
2. Type the number of copies you need in the Copies box.
If you just want one copy, no need to make any changes. If you don’t see a Copies field in the Print dialog box, click the blue downward arrow next to the printer name to expand the window to its full view.
3. Click Print.
Your printer starts whirring and chirping and, in short order, delivers the hard copy.
Now that you’re done writing your letter, you can close its document window. Click the red Close button in the upper-left corner of the window. If Pages asks if you want to save your changes, click Save. Your letter vanishes from the screen but remains safe on your hard drive, ready to be reopened if you ever want to review it.