Chapter 9
Media Management: Images, Audio, and Video
In This Chapter
![]() Adding images, photo galleries, and videos to your blog posts
Adding images, photo galleries, and videos to your blog posts
![]() Uploading audio files
Uploading audio files
![]() Exploring the WordPress Media Library
Exploring the WordPress Media Library
Adding images and photos to your posts can really dress up the content. By using images and photos, you give your content a dimension that you can’t express in plain text. Through visual imagery, you can call attention to your post and add depth to it.
The same goes for adding video and audio files to your posts and blog. Video lets you provide entertainment through moving, talking (or singing!), streaming video. Audio files let you talk to your visitors and add a personal touch. Many bloggers use video and audio to report news and to broadcast Internet radio and television shows. The possibilities are endless!
In this chapter, you discover how to enhance your blog posts by adding images, video, and audio. And you even find out how to run a full-fledged photo gallery on your site, all through the WordPress.org software and its integrated Media Library.
 This chapter is pertinent to the WordPress.org platform only. If you’re using the hosted WordPress.com version, check out Chapter 4 for information on adding images, video, and audio to your blog.
You add these extras to your blog posts in the Upload/Insert area of the Add New Post page. You can add them as you’re writing your post or come back and add them later. The choice is yours!
Inserting Images into Your Blog Posts
Adding images to a post is pretty easy with the WordPress image uploader. Jump right in and give it a go by clicking the Add Media button on the Add New Post page. The Insert Media window opens and lets you choose images from your hard drive or from a location on the web. See Figure 9-1.

Figure 9-1: Insert images into your posts with the WordPress Insert Media window.
To add an image from the web after you click the Add Media button, follow these steps:
- Click the Insert From URL link in the Insert Media window.
The Insert from URL window opens.
- Type the URL (Internet address) of the image in the URL text box.
Type the full URL, including the
httpandwwwportions of the address. You can easily find the URL of any image on the web by right-clicking (PC) or Control-clicking (Mac) and selecting Properties from the menu. - Type a title for the image in the Title text box.
- (Optional) Type the caption of the image in the Image Caption text box.
The words you type here display underneath the image on your blog as a caption — if your current theme supports image captions.
- Type a description of the image in the Alt Text text box.
Alt Text stands for alternate text, and it is what shows in a browser for visually impaired people who use text readers, or it appears when the image does not load properly for some reason. Although alternate text gives the visitors to your site a description of what the image is, adding it is also good for SEO (search engine optimization). Search engines read the alternate text (also called
ALTtags) and give search engines additional descriptive text to further categorize and define your site in listings and directories. - Choose an alignment option by clicking the Left, Center, Right, or None button.
- Select what you would like the image hyperlinked to.
Whatever option you choose determines where your readers go when they click the image you’ve uploaded; you can type in a specific URL or you can select one of the three available buttons:
- Image URL: Readers can click through to the direct image itself.
- Custom URL: Type in your own URL that you want readers to visit when they click on the image.
- None: Select this to attach no hyperlink to the image.
- Click the Insert into Post button.
To add an image from your own computer’s hard drive after you click the Add Media button, follow these steps:
- Click the Add Media link and then click the Select Files button.
A dialog box opens from which you can select an image (or multiple images) from your hard drive.
- Select your image(s); then click Open.
The image is uploaded from your computer to your web server. WordPress displays a progress bar on the upload and displays an image options box when the upload is finished.
- Edit the details for the image(s) by configuring the options that display to the right of the Insert Media window.
After an image is uploaded, the right side of the Insert Media window (see Figure 9-2) contains several image options:
- Title: Type a title for the image.
- Caption: Type a caption for the image (such as My beautiful granddaughter enjoying the beautiful Spring weather).
- Alt Text: Type the alternate text (see previous section) for the image.
- Description: Type a description of the image.
- Alignment: Choose None, Left, Center, or Right. (See Table 9-1 in the following section for styling information regarding image alignment.)
Table 9-1 Styling Techniques for Image Alignment
Image Alignment
Add This to Your Stylesheet (style.css)
None
img.alignnone {margin: 5px 0 5px 0;}Left
img.alignleft {float:left; margin: 5px 10px 5px 0px;}Center
img.aligncenter {display:block margin: 5px auto;}Right
img.alignright {float:right; margin: 5px 0 5px 10px;} - Link To: Choose what you want the image linked to. Whatever option you choose determines where your readers go when they click the image you’ve uploaded. Type in your own URL or select one of four available presets: None (if you don’t want the image to be clickable); Media File (readers can click through to the direct image); Attachment Page (readers can click through to the post the image appears in); or Custom URL (readers can click through to the URL that you type in).
- Size: Choose Thumbnail, Medium, Large, or Full Size.
 WordPress automatically creates small and medium-size versions of the images you upload through the built-in image uploader. A thumbnail is a smaller version of the original file. You can edit the size of the thumbnail by clicking the Settings link and then clicking Media. In the Image Sizes section, designate your desired height and width of the small and medium thumbnail images generated by WordPress.
If you’re uploading more than one image, skip to the “Inserting a photo gallery” section later in this chapter.

Figure 9-2: You can set several options for your images after you upload them.
- Click the Edit Image link (refer to Figure 9-2) to edit the appearance of the image. Be sure to click Save after you’ve edited the image.
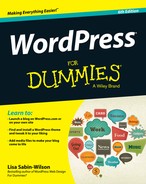
The image editor (shown in Figure 9-3) options include the following tools:
- Crop: Cut the image down to a smaller size.
- Rotate counterclockwise: Rotate the image to the left.
- Rotate clockwise: Rotate the image to the right.
- Flip vertically: Flip the image upside down and back again.
- Flip horizontally: Flip the image from right to left and back again.
- Undo: Undo any changes you’ve made.
- Redo: Redo image edits that you’ve undone.
- Scale Image: Drop down the option menu that you use to set a specific width and height for the image.
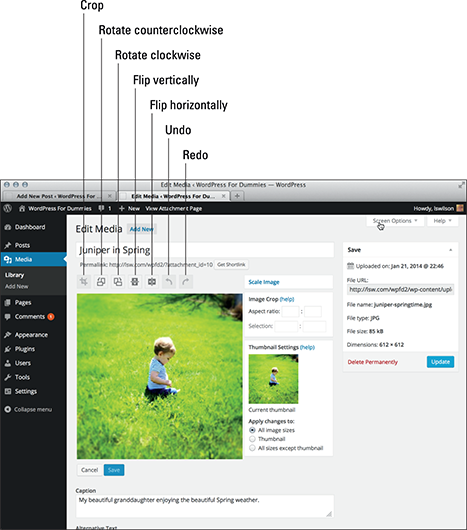
Figure 9-3: The WordPress image editor options.
- Click the Insert into Post button.
You can find the Insert into Post button at the bottom of the Insert Media window (refer to Figure 9-1). The image uploader window closes, and you return to the Add New Post page (or the Add New Page page, if you’re writing a page). WordPress has inserted the HTML to display the image in your post, as shown in Figure 9-4; you can continue editing your post, save it, or publish it.
To see the actual image and not the code, click the Visual tab that’s just above the post text box.

Figure 9-4: WordPress inserts the correct HTML code for your uploaded image into your post.
Aligning your images
When you upload your image, you can set the alignment for your image as None, Left, Center, or Right. The WordPress theme you’re using, however, may not have these alignment styles in its stylesheet. If you set the alignment to Left, for example, but the image on your blog doesn’t appear to be aligned at all, you may need to add a few styles to your theme’s stylesheet.
I discuss themes and templates in detail in Part V, but for the purpose of making sure that you have the correct image alignment for your newly uploaded images, here is a quick-and-dirty method:
- Click the Editor link in the Appearance menu.
The Edit Themes page opens. All the template files for your active theme are listed on the right side of the page.
- Click the Stylesheet template.
The Stylesheet (
style.css) template opens in the text box on the left side of the page. - Add your desired styles to the stylesheet.
Table 9-1 shows the styles you can add to your stylesheet to make sure that image-alignment styling is in your theme.
These styles are just examples of what you can do. Get creative with your own styling. See Chapter 13 for more information about using CSS (Cascading Style Sheets) to add style to your theme(s).
Inserting a photo gallery
You can also use the WordPress media uploader to insert a full photo gallery into your posts. Upload multiple images once you are in the Insert Media window; then, instead of clicking the Insert into Post button, click the Create Gallery link on the left side of the Insert Media window, as shown in Figure 9-5.
This link opens the Create Gallery window, along with the multiple images you uploaded. All of the images are selected, as indicated by the check mark shown at the upper right side of the image (you can deselect any image to exclude it from the gallery by clicking the check mark).
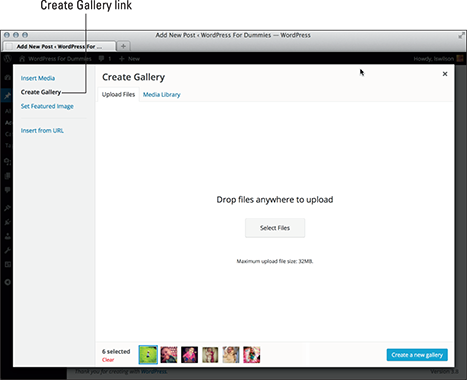
Figure 9-5: Insert a photo gallery into a post by using the Create Gallery link.
Follow these steps to insert a photo gallery into a blog post:
- Click the Create a New Gallery button.
The button is located at the bottom right of the Create Gallery window. This opens the Edit Gallery window.
- (Optional) Edit the gallery images.
If you would like to re-arrange the images, you can drag and drop the images to appear in the order you would like them to be displayed on your website. You can also include a short caption for each image by clicking the text box beneath each image.
- Configure the Gallery Settings.
Located on the right side of the Edit Gallery window, these options include:
- Link To: Use the drop-down menu to select the Attachment Page, Media File, or None.
- Columns: Select the number of columns you would like the gallery thumbnails to be displayed in. Options in the drop-down menu include 1 to 9 columns.
- Random Order: This box is deselected, by default. Selecting this box tells WordPress to ignore the defined order of images and orders them randomly on the page instead.
- Click the Insert Gallery button.
WordPress inserts into your post a piece of shortcode that looks like this:
[gallery].Table 9-2 shows some gallery shortcodes that you can use to manually set the display settings for your photo gallery.
Table 9-2 Gallery Shortcode Examples
Gallery Shortcode
Output
[gallery columns="4" size="medium"]A four-column gallery containing medium-size images
[gallery columns="10" id="215" size=-thumbnail-]A ten-column gallery containing thumbnail images pulled from the blog post with the ID 215
[gallery captiontag="p" icontag="span"]A three-column (default) gallery in which each image is surrounded by
<span></span>tags and the image caption is surrounded by<p></p>tags - (Optional) Change the order of appearance of the images in the gallery, as well as the markup (HTML tags or CSS selectors):
captiontag: Change the markup that surrounds the image caption by altering the gallery shortcode. For example:[gallery captiontag="div"]places<div></div>tags around the image caption (the<div>tag is considered a block-level element and creates a separate container for the content); to have the gallery appear on a line of its own, the[gallery captiontag="p"]code places<p class="gallery-caption"></p>tags around the image caption. The default markup for thecaptiontagoption isdd.icontag: Defines the HTML markup around each individual thumbnail image in your gallery. Change the markup around theicontag(thumbnail icon) of the image by altering the gallery shortcode to something like[gallery icontag="p"], which places<p class="gallery-icon"></p>tags around each thumbnail icon. The default markup foricontagisdt.itemtag: Defines the HTML markup around each item in your gallery. Change the markup around theitemtag(each item) in the gallery by altering the gallery shortcode to something like[gallery itemtag="span"], which places<span class="gallery-item"></span>tags around each item in the gallery. The default markup for theitemtagisdl.orderby: Defines the order that the images are displayed within your gallery. Change the order used to display the thumbnails in the gallery by altering the gallery shortcode to something like[gallery orderby="menu_order ASC"], which displays the thumbnails in ascending menu order. Another parameter you can use isID_order ASC, which displays the thumbnails in ascending order according to their IDs.
- Define the style of the
<span>tags in your CSS stylesheet.The
<span>tags create an inline element; an element contained within a<span>tag stays on the same line as the element before it; there is no line break. You need a little knowledge of CSS to alter the<span>tags. Click the Editor link in the Appearance menu on your WordPress Dashboard to edit the stylesheet for your theme. Here’s an example of what you can add to the stylesheet (style.css) for your current theme:span.gallery-icon img {
padding: 3px;
background: white;
border: 1px solid black;
margin: 0 5px;
}Placing this bit of CSS in the stylesheet (
style.css) of your active theme automatically places a one-pixel black border around each thumbnail, with three pixels of padding and a white background. The left and right margins are five pixels wide, creating nice spacing between images in the gallery. - Click the Update File button to save changes to your stylesheet (
style.css) template.
Figure 9-6 shows my post with my photo gallery displayed, using the default image.

Figure 9-6: A photo gallery inserted into my post.
Matt Mullenweg, co-founder of the WordPress platform, created an extensive photo gallery by using the built-in gallery options in WordPress. Check out the fabulous photo gallery at http://ma.tt/category/gallery/.
Some great WordPress plugins work in tandem with the WordPress gallery feature. Check out Chapter 10 for information on how to install and use WordPress plugins in your blog.
Inserting Video Files into Your Blog Posts
Whether you’re producing your own videos for publication or want to embed other people’s videos that you find interesting, placing a video file in a blog post has never been easier with WordPress.
Check out a good example of a video blog at www.thedogfiles.com. The Dog Files is a website about dogs and the people who love them; the site serves up videos for information and entertainment.
Several video galleries on the web today allow you to add videos to blog posts; Google’s YouTube (http://youtube.com) is a good example of a third-party video service that allows you to share videos. To add a video from the web, click the Add Media icon and then click the Insert from URL link and follow these steps:
- Type the URL (Internet address) of the video in the URL text box.
Type the full URL, including the
httpandwwwportions of the address. Video providers, such as YouTube, usually list the direct link for the video file on their sites; you can copy and paste it into the URL text box. - (Optional) Type the title of the video in the Title text box.
Giving a title to the video allows you to provide a bit of a description of the video. It’s a good idea to provide a title if you can so that your readers know what the video is about.
- Click the Insert into Post button.
A link to the video is inserted into your post. WordPress doesn’t embed the actual video in the post; it inserts only a link to the video. Your blog visitors click the link to load another page where the video can be played.
The previous steps give you the ability to insert a hyperlink that your readers can click and view the video on another website (such as YouTube.com). WordPress also has a nifty feature called Auto-Embed that automatically embeds videos within your posts and pages when you simply type the URL for the video into the body of your post or page.
WordPress automatically detects that a URL you typed in your post is a video from YouTube (for example) and automatically wraps the correct HTML embed code around that URL to make sure that the video player displays in your post (in a standards- and XHTML-compliant way).
You do not need to do anything to enable the Auto-Embed feature — this is built into WordPress and it does it for you automatically.
Currently, WordPress automatically embeds videos from blip.tv, Bunkr, DailyMotion, Flickr, FunnyOrDie.com, Hulu, Instagram, Qik, Photobucket, PollDaddy, Rdio, Revision3, Scribd, SlideShare, SmugMug, SoundCloud, Spotify, Twitter, Viddlr, Vimeo, YouTube, and WordPress.tv. Find out more about these services in the WordPress Codex: http://codex.wordpress.org/Embeds.
To upload and post to your blog a video from your computer, click the Add Media icon on the Edit Post or Add New Post page. Then follow these steps:
- Click the Select Files button.
An Open dialog box opens.
- Select the video file you want to upload and click Open (or double-click the file).
You return to the file uploader window in WordPress, which shows a progress bar while your video uploads. When the upload is complete, a box containing several options drops down.
- Type a title for the file in the Title text box.
- Type a caption for the file in the Caption text box.
- Type a description of the file in the Description text box.
- Click the File URL button.
It provides a direct link in your post to the video file itself.
- Click the Insert into Post button.
WordPress doesn’t embed a video player in the post; it inserts only a link to the video.
Inserting Audio Files into Your Blog Posts
Audio files can be music files or a recording of you speaking to your readers. Audio adds a nice personal touch to your blog, and you can easily share audio files on your blog through the use of the Upload Audio feature in WordPress. After you’ve inserted an audio file in your blog posts, your readers can listen to it on their computers or download it onto an MP3 player and listen to it while they drive to work.
Click the Add Media icon on the Edit Post or Add New Post page and follow these steps to upload an audio file to your blog post:
- Click the Select Files button.
An Open dialog box opens.
- Choose the file you want to upload and click Open (or double-click the file).
You return to the file uploader window in WordPress, which shows a progress bar while your audio file uploads. When the upload is complete, a box containing several options drops down.
- Type a title for the file in the Title text box.
- Type a caption for the file in the Caption text box.
- Type a description of the file in the Description text box.
- Configure the Attachment Display Settings.
In the Attachment Display Settings drop-down menu, you can select Embed Media Player (embeds the audio file in an audio player on your site); Link to Media File (inserts the title of the audio file, linked to the file itself); or Link to Attachment Page (inserts the title of the audio file, linked to a post containing the file).
- Click the Insert into Post button.
The audio file is inserted into your post using the method you selected in Step 6.
Some great WordPress plugins for audio handling can enhance the functionality of the file uploader and help you manage audio files in your blog posts. Check out Chapter 10 for information on how to install and use WordPress plugins in your blog.
Keeping Media Files Organized
If you’ve been running your blog for any length of time, you can easily forget what files you’ve uploaded with the WordPress uploader. I used to have to log in to my web server via FTP and view the Uploads folder to see what I had in there. Now, the WordPress Media Library makes it very convenient and easy to discover which files are in your Uploads folder.
To find an image, video, or audio file that you’ve already uploaded using the file uploader and use that file in a new post, follow these steps on the Add New Post page:
- Click the Add Media button to open the Insert Media window.
- Click the Media Library link at the top.
You see all the files you’ve ever uploaded to your blog with the file uploader feature; see Figure 9-7. Files you’ve uploaded through other methods, such as FTP, are not displayed in the Media Library.

Figure 9-7: The Media Library shows all the files you’ve ever uploaded to your blog.
- Select the file you want to reuse and click the Show link.
- Set the options for that image: Title, Caption, Description, Link URL, Order, Alignment, and Size.
- Click the Insert into Post button.
The correct HTML code is inserted into the post text box.
If you want to view only the files you’ve uploaded and don’t need a particular image or file for a new post, click the Library link in the Media menu, which opens the Media Library page. The Media Library page lists all the files you’ve ever uploaded to your WordPress blog. By default, the page displays all types of files, but you can click the Images, Audio, or Video links to specify which file type you want to see; see Figure 9-8.

Figure 9-8: Manage your media files with the WordPress Media Library page.
You can do the following tasks on the Media Library page:
- Filter media files by date. If you want to view all media files that were uploaded in February 2014, choose that date from the drop-down menu and click the Filter button; the page reloads and displays only the media files uploaded in the month of February 2014.
- Search media files using a specific keyword. If you want to search your Media Library for all files that reference kittens, type the word kittens in the Search Media box in the upper-right side of the Media Library page. Then click the Search Media button; the page reloads and displays only media files that contain the keyword or tag of
kittens. - Delete media files. Click the small white box that appears to the left of every thumbnail on the Media Library page; then select Delete in the Bulk Actions drop-down list that shows at the top left of the page. The page reloads, and the media file you’ve just deleted is now gone.
- View media files. On the Media Library page, click the thumbnail of the file you’d like to view. The actual file opens in your web browser. If necessary, you can copy the permalink of the file from your browser’s address bar.