
The previous chapter discussed performance counters which are excellent for tracking your application’s overall performance. What performance counters cannot do is provide any information on a specific event or operation in your application. For that, you need to log data per operation. If you include time stamps then you now have the ability to track performance in your program in an extremely detailed way.
There are many logging libraries for .NET. There are some popular ones like log4net, as well as countless custom solutions. However, I strongly encourage you to use Event Tracing for Windows, which has a number of advantages:
- It is built into the operating system
- It is extremely fast and suitable for high-performance scenarios
- It has automatic buffering
- You can dynamically enable and disable consuming and producing events during runtime
- It has a highly selective filtering mechanism
- You can integrate events from multiple sources into one log stream for comprehensive analysis
- All OS and .NET subsystems generate ETW events
- Events are typed and ordinal-based instead of just strings
PerfView and many other profiling tools are nothing more than fancy ETW analyzers. For example, in Chapter 2 you saw how to use PerfView to analyze memory allocations. All of this information came from ETW events from the CLR.
In this chapter, you will explore how to define your own events and then consume them. All of the classes we introduce are in the System.Diagnostics.Tracing namespace and are available as of .NET 4.5.
You can define events that mark the start and stop of your program, the various stages of processing requests, errors that occur, or literally anything else. You have complete control of what information goes into an event.
Using ETW starts by defining things called providers. In .NET terms, this is a class with methods that define the events you want to log. These methods can accept any fundamental data type in .NET, such as strings, integers, and more.
Events are consumed by objects called listeners, which subscribe to the events they are interested in. If there are no subscribers for an event, then those events are discarded. This makes ETW very cheap on average.
- Defining Events
Events are defined with a class that derives from the .NET Framework’s EventSource class, as in this example:
using System.Diagnostics.Tracing;
namespace EtlDemo
{
[EventSource(Name="EtlDemo")]
internal sealed class Events : EventSource
{
...
}
}
The Name argument is necessary if you want listeners to find the source by name. You can also provide a GUID, but this is optional and if you do not provide one, it will be generated automatically for you from the name by a procedure specified in RFC 4122 (See http://www.writinghighperf.net/go/30). GUIDs are only necessary if you need to guarantee an unambiguous event source. If your source and listener are all in one process then you do not even need a name, and can pass the event source object directly to the listener.
After this basic definition, there are some conventions you should follow in defining your events. To illustrate them, I will define some events for a very simple test program (see the EtlDemo sample project).
using System.Diagnostics.Tracing;
namespace EtlDemo
{
[EventSource(Name="EtlDemo")]
internal sealed class Events : EventSource
{
public static readonly Events Write = new Events();
public class Keywords
{
public const EventKeywords General = (EventKeywords)1;
public const EventKeywords PrimeOutput = (EventKeywords)2;
}
internal const int ProcessingStartId = 1;
internal const int ProcessingFinishId = 2;
internal const int FoundPrimeId = 3;
[Event(ProcessingStartId,
Level = EventLevel.Informational,
Keywords = Keywords.General)]
public void ProcessingStart()
{
if (this.IsEnabled())
{
this.WriteEvent(ProcessingStartId);
}
}
[Event(ProcessingFinishId,
Level = EventLevel.Informational,
Keywords = Keywords.General)]
public void ProcessingFinish()
{
if (this.IsEnabled())
{
this.WriteEvent(ProcessingFinishId);
}
}
[Event(FoundPrimeId,
Level = EventLevel.Informational,
Keywords = Keywords.PrimeOutput)]
public void FoundPrime(long primeNumber)
{
if (this.IsEnabled())
{
this.WriteEvent(FoundPrimeId, primeNumber);
}
}
}
}
First, notice that the first thing declared is a static reference to an instance of itself. This is common because events are usually global in nature and need to be accessed by many parts of your code. Having this “global” variable makes this a lot easier than passing a reference to the event source around to every object that needs it. I am used to using Write, but I have seen others use Log. You can name it whatever you want, but you should standardize on the same term for all your event sources for clarity.
After the declaration, there is an inner class which just defines some constant Keyword values. Keywords are optional and their values are arbitrary and completely up to you. They serve as a way of categorizing events in ways that are meaningful to your application. Listeners can filter what they want to listen for based on Keywords. Note that Keywords are treated like bit flags so you must assign values of multiples of two. This way, listeners can easily specify multiple Keywords to listen for.
Next come some constant declarations for the event identifiers. Using a constant declaration is not required, but it makes it more convenient if both the source and listener need to refer to the identifiers.
Finally, there is the list of events. These are specified with a void method that takes any number of arbitrary arguments. These methods are prefaced with an attribute that specifies the ID, the event level, and any keywords you want to apply (you can apply multiple keywords by ORing them together: Keywords = Keywords.General | Keywords.PrimeOutput).
There are five event levels:
- LogAlways—Always logged, no matter what, regardless of log level specified
- Critical—A very serious error, probably indicating your program cannot safely recover
- Error—A normal error
- Warning—Not quite an error, but someone may want to act on it
- Informational—A purely informational message; does not indicate an error
- Verbose—Should not be logged at all in most situations; useful for debugging specific problems or when running in certain modes
These levels are cumulative. Specifying a logging level implies that you will receive all events for that level and above. For example, if you specify a log level of Warning, you will also get events for Error, Critical, and LogAlways.
The event body is simple. Check to see if events are enabled (this is mostly a performance optimization). If they are, call the WriteEvent method (inherited from EventSource) with the event ID and your arguments.
Note Do not try to log null values. The EventSource system does not know how to interpret them correctly because there is no type information. This is most common with string values. In that case, check for the null and supply a reasonable default:
[Event(5, Level = EventLevel.Informational, Keywords = Keywords.General)]
public void Error(string message)
{
if (IsEnabled())
{
WriteEvent(5, message ?? string.Empty);
}
}
To write your events, your code just needs to do something like this:
Events.Write.ProcessingStart();
Events.Write.FoundPrime(7);
- Consume Custom Events in PerfView
Now that your application is producing ETW events, you can capture these events in any ETW listener utility, such as PerfView (or even Windows’ built-in utility PerfMon).
To capture custom event sources in PerfView, you need to put the name, preceded by an asterisk (*), in the Additional Providers textbox in the Collect window:
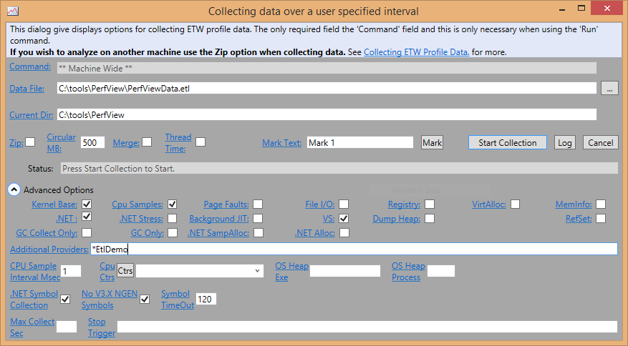
Figure 8-1. PerfView's Collect window, showing where to enter additional ETW providers.
By writing *EtlDemo, you tell PerfView to calculate the GUID automatically, as described earlier in the chapter. You can see more information by clicking on the Additional Providers title link.
Start collecting the samples, run EtlDemo, then press the Stop Collection button. Once the resulting events are recorded, open the raw Events node. You will see a list of all events captured, including these:
- EtlDemo/FoundPrime
- EtlDemo/ManifestData
- EtlDemo/ProcessingStart
- EtlDemo/ProcessingFinish
If you highlight all the events in the list and click the Update button to refresh the view, you can see a list similar to this:
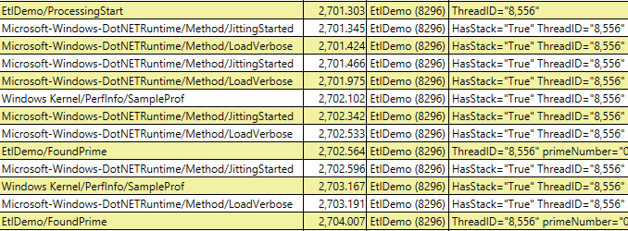
Figure 8-2. A sorted list showing Windows, .NET, and application events.
This shows you the custom events in the context of all the other captured events. You can see, for example, the JIT events that precede the FoundPrime events. This hints at the great power you can unleash with some smart ETW analysis. You can do some very detailed performance investigations in the context of your own application’s scenarios. You can see a simple example of this later in the chapter.
- Create a Custom ETW Event Listener
Most applications will not require you to create your own ETW listener. It is almost always sufficient to define your own events and use an application like PerfView to do the collection and analysis for you. However, you may want to create a listener if you need a custom logger or to perform real-time event analysis, for example.
In .NET, an event listener is a class that derives from the EventListener. To demonstrate multiple ways of handling the event data, I will define a base class for generic handling of listeners.
This class will need to know which events it should listen for and which level and keywords to filter by, so first define a simple structure to encapsulate that information:
class SourceConfig
{
public string Name { get; set; }
public EventLevel Level { get; set; }
public EventKeywords Keywords { get; set; }
}
Then we can define our listener’s constructor as taking a collection of these (one for each event source):
abstract class BaseListener : EventListener
{
List<SourceConfig> configs = new List<SourceConfig>();
protected BaseListener(
IEnumerable<SourceConfig> sources)
{
this.configs.AddRange(sources);
foreach (var source in this.configs)
{
var eventSource = FindEventSource(source.Name);
if (eventSource != null)
{
this.EnableEvents(eventSource,
source.Level,
source.Keywords);
}
}
}
private static EventSource FindEventSource(string name)
{
foreach (var eventSource in EventSource.GetSources())
{
if (string.Equals(eventSource.Name, name))
{
return eventSource;
}
}
return null;
}
}
After saving the sources to its own list, it iterates over them and tries to find an existing EventSource that matches the names we want. If it finds one, it subscribes by calling the inherited method EnableEvents.
This is not enough, however. It is possible the EventSource is created after we set up our listener. For this eventuality, we can override the OnEventSourceCreated method and do essentially the same check to see if we are interested in the new EventSource.
protected override void OnEventSourceCreated(EventSource eventSource)
{
base.OnEventSourceCreated(eventSource);
foreach (var source in this.configs)
{
if (string.Equals(source.Name, eventSource.Name))
{
this.EnableEvents(eventSource, source.Level, source.Keywords);
}
}
}
The last thing we need to do is handle the OnEventWritten event which is called every time a new event is written by the sources for the current listener.
protected override void OnEventWritten(EventWrittenEventArgs eventData)
{
this.WriteEvent(eventData);
}
protected abstract void WriteEvent(EventWrittenEventArgs eventData);
In this case, I am just deferring to an abstract method which will do the heavy lifting.
It is common practice to define multiple listener types that expose the event data in different ways. For this sample, I have defined one that writes the messages to the console and another that logs them to a file.
The ConsoleListener class looks like this:
class ConsoleListener : BaseListener
{
public ConsoleListener(
IEnumerable<SourceConfig> sources)
:base(sources)
{
}
protected override void WriteEvent(EventWrittenEventArgs eventData)
{
string outputString;
switch (eventData.EventId)
{
case Events.ProcessingStartId:
outputString = string.Format("ProcessingStart ({0})",
eventData.EventId);
break;
case Events.ProcessingFinishId:
outputString = string.Format("ProcessingFinish ({0})",
eventData.EventId);
break;
case Events.FoundPrimeId:
outputString = string.Format("FoundPrime ({0}): {1}",
eventData.EventId,
(long)eventData.Payload[0]);
break;
default:
throw new InvalidOperationException("Unknown event");
}
Console.WriteLine(outputString);
}
}
The EventId property is how you determine which event you are looking at. It is not as easy to get the name of the event, unfortunately, but it is possible with some upfront work, as you will see later. The Payload property provides you an array of the values that were passed into the original event method.
The FileListener is only slightly more complicated:
class FileListener : BaseListener
{
private StreamWriter writer;
public FileListener(IEnumerable<SourceConfig> sources, string outputFile)
:base(sources)
{
writer = new StreamWriter(outputFile);
}
protected override void WriteEvent(EventWrittenEventArgs eventData)
{
StringBuilder output = new StringBuilder();
DateTime time = DateTime.Now;
output.AppendFormat("{0:yyyy-MM-dd-HH:mm:ss.fff} - {1} - ",
time, eventData.Level);
switch (eventData.EventId)
{
case Events.ProcessingStartId:
output.Append("ProcessingStart");
break;
case Events.ProcessingFinishId:
output.Append("ProcessingFinish");
break;
case Events.FoundPrimeId:
output.AppendFormat("FoundPrime - {0:N0}",
eventData.Payload[0]);
break;
default:
throw new InvalidOperationException("Unknown event");
}
this.writer.WriteLine(output.ToString());
}
public override void Dispose()
{
this.writer.Close();
base.Dispose();
}
}
This code snippet from EtlDemo demonstrates how to use both listeners and have them listen to different keywords and levels:
var consoleListener = new ConsoleListener(
new SourceConfig[]
{
new SourceConfig(){
Name = "EtlDemo",
Level = EventLevel.Informational,
Keywords = Events.Keywords.General}
});
var fileListener = new FileListener(
new SourceConfig[]
{
new SourceConfig(){
Name = "EtlDemo",
Level = EventLevel.Verbose,
Keywords = Events.Keywords.PrimeOutput}
},
"PrimeOutput.txt");
long start = 1000000;
long end = start + 10000;
Events.Write.ProcessingStart();
for (long i = start; i < end; i++)
{
if (IsPrime(i))
{
Events.Write.FoundPrime(i);
}
}
Events.Write.ProcessingFinish();
consoleListener.Dispose();
fileListener.Dispose();
It first creates the two types of listeners and subscribes them to a different set of events. Then it logs some events and exercises the program.
The console output has just this:
ProcessingStart (1)
ProcessingFinish (2)
While the output file contains lines like this:
2014-03-08-15:21:31.424 - Informational - FoundPrime - 1,000,003
2014-03-08-15:21:31.425 - Informational - FoundPrime - 1,000,033
2014-03-08-15:21:31.425 - Informational - FoundPrime - 1,000,037
- Get Detailed EventSource Data
If you were paying attention in the previous couple of sections you will have noticed something interesting: our own event listener did not know the name of the event it was receiving, but PerfView somehow did. This is possible because every EventSource has a manifest associated with it. A manifest is just an XML description of the event source. Thankfully, .NET makes it easy to generate this manifest from an EventSource class.
string xml =
EventSource
.GenerateManifest(typeof(Events), string.Empty);
Here is the manifest for our own events defined previously:
<instrumentationManifest xmlns="http://schemas.microsoft.com/win/2004/08/events">
<instrumentation xmlns:xs="http://www.w3.org/2001/XMLSchema" xmlns:xsi="http://www.w3.org/2001/XMLSchema-instance" xmlns:win="http://manifests.microsoft.com/win/2004/08/windows/events">
<events xmlns="http://schemas.microsoft.com/win/2004/08/events">
<provider name="EtlDemo" guid="{458d4a63-7cc9-5239-62c4-f8aebbe597ac}" resourceFileName="" messageFileName="" symbol="EtlDemo">
<tasks>
<task name="FoundPrime" value="65531"/>
<task name="ProcessingFinish" value="65532"/>
<task name="ProcessingStart" value="65533"/>
</tasks>
<opcodes>
</opcodes>
<keywords>
<keyword name="General" message="$(string.keyword_General)" mask="0x1"/>
<keyword name="PrimeOutput" message="$(string.keyword_PrimeOutput)" mask="0x2"/>
</keywords>
<events>
<event value="1" version="0" level="win:Informational" keywords="General" task="ProcessingStart"/>
<event value="2" version="0" level="win:Informational" keywords="General" task="ProcessingFinish"/>
<event value="3" version="0" level="win:Informational" keywords="PrimeOutput" task="FoundPrime" template="FoundPrimeArgs"/>
</events>
<templates>
<template tid="FoundPrimeArgs">
<data name="primeNumber" inType="win:Int64"/>
</template>
</templates>
</provider>
</events>
</instrumentation>
<localization>
<resources culture="en-US">
<stringTable>
<string id="keyword_General" value="General"/>
<string id="keyword_PrimeOutput" value="PrimeOutput"/>
</stringTable>
</resources>
</localization>
</instrumentationManifest>
.NET is doing some behind-the-scenes magic for you to examine the types you use and generate the resulting manifest. For a more feature-rich logging system, you can parse this XML to get the names of the events and match them to the IDs, as well as the types of all the arguments.
- Custom PerfView Analysis Extension
Using the existing tools to capture and view events is all well and good, and you may never need to go beyond that, but if you want to automate in-depth performance analysis, one of the easiest ways is by analyzing ETW data and nothing makes that easier than using PerfView as an engine to drive it. By using PerfView, you can analyze the raw event stream, but the real power comes from taking advantage of its amazing grouping and folding functionality to generate filtered, relevant stacks for your application.
PerfView ships with its own sample project to get started with this and it is actually built-in to PerfView’s executable itself. To generate a sample solution, type the following at a command prompt:
PerfView.exe CreateExtensionProject MyProjectName
This will generate a solution file, project file, and sample source code file, complete with some code samples to get you started. Some examples of what you could do:
- Create a report showing you which assemblies use the most CPU. There is already a generated demo command that does exactly this.
- Automate a CPU analysis to export an XML file showing you the top most expensive stacks in your program, given some kind of criteria.
- Create views with complex folding and grouping schemes that you use frequently.
- Create a view that shows memory allocations for a specific operation in your program, where the operation is defined by your own custom ETW events.
With custom extensions and PerfView’s command-line mode (no GUI), you can easily create a scriptable profiling tool that gives you easy-to-analyze reports of the most interesting areas of your application.
Here’s a simple example that analyzes the frequency of the FoundPrime events from the EtlDemo sample program. I first captured the events with PerfView in a normal collection, using the *EtlDemo provider.
public void AnalyzePrimeFindFrequency(string etlFileName)
{
using (var etlFile = OpenETLFile(etlFileName))
{
var events = GetTraceEventsWithProcessFilter(etlFile);
const int BucketSize = 10000;
//Each entry represents BucketSize primes and how
//long it took to find them
List<double> primesPerSecond = new List<double>();
int numFound = 0;
DateTime startTime = DateTime.MinValue;
foreach (TraceEvent ev in events)
{
if (ev.ProviderName == "EtlDemo")
{
if (ev.EventName == "FoundPrime")
{
if (numFound == 0)
{
startTime = ev.TimeStamp;
}
var primeNumber = (long)ev.PayloadByName("primeNumber");
if (++numFound == BucketSize)
{
var elapsed = ev.TimeStamp - startTime;
double rate = BucketSize / elapsed.TotalSeconds;
primesPerSecond.Add(rate);
numFound = 0;
}
}
}
}
var htmlFileName = CreateUniqueCacheFileName(
"PrimeRateHtmlReport", ".html");
using (var htmlWriter = File.CreateText(htmlFileName))
{
htmlWriter.WriteLine("<h1>Prime Discovery Rate</h1>");
htmlWriter.WriteLine("<p>Buckets: {0}</p>",
primesPerSecond.Count);
htmlWriter.WriteLine("<p>Bucket Size: {0}</p>", BucketSize);
htmlWriter.WriteLine("<p>");
htmlWriter.WriteLine("<table border="1">");
for (int i = 0; i < primesPerSecond.Count; i++)
{
htmlWriter.WriteLine(
"<tr><td>{0}</td><td>{1:F2}/sec</td></tr>",
i,
primesPerSecond[i]);
}
htmlWriter.WriteLine("</table>");
}
OpenHtmlReport(htmlFileName, "Prime Discovery Rate");
}
}
You can run the extension with this command line:
PerfView userCommand MyProjectName.AnalyzePrimeFindFrequency
PerfViewData.etl
Everything after the extension name is passed into the method as the arguments.
The output will be a window in PerfView that looks like this:
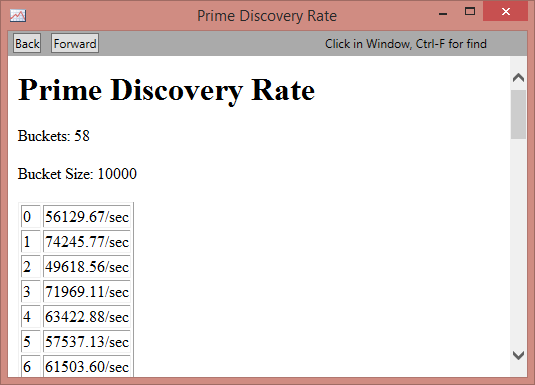
Figure 8-1. The HTML output of our custom ETW analysis.
Note that the extension capability is not an officially supported API. PerfView’s internal API has had breaking changes in the past and likely will so in the future.
- Summary
ETW events are the preferred method of logging discrete events in your application. They are ideal for both an application log as well as tracking detailed performance information.
In most cases, PerfView or another ETW analysis application will be able to provide all of the investigation tools you need, but if you want custom analysis, build a PerfView extension.