
A foolish consistency is the hobgoblin of little minds...
Validation is the process of assuring that the XML you create conforms to the rules of your structure, whether governed by a DTD, schema, or database structure. While "a foolish consistency" in philosophy may not be praiseworthy, a wise consistency in content creation may save you a lot of later effort.
When you validate your XML content, the assumption is that any other system using the same structural rules can use the XML you create. For solo content creators who are only making XML and storing it for their own uses, validation may not be necessary. But for anyone who is working with XML with the intent of passing along the content they create to other applications or processes, making sure that the XML is valid will be imperative.
Adobe has given you the ability to make mistakes when creating XML content, then go back and fix them by checking the content's validity against a DTD. If you need really robust validation while authoring XML content, InDesign may not be the right choice for your publishing needs. Adobe FrameMaker and other XML publishing applications that offer a guided content creation process (preventing you from inserting invalid structure in your document) will serve you better.
Consider InDesign as a tool for which validation should be done before importing XML (if possible), or frequently while creating XML structure within an InDesign document.
To use InDesign's validations features, you must first load a DTD. If your organization is using XML elsewhere, you may have been provided a DTD that you can use for creating XML in InDesign. If not, you may want to consider what type of DTDs already in existence would serve your needs.
DITA (for topic-based content that is suitable to repurpose as online help), NewsML (for news articles), and other useful rulesets for technical publishing, catalogs, theses, and scientific papers are available if you search online. I would advise the use of the simplest DTD you can find that will provide the minimum structure you need. Most DTDs have low-level structures (titles, subheads, tables, lists, links, images, and generic paragraphs) that will be very similar to HTML tags. More complex DTDs also provide "semantic" tags that help you understand the meaning of a piece of content, such as bylines, author names, product specifications, units of measure, mathematical equations, chemical structures, etc. Use the simplest DTD that will meet your needs, if you don't already have one.
It is best to work locally with a copy of the DTD, rather then pointing to a DTD on a remote server on the Internet. Save the DTD on your own computer in the folder with the InDesign documents, or in a common server that a group of content creators can access. Just remember two things: you should use the markup in the way that the DTD was intended (not by guessing, but by having documentation that explains how it is to be used), and you should never alter a DTD yourself if it is being used by a group of people.
To add a DTD to your InDesign document, simply open the Structure pane, click on the upper right corner arrow icon to get the Structure menu, then select Load DTD. Browse to where the DTD is located and select it. If you do this in an empty InDesign document, you will automatically get a root element tagged with the default <Root> element that InDesign provides. InDesign will load all of the tags from the DTD in alphabetical order into the Tags palette when you load the DTD. To apply the root element from your own XML tags, open the Tags palette, select the default <Root> element, and retag it with the real root element of your DTD.
After you have loaded the DTD and applied the correct tag to the root element, you can start authoring and validating as you go. Here is an example DTD:
<?xml version="1.0" encoding="UTF-8"?>
<!--DTD generated by XML Spy v4.3 U (http://www.xmlspy.com)-->
<!ELEMENT CourseDescriptions (CourseDescription_Major | CourseDescription)+>
<!ELEMENT CourseDescription_Major (#PCDATA)>
<!ELEMENT CourseDescription (CourseDescription_Name | CourseDescription_Text |
CourseDescription_Footnote)+>
<!ELEMENT CourseDescription_Name (#PCDATA)>
<!ELEMENT CourseDescription_Text (#PCDATA)>
<!ELEMENT CourseDescription_Footnote (#PCDATA)>
<!ATTLIST CourseDescription_Footnote
     type CDATA #REQUIRED
>
A simple DTD for course descriptions
This DTD states that I have a root element <CourseDescriptions> that can contain multiple <CourseDescription_Major> and <CourseDescription> elements. There aren't any structures inside a <CourseDescription_Major>, only text (PCDATA).
Within a <CourseDescription>, there are <CourseDescription_Name>, <CourseDescription_Text> and <CourseDescription_Footnote> elements. These elements don't contain any other element structures.
<CourseDescription_Footnote> has a required attribute of type (used mainly to indicate when there is a prerequisite for the course mentioned in the footnote).
(This is an extremely simple DTD. I will not go into detail about how to read DTDs and how to write them, but suggest that you read up on them online or in a book like XML Elements of Style.)
Create a text frame and tag it with the root element of your DTD by dragging the root element onto the text frame (use the Text selection tool when dragging). To see if the tag has been applied, use View>Structure>Show Tagged Frames.
Now, with the text cursor in the tagged text frame, select the square New Element icon in the top bar of the Structure pane. In the dialog that opens, select the next element that you need from the drop-down list (this can be very long for a complex DTD) and it will be added to the structure, indented below the root element.
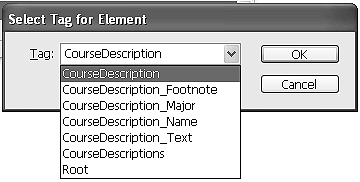
Figure 20. Adding an element with the Structure pane icon (by selecting a tag name from the drop-down list)
You can test if you added the first element that the DTD requires by clicking the Validation icon (lightning bolt). A subwindow appears at the bottom of the Structure pane and will display the words "no known errors" if you selected the correct element to add below your root element.
If you see that the element you inserted has turned red when you click the Validation icon, the validation window will display an error message and suggestions for how to fix the structure. If you click on the suggestion that you think will solve the validation problem, the suggested fix will be applied in the Structure pane. If it is correct according to the DTD, the element will no longer be red in the structure pane.
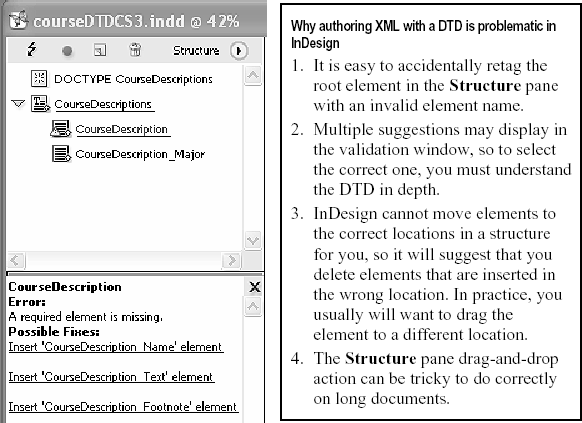
One problem with the suggestions that InDesign makes is that many of them are not helpful to the process of creating content quickly. For example, if I insert a <CourseDescription> element inside a <CourseDescription_Major> element, InDesign states that the element is not valid in that position in the structure, and suggests that I delete the element.

While this action will fix my problem, it is not the best solution. The DTD requires that the <CourseDescription> element be at the same level of indentation as the <CourseDescription_Major> (a "sibling" element, rather than a "child"). It would be better for me to move the <CourseDescription> element out of and below the <CourseDescription_Major> element, as my intention was to add a <CourseDescription> to the structure. To move an element, select it in the Structure pane, and drag it to the new location (the location where it will be dropped into the structure is indicated by a bold line).
If I validate the structure now, the <CourseDescription> element turns red and multiple suggestions are displayed in the validation window. InDesign recognizes that the <CourseDescription> element must contain other elements (for the name, descriptive text and footnotes) to be valid.
Note
Use Edit>View in Story Editor to see the element tags more clearly when you are not typing text within the elements. You can also add line breaks and rearrange (drag) elements in Story Editor View.
I can click each of the suggestions to insert the missing elements. InDesign will add them to the Structure in the order that I click the suggestions. Or, I can use the Add Element icon to insert the three subelements inside the <CourseDescription> element. I just select <CourseDescription> in the Structure pane, and then add the other elements one by one in the order that I want them to appear.
When I validate, this time the <CourseDescription_Major> and <CourseDescription> are not red, so it has been fixed. However, the <CourseDescription_Footnote> I added is red, and the validation window suggests that I add the required "type" attribute.
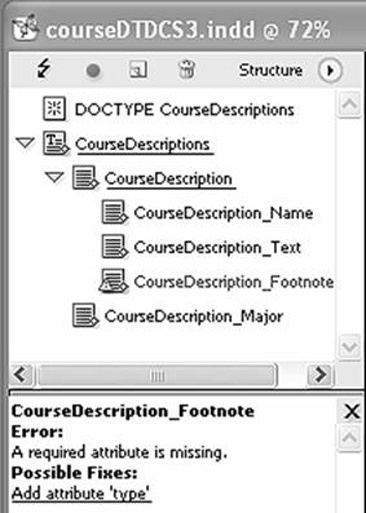
When I click the suggestion, an empty attribute name "type" is added to the <CourseDescription_Footnote>. When I click the Validation icon, the structure is now valid, even though I have not supplied any value for the "type" attribute."
If I double-click the "type" attribute, the Add Attribute dialog opens, and I can type in the value for this attribute, such as "prerequisite." I need to know what the choices are for the value of the attribute, if they are constrained, or whether I can put in any value I want (in this case, I can). So again, it is important to understand how your DTD works in detail to author valid XML in InDesign.
Many DTDs limit the occurrence and sequence of elements at different places in the structure they define. Only one element of a given kind, or a sequence of elements in a certain order, may determine how you author XML in InDesign. Such constraints add to the complexity of the validation process.
Note
Validate early and often when working with XML and DTDs for the first time. Once you have created a set of valid structures, you can write a procedure to follow so that your next XML document authoring session will be less difficult.
In the case of my DTD, the <CourseDescription_Major> and <CourseDescription> element can occur multiple times, and the sequence is not constrained. So, I can have a <CourseDescription> element before a <CourseDescription_Major> element, even though that is probably not what I really want. But I will resist the temptation to "improve" the DTD by adding more constraints to the structure model. Logically, any <CourseDescription> might be a child of a <CourseDescription_Major>, but there might be courses that are not associated with a major. The database model that was the origin of the elements for this DTD is not constrained in this regard, and I want to maintain synchronization with that database.
Note
Schemas (not DTDs) based on database tables can be generated from many database applications. InDesign does not support schemas, so you will need to use another XML tool to convert the schema to a DTD to use in InDesign.
As a reality check when working with a DTD, even when InDesign reports "no known errors," you can double-check the XML's validity. Export the XML with the choice to Include DTD declaration checked in the Export XML Options dialog.
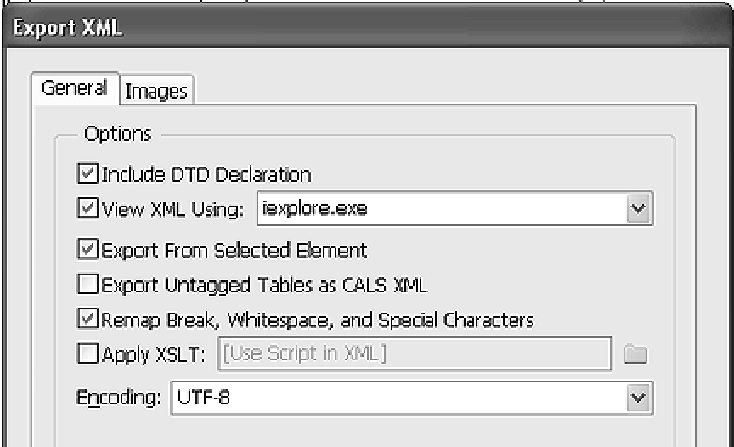
Now, the XML can be tested in another XML application that has validation capabilities. In XML Spy, the exported file opens without any warnings if the file is valid. Here is what my valid sample (empty) XML elements look like:
<?xml version="1.0" encoding="UTF-8" standalone="no"?>
<!DOCTYPE CourseDescriptions SYSTEM
"C:TextenergyoreillybooksshortCutcoursedescriptions.dtd">
<CourseDescriptions>
   <CourseDescription>
        <CourseDescription_Name/>
        <CourseDescription_Text/>
        <CourseDescription_Footnote type="whatever"/>
   </CourseDescription>
   <CourseDescription_Major/>
</CourseDescriptions>
Valid XML with DTD declaration exported from InDesign
There are many other things that you should know about working with DTDs, schemas, databases, and creating valid XML. Consider acquiring a book or researching these subjects online if you plan to become proficient in XML.
Once you have a block of elements that is valid, you can duplicate the structure to build your XML document more rapidly. Select an element structure that you want to copy in the Structure pane. Then, use Copy to put it on the clipboard. Select the copied element structure's parent element and Paste. The duplicate structure will be added to the end of the current structure of the parent element.
Note
Paste operations add content to the end of the parent structure. You can't Paste an element structure between other elements that are siblings. After you Paste, you have to drag the new structure if you want it in between existing sibling structures.
Duplicating is much faster than tagging plain text paragraphs with XML elements after you type the text. When you have created blocks of duplicate structures with Copy/Paste, you can switch to the Story Editor, and start typing text into the elements.
Note
Don't forget to switch back to the Layout view to see how your line breaks, spaces and tabs look on the page. While the Story Editor is great for seeing the start and end tags of your elements, it is easy to forget to insert breaks and have XML elements that run together on the page.
You should run the validation on any XML that you import into InDesign for which you have a DTD. With a large XML file, this can be problematic, because you will have a large number of suggestions in the validation window to work through. If possible, validate the XML before importing it into InDesign.
If there is no DTD available for you, you can create one from sample XML yourself. Start by making a list of the different information bits that will make up your content structure. For example, suppose that I am trying to get some personnel information into my course catalog. On looking at the text in the current unstructured document, I see that there are people who have administrative positions, people who are on various boards, people who have won awards, people who are on staff, and various types of teachers on the faculty. All of these people are employees except some of the board members. All of the faculty have their degrees, degree-granting institutions, and any special awards listed after their names. In another part of the catalog, these people are listed with phone numbers.
I can choose <personnel> as my root element (while knowing that a few people are technically not employees). Then I can have a <person> with <name> elements patterned on a standard model like <lastname> <firstname> <mi> and <honorific>. Each person can also have contact information (<phone>, <email>, etc.) and <degrees> containing <degree> and <institution> elements.
With this as a starting point, I can model the XML directly in InDesign. I work in much the same way that I did when I was using a DTD, except I don't do any validating as I go. Once I have a good example set of XML elements, I export the XML. Then with another XML tool, such as XML Spy or Oxygen, I generate a DTD based on the sample.
Once I have an initial DTD, I load it into my InDesign document that contains the sample XML content and validate the XML with it. Assuming that it validates, I continue to make XML to match the structure model of my DTD.
At some point in my development, someone may ask for a new element in the XML structure. Perhaps they want to add the teacher's department to each person who is a teacher, and an office location to each staff and administrative person. I can add this new element structure based on some database fields used for the college's online directory, or by looking at a printed directory to see what headings and information are in the directory that describe the locations of people on campus (like the building name and/or number, the floor, room or suite, etc.).
I now delete the current DTD from the Structure pane in InDesign because I don't want a lot of validation errors with my new structure. I add the <location> elements to the contact information for each person in a three-phase process:
First, I build a placeholder for the <location> structure with all the new elements I want in the first <person> element of my XML content. I export the XML again so that the new <location> structure is included in the sample XML that I use for DTD development.
Second, I regenerate a DTD with my other XML tool, then load it into my InDesign document, and validate the XML that contains my new structure. If I have made the new <location> structure required, every <person> element that is missing the <location> structure will now generate an error in the validation window.
Third, I repair the XML so that it will validate with the revised DTD. I can duplicate the first <location> structure by selecting it in the Structure pane and doing a copy/paste operation to add it to the other <person> element structures. Then I can validate again and continue fixing the structure until I see the "no known errors" message in the validation window.
Note
If you know how to work with XSLT, this would be faster than manually adding elements with a copy/paste operation. You can write a template that adds new XML structures to your existing XML file. Consult books such as XSLT Cookbook or online references on XSLT for more information on adding structures or modifying existing ones.
The process of creating the new structure, generating a revised DTD, and validating can be repeated as I make changes to the structure. At each iteration, I can demonstrate the XML to stakeholders to see if it meets their needs. Once everyone has agreed to a structure, I can annotate the final DTD with comments so that everyone knows what each element is and how many times it can occur and in what sequence. This documentation then gets distributed to anyone else who needs to create XML or use the XML that is being created.
Despite all your best efforts to document how the DTD should be used, and to train authors, someone will always create invalid XML content in InDesign. It simply does not provide enough XML authoring support in its current incarnation. If the content authors are struggling, you might investigate other XML authoring tools that help authors use a DTD. Adobe makes another product, FrameMaker, which provides guided authoring for XML based on a DTD. FrameMaker costs about the same as InDesign, but requires more expert assistance to set up for XML import and export than does InDesign. Or, if you search online, you will find a number of XML editors and authoring tools (freeware, shareware or commercial) that may meet your authoring needs and budget.
If you use a different XML authoring tool than FrameMaker or InDesign itself, you can still import the XML you create into InDesign to make a visually pleasing document. In this regard, InDesign provides sufficient functionality to be very useful for XML publishing. Validate the XML before you import it. Then use the techniques described in this Short Cut to map to Paragraph and Character styles.