
In the depths of a top secret research facility, a super-computer has gone rogue. It has reached out over the worldwide network and seized control of automated factories across the globe. In these factories, it has begun building tank-like robotic warriors.
In Robot Rampage, the player takes on the role of a robo-tank fighting for the good guys. The player moves from factory to factory, shutting down the computer-controlled manufacturing facilities and destroying the enemy robots.
Robot Rampage is a multi-axis game—the player's movement and weaponry are controlled separately, allowing them to move and fire in any combination of directions simultaneously.
In this chapter, we will begin constructing the Robot Rampage project, and explore the following topics:
Using a camera class to view a world larger than the game window
Creating a sprite class that is aware of coordinates in the larger world
Building a tile-based game world map
Building a player sprite from multiple component sprites
Using the Xbox 360 gamepad's thumb stick controllers
Collision detection between sprite objects and tile map squares
We looked at static classes in Chapter 5, Asteroid Belt Assault Special Effects, by creating a module to play sound effects that did not require class instances to be created or referenced in other areas of our code. We will expand on that technique in Robot Rampage, by defining several modules to handle components, such as the game's camera, effects manager, and shots manager.
In Visual Studio Express, create a new XNA 4.0 Windows Game project called Robot Rampage.
Download the
2403_06_GRAPHICSPACK.zipfile from the book's website, and extract the graphics resources to a temporary folder.In the Robot Rampage
Contentproject, create a new folder calledFonts.Add a new
SpriteFontcalledPericles14to theFontsfolder, updating the generated XML file to change the<FontName>toPericles.Also in the
Contentproject, create a new folder calledTextures.Add the graphics resources from the temporary directory to the
Texturesfolder.Copy the
SpriteSheet.pngandTitleScreen.pngfiles from the temporary folder you extracted them to in step 2 into theTexturesfolder, and add them to the project.In the declarations area of the
Game1class, add a declaration for the sprite sheet and font objects:Private spriteSheet As Texture2D Private titleScreen As Texture2D Private pericles14 As SpriteFont
In the Initialize() method of the Game1 class, add these lines to specify the size of the game window:
Me.graphics.PreferredBackBufferWidth = 800
Me.graphics.PreferredBackBufferHeight = 600
Me.graphics.ApplyChanges()
In the
LoadContent()method of theGame1class, initialize the sprite sheet and the font objects:spriteSheet = Content.Load(Of Texture2D)("TexturesSpriteSheet") titleScreen = Content.Load(Of Texture2D)("TexturesTitleScreen") pericles14 = Content.Load(Of SpriteFont)("FontsPericles14")
In both Flood Control and Asteroid Belt Assault, we dealt with game worlds limited to the area of the display window of the game. None of our game objects existed outside the confines of the screen, and, in fact, when we wished to eliminate some objects in Asteroid Belt Assault, we just moved them to an off-screen location, to allow the appropriate code manager to clean them up.
When dealing with a larger game world, we need to make a few adjustments to the way we think about object positions. Instead of simply tracking the location of a sprite on the screen, we will need to track the location of the object in world coordinates:

In this screenshot, the camera points to the upper-left corner of a viewport, within a larger game world. Anything inside the viewport will be visible on the screen, while background areas and objects outside the viewport will not be drawn.
Both the viewport and the game objects can move independently, so we can no longer consider objects that are off-screen to be ready, to be cleaned up, and removed from the game. An object that is off-screen during the current frame, may be moving towards an on-screen location, or alternatively, the camera may be moving towards the object, causing it to appear within the newly moved viewport.
In order to create our viewport into the game world, we will define a Camera module that will represent the view the player currently has of the game world. At its most basic, a camera is really nothing more than a vector pointing to the camera's location. In order to provide some additional functionality, we will add several other properties and methods to the Camera module.
Add a new module called
Camerato the Robot Rampage project.Add declarations to the
Cameramodule:#Region "Declarations" Private _position As Vector2 = Vector2.Zero Private _viewPortSize As Vector2 = Vector2.Zero #End Region
Add properties to the
Cameramodule, to access and modify the underlying members:#Region "Properties" Public Property WorldRectangle As Rectangle = New Rectangle(0,0,0,0) Public Property ViewPortWidth as Integer Get Return CInt(Int(_viewPortSize.X)) End Get Set(ByVal value As Integer) _viewPortSize.X = value End Set End Property Public Property ViewPortHeight As Integer Get Return CInt(Int(_viewPortSize.Y)) End Get Set(ByVal value As Integer) _viewPortSize.Y = value End Set End Property Public Property Position As Vector2 Get Return _position End Get Set(ByVal value As Vector2) _position = new Vector2( MathHelper.Clamp(value.X, WorldRectangle.X, WorldRectangle.Width - ViewPortWidth), MathHelper.Clamp(value.Y, WorldRectangle.Y, WorldRectangle.Height - ViewPortHeight)) End Set End Property Public ReadOnly Property ViewPort As Rectangle Get return new Rectangle( CInt(Int(Position.X)), CInt(Int(Position.Y)), ViewPortWidth, ViewPortHeight) End Get End Property #End Region
Add methods to the
Cameramodule:#region "Public Methods" Public Sub Move(offset As Vector2) Position += offset End Sub Public Function ObjectIsVisible(bounds As Rectangle) As Boolean Return ViewPort.Intersects(bounds) End Function Public Function Transform(point As Vector2) As Vector2 Return point - position End Function Public Function Transform(rect As Rectangle) As Rectangle Return new Rectangle( rect.Left - CInt(Int(position.X)), rect.Top - CInt(Int(position.Y)), rect.Width, rect.Height) End Function #End Region
In the
LoadContent()method of theGame1class, initialize theCamera, after the textures and sprite font have been loaded:Camera.WorldRectangle = new Rectangle(0, 0, 1600, 1600) Camera.ViewPortWidth = 800 Camera.ViewPortHeight = 600
The first thing to notice about this code is that we have included compiler directives to define code regions. These directives (#Region and #End Region) instruct the Visual Studio development environment to treat these code areas as blocks that are collapsible as a related unit. You can click on the little minus sign on the left side of the screen at the beginning of a region to collapse it, hiding the code and leaving behind just the region title. We will include region declarations in all of the classes in Robot Rampage as an example of their usage.
Note
Regions
Grouping your code into region blocks, known as Code Folding, can be a big help for readability purposes. If you give your regions descriptive names, you can keep them all collapsed until you need to work on a particular method or other code element. Finding the element you need is then as simple as expanding the region it is located in.
Our Camera module only needs three pieces of information to operate. The first is its position within the game world. This vector points to the upper-left corner of the viewing area represented by the camera. That is, if you think of the game world as a huge grid of pixels, the pixel pointed to by the _position vector is the pixel that will be drawn in the upper-left corner of the display area, when the camera is used to draw a scene.
The _viewPortSize vector represents the number of pixels to the right and down from the camera position that are covered by the viewing area. While this size defaults to zero during our game's initialization, we will set the size to match the size of the game's client window in the LoadContent() method. Together, the _position and _viewPortSize vectors can be thought of as defining a rectangle that represents the portion of the game world that is currently visible on the screen.
The last piece of information the Camera needs is the size of the game world itself. Unlike our other two variables, we have not created a backing field separate from the property declaration we wish to use. Instead, we simply declare the WorldRectangle property without a Get or Set block. This indicates to Visual Basic that we want to use an auto-implemented property. In the background, the Visual Basic compiler will create a backing field for us, by prefixing an underscore to the name of the property (_WorldRectangle in this case). We could use this field in our module code, if we wished to do so, even though we have not explicitly declared it.
The auto-implemented property will act as if we had created a full property with a simple get and set pair that returns the underlying field directly, and allows outside code to directly set the value of the field. In fact, the single line we have above is equivalent to:
Private _WorldRectangle As Rectangle = New Rectangle(0, 0, 0, 0)
Public Property WorldRectangle As Rectangle
Get
Return _WorldRectangle
End Get
Set(ByVal value As Rectangle)
_WorldRectangle = value
End Set
End Property
So, why not declare the other two values as auto-implemented properties? After all, it saves quite a bit of code! In this case, we need to place limits on what can be stored in the _position field, and we will not be directly exposing the _viewPortSize variable to outside code.
The WorldRectangle property defines the space in which all the objects in the game world will exist, and it is measured in pixels. Again, this value defaults to a zero-by-zero pixel game world, but will is set to our desired world sized in the LoadContent() method of the Game1 class.
Because the _position vector actually represents the upper-left corner of a rectangle (the visible screen) instead of a single point, we want to make sure that position remains not only within the game world, but also does not get any closer to the right or bottom edges of the game world than the width and height of the viewing area. In other words, if the game world is 1000x1000 pixels, and the display screen is 800x600 pixels, then the largest values we ever want for the components of the position vector are 200 for the X position and 400 for the Y position. If the camera were allowed to get closer to the edge of the game world, we would not have anything to display to the right or bottom of the game world's edges.
To enforce this limitation, we use MathHelper.Clamp() in the set portion of the Position property. This ensures that a full display of the game world will always be visible on the screen.
While external code could directly set the position of the camera through the Position property, we will generally prefer to use the Move() method to relocate the camera relative to its current position. Even though the Move() method is a member of the Camera module and could access the _position member directly, it uses the Position property just as external code would, allowing us to maintain the limitations that Position imposes without having to rewrite them in the Move() method.
Note
Accessing private members
This method of using the public properties to access your class' variables even from within the class' member methods is a good way to keep your code organized and make hunting down and dealing with bugs easier. As long as your properties are robust in their validation of data, using them in your methods prevents unchecked values from slipping in and disrupting other code.
When a game object is going to be drawn, we can check its display rectangle against the ObjectIsVisible() method of the Camera, to determine if any pixels in the object would be visible on the screen based on the camera's current position. If ObjectIsVisible() returns false, there is no need to draw the object, as all of its pixels are off screen. We will build this check into the updated Sprite object we construct, so that each sprite will check its own visibility and skip drawing itself, if it does not appear anywhere on the display.
Lastly, we have a pair of methods named Transform(). Given either a pixel location (as a Vector2) or a rectangle, the Transform() methods subtract the camera's current position from them and returns the result. To visualize the transformation of world coordinates into screen coordinates, let's return to the world and camera diagram we saw previously, with the addition of an object in the game world:
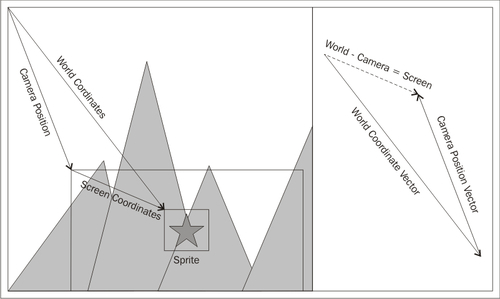
Here, we can see that the Sprite object's world coordinates represent its absolute position within the context of the game world. On the right side of the previous diagram, we can see that if the Camera Position vector is subtracted from the World Coordinate Vector, the resulting vector has the same direction and length as the Screen Coordinates vector. When this vector is placed relative to the upper-left corner of the screen, the position of the object in screen coordinates is given.
By storing the location of all of our game objects in world-based coordinates, the Camera's Transform() methods will provide screen-coordinate locations for the SpriteBatch.Draw() method, to display them in the appropriate locations.
This world coordinate focus means that the Sprite class we built for Asteroid Belt Assault will not work directly in the world of Robot Rampage. While all of the concepts are still valid, we need to build in ways to account for the world's camera and a game world larger than the screen. It is possible for a sprite object to be completely on screen, partially on screen, or completely off-screen.
In addition, while the sprite's world location may remain constant, the game's camera may move, requiring the on-screen location of the sprite to be adjusted to compensate for the camera's new position.
Add declarations to the
Spriteclass:#Region "Declarations" Public Texture As Texture2D Private _frames As List(Of Rectangle) = new List(Of Rectangle)() Private _currentFrame As Integer Private _frameTime As Single = 0.1 Private _timeForCurrentFrame As Single = 0.0 Private _rotation as Single = 0.0 #End Region
Add position-related properties to the
Spriteclass:#Region "Positional Properties" Public Property WorldLocation as Vector2 = Vector2.Zero Public Property Velocity as Vector2 = Vector2.Zero Public ReadOnly Property ScreenLocation As Vector2 Get Return Camera.Transform(WorldLocation) End Get End Property Public ReadOnly Property WorldRectangle as Rectangle Get return new Rectangle( CInt(Int(WorldLocation.X)), CInt(Int(WorldLocation.Y)), FrameWidth, FrameHeight) End Get End Property Public ReadOnly Property ScreenRectangle As Rectangle Get Return Camera.Transform(WorldRectangle) End Get End Property Public ReadOnly Property RelativeCenter As Vector2 Get Return New Vector2(FrameWidth / 2.0F, FrameHeight / 2.0F) End Get End Property Public ReadOnly Property WorldCenter As Vector2 Get Return WorldLocation + RelativeCenter End Get End Property Public ReadOnly Property ScreenCenter As Vector2 Get Return Camera.Transform(WorldLocation + RelativeCenter) End Get End Property #End Region
Add properties related to drawing and animating the sprite to the
Spriteclass:#Region "Drawing and Animation Properties" Public Property Animate As Boolean = True Public Property AnimateWhenStopped as Boolean = True Public Property Expired as Boolean = False Public Property TintColor As Color = Color.White Public Property Rotation As Single Get Return _rotation End Get Set(ByVal value As Single) _rotation = value Mod MathHelper.TwoPi End Set End Property Public ReadOnly Property FrameWidth as Integer Get Return _frames(0).Width End Get End Property Public ReadOnly Property FrameHeight As Integer Get Return _frames(0).Height End Get End Property Public Property Frame As Integer Get Return _currentFrame End Get Set(ByVal value As Integer) _currentFrame = CInt(Int(MathHelper.Clamp(value, 0, _frames.Count - 1))) End Set End Property Public Property FrameTime as Single Get Return _frameTime End Get Set _frameTime = MathHelper.Max(0, value) End Set End Property Public ReadOnly Property Source As Rectangle Get Return _frames(_currentFrame) End Get End Property #End Region
Add properties related to collision detection to the
Spriteclass:#Region "Collision Related Properties" Public Property Collidable As Boolean = True Public Property CollisionRadius As Integer = 0 Public Property BoundingXPadding As Integer = 0 Public Property BoundingYPadding As Integer = 0 Public ReadOnly Property BoundingBoxRect As Rectangle Get return new Rectangle( CInt(Int(worldLocation.X)) + BoundingXPadding, CInt(Int(worldLocation.Y)) + BoundingYPadding, FrameWidth - (BoundingXPadding * 2), FrameHeight - (BoundingYPadding * 2)) End Get End Property #End Region
Add a constructor for the
Spriteclass:#Region "Constructors" Public Sub New( worldLocation As Vector2, texture As Texture2D, initialFrame As Rectangle, velocity As Vector2) Me.WorldLocation = worldLocation Me.Texture = texture Me.Velocity = velocity _frames.Add(initialFrame) End Sub #End Region
Add collision detection methods to the
Spriteclass:#Region "Collision Detection Methods" Public Function IsBoxColliding(OtherBox As Rectangle) As Boolean If (Collidable) And (Not Expired) Then Return BoundingBoxRect.Intersects(OtherBox) Else Return False End If End Function Public Function IsCircleColliding( otherCenter As Vector2, otherRadius As Single) As Boolean If (Collidable) And (Not Expired) Then If Vector2.Distance(WorldCenter, otherCenter) < (CollisionRadius + otherRadius) Return True Else Return False End If Else Return false End If End Function #End Region
Add animation-related methods to the
Spriteclass:#Region "Animation-Related Methods" Public Sub AddFrame(frameRectangle As Rectangle) _frames.Add(frameRectangle) End Sub Public Sub RotateTo(direction As Vector2) Rotation = CSng(Math.Atan2(direction.Y, direction.X)) End Sub #End Region
Add the
Update()andDraw()methods to theSpriteclass:#Region "Update and Draw Methods" Public Overridable Sub Update(gameTime As GameTime) If Not Expired Then Dim elapsed As Single elapsed = CSng(gameTime.ElapsedGameTime.TotalSeconds) _timeForCurrentFrame += elapsed If Animate Then If _timeForCurrentFrame >= FrameTime Then If (AnimateWhenStopped) Or (velocity <> Vector2.Zero) Then _currentFrame = (_currentFrame + 1) Mod _frames.Count _timeForCurrentFrame = 0.0F End If End If End If WorldLocation += (Velocity * elapsed) End If End Sub Public Overridable Sub Draw(spriteBatch As SpriteBatch) If Not Expired Then If Camera.ObjectIsVisible(WorldRectangle) Then spriteBatch.Draw( Texture, ScreenCenter, Source, TintColor, Rotation, RelativeCenter, 1.0F, SpriteEffects.None, 0.0F) End If End If End Sub #End Region
The Sprite class is presented in one large block here, because most of the code should be familiar (if slightly reorganized) from the same class in Asteroid Belt Assault. A few updates have been made to the code, however, so let's go over those changes in detail.
To start with, we have made use of auto-implemented properties wherever we can, including the WorldLocation property, which has replaced the Location property from the previous version of the Sprite class. The renaming of this property really just serves as a reminder that the coordinates are world-aligned instead of screen-aligned.
Several new member variables and properties have been added to the class as well. Animate and AnimateWhenStopped are checked during the sprite's Update() method. If Animate is false, the sprite will not advance frame animations. If AnimateWhenStopped is set to false, the sprite will not advance its frame animations, if the Velocity vector is equal to Vector2.Zero. This simply means that when the sprite is moving, its animation will play (assuming Animate is true). When the sprite is not moving, its animation will not play.
If Expired is set to true, the sprite will not be updated or drawn. In addition, the BoxCollision() and CircleCollision() methods will always return false for expired sprites. If the Collidable member is set to false, both of the collision methods will also return false.
The WorldLocation property has a new counterpart called ScreenLocation. This property uses the Camera.Transform() method to return the screen-based location of the object and is used in the Draw() method, to determine where on the screen the sprite should be displayed.
Similarly, the Destination property (which, in Asteroid Belt Assault, returned the rectangle on the screen that the sprite was drawn to) has been split into WorldRectangle and ScreenRectangle, and the Center property has been split into WorldCenter and ScreenCenter.
As a helper to assist in calculating the center of the sprite object, the RelativeCenter property has been introduced, which returns a vector equal to half of the width and height of the sprite's frame rectangle. This vector points to the center of the sprite relative to its own upper-left corner.
Note
CInt versus. Int versus Fix
In the Sprite class, we have begun using a rather odd looking "CInt(Int(…))" structure in the code for the Sprite class. This is due to the way the various conversion to integer functions handle rounding. This has not been an issue in the past, so we just used CInt(), which performs rounding on the values passed to it. CInt(1.4) will result in a value of 1, while CInt(1.6) will result in a value of 2. This can throw-off some of our calculations, later, when we wish to determine what square a sprite is in, or when we determine what map squares to draw.
For this reason, we use Int(), which does not round numbers, and simply truncates the fractional portion of the value. For positive numbers, the Fix() function does exactly the same thing that Int() does. For negative numbers, Int() returns the first negative integer less than or equal to the number (Int(-1.5) will return -2), while Fix() returns the first negative number greater than or equal to the number (Fix(-1.5) will return -1).
In either case, though, Int() and Fix() return the same data type as was submitted to them. So performing an Int() on a Single returns a Single, containing only the whole number portion of the value. We still need to convert this variable's data type to an Integer, which is why we surround the call with a CInt() function call. This drops the fractional part of the number first, and then returns the result as an Integer variable.
We now have both of the components we need for a "larger than the screen" world for our game, so let's add a few lines of temporary code to our project to get a feel for how they work together. Throughout the project, we will be expanding on or adding new temporary code segments to see the objects we have implemented in action.
In the declarations area of the
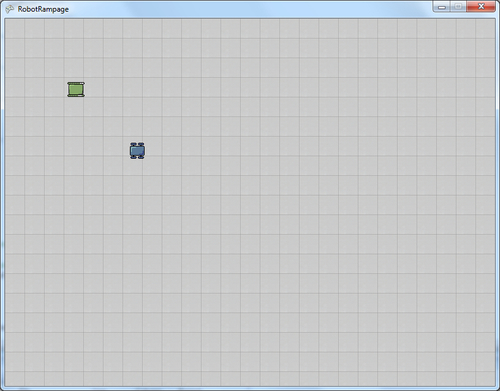
Game1class, add a declaration for a temporary sprite object:' Temporary Demo Code Begin Private tempSprite As Sprite Private tempSprite2 As Sprite ' Temporary Demo Code End
In the
LoadContent()method of theGame1class, initialize the temporary sprite and theCameraclass:' Temporary Demo Code Begin tempSprite = New Sprite( New Vector2(100, 100), spriteSheet, New Rectangle(0, 64, 32, 32), Vector2.Zero) tempSprite2 = New Sprite( New Vector2(200,200), spriteSheet, New Rectangle(0, 160, 32, 32), Vector2.Zero) ' Temporary Demo Code End
In the
Draw()method of theGame1class, draw the temporary sprite:' Temporary Demo Code spriteBatch.Begin() tempSprite.Draw(spriteBatch) tempSprite2.Draw(spriteBatch) spriteBatch.End() ' Temporary Demo Code End
In the
Update()method of theGame1class, add temporary input handling to allow the sprite and the camera to be moved:' Temporary Demo Code Begin Dim spriteMove As Vector2 = Vector2.Zero Dim cameraMove As Vector2 = Vector2.Zero If Keyboard.GetState().IsKeyDown(Keys.A) Then spriteMove.X = -1 End If If Keyboard.GetState().IsKeyDown(Keys.D) Then spriteMove.X = 1 End If If Keyboard.GetState().IsKeyDown(Keys.W) Then spriteMove.Y = -1 End If If Keyboard.GetState().IsKeyDown(Keys.S) Then spriteMove.Y = 1 End If If Keyboard.GetState().IsKeyDown(Keys.Left) Then cameraMove.X = -1 End If If Keyboard.GetState().IsKeyDown(Keys.Right) Then cameraMove.X = 1 End If If Keyboard.GetState().IsKeyDown(Keys.Up) Then cameraMove.Y = -1 End If If Keyboard.GetState().IsKeyDown(Keys.Down) Then cameraMove.Y = 1 End If Camera.Move(cameraMove) tempSprite.Velocity = spriteMove * 60 tempSprite.Update(gameTime) tempSprite2.Update(gameTime) ' Temporary Demo Code End
Launch the game. Use the W, A, S, and D keys to move the first sprite around, and use the arrow keys to move the camera around.
Leave the temporary code in place. We will expand on it a bit later, before replacing it with the actual code for the
Game1class.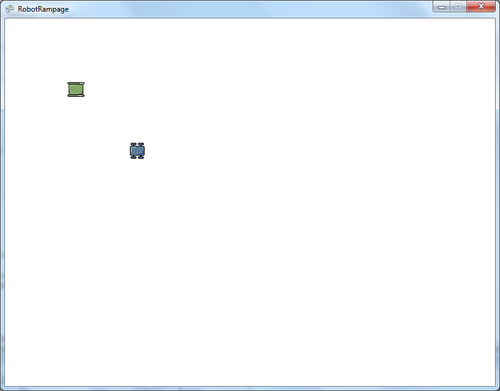
If you play with the previous temporary code for a few minutes, you will see that the W, A, S, and D keys move the first sprite (the green tank base) as expected: A moves left, D moves right, W moves up, and S moves down. There is no way to directly move the second sprite (the blue tank base), because the temporary Update() method does not define a set of controls for tempSprite2.
Using the arrow keys moves the camera instead of either of the sprites. In world coordinates, the second sprite is always stationary. It only moves on the screen, because the camera is panning around, altering the player's view of the game world. You will also notice that you cannot move the camera left or up from the starting position. This is because the camera is clamped to the world area, and starts out in the upper-left corner.
At a screen size of 800x600 pixels, an image filling the screen contains 480,000 individual pixels. If these pixels are stored as 32-bit values (8 bits each for red, green, blue, and alpha) this means that each screen of pixels occupies 1875 kilobytes of memory. That does not sound too bad on the surface—after all, computers have lots of memory, and 1.8 megabytes for an image is not all that much memory.
In that case, when making a world that is larger than a single screen, why not just make a huge bitmap to use as the background and scroll across it? Unfortunately, there are a couple of problems with this approach.
First, many graphics cards have a maximum texture size. On Windows, 2048x2048 is a common texture size limitation, though some graphics cards have higher limits. The Xbox 360 is limited to textures that are 8192x8192 pixels.
Second, once the bitmap image representing the world has been defined, it is fixed. When you create the image, you create all of the details of the world and save the bitmap. You cannot re-arrange pieces of the world at run time, which will be vital when we want to generate random maps for Robot Rampage.
Let's consider the 2048 limitation for a moment. If we create our world out of a single texture 2048 pixels wide, the world can be a little larger than two screens wide and three screens tall at a resolution of 800x 600. This does not offer much room for the player to roam, and the resulting texture would occupy 16 megabytes of memory.
To generate very large worlds, we need an alternative method. One of the most common ways is to use a tile-based engine. In a tile engine, the world is made up of a grid of blocks. Each block has a tile value that represents the image that should be displayed within it.
Note
Complex tile engines
Tile engines have long been a staple of 2D game design. From role playing games to side-scrolling platformers and real-time strategy games, the ability to represent a game map or level as an array of tile indexes makes them very flexible. Advanced tile engines can support multiple layers of tiles, each tile in a space drawing above the previous layer to create a depth effect where objects (rocks and trees, for example) can be placed on top of basic terrain tiles, without needing to draw individual tiles for the object on every type of terrain background in the game. We will look at a multi-layered tile engine in Chapter 8,Gemstone Hunter - Put on Your Platform Shoes.
When the tile engine needs to be drawn to the screen, we can extract only the individual tiles that are currently visible to the camera and draw them, leaving the rest of the map unrendered.
For Robot Rampage, we will create a basic tile engine that supports a single layer of tiles, drawn from a handful of floor and wall tile images on the SpriteSheet.png image. We will define a world that is 50x50 map squares in size, each composed of a 32x32 pixel block. The result will be a world that occupies 1600x 1600 virtual pixels. Unlike a single bitmap of that size, which would occupy about 10 megabytes of memory, our map will use about 42 kilobytes of memory, including the map data itself as well as the image data comprising the tiles used to draw the map.
A tile map is composed of a grid of squares, each one containing a reference to the tile that we wish to display in that map square. The tile itself is simply a rectangular texture that contains the visual representation of a terrain or background type.
In Robot Rampage, we will only need a handful of tile textures. We will have a few variations of floor textures to represent the factory floor, and a handful of wall and machinery textures to represent barriers:
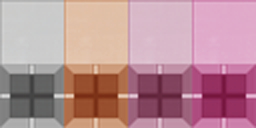
As before, we will use a single texture sheet that will contain all of the images used by our game. The first row of images on the SpriteSheet.png file represents floor tiles, while the second row represents wall-type images. When we generate a game map, we will select a random floor and wall combination for each level.
From an XNA standpoint, we will define each of the tiles available to our tile map as a rectangle. These rectangles will be stored in a numerically indexed list. This allows each of the tiles to be referenced by their index number.
Since we can refer to an individual tile by using its tile index number, our tile map can be represented as a two-dimensional array of integers, with each integer corresponding to the index of the tile associated with that map square.
We have four different floor textures and four different wall textures, so the values stored in the tile map array will range from zero to seven. Any value greater than three will be treated as a barrier, while tiles zero through three will not block movement or shots:
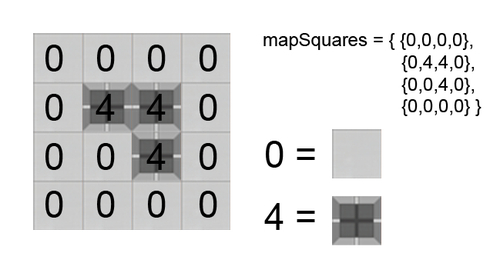
In the previous diagram, mapSquares is a two-dimensional array of integers. A zero value in the array corresponds to the empty floor tile, while a four corresponds to a wall tile image. When the map is drawn, each integer in the array is examined, and the image corresponding to the tile index is drawn to the screen to occupy that square's display area.
Add a new module called
TileMapto the Robot Rampage project.Add declarations to the
TileMapmodule:#Region "Declarations" Public Const TileWidth As Integer = 32 Public Const TileHeight As Integer = 32 Public Const MapWidth As Integer = 50 Public Const MapHeight As Integer = 50 Public Const FloorTileStart As Integer = 0 Public Const FloorTileEnd As Integer = 3 Public Const WallTileStart As Integer = 4 Public Const WallTileEnd As Integer = 7 Private _texture As Texture2D Private _tiles As List(Of Rectangle) = new List(Of Rectangle)() Private _mapSquares(MapWidth, MapHeight) As Integer Private _rand As Random = new Random() #End Region
Add the
Initialize()method to theTileMapclass:#Region "Initialization" Public Sub Initialize(texture As Texture2D) _texture = texture _tiles.Clear() _tiles.Add(New Rectangle(0, 0, TileWidth, TileHeight)) _tiles.Add(New Rectangle(32, 0, TileWidth, TileHeight)) _tiles.Add(New Rectangle(64, 0, TileWidth, TileHeight)) _tiles.Add(New Rectangle(96, 0, TileWidth, TileHeight)) _tiles.Add(New Rectangle(0, 32, TileWidth, TileHeight)) _tiles.Add(New Rectangle(32, 32, TileWidth, TileHeight)) _tiles.Add(New Rectangle(64, 32, TileWidth, TileHeight)) _tiles.Add(New Rectangle(96, 32, TileWidth, TileHeight)) For x As Integer = 0 to MapWidth - 1 For y As Integer = 0 to MapHeight - 1 _mapSquares(x,y) = FloorTileStart Next Next End Sub #End Region
Most of the declarations for the TileMap class are constants that define the dimensions of the individual tiles, the size of the map, and the meanings of the tile index numbers.
In our case, each tile is 32x32 pixels, and the map will be 50 tiles wide and 50 tiles high, resulting in 2,500 individual map squares.
The _tiles list contains a set of rectangles that correspond to the locations of each individual tile on the texture image. When a rectangle is added to the tiles list, it will automatically receive an index number. The first tile added will be index zero, the second will be index one, and so on.
It is these index numbers that we will store in the _mapSquares array to indicate what type of terrain should be displayed for each square on the map. When the Initialize() method is executed, eight rectangles are added to the tiles list. Each of these rectangles corresponds to the position of one of the tiles on the game's sprite sheet.
In the declarations area, we determined that the first four tiles (numbers zero through three) would be floor tiles, while the second set of four tiles will be considered wall tiles by the game's code.
After adding the tiles to the list, the Initialize() method loops through each square in the _mapSquares array, and sets it to the first of the floor tile indexes. This way we start with a known, empty map.
We need to make a distinction between squares and tiles as we use them in our code. We will use square to refer to a location within the _mapSquares array, while we will use tile to refer to the index number stored in a particular square.
Our first set of methods for the TileMap module deal with squares, providing methods for locating squares based on pixel positions, and providing locations in both world and screen coordinates for squares on the map.
Add methods to the
TileMapmodule that deal with map squares and translate pixel coordinates into map square references:#Region "Information about Map Squares" Public Function GetSquareByPixelX(pixelX As Integer) As Integer Return CInt(Int(pixelX / TileWidth)) End Function Public Function GetSquareByPixelY(pixelY As Integer) As Integer Return CInt(Int(pixelY / TileHeight)) End Function Public Function GetSquareAtPixel(pixelLocation As Vector2) As Vector2 Return New Vector2( GetSquareByPixelX(CInt(Int(pixelLocation.X))), GetSquareByPixelY(CInt(Int(pixelLocation.Y)))) End Function Public Function GetSquareCenter( squareX As Integer, squareY As Integer) As Vector2 Return New Vector2( (squareX * TileWidth) + (TileWidth / 2.0F), (squareY * TileHeight) + (TileHeight / 2.0F)) End Function Public Function GetSquareCenter(square As Vector2) As Vector2 Return GetSquareCenter(CInt(Int(square.X)), CInt(Int(square.Y))) End Function Public Function SquareWorldRectangle( x As Integer, y As Integer) As Rectangle Return New Rectangle( x * TileWidth, y * TileHeight, TileWidth, TileHeight) End Function Public Function SquareWorldRectangle(square As Vector2) As Rectangle Return SquareWorldRectangle( CInt(Int(square.X)), CInt(Int(square.Y))) End Function Public Function SquareScreenRectangle( x As Integer, y As Integer) As Rectangle Return Camera.Transform(SquareWorldRectangle(x, y)) End Function Public Function SquareScreenRectangle(square As Vector2) As Rectangle Return SquareScreenRectangle( CInt(Int(square.X)), CInt(Int(square.Y))) End Function #End Region
Our first two methods, GetSquareByPixelX() and GetSquareByPixelY(), allow us to convert world-based pixel coordinates to map square references. Given a pixel reference, they simply divide it by either the width of a single tile (for X coordinates), or the height of a tile (for Y coordinates), and return the resulting value. Several of our other methods will make use of these methods to convert pixel parameters into square references.
GetSquareAtPixel() in fact, does just that. Given a vector pointing to a pixel location, it returns a vector containing a reference to the square within the _mapSquares array that corresponds to that pixel location. Given that our map is 50x50 squares, the resulting vector will contain X and Y coordinates between 0 and 49.
When the time comes to build our enemy AI, the computer-controlled robotic tanks will need to be able to navigate their way between squares. In order to facilitate this, we need to be able to determine the center of any particular square in world coordinates. GetSquareCenter() calculates this vector for us, by multiplying the X and Y square coordinates by the tile width and height, and adding half of a tile width and height to the result.
Note
Overloads
Several of the overload methods in the TileMap module simply manipulate the passed parameters and call another overload method of the same name. For example, GetSquareCenter() has an overload that accepts a Vector2 instead of individual X and Y components. The vector version simply calls the individual component version, passing in the split components of the vector.
This prevents you from writing (and therefore having to maintain) the code in each individual overload. After all, you never know when you are going to want to change something, and having to update it in one place is much less prone to introducing bugs than having to make the same update in several locations—not to mention easier!
The SquareWorldRectangle() methods answer the question What pixels on the world map does this square occupy? We will need to know this when the time comes to determine if something has collided with a wall on the map.
Finally, the SquareScreenRectangle() methods provide the same information, but in localized screen coordinates. This information will be used in the Draw() method when rendering each square's tile to the display.
The tile index that a square contains determines what eventually gets drawn out to the screen, when that square is visible in the game window. In addition to simply determining what tile is located in a particular square, we will include helper methods to quickly determine if a particular square contains a wall tile or not.
Add methods to the
TileMapmodule that relate to reading and setting the tile index associated with individual map squares:#Region "Information about Map Tiles" Public Function GetTileAtSquare( tileX As Integer, tileY As Integer) As Integer If ((tileX >= 0) And (tileX < MapWidth) And (tileY >= 0) And (tileY < MapHeight)) Then Return _mapSquares(tileX, tileY) Else Return -1 End If End Function Public Sub SetTileAtSquare( tileX As Integer, tileY As Integer, tile As Integer) If ((tileX >= 0) And (tileX < MapWidth) And (tileY >= 0) And (tileY < MapHeight)) Then _mapSquares(tileX, tileY) = tile End If End Sub Public Function GetTileAtPixel( pixelX As Integer, pixelY As Integer) As Integer Return GetTileAtSquare( GetSquareByPixelX(pixelX), GetSquareByPixelY(pixelY)) End Function Public Function GetTileAtPixel(pixelLocation As Vector2) AS Integer Return GetTileAtPixel( CInt(Int(pixelLocation.X)), CInt(Int(pixelLocation.Y))) End Function Public Function IsWallTile( tileX As Integer, tileY As Integer) As Boolean Dim tileIndex As Integer = GetTileAtSquare(tileX, tileY) If tileIndex = -1 Then Return False End If Return tileIndex >= WallTileStart End Function Public Function IsWallTile(square As Vector2) As Boolean Return IsWallTile(CInt(Int(square.X)), CInt(Int(square.Y))) End Function Public Function IsWallTileByPixel( pixelLocation As Vector2) As Boolean Return IsWallTile( GetSquareByPixelX(CInt(Int(pixelLocation.X))), GetSquareByPixelY(CInt(Int(pixelLocation.Y)))) End Function #End Region
At the most basic level, we need to be able to determine the tile index associated with any particular square on the map. GetTileAtSquare() provides this information, and the corresponding SetTileAtSquare() allows the index of any square to be changed.
For convenience, the GetTileAtPixel() methods combine the GetTileAtSquare() along with the GetSquareByPixel() methods we have already established. They do not contain any additional processing themselves, but provide more convenient access to tile information rather than having to do the pixel to tile conversions in external code, every time we want to access tile information.
Finally, IsWallTile() and IsWallTileByPixel() examine the contents of the given square, and return true if the tile index is greater than or equal to the first defined wall tile index (WallTileStart). Again, we could do this check externally, but since we will often need to know if a tile is a wall, it is convenient to summarize all of the checking into a single set of methods.
Add the
Draw()method to theTileMapmodule:#Region "Drawing" Public Sub Draw(spriteBatch As SpriteBatch) Dim startX As Integer = GetSquareByPixelX(CInt(Int(Camera.Position.X))) Dim endX As Integer = GetSquareByPixelX( CInt(Int(Camera.Position.X)) + Camera.ViewPortWidth) Dim startY As Integer = GetSquareByPixelY(CInt(Int(Camera.Position.Y))) Dim endY As Integer = GetSquareByPixelY( CInt(Int(Camera.Position.Y)) + Camera.ViewPortHeight) For x As Integer = startX to endX For y As Integer = startY to endY If ((x >= 0) And (y >= 0) And (x < MapWidth) And (y < MapHeight)) Then spriteBatch.Draw( _texture, SquareScreenRectangle(x, y), _tiles(GetTileAtSquare(x,y)), Color.White) End If Next Next End Sub #End Region
In the
LoadContent()method of theGame1class, initialize theTileMapmodule (outside of the temporary code block, after theSpriteSheethas been loaded):TileMap.Initialize(spriteSheet)
In the
Draw()method of theGame1class, modify the temporary code you added when building the camera to read:' Temporary Demo Code Begin spriteBatch.Begin() TileMap.Draw(spriteBatch) tempSprite.Draw(spriteBatch) tempSprite2.Draw(spriteBatch) spriteBatch.End() ' Temporary Demo Code End
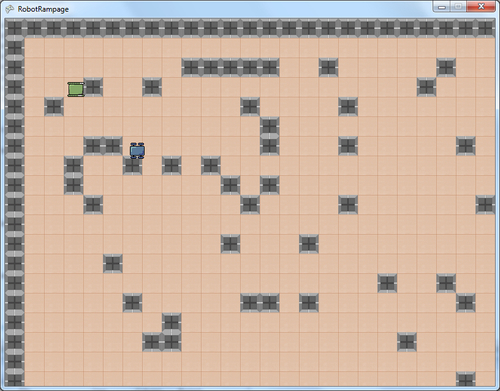
Launch your game. You can now use the temporary camera movement keys (the arrow keys) to scroll around the tile-based map:
The Draw() method begins by establishing four integer variables that will be used to control the loop that will output the tiles to the screen. We normally would not split and create separate variables for these control values. It would be more common to include the calculation directly into the for loop itself. In this case, however, the expressions are long enough that they are split here to make them more readable.
The startX and startY values are simple to obtain—simply divide the X and Y position of the camera by the size of a tile, and you know what tile is in the upper-left corner of the screen. To get the rightmost and bottommost tiles that need to be drawn, we just need to add the width and height of the viewport to the camera position. This will give us the tile in the lower right corner, defining the entire range of tiles that need to be drawn to the screen.
Why not just draw the whole thing? With a map size of only 50x50 tiles, drawing the whole map would be unlikely to have a detrimental impact on the performance of our game, but it would also be unnecessary. The large majority of the draw calls would simply be wasted on squares that are outside the display area. XNA does not have any issue with drawing outside the display—your game will not crash—but if you were to make the game world larger, you would reach a point where drawing the whole map would start to negatively impact the frame rate of the game.
The actual drawing loop checks to make sure that the tile we are going to draw actually exists (it always should since we limit the movement of the camera, but it is rarely a bad idea to verify before attempting the draw) and uses the SpriteBatch.Draw() method to output the tile to the screen.
Add the
GenerateRandomMap()method to theTileMapmodule:#Region "Map Generation" Public Sub GenerateRandomMap() Dim wallChancePerSquare As Integer = 10 Dim floorTile As Integer floorTile = _rand.Next(FloorTileStart, FloorTileEnd + 1) Dim wallTile As Integer wallTile= _rand.Next(WallTileStart, WallTileEnd + 1) For x As Integer = 0 to MapWidth - 1 For y As Integer = 0 to MapHeight - 1 _mapSquares(x, y) = floorTile If ((x = 0) Or (y = 0) Or (x = MapWidth - 1) Or (y = MapHeight - 1)) Then _mapSquares(x, y) = wallTile Continue For End If If ((x = 1) Or (y = 1) Or (x = MapWidth - 2) Or (y = MapHeight - 2)) Then Continue For End If If _rand.Next(0, 100) <= wallChancePerSquare Then _mapSquares(x, y) = wallTile End If Next Next End Sub #End Region
Modify the
Initialize()method of theTileMapmodule, by adding a call toGenerateRandomMap()as the last line in the method:GenerateRandomMap()
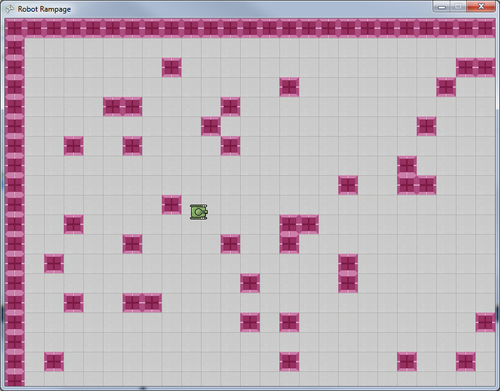
Execute the game project, and view the randomly generated map:
The GenerateRandomMap() method selects one floor and one wall tile to use for this map, resulting in a random combination each time a map is generated. It then loops through each of the tiles on the map and sets them initially to the floorTile value generated previously.
Next, the method checks to see if the tile is one of the outside edges of the map (x equal to either zero or the width of the map minus 1, or y equal to zero or the height of the map minus 1). If any of these conditions are true, the map square is automatically set to a wall tile. Similarly, the second row of tiles around the map (x or y equal to one or the width/height minus two) are skipped over for wall generation, ensuring that the map will always contain a single layer of wall tiles around the outside edge, and a clear layer of floor tiles inside that.
For all other squares, a random number is generated and compared to wallChancePerSquare. If the random value indicates that a wall should be placed at the square, the tile map is updated appropriately.
So, we now have a working tile map, and what looks like a piece of a robotic vehicle that we can move around on the map. However, there are a number of issues right now:
The robot we can move around simply floats around without animation or direction.
Our floating sprite does not obey any kind of screen or world limitations. It will happily fly off into oblivion if you hold down the movement keys.
Similarly, the sprite is not blocked by wall tiles. It will float right over them.
Moving the sprite to the right or bottom edges of the screen doesn't scroll the camera to follow the sprite. Our camera is currently controlled by a separate set of movement keys.
In order to begin addressing these issues, we need to construct a class for the player's robo-tank. If you look at the SpriteSheet.png image, you will see that the player's robot is split into a couple of pieces. The treaded base that we currently have floating around on the screen will provide the base for the player's character:

On top of the base, we will place one of the available gun turrets located below the tank base on the sprite sheet. Both the base and the turret will rotate independently, allowing the user to move and fire in any combination of directions.
Add a new module called
Playerto the Robot Rampage project.Add declarations to the Player module:
#Region "Declarations"
Public BaseSprite As Sprite
Public TurretSprite As Sprite
#End Region
Add the
Initialize()method to thePlayermodule:#Region "Initialization" Public Sub Initialize( texture As Texture2D, baseInitialFrame As Rectangle, baseFrameCount As Integer, turretInitialFrame As Rectangle, turretFrameCount As Integer, worldLocation As Vector2) Dim frameWidth As Integer = baseInitialFrame.Width Dim frameHeight As Integer = baseInitialFrame.Height BaseSprite = new Sprite( worldLocation, texture, baseInitialFrame, Vector2.Zero) BaseSprite.BoundingXPadding = 4 BaseSprite.BoundingYPadding = 4 BaseSprite.AnimateWhenStopped = False For x As Integer = 1 To baseFrameCount - 1 BaseSprite.AddFrame( new Rectangle( baseInitialFrame.X + (frameHeight * x), baseInitialFrame.Y, frameWidth, frameHeight)) Next TurretSprite = new Sprite( worldLocation, texture, turretInitialFrame, Vector2.Zero) TurretSprite.Animate = false For x As Integer = 1 To turretFrameCount - 1 BaseSprite.AddFrame( new Rectangle( turretInitialFrame.X + (frameHeight * x), turretInitialFrame.Y, frameWidth, frameHeight)) Next End Sub #End Region
Add
Update()andDraw()methods for thePlayermodule:#Region "Update and Draw" Public Sub Update(gameTime As GameTime) BaseSprite.Update(gameTime) TurretSprite.WorldLocation = BaseSprite.WorldLocation End Sub Public Sub Draw(spriteBatch As SpriteBatch) BaseSprite.Draw(spriteBatch) TurretSprite.Draw(spriteBatch) End Sub #End Region
In the
Game1class, remove all of the existing code marked asTemporarycode that you added while building the camera and tile map systems. This includes the declarations for the two temporary sprites and their initialization inLoadContent(), as well as the calls to theirUpdate()andDraw()methods in the corresponding methods ofGame1.In the
LoadContent()method of theGame1class, after the sprite sheet has been loaded, initialize thePlayermodule:Player.Initialize( spriteSheet, new Rectangle(0, 64, 32, 32), 6, new Rectangle(0, 96, 32, 32), 1, new Vector2(300, 300))
Modify the
Update()method of theGame1class to update the player sprites. The entireUpdate()method is presented here, in order to verify that the temporary code from the previous steps was removed:Protected Overrides Sub Update(ByVal gameTime As GameTime) ' Allows the game to exit If GamePad.GetState(PlayerIndex.One).Buttons.Back = ButtonState.Pressed Then Me.Exit() End If Player.Update(gameTime) MyBase.Update(gameTime) End Sub
Replace the current
Draw()method in theGame1class with the following method that draws both the tile map and the player sprites:Protected Overrides Sub Draw(ByVal gameTime As GameTime) GraphicsDevice.Clear(Color.CornflowerBlue) spriteBatch.Begin() ileMap.Draw(spriteBatch) Player.Draw(spriteBatch) spriteBatch.End() MyBase.Draw(gameTime) End Sub
Execute the game to verify that the player's robo-tank is displayed on the tile map background:
Two individual sprites make up the player's tank. The BaseSprite will be drawn to the screen first, with the TurretSprite drawn over it. When the Player module's Initialize() method is called, the animation for the BaseSprite is created normally, and the sprite's AnimateWhenStopped member is set to false. Since the animation associated with the BaseSprite shows the treads of the player's tank rolling, the animation should not play when the player is not moving. In order to prevent the player from having to squeeze tightly between walls, a margin of four pixels on each side of the base sprite is established that will reduce the size of the robo-tank, when we detect collisions with walls on the map.
The TurretSprite, on the other hand, will not animate at all. The multiple frames of the TurretSprite animation actually represent different turrets that we will swap for the default turret, when the player has upgraded their weapons (more on this in Chapter 7, Robot Rampage - Lots and Lost of Bullets). By setting the Animate member to false, the frame displayed by the TurretSprite will remain constant unless we use the Frame property to change it directly.
During the Update() method, after updating the turret sprite, we always set its location equal to the location of the base sprite. This is because we always want the turret sprite to be drawn at the same location as the base sprite. Instead of trying to synchronize their velocities to keep them in the same spot, we just force them to the same location on each frame.
We will be expanding on the Update() method when we add input handling, but the Draw() method will remain as simple as it is now—just passing the draw command along to the sprites composing the player.
Note
Compositing sprites
Creating a game object made up of multiple sprites that are drawn on top of each other at the same location can be used to create several different effects. For example, you could overlay a fiery thrust sprite on top of a space ship that only played while the player was actively moving. In a role-playing game, you could create a variety of body and armor pieces (head, wings, tails, armor of different types, weapons, and so on) and draw whichever combination represents the equipment the player's character is currently wearing.
The player's movement and weapons fire are controlled separately by using the two thumbsticks on a gamepad. While the gamepad is by far the most comfortable way to control Robot Rampage, we will also include support for the keyboard. After all, not everyone has an Xbox controller connected to their PC.
Add the following declarations to the declarations region of the
Playermodule:Private baseAngle As Vector2 = Vector2.Zero Private turretAngle As Vector2 = Vector2.Zero Private playerSpeed As Single = 90
Add the methods to handle keyboard and gamepad input to the
Playermodule:#Region "Input Handling" Private Function handleKeyboardMovement( keyState As KeyboardState) As Vector2 Dim keyMovement As Vector2 = Vector2.Zero If keyState.IsKeyDown(Keys.W) Then keyMovement.Y -= 1 End If If keyState.IsKeyDown(Keys.A) Then keyMovement.X -= 1 End If If keyState.IsKeyDown(Keys.S) Then keyMovement.Y += 1 End If If keyState.IsKeyDown(Keys.D) Then keyMovement.X += 1 End If Return keyMovement End Function Private Function handleGamePadMovement( padState As GamePadState) As Vector2 Return New Vector2( padState.ThumbSticks.Left.X, -padState.ThumbSticks.Left.Y) End Function Private Function handleKeyboardShots( keyState As KeyboardState) As Vector2 Dim keyShots As Vector2 = Vector2.Zero If keyState.IsKeyDown(Keys.NumPad1) Then keyShots = New Vector2(-1, 1) End If If keyState.IsKeyDown(Keys.NumPad2) Then keyShots = New Vector2(0, 1) End If If keyState.IsKeyDown(Keys.NumPad3) Then keyShots = New Vector2(1, 1) End If If keyState.IsKeyDown(Keys.NumPad4) Then keyShots = New Vector2(-1, 0) End If If keyState.IsKeyDown(Keys.NumPad6) Then keyShots = New Vector2(1, 0) End If If keyState.IsKeyDown(Keys.NumPad7) Then keyShots = New Vector2(-1, -1) End IF If keyState.IsKeyDown(Keys.NumPad8) Then keyShots = New Vector2(0, -1) End If If keyState.IsKeyDown(Keys.NumPad9) Then keyShots = New Vector2(1, -1) End If Return keyShots End Function Private Function handleGamePadShots( padState As GamePadState) As Vector2 Return New Vector2( padState.ThumbSticks.Right.X, -padState.ThumbSticks.Right.Y) End Function Private Sub handleInput(gameTime As GameTime) Dim elapsed As Single Elapsed = CSng(gameTime.ElapsedGameTime.TotalSeconds) Dim moveAngle As Vector2 = Vector2.Zero Dim fireAngle As Vector2 = Vector2.Zero moveAngle += handleKeyboardMovement(Keyboard.GetState()) moveAngle += handleGamePadMovement(GamePad.GetState(PlayerIndex.One)) fireAngle += handleKeyboardShots(Keyboard.GetState()) fireAngle += handleGamePadShots(GamePad.GetState(PlayerIndex.One)) If moveAngle <> Vector2.Zero Then moveAngle.Normalize() baseAngle = moveAngle End If If fireAngle <> Vector2.Zero Then fireAngle.Normalize() turretAngle = fireAngle End If BaseSprite.RotateTo(baseAngle) TurretSprite.RotateTo(turretAngle) BaseSprite.Velocity = moveAngle * playerSpeed End Sub #End Region
Modify the
Update()method of thePlayermodule to call thehandleInput()method before updating the sprite. The entireUpdate()method should look like:Public Sub Update(gameTime As GameTime) handleInput(gameTime) BaseSprite.Update(gameTime) TurretSprite.WorldLocation = BaseSprite.WorldLocation End Sub
Launch your game and drive around! Swing your cannon around with the right thumbstick or the numeric keypad. Make sure Numlock is turned on!
The whole purpose of the input handling methods is to determine the value of the two vectors declared in step one. The baseAngle vector determines the direction that the player is moving in (and therefore the orientation of the base sprite), while the turretAngle vector determines the direction the player's cannon will face.
The gamepad controls are far simpler than the keyboard controls because the gamepad's thumbsticks already return a complete vector. The only alteration we need to make is to reverse the sign on the Y component of the vector, since negative Y values correspond to the up direction on the screen, but to the down direction on the gamepad.
In the case of the keyboard, pressing the individual movement keys increments or decrements the appropriate component of the vector that will be returned, while pressing the firing keys on the numeric keypad sets the returned vector to a vector pointing in the direction of the firing key relative to the five key (in other words, pressing eight on the keypad fires upwards, while pressing three fires down and to the right).
In the handleInput() method, we initially set both the moveAngle (which determines the direction the player will move in) and the fireAngle (which determines the direction the turret will be facing) to Vector2.Zero, indicating that they are both empty. We need to keep these two vectors separate from their related vectors (baseAngle and turretAngle), because we do not want to modify the angle that either the tank or the turret is facing if the player is not moving the corresponding thumbstick. If we did allow them to reset back to Vector2.Zero in every frame, any time the player was not pressing one of the control sticks, the corresponding part (tank or turret) would snap back to face the right edge of the screen.
By calling the handle...() methods and adding the results to the moveAngle and fireAngle vectors, we now have the two vectors we need to animate the player's tank. We check to see if the local vectors have a value (in other words, are not equal to Vector2.Zero). If so, the vector is normalized and assigned to the corresponding class-level member variable (moveAngle to baseAngle, and fireAngle to turretAngle).
The sprites are then rotated to their appropriate angles, and the moveAngle is applied to the base tank sprite's velocity.
The Update() method calls our new handleInput() method, and then updates the base sprite. The position of the base sprite is then copied to the location of the turretSprite, keeping the two sprites in sync with each other.
As the game stands, you can drive your tank around the game screen easily. Too easily, in fact! You can run straight through the walls and off the screen!
We need to ensure that the player's tank cannot move outside of the game world and that the game's camera follows the player as they move near the screen's edges.
Create a region called
Movement Limitationsin thePlayermodule:#Region "Movement Limitations" #End Region
Inside the
Movement Limitationsregion, add theclampToWorld()method:Private Sub clampToWorld() Dim currentX As Single = BaseSprite.WorldLocation.X Dim currentY As Single = BaseSprite.WorldLocation.Y currentX = MathHelper.Clamp( currentX, 0, Camera.WorldRectangle.Right - BaseSprite.FrameWidth) currentY = MathHelper.Clamp( currentY, 0, Camera.WorldRectangle.Bottom - BaseSprite.FrameHeight) BaseSprite.WorldLocation = New Vector2(currentX, currentY) End Sub
Add a declaration to the
Playermodule, to define the area in which the camera should attempt to keep the player:Private scrollArea As Rectangle = New Rectangle(150, 100, 500, 400)
Add the
repositionCamera()helper method to theMovement Limitationsregion of thePlayermodule:Private Sub repositionCamera( gameTime As GameTime, moveAngle As Vector2) Dim elapsed As Single Elapsed = CSng(gameTime.ElapsedGameTime.TotalSeconds) Dim moveScale As Single = playerSpeed * elapsed If (BaseSprite.ScreenRectangle.X < scrollArea.X) And (moveAngle.X < 0) Then Camera.Move(New Vector2(moveAngle.X, 0) * moveScale) End If If (BaseSprite.ScreenRectangle.Right > scrollArea.Right) And (moveAngle.X > 0) Then Camera.Move(New Vector2(moveAngle.X, 0) * moveScale) End If If (BaseSprite.ScreenRectangle.Y < scrollArea.Y) And (moveAngle.Y < 0) Then Camera.Move(New Vector2(0, moveAngle.Y) * moveScale) End If If (BaseSprite.ScreenRectangle.Bottom > scrollArea.Bottom) And (moveAngle.Y > 0) Then Camera.Move(New Vector2(0, moveAngle.Y) * moveScale) End If End Sub
Modify the
Update()method to callclampToWorld(), after the base sprite has been updated. The fullUpdate()method should read:Public Sub Update(gameTime As GameTime) handleInput(gameTime) BaseSprite.Update(gameTime) clampToWorld() TurretSprite.WorldLocation = BaseSprite.WorldLocation End Sub
In the
handleInput()method of thePlayermodule, add the following as the last line of the method:repositionCamera(gameTime, moveAngle)
Launch the game and drive around again. Your tank will stay confined to the game world, but is still able to drive through walls.
Things are looking a little better now. The player can no longer drive off the edge of the world, and when they reach the bottom or right-hand side, the camera will scroll with them. We can still drive through walls, but we are getting there!
When we apply movement to the player, we call clampToWorld(), which separates the player's location into X and Y components. The MathHelper.Clamp() method is then used to ensure that the components stay within the world's coordinate system. The width and height of the sprite is subtracted from the width and height of the game world, so that the furthest the player's sprite can get to the right-side and bottom of the world is a full sprite's size away. This will keep the sprite fully within the game world at all times.
When the player approaches an edge of the screen, the camera needs to be adjusted to move in the same direction that the player is moving, assuming that the end of the game world has not yet been reached. By defining the scrollArea rectangle, we are specifying that we would like to keep the player in a 500x400 pixel area beginning at (150, 100). This corresponds to the center of our 800x600 screen, with a 150 pixel buffer on the left and right edges, and a 100 pixel buffer along the top and bottom.
When repositionCamera() is called, it checks to see if the player has moved out of the defined scrolling area. Each side of the scroll area is checked individually, starting with the left edge. If the X coordinate of the ScreenRectangle is less than the X coordinate of the scrollArea and the player is moving left, the camera is moved left by an amount equal to the amount that the sprite itself will be moved by multiplying the appropriate component of moveAngle by the moveScale value.
The result is that the camera will move the same distance that the player moves. The player's sprite will appear to stay in place while the game world scrolls around it. Since the Camera module limits its own position to ensure that a full view of the world is always displayed, the camera will simply stop moving when the player is close enough to the edge that it can no longer scroll.
Add the
checkTileObstacles()method to theMovement Limitationsregion of thePlayermodule:Public Function checkTileObstacles( elapsedTime As Single, moveAngle As Vector2) As Vector2 Dim newHorizontalLocation As Vector2 = BaseSprite.WorldLocation + (New Vector2(moveAngle.X, 0) * (playerSpeed * elapsedTime)) Dim newVerticalLocation As Vector2 = BaseSprite.WorldLocation + (New Vector2(0, moveAngle.Y) * (playerSpeed * elapsedTime)) Dim newHorizontalRect As Rectangle = new Rectangle( CInt(Int(newHorizontalLocation.X)), CInt(Int(BaseSprite.WorldLocation.Y)), BaseSprite.FrameWidth, BaseSprite.FrameHeight) Dim newVerticalRect As Rectangle = new Rectangle( CInt(Int(BaseSprite.WorldLocation.X)), CInt(Int(newVerticalLocation.Y)), BaseSprite.FrameWidth, BaseSprite.FrameHeight) Dim horizLeftPixel As Integer = 0 Dim horizRightPixel As Integer = 0 Dim vertTopPixel As Integer = 0 Dim vertBottomPixel As Integer = 0 If moveAngle.X < 0 Then horizLeftPixel = CInt(Int(newHorizontalRect.Left)) horizRightPixel = CInt(Int(BaseSprite.WorldRectangle.Left)) End If If moveAngle.X > 0 Then horizLeftPixel = CInt(Int(BaseSprite.WorldRectangle.Right)) horizRightPixel = CInt(Int(newHorizontalRect.Right)) End If If moveAngle.Y < 0 Then vertTopPixel = CInt(Int(newVerticalRect.Top)) vertBottomPixel = CInt(Int(BaseSprite.WorldRectangle.Top)) End If If moveAngle.Y > 0 Then vertTopPixel = CInt(Int(BaseSprite.WorldRectangle.Bottom)) vertBottomPixel = CInt(Int(newVerticalRect.Bottom)) End If If moveAngle.X <> 0 Then For x As Integer = horizLeftPixel To horizRightPixel - 1 For y As Integer = 0 To BaseSprite.FrameHeight - 1 If TileMap.IsWallTileByPixel( New Vector2(x, newHorizontalLocation.Y + y)) Then moveAngle.X = 0 Exit For End If Next If moveAngle.X = 0 Then Exit For End If Next End If If moveAngle.Y <> 0 Then For y As Integer = vertTopPixel To vertBottomPixel - 1 For x As Integer = 0 To BaseSprite.FrameWidth - 1 If TileMap.IsWallTileByPixel( New Vector2(newVerticalLocation.X + x, y)) Then moveAngle.Y = 0 Exit For End If Next If moveAngle.Y = 0 Then Exit For End If Next End If Return moveAngle End Function
In the
handleInput()method, update theIf moveAngle <> Vector2.Zerostatement block, by adding a call tocheckTileObstacles(). The whole statement should now read:If moveAngle <> Vector2.Zero Then moveAngle.Normalize() baseAngle = moveAngle moveAngle = checkTileObstacles(elapsed, moveAngle) End If
Execute the game again and drive around.
In order to check for tile-based collisions, we break the process into two steps. First we will check for collisions due to horizontal movement, and then due to vertical movement.
To facilitate this, we begin by establishing two new vectors representing the new locations of the sprite, if only the horizontal or vertical movement was applied.
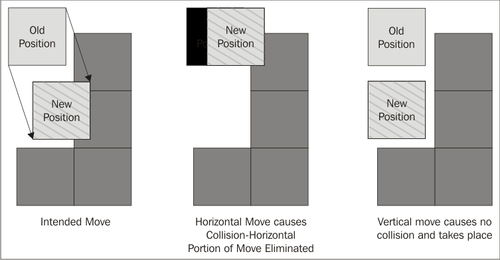
From these new vectors, we create two rectangles, representing the world location of the sprite's two possible movements. In other words, newHorizontalRect specifies where the player's sprite would be located after moving, if only the horizontal component of the movement is considered, while newVerticalRect represents the new location, if movement occurred only along the vertical axis:
Next, we need to determine a range of pixels to check for tile obstacles. We could simply check all of the pixels inside the two new rectangles, by calling TileMap.IsWallTile() for each pixel in both rectangles. This would return the results we are looking for, but it would cause unnecessary processing, as only the portions of the new rectangles that are not already covered by the current position's rectangle need to be checked for collisions.
Instead, we can use the direction in which we are moving to determine a smaller range of pixels that need to be checked. In the horizontal movement portion of the previous diagram, the new position rectangle mostly overlaps the old position rectangle. We only need to check the pixels between the right edge of the old position and the right edge of the new position, because the old position is already known to be an area the sprite can exist in.
If we are moving to the right, we use the right edges of the old and new positions to define the limits of the area we will check. Similarly, if we are moving left, we use the left edges of the two position rectangles to define the area.
We can then check each pixel in the new area against TileMap.IsWallTile() to determine if moving in this direction would cause the sprite to overlap a wall tile. If any of them do, we set the X component of the moveAngle vector to zero, eliminating the movement in that direction. As soon as any pixel tests true, we break out of the loop, since there is no need to continue testing.
After we have dealt with horizontal movement, the process is repeated for vertical movement, eliminating the Y component of the moveAngle vector if the new Y position would result in a wall collision.
We have covered a lot of ground building the foundation for Robot Rampage. So far, our new game:
Contains a camera to view a game world larger than the display screen
Allows us to define sprites that are aware of their positions within the game world instead of simply their location on the screen
Generates a tile-based map for the game world with randomly placed walls
Allows the player to drive their tank around the tile map, including collision detection with map walls and automatic camera panning
In the next chapter, we will finish building Robot Rampage by adding enemy robots and the ability to fire weapons. We will also cover basic path finding to allow the enemy to hunt down the player.