
Chapter 1. Working with XSP Properties
For most XPages developers, the process of building knowledge and expertise begins inside Domino® Designer. Typically, a neophyte developer loads Domino Designer, learns to create a new XPage, and then quickly figures out how to drag and drop controls from palette to page and assign values to these controls via the various property panels. From there, the natural progression is to discover how to program the controls dynamically, using JavaScript or one of the other languages available within the XPages framework. Pretty soon, a developer can be laying out fully fledged pages that link and combine in clever ways to form an impressive application. At that stage, it is common for a developer to feel that the XPages learning curve is complete and all that remains is to roll out applications and await the plaudits of the user community. Unfortunately, the feel-good factor is often short lived and a swift reality check is delivered by those tasked with appraising the initial versions of applications. New and unforeseen factors always come to the fore when an application is unveiled to users, and at this point the less experienced developer becomes acutely aware of the need for a whole new set of tools that can help tune and adapt an application to the many and varied nuances of real-world usage. This is when a collection of XPages framework parameters, known as xsp.properties, become the new best friend of the XPages developer!
XPages is a rich and extensive application framework that supports applications on a number of different runtime platforms, such as web browsers, the Notes® client, and mobile devices (smartphones, iPads, and so forth). The best applications are inevitably those that can deliver the required core functionality across all platforms, while at the same time leveraging the best unique features of each individual platform at runtime. Often it is possible to deliver such smart behavior programmatically, such as by dynamically detecting the runtime environment and adapting the application markup appropriately; other times, it is more effective to simply have parameters that dictate the appropriate behavior in a particular context. Diversity of runtime platforms is just one example of the need for runtime adaptability. An application designed to work a particular way out of the box might require different adaptations to satisfy varying customer requirements, whether they are driven by divergent performance and scalability metrics or simply by differing consumer expectations of application runtime behavior. Whatever the driving force is, XPages requires a means of modifying its behavior to flexibly adapt to different well-known use cases. The collection of parameters defined in its xsp.properties file is a primary tool for doing just that.
To get more concrete about what xsp.properties is and what it can do for you, Table 1.1 provides a high-level summary definition of all such parameters available within the XPages framework as of Notes/Domino V8.5.3. This chapter explores all 47 of these parameters in detail, along with some practical examples of how and why they can be applied to solve common problems. First, however, you should download PCGCH01.nsf and open it in Domino Designer so that you can be ready to explore some of the hands-on sample XPages this chapter covers. All the sample NSFs are available at this website: www.ibmpressbooks.com/title/0132943050
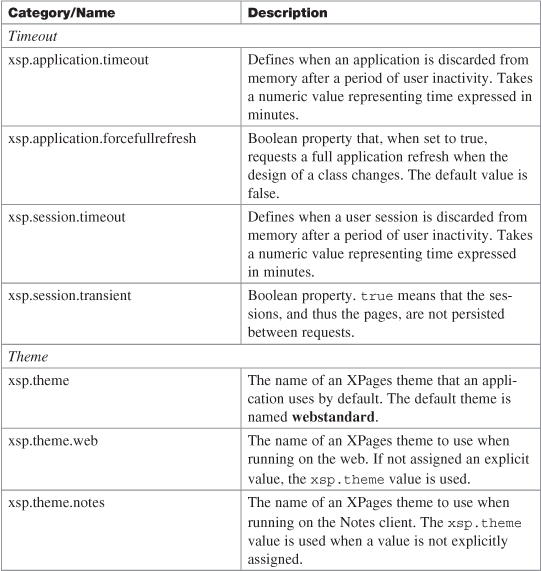


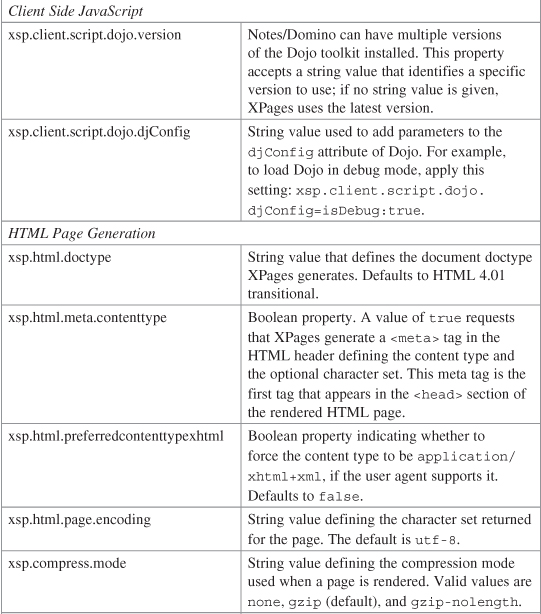
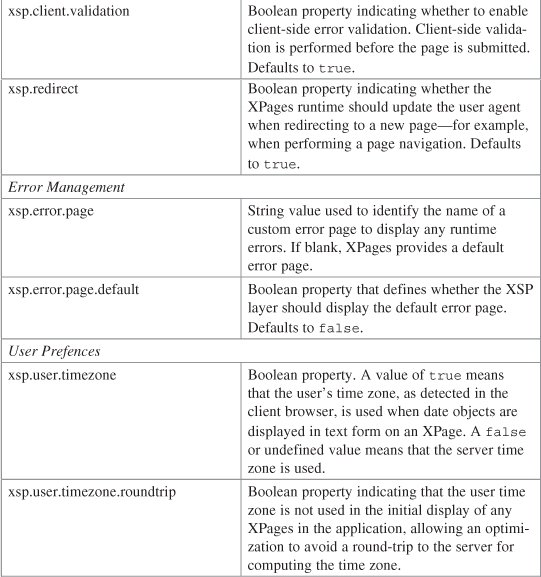


Table 1.1 groups all these magic runtime switches and levers into various categories. This chapter explores each of these categories later. A cursory skimming of the summary definitions indicates that these properties do not all fall solely within the exclusive domain of the Domino application developer, but many are appropriate to Notes/Domino administrators also. For instance, many properties offer a simple means of executing administrative tasks, such as fine-tuning performance, applying security rules, limiting document size, and so forth. First and foremost, however, you need to find this xsp.properties file!
Locating and Updating xsp.properties
One interesting point about the xsp.properties file is that there is potentially more than one of them. Every XPages NSF application contains an xsp.properties file, and you likely will find an xsp.properties file on your Domino server and/or Notes client installation also. Where exactly are these files located? You can start with the properties file that is embedded directly in every XPages application.
XPages applications are standard web applications based on the J2EE specification, and J2EE-compliant web applications typically place configuration files inside a standard private WEB-INF folder. XPages adheres to this by locating its xsp.properties file inside the WEB-INF folder inside the NSF. The Domino Designer perspective does not expose the raw Java™ project structure that underlies your XPages application, but you can view it by switching perspective or by including other Eclipse views in your Domino Designer perspective. To do the latter, select the Window > Show Eclipse Views > Other menu and then choose Package Explorer view from the Java category. In Domino Designer V8.5.3, this adds a new tab adjacent to the Application Navigator, from which you can explore all project elements. After you have opened the Package Explorer, find your current NSF, expand it, and then peruse its contents. Open the Web ContentWEB-INF folder to locate the xsp.properties file, and then double-click to open the file. Figure 1.1 shows a simple xsp.properties file in a plain text editor. You can view and/or modify the file contents directly from this editor.

Figure 1.1. Accessing xsp.properties from the Eclipse Package Explorer
Luckily, viewing and updating the embedded xsp.properties file is not always as cumbersome as just described. Domino Designer makes it easy to work with most of the more commonly used settings. You might have already been setting and modifying property values within the local xsp.properties file and not been aware of this process. Many of these XPages properties, along with other Notes/Domino properties, are surfaced in a single general-purpose Application Properties editor. Look for an outline entry of the same name in the Application Navigator and double-click it to activate the multitab editor. Selecting the XPages tab in the bottom editor pane gives access to the properties. Figure 1.2 shows a sample, with some property mappings highlighted.

Figure 1.2. Accessing xsp.properties from the Domino Designer Applications Editor Explorer
The embedded xsp.properties file specifies parameter values that apply to the application that contains it. The Domino server also has an xsp.properties file so that parameter values can be applied to all applications loaded on the server. A sample file, appropriately named xsp.properties.sample, is installed automatically as part of the Domino installation process; it is located in the dataproperties folder under the Domino root directory. (Note that this is the location on MS Windows® platforms; it can vary on other systems.) You can edit this file with a standard text editor. It contains all the properties listed in Table 1.1. All property assignments are commented out—that is, the line is prefixed with a # character, as follows:
#xsp.application.timeout=30
The default value is typically demonstrated as a default assignment. To uncomment a line, simply delete the # character prefix. To enforce a property, do the following:
1. Rename the file from xsp.properties.sample to xsp.properties, if not already done.
2. Edit the xsp.properties file, uncomment the line, and apply the desired value.
3. Restart the server (or just the http server task), depending on the chosen property.
To restart just the http task on the server, you can enter restart task http in the Domino console window. Alternatively, just type tell http q, followed by a load http command.
If you are using clusters, you must repeat the operation for all servers in the cluster. Server xsp.properties file changes are not automatically replicated between servers of the same cluster.
Similarly, the Notes client has an xsp.properties file where you can apply settings on a client-wide basis. If the xsp.properties file has not been used, it is named xsp.properties.sample; in this case, you must rename it to xsp.properties before you can apply any properties. You can find this file in the same dataproperties subfolder structure under the Notes root directory; and the same rules and principles apply when it comes to enforcing settings.
As described in Step 3, you might or might not have to restart your Domino server or Notes client for a given property value change to take effect. This depends on the individual nature of a given property: Some are static and require a restart when changed, whereas others are dynamic and are reread when next executed.
The Timeout Properties
The XPages runtime creates and manages an application session whenever a user initially requests an application. Thereafter, subsequent requests from any user, regardless of how many, cause that application to use the initial application session object for storing application-scoped objects. Furthermore, the XPages runtime creates and manages a user session for each user of any given application. Each user is associated with a unique user session object within the context of the current application.
This category of xsp.properties facilitates the management of application and user session timeout durations, as well as determines the way in which the XPages runtime maintains the user session and application object. This maintenance relates to how a user session is serialized between page requests and also to how the objects representing an application are recycled and reinstantiated between page requests based on design element changes.
xsp.application.timeout
If you look for the xsp.application.timeout setting in the xsp.properties file, you will find the snippet shown in Listing 1.1.
Listing 1.1. xsp.properties Snippet for the xsp.application.timeout Property
# Application timeout management defines when an application is
# discarded from memory after a period of inactivity expressed
# in minutes
#xsp.application.timeout=30
By default, a Domino server boots up without any XPages applications in memory. You can learn more on how to preload XPages applications in Chapter 2, “Working with Notes/Domino Configuration Files.” Only when the XPages runtime processes a user request for a given XPages application is an application loaded into memory and processed to serve the incoming request. Thereafter, that application resides in memory within the XPages runtime until all user sessions associated with that application have been discarded from the XPages runtime and the xsp.application.timeout duration has been exceeded. As shown in Listing 1.1, the default timeout value is 30 minutes. This property can be set at the global server level or, alternatively, within an application. Figure 1.3 shows where this can be set within Designer for an application.

Figure 1.3. The xsp.application.timeout property exposed in the application properties editor in Designer
xsp.session.timeout
If you look for the xsp.session.timeout setting in the xsp.properties file, you will find the snippet shown in Listing 1.2.
Listing 1.2. xsp.properties Snippet for the xsp.session.timeout Property
# Session timeout management defines when a user session is
# discarded from memory after a period of inactivity expressed
# in minutes
#xsp.session.timeout=30
When a user first issues a request for an XPages application, following successful authentication, a user session object is instantiated and associated with that user. This user session object is used to store temporary data created during that user’s usage of the application. By default, no explicit mechanism exists for discarding a user session object when a user closes a browser or otherwise exits the system. Therefore, this xsp.session.timeout property defines a timeout period for discarding a user session object from server memory, based on a period of inactivity. This is expressed in minutes, with 30 minutes being the default period.
This property can be set at the global server level or, alternatively, within an application. Figure 1.4 shows where this can be set within Designer for an application.
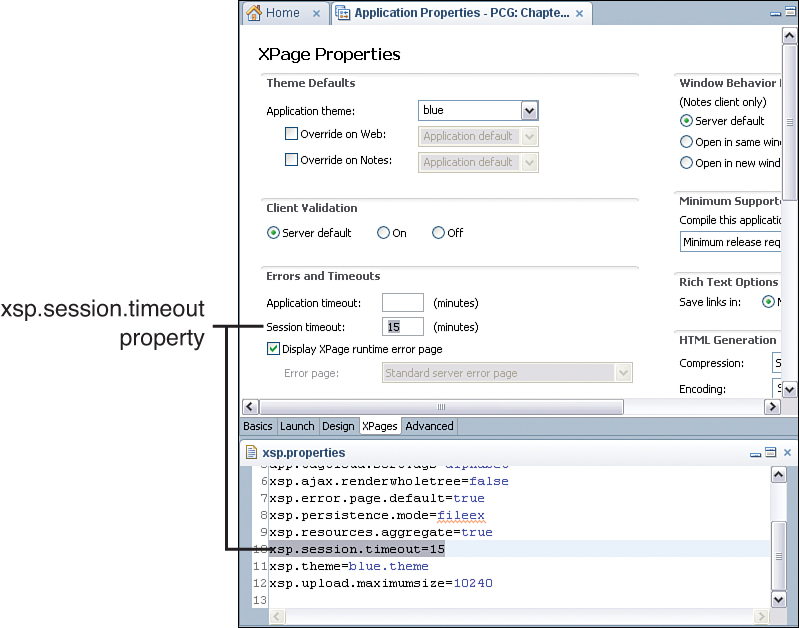
Figure 1.4. The xsp.session.timeout property exposed in the application properties editor in Designer
xsp.session.transient
This property is new in Notes/Domino 8.5.3.
By default, the XPages runtime is a stateful web application framework. A request for an XPage results in a degree of server-side processing that begins with creation or retrieval of a user session and ultimately ends with a rendering process that builds up the content for a response. During this server-side processing, a user session configuration object, along with all the controls on a requested XPage, have their respective properties and values serialized to disk and/or deserialized from disk. This is due to the inbuilt serialization mechanism of XPages that manages and provides the stateful characteristics of the XPages runtime. Based on application requirements, it might be beneficial from a performance and scalability perspective for an application not to participate in this serialization process, to optimize its level of participation. This aim of the xsp.session.transient property is to provide a way to control how user session objects are serialized between requests.
If you look for the xsp.session.transient setting in the xsp.properties file, you will find the snippet in Listing 1.3.
Listing 1.3. xsp.properties Snippet for the xsp.session.transient Property
# Transient sessions means that the sessions, and thus the pages,
# are not persisted between requests
#xsp.session.transient=false
By default, the XPages runtime sets this property to false. Therefore, the serialization process includes all user session objects, but not the sessionScope object. This means that any XPages a given user requests are serialized/deserialized in association with the user session object over the life of that user session object. They are discarded along with the user session object when the overall user session timeout duration passes.
Alternatively, if this property is set to true, the XPages runtime automatically avoids serializing user session objects between XPage requests. It is important to note that a user session object still is instantiated for a request, but it simply is not serialized between requests. This also means that properties and values of controls within requested XPages still participate in the serialization process—this ensures that an XPage can still provide a rich user experience for the scoped variables and partial execution of actions, for example. However, when a user navigates to another XPage, the associated stateful data for that XPage is discarded because the user session object is not serialized between requests. This feature is made available for use cases that require an extremely optimal level of performance tuning where server memory must be finely managed. Note that such use cases are those in which partial updates are applied against only the current page; full page refreshes cause the state to be discarded between requests. Therefore, the design and intent of the page require careful consideration to benefit from this feature.
xsp.application.forcefullrefresh
This property was introduced in Notes/Domino 8.5.3. It is set to false by default and is particularly useful during the development phase of an XPages application. Listing 1.4 shows the relevant section of the xsp.properties file.
Listing 1.4. xsp.properties Snippet for the xsp.application.forcefullrefresh Property
# Application refresh when this property is set to true, then a
# full application refresh is requested when the design of a
# class changes (means that all the data is discarded in scopes)
#xsp.application.forcefullrefresh=false
The property ensures a full refresh of all data and objects stored within the scoped variables and context whenever an XPage is refreshed in a browser while the application design is open within Domino Designer and design changes are being made. Note that “refresh” in this context means resetting to empty values. This specifically ensures that view-, session-, and application-scoped variables, objects, and even Managed Beans are forcefully refreshed as a consequence of any application design changes. Request-scoped variables, objects, and Managed Beans, on the other hand, automatically are refreshed anyway because of the rules governing the request scope.
When this xsp.application.forcefullrefresh property is set to true, an application design refresh from a template causes this same behavior. Therefore, after the design refresh task has executed, subsequent requests to a given application with this property set to true cause a complete refresh of the scoped variables, objects, and context for the first incoming request after the design refresh. Ideally, for a production environment, this setting should be set to false; it is intended as a development-time aid.
The Theme Properties
This category of xsp.properties provides a way to set the application theme in three different ways. This accommodates the possibility of an application running in different platforms—namely, a Notes client or Domino server—and requiring different themes for each. You can also use this group of settings to specify a single theme for use in all platforms, which is the most common case. This is done by not specifying any Override on Web or Override on Notes settings, therefore allowing the theme specified for the Application Theme setting to be the one used regardless of running environment.
xsp.theme
If the xsp.theme.web or xsp.theme.notes properties are not specified, the xsp.theme property sets the default theme for all platforms. Therefore, you can configure the default theme for a Notes client or Domino server using this setting, as shown in Listing 1.5.
Listing 1.5. xsp.properties Snippet for the xsp.theme Property
# Name of the XSP theme to use
#xsp.theme=webstandard
This property is applied at platform level and affects all new or existing applications that do not specify their own theme. However, an application can override this setting using its own xsp.properties setting, therefore providing an Application Level setting. Figure 1.5 shows where this can be set within Designer for an application.

Figure 1.5. The xsp.theme property exposed in the application properties editor in Designer
Refer to the Mastering XPages book (ISBN: 0132486318) from IBM® Press: www.ibmpressbooks.com/bookstore/product.asp?isbn=0132486318 where you will find extensive details on creating and applying XPages Themes in Chapter 14, “XPages Theming” (pages 543–620).
xsp.theme.web
Set this property to define the theme to display for web applications. Simply assign the name of any existing theme to the property declaration shown in Listing 1.6.
Listing 1.6. xsp.properties Snippet for the xsp.theme.web Property
# Name of the XSP theme to use when running on the web, if this
# property is not defined, the xsp.theme is used
#xsp.theme.web=
Regardless of whether the xsp.theme property is specified, the xsp.theme.web property takes precedence when specified for applications accessed using a browser. Figure 1.6 shows where this can be set within Designer for an application.

Figure 1.6. The xsp.theme.web property exposed in the application properties editor in Designer
xsp.theme.notes
Set this property to define the theme to display for XPages applications running in the Notes client. Listing 1.7 shows the relevant part of the xsp.properties file.
Listing 1.7. xsp.properties Snippet for the xsp.theme.notes Property
# Name of the XSP theme to use when running on the Notes client, if
# this property is not defined, the xsp.theme is used
#xsp.theme.notes
If the xsp.theme property is specified, this property takes precedence for applications accessed using a Notes client.
Set this property to define the theme to display for XPages applications running in the Notes client. Regardless of whether the xsp.theme property is specified, the xsp.theme.notes property takes precedence when specified for applications accessed using the Notes client. Figure 1.7 shows where this can be set within Designer for an application.
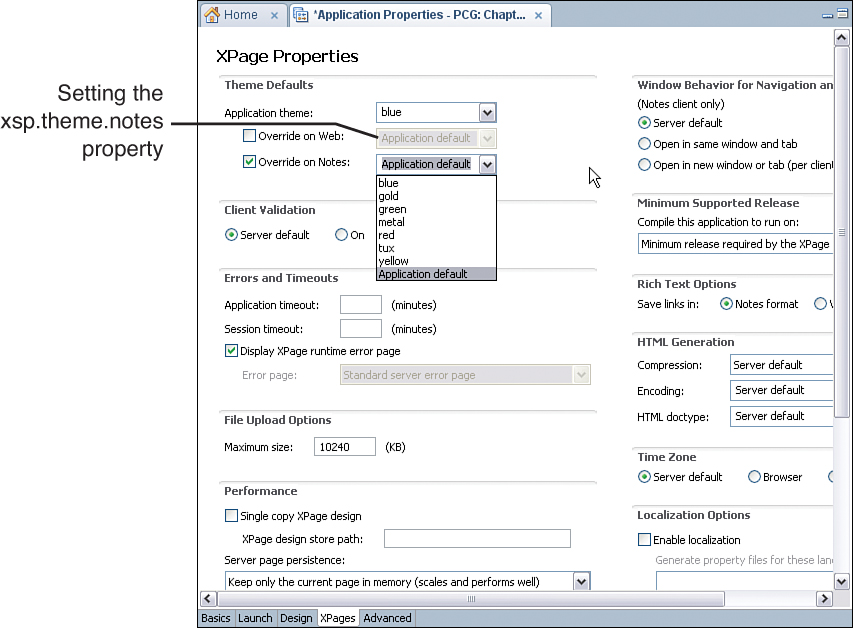
Figure 1.7. The xsp.theme.notes property exposed in the application properties editor in Designer
When you specify any of these theme properties from the Application Properties editor for any given application, they are written into the xsp.properties file for that application. Figure 1.8 shows that all three theme properties have been specified using the Application Properties editor.
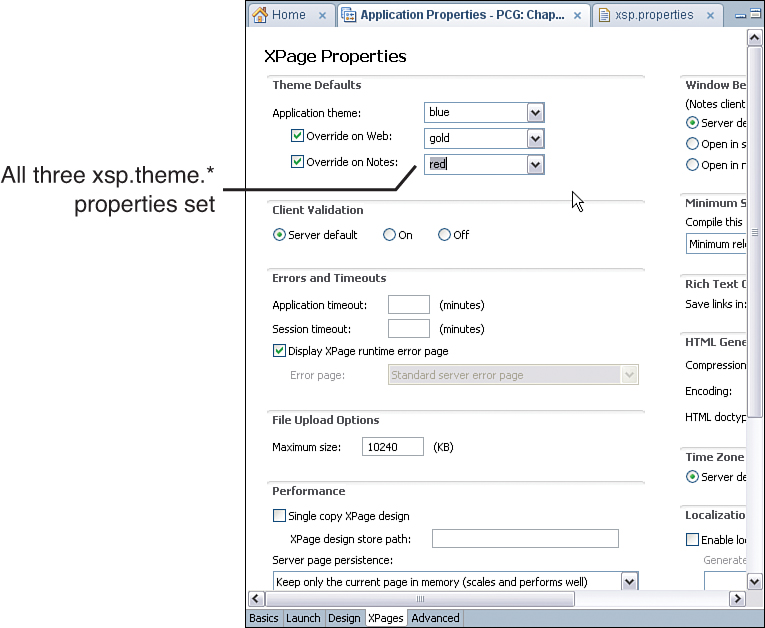
Figure 1.8. All three xsp.theme.* properties specified in the application properties editor in Designer
Figure 1.9 shows these theme property values. They have been written into the application’s underlying xsp.properties file.

Figure 1.9. All three xsp.theme.* properties written into the application’s underlying xsp.properties file
Incidentally, you can use the propertiesInspector XPage found within the supporting PCGCH01.nsf application to inspect the values of any application-level property. When you open this XPage in a browser or on the Notes client, you see a type-ahead edit box that enables you to select from the available xsp.properties, as shown in Figure 1.10.
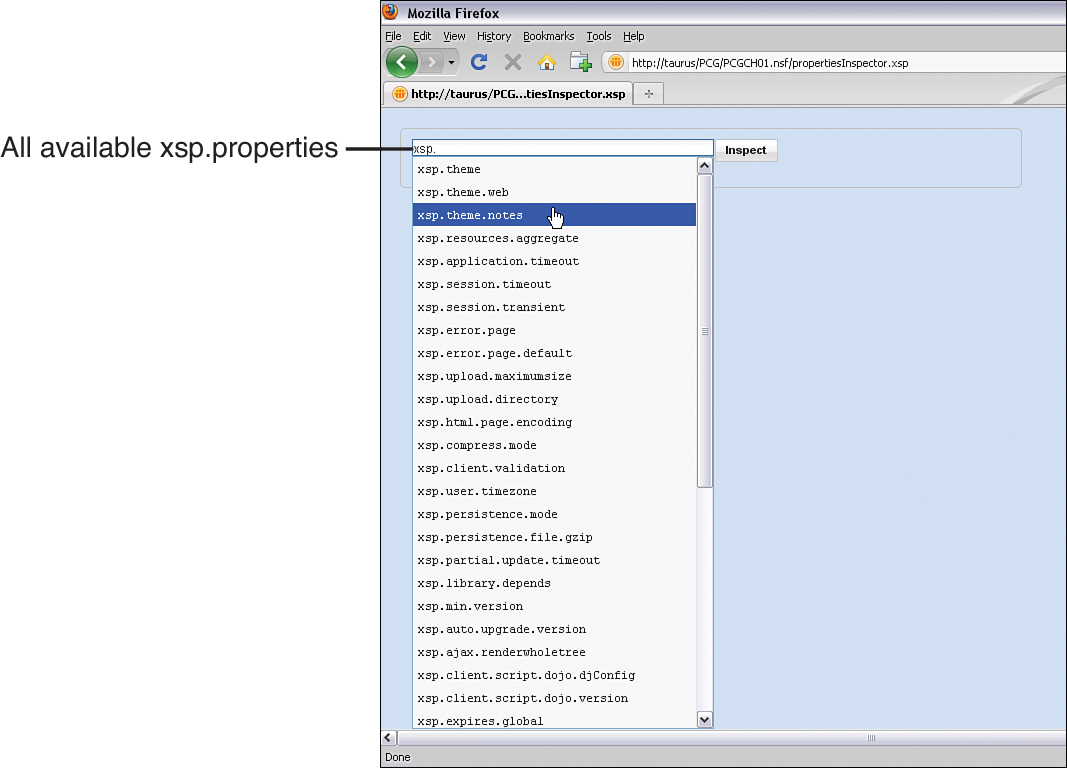
Figure 1.10. The type-ahead list of available xsp.properties displayed in the propertiesInspector XPage
After you select any of the xsp.properties and then click the Inspect button, you see the currently specified value of that property based on the application-level setting. Figure 1.11 shows an example for the xsp.theme property that has been specified within the Application Properties editor for the theme blue.

Figure 1.11. The propertiesInspector XPage showing the currently set value of the xsp.theme property
The Resources Properties
This category is new in Notes/Domino 8.5.3 and contains only one published entry.
xsp.resources.aggregate
The purpose of the xsp.resources.aggregate property is to enhance performance by reducing the number of requests made for resources like JavaScript files and cascading style sheets, when an XPage is loaded by an end-user at runtime. The relevant part of the xsp.properties file is shown in Listing 1.8.
Listing 1.8. xsp.properties Snippet for the xsp.resources.aggregate Property
# Defines if the resources served to a page should be aggregated.
# This option should be used to provide the best download time
# experience. The option defaults to false when not set, but new
# applications created in Designer 8.5.3 or later will contain
# an xsp.properties file with the option value set to true.
#xsp.resources.aggregate=false
The more sophisticated the XPage is, the more likely it is to require many Dojo modules and CSS resources. Each resource request necessitates a network round-trip before the XPage rendering can be completed. Each round-trip has a performance impact, especially on slow or busy networks.
The number of resource requests required for a typical XPage can ramp up quickly—and in a manner that is often not immediately transparent to the application developer. This mostly occurs as a result of large and opaque resource-dependency trees generated by rich Dojo controls and complex UI themes. For instance, many of the sample pages in the standard XPages Extension Library demo application routinely generated more than 80 resource requests, although often the XSP markup of the XPages themselves do not explicitly declare resources. Clever analysis of the resource dependencies by the XPages runtime indicates that Dojo modules and CSS files can be aggregated (joined in the right order in a single file) so that fewer large-payload requests replace many small-payload requests. The former is far more efficient in terms of performance.
If you are inspecting the resource requests made on a typical XPage, such as when using Firebug on a Firefox browser, you will see resource requests of the form shown in Listing 1.9, when aggregation is not in effect.
Listing 1.9. Nonaggregated Resource Requests
...
GET http://server/domjs/dojo-x.y.z/dojo/../dijit/_base.js
GET http://server/domjs/dojo-x.y.z/dojo/../dijit/_base/focus.js
GET http://server/domjs/dojo-x.y.z/dojo/../dijit/_base/manager.js
GET http://server/domjs/dojo-x.y.z/dojo/../dijit/_base/popus.js
...
The simple resource requests shown here are replaced by something less humanly digestible when aggregation is applied. For instance, the GET request may point to an aggregated file named something like @Wc&@Ei&@ESb.js, an example of an aggregated Dojo module resource. When aggregation is in effect, you will not see these aggregated names in the GET request stack and you will also see fewer requests for the XPage.
The standard 8.5.3 help documentation summarizes the performance benefits of this feature quite well. It short, it provides the following:
• A decrease in requests sent from the browser to the server
• An increase in user performance, particularly in the context of networks with high latency
• An increase in the speed of JS/CSS parsing from the browser
• The freeing of server connections to fulfill other requests
The xsp.resources.aggregate property is exposed directly in Domino Designer by the Application Properties > XPages > Use runtime optimized JavaScript and CSS resources check box, so it does not require direct editing of the xsp.properties file to apply the setting for a given application. As indicated in the property comments, any new applications created with Domino Designer 8.5.3 automatically insert this property in the local xsp.properties file with a value of true. Earlier releases of the XPages core runtime ignore this property, so it is safe to apply in an environment that contains a mix of Notes/Domino 8.5.x releases, in which applications replicate with each other.
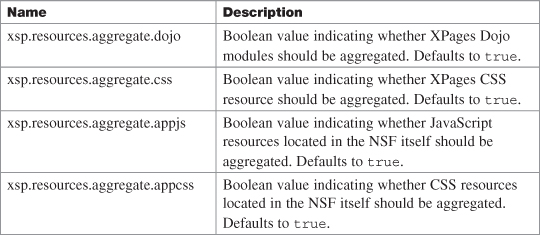
Some unpublished properties in this category can also give you more granular control over the operation of the feature. Table 1.2 summarize these properties. Their behavior is self-explanatory, although unpublished properties are not guaranteed to be supported in future releases.
Table 1.2. Other Aggregation Properties
It is also worth mentioning that this feature works equally well on the Notes client and Domino server, although network round-trips for resources may not be such a worry if you are running in the Notes clients.
Finally, aggregated resources are also packaged in compressed gzip form, as long the browser accepts gzip content (refer to the xsp.compress.mode section for more information on compression). The browser caches aggregated resources just like any other such resource, and the cache header field in the response is set to 10 days, by default. You can change this value by using the xsp.expires.mini property, to assign it an alternative number of days (0 means no cache).
In a production environment, it is beneficial to enable resource aggregation. Otherwise, during development, you can turn off this setting if you are interested in viewing the individual resource links within the generated HTML markup.
The File Upload Properties
This category of properties enables you to override the default settings for handling a file upload attachment using the XPages core File Upload control. In particular, two properties control the maximum attachment size and the target upload directory on the receiving server.
xsp.upload.maximumsize
The xsp.upload.maximumsize property gives you the capability to set a specified maximum attachment size for file uploads processed by an XPage—in particular, file uploads handled by the XPages core File Upload control. The default setting is declared in the placeholder location in xsp.properties, as shown in Listing 1.10.
Listing 1.10. xsp.properties Snippet for the xsp.upload.maximumsize Property
# This controls the maximum size, in kilobytes, of a file being
# uploaded as an attachment
#xsp.upload.maximumsize=1024
The Domino server web engine enables you to specify a maximum attachment size for file uploads using the Domino Server Configuration document from within Domino Administrator. Ultimately, that setting takes precedence over any other setting. Figure 1.12 shows where to find this property within an application’s Application Properties editor.
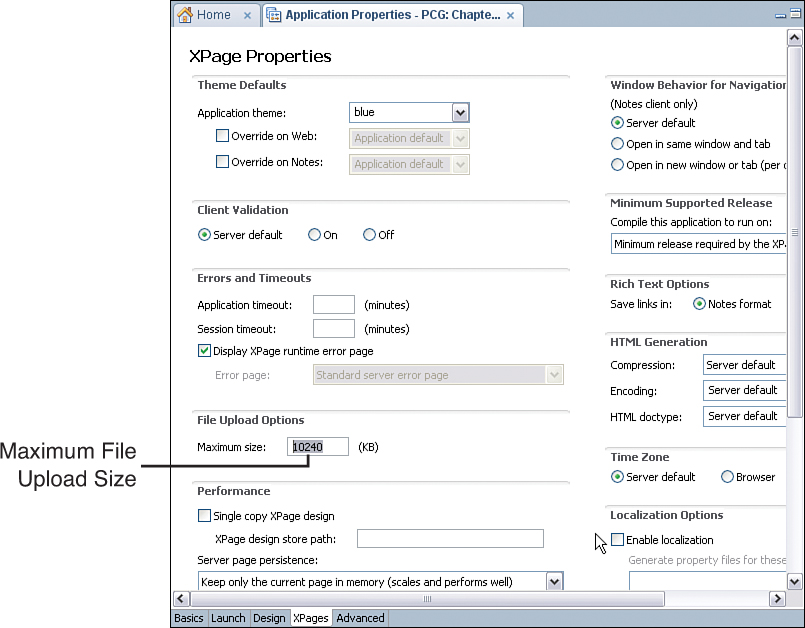
Figure 1.12. The xsp.upload.maximumsize property exposed in the Application Properties in Designer
You can set this property at the server level within the xsp.properties file of a Domino server or Notes client. You should set it within the upper limits of the overall Domino Server Configuration document maximum file attachment size setting. Of course, you can increase the Domino Server Configuration document setting accordingly.
xsp.upload.directory
By default, the XPages runtime receives a File Upload attachment or Rich Text Editor embedded image file and temporarily persists it to disk on the receiving server before further processing the attachment or image. (See the xsp.persistence.dir.xspupload property for the default behavior.) Listing 1.11 shows this property as it appears in the xsp.properties file.
Listing 1.11. xsp.properties Snippet for the xsp.upload.directory Property
# Directory used to temporarily store the uploaded attachment
# Default to a temporary directory returned by the OS
#xsp.upload.directory=
This property is a global setting; therefore, it must be specified only within a Domino server or Notes client xsp.properties file. Setting the xsp.upload.directory property within an application’s xsp.properties file has no effect because the global setting always takes precedence.
This setting has been available since version 8.5, but it is now deprecated and provided only for legacy compatibility purposes. You should use the xsp.persistence.dir.xspupload property instead. If specified, the xsp.upload.directory property value is used instead of the xsp.persistence.dir.xspupload property value. The xsp.upload.directory property enables you to specify a different temporary upload directory. This can be useful if disk space is an issue and you need to point at another disk space directory on another server- or network-assigned storage device.
The JSF Persistence Properties
This category mostly relates to how a user’s page state is saved on the server between requests interacting with that page. Options relate to how the page state is saved on the server file system. This category also includes some options for how uploaded and attached files are saved on the server file system. But to start, an option controls how JavaScript variables are saved between requests, which impacts on the size of the page state.
xsp.persistence.discardjs
This property controls how data stored as global JavaScript variables are handled when a page request is complete. Listing 1.12 shows the relevant section of xsp.properties.
Listing 1.12. xsp.properties Snippet for the xsp.persistence.discardjs Property
# Discard the JavaScript context for a page after the page is processed
# This is a runtime optimization that is set to true by default
# but might be reverted to avoid compatibility issues
# (although it is *not* advised).
#xsp.persistence.discardjs=true
Version 8.5.1 included a change in how global Server Side JavaScript variables are handled between page requests. You can set this option to false to revert to the older behavior from version 8.5.0, although it is better to change your application to work with the new behavior. The new behavior gives better performance by helping your application to use less memory.
The behavior that the option controls is related to global variables defined in Server Side JavaScript code, such as the valueComputed variable shown in Listing 1.13.
Listing 1.13. Global Server Side JavaScript Variable
valueComputed = false;
// update valueComputed
When such a global variable is defined, it can be referenced in any Server Side JavaScript in the XPage that executes after the global variable has been defined, until the end of the current server request.
In version 8.5.0, global variables were available to be referenced for a longer duration, from when the global variable was defined until a different XPage instance was loaded. That is, when multiple redisplays of the same XPage used repeated requests to the server, global variables continued to be available during subsequent server requests. The new behavior, post–version 8.5.0, ensures that global variables are discarded between page requests.
When attempting to redesign your application to handle the shorter global variable availability, you can use viewScope variables for values that you need to access in subsequent redisplays of the same XPage. Listing 1.14 shows the revised code.
Listing 1.14. Scoped Server Side JavaScript Variable
viewScope.valueComputed = false;
// update viewScope.valueComputed
Similarly, you can change any other code in the application that used to reference valueComputed (or your variable name) to reference viewScope.valueComputed.
The viewScope is a namespace where you can store simple values while the same page is being repeatedly redisplayed. It is not possible to store a document in viewScope, but it is often sufficient to store the document ID and retrieve the document using the ID. It is okay to save Strings, Booleans, Numbers, and many other values in the viewScope, but if nonserializable objects are placed in the viewScope, problems can arise—see the information on the xsp.persistence.mode option for more details. Other scopes can be useful as well, such as the sessionScope, which stores values for the duration of the current user’s login session. Chapter 5, “Server-Side Scripting,” explains the scopes in the section “Scope Objects.”
xsp.persistence.mode
This option determines how the server-side tree of controls is saved between requests while the user is interacting with the XPage. Listing 1.15 shows the help information provided in the xsp.properties file.
Listing 1.15. xsp.properties Snippet for the xsp.persistence.mode Property
# Defines the persistence mode for the JSF pages (a.k.a. Views)
# file: All the pages are persisted on disk
# fileex: All the pages are persisted on disk except
# the current one, which stays in memory
# basic: All the pages stay in memory, the default.
#xsp.persistence.mode=
When a user first opens an XPage in a web browser, a server-side tree representing the controls in the XPage is built up and used to output the XPage to the browser. If the user then interacts with the same page, such as by clicking a Section control to make its contents visible, the same control tree is used to respond and interact with the user. As the user interacts with the page, the control tree maintains state so that, for example, values typed into fields are still present between requests and a document can be edited across multiple requests without saving on each request.
To allow such interaction, the tree of controls for an XPage must be saved on the server between requests from the user. A specific control tree instance that one user requesting an XPage has created is known as a page or a JSF view. The options controlling this saving are known as the persistence options, meaning that they control how the pages manage to persist (or, continue to be present) when attempting to redisplay them.
Broadly speaking, the page can be either saved on the server’s file system or kept in memory (RAM) so that no explicit save operation takes place.
When the pages are saved in memory, the response time for individual users is quick. Most servers can handle low levels of infrequent users, but as the number of users increases, eventually the server might have not enough memory. When the server runs out of memory, it reports the serious java.lang.OutOfMemoryError problem, which prevents XPages from being displayed to any users. This problem likely has negative consequences for non-XPages use of the server.
When pages are saved on the file system, they do not cause the server to run out of memory. The application will be less likely to fail as it scales up to larger numbers of users and a greater request load. However, when the pages are saved to the server’s file system, it may be necessary to configure how that saving occurs. (Refer to the section entitled “No Space Left on Device Problems,” for suggested solutions when the file system runs out of space.) Saving pages to the file system also introduces the possibility of serialization problems that prevent XPages from displaying. (This chapter discusses how to fix such problems in an upcoming section titled “XPages Problems When Storing Pages on the File System.”)
It is also possible to choose a model that acts as a hybrid between in-memory and file system schemes. The most commonly used option, fileex, saves the most recent page the user has touched in memory and saves the previous pages in the usage history on the file system. This is sensible because users are most likely to continue interacting with the most recent page. Users generally interact with previous pages only if they press the browser back button or if they are using multitab browsing, in which the web browser has multiple pages open in the same application.
The xsp.persistence.file.threshold option enables another compromise by saving pages that are smaller than a certain size in memory and writing only larger pages to disc. However, the process of saving in memory is different when using the threshold option. A later section, “xsp.persistence.file.threshold Property,” is dedicated to this option.
Choosing the Persistence Mode in Designer
You can change the main setting that controls persistence in Application Properties, in Designer. The Application Properties > XPages > Performance > Server page persistence combo box offers the following options:
• Server default.
• Keep pages in memory (best performance). This saves the mode as basic, meaning that the pages are always saved in memory.
• Keep pages on disk (best scalability). This saves the mode as file, meaning that the pages are always saved on disk unless the threshold option is set to some value.
• Keep only the current page in memory (scales and performs well). This saves the mode as fileex, meaning that the most recently accessed page for each user is saved in memory and older pages for the users are saved on disk.
In applications created in a Designer version 8.5.2 or later, this setting defaults to fileex. That is, the actual xsp.properties file in the application has the literal mode fileex specified. This means that editing the server xsp.properties file does not have an effect on the persistence of such applications. For applications created in version 8.5.0 or 8.5.1, this setting defaults to Server default, but it is advisable to edit such applications to change the setting to fileex. However, when making such a change, it is best to verify that the application continues to work. Refer to the section “Serialization Problems Giving an Error Page with NotSerializableException” if issues arise.
Cache Size Limits and XPages Behavior When Limits Are Encountered
Whether saving on disk or in memory, limits govern the number of pages in a user’s browser session that are maintained on the server. You can configure the limits for the maximum number of views for an application. When a user in a given session navigates through more pages than the maximum limit, older pages are discarded. Selecting which page to discard is accomplished using an MRU (most recently used) algorithm, to preserve the most recently accessed pages. The pages discarded are the pages whose last redisplay time was furthest in the past, not the pages that were created furthest in the past. The discarding happens when the user navigates to a new page, so continued redisplay of the same page does not cause previously cached pages to be discarded.
When a user attempts to access a page that was discarded from the cache, the page is displayed in its initial state, as if this were the first time the user opened the page. Users can access old pages either by redisplaying them using the browser back button or by clicking a button or link on an open page in a browser tab that is not the most recent tab the user was interacting with. When a user accesses a discarded page, the previous state of the page is not available; if the user had been editing values in a document, those values would not be present in the page. If the user clicked a Save button and expected the page to be no longer editable, the user might not realize that the updated values were lost. Certain applications and populations of users are more likely to encounter discarded page problems; examples are users who commonly use tabbed browsing and edit multiple documents at once. If users of your application likely will attempt to access discarded pages, you might want to either increase the maximum number of pages saved per user or provide warnings about the use of tabbed browsing with this application.
XPages Problems When Storing Pages on the File System
An application that saves the pages in files on disk might encounter some problems that it would not if it saved the pages only in memory.
Serialization Problems Giving an Error Page with NotSerializableException
The most common type of problem with saving to files is a java.io.NotSerializableException. Serialization is the process of converting from in-memory objects to a representation of those objects that can be saved to a file. When the configuration options indicate that pages are to be saved to the file system and a page is about to be saved, this serialization is performed and any problems in the serialization process give a java.io.NotSerializableException. The exception prevents the XPage from displaying and an error page appears with a stack trace, as shown in Figure 1.13. One of the messages at the top of the error page is java.io.NotSerializableException: classname, where classname is the name of a class that could not be serialized.

Figure 1.13. Example of an error page showing serialization problems
When a NotSerializableException occurs, it indicates a problem in the design of the application where a nonserializable object is being used but cannot be persisted as part of the page state. Commonly, the application designer buffered a nonserializable object in the viewScope map. Alternatively, the application designer might have used a Compute On Page Load expression to generate the value of a control property, but the computed value is not serializable. Many types of objects are serializable and okay to save in the viewScope and other serialized scopes. For example, Strings, Numbers, and Java Dates are serializable, as are Arrays, Lists, and Maps containing such values. When saving other objects to the viewScope, it is recommended to verify that they are serializable. Java developers can check whether the object’s class implements the java.io.Serializable interface and that all the contents of the object are also serializable. It may be more convenient to verify that the NotSerializableError does not occur, by changing the application to save the pages on disk, opening the page that is saving the value to the viewScope, and clicking a submit button to redisplay the page a few times.
To fix your serialization problem, you should redesign your application not to save the nonserializable object. Usually, it is possible to save some String value that can reconstruct any nonserializable object during subsequent page requests. If it is not immediately apparent where the problem object is arising, you can take some common steps to find the cause of the problem. In the afterRenderResponse event on your page, you should print the names and values of the viewScope contents to the server console and do a (value instanceof java.io.Serializable) check on each to determine which viewScope object is causing the problem. When you have the name used to save the object in the viewScope, you can search your application for references to that name and put further debugging code where values are saved in the viewScope.
Functional Problems Caused by Control State Saving Issues
Besides serialization problems, the other kind of problem you may see when saving pages on the file system occurs when using controls and data sources built using the XPages Extensibility APIs rather than the controls the XPages runtime provides. If problems arise in the control implementations, you might see functional issues in the controls after the pages are redisplayed. The values set on the control in the XPage might be missing after the page is restored from disk. For instance, the control style might be gone, or if it was configured to do a partial update, it might have reverted to doing a full update. Such issues can be subtle and hard to notice, especially because the page appears correctly on the initial page display. Those problems occur when controls do not correctly implement the javax.faces.component.StateHolder interface. The solution is usually to ask the control developer to fix the problem in the control. Work around the issue might be possible by computing the values instead of directly setting them in the XPage. For instance, instead of setting the style as:
style="background-color: blue"
You might compute it as this:
style="#{javascript: 'background-color: blue'}"
No Space Left on Device Problems When the Disk Is Full
When saving page states to the file system has been enabled by setting xsp.persistence.mode to file or fileex, the possibility exists that the server file system might run out of space. This is determined by the amount of space used in proportion to how many users are accessing XPages in various applications, and up to a limit, to how many XPages they view during their session. A more likely scenario than the file system running out of space is that the server will run out of memory, so the solution here is not to change the mode to basic (saving the state in memory). Instead, you can use options to reduce the number of page files saved, to decrease their size, and possibly to avoid saving pages.
• The solution with fewest negative effects is to change the location where the page files are saved so that it points to a different, larger drive that is less likely to run out of space. The location where the files are saved is configurable through the option xsp.persistence.dir.xspstate; see the section dedicated to that option for more details.
• The option xsp.persistence.file.gzip ensures that files are compressed using GZIP format before they are saved to the file system. This results in smaller files, but at a cost of both more processing load on the server when compressing the files and longer response time to the users on the client side when decompressing the files to restore the pages.
• The option xsp.persistence.tree.maxviews can be used to reduce the number of files saved per user. The capability to use that option depends on the usage patterns of the application users. Reducing this limit might make users lose data entered into the browser when the cache limit is reached.
• The xsp.session.timeout option can be reduced to decrease the time page files remain on disk after the user stops interacting with the application. The usefulness of this option depends on the user application usage patterns. Possible negative effects can arise, including loss of data typed into a browser. It can be useful if many intermittent users are each accessing a few pages and then closing the browser or navigating away from the site.
• The xsp.persistence.file.threshold option can reduce the number of page files, at the expense of using more memory. It can be useful if the application pages are often small.
• The xsp.persistence.viewstate and xsp.session.transient options ensure that no pages are saved, but they are useful for only certain types of applications. Generally, they are useful when the application does not allow editing or creating documents and mostly uses HTTP GET requests instead of HTTP POST requests.
xsp.persistence.tree.maxviews
This option applies when using the option xsp.persistence.mode with the value basic, indicating that a user’s pages should be stored in memory. The default value is 4 (as shown in Listing 1.16), which means that the server stores four pages per user in memory.
Listing 1.16. xsp.properties Snippet for the xsp.persistence.tree.maxviews Property
# Defines the number of pages persisted when in memory (MRU algorithm)
#xsp.persistence.tree.maxviews=4
Refer to the section “Cache Size Limits and XPages Behavior When Limits Are Encountered” for details on what happens when users access a fifth page and the possible negative effects if a user attempts to access a page that is no longer in the cache. Those negative effects include the possibility of data loss, where values that the user has typed into the browser are no longer available and the user then must reenter values. If users of this application encounter such problems, it may be necessary to increase this in-memory cache size limit. If increasing this limit causes the server to run out of memory, it may be necessary to change the xsp.persistence.mode option to file or fileex; fewer problems arise with large cache sizes when dealing with pages persisted on the file system.
By changing your application design, you might reduce this limit without negative effects to your users. Generally, your application must be designed to mostly use HTTP GET requests instead of POST requests, to have few or no forms where users need to edit data, and few or no server-side actions in response to events. Reducing the value means that less memory is used per user. Thus, a greater number of users can access the server without incurring the response time issues associated with setting the modes file and fileex, which are usually used when attempting to support a greater number of users.
xsp.persistence.file.maxviews
This option applies when using the value file or fileex with the option xsp.persistence.mode, meaning that some or all of a user’s saved page states are written to the server’s file system. This option controls the number of previous pages the user viewed that will be saved as files on the file system before further opened pages cause older pages to be discarded. The default value is 16 pages, as shown in Listing 1.17.
Listing 1.17. xsp.properties Snippet for the xsp.persistence.file.maxviews Property
# Defines the number of pages persisted on disk,
# when "file" or "fileex" is defined (MRU algorithm)
#xsp.persistence.file.maxviews=16
Again, refer to the section “Cache Size Limits and XPages Behavior When Limits Are Encountered” for details on the behavior when users access the next page after the limit is reached. In theory, it might be necessary to increase this limit if users are using multiple page tabs in the web browser or if they use the browser’s back history.
If problems with insufficient disk space on the server arise, a possible solution is to reduce this limit so that fewer pages are saved per user. The value should not be so low that it causes the cache limit negative effects, however. The previous section, “No Space Left on Device Problems,” covers part of the xsp.persistence.mode topic.
xsp.persistence.viewstate
This setting controls how much of the page control tree state is saved between requests. It has four possible values: fulltree, nostate, delta, and deltaex, as shown in Listing 1.18.
Listing 1.18. xsp.properties Snippet for the xsp.persistence.viewstate Property
# Defines the persistence mode for the JSF pages (a.k.a. Views)
# fulltree: Persists the full page content. Default mode.
# nostate: The page is *not* persisted at all. Useful
# for pure read-only pages.
# The following options are valid only when the page
# is persisted in memory
# delta: Only persists the changes since the
# page was constructed
# deltaex: Persists the full state for the current page,
# and delta's for all other pages #xsp.persistence.
viewstate=
The default value for this property is fulltree, meaning that the full control tree state is saved between requests. This behavior can also be configured through the XPage root control’s viewState property, which you can set to the same possible values. The value set in an XPage overrides the application setting in the xsp.properties file. The behavior when this option is set to nostate is similar to when the option xsp.session.transient is enabled.
The value nostate means that none of the control tree is saved between requests. Instead, when attempting to restore a control tree state for a previously displayed page, a new control tree is created and used to process the incoming request. Some of the behavior here is similar to the behavior when the cache size limits are reached. For example, if the user has navigated to a different tab in a Tabbed Panel or has toggled a Section area open or closed, those controls appear at the initial state, either displaying the wrong tab or appearing closed instead of open.
However, submitted values from the browser are not ignored. Values in edit boxes can be saved to a document and simple actions can occur in response to events (although only if they are in an area that is initially visible in the first page display). When designing a page intended to be used with the nostate value, values that would normally be saved in a viewScope variable can be saved in an Input Hidden control included in page submissions and thus can maintain their value in the browser across multiple requests. In general, though, this option is usually used when building applications that are intended only to display data, not to edit existing documents or to create new documents. That way, the application developer doesn’t have to worry about maintaining data across pages and possibly losing user-entered values.
As a refinement of the nostate value, the value delta attempts to address some of the limitations of the nostate value by saving certain values between requests. However, it still does not save the control tree and it still re-creates a new control tree for every request. Not all XPages controls support the delta option, and not all control values are saved. When using the delta strategy for saving the control tree state, certain parts of the control tree are saved. Examples include the viewScope map; the Tabbed Panel control’s current tab state; the Section control’s open or closed state; and the View Panel control’s first property value, which corresponds to which page of data is being displayed. An example of a value that is not saved is the View Panel control’s rows value, which indicates how many documents will be displayed in each page of data. It is common to make the rows configurable so that an end user can choose to display more rows in each page. With the nostate and delta options, the View Panel control reverted to displaying the initial number of rows on the next redisplay of the XPage, so the user’s change to the rows value was lost.
The deltaex value gives a similar behavior to the delta option, in that most of the previous pages in a user’s session history are saved using the delta option. Thus, only some of the state in the control tree is saved. The difference with the deltaex value is that the current page the user is viewing is entirely saved. The entire control tree state for the current page, not just the minimal state used with the delta value, is serialized and saved in memory. The behavior where it serializes the state before saving it in memory is different than the normal in-memory saving of the control tree explained for the xsp.persistence.mode value basic. That serialization strategy is also used with the xsp.persistence.file.threshold option. It has the disadvantage that serialization errors may occur, such as those explained in the previous section on serialization problems. However, this option has an advantage over delta view state saving: The user is less likely to encounter problems where page state seems to have reverted. The page state is the same for most use cases, and only when users use the Back button in the browser will they encounter the behavior explained for the delta value.
xsp.persistence.file.gzip
This option applies when the xsp.persistence.mode option is set to file or fileex, meaning that the page state is stored on the server as files on the file system. Listing 1.19 shows the relevant part of the xsp.properties file.
Listing 1.19. xsp.properties Snippet for the xsp.persistence.file.gzip Property
# Defines if the persisted files should be GZIP'ed on disk
# (less disk space, more CPU processing)
#xsp.persistence.file.gzip=false
You can set this property to true to cause the files to be zipped or compressed before they are saved. (GZIP is a particular compression utility.) This means that the file size is smaller, so there is less possibility of running out of disk space on the server. However, this comes at the cost of running the compression algorithm, which uses up server computation time and may cause decreased response time for users, depending on how busy the server is. The section entitled “No Space Left on Device Problems” discusses other solutions to low disk space problems, as part of the xsp.persistence.mode property discussion.
xsp.persistence.file.async
This option applies when the xsp.persistence.mode option is set to file or fileex, meaning that the page state is stored on the server as files on the file system. It defaults to true, as shown in Listing 1.20.
Listing 1.20. xsp.properties Snippet for the xsp.persistence.file.async Property
# Defines if the pages persistence to a file
# should be done asynchronously (best response time,
# creates extra threads on the server)
#xsp.persistence.file.async=true
The default value (true) means that, after the page has been used to generate the HTML response, it is not immediately saved to the file system during that user’s browser request. Instead, a helper thread later handles the operation of writing the file to the file system; the response to the browser is not delayed by interaction with the server file system. This leads to better response times and better user experience in the browser.
The most common use case for setting this option to false is for debugging issues encountered when writing the page to the file system.
Before the page content is passed to the helper thread, it is serialized to a buffer. This can result in serialization problems with an error page displayed to the user, as mentioned in the section on the xsp.persistence.mode option. Later, the helper thread attempts to save the buffer to the file system. Any problems during the file system save do not appear in the browser and are noted only in the server log files. Problems saving to the file system can occur if the server disk is full, if the server process does not have permission to write values to the cache location, or if any other types of java.io.IOException problems occur. If a problem saving the page arises, the behavior for the user is the same as if the page was discarded because the cache was full. This can lead to data loss issues. For more information, refer to the section “Cache Size Limits and XPages Behavior When Limits Are Encountered.”
xsp.persistence.file.threshold
This option applies when the xsp.persistence.mode option is set to file or fileex, meaning that the page state is stored on the server as files on the file system. Listing 1.21 shows the relevant property and help text as contained in the xsp.properties file.
Listing 1.21. xsp.properties Snippet for the xsp.persistence.file.threshold Property
# Defines if the pages should be serialized in memory,
# instead of in files, when their size is less
# than a specific amount of bytes. 0, which is default,
# means that it is always serialized to disk
#xsp.persistence.file.threshold=0
When set to 0, the user’s pages on the server are serialized (converted from control tree objects to a representation of objects that can be saved to a file), and the serialized pages are saved to a file on the server’s file system. This option provides a size threshold that depends on the size of the serialized page, measured in bytes. If the serialized page size is less than this threshold, the serialized page is stored in memory instead of on the file system. Note that this is different than the behavior when the xsp.persistence.mode option is set to basic. In that case, the actual page control tree objects are saved in memory, whereas, in this file or fileex case, the serialized representation of that page is saved instead. Because these smaller pages are saved in memory instead of on disk, response times are improved for browser requests for these pages. The possibility of running out of server memory does arise, along with the consequent issues discussed at length elsewhere in this chapter. If such problems are encountered, it may be necessary to reduce this threshold again. This threshold option was added in version 8.5.3.
xsp.persistence.dir.xspstate
This option controls the location where the state of pages previously opened by a user are saved when saving to the file system. Listing 1.22 shows a snippet from the relevant section in the xsp.properties file.
Listing 1.22. xsp.properties Snippet for the xsp.persistence.dir.xspstate Property
# Define the directory where the JSF pages are persisted
# defaults to <tempdir>/<notesSessionID>/xspstate
#xsp.persistence.dir.xspstate=
Pages are saved to the file system when the xsp.persistence.mode option is file or fileex. The generally recommended mode is fileex, so this location is likely to contain page files.
The page state files are saved to a location such as this: C:Documents and SettingsuserNameLocal SettingsTemp otes74483Dxspstate2CXXTXFVP7Ccxzkvftr56.ser
The folder C:Documents and SettingsuserNameLocal SettingsTemp is the default Windows temporary folder. That folder location varies, depending on your operating system and how your OS is configured. In this example, the folder notes74483D is a Notes/Domino instance temporary folder; the number changes every time Notes or Domino is restarted. In version 8.5.0, this folder didn’t exist and the XPages persistence used different subfolders under the temporary folder. The folder xspstate is a container folder for the page files; other container folders are present at that level. The 2 is a folder corresponding to the application. Those numbers are lazily assigned based on the order applications are accessed using XPages, starting at 1 for the first application opened after the server starts. The CXXTXFVP7C is a user session identifier. Different users, or the same user logged in using a different web browser, have different session IDs. The sessions also have a timeout, so a user reaccessing the application after the session has expired triggers a new session. The cxzkvftr56.ser is the viewId identifying this XPage control tree instance. The viewId is accessible through Server Side JavaScript via the view.getViewId()API call and is present in the HTML source produced by an XPage. Files saved here are discarded when the page cache for that user session is full, when the user session has timed out due to inactivity, and when the server is restarted. It may be useful to change this setting to point to a different location, if the folder is taking up too much space on the main server drive and an alternate drive has more available space. Other options also can be set to reduce the space used by the page saving. For more information, refer to the section “No Space Left on Device Problems,” as part of the xsp.persistence.mode property discussion. It may also be useful to change this if faster drives are available, to give better turn-around time to individual web users.
This option is server-wide, so it should be set in the server xsp.properties file. Values set in a particular application’s xsp.properties file are ignored.
xsp.persistence.dir.xspupload
As described in the help text in Listing 1.23, this option defines the location where uploaded files are temporarily stored on the server file system.
Listing 1.23. xsp.properties Snippet for the xsp.persistence.dir.xspupload Property
# Define the directory where the temporary uploaded files are stored
# defaults to <tempdir>/<notesSessionID>/xspupload
#xsp.persistence.dir.xspupload=
If the File Upload control is bound to a document field so that it will be saved as an attachment, the file will not be in this temporary upload folder for long and will be moved to the folder referenced by the option xsp.persistence.dir.xsppers.
The default location of this folder is like so: C:Documents and SettingsuserNameLocal SettingsTemp otes74483Dxspupload
Refer to the option xsp.persistence.dir.xspstate for a discussion of the folders up to xspupload. Within the xspupload folder, the file is saved with a temporary filename, unrelated to the name before upload or to the name used when it is attached to the document. Note that there is a limit to the size of files that can be uploaded, configurable through the option xsp.upload.maximumsize.
It may be useful to change this setting to point to a different location if the folder is taking up too much space on the main server drive and another drive has more available space.
This option is server-wide, so it should be set in the server xsp.properties file. Values set in a particular application’s xsp.properties file are ignored.
The xsp.persistence.dir.xspupload property is related to the xsp.upload.directory property but should be used as the preferred option because the xsp.upload.directory is deprecated.
xsp.persistence.dir.xsppers
This option controls the location where document attachments are temporarily stored on the server file system after the files have been uploaded and associated with a document, but before the document has been saved. An intermediary step comes before the attachment is associated with a document: At that point, the file is saved in the location indicated by the xsp.persistence.dir.upload option. Listing 1.24 displays the relevant snippet from xsp.properties.
Listing 1.24. xsp.properties Snippet for the xsp.persistence.dir.xsppers Property
# Define the directory where the document attachments
# are temporarily persisted (stored)
# defaults to <tempdir>/xsppers
#xsp.persistence.dir.xsppers=
While the file is in this xsppers folder, the browser URL to download the file is like: http://serverName/appName.nsf/xsp/.ibmmodres/persistence/DominoDoc-3-Body/red.GIF
With the default settings, the actual file location on the server file system is like: C:Documents and SettingsuserNameLocal SettingsTemp otes74483Dxsppers2CXXTXFVP7CDominoDoc-3-Body ed.GIF
See the option xsp.persistence.dir.xspstate for a discussion of the folders up to DominoDoc-3-Body, except that these attachment files are saved in an xsppers folder instead of the xspstate folder described in that option.
DominoDoc-3-Body/ indicates that this is the third document to which files are being attached in the application. That folder can contain multiple files as more attachments are added to the document.
red.GIF is usually the name of the file before it was uploaded, although there is an option on the file upload control to assign a different name to the uploaded file.
After the document has been saved, the file no longer is accessed through a persistence URL. Instead, it is accessed through a Domino document attachment URL: http://serverName.example.com/appName.nsf/xsp/.ibmmodres/domino/OpenAttachment/appName.nsf/91AB1F5555CF7E06802578FA005F8DFC/Body/red.GIF
Some different variants of that URL syntax exist—for example, the document might be from an application on a different server.
The files remain in the temporary persistence location until the user session expires. The file is not removed after the document is saved, although it is no longer referenced by URLs.
Note that there is a limit to the size of files that can be uploaded, configurable through the option xsp.upload.maximumsize.
It may be useful to change this setting to point to a different location if the folder is taking up too much space on the main server drive and another drive has more available space.
This option is server-wide, so it should be set in the server xsp.properties file. Values set in a particular application’s xsp.properties file are ignored.
The Client Side JavaScript Properties
These options relate to the JavaScript framework used in the browser. “Client side” here means in the browser, as opposed to Server Side JavaScript, which executes in the XPages runtime as part of the web server. The Client Side JavaScript framework used by XPages is the Dojo Toolkit, so these options relate to how Dojo is used in XPages.
xsp.client.script.dojo.version
This option relates to the Dojo Toolkit, which comes installed on the Domino server and in the Notes client. Pay close attention to the help text shown in Listing 1.25.
Listing 1.25. xsp.properties Snippet for the xsp.client.script.dojo.version Property
# The version of the Dojo Toolkit to use.
# By default the Dojo version is detected by examining the folder
# Data/domino/js/ for subfolders with names like dojo-<version>,
# and using the latest version available.
# Change this setting if you are installing different versions of Dojo
# in that folder and you need XPages to use a specific version.
# Note, using XPages with a Dojo version other than the default
# is unsupported; if you do so you will need to test for
# compatibility problems.
#xsp.client.script.dojo.version=
Dojo is used in XPages as a client (browser) JavaScript framework and to provide the browser behavior of some controls. People familiar with Dojo can also use the dojo utilities in their own application scripts. In addition, it is possible to use the full set of Dojo controls directly in XPages pages. However, most of those controls have not been tested with XPages so it is up to the application developer to debug any problems encountered.
The Dojo Toolkit resources (JavaScript files, icons, style sheets, and so on) are installed on the Domino server, where web URLs can access them. The HTML for individual XPages refers to the main dojo.js file, which provides the Dojo infrastructure, and to other Dojo files as needed.
Different versions of Dojo exist, each with a different version number. Whenever you upgrade a Domino server, such as from version 8.5.2 to version 8.5.3, a new, later version of Dojo is installed. If you do an upgrade install, the older version of Dojo for the previous Domino server version remains present in the server’s Dominodata folder. (From version 8.5.3, now that the supported Dojo is packaged as an OSGi plug-in, the older Dojo version no longer is available on upgrade.) The XPages runtime is verified to run with only a single version of Dojo, the XPages-supported Dojo version for that release, so usually the older version left after an upgrade is unused. The Domino server versions 8.5.2 and 8.5.3 contain two installs of Dojo. Lotus iNotes uses the installed version with the earlier number, and the XPages runtime uses the later Dojo version. The URLs to Dojo resource locations contain the Dojo version number, so to refer to a Dojo file, your application should use paths like this:
src="/.ibmxspres/dojoroot/dijit/themes/tundra/tundra.css"
The XPages runtime preprocesses the /.ibmxspres/dojoroot/ portion of that path. Thus, the HTML output for the page contains a URL that points into the Dojo resource location for the current Dojo version.
You can use this xsp.client.script.dojo.version option to choose a Dojo version to use in XPages, from among the Dojo version installs available on the server. Use of any Dojo version other than the version associated with XPages for that Domino release is an unsupported configuration, so you must test to verify that the XPages infrastructure and the XPages controls used in your application work with the version of Dojo you have chosen. The version format is like 1.6.1—that is, three integers separated by dots, read as “major.minor.micro.” A text value after the third number is allowed, though not included in version comparisons, so it can be like “1.6.1.xxx,” with the text referred to as a qualifier.
The option is usually set in an application’s xsp.properties file when your application needs to use an unsupported Dojo version. You might need to set the option in the server-wide xsp.properties file if you have installed an unsupported version for use in a specific application but it is being detected as the default version and is being used in all XPages applications on the server. In that case, the server-wide xsp.properties file should be explicitly configured to use the supported version. When setting the option in the server file, keep in mind that the server xsp.properties file is not overwritten on upgrade, so after upgrade, you must edit the file to change to the version supported by the upgraded Domino version.
Note that when setting this option in an application xsp.properties file, you also need to disable the resource aggregator by setting the option xsp.resources.aggregate to false. The aggregator incorrectly uses the files for the server-wide Dojo version, yet the reference to the main dojo.js file uses the application Dojo version. Thus, you end up with a mix of Dojo versions in use on the page, giving Client Side JavaScript errors. That issue is still open in version 8.5.3.
Table 1.3 shows the Dojo versions that XPages runtime supports.
Table 1.3. XPages Runtime–Supported Dojo Versions

Reasons to Use Different Dojo Versions
You might want to use different Dojo versions in your application, for a few reasons. As mentioned before, none of these is officially supported, so testing is required.
You might want to upgrade to a later point release of Dojo when that point release has Dojo fixes or new features that you need for Dojo controls used in your application. Point releases are instances when the third part of the version number changes, such as from 1.6.0 to 1.6.1. Different point releases are usually broadly compatible and less likely to result in breaking functionality, although you should read the release notes to be aware of any possible issues.
You might want to downgrade to the version of Dojo used in the previous version of the Domino server after a server upgrade. This is sometimes useful as a quick fix when your application is using a specific Dojo version, such as when the paths to the Dojo resources are explicitly using the version number, instead of using the /.ibmxspres/dojoroot/ paths mentioned earlier. Alternatively, your application might have been using the dojox experimental Dojo controls, and they might have changed significantly in the upgraded Dojo version so that your pages are now broken. As with all unsupported Dojo versions, you must retest your applications with this older Dojo version because the server-side behavior of the XPages runtime controls will have been tested with only the supported Dojo version. It is better to upgrade your application design to work with the new supported version.
You might want to install a source copy of the supported Dojo version for debugging. The version of Dojo installed in the Domino server is compressed to remove whitespace, to use shorter variable names, and to implement other changes to make the files smaller and the code run faster. That makes it more difficult to read the JavaScript code when you need to debug, to investigate some problem. You can install the more verbose source copy of Dojo from the dojotoolkit.org website. You will need to give your source copy a version, such as 1.6.1.source instead of 1.6.1, because the versions need to be unique. Then in the application, set this xsp.client.script.dojo.version option to the version 1.6.1.source so that the uncompressed source is available for debugging.
As another option, you might want to use an entirely different version of Dojo than that supported by the XPages runtime. Perhaps it has some feature you want to use in your controls, or maybe you are using some third-party Dojo-based controls that work with only a specific Dojo version. This is the riskiest option and the one most likely to introduce compatibility problems in your applications. You will likely need to fully test that your application and the XPages controls it uses work with the proposed Dojo version in all the browsers your application users will be using. Areas to test in particular are the Partial Update behavior, the event handling (for actions configured in the Designer Events view), the Rich Text Editor control, the Date Time Picker, any type-ahead controls, and anywhere you’re setting a dojoType property on an XPage control or in pass-through HTML.
Installing Multiple Dojo Versions and Determining the Version Used
The Domino server detects the Dojo-installed versions available in various ways. Among the detected versions, an algorithm selects the default Dojo version for the server. In addition, within an application are various factors that determine the Dojo version used for that application.
Since version 8.5.3, there is an XPages Dojo contribution extension point so that the Dojo resources can be provided within a plug-in, not just as a folder under the Dominodata directory.
The supported Dojo version in version 8.5.3 is packaged as a plug-in (as mentioned, another version on the server is not supported for XPages, just for Lotus iNotes). The plug-in is installed as a zipped .jar file here:
{dominobin}osgisharedeclipseplugins
com.ibm.xsp.dojo_8.5.3.20110824-1655.jar
That Dojo plug-in, shipped with the Domino server, lists the Dojo version in an inner text file:
/resource/dojo.properties
In version 8.5.3, it lists the version as follows:
DojoVersion.versionStr=1.6.1
Your server might contain other plug-ins contributing Dojo versions to the XPages runtime. This is most likely to occur if you’ve installed some XPages Extensibility library of controls that requires and provides some other version of Dojo. Additionally, when you want to install different Dojo versions, you might find it useful to package the alternate Dojo versions as plug-ins.
The other way of installing Dojo versions is as domjs subfolders, as in this folder present in Domino 8.5.3 servers and used only by Lotus iNotes:
{dominodata}dominojsdojo-1.5.1
When providing Dojo versions as folders, they must be present in that Dominodatadominojs parent folder. That parent folder is known as domjs because, on the Domino server, the URL used to access the subfolder will be like http://server.example.com/domjs/dojo-1.5.1.
The name of the Dojo folder under domjs must match that format, with dojo- and the major.minor.micro version number. A folder name such as dojo-1.5.1.xxx is also possible, but the extra text at the end is not included in version comparisons. If the folder name does not match either of those formats, it will not be recognized as an installed version of Dojo. Because the XPages Dojo extension point became available only in version 8.5.3, in the older servers, the only way to provide Dojo versions is through domjs folders.
The contents of the Dojo resource folder should be like this:
dijit/
dojo/
dojox/
ibm/
The first three folders, dijit, dojo, and dojox, are standard folders that are available in the download zips from the Dojo Toolkit website.
The ibm/ folder contains extra JavaScript files that the XPages runtime requires. When installing a new Dojo version, you need to copy the ibm folder from the supported Dojo location into your new location so that those files are available to the XPages runtime. (Anyone using the version 8.5.3 XPages Dojo extension point will notice that it was designed so that you don’t need to copy the ibm folder, but that feature is unavailable at this time.)
At a server level there is a detected default Dojo version, usually used when individual applications do not specify an explicit version in the xsp.properties option.
If the server-wide xsp.properties file contains the option xsp.client.script.dojo.version and it matches one of the installed Dojo versions, that will be the default dojo version for the server.
Otherwise, the default version is chosen from among the installed versions. Dojo installs provided as domjs folders are considered candidates for default, unless the version is like 1.1.1.xxx. The text at the end after the “major.minor.micro” numbers disqualifies them as candidates. Dojo resource locations provided through the XPages Dojo extension point are considered candidates when their implementation of the method DojoLibrary.isDefaultLibrary() returns true. The candidate location with the highest version number becomes the default server dojo version.
Within an application, the version of Dojo used depends on the value of the xsp.client.script.dojo.version option and also on the maximum dependency Dojo version.
The max dependency Dojo version applies only when your application uses any XPages Extensibility library of controls. As explained in the xsp.library.depends option, an application can be configured to use multiple libraries of controls other than those that the XPages runtime provides. A library can declare a required version of Dojo, indicating that the library will not work if the Dojo version the application uses is less than the required version. When an application depends on multiple libraries requiring different minimum versions of Dojo, the application must use a Dojo version the same or greater than the maximum Dojo version required by any of the libraries. That maximum is known as the max dependency Dojo version.
In an application, when the xsp.client.script.dojo.version option is explicitly configured, that version of Dojo is used. Note that the version can have text after the version numbers, as in 1.6.1.source. If the application-configured Dojo version (including any text after the numbers) does not exactly match one of the installed Dojo versions, an error will prevent the application from running. If the application is using some control libraries, the option value is validated against the max dependency Dojo version. If the version in the option is less than the max dependency version, an error will prevent the application from running. That can happen if you upgrade some library on your server so that the dependency Dojo versions change and your application-specified version is no longer viable.
When the option is not configured in the application, either the max dependency version or the server default Dojo version is used. The one with the highest version number applies.
xsp.client.script.dojo.djConfig
This option can add extra values to the djConfig object in the page header besides values that XPages automatically outputs. Listing 1.26 includes the relevant section of the xsp.properties file.
Listing 1.26. xsp.properties Snippet for the xsp.client.script.dojo.djConfig Property
# Add parameters to the djConfig attribute of Dojo.
# Useful to switch Dojo to debug, using for example:
# xsp.client.script.dojo.djConfig=isDebug:true
#xsp.client.script.dojo.djConfig=
The full description of parameters to the djConfig object is part of the Dojo Toolkit documentation at dojotoolkit.org. The value format is the contents of a Client Side JavaScript object, so it can have multiple name and value pairs. A colon (:) separates the name and value, and commas (,) separate the different pairs. The value is written in the HTML page as an attribute, so it should not contain double quotes (") or newline characters. Consider two examples of the format:
someBoolean:true, someString: 'text', someNumber: 20
someArray: ['text1','text2'], someObj: {name1:'value1', name2:'value2'}
This option can be set per XPage, in the XPage root control property named properties. Unlike in some other options, the behavior is not solely determined by the value in the application and server xsp.properties files.
The option is most commonly used to set the parameter isDebug:true. That parameter is used when your page has some Client Side JavaScript error, to find out more information about the cause. The option is useful when writing complicated Client Side JavaScript code or when attempting to use Dojo controls instead of the predefined XPages controls by setting a dojoType property on an XPage control or in an HTML snippet in the XPage source. Since version 8.5.3, by default, the XPages resource aggregator appends all the Dojo .js files into a single file. For debugging purposes, then, it is usually necessary to disable the resource aggregator by setting the option xsp.resources.aggregate to false. Also, the .js files on the server are compressed, with formatting whitespace removed. To make the files more readable for debugging purposes, it may be useful to replace the server’s dojo resources with a source-uncompressed version of the same, downloaded from the Dojo Toolkit website. Uncompressed versions of the XPages runtime files are included in the Domino server, but under names such as file.js.uncompressed.js; you’ll need to do some file renaming to use the uncompressed versions. For more on debugging Client Side JavaScript, see Chapter 4, “Working with the XSP Client Side JavaScript Object.”
Besides the parameters explicitly configured in this option, the XPages runtime outputs other parameters to the djConfig object, some by default and others depending on property settings in the XPage.
Every XPage outputs the locale parameter, as in locale: ‘en-us’. That usually corresponds to the language and region of the user’s web browser, although if the application is translated but not to the user’s language, the application’s default language may be used instead. For more on how the XPages locale is chosen, see the Internet document “Locale Use in XPages.”
Another djConfig locale parameter, extraLocale, may be useful to configure in this option when your application has pages containing multiple languages. If you need to specify that option, keep in mind that the XPages locales are Java locales, as with en_US, which need to be explicitly converted to a Dojo locale, such as en-us. Some locale conversions are complicated, as with the language Indonesian, which is in in Java but id in Dojo. For more details, in the Internet document “Locale Use in XPages,” see the section “Norwegian and the Deprecated Locale Codes.”
The djConfig parameter parseOnLoad:true is usually set by the XPages runtime instead of through this option. It is not always present on an XPage, but the presence of certain XPage controls causes the option to be set to true. In addition, the XPages root control has a Boolean property dojoParseOnLoad that can be set to output this parameter. The parseOnLoad parameter means that the Dojo infrastructure detects any dojoType attributes in the HTML source and converts those elements to Dojo controls or modules.
A djConfig parameter named modulePaths provides locations where Dojo will search for Dojo module JavaScript files. To output a module path, an XPage resource can be set in an individual XPage. Actually, it outputs the module path as a separate line in the header, but the effect is similar to when the value is set in the djConfig parameter, so the djConfig modulePaths parameter is not generally used in XPages.
The module path resource can be used when providing Dojo-based controls or modules as JavaScript files in your application. Listing 1.27 provides the XPage source for such a page.
Listing 1.27. Setting the Dojo Module Path in XSP Markup
<?xml version="1.0" encoding="UTF-8"?>
<xp:view xmlns:xp="www.ibm.com/xsp/core"
dojoParseOnLoad="true">
<xp:this.resources>
<xp:dojoModulePath prefix="inapp" url="/" />
<xp:dojoModule name="inapp.CustomButton" />
</xp:this.resources>
<xp:button value="Label" id="button1"
dojoType="inapp.CustomButton" />
</xp:view>
There is also an XPages extension point for module paths, used in XPages Extensibility control libraries. For example, the extension point is used by the XPages Extension Library project on OpenNTF.org. When that library is installed, any Dojo module names beginning with extlib. are not searched for in the Domino server’s Dojo folder. Instead, they are registered as being available from a URL folder pointing into the Extension Library plug-in. The URL to an individual module JavaScript file is in this form: http://server.example.com/xsp/.ibmxspres/.extlib/dijit/Tooltip.js
The HTML Page-Generation Properties
This category of properties provides you with several properties that can be used to configure the emitted HTML markup from the XPages runtime. This includes document and content type, encoding, compression mode, client-side validation, and client or server redirection.
xsp.html.doctype
This property gives you control over the <!DOCTYPE> tag that is emitted as the first line of all your XPages at runtime. This is not an HTML tag, but a declaration to the browser for the document type definition (DTD) used to create the page that is being served up—essentially, the type and version of the markup language. Some good summary information is provided in the xsp.properties file, in Listing 1.28.
Listing 1.28. xsp.properties Snippet for the xsp.html.doctype Property
# Defines the document doctype generated by the engine
# Defaults to HTML 4.01 transitional, but XHTML is available with:
# html PUBLIC "-//W3C//DTD XHTML 1.0 Transitional//EN
# "http://www.w3.org/TR/xhtml1/DTD/xhtml1-transitional.dtd"
# Note that when using XHTML, the content type is still text/html as IE,
# as well as Dojo, don't support application/xhtml+xml
# xsp.html.doctype=HTML PUBLIC "-//W3C//DTD HTML 4.01 Transitional//EN" http://www.w3.org/TR/html4/loose.dtd"
You can specify the literal <!DOCTYPE> option directly in the xsp.properties file or via Domino Designer using Application Properties > XPages > HTML doctype: combo box menu. With the latter, you can make your selections using the logical doc type names, as follows:
• HTML Strict
• HTML Transitional
• XHTML Strict
• XHTML Transitional
• HTML5
These are transformed into the following <!DOCTYPE> declarations at runtime, respectively:
<!DOCTYPE HTML PUBLIC "-//W3C//DTD HTML 4.01//EN"
"http://www.w3.org/TR/html4/strict.dtd">
<!DOCTYPE HTML PUBLIC "-//W3C//DTD HTML 4.01 Transitional//EN"
"http://www.w3.org/TR/html4/loose.dtd">
<!DOCTYPE html PUBLIC "-//W3C//DTD XHTML 1.0 Strict//EN"
"http://www.w3.org/TR/xhtml1/DTD/xhtml1-strict.dtd">
<!DOCTYPE html PUBLIC "-//W3C//DTD XHTML 1.0 Transitional//EN"
"http://www.w3.org/TR/xhtml1/DTD/xhtml1-transitional.dtd">
<!DOCTYPE html>
HTML Transitional is the runtime default. Even though you can change this setting using this property, you must consider certain issues. As pointed out via the comments in the xsp.properties file, not all browsers fully support XHTML mode. Using a strict HTML DTD can cause problems with Dojo controls within XPages—for instance, the dojoType attribute is used by the XPages Date Time Picker renderer when generating the markup for the Dojo control. Because dojoType is not part of the HTML specification, the emitted markup fails a strict validator.
Similarly, you can have HTML content on an XPage that does not emanate from the XSP design markup at all, but rather from the document data itself. Suppose that your XPage contains a Rich Text control instance and you are working with one originally created on the native Notes client. The data in the Notes rich-text field has been transformed into HTML by an internal CD-MIME engine. The resulting HTML might not be well formed or might contain deprecated HTML tags, which would also result in validation failures.
These are issues to bear in mind if you are considering a <!DOCTYPE> change.
xsp.html.meta.contenttype
This property is really a convenient means of inserting an HTML <meta> tag into the emitted page markup as the first line in the <head> section. Simply set the property to the desired Boolean value, as shown in Listing 1.29.
Listing 1.29. xsp.properties Snippet for the xsp.html.meta.contenttype Property
# Ask the XPages runtime to generate a <meta> tag in the HTML header
# defining the content type, and the optional character set.
# This meta tag is the first tag appearing after the <head> one.
# For example, it generates something like:
# <meta http-equiv="Content-Type" content="text/html; charset=utf-8">
#xsp.html.meta.contenttype=false
The tag includes http-equiv and content attributes, with the values reflecting the settings applied by the runtime. For example, if such a metadata declaration is required by policy for all web pages in an application or organization, setting this property makes the implementation simple.
The alternative is to stipulate the metadata manually, by inserting <xp:metadata> tags with the required attribute values into the <xp:resources> of each XPage, which is cumbersome. Extra metadata, over and above that automatically specified by this property, can be added to any page using the <xp:metadata> tag. You will end up with multiple <meta> tags in the <head> section of the emitted markup, but that is okay.
xsp.html.preferredcontenttypexhtml
Listing 1.30 summarizes this property in the xsp.properties file.
Listing 1.30. xsp.properties Snippet for the xsp.html.preferredcontenttypexhtml Property
# Force the content type to be application/xhtml+xml if the user agent
# supports it
# WARN: this has to be used very carefully as some features won't work
# with an XML content type. For example, the innerHTML JavaScript
# property is read only and then breaks Dojo or XPages partial refresh.
# Moreover the RichText fields converted to MIME are not XHTM compatible
# This option should only be used in very particular cases
# xsp.html.preferredcontenttypexhtml=false
Although you can use the xsp.html.doctype property to set the <!DOCTYPE> of the emitted page to XHTML, the Content-Type response field is still set to text/html to guard against the potential pitfalls described for that property, such as non-XHTML-enabled browsers and noncompliant XHMTL markup generated in certain use cases. If your application is not affected by such issues and you want to coerce the Content-Type field in the response header to explicitly specify the application/xhtml+xml type (which makes it a real XML file), simply set this xsp.html.preferredcontenttypexhtml property to true. It will be applied as long as the end user’s browser includes application/xhtml+xml as an Accept parameter value.
xsp.html.page.encoding
This property is used to set the preferred character encoding for the web pages generated by your XPages. The XPages default encoding in utf-8, as shown in Listing 1.31.
Listing 1.31. xsp.properties Snippet for the xsp.html.page.encoding Property
# Defines the character set returned for the page
#xsp.html.page.encoding=utf-8
UTF-8 is part of the Unicode standard and is the preferred character encoding for web pages. However, you can specify alternative character encoding standards, although this is not a common occurrence in practice, at least from this author’s experience. A comprehensive selection of character encodings is made available in Domino Designer via the Application Properties editor, as shown in Figure 1.14.

Figure 1.14. Application Properties, HTML Generation > Encoding Options
Picking an entry from the combo box writes the value as the xsp.html.page.encoding setting in the local xsp.properties file, while the Domino server/Notes client file provides a convenient global override mechanism.
xsp.compress.mode
XPages supports a number of compression options that are designed to give maximum control over the manner in which XPages content is sent from the server to the client browser. Good summary information is provided in the xsp.properties file, as shown in Listing 1.32.
Listing 1.32. xsp.properties Snippet for the xsp.compress.mode Property
# XSP compression
# This defines the compression mode used when a page is rendered to
# the client. The compression is effectively enabled when the client
# supports it, as specified in the HTTP header of the request.
# The possible values are
# none
# no compression at all
# gzip
# the response contains the content-length header, which forces
# the data to be buffered.
# this is the prefered mode and is required to support HTTP 1.1
# persistent connections.
# gzip-nolength
# The content is compressed but it doesn't compute the content-length,
# Thus it doesn't need to buffer the result
#xsp.compress.mode=gzip
Compressing text resources such as HTML, CSS, and JavaScript can boost runtime performance by drastically reducing the physical size of the data that is sent from the server to the browser when rendering an XPage. The default mode specifies an encoding format called gzip, short for GNU zip. XPages content is compressed using this format by default, as long as the browser client can handle this type of encoding. The compression mode negotiation occurs between browser and server using the request/response headers. If the browser specifies an Accept-Encoding of gzip in the request, XPages responds with gzipped content and sets the Content-Encoding field in the response header to gzip. The size of the compressed content is also computed and included in the Content-Length response header field, unless gzip-nolength is specified as the preferred compression mode. When the Content-Length field is set, all the content is buffered before being sent to the browser. When not set, the response is sent to the browser immediately, which can be advantageous in low-bandwidth situations as the page will incrementally be rendered by the browser as it receives content from the server.
You can access this feature directly through Domino Designer using the Application Properties > XPages > HTML Generation > Compression combo box options.
xsp.client.validation
This property specifies whether to apply client-side validation. The default setting is true, as shown in Listing 1.33.
Listing 1.33. xsp.properties Snippet for the xsp.client.validation Property
# Enable the client validation - default to true
#xsp.client.validation=true
User input validation is a fundamental aspect of any application. Any input control included on an XPage can have validation conditions attached so that the data ultimately submitted by the end user at runtime can be checked against particular criteria. The validation criteria might be that a required field is not empty or that a number in another field falls within a certain range. Any stipulated validation criteria are always executed on the server side by the XPages runtime as part of the validation phase of the request lifecycle. In other words, validator code is always executed on the Domino server after the XPage is submitted from the browser agent. However, XPages also provides the option of having validation performed on the client side—that is, it provides the capability to apply the validation criteria in the browser container before the page is submitted to the server. In this scenario, if the data on the page does not pass the validation conditions, the page is not submitted to the server at all and the user is notified with one or more error boxes in the browser. This can result in an improved user experience—because of quicker validation feedback, for example—and thus client-side validation is enabled by default in the XPages runtime.
If client-side validation is not really required for a given application—remember, server-side validation is performed regardless—you can simply turn it off. For a particular application, you can do this via Domino Designer by selecting the Application Properties > XPages > Client Validation > Off radio button. This action results in xsp.client.validation=false being written to the local xsp.properties file. If the Server Default option is chosen, the preference is taken from the xsp.properties file on the Domino server (or from the xsp.properties file in the Notes client if running on that platform, which makes the UI name somewhat confusing).
When client validation is turned on, client validation code is rendered at runtime in the emitted HTML for any input control on the XPage that has validators attached. Note that individual controls can also opt out of the client-side validation either by setting their own disableClientSideValidation Boolean property to true or by setting the disableValidators Boolean property on event handlers belonging to the control to true. Finally, be aware that not all standard validators have a client-side implementation.
xsp.redirect
The xsp.redirect comment included verbatim from the xsp.properties file, in Listing 1.34, summarizes this feature concisely.
Listing 1.34. xsp.properties Snippet for the xsp.redirect Property
# xsp Page redirect mode - This happens when the runtime redirects
# to a new page (navigation rules, API, simple action)
# When this property is true, then the runtime emits an HTTP 302 code
# to the ask client to redirect to the new page.
# This ensures that the client has the right URL in its address bar,
# at the cost of an extra client/server roundtrip.
# Else, the redirection is purely done on the server, without any
# notification to the browser (the URL doesn't change)
#xsp.redirect=true
When something happens within the runtime on the server side that changes the current page, as with the execution of a navigation rule, simple action, or particular set of API calls, XPages can simply render the new page to the browser client or instruct the client to request the new page. The latter means that the browser always shows the correct URL in the address bar. This is critical if your application needs to support page bookmarking, enabling users to return to a particular part of your application at some future point via a browser bookmark. The xsp.redirect property defaults to true, but you can set it to false to gain some performance optimization if bookmarking is not important and you generally have no requirement to have the browser address bar accurately reflect the active page.
The Error-Management Properties
These options control the application’s response to the browser when an unanticipated problem occurs. In those situations, instead of displaying the current application page or the next page triggered by some action, an error page displays and reports that some problem occurred. These errors are different from the anticipated validation errors, which are displayed in the Display Errors controls, such as messages indicating that a required field has not been supplied. Such validation errors are expected to occur as users fill out forms, and the message indicating the problem is displayed within the current page so that users can continue editing their form and not lose the values they entered so far.
The default behavior for an XPages application is that the underlying web server handles any errors encountered and returns a simple page with the HTTP error code, along with possibly a one-line description of the problem. The most common such error is probably the Error 500 – Command Not Handled error page, which indicates a problem in the application code (as opposed an authentication problem, unknown page, or other server-level problem).
These options allow different pages to be displayed instead of the simple web server error pages.
xsp.error.page.default
This option, if set to true, displays an error page provided by the XPages runtime as the default in-built page for debugging problems in an XPages application. Listing 1.35 shows the relevant section from the xsp.properties file.
Listing 1.35. xsp.properties Snippet for the xsp.error.page.default Property
# Defines if the default error page should be displayed by the XSP
# layer this is very useful in development as it displays extra
# information on the error
#xsp.error.page.default=false
The setting can be set for the entire server by changing the server xsp.properties file, but it is more normal to set the option for a specific application. To set the option for an application, in Application Properties, choose the XPages tab and check the check box Display XPages runtime error page, as shown in Figure 1.15. (In earlier versions, that option was named Display default error page—the behavior is unchanged.)
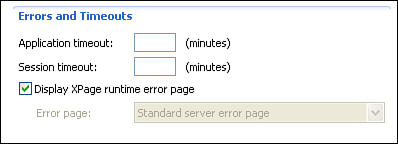
Figure 1.15. Application Properties, Display XPages runtime error page
You normally do not use this option in a production environment because it is intended only for debugging. It is considered less scary for an end user to see an Error 500 page than to see a page with a stack trace. However, the application designer can choose what works best for the application.
The default built-in error page has the text Unexpected runtime error, displays the messages from the exception that caused the problem and from any ancestors that cause exceptions, and enables the user to toggle open an area to see the full stack trace of the problem. In addition, if the error occurred within some JavaScript code in the XPage, the default error page displays the snippet of JavaScript code and highlights in red the line where the problem occurred, as shown in Figure 1.16.

Figure 1.16. Default error page with JavaScript snippet
Unlike the user-provided error page, limitations govern the circumstances under which the XPages default error page will appear. That error page is displayed only if the encountered problem is a java.lang.Exception, not when the problem is the more serious java.lang.Error type. When a java.lang.Error is encountered, the problem is written to a log file and the default web server Error 500 simple error page is displayed. It does not attempt to display the default error page for such serious problems, which can occur when the JVM has run out of memory or required class dependencies cannot be resolved, because the problems are so serious that attempting to display the default error page will probably fail, too. In that situation, it is best to log the information currently available rather than risk losing that information or complicating the effort to debug the problem by filling the error logs with problems caused by failing to output the default error page.
When building your own user error-provided error page, it may be best to treat such java.lang.Error problems in a similar manner. However, such errors are passed to the custom error page in case the page designer wants to handle certain types of java.lang.Error problems differently, perhaps partially recovering from the problem.
When we refer to the default error page, we generally mean that page with the main message Unexpected Runtime Error. Some other, less frequently occurring error pages provided by the XPages runtime are also displayed only when the default error page option is enabled. The other runtime error pages are used at a lower level of code, closer to the web server engine. An example is a page that says Page Not Found instead of Unexpected Runtime Error but otherwise looks the same, including the exception messages and the area where the user can toggle open the stack trace.
The HTTP response code for the error page was incorrect in releases before version 8.5.3. Previously, it returned HTTP status 200 OK, indicating that the XPage had displayed without any problem. Now, since version 8.5.3, it returns HTTP status 500 Internal Server Error, indicating that some error occurred in the XPage it was attempting to display.
Chapter 6, “Server-Side Debugging Techniques,” details how the XPages runtime logs error and trace information.
xsp.error.page
This option can be set to an XPage name to display an XPages error page provided by application developer, instead of the usual web server error page or the XPages runtime default error page. This is done in the snippet of xsp.properties, shown in Listing 1.36.
Listing 1.36. xsp.properties Snippet for the xsp.error.page Property
# Defines an XSP specific error page
# When not defined, it displays a default error page
#xsp.error.page=
To set the option, create a new XPage that will be used for your error handling. Then in the Application Properties, XPages tab, under Errors and Timeouts, in the Error page: drop-down list, choose your XPage.
To quickly test that your custom error page is used, in some other XPage of your application, set loaded="true" on the XPage root control and then open that XPage in your browser. Your custom error page is displayed instead of the XPage that you opened in the browser, because an error returns when the root XPage control is not loaded.
To refer to the problem that caused the custom error page to be displayed, you can reference the requestScope.error value. That object will be a java.lang.Throwable, which has the information about where the problem occurred in your application. The commonly used methods there are getMessage(), which gives the text of the problem; getCause(), which may give another Throwable that caused this problem (and possibly a chain of Throwable causes); and the methods for printing and accessing the Java stack trace that can be read by a Java developer to understand how the problem occurred.
In addition, if the problem in the application occurred during the execution of some Server Side JavaScript code, it is possible to find which code was executing and the line number and column number where the problem occurred. That information is available by checking whether the error object and its cause implement com.ibm.xsp.exception.XSPExceptionInfo and com.ibm.jscript.InterpretException (information about those interfaces is part of the XPages Extensibility JavaDocs available on the Internet). For example, Listing 1.37 provides a simple error page.
Listing 1.37. XSP Markup for a Sample Error Page
<?xml version="1.0" encoding="UTF-8"?>
<xp:view xmlns:xp="www.ibm.com/xsp/core">
<b>An error occurred</b>
<pre>
<xp:text escape="true" id="computedField1">
<xp:this.value><![CDATA[#{javascript:
var output = requestScope.error.toString()+"
";
output+="
";
if( requestScope.error instanceof
com.ibm.xsp.exception.XSPExceptionInfo ){
var codeSnippet = requestScope.error.getErrorText();
var control = requestScope.error.getErrorComponentId();
var cause = requestScope.error.getCause();
output+="In the control : "+control+"
";
output+="
";
if( cause instanceof com.ibm.jscript.InterpretException ){
var errorLine = cause.getErrorLine();
var errorColumn = cause.getErrorCol();
output+="At line "+errorLine;
output+=", column "+errorColumn+" of:
";
}else{
output+="In the script:
";
}
output+=codeSnippet;
}
return output;
}]]></xp:this.value>
</xp:text>
</pre>
</xp:view>
That page displays in a browser, as follows in Figure 1.17.

Figure 1.17. Custom error page with JavaScript snippet
In general, you design your error page so that its appearance matches the design of the rest of your application.
However, when developing your error page, keep in mind that you cannot use any XPages server-side simple actions or any server-side Events. This is because the URL used for the custom error is the same as the URL for the page that was opened when the problem was encountered, so any attempt to communicate with the server-side representation of the page will contact the wrong XPage.
Note that the HTTP response code for the error page defaults to HTTP 500: Internal Server Error. You might want to update that response code if the encountered error more closely matches one of the other HTTP response codes. To update the status code, use the API shown in Listing 1.38.
Listing 1.38. Server-Side JavaScript Snippet to Update HTTP Response Code
var responseObj = facesContext.getExternalContext().getResponse();
responseObj.setStatus(404/*Page Not Found*/);
Note that, even when using this option, some problems might not display in your custom error page, so you might still want to set the xsp.error.page.default option to make it easier to debug such issues. That might happen for some problems that occur at a lower level in the web server, where the facility for loading an XPage might not be available and it is not possible to load the custom error XPage.
It is also worth noting that if a problem arises in the display of the custom error page itself, that problem is noted in the log file and the default web server error page is displayed to report the original problem. (The default page is usually a simple Error 500 page.)
The most common occurrence where the custom error page cannot be displayed arises when the original problem was severe. An example might be a Java OutOfMemoryError, in which no further objects can be created because all the memory available to the server has been consumed. In general, problems that implement java.lang.Error are likely to be unrecoverable. If users of your application are likely to encounter such problems, you should probably redesign your application to prevent them from occurring.
The User Preferences Properties
These options control the detection of the end user’s browser settings and preferences.
xsp.user.timezone
XPages supports different time zones, so dates can be displayed in the user’s local time, using the server’s time zone, or using a programmatically configured time zone. Listing 1.39 shows the relevant section of the xsp.properties file.
Listing 1.39. xsp.properties Snippet for the xsp.user.timezone Property
# Defines the timezone to use
# When not specified, it uses the server timezone.
#xsp.user.timezone=false
The time zone is used when displaying date objects as text. The date objects contain the universal region-independent time (for example, 1pm in London today, saved in milliseconds), and the current time zone is used to display the time. For example, it knows to display the date as 8am EST when the web server is located in the eastern USA. By default, in XPages, the server time zone is used. So if you have users in different time zones, the exact same time is shown to each user instead of using the local time for that user. This option can be set to true to use the user’s browser time zone instead of the server’s, so that users see their local time.
You can change the time zone that an individual application uses in Designer, in the Application Properties, XPages tab, as shown in Figure 1.18. The Time Zone section enables you to choose from three values. The default value is Server Default, meaning that the option is not set in the application, so the value in the server-wide xsp.properties file is used. The other values are Browser, meaning the user’s web browser’s time zone, and Server, meaning the time zone on the web server where the XPages runtime is running.
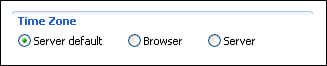
Figure 1.18. Application Properties, Time Zone option
It is also possible to set Time Zone programmatically instead of detecting the browser or server time zones. The current Time Zone for an XPage can be accessed through the context object, through Server Side JavaScript. You can create a Java TimeZone object and set it as the current time zone. The value set then is used for the rest of the current user session. Unlike other values that can be set onto the context, it is not necessary to reload the page after changing the time zone. The time zones values are either TimeZone objects or text IDs defined by the java.util.TimeZone class, as in America/Los_Angeles. Not all common names for time zones are supported, so you might need to refer to the documentation for that class. That documentation also describes the custom time zone syntax; for example, GMT+5 means 5 hours ahead of GMT.
Listing 1.40 provides the time zone methods on the context object.
Listing 1.40. TimeZone API Method Calls Available on Context Object
context.getTimeZone() : TimeZone
context.getTimeZoneString() : string
context.setTimeZone(timeZone:TimeZone)
context.setTimeZoneString(timeZone:string)
The server time zone is always available through the I18n library, like so:
I18n.getServerTimeZone(): TimeZone
In addition, it is possible to set the time zone for an individual Edit Box or Computed Field. Verify that the control display type is set to Date/Time in the Properties view, Data tab. Then in the All Properties tab, Data category, either configure the converter’s timeZone property to a value such as America/New_York or compute the property to programmatically determine the time zone displayed.
xsp.user.timezone.roundtrip
This property is a simple Boolean option, as shown in Listing 1.41.
Listing 1.41. xsp.properties Snippet for the xsp.user.timezone.roundtrip Property
#
#xsp.user.timezone.roundtrip=true
When the option xsp.user.timezone is true, so that the user’s browser time zone is being used, you can sometimes change the round-trip option to false, as an optimization.
The round-trip it refers to is part of how XPages detects the browser time zone. The time zone information is not automatically passed by the browser to the server. So XPages computes a time zone using a piece of JavaScript in a temporary page and then submits the result to the server and redirects to the actual XPage. The piece of JavaScript produces a rough guess of the time zone, so it finds GMT+5 instead of America/New_York. If the first XPage in your application does not use any time zone information, you can change the setting to avoid the temporary page and prevent that round-trip to the server. In that case, the piece of JavaScript is output in the first XPage you open and the browser time zone is available only after the user submits for the first time. Often it is not possible to use that option because users might bookmark pages within your website, so you cannot predict which will be the first page they open in any session.
The AJAX Properties
The option in this section controls some of the behavior during partial update (also known as partial refresh). In a partial update, a subsection of the web page is updated by submitting and retrieving an updated snippet of the page from the web server. It uses an AJAX request, which is a popular Web 2.0 technique. The acronym stands for asynchronous JavaScript and XML, although the XPages partial update request actually transfers a snippet of HTML rather than XML.
xsp.ajax.renderwholetree
This option allows a performance improvement while processing a partial update (also known as partial refresh). Listing 1.42 shows the summary information provided in the xsp.properties file.
Listing 1.42. xsp.properties Snippet for the xsp.ajax.renderwholetree Property
# This property defines if the JSF tree should be
# completely processed during the render phase,
# including the components that are not rendered. When set to false
# it gives better performance but with potential side effects
# if some components are changing data during the render phase (which
# should be avoided anyway)
#xsp.ajax.renderwholetree=true
The option was added in version 8.5.1 and defaults to true, meaning to use the old slower way of handling partial update, the same as the behavior in 8.5.0. Version 8.5.2 implemented a change so that applications that are newly created in Designer 8.5.2 or later have this setting set to false, with faster handling of partial updates. If you have existing applications that were created in version 8.5.0 or 8.5.1, it is usually possible to set this value to false so that partial updating is faster. However, some applications that depended on the old behavior might fail when this value is changed, so you must retest applications after you change this setting.
To change this value in an application, you can edit the xsp.properties file directly or change the check box in the Application Properties. In the Application Properties, XPages tab, in the section Performance, the check box is named Evaluate the entire page on partial refresh, as detailed in Figure 1.19.
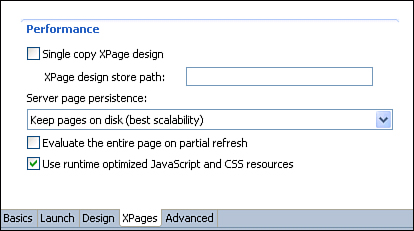
Figure 1.19. The Application Properties, XPages tab, Performance section
The behavior this option controls occurs during the server-side processing of partial update events and affects only the Render phase of the JSF lifecycle.
The default, slower behavior means that the render phase navigates through all controls in the server-side tree of controls. It doesn’t generate HTML for the controls outside the update area, and it doesn’t execute their “rendered” property, but it does publish the data sources for each control. In fact, all variables that are published by controls are made available, including the Repeat control’s indexVar variable and the Custom Control’s compositeData variable.
The improved behavior means that, during the render phase, it navigates through the controls until it finds the update area. After generating the HTML for the update area, it does not navigate through the rest of the controls. Also with the improved behavior, when navigating through controls before the update area, if it finds controls that implement the NamingContainer interface, it does not search through any naming container that does not contain the update area. So in effect, the naming container protects its contents’ controls from being navigated through and having their variables published. The most common naming container controls are the repeating controls (Repeat, Data Table, and View Panel) and the Custom Control container.
The application for this chapter contains the sample XPage testRenderWholeTree demonstrating this behavior. The page has print statements that are emitted to the server console when various data are published, when the render phase starts and ends, and so on. The page starts with an update button to update Panel4; Panel1 is the first panel configured with data to output a print statement to the server console, a Repeat control contains Panel2, then after the Repeat is Panel3 (which has a child Panel4 that is updated), and after Panel3 is Panel5.
To test, set the xsp.ajax.renderwholetree option to true, meaning to navigate the whole tree. Then click the button Update Panel4 on that page. Listing 1.43 shows the console output.
Listing 1.43. Console Output for the Sample Page with xsp.ajax.renderwholetree=true
beforeRenderResponse
data in Panel1 published
data in Panel2 published, in Repeat1, index 0
data in Panel2 published, in Repeat1, index 1
data in Panel2 published, in Repeat1, index 2
data in Panel3 published
data in Panel4 published
data in Panel5 published
afterRenderResponse
The output indicates that the data is published in all the controls before the updated Panel4. Then the data is published in Panel4 itself and, finally, the data is published in the control after Panel4, in Panel5.
Next, to test the optimized behavior, set the xsp.ajax.renderwholetree option to false. Then click the button Update Panel4 on that page. Listing 1.44 shows the updated console output.
Listing 1.44. Console Output for the Sample Page with xsp.ajax.renderwholetree=false
beforeRenderResponse
data in Panel1 published
data in Panel3 published
data in Panel4 published
data in Panel4 published
afterRenderResponse
With the updated behavior, after the render phase has found Panel4, it stops searching, so the data for Panel5 is not present in the output. The data in Panel2 within the Repeat1 is not output because the Repeat control is a NamingContainer and it acts to prevent data within that area from being published. The data in Panel4 is published twice—once while searching and again while generating the HTML output.
You can see that when the option is set to false, less of the control tree is navigated through and less of the data is published. This means that less work is done on the server and the response is available to the browser more quickly.
An application might fail to function if this option is changed from true to false. The application may have been designed to compute and set values during property evaluations that happen while data is published. For example, when the Custom Control container publishes the compositeData variable, all property values set to that Custom Control tag are evaluated. If the application is relying on those property evaluations happening at specific times and you change the option to false, those property evaluations might not occur and your application might break. It is usually possible to redesign your application to avoid such problems, or it might be convenient to set this option back to true so that the application runs slightly slower but still functions.
The Script Cache Size Properties
Two available properties within this category enable you to control the optimization of compiled script expressions within the XPages runtime. The first time an expression is used at runtime, the Server Side JavaScript, and any XPath computed expressions, are further decomposed into optimized, line-for-line expressions. The optimized expressions are then cached for later reuse. This enables an application to execute faster at runtime because there is no need for the XPath runtime to keep parsing Server Side JavaScript or XPath expressions for every XPage request. Instead, the XPages runtime leverages an expression-caching mechanism to accommodate Server Side JavaScript and XPath-computed expressions. When an application is loaded, the expressions within any given XPage are cached for use during any subsequent request of that XPage.
Server Side JavaScript is the default scripting language for XPages. However, a built-in XPath expression engine supports expressions for working against XML-based document stores. This XPath engine has been available within XPages since version 8.5. Furthermore, because XPages is built upon the JavaServer Faces framework, there is indeed a third scripting language option by way of Expression Language, or EL, as it is more commonly termed. This is the scripting language technology provided by the underpinning JSF framework and is readily usable within XPages applications also. However, it is important to point out that there is no facility for caching EL expressions.
ibm.jscript.cachesize
The Server Side JavaScript expression cache is set by default to a maximum limit of 400 computed expressions, as shown in Listing 1.45.
Listing 1.45. xsp.properties Snippet for the ibm.jscript.cachesize Property
# This controls the number of compiled JavaScript expressions.
#ibm.jscript.cachesize=400
In a server with high available JVM memory, this property value can be increased accordingly based on benchmark testing results to find an optimal setting based on the demands of the particular application use case.
ibm.xpath.cachesize
The XPath expression cache is set by default to a maximum limit of 400 computed expressions, as shown in Listing 1.46.
Listing 1.46. xsp.properties Snippet for the ibm.xpath.cachesize Property
# This controls the number of compiled XPath expressions.
#ibm.xpath.cachesize=400
Similar to the ibm.jscript.cachesize property, any adjustment of this property value must be determined by adequate benchmark testing to establish an optimal setting.
For your interest, Listing 1.47 shows the XSP markup code for an XPage containing XPath-computed expressions.
Listing 1.47. Example of an XPage Containing XPath-computed Expressions
<?xml version="1.0" encoding="UTF-8"?>
<xp:view xmlns:xp="www.ibm.com/xsp/core">
<xp:this.beforePageLoad>
<![CDATA[#{javascript:
var document = DOMUtil.createDocument();
var person = document.createElement("person");
document.appendChild(person);
var firstName = document.createElement("firstName");
firstName.setStringValue("Joe");
person.appendChild(firstName);
var lastName = document.createElement("lastName");
person.appendChild(lastName);
lastName.setStringValue("Bloggs");
requestScope.put("document", document);
}]]>
</xp:this.beforePageLoad>
<xp:text escape="true" id="computedField1"
value="${xpath:document:/person/firstName}">
</xp:text>
<xp:text escape="true" id="computedField2"
value="${xpath:document:/person/lastName}">
</xp:text>
</xp:view>
The Active Content Filtering Properties
Active Content Filtering (ACF) was introduced to XPages in Notes/Domino V8.5.1 as a means of protection from malicious content entered via requests or responses in an XPages application. The ACF properties are the following:
xsp.htmlfilter.acf.config
xsp.richtext.default.htmlfilter
xsp.richtext.default.htmlfilterin
Good summary information on the Active Content Filtering properties is included in the xsp.properties file, as shown in Listing 1.48.
Listing 1.48. xsp.properties Snippet for the xsp.htmlfilter.acf.config Property
# #######################################
# ACTIVE CONTENT FILTERING
# #######################################
#
# Defines which filter should be used by default for some controls
# (richtext)
# The valid values are:
# - acf: use the acf library
# - identity: no filtering is applied
# - empty: the entire text is stripped out
# - striptags: all the html tags are stripped out.
# Only the text pieces remain
#xsp.richtext.default.htmlfilter=acf
#xsp.richtext.default.htmlfilterin=
#
# Defines the acf library config file to use
# If empty, then it uses the default config file provided by the
library
# Else, it looks for a file locating in data/properties. For example:
# acf-config.xml
#xsp.htmlfilter.acf.config=<file name>
Dynamic scripting languages such as JavaScript can pose a threat if used maliciously by a hacker—for example, if some JavaScript code is embedded in the HTML content on a rich text control and then submitted as part of a request. Similarly, output fields can contain malicious content, such as where dynamically computed text contains code that attempts to perform privileged or illegal operations. To counteract such threats, each output control, such as Labels and Computed Fields, has had an htmlFilter property since version 8.5.1, and input controls such as the Edit Box and the Rich Text editor additionally have an htmlFilterIn property. These nominate a filtering engine that can check the field data for malicious content and take appropriate action.
The standard values applied to these properties are as follows:
• acf. Parses the HTML text and filters out the unsafe constructs. The filter used is based on a default configuration shipped with the XPages runtime. The default configuration can be overridden by specifying a custom acf-config.xml configuration file in your Notes/Domino data/properties directory.
• striptags. Removes all the tags using a regular expression:
replaceAll("\<.*?>","")
• identity. Does nothing but return the original string. This option is useful if you have the engine set to acf and you want to override this setting for one particular control.
• empty. Removes everything and returns an empty string.
The first two ACF settings in the xsp.properties file, xsp.richtext.default.htmlfilter and xsp.richtext.default.htmlfilterin, merely provide a means of applying the same filters on a more global basis than the control properties themselves can facilitate. That is, you can set any of the same four aforementioned values to the xsp.properties file within an NSF and thus have them apply to all input/output fields on all pages of the application (saving a lot of typing). Moreover, setting these property values in the xsp.properties file on a given server applies the nominated filters to all applications running on that server—and the same for the Notes client.
The third ACF setting, xsp.htmlfilter.acf.config, is a little more interesting. This property allows a custom configuration file to be applied as the ACF filter engine, for example:
xsp.htmlfilter.acf.config=acf-config.xml
On your Notes client or Domino server, in the data/properties directory, a file named acf-config.xml.sample is provided as an example containing some custom filtering rules. You can examine this file and perhaps add your own extended ACF rules. Of course, you must rename the file to acf-config.xml for the rules to take effect. And remember, this must be performed on each server in a given cluster because the configuration file is not part of the replication process. Listing 1.49 shows a snippet containing some sample filter rules.
Listing 1.49. Sample ACF Rules
<?xml version="1.0"?>
<config>
<filter-chain>
<filter name='base'
class='com.ibm.trl.acf.impl.html.basefilter.BaseFilter'
verbose-output='false' use-annotation='false' />
</filter-chain>
<filter-rule id='base'>
<target scope=''>
<!-- C14N rules -->
<rule c14n='true' all='true' />
<!-- Base rules -->
<rule attribute='on' attribute-criterion='starts-with'
action='remove-attribute-value' />
<rule attribute='${' attribute-criterion='starts-with'
action='remove-attribute-value' />
<rule attribute='href' value='javascript:'
value-criterion='contains'
action='remove-attribute-value' />
<rule attribute='style' action='remove-attribute-value' />
<rule tag='script' action='remove-tag' />
<rule tag='style' action='remove-tag' />
</target>
</filter-rule>
</config>
Most of the keywords in the listing are self-explanatory. For example:
<rule attribute='on' attribute-criterion='starts-with'
action='remove-attribute-value' />
This rule means to remove attributes that start with the sequence of letters on. If the input contains any tag attributes, such as onmouseover or onclick, these are removed while still leaving the enclosing tag. If you want to strip out the complete tag, use a rule similar to the following:
<rule tag='script' action='remove-tag' />
This rule removes all the script tags.
One important point to remember with ACF filtering is that it is based on a blacklist approach. This means that everything is allowed and only code matching the specified patterns is removed. As new vulnerabilities are discovered, the blacklist must be updated.
ACF filtering can also be applied programmatically. The XPages Server Side JavaScript context global object provides two methods:
filterHTML(html:String, processor: String) : String
filterHTML(html:String) : String
The methods accept a string of markup that is then filtered using the specified processor or engine. The processed string is returned as the result. If no engine is specified, acf is used. A typical use case might be one in which you want to verify that the result of several input fields do not form a string with malicious content when concatenated—in other word, where the sum of various parts amounts to something malicious.
Finally, the ACF technology that XPages uses is a common component shared across other products in the IBM software portfolio, such as IBM WebSphere® sMash. In-depth information on ACF is now available in the development community for WebSphere sMash, known as Project Zero. At the time of writing, searching the Internet for ACF yielded good information at the projectzero.org site, as follows: www.projectzero.org/sMash/1.0.x/docs/zero.devguide.doc/zero.acf/ActiveContentFiltering.html
This resource is certainly worth exploring if you want to deep dive on ACF customizations.
The Resource Servlet Properties
The XPages runtime supports a range of different resource providers. These are responsible for serving common resource content, such as CSS, Images, and JavaScript files, to a requesting browser or client. Such content is marked for inclusion in a browser-caching policy, to reduce the number of duplicate requests for any given global resource against a server. One available property enables you to optimize this process.
xsp.expires.global
The xsp.expires.global property is set to 10 days by default (as shown in Listing 1.50). This means that, for any given resource served by any of the XPages runtime resource providers, that resource is set to be included within the requesting browser or client cache for a maximum of 10 days.
Listing 1.50. xsp.properties Snippet for the xsp.expires.global Property
# Defines the default expiration duration for global resources
# When not defined, it is 10 days
#xsp.expires.global=10
If the defined period has passed, then for any requests issued against the server for that same resource, there will be a new download (refresh) of that resource within the requesting browser or client cache. Again, the expiry duration is set to 10 days into the future from that point in time.
This mechanism works in isolation to the range of cache expiry duration settings found within the Applications Properties editor, as shown in Figure 1.20.

Figure 1.20. The general cache expiry duration settings in the Application Properties in Designer
These cache expiry duration values are written into the application’s database.properties file. This is due to the dual use by the Classic Domino web engine and the XPages runtime of these values. You can see this in the following code fragment in Listing 1.51, taken from the database.properties file.
Listing 1.51. Sample database.properties Snippet
<item name='$CSSExpires'><text>365</text></item>
<item name='$ImageExpires'><text>365</text></item>
<item name='$JSExpires'><text>365</text></item>
<item name='$FileExpires'><text>365</text></item>
Such isolated requests against the XPages Resource Servlet can typically be identified by a special URL alias, such as /.ibmxspres/, within the resource URL’s of a rendered XPage. These URLs are issued against the global resource providers and not directly to the underlying Domino HTTP engine.
The following URLs demonstrate a standard resource request against the Domino server for an image resource versus a request for a global resource issued against the XPages Resource Servlet (resource provider) for CSS content:
http://taurus/domjava/xsp/theme/common/images/expanded.gif
versus
http://taurus/xsp/.ibmxspres/.mini/css/@Oa&@Ob&@Da&@Ib&@Ta&@Tb&@Tc.css
In this example, the first URL retrieves the image resource and caches this resource based on the standard caching expiry for image resources found within the Application Properties. The second URL is issued directly at the XPage Resource Servlet. This can be identified here by the inclusion of the /.ibmxspres/ alias within the URL. This runtime servlet then provides the resource based on the xsp.expires.global property setting. If you have not specified a value for this property, the default expiry duration of 10 days is specified in the response headers to the requesting browser or Notes client.
The Repeating Control Properties
This category has a single option and controls an aspect of the behavior of the content-repeating controls. In the XPages runtime, the repeating controls are the View Panel, the Data Table, and the Repeat control, although any third-party implementation of a repeating control (in other words, anything that extends UIData or implements FacesDataIterator) should honor the behavior this property defines.
xsp.repeat.allowZeroRowsPerPage
This option was added in version 8.5.2. The behavior of the repeating controls is the same as in the previous releases, but now this option can be used to change the behavior for an individual application. Listing 1.52 shows the summary information provided in the xsp.properties file.
Listing 1.52. xsp.properties Snippet for the xsp.repeat.allowZeroRowsPerPage Property
# Defines the behavior in repeating controls when the rows property
# evaluates to 0. By default, in that situation 30 rows are displayed
# per page. With this option set to true no rows would be displayed.
# This may be useful when computing the number of rows to display,
# as there may be situations when no rows should be displayed
# but the control should still be rendered.
#xsp.repeat.allowZeroRowsPerPage = false
The repeating controls are the View Panel, the Data Table, and the default configuration of the Repeat control. When the Repeat control is configured with the property repeatControls=“true”, it repeats its contents only once, at page load time. Hence, it does not engage in the repeating behavior controlled by this option and is not affected by changes to this option. The repeating controls can be bound to a list of items, and in the HTML page, the contents of the repeating control are redisplayed for each item, usually with subsequent contents displaying vertically under the previous items so that the contents appear in multiple rows. The list of items commonly consists of the contents of a Notes/Domino view, appearing as a list of documents.
Each of those repeating controls has a property rows, which controls how many rows or documents are initially visible in the repeating control. For example, you may have an application with 10,000 documents and a View Panel control displaying the All Documents view. The control does not attempt to display all 10,000 documents at once because the browser page would be too long and unwieldy, and it would take a long time for the page to load. Instead, by default, the control displays the first 30 documents. The user can use a Pager control Next link to move to the next 30 documents and to navigate through the rest of the documents. The rows property can be used to change the number of documents shown initially and in each subsequent page of documents. So if it is set to 10, the first 10 documents will be initially shown; clicking Next then would show the 11th to 20th documents.
It is possible to compute the rows property and also the first property, which controls the document index where the initial display starts. This allows use cases in which you can design a page to show any range of documents in a view. For example, you could show three documents starting at the fifth document. If you’ve designed a page to show a dynamic range of documents, sometimes the range might be empty. That is, if none of the documents is suitable for the criteria you’re selecting, you might want to show zero documents.
By default, when the rows property is set to 0, 30 documents are displayed. That might seem odd, but it is the behavior of the underlying JSF framework. The possibility is that existing XPages have been designed to depend on that behavior, so changing the behavior might cause problems. However, it also means that you need special configuration when attempting to display a range of documents. This xsp.repeat.allowZeroRowsPerPage option can be set to true in an application to change the behavior for that application so that when the rows property is 0, no rows are displayed. It can also be set to true at a server-wide level, but be aware that you might need to retest the existing applications on that server, to verify that they do not depend on the old behavior of 0 displaying 30 documents.
The Partial Update Properties
This category contains one property relevant to AJAX requests issued against the XPages runtime.
xsp.partial.update.timeout
The XPages partial update feature enables an area of the web page to be submitted and updated with the response from the web server. Sometimes the browser does not receive the web server response; perhaps the web server is down, the network connection is slow, or the user has accidentally unplugged the network cable. Eventually, the browser determines that the request has timed out—that it is taking more time than is allowed—and displays an error dialog to the user. Listing 1.53 shows the relevant section of the xsp.properties file.
Listing 1.53. xsp.properties Snippet for the xsp.partial.update.timeout Property
# This allows a user to configure the partial update timeout in Designer
# The default is 20 seconds
#xsp.partial.update.timeout=20
Since version 8.5.3, the dialog has this text:
An error occurred while updating some of the page. timeout exceeded
The user can click an OK button. In earlier releases, the dialog had this text:
Problem submitting an area of the page. timeout exceeded
Submit the entire page?
The user could click OK to submit the page or click Cancel to prevent the page submission. The dialog has been changed because people found the text confusing and weren’t sure which button to click.
This option can be used to change the amount of time the browser will wait before displaying that dialog. The value is specified in seconds; it currently defaults to waiting 20 seconds when not specified.
This option has been available only since version 8.5.2. Also before 8.5.2, the time-out duration was 6 seconds, by default. In this case, people with slow network connections saw time-out problems when the server response was just taking time and was not actually unavailable, so the default was increased to 20 seconds.
The time-out can also be changed programmatically. It has been possible to change the time-out duration like this since release 8.5.0, so you can use this as a workaround for too-short time-out problems in versions 8.5.0 and 8.5.1. To programmatically change the timeout, in Client Side JavaScript, set the value of XSP.submitLatency to some number of milliseconds (not seconds), as in the example XPage control in Listing 1.54.
Listing 1.54. XSP Markup Example Showing Programmatically Setting the Partial Update Timeout
<xp:scriptBlock id="scriptBlock1">
<xp:this.value><![CDATA[
XSP.addOnLoad(function(){
// change submitLatency to 2 seconds (defaults to 6 or 20):
XSP.submitLatency = 2 * 1000; // milliseconds
});
]]></xp:this.value>
</xp:scriptBlock>
Note that the option xsp.ajax.renderwholetree also affects partial update behavior, so you should study and understand it in relation to the partial refresh feature.
The Link Management Properties
Although it might not be immediately obvious, the fine art of managing the humble anchor link is sufficiently complex that it requires not one, but two dedicated xsp.properties settings. The sections that follow explain these settings.
xsp.default.link.target
This property can be assigned one of two values, namely _self or _blank. Anyone familiar with the standard HTML anchor link tag, <a>, will recognize these attribute values. The former instructs the browser to open a link in the current window, replacing current content; the latter means that the linked page is to be opened in a new tab. Applying either value in the xsp.properties file establishes the default link behavior for all applications on the platform. In this case, the platform is the Notes client exclusively. Listing 1.55 shows the relevant section of the xsp.properties file.
Listing 1.55. xsp.properties Snippet for the xsp.default.link.target Property
# #######################################
# DEFAULT LINK TARGET
# #######################################
# The Default Link Target when not specified directly on link
#xsp.default.link.target=
Why just the Notes client and not the web? The answer lies in the management of application data. The logic and behavior of any application often depend on data stored in application scope—that is, data shared by all instances of a given application. In a nutshell, if a single XPages application instance has several pages open at any one time in different tabs within the Notes client, each open page can be reliably associated with the application instance to which it belongs. This is because the XPages runtime has very granular control over the window-management features of the Notes platform and has built custom runtime logic to keep tabs on multiple windows. On the web, however, if a single XPages application instance has multiple pages open in different browser tabs, it is not possible to deterministically identify the owning application instance. As a result, applications that make dynamic use of application-scope data could become unstable in a multitabbed web application. Thus, the feature can be honored only in the Notes client. Moreover, the traditional user experience on the Notes client is for multitabbed or multiwindowed applications, and it is important that XPages support this native mode of execution when running on that platform.
So because the value specified in xsp.default.link.target is used as a default value for link behavior on the Notes client, what links does it apply to, when is it enforced, and how is it overridden?
In essence, the xsp.properties setting is applied to any standard link control located on an XPage if the link itself does not explicitly specify a target value. To cater to the use case in which a particular XPage contains many link controls, a defaultLinkTarget property can be set on the XPage itself to dictate link behavior for all links on the XPage, saving the application developer a lot of typing. If the required link behavior does not vary from one XPage to another, but is consistent across the application as a whole (as one would expect to be the norm), it is easier to simply set the overall link behavior in the xsp.properties file. When no value is set at any of these three levels (control, page, or application), a default value of _self is automatically applied and linked pages open in the original window or tab.
Another link also needs to be accounted for: the column link that can be optionally rendered inside a <xp:viewPanel> control. Here also, any underlying document link displayed for a row of the view can be opened either in a new tab or in the same pane when running in the Notes client. This is achieved using the same target property name and attribute values as the link control, but applied on the view control.
This extended link behavior was added in Notes/Domino V8.5.2. Table 1.4 displays a summary of all options.
Table 1.4. Link Management Property Summary
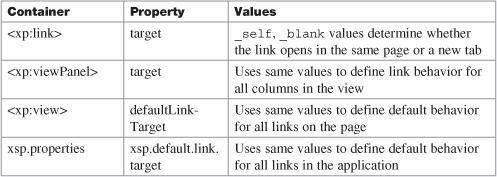
Bear in mind that the XPages link control renders as a standard HTML anchor link. In addition, standard HTML link attribute values are supported within XPages and simply passed through at runtime if specified in the XSP markup. Thus, a value of _blank can be applied to a link on the web and will result in a new tab being opened in the browser, but the application developer must be cognizant of the potential for application scope errors mentioned earlier and must also understand that neither the XPage nor xsp.properties default target setting will be applied to applications running on the web.
xsp.save.links
This property defines what format is used to save native Notes/Domino links in XPages. Listing 1.56 shows the default setting.
Listing 1.56. xsp.properties Snippet for the xsp.save.links Property
# #######################################
# SAVING LINKS IN DOMINO DOCUMENTS
# #######################################
# Defines how doc/db/view/app links should be saved in a Domino
Document
# Valid Values are:
# - UseNotes: Saves your links with the notes protocol
# - UseWeb: Saves your links as web links
#xsp.save.links=UseNotes
To understand the semantics of this property, it is necessary to briefly discuss the formats used to store rich text in Notes/Domino applications, namely MIME and CD. Rich text content created within an XPages application on the Notes/Domino platform is always stored in MIME format. This is also true of documents created using applications running on the classic Domino web server. On the other hand, any rich text document fields created using the native Notes client are typically stored in a proprietary Composite Data (CD) format. If your application needs to be supported on a mixed Notes/Domino platform—for example, if it runs using XPages on the web and also as a native Notes client application—xsp.save.links can help you avoid incompatibilities that can arise between these two formats.
A cursory examination of most any Notes/Domino application inevitably demonstrates heavy usage of links within the documents stored in an NSF. For example, a typical document in a Discussion or TeamRoom application instance, by virtue of being a collaborative application, will be littered with document, view, and application links. When working with such a document in XPages, if it was created or last updated in the native Notes client, it must go through a CD-to-MIME format conversion. Any such links are converted in the process from Notes links to Domino URLs. For example, a generic view link on Domino looks like this: http://[server]/appname.nsf/viewName
A view link on the Notes client typically is of this form:
notes://[server]/appname.nsf/viewName
You will immediately observe the differing protocols (http versus notes) between both types. The square bracket notation also indicates that the server name is optional. Before the advent of XPages, documents that went through the CD-to-MIME conversion process were expected to run only on the web—that is, on the Domino web server—and so were converted as relative instead of absolute URLs. This meant that, for applications residing on a server, the server name was omitted from the Domino URL. This was okay because the Domino web engine running on that server could resolve these locally. When XPages in the Notes client (XPiNC) was released in version 8.5.1, it was suddenly easy to take XPages applications offline by creating a local client replica of an XPages web application. Any Notes/Domino links opened in XPiNC could not be resolved, however, because the server name was not present in the converted URL and the client could not resolve the relative URL.
To be a good citizen on both the Notes client and the web, the XPages runtime attempts to massage native links opened in XPages applications so that the converted links resolve correctly, regardless of either their provenance or the runtime platform on which they are opened. However, a lot of the massaging can be avoided in the first place if links are saved in a common format that both the Notes client and the Domino web server can resolve. The xsp.save.links property thus gives the application developer the opportunity to choose a Notes/Domino link format that is most compatible with the mix of runtime platforms for which the application is to be deployed. Table 1.5 suggests appropriate values for different application configurations.
Table 1.5. Application Type by Notes/Domino Platform

The implementation of this feature went through a number of iterations. In Notes/Domino 8.5.3 (or Notes/Domino 8.5.2 FixPack 2), the default link format used by XPages when saving links is as follows:
notes:///__replicaID/resourceUNID?Redirect&Name=ServerName
When the XPages runtime encounters such links on the web, the notes protocol is automatically replaced with the http protocol. This format is the best common denominator for links in a mixed-runtime environment.
The Control Library Properties
Generally, extensibility refers to the capability for XPages controls provided by third parties to be used in XPages applications so that applications are no longer limited to the default set of controls that comes with the XPages runtime (the Edit Box, Button, and View Panel controls, and so on).
Libraries of controls can be developed using the instructions on the web page “XPages Extensibility API Developers Guide.” Existing libraries can be purchased from third parties or downloaded for free from open source sites on the Internet. The most prominent control library is the XPages Extension Library project, available on OpenNTF.org. This library has mostly been developed by people working for IBM, although it is provided under an Apache license and is not an IBM product offering.
xsp.library.depends
This option was new in version 8.5.2 as part of XPages Extensibility. Good summary information is included in the xsp.properties file, as shown in Listing 1.57.
Listing 1.57. xsp.properties Snippet for the xsp.library.depends Property
# A comma-separated and trimmed list of library IDs of
# XPages control libraries that the current application depends on.
# This option should only be set in the application xsp.properties file,
# not in the server Data/properties/xsp.properties file.
#xsp.library.depends=
You can install any libraries of controls that you want to use in your application in Domino Designer, as well as probably onto the Domino server you use for testing, using the instructions in the Extensibility guide. If your application is using XPages in the Notes client, you will find instructions on installing the library to Notes client installations where the application will be used.
After you have installed the library into Designer, when editing an XPage, the Controls palette contains all the extra controls provided by all the libraries installed in Designer. If you drag a library control onto an XPage in your application, you get a prompt dialog asking to enable the control library in this application, as shown in Figure 1.21.

Figure 1.21. The Designer prompt to add a library dependency to an application
When you click Continue at that dialog, this xsp.library.depends option in the application’s xsp.properties file is updated to include the ID of the library containing the control you have used. That configures the application to allow use of all controls in that library.
When you have used controls from multiple libraries in your application, the option value is a comma-separated list of the IDs of libraries that your application depends on. Listing 1.58 provides an example.
Listing 1.58. xsp.properties Snippet Showing Sample Dependency Declaration
xsp.library.depends=com.ibm.xsp.extlib.library,com.example.library
You can also set the option in the Application Properties in Designer. It is usually set there, or by adding controls from the palette, instead of directly editing the xsp.properties file. In the Advanced tab, in the XPages Libraries section, you can see a list of all the third-party libraries that are installed into this Designer instance, as shown in Figure 1.22. Check boxes indicate the libraries that this application depends on. You can add or remove dependencies on a particular application by checking or unchecking those check boxes.
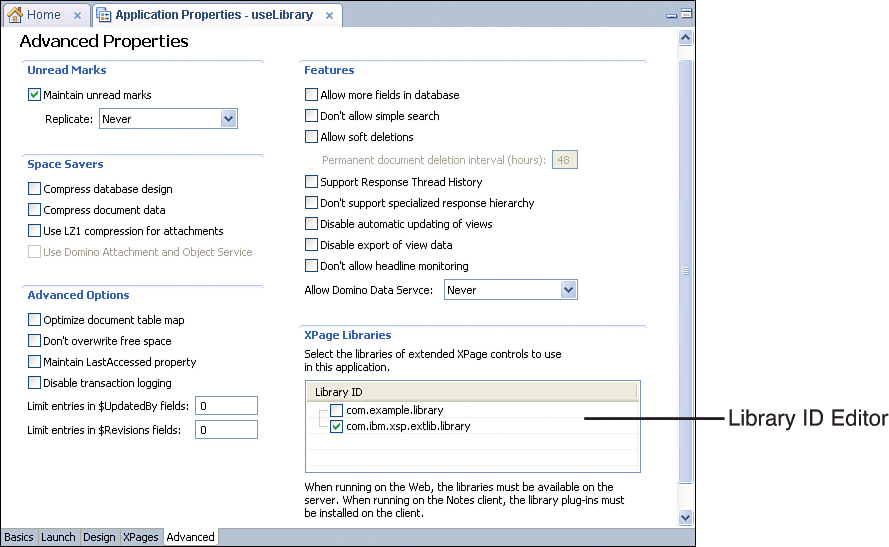
Figure 1.22. The Application Properties, Advanced tab, showing multiple libraries
If you uncheck a check box for a library but the application is using controls from that library, the application will fail to compile. The Problems view then will contain “Unknown tag” errors, complaining that it does not recognize the controls.
You should check boxes for only the libraries that your application depends on. When the application runs on a server, it validates the list of library dependencies against the list of libraries installed on the server. If any of the required libraries are not present on the server, the application will fail to display, with an error message similar to this:
Cannot find the library com.example.library, required by the application TestApp.nsf.
The XPages runtime is actually implemented as a set of XPage libraries, but there is special handling for those libraries so that they do not need to be explicitly listed in the xsp.library.depends option. Those libraries are always depended upon so that attempts to use the Edit Box, Button, and other core runtime controls do not give an “Unknown tag” error.
The Composite Data Properties
XPages Theme files can be created in an application to change the appearance of every instance of a control in the application. Generally, there is a default behavior for each property of a control—for example, an Edit Box may have a default size of 20 characters wide. Theme files support overriding the default property value, for example—for example, setting Edit Boxes to have size of 25 and to have a style indicating a thick border instead of the default border width. The theme values for the control properties are applied to all Edit Boxes in the application, except for those for which the XPage has specifically set a value. It is also possible to apply a theme property value to a smaller group of controls using the control themeId property. For example, on all Edit Boxes that are designed to accept a user’s age, you might set a themeId such as ageEditBox. Then it would be possible to use a theme file to configure that all ageEditBox controls must have a size of three characters wide.
You can create Custom Controls in an application that contain some snippet of XPage content. The Custom Control then becomes available in the controls palette and can be used in different XPages or used multiple times in the same XPage. Every place where a Custom Control is used is an individual Custom Control instance and appears in the XPage source tab as an XML tag. When editing a Custom Control’s content, in the Properties view is a Property Definition tab where you can define properties of the Custom Control. You then can set that property to different values on each Custom Control instance tag. Within the Custom Control content, it is possible to refer to the property values passed in from the outer Custom Control tag instance. A Custom Control property named header can be referred to in a computed expression as compositeData.header, which contains the property value set on the current Custom Control tag (or which is empty if the property has not been set).
In version 8.5.0, it was not possible to set Custom Control property values using theme files. In the Custom Control contents, if you selected the root tag, set the themeId to customHeaderArea, and then configured a theme to set the header value of all customHeaderArea controls, the value set in the theme file would not be available as compositeData.header in computed expressions.
Since version 8.5.1, in applications where this option is not set or is set to true, it is now possible to set Custom Control property values using a theme file. So in the previous example, if your theme is configured to set all customHeaderArea controls so the header property value is Welcome, then computed expressions referring to compositeData.header will resolve to the value Welcome unless the header property has been explicitly set to some other value in this particular Custom Control tag instance.
xsp.theme.preventCompositeDataStyles
This option relates to a change in behavior for Custom Controls in version 8.5.1. The option can be set to true to revert an application to the old version 8.5.0 behavior, although it usually is better to update the application to work with the new behavior. Refer to the summary information provided in xsp.properties, as shown in Listing 1.59.
Listing 1.59. xsp.properties Snippet for the xsp.theme.preventCompositeDataStyles Property
# In 8.5.0 style and styleClass would be set as a base property
# but in 8.5.1 they are set as compositeData properties
# and referred to in the inner custom control
# as compositeData.style/styleClass.
# Set to true to revert to 8.5 behavior, default is false.
#xsp.theme.preventCompositeDataStyles=false
The behavior in question relates to how theme property values are applied to Custom Control properties named style and styleClass. The default behavior changed in version 8.5.1.
The only disadvantage to this, and the reason you might want to revert the behavior, is that, previously, a quirk in the implementation meant that even where you had not declared Custom Control properties named style and styleClass, it was possible to set values for those nonexistent properties in the theme file. The property values then actually appeared in the output HTML on a DIV tag wrapped around the Custom Control content.
If you have already implemented an application that is using the old behavior to set a style or a styleClass onto a Custom Control in a theme file, it may be useful as a temporary workaround to set this option to true to revert to the old behavior. It will revert the behavior for only the style and styleClass properties. Other Custom Control property values will continue to be settable in theme files in the new manner; however, any style or styleClass property set in a theme file will appear in the HTML DIV tag but will not be available when referenced by compositeData.style or compositeData.styleClass expressions.
Instead of using this option to revert the behavior, it might be best to update your Custom Controls to support the desired style properties through normal Custom Control property definitions. To achieve this, in the Property Definition tab, define new properties named style and styleClass. Then in the Custom Control content, select the root tag acting as a container for the Custom Control contents and compute style and styleClass properties using the expressions compositeData.style and compositeData.styleClass. You then can set the style and styleClass properties using the theme file and have them appear in a DIV tag around the Custom Control content. The Source tab of the Custom Control content will look like that shown in Listing 1.60.
Listing 1.60. XSP Markup Snippet for a Custom Control with Custom Style Properties
<?xml version="1.0" encoding="UTF-8"?>
<xp:view xmlns:xp="www.ibm.com/xsp/core"
style="#{javascript:compositeData.style}"
styleClass="#{javascript:compositeData.styleClass}">
custom control content
</xp:view>
Other Ways of Applying xsp.properties Settings
At this point, the chapter has explained all the properties and you have seen that they can be applied at various scopes, such as at an application-wide level and a server-wide level. In truth, it gets more sophisticated than that: Many properties can be applied on an individual XPage basis, for the lifetime of a particular request, or even by a completely different mechanism, as with an XPages theme. These operations might not be common, but they are worth exploring.
Viewroot Properties
Making an xsp.properties setting apply to just a single XPage is easy. Open Domino Designer and create a new XPage. In the Outline navigator, select the XPage element itself (that is, the root node of the tree of components that comprise an XPage) and then select the All Properties panel for the page. Under the data category, you will see a properties entry. You can select this element and add new entries. By clicking the properties entry, you can see from both the panel editor and the source panel that Designer wants you to add a new name/value pair. In this case, you can add any of the xsp.properties shown in Table 1.1 and apply an appropriate value. To take a simple and recent example, add xsp.default.link.target as a property name and assign _blank as the property value. Then drop a link control on to the page from the Core Controls palette and assign www.masteringxpages.com as the value attribute. Your XPage markup should correspond to that shown in Listing 1.61.
Listing 1.61. Applying xsp.properties to a Single XPage
<?xml version="1.0" encoding="UTF-8"?>
<xp:view xmlns:xp="www.ibm.com/xsp/core"
xmlns:xe="www.ibm.com/xsp/coreex">
<xp:this.properties>
<xp:parameter name="xsp.default.link.target"
value="_blank">
</xp:parameter>
</xp:this.properties>
<xp:link escape="true" text="Link" id="link1"
value="www.masteringxpages.com">
</xp:link>
</xp:view>
Now preview this XPage in the Notes client (remember that this is a client-only feature) and click the link when the XPage is rendered. The target web page is loaded in its own tab window in the Notes client, as you might expect when _blank is the property value. Now close the new tab and the previewed XPage, and go back to Domino Designer. Change the xsp.default.link.target property name value to _self and preview the page in the Notes client again. Observe that, this time, the target web page is loaded inside the previewed page. That is, it replaces the current window content and does not open a new tab window for the target web page.
Thus, the xsp.default.link.target property has been applied to just a single XPage. The term viewroot, by the way, can be easily explained. In JSF parlance, pages are known as views, not to be confused with the view design element in the Notes/Domino world. The XPage itself is always the root node of the tree of controls and other components that comprise an XPage. So the term viewroot is synonymous with the base XPage element itself.
Request Properties
Taking this notion a step further, you can simply set an xsp.properties parameter for a particular request. You do this by using the com.ibm.xsp.context.RequestParameters object obtained from the facesContext global object. Simply use the setProperty method on this object to set an xsp.property. (Note that not all xsp.properties can be applied using this mechanism—see the last section of this chapter.) To retrieve the value of any given property, you can call the context.getProperty(String propertyName) method. This method returns a property value based on an order of precedence. First, it checks the RequestParameters object for the given property, if not defined in the request (through prior use of the RequestParameters object). It then checks the viewRoot of the actual XPage. If the given property is not defined at this level, it checks the session, or application properties. Note that this is equal to checking using the context.getSessionProperty(String propertyName) method. If the given property is not defined within the session or application properties, a check is done within the currently running theme. Thereafter, a final check of the system properties is done.
Remember that any property set on the RequestParameters object takes absolute precedence over any other defined setting for that property. This means that any Application Properties property value is ignored for a property if set in the RequestParameters object for a request.
A simple but illustrative example of this arises in changing the new version 8.5.3 Resource Aggregation feature setting on a per-request basis. (Note that this example will not work in earlier releases of Notes/Domino.) Study the requestPropertySetter XPage within the PCGCH01.nsf application to understand how this is done. For your convenience, Listing 1.62 details the XSP markup for this XPage.
Listing 1.62. XSP Markup Used to Set the xsp.resources.aggregate Property on a Per-Request Basis
<?xml version="1.0" encoding="UTF-8"?>
<xp:view xmlns:xp="www.ibm.com/xsp/core" style="margin:30px">
<xp:text escape="false">
<xp:this.value>
<![CDATA[#{javascript:"Application Property: " +
facesContext.getApplication().
getApplicationProperty("xsp.resources.aggregate", null);
}]]>
</xp:this.value>
</xp:text>
<xp:br></xp:br>
<xp:br></xp:br>
<xp:text escape="false">
<xp:this.value>
<![CDATA[#{javascript:"Request Property: " +
context.getProperty("xsp.resources.aggregate", null);
}]]>
</xp:this.value>
</xp:text>
<xp:br></xp:br>
<xp:br></xp:br>
<xp:button value="Aggregate" id="button2">
<xp:eventHandler event="onclick" submit="true"
refreshMode="complete">
<xp:this.action>
<![CDATA[#{javascript:
facesContext.getRequestParameters().
setProperty("xsp.resources.aggregate", "true");
}]]>
</xp:this.action>
</xp:eventHandler>
</xp:button>
<xp:button value="Do Not Aggregate" id="button3">
<xp:eventHandler event="onclick" submit="true"
refreshMode="complete">
<xp:this.action>
<![CDATA[#{javascript:
facesContext.getRequestParameters().
setProperty("xsp.resources.aggregate", "false");
}]]>
</xp:this.action>
</xp:eventHandler>
</xp:button>
</xp:view>
The PCGCH01.nsf application has its xsp.resources.aggregate property already set to true using the Application Properties editor in Designer. But in this example, a user can click either the Aggregate or Do Not Aggregate buttons, and the XPages Runtime will process the request and toggle resource aggregation handling. This is best seen by viewing the source of the HTML markup where the CSS and JavaScript resources are either aggregated or not, based on each request.
Applying Properties Using a Theme
If you like to work with XPages themes, you’ll be glad to know that you can also apply the xsp.properties parameters using a theme. This can be useful in providing customized settings of xsp.properties based on the currently selected theme. Each theme within an application provides different settings for the same xsp.property. For example, consider the earlier example of setting the xsp.default.link.target property. By alternatively using a theme file, you can achieve this same behavior for every XPage within a given application—but you also gain the benefit of decoupling the logic to set the xsp.property from within the XPage itself to being discretely done inside the theme file. Listing 1.63 shows the fragment of theme code required to achieve this.
Listing 1.63. Fragment of Theme Code to Set the xsp.default.link.target Property
<?xml version="1.0" encoding="UTF-8"?>
<theme>
<property>
<name>xsp.default.link.target</name>
<value>_blank</value>
</property>
</theme>
What Works Where?
Even though you can use these mechanisms to attempt to apply any of the xsp.properties, not all properties are applicable in all circumstances. For example, you cannot apply a new random server persistence folder through the xsp.persistence.dir.xspupload property via a single request or XPage property. This is a static server property that can be applied only via the xsp.properties file that resides on the server itself. Your own intuition will be a good guide as to whether a property is applicable via a particular mechanism, and it is easy to quickly test it out, as shown here with the viewroot and request properties examples.
Conclusion
In this chapter, you explored every xsp.properties setting and saw how they can be used to adapt XPages runtime behavior to suit particular use cases. Hopefully, you have learned about some properties that you can apply to meet requirements you have encountered in the field so that you can produce highly tuned, well-adapted applications—and, of course, happier XPages customers.