
In the previous chapter, we saw how to work with data. Most of this data will probably come from some kind of backend over a network. In this chapter, we see how we can transfer this data from a backend to our app in several ways. Associated with sending and receiving data is connectivity. How can we assure that we are actually connected to a network and act on changes in the network state? These are also things we will be looking at in this chapter.
Furthermore, especially on mobile, it is very important to consider that a network connection might not always be available or stable. To overcome this, we can take a look at how to cache data so the user isn’t lost completely whenever no connection is available. All of this and even a little bit more like storing data secure, network resiliency, and saving bandwidth are all things we will learn in this chapter.
Connecting with REST APIs
A big part of most apps will be based on data that is sent to and received from a backend. This can be done in numerous ways, but the most popular one for a while now is REST. REST stands for REpresentational State Transfer and is based on the constraints and properties of HTTP. Explaining HTTP and REST could be done in a book of itself and thus beyond the scope of this book. I am going to assume that you grasp the concepts of REST. If you need help, here is a extensive introduction: https://docs.microsoft.com/en-us/azure/architecture/best-practices/api-design .
The Old-Fashioned Way
Old-School HttpClient Communication with the Backend
If you have worked with REST APIs in C# before, this code should look pretty familiar. We just create an instance of the HttpClient and use it to implement all of our needed requests. For basic apps, the is fine. You can probably come up with some optimizations to reduce your amount of duplicated code and handle errors in a graceful way.
However, there is a lot of boilerplate code in here. You can imagine, that if you have a dozen or more calls to implement, there are a lot of pretty similar lines of code to be found in your API client class. They will all serialize or deserialize an object and send some request. This can be done in a better way.
HTTP Requests with Refit
One way to overcome the redundant code from the “old-fashioned” way, is by using a library called Refit. With Refit, you can reduce your code needed to communicate to the backend to a simple interface. In that interface you decorate the method signatures with a couple of attributes, and the rest will be generated for you at compile-time. Let’s see how this works.
New Backend Client with Refit
From this interface, the full implementation will be generated at compile-time. It won’t be exactly like the code in Listing 4-1, but it will look pretty similar. To be clear: this code lives in your client application, inside your app. Refit generates code from your interface definition to communicate with your backend. This saves you the trouble of writing (de)serialization or HTTP call code over and over again.
For each method signature, you can see I have adorned it with an attribute. The name of the attribute indicates what HTTP verb is to be used for that request. In the code of Listing 4-2 there are two methods: one uses the GET verb and one uses the POST verb. Of course, the other verbs are available as well.
As a parameter for the Get and Post attributes, you need to supply the relative endpoint at the backend. Later, we will provide a base URL for the client.
Tip
Don’t forget to add a slash in front of the endpoint or your code will throw an exception at runtime!
Something cool is going on in the endpoint definition of the GetPersonById method . As you can see the “id” part of our endpoint is enclosed in curly brackets. The parameter of the method signature of the GetPersonById, is also named “id”. By constructing the attribute this way, the value we supply to the id parameter will automatically be mapped onto the values between curly brackets in the endpoint with the same name.
When working with REST, it is a very common thing to retrieve an object by its ID. This ID is of course dynamic, which would cause a problem if we have to specify the endpoints on beforehand. By using this method with the curly brackets, we overcome this problem.
Another curious thing is going on with the AddPerson method. You can see a [Body] attribute inside of the parameter list. Depending on the HTTP verb, this means that the value will be read, or will be provided in the body of the request. Since we are doing a POST request in this example, the serialized object will be put in the body because of the [Body] attribute that is in front of it.
Adding Static Headers on Interface and Method Level
Dynamic Header Value
As a parameter for the [Header] attribute you supply the key of the header; the parameter that comes after it will be used as the value.
Of course, HTTP and REST have a lot more options that you can use. Think of query string parameters and file uploads for instance. This is all possible with Refit as well, and I encourage you to check it out yourself.
Note
All details about Refit and its capabilities can be found on the project’s page on GitHub: https://github.com/reactiveui/refit .
The interface describing our endpoints on the backend.
The generated class that implements the previously-mentioned interface. Based on the interface definition and the attributes, Refit will generate this for us.
A wrapper class that will use the generated Refit class to retrieve data.
To retrieve a client for this, we can simply call: RestService.For<IBackendService>("https://www.example.com");. With the client we get out of this line of code, we can call the methods that we have defined in the interface for it. You probably want to wrap this into some kind of client of your own to handle errors, etc.
Probably a good thing to know is that when a call from Refit is not a HTTP success status code, so whenever a call is not a HTTP 200 OK, it will throw an exception. That in itself might be a reason to wrap it into a class and not repeat a lot of error handling code in your view models.
Other Libraries
There are, of course, other libraries out there that will help you with making HTTP requests. One of them is called RestSharp . This library, and others out there, of course have its own use but are not so extensive as Refit. Or at least extensive in its own way. RestSharp does not generate implementations for you; it just provides you with shorthand methods for HTTP calls. It will also take care of the serialization and deserialization for you. So, if you don’t like to give out control on what your methods look like down to the letter, libraries like RestSharp might be better for you.
Note
For information on RestSharp, check out the project’s website: http://restsharp.org/.
Connectivity
On a mobile device, it is not always a certainty that you have a network or Internet connection. It might be good to check if you are connected before starting some network intensive calls.
Nothing is built into this for Xamarin.Forms, but luckily this is solved by a library called Xamarin.Essentials. This NuGet package contains a whole number of very easy to use APIs that provide you with some much-needed functionality. The best thing is, it isn’t just for Forms, you can also use this library in traditional Xamarin projects. You will probably see this library being referenced a couple of more times throughout this book.
Note
If you have been working with Xamarin for a longer time, the Essentials library might look familiar. The Xamarin.Essentials library is a bundle of a whole lot of separate libraries that were already out there and much used, most of them by James Montemagno.
Android, version 4.4 (API 19) or higher
iOS, version 10.0 or higher
UWP, version 10.0.16299.0 or higher
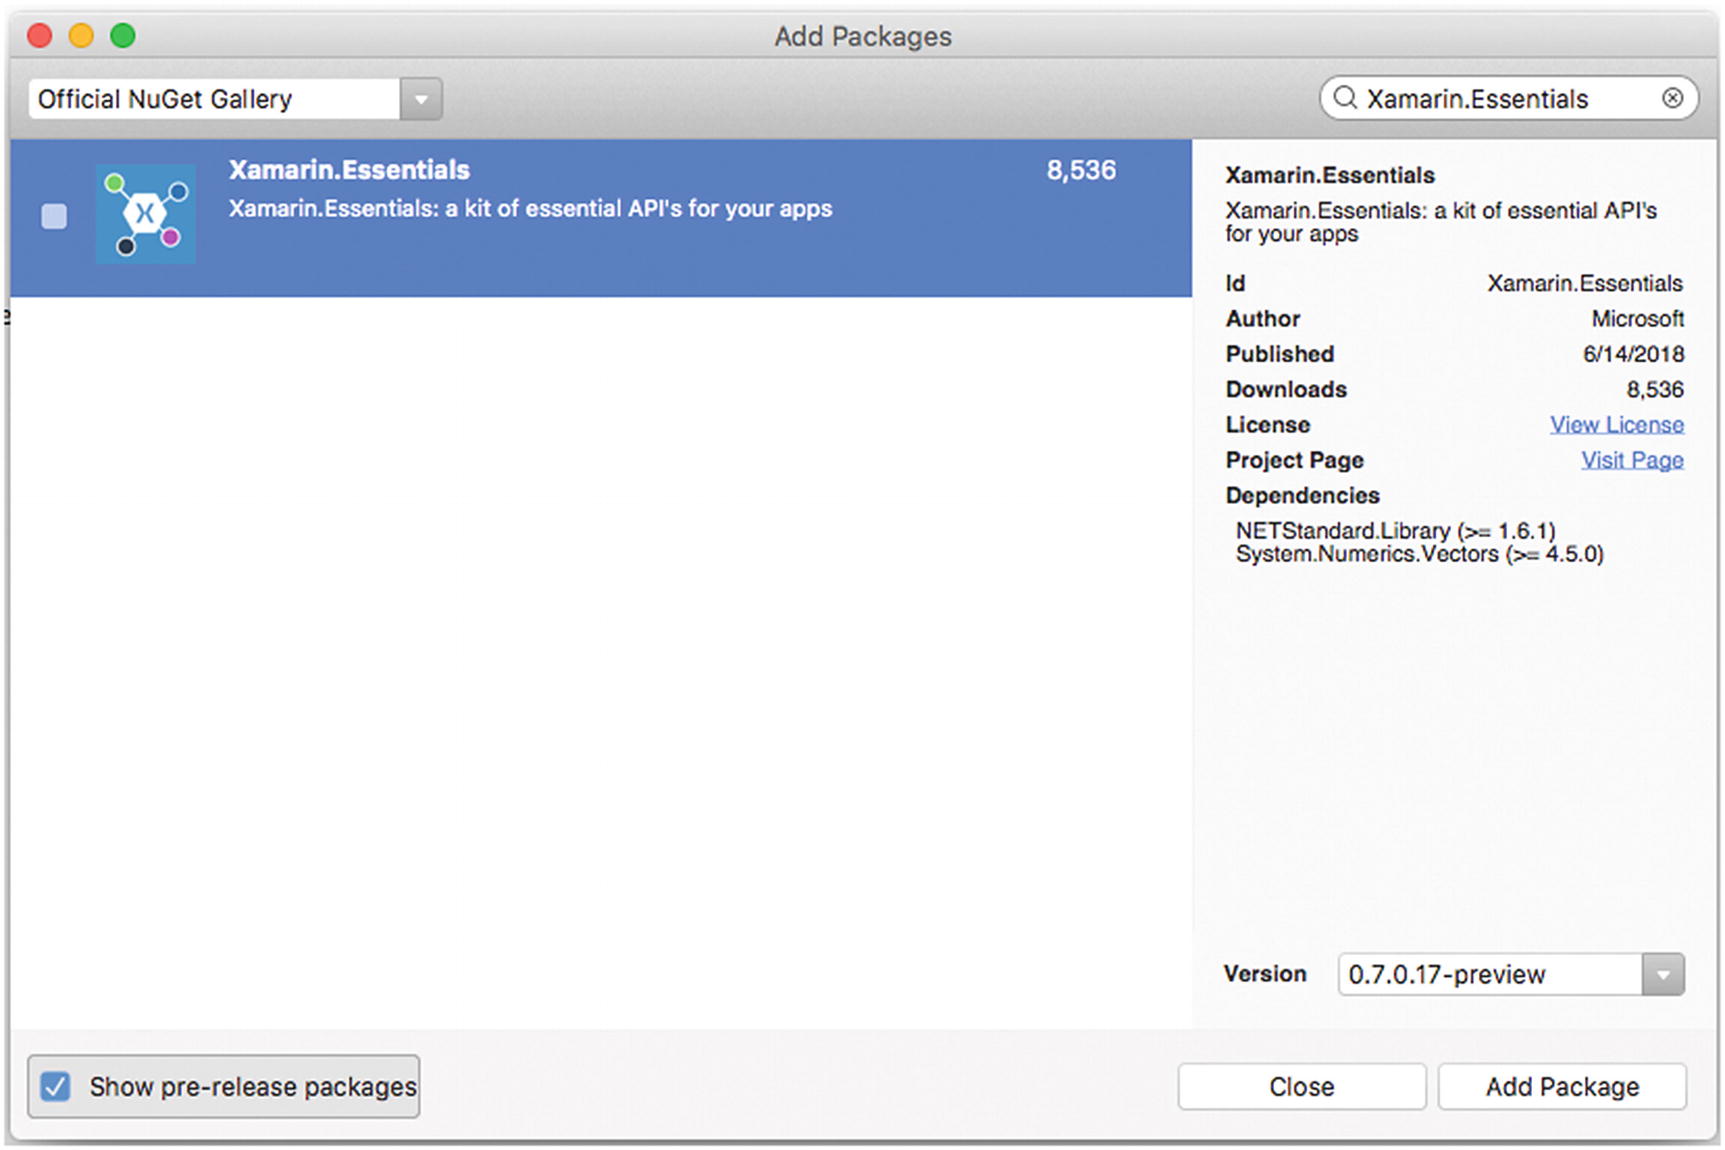
Adding the Xamarin.Essentials package to a project
On Android, Essentials needs a little bit of initialization. In your Android project’s MainLauncher or any Activity that is launched, you need to add this line in the OnCreate method: Xamarin.Essentials.Platform.Init(this, bundle);.
Runtime Permissions Handling for Xamarin.Essentials
Again, for Android we need something special to be able to use this. In this case the AccessNetworkState permission. To add this, open the AssemblyInfo.cs file in your Properties folder and add this line: [assembly: UsesPermission(Android.Manifest.Permission.AccessNetworkState)]. Or you can add it in the AndroidManifest.xml file, also under the Properties folder.
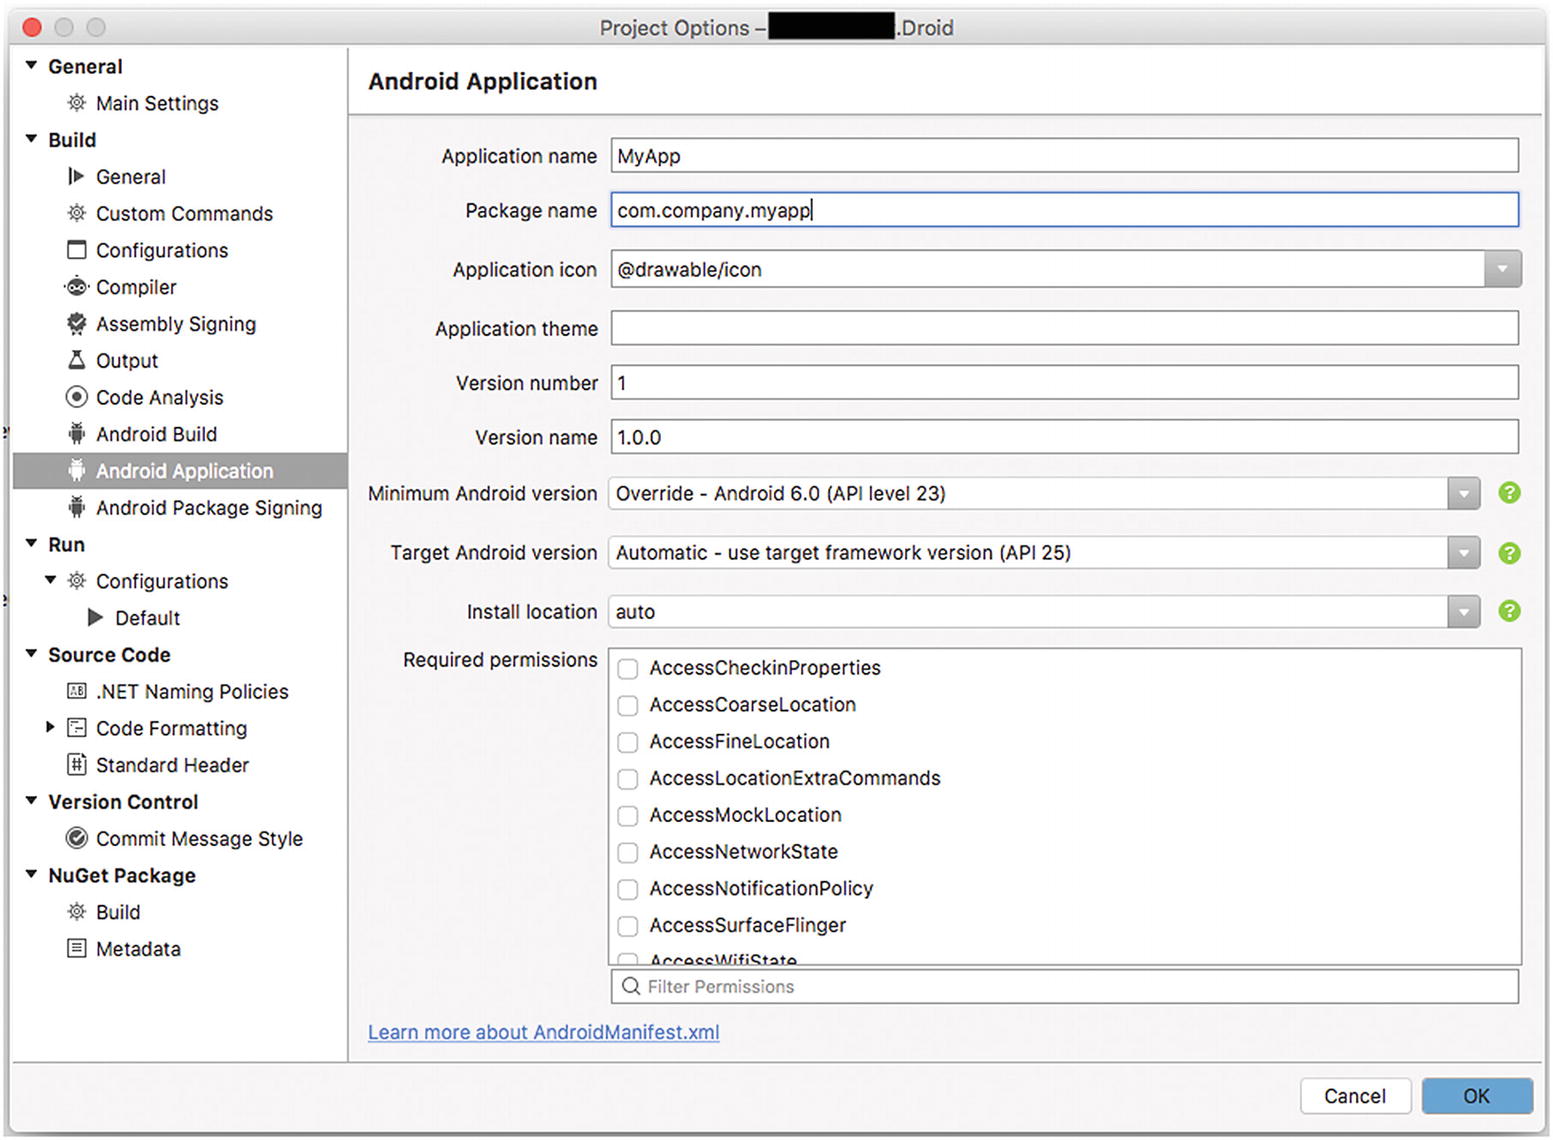
Set the required permissions for the Android app
Now we are all set to go!
The connectivity part of the Essentials library isn’t very hard to use. It exposes a couple of methods and events that we can use to determine whether or not our app has any form of connection.
Checking the Current Network Access
Internet—The app has local and internet access. Note that Internet access can be reported “falsely”. Due to the limitations of the implementation on each platform, it can only be guaranteed that a connection is available. For instance, the device can have a WiFi connection, but if the router is disconnected, no actual Internet access is available, although it will be reported as such by Essentials.
ConstrainedInternet —This means limited Internet access. Usually means that you can connect to a portal where you have to accept the agreement and/or enter credentials to gain access to the internet.
Local—The app has only local access to the network.
None—No connection is available at all for the app.
Unknown—The app is not able to determine whether there is a connection.
Besides knowing that you have a connection or not, it might also be useful to know what type of connection you have access to. For instance, if you want to sync large images, you might not want to do that over the cellular connection since it could incur costs for the user.
Checking the Type of Connection
Bluetooth
Cellular
Ethernet
Other
WiFi
WiMAX
Finally, you might be interested in the fact that the state of the network changes. You might want to show some icon or other visual indicator to the user that they are offline or start reaching for your cache when the connection drops.
ConnectivityChanged Event to Detect Changes in the Network State
And basically, that is all there is to it. The actual implementation of this can vary depending on your architecture and requirements. With the Connectivity plugin you can very easily gain access to information about the user’s connection and use it to your advantage. We will see how to use it in conjunction with caching, for example, in the next section.
Caching
An important part of any application is caching. This is true especially on mobile where bandwidth can be limited and costly. But not only that, no one likes to look at an empty screen, right? When we cache some data we at least have something to show the user while we load actual new data in the background and present it to them when it’s done.
Of course, you can do all of this yourself, which can be a lot of work. Luckily, there are already some smart people who have done the hard work for us. In this section, we will look at Akavache and Monkey Cache. Both do more or less the same thing but in a slightly different way. What they have in common that it is all about caching data and help us reduce network traffic and create a more responsive app.
Akavache
The Akavache library , originally by Paul Betts, is based on SQLite3 and provides us with an asynchronous and persistent key/value store. It is extremely suitable for expiring caching data but can also be used to save user settings or other data.
I have been using this plugin in a number of my projects because it just works and it is such an addition to the user experience. Before I knew Akavache, I just had users look at an empty list view that may or may not had a loading indicator. While it is functional, it might not be what users expect nowadays. If you look at other popular apps by big vendors, you will see that you are presented with data immediately and data is then loaded and replaced for you as you go. This makes for a much better experience for your users.
BlobCache.LocalMachine—General cached data. Retrieved objects from a server, i.e. news items, list of users, etc.
BlobCache.UserAccount—Settings that the user does within your app. Some platforms sync this to the cloud.
BlobCache.Secure—If you are saving sensitive data, this is the place where you want to put it.
BlobCache.InMemory—Like the name says; it holds the data in-memory, whenever your app is killed, so is the data in there.
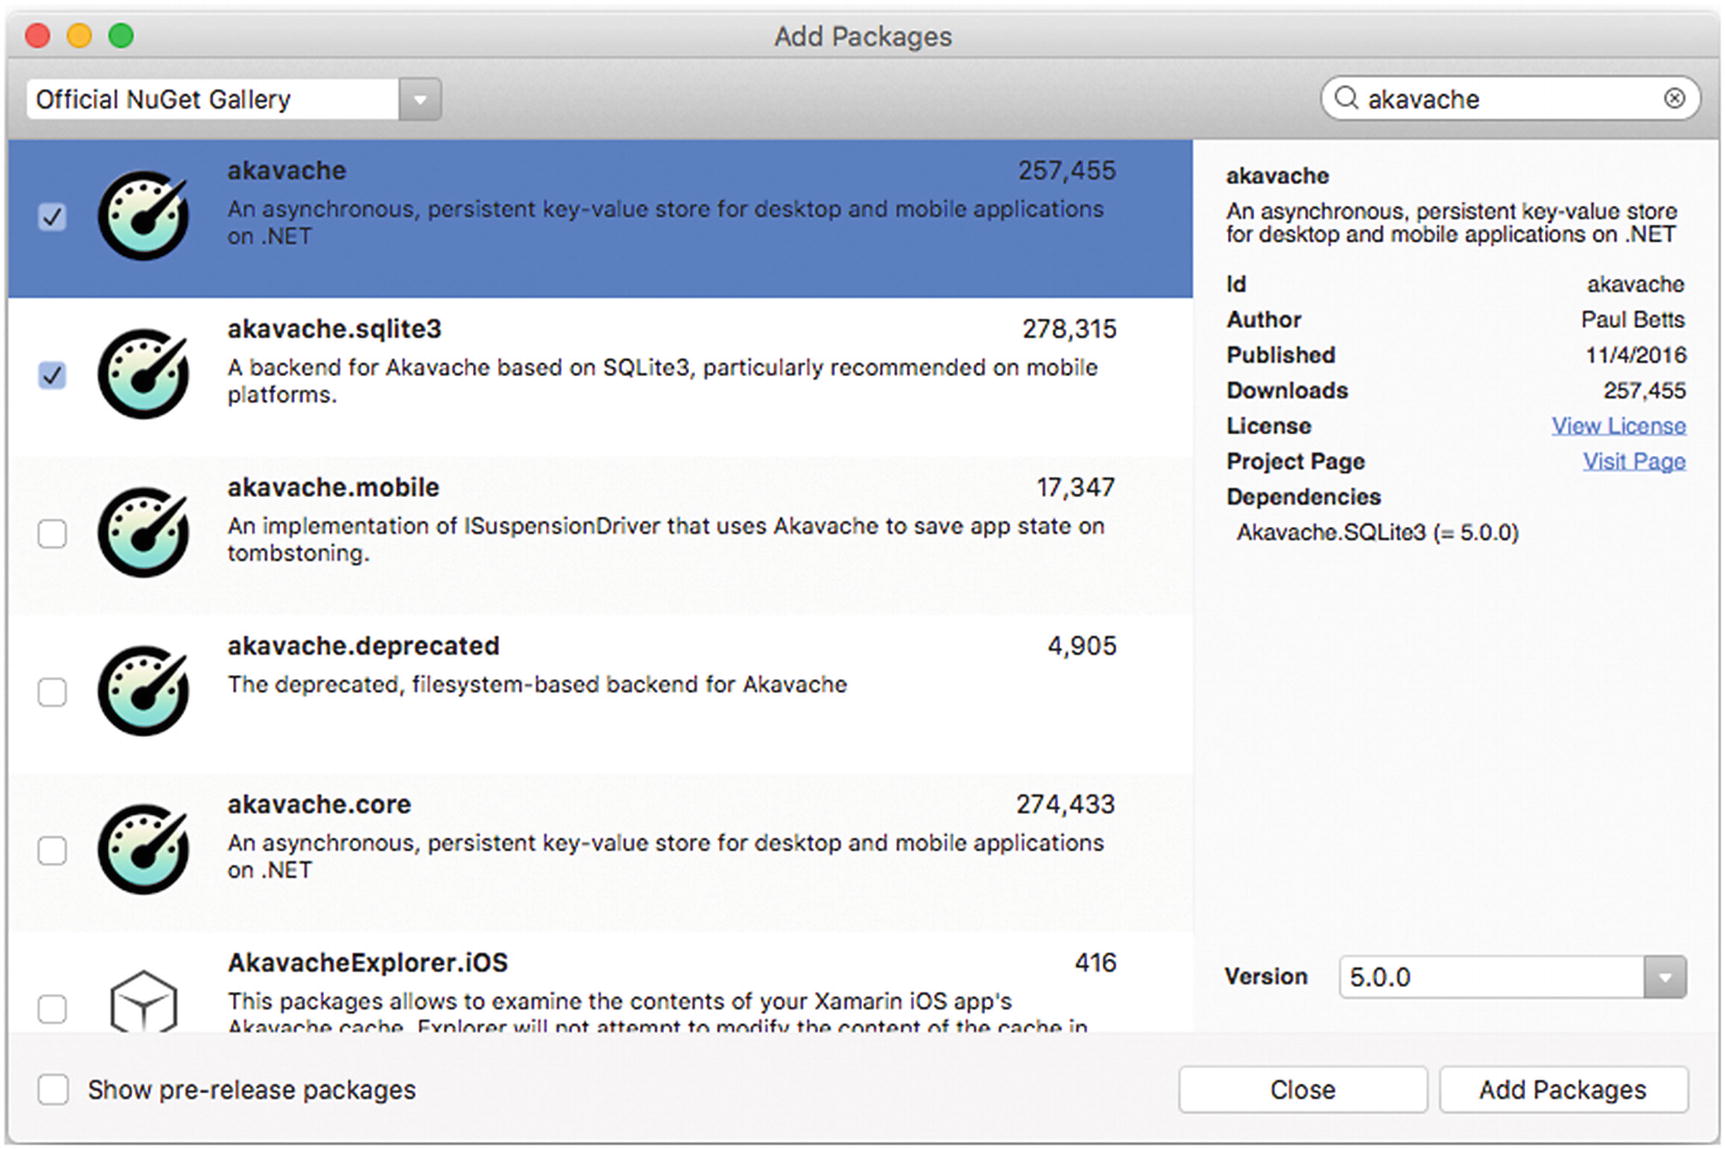
Adding the Akavache packages to your project through NuGet
Note
For your iOS project, make sure a class AkavacheSqliteLinkerOverride.cs is created. It might in some cases be needed by Android as well. This prevents the linker removing some much needed DLL files because they don’t have a reference in your platform-specific platforms. The content for this class should be like in this link: https://github.com/reactiveui/Akavache#handling-xamarin-linker
To show you how to use Akavache in code, let’s stick with the people example from the “Connecting with REST APIs” section. For this example, we will retrieve a list of all people. Assume that we have implemented the REST client with Refit and hold an instance in the _restService variable.
Retrieve a List of People Through Our Akavache Cache
There is a couple of things that stand out in this piece of code. Let’s go through it from top to bottom. First, notice that we now return an IObservable object. Objects that implement the IObservable interface can send push-based notifications to subscribers.
- 1.
The local cache will be checked. If something is in there it will be returned and subscribers are notified.
- 2.
The cache expiry condition is evaluated.
- 3.
Asynchronously, the data from the remote source is being fetched.
- 4.
When remote data comes in, the subscribers are again notified, this time with the updated data.
"people"—A string that identifies this specific cache. Since it uses SQLite under the hood, think of this as the table name where the cached records are stored. Each time data comes in from remote, this table is refreshed.
async () => await _restService.GetAllPeople()—This holds the call to execute to fetch remote data. In our case this just calls the (Refit) REST client, which returns the list of people. You can supply your own method here with more extensive logic.
(offset) => { ... }—This method will determine whether the cache is stale or not. As an input parameter you will receive the DateTimeOffset of the last time the cache was updated. This you can use to determine if the cache is expired or not. In this example we compare it to the current timestamp and if there is more than 24 hours in-between we expire the cache. But you can implement any logic here as you see fit. This should return a boolean: true means the cache is expired and remote data should follow. False means the cached data is enough for now.
There is another parameter that specifies an absolute point in time when the cache is expired as an addition to the expiration logic you might have in the third parameter.
In the expiration logic you can also see I incorporated the Connectivity plugin to first determine if we have a connection. If there is no connection available, we will just work with cached data.
Subscribe to Our Cache Method
Imagine that this code lives in a view model and we have a variable _backendService that holds an instance to the class that retrieves our people. Because the GetPeople returns an IObservable, we can use the Subscribe on it.
The Subscribe method takes in a function with an input parameter of the type that we specified on GetPeople, in this case a collection of Person. When this method gets invoked, we clear People, which is a more global collection and start repopulating this collection. Probably because we are showing in in some kind of list in the UI.
If we only get cached data, we pass through here once and it will be lightning fast because we are loading data from this. When there is data in the cache, this will happen either way. So, the user is presented with the dataset that is already in there. When the cache is expired and we are able to retrieve new data from remote, we will pass through this method again, but now with new data. Because of the way the OS handles the UI updates, the user will barely notice that new data is coming in. And of course, you could make the updating of data a bit smarter than just replacing the whole thing.
The Subscribe method returns an IDisposable object. To avoid memory leaks, make sure that you dispose the observable whenever you do not need it anymore. You can do this by capturing the return value of the subscribe method in a variable like this: var subscription = _backendService.GetPeople().Subscribe(…); and then disposing it later, like this: subscription.Dispose();.
Tip
All in-depth details about Akavache can be found on the project’s GitHub page: https://github.com/reactiveui/Akavache
Akavache has some more methods that are more or less shorthand for caching files, images, and secure data. They should be pretty self-explanatory.
Monkey Cache
Another caching provider is Monkey Cache. This plugin is also very good but goes about things a little differently. First of all, it has different persistence providers. You can choose from SQLite, LiteDB, and FileStore or roll your own if you’re feeling adventurous.

Test results of the different persistence providers of Monkey Cache
Unlike Akavache, in Monkey Cache, you do not get to choose where your data is persisted. Per platform it will get saved in a specific location. For all platforms this will be the local app’s folder.
Installing Monkey Cache is just as easy as any other plugin; you can install it through NuGet. Just find the package named MonkeyCache and install it, together with MonkeyCache.SQLite, MonkeyCache.LiteDB, or MonkeyCache.FileStore. Make sure you also install this on your shared project as well as your platform projects.
You need to initialize with just one line, where you state your application name. This can be anything you make up and will be used as a name for your caching container. Just call Barrel.ApplicationId = " YourAppName"; before you call any other caching method.
Retrieving the Person Data with the Help of Monkey Cache
The biggest difference here is that Monkey Cache will not present the user with cached data immediately while retrieving data remotely if needed. You as the developer are responsible for how data is cached and how it is presented to the user.
You should see some familiar things in the code from Listing 4-11 by now. First, we check if there is an Internet connection. If the device is offline, we always return the cached data. If we are online, see if our cached data is still valid. If so, return that cached data. If the data has expired, we get it from remote, put it in our cache, and return the just fetched data to the user.
To make your life easier, you can of course create some generic methods for this which you can reuse. Monkey Cache also has support for ETags to reduce network traffic. What this means exactly we will learn a little down the road in this chapter.
Tip
To get all details about Monkey Cache, check out the GitHub page: https://github.com/jamesmontemagno/monkey-cache .
Network Resilience
An app is usually more than just the piece of software running on the device. It almost always has some kind of backend where it gets its data from or sends its data to. This backend can be half a world away, though! With servers hosted anywhere and app stores distributing our apps globally, there can literally be a whole world between your app and the backend.
And don’t forget the other way around: our users might be doing the craziest things. Travel at high speed through the air or over land, going through tunnels or even go into space in a cool electric car! These scenarios and much more can cause the network to be instable or not reachable at all. As the developer, we are expected to take all of these scenarios into account. If you don’t, the user might decide your app doesn’t work well
Of course, the easiest solution is to just check if a connection is available and decide what to do based on that. But even doing that might not be a 100% accurate. A next logical step would be to catch exceptions and let the user retry whenever something bad happens. This is of course a pretty viable and tried and tested method, but for most scenarios you, the developer, will probably know best how to handle certain situations.
To help you with that, there is a great NuGet package available named Polly. With this package, you can define certain policies (hence the name) for whenever something bad happens, instead of just asking the user to retry.
Polly’s Different Policies
Policy | Premise | AKA | Mitigation |
|---|---|---|---|
Retry | Many faults are transient and may self-correct after a short delay. | “Maybe it’s just a blip” | Allows configuring automatic retries. |
Circuit-Breaker | When a system is seriously struggling, failing fast is better than making users/callers wait. Protecting a faulting system from overload can help it recover. | “Stop doing it if it hurts” or “Give that system a break” | Breaks the circuit (blocks executions) for a period, when faults exceed some pre-configured threshold. |
Timeout | Beyond a certain wait, a success result is unlikely. | “Don’t wait forever” | Guarantees the caller won’t have to wait beyond the timeout. |
Bulkhead Isolation | When a process faults, multiple failing calls backing up can easily swamp resource (e.g., threads/CPU) in a host.A faulting downstream system can also cause “backed-up” failing calls upstream.Both risk a faulting process bringing down a wider system. | “One fault shouldn’t sink the whole ship” | Constrains the governed actions to a fixed-size resource pool, isolating their potential to affect others. |
Cache | Some proportion of requests may be similar. | “You’ve asked that one before” | Provides a response from cache if known. Stores responses automatically in cache, when first retrieved. |
Fallback | Things will still fail—plan what you will do when that happens. | “Degrade gracefully” | Defines an alternative value to be returned (or action to be executed) on failure. |
PolicyWrap | Different faults require different strategies; resilience means using a combination. | “Defense in depth” | Allows any of these policies to be combined flexibly. |
There is a lot of ground to cover with Polly and I don’t get around to describing all of it. But let’s look at some examples.
Retry Policy
The Retry policy is pretty self-explanatory: you are able to retry a request with conditions.
Getting People from the Remote Backend Wrapped in a Retry Policy
This code seems a lot to take in at first, but when you see all the different pieces, it’s not so bad. Let’s go through it step-by-step. The reason why the code seems so much is because it is actually a few methods chained together. If you look closely, you will see the Handle, WaitAndRetryAsync, and ExecuteAsync methods. To make it extra confusing, all methods have parameters that take a lambda expression.
All methods originate from the static Policy class. With the Handle method, we specify which kind of exceptions we want to handle with this policy. We can implement some logic here to make it even more flexible. In this example, the retry will happen only for the ApiException class and only when the ApiException.StatusCode not is NotFound. In other words, all ApiExceptions that return anything but a 404 will be retried.
This is a really powerful thing. Think about it: a 404 Not Found is very unlikely to recover when retried. The endpoint just is not there, so retrying a couple of times would make no sense. But for instance, a 500 Internal Server Error might be resolved within a small window of time and suddenly your code works again without bothering your user with any error that occurred in the background. Depending on your own requirements, you can implement a custom condition to suit your needs.
Then the WaitAndRetryAsync method tells the policy that it needs to retry for all the exceptions that come up. With the parameters you can specify how often a retry attempt should happen—three times in this case—and how long should be between retries. Again, here you can implement your own logic. On this line—retryAttempt => TimeSpan.FromSeconds(Math.Pow(2, retryAttempt)—you see the logic for the example code. From the policy, we get the current retry attempt as an input parameter. With the value in there, we calculate a number of seconds to a power of two. So, each attempt will be the current attempt to the power of two: 1, 4, and 9 in our case. You could also choose to have a fixed time between retries. It is all up to you!
Optionally, you can execute your own logic whenever a retry attempt it done. In Listing 4-12, you see a line that writes something to the console, that will happen whenever an exception was cached and a retry was invoked.
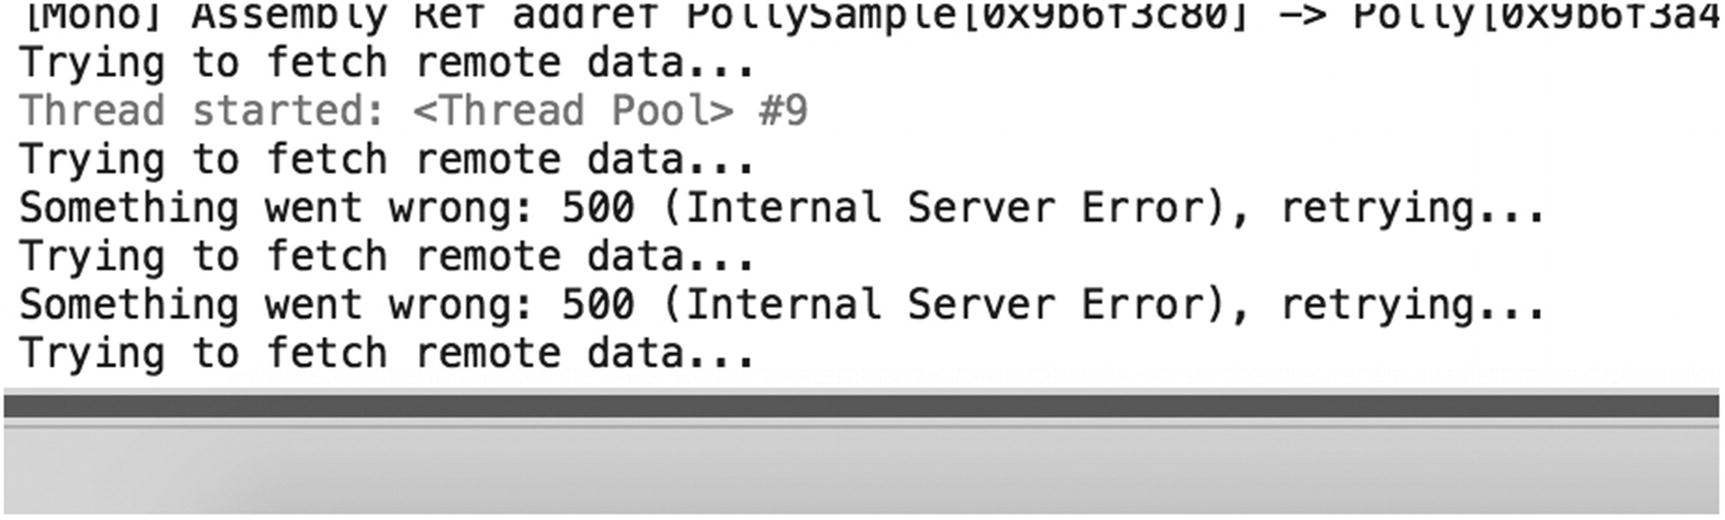
Retry output in the console window
If, after the specified number of retries, the call still fails, the exception is still thrown. Take that into account. One way to do this is by using the PolicyWrap, which we will see a little bit later.
Timeout
The Polly Timeout Policy
In this code, we see again the call to our REST service to obtain the people data. This time, it is wrapped in a TimeoutAsync method. The first parameter specifies that we want to wait for at most 30 seconds. The second parameter lets us specify a method that runs just before the exception is thrown when the method runs out of time. In this case we write a message to the console. The return of the Task.CompletedTask is needed to prevent warnings, because the lambda is an async method, but I don’t await anything.
Basically, that is all there is to it. Just like with the Retry policy, you see a ExecuteAsync call, which contains the actual code we want to execute.
There are a lot more options available when working with the timeout policy. The biggest feature is the ability to implement it as a pessimistic or optimistic timeout. The default strategy is the optimistic strategy. When using the optimistic strategy, you have the ability to work with a CancellationToken. When implemented, you can allow your users to cancel the operation before the timeout hits. You can, of course, also have a programmatically implemented trigger that cancels the operation.
With the pessimistic strategy, you can implement a timeout for methods that normally don’t support it. Also, cancellation before the timeout hits is not possible. To implement either the optimistic or pessimistic timeout strategy, simply pass in the corresponding value from the TimeoutStrategy enum into the TimeoutAsync method.
PolicyWrap
Different Notations of the PolicyWrap
In this code, variables like waitAndRetry, breaker, and fallback hold instances to the policies with the same name. Then in the Execute method, the code is inserted that you actually want to run. You need two or more policies to be able to use PolicyWrap.
When using multiple policies, the question arises how execution and errors are handled. When using the PolicyWrap, all policies act as layers. Each policy is wrapped in the next until the last one is reached which executes the actual logic from the Execute method. When reading the code, policies are wrapped from left to right. In the example from Listing 4-14, breaker executes the code and is wrapped in waitAndRetry and waitAndRetry is wrapped in fallback. When the code is executed and fails, it will execute whatever the policy prescribes and, if the policy is exhausted, it will bubble up to the policy wrapping.
- fallback is the outer policy and will pass execution along to waitAndRetry
waitAndRetry will pass it along to breaker
breaker is the most inner policy and executes the code, unless the circuit is open
The executed code succeeds, returns its result, or throws an error
breaker will update its status according to the policy configuration
waitAndRetry will wait and retry in case of a fault, fail completely when retry attempts are exhausted, or return in case of a success
fallback will substitute the result for a fallback value or return the result in case of a success
As mentioned earlier, it would probably be too much to handle all the policies and their options here. I would like to invite you to try the rest of them for yourself and see what you can come up with.
Tip
Like many of the packages out there today, Polly is also available on GitHub. See all the details about this project here: https://github.com/App-vNext/Polly
Conditional HTTP Requests
One more optimization that is worth noting can be accomplished with conditional HTTP requests. A conditional HTTP request is a request that is executed differently depending on the value of specific headers.
For safe methods, like GET, which usually retrieves data, the conditional request can be used to send back the data only if it is newer than the version retrieved earlier. This can spare bandwidth, something that is particularly interesting on mobile devices.
For unsafe methods, like POST, which usually sends or updates data, conditional requests can be used to check the integrity of the data being sent.
To clarify a bit more on safe and unsafe methods—safe methods are the HTTP verbs that do not change the state on the server. They just retrieve data for consummation on the client. Unsafe methods are the opposite—they do mutate data on the server.
In this section, we just focus on the safe methods, since we are mostly interested in saving bandwidth.
If-Match—The request yields a result whenever the ETag (a hash, which I will go into in a bit) matches in both the request as well as on the server.
If-None-Match—The request yields a result whenever the ETag in the request and the server do not match.
If-Modified-Since—The request yields a result whenever the date on the server is newer than the value in the request.
If-Unmodified-Since—The request yields a result whenever the date on the server is older or equal to the date on the server.
If-Range—Similar to If-Match and If-Unmodified-Since but can have just one ETag or one date (whereas the other headers could have multiple). If the condition matches, you will retrieve only a partial result that is relevant. If the condition fails, you will retrieve the full content.
If a result is sent back from the server, this will have a HTTP 200 OK result. If the condition from these headers is met and the server decides no data has to be transferred, you will receive a HTTP 304 Not Modified result with an empty body, saving you the bandwidth of retrieving a result you already had. The exception is If-Range, that will send back a 206 Partial Content when the condition is met and a 200 OK with the full content otherwise.
I have mentioned the term ETag a couple of times now, so let me explain to you what it is. The ETag stands for Entity Tag . Basically, it is a hash that uniquely identifies the data that you are requesting. The HTTP specification does not prescribe what type of hash it should be (MD5, SHA-1, etc.) or how it should be composed. This is totally up to you, as long as the hash that is produced is unique for that data.
To give you a concrete example, I show you how to work with the If-None-Match header , which is the most relevant in regard to mobile apps.
The app initiates a request to the server for the first time.
The server returns the requested data together with an ETag header.
The app saves the ETag together with the endpoint where the data came from.
The next time the same endpoint is requested, the app adds an If-None-Match header to the request with the saved ETag hash from before.
The server compares the incoming hash from the app to the hash computed from the requested data. If the hash is equal, the data is not sent back to the app. Instead a HTTP 304 Not Modified with an empty body is returned. If the hash is different, apparently something is changed and the full data is returned to the app.
The implementation for this solution needs to happen on the client application, our app, and the backend application. On the client, we have to create some kind of key/value store where the key is the endpoint that we request the data from and the value is the ETag hash that we retrieve from the server.
Handling the ETag and If-None-Match Headers from the HttpClient
All the heavy lifting is done in the SendAsync method . This method is invoked whenever a request is sent to the server. As denoted in the comments in the code, everything before the call to the base is before the actual request is sent. That is the place where you can enrich the outgoing request. In our case, we are checking our cache—implemented with Akavache—to see if we have a hash value available. If we do, it is attached in the If-None-Match header.
Then the actual network call happens, and when we get a (successful) result back, we check if there is an ETag header in there and save it in the cache.
Tip
The code from Listings 4-15 and 4-16 is part of a sample project available on: https://github.com/jfversluis/AirplaneModeProof/tree/master/AirplaneModeProof.Api/Middleware . The repository contains a working example of both the server and client application. To get a full understanding of how it all works together, it might be good to have a look at that. It also holds examples of other concepts we have seen in this chapter.
On the server side, the implementation varies depending on what technology you are using for your backend. The code shown in Listing 4-16 shows a so-called middleware for ASP.NET Core. Middleware is a piece of code that is registered in the request/response pipeline that can be used to enrich the request and/or response. To see how to register and work with this piece of middleware, look at the mentioned repository in the previous tip.
Calculate the ETag Value from ASP.NET Core Middleware
The magic in this case happens in the InvokeAsync method. There we check if the ETag header is supported. And if yes, we calculate a simple SHA1 hash from the response’s body. There is a little helper method all the way down the bottom of the class to calculate the SHA1 hash.
That is all there is to it. In Figure 4-6, you can see two requests that implement this feature. In the screen at the top, a request is sent without an If-None-Match header and you only see the server responding with an ETag header.
In the screen at the bottom, the If-None-Match header from the client and the ETag from the server are identical, thus the server responded with an HTTP 304 (not visible in screenshot).
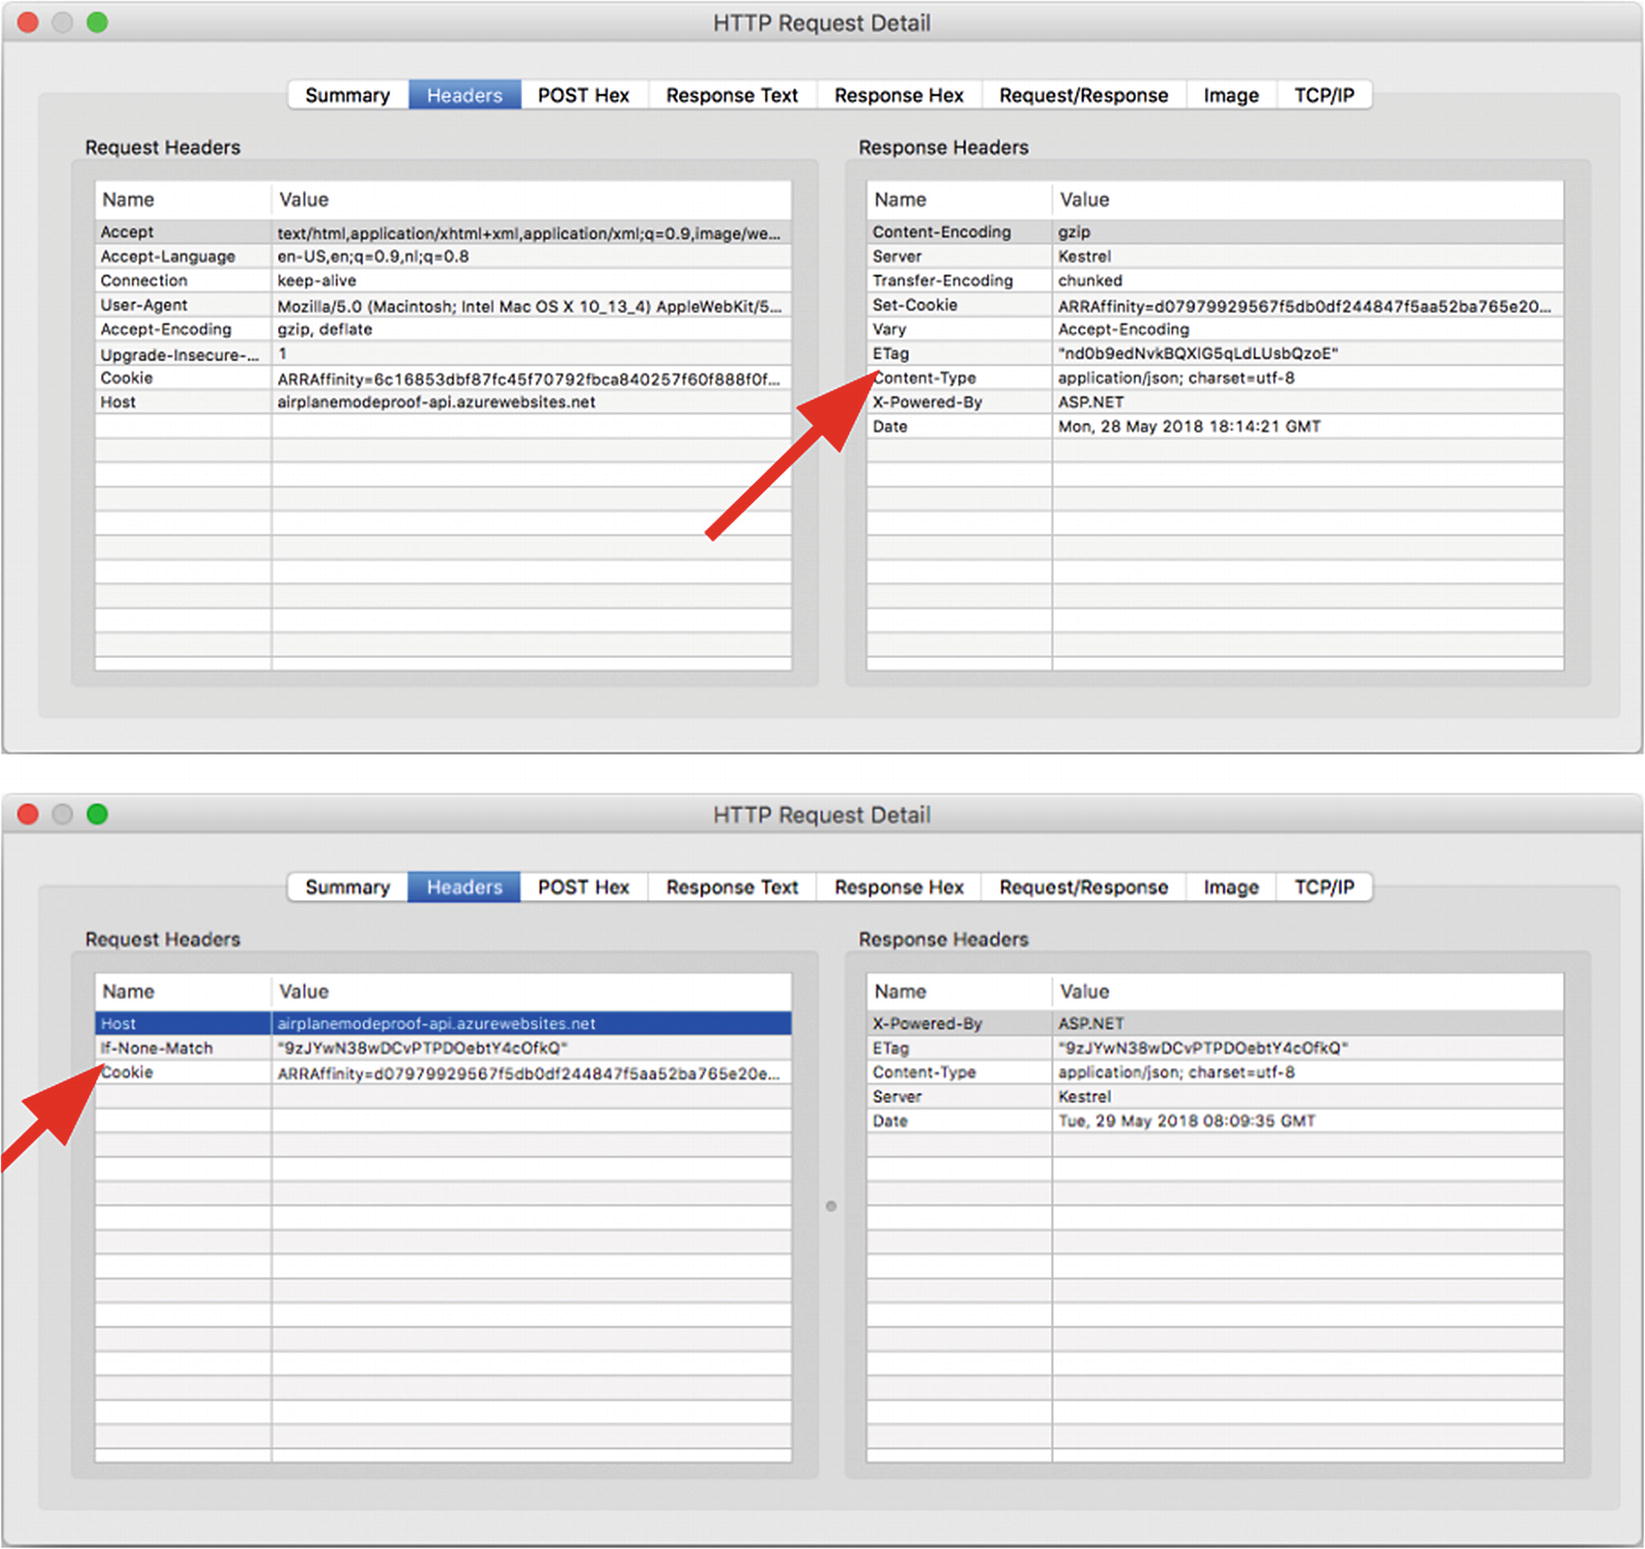
Two requests with ETag and If-None-Match headers
The Monkey Cache plugin we saw earlier has built-in support for using the ETag value.
Another thing that might be interesting to look at is implementing GZip/Deflate. This basically zips the contents of the request and unzips it at the other side. The implementation is not handled in this book.
Tip
If you want to read more extensively into the conditional HTTP requests, look at this documentation from Mozilla: https://developer.mozilla.org/en-US/docs/Web/HTTP/Conditional_requests
Sensitive Data
Besides just getting data across and optimizing that, there is also the matter of sensitive data. Not a day goes by without some kind of data breach that is in the news. As a developer, it is rapidly becoming more important to be aware of what sensitive data is and how to store and transfer it properly.
In this section, we learn how to save sensitive data properly and what we need to know about transferring data securely. Secure data can be anything. The most obvious is usernames, passwords, OAuth tokens, and other kinds of credentials. But anything that you deem sensitive should be saved securely. Especially with privacy laws like the GDPR, it might be worth double-checking the security of the data you’re saving.
Storing Sensitive Data
There are a couple of solutions for storing data in a secure way. Each platform—at least iOS, Android, and UWP—has a dedicated store for secure data. On iOS it will be saved in the keychain, for Android in the keystore, and on UWP there is the DataProtectionProvider.
Multiple plugins have implemented functionality to save data in each respective secure store in Xamarin.Forms. Akavache that we have seen earlier, is actually one of them. But since we have seen that in action already, let’s look at an alternative. The alternative plugin is one we have seen earlier as well, it’s Xamarin.Essentials!
To set up the secure storage, there is a little platform-specific setup required for iOS. You need to enable the Keychain entitlement and add a keychain access group for the application’s bundle identifier. To do this, open the Entitlements.plist file, find the keychain entitlement, and enable it. This will take care of the rest for you. Then go into your iOS project’s properties and set the Custom Entitlements to the Entitlements.plist file under iOS Bundle Signing.
Methods to Work with Secure Data in Xamarin.Essentials
Tip
Read up on all the details of the secure storage part of Xamarin.Essentials on the Microsoft Docs website: https://docs.microsoft.com/en-us/xamarin/essentials/secure-storage
Transferring Data Securely
This part is actually pretty easy: make sure you only connect with HTTPS resources. On iOS, Apple already forces you to do this by default since iOS 9. Since the world isn’t up to speed with that yet, there is a way around it, but I would discourage that. If you have control over the app as well as the backend, invest some time in installing a certificate to make the connection secure. Also, make sure to do it properly and do not bypass the validity or integrity of the certificate in any way. Android does not enforce anything of this kind (yet).
Since not too long ago, an SSL certificate was quite costly, but now with the Let’s Encrypt service you can get certificates for free and in an automated way. That means there is no reason not to implement it and secure all the things!
When not using a secure connection, your app is vulnerable to all kinds of attacks. Malicious people might be able to change the content in your app or steal data from your users. If that happens and it gets out, people will not just stop using your app and prevent other users from ever installing it, but you might even face criminal charges depending on local laws. I would say that is reason enough to do everything in your power to prevent this from happening.
If you do need to get around the requirement for secure connections for iOS, because for instance you do not have the backend in your own management, you have a couple of keys to work with in the info.plist file.
The best thing to do is add an exception for a single domain. You can exclude one (or more) domains from the secure connection requirement. Excluding just a few domains is the best thing you can do, as it leaves your app as secure as possible.
Allowing the example.com Domain to Load Data Insecurely
Allow All Data to Be Loaded Insecurely
Note that when implementing the code in Listing 4-19, Apple might decline your app in the store if you do not have a good reason to disable this.
Note
To read up on all the details of the info.plist keys, refer to the Apple documentation: https://developer.apple.com/library/ios/documentation/General/Reference/InfoPlistKeyReference/Articles/CocoaKeys.html#//apple_ref/doc/uid/TP40009251-SW33
As mentioned, Android does not have any requirements for this just yet. It is unclear if Google will enforce anything like this. Nevertheless, just make sure to be as secure as possible.
Tying It All Together
You might have already noticed that I combined some of the concepts explained in this chapter here and there. Because it all has to do with networking and a bit of security, you can pull together some of the bits and pieces to make your app even more robust.
For instance, the check to see if there is an active Internet connection works great with the caching mechanism. And with Polly in the mix, you can anticipate certain errors and deal with them without the user ever having to know about them.
Each app is different, so it all depends on your requirements and time you have to spend on these kinds of solutions, but I would recommend you play with it a little. See what fits together and how it can work in your project structure. Start small and add a concept each iteration. Naturally over time, you will develop a pattern with these concepts that handles your network calls beautifully, making your more stable and robust and a delight to work with.
Summary
In this chapter we saw everything that has to do with networking and a bit of security. We learned how we can connect with REST APIs and how we can do it with the least amount of code possible by using libraries like Refit and RestSharp.
Also, saving bandwidth is an important factor on mobile. Not only that, while we’re saving bandwidth, we can also attribute to the user experience. By implementing caching, we do not retrieve data unless we decide that it is needed and have the possibility to show data to our users while updating in the background.
A device goes anywhere the users go, which means walking through deserted places, sitting on high-speed trains that go through tunnels, or maybe even riding in an expensive sports car in space. This means a network connection might not always be available or at least not always stable. Because of this, we need libraries like Xamarin.Essentials and Polly to check if we have a connection and be able to recover from certain network errors gracefully. By doing so, our users might never even notice something went wrong and will be more pleased with the quality of our app.
Also, we saw how we can store certain data in a secure store, I have shown you a little trick to save even more bandwidth by using conditional HTTP requests and how all of this could work together in your own projects.
In the next chapter, we look at some common business concepts for apps, like scanning barcodes, showing PDFs, and much more.