Chapter 5. Service Discovery Beyond the Local Link
Zeroconf is designed to make it easy for you to discover services that are close to you. The word close can be ambiguous. You go to your neighborhood coffee shop and the people drinking their cappuccinos at the next table are physically close to you. You may be able to use a Zeroconf-enabled chat client, text editor, or audio application to interact with them, to collaborate on a document, or to listen to their music library. In the preceding three chapters, you have been introduced to the components of Zeroconf that are designed to allow you to painlessly discover and offer services to devices that are close to yours—where close implies proximity in a network sense. Devices on the same link can use IP to communicate with one another and can present a list of available services in a user-friendly format.
As you drink your morning coffee, the person at the next table may be just a couple of feet away, but you may have never met them. They are not what you would describe as close in the sense of someone who is personally close, they just happen to be near you. There are many people who you might describe as being personally close: friends, family members, coworkers, and people you interact with on a regular basis.
If you are a Mac OS X user who uses iChat as your chat client, the differences in these
two notions of close are reflected in the two windows you can use to find people to chat
with. The Bonjour window shows you names of people on your local link who are available to
chat. You may never have met these people and may not know their email addresses or chat
usernames. If they have authorized the Bonjour connection, they just automatically appear
in your Bonjour window. All that is required is that they have advertised a service of type
_presence._tcp. Contrast this with your Buddy window.
This only includes people who you have designated as buddies. These people may not be
nearby, but they are people you are most interested in interacting with on a regular
basis.
Chapter 4 described how DNS Service Discovery (DNS-SD) allows you to discover and to advertise services using PTR, SRV, and TXT records. In Chapter 4, we conveniently avoided the question of whether we were talking about Unicast or Multicast DNS. This was intentional, because it really doesn’t matter. DNS-SD was created to work with both Unicast and Multicast DNS. Multicast DNS is perfect for small networks because of its zero-configuration nature. Instead of trying to predict where each query and announcement needs to go, it just sends them all to every peer on the network and lets the peers sort what they need. Clearly, this can’t work on a global scale. If every machine on the Internet were busy sending packets that were replicated and delivered to every other machine on the Internet, every machine would be buried under an avalanche of unwanted traffic. Clearly, at a certain stage, we have to move out of the zero-configuration world and into the world of configuration and infrastructure. By building DNS-SD on top of Multicast DNS on the local network, that gives us a natural candidate for what configuration and infrastructure we should use when operating on larger networks: Unicast DNS. In most respects, the DNS-SD part of the protocol works just the same, regardless of whether it’s running over Multicast DNS or Unicast DNS. The difference is that Multicast DNS is configuration-free and infrastructure-free, whereas Unicast DNS is more efficient on large networks but requires some configuration and infrastructure.
One configuration detail that needs to be worked out when using Unicast DNS is which domain(s) to use. When you browse on the local network, it’s clear that the domain you want is local. When you browse on the global Internet, there are millions of domains to choose from. How does the computer know which to use? The answer to that question is Domain Enumeration , covered in this chapter. This chapter also covers how computers make service information available to other computers that may be thousands of miles away. It covers how computers get timely updates when that service information changes. Finally, whenever we talk about global networking in today’s world, NAT (Network Address Translation) rears its ugly head. In the 1970s and 1980s, TCP/IP programmers never had to worry about NAT. Perhaps in the future, using IPv6, network programmers will again not have to worry about NAT. But, in today’s world, NAT is a problem we can’t ignore, and this chapter explains how wide-area service advertising deals with NAT.
Domain Enumeration
When you browse on the local network, it’s clear that the domain you want is local. When you browse on the Internet, you can ask DNS-SD to browse in any valid DNS domain, like http://apple.com or http://oreilly.com. Whether you get any results will depend on whether the domain is advertising any services. Clearly, one way to decide which domain(s) to browse is to have the user type them in. However, the spirit of Zeroconf is zero configuration, so we don’t want to make the user start manually configuring things now. The computer should automatically learn from its environment about interesting domains to browse. The way DNS-SD does this is with Domain Enumeration queries. DNS-SD performs five Domain Enumeration queries:
Where are interesting domains to browse for services?
The Domain Enumeration query string for this is
b._dns-sd._udp.Of that list, what is the recommended default domain to browse?
The Domain Enumeration query string for this is
db._dns-sd._udp.Where are recommended places I might want to register to advertise my services?
The Domain Enumeration query string for this is
r._dns-sd._udp. (Advertising services may require authorization and credentials, so just because a given domain is recommended to people on this network doesn’t necessarily mean that you have permission to advertise services there.)Of that list, what is the recommended default domain to register services?
The Domain Enumeration query string for this is
dr._dns-sd._udp.For legacy client applications that don’t specify any particular domain when browsing for services, are there any additional domains that we should browse in addition to the usual local domain?
The Domain Enumeration query string for this is
lb._dns-sd._udp.
When your laptop finds itself on a new network, it typically learns certain information from the DHCP server, including the address it’s been assigned, the netmask for that network, the address(es) of one or more DNS services, and the default DNS search domain recommended for users on that network.
DNS-SD uses this information to construct its Domain Enumeration queries in two ways: domain- and address-based .
The first way is a domain-based query. DNS-SD takes each of the five Domain Enumeration query strings
above, appends the default DNS search domain, and does a PTR query. For example, at
Apple, the DHCP server informs clients that the domain is http://apple.com, so DNS-SD will do a PTR query for http://lb._dns-sd._udp.apple.com. to
determine if browse operations done by legacy clients should browse any other domain in
addition to local.
The second way is an
address-based query, which allows more fine-grained, location-specific defaults to be
fed to clients based on which network segment they are on. DNS-SD does address-based
queries by taking the client’s IP address and performing a logical AND operation with
the netmask to get the base address for the subnet.
This address is then reversed in the manner of a normal in-addr.arpa reverse lookup, and this name is then appended to each of
the Domain Enumeration query strings. For example, if the client’s IP address is
192.168.1.2 and the netmask is 255.255.0.0, then the base address for the subnet is
determined to be 192.168.0.0, and DNS-SD will do a PTR query for lb._dns-sd._udp.0.0.168.192.in-addr.arpa. to determine if
there’s a recommended legacy browse domain for that particular network.
Advertising Static Services
If you run your own DNS server, or are friendly with the network administrator who does, then you can create magical results just by adding a few lines to your DNS zone file to create the right records to support the domain-based or address-based Domain Enumeration queries. You just need to add a couple of lines to answer those queries and then add three records for each static service you want to advertise. At Apple, various interesting web pages are statically advertised, so that they magically show up in Safari’s Bonjour Bookmarks list. For example, the web page of information for new employees is advertised. You can imagine a scenario that used to happen quite frequently: on a new employee’s third day, she would want to find out some information that’s available on the New Employees page, but she couldn’t remember the URL. She’d ask coworkers around her, but they’d all been at Apple for years and hadn’t looked at the New Employees page for a long time, so they couldn’t remember the URL either. Thus, a hunt for the New Employees page would begin. That scenario doesn’t happen anymore. Now, the page appears in Safari’s Bonjour Bookmarks list and any employee, new or old, can find it easily, even if she doesn’t remember the URL.
Any organization can easily advertise services this way. A hotel offering network access in its rooms can just add a few lines to their DNS server and have the hotel’s web page magically show up in clients’ web browser’s list of discovered pages. An airport offering 802.11 wireless service can have airport information pages and flight departure times magically appear in passengers’ web browsers. A school or university can advertise pages of information relevant to students and visitors. An ISP can advertise pages of information relevant to its customers. A café or coffee shop can advertise pages with menus and price lists.
Example 5-1 shows a very simple example of the lines to add to a DNS zone file to answer Domain Enumeration queries and advertise a single web page in that domain.
; Invite clients to browse this domain ("@" means "this domain")
b._dns-sd._udp                  PTR     @
lb._dns-sd._udp                 PTR     @

; Advertise our web page ("www.<this domain>" in this example)
_http._tcp                      PTR     Our Web Page._http._tcp
Our Web Page._http._tcp       SRV     0 0 80 www
                                TXT     path=/
For more information on setting up your own DNS server, see DNS and BIND by Paul Albitz and Cricket Liu (O’Reilly).
Wide-Area Preference Settings
As provided by Apple in Mac OS X 10.4 Tiger and in Bonjour for Windows 1.0, Wide-Area service discovery is a behind-the-scenes technology. The APIs are there for developers to use, but until developers start using those APIs or DNS administrators start advertising the automatic legacy browse domains described above, end users will see no difference. However, if you look in Apple’s Darwin open source repository, you’ll find source code for user-interface control panels for Mac OS X and for Windows, to allow developers (and adventurous end users) to experiment with the technology. Also, at time of writing, precompiled binaries of those control panels are available with instructions at http://www.dns-sd.org/ClientSetup.html. These control panels allow you to set system-wide defaults that will cause standard, unmodified Zeroconf applications to browse for and/or register network services in wide-area domains, rather than only on the local link.
Figure 5-1 shows the Bonjour Preference Pane as it appears when installed on Mac OS X.

Figure 5-2 shows the Bonjour Control Panel as it appears when installed on Microsoft Windows.
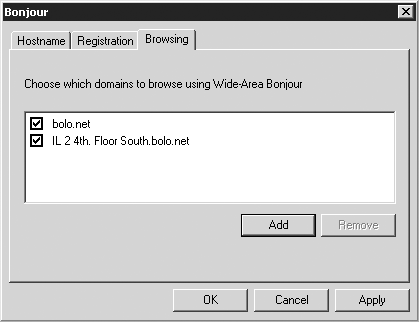
On both Windows and Macintosh, the Bonjour Control Panel has three tabs: Hostname, Registration, and Browsing.
Hostname
If you have a Dynamic DNS hostname assigned to you by your DNS server admin, who ensures that everyone’s hostname is unique, (or if you run your own DNS server with Dynamic Update), you can enter it here and click Apply. The hostname must be fully qualified, so don’t enter a hostname like steve, enter a hostname like http://steve.bonjour.example.com. The yellow dot will turn green to confirm a successful registration with the DNS server, or red if a permanent error occurs, such as trying to update a name that you’re not authorized to update. If the dot remains yellow, that indicates lack of network connectivity; for example, your Ethernet cable may not be plugged in. Connect the cable or otherwise establish connectivity, and the dot should turn green or red as appropriate. Note that hostname registrations will not work if your computer is behind a NAT gateway, unless that NAT gateway supports a NAT port mapping protocol. If you have an Apple AirPort Extreme or AirPort Express base station, you can turn on NAT-PMP, described below, using the AirPort Admin Utility. Certain NAT gateways that support the UPnP Home Gateway Protocol may also work.
If the DNS server requires credentials to authenticate secure
updates, click Password...and enter the key name and key data given to you by the DNS
operator. The key name is most often the name of your DNS domain, for example,
http://bonjour.example.com. The key data or
“password” is most often a random-looking string of characters—for example, CnMMp/xdDomQZ4TelKIHeQ==.
Registration
If you’d like to advertise services on your machine that are discoverable anywhere on the Internet (or anywhere behind your firewall), click the checkbox and enter an appropriate DNS domain in the Registration panel. DNS-SD-advertised services such as Personal File Sharing, Personal Web Sharing, Remote Login, FTP Sharing, SubEthaEdit shared documents, iPhoto sharing, etc., will be visible from anywhere in the world. As with Dynamic DNS hostnames, if your computer is behind a NAT gateway, wide-area service registrations will only work if the NAT gateway supports NAT-PMP or the UPnP Home Gateway Protocol.
Just like your hostname registration, the DNS server for your DNS-SD domains may require you to enter a key name and password before it will accept service registrations. Simply click Password...and enter the key name and key data given to you by the DNS server operator.
Browsing
If you don’t want to advertise services on your machine but do want to discover services advertised by others, enter a default browse domain in the Browsing panel.
For fun, try this on Mac OS X 10.4 Tiger or the equivalent steps on Windows using the Bonjour plug-in for Internet Explorer:
Open a Safari window.
Press Cmd-Opt-B to bring up the bookmarks list.
Click on the Bonjour icon.
Now, with the Safari window still visible, go to the Bonjour Preference Page in System Preferences.
Click + and enter http://dns-sd.org as a browse domain.
Click Apply and watch a bunch of new stuff instantly appear in the Safari Bonjour Bookmarks list.
Uncheck http://dns-sd.org and click Apply again, and the new stuff instantly vanishes.
Dynamic DNS Updates
Think back to the days before mobile phones. If you wanted to remain in contact while you traveled around, you had to leave detailed directions on how you could be reached. Someone might say, “I have a 10 o’clock meeting with Stan, so you can call me over on the main campus between 9 and 11 at xxx-xxxx. Then, I have lunch with Betty, so you can call me at Sushi Sally’s from around noon to 1 at yyy-yyyy. Then, I need to head in to the city. I should be at Dana’s around 3, so call me at zzz-zzzz if you need me.” Now you just say, “I’ll be running around all day, just call me on my mobile.” One number follows you around all day, one number that can be used to access the device you carry all day long as you move from one local cell area to another. The person trying to reach you does not need to be aware of your physical location.
Consider the same fun-packed day, but this time you are taking your laptop with you from place to place. If, at each location, you are able to connect to the Internet, then, in the absence of firewalls, you can check your email and use instant messaging with your usual group of friends. For email, you are logging in to a mail server somewhere and initiating a request that conveys your current location. No one sending you email has to track where you are. They sent the mail to an address that is handled by a mail server, and you connect to that same server to download your mail. Similarly, with the chat program, you log in to a server at a well-known DNS name or address to announce your availability and to determine which of your other friends are currently available. No one needs to know the physical location of your laptop. While these solutions work, they are heavyweight and awkward. People don’t need to know your location to send you email, but you need to keep polling the mail server to find out if new mail has arrived. The mail server can’t tell you when mail arrives if it doesn’t know where you are or how to reach you. Instant messaging gives the illusion of direct peer-to-peer communication but requires some organization to run the big “server in the sky” that’s actually the intermediary for all communication. The need for a big, expensive server in the sky can be a serious impediment to the creation of new network applications and new uses for the Internet.
Dynamic DNS Update provides part of the answer to this problem. By having a fixed DNS name and using Dynamic DNS Update to update your DNS address record every time your IP address changes, people can now find your current IP address at any time by looking up the current DNS address record for your fixed DNS name.
Wide-area DNS-SD builds on standard Secure DNS Dynamic Update as defined in RFC 2136 “Dynamic Updates in the Domain Name System (DNS UPDATE)” (http://www.ietf.org/rfc/rfc2136.txt) and RFC 3007 “Secure Domain Name System (DNS) Dynamic Update” (http://www.ietf.org/rfc/rfc3007.txt).
The abstract for RFC 3007 explained the need for Dynamic DNS Update as follows.
The Domain Name System was originally designed to support queries of a statically configured database. While the data was expected to change, the frequency of those changes was expected to be fairly low, and all updates were made as external edits to a zone’s Master File.
Using this specification of the UPDATE opcode, it is possible to add or delete RRs or RRsets from a specified zone.
Dynamic DNS Update Leases (DNS-UL)
Secure DNS Dynamic Update provides almost all the solution we need, but not quite. It allows a client to create and update records on a DNS server but makes no provision for garbage-collecting stale records. When your laptop arrives on a new network, it can create or update its address records, but what happens if your laptop crashes, or runs out of battery power, or you unceremoniously disconnect its Ethernet cable or shut off the wireless interface without giving it a chance to delete the address record? The IP address you got from the DHCP server has a lease time associated with it, and if the laptop fails to renew the lease, when the time expires the DHCP server will reclaim that address. RFC 2136 provides no such lease time on DNS record creation. Once created, a DNS record remains valid until someone comes along and decides to delete it.
Dynamic DNS Update Leases (see http://files.dns-sd.org/draft-sekar-dns-ul.txt) remedies this omission.
Changes to the message format
The requests and responses for DNS-UL use the same format as those described in RFC 2136 for Dynamic DNS
Update, with the addition of a single OPT-RR as the last record in the Additionals
section. The new EDNS0 Option Code, UPDATE-LEASE, has been assigned the number 2. The advantages of using an OPT-RR to encode the update lease are
that (1) minimal modifications to a name server’s frontend are required and (2)
servers that do not implement this extension will automatically return NOTIMPL.
The fixed part of the OPT-RR is described in RFC 2671 (http://www.ietf.org/rfc/rfc2671.txt), and is shown in Table 5-1.
|
Field name |
Field type |
Description |
|
|
Domain name |
Empty (root domain) |
|
|
|
|
|
|
|
Sender’s UDP payload size |
|
|
|
Extended |
|
|
|
Describes |
|
|
Octet stream |
{attribute, value} pairs |
The variable part of the data is contained in the RDATA and consists of one or more sets of the three
fields OPTION-CODE, OPTION-LENGTH, and OPTION-DATA.
In the DNS-UL requests and responses, there will be one set of these fields, and
the OPTION-CODE will have the value UPDATE-LEASE (i.e., 2), the OPTION-LENGTH will
indicate the size in octets of the OPTION-DATA
(i.e., 4), and the OPTION-DATA will have desired lease (request) or granted lease
(response), in seconds.
In the request, the value of the lease is a signed 32-bit number with the requested lease life in seconds. This value must be chosen to balance between the desire to have accurate information and the need to not burden the network or the server. The current recommended minimum lease is 1,800 seconds, which is 30 minutes. In the response, the value of the lease is the time granted by the server. This value is not restricted to be less than or equal to the value requested and could also be greater.
Refresh messages
In order to keep resource records from being deleted by the server, clients should send a refresh message when 75% of the current lease has elapsed. If the client uses UDP and does not receive a response from the server within two seconds, the client can either retry with TCP or continue to retry with UDP, doubling the length of time between successive attempts. If, for any reason, the lease of a resource record expires without being refreshed, the server must not respond to queries with this record and is allowed to delete the record from its database.
Refresh messages are nearly identical to those used for DNS-UL requests. The change is that the resource records to be refreshed are contained in the Update section and in the Prerequisites section as an “RRSet exists (value dependent)” pre-requisite. The requested and granted lease times do not need to be the same as in the original request. If a client has sent more than one update to a single server, the client may coalesce the refresh messages into a single message. The client can include all existing updates to the server as long as at least one of the included resource records has elapsed at least 75% of its original lease.
A server sends an acknowledgment to a valid refresh request. This response is identical to the previously described DNS-UL response and contains the new lease of those records being refreshed. If no records in the refresh request have completed 75% of their leases, the updates are not refreshed and the response will contain the smallest remaining lease of all the records in the refresh message.
DNS Long-Lived Queries (DNS-LLQ)
Software development teams that are collocated experience synergies that are harder to replicate in teams working remotely. You may be working in one area of the code and overhear two people discussing another area of the code that you have quite a lot of experience with. You can easily jump in and join the conversation. There are also benefits of working remotely. Once you take the time for commuting, the time taken on incidental conversation with colleagues, and the time spent trying to block out the noise of others working, you find many more hours in the day to get work done. How, in this setting, do you make yourself available to exchange ideas with your colleagues? Email, Net meetings, instant messaging, and IRC chat rooms all contribute to the virtual work environment—but it is not the same as being there.
The same synergies exist for DNS-SD in a Multicast DNS environment. When you’re on the local network, you hear announcements when new services arrive. You hear goodbye packets with services go away. If a service goes away without sending its goodbye packet, and later, another client attempts (unsuccessfully) to contact it, you hear that too. What we want to do is provide similar timeliness for remote clients that may be far removed from the local network.
A standard DNS query gives you the answer that’s true at that moment in time. If you want to find out later what’s changed, you have to do another query. Querying very frequently puts a large load on the network and on the DNS server. Querying only occasionally imposes lower load, but your information may become out of date. When using polling, there is no good answer.
Instead of polling, DNS-SD extends DNS to support long-lived queries (LLQ). In addition to asking a question of the server, it uses an EDNS0 extension to say, in effect, “...and tell me in the future if the answer to this question changes.” DNS long-lived queries are described at http://files.dns-sd.org/draft-sekar-dns-llq.txt.
LLQ Message Format
LLQ messages extend the standard DNS message format described in RFC 1035 (http://www.ietf.org/rfc/rfc1035.txt) with a new OPT-RR and RDATA format, similar to the way that Dynamic DNS Update
was extended as described earlier. This time, the RDATA triples are of the form
OPTION-CODE, OPTION-LENGTH, and LLQ-Metadata. The
OPTION-CODE is filled with the value of the
EDNS0 Option Code for LLQ, which is 1.
The LLQ-Metadata
consists of a VERSION field used to identify the
version of the LLQ protocol implemented and an LLQ Opcode field that consists of one
of the following codes: LLQ-SETUP (1), LLQ-Refresh
(2), or LLQ-EVENT (3). The ERROR field is next and contains one of the following
error codes: NO-ERROR (0), SERV-FULL (1), STATIC (2), FORMAT-ERR
(3), NO-SUCH-LLQ (4), BAD-VERS (5), and
UNKNOWN-ERR (6). The remaining two fields are LLQ-ID, which is a unique identifier for a particular LLQ, and LEASE-LIFE, which indicates how long the LLQ will remain
in effect.
LLQ Setup Four-way Handshake
The setup of long-lived queries is a four-way handshake consisting of the following steps.
Step 1: initial request
The initial request is sent by the client to the server. The format for this
request is an extension of a standard DNS query using an OPT-RR containing LLQ
metadata in its Additionals section. The RDATA triple consists of an OPTION-CODE, OPTION-LENGTH, and LLQ-Metadata.
This triple may appear one or more times. Values should be as follows:
The
OPTION-CODEshould be set toLLQ(1).The
LLQ-Metadatasection consists of fields for theLLQ-OPCODE,ERROR,LLQ-ID, andLEASE-LIFE.In an initial setup request, the
LLQ-OPCODEis set toLLQ-SETUPand theLLQ-IDis set to0.In requests the
ERRORfield should be set toNOERRORand theLEASE-LIFEshould contain the desired life of the LLQ request in seconds.
Step 2: challenge
In response to an LLQ setup request, a server will send a setup challenge to the requestor. The reason for the challenge is to prevent abuse of the LLQ feature by rogue machines that might otherwise use spoof source addresses to set up LLQs on behalf of some other unsuspecting machine. The challenge packet contains a large number selected at random by the DNS server. A legitimate client setting up an LLQ receives the challenge and answers it correctly. An impostor generating fake packets with spoof source addresses will not receive the challenge packet and will be unable to fake a correct response to the challenge it never received.
This challenge is a DNS Response, with the DNS message ID matching that of the request and with all questions contained in the request present in the questions section of the response. The challenge contains one OPT-RR with an LLQ metadata section for each LLQ request, which will indicate the success or failure of each request.
The LLQ-Metadata section consists of a field
VERSION, which indicates the version of the
LLQ protocol implemented in the server, and an LLQ-OPCODE field with value LLQ-SETUP. The remaining fields are ERROR, LLQ-ID, and LEASE-LIFE. Possible values for the ERROR-CODE include the following:
NO-ERRORFORMAT-ERR, which indicates the LLQ was improperly formattedSERV-FULL, which indicates the server is overloaded by the number of LLQs being managed or by the rate at which the requests are being receivedSTATIC, which indicates the data for this name and type is not expected to change frequently, so the server does not consider LLQ the appropriate mechanism for this serviceBAD-VERS, which indicates the protocol version in the client request is not supported on the serverUNKOWN-ERR
On error, LLQ-ID is set to 0.
On success, a large random number generated by the server that is unique for
the requested name, type, and class is created and stored as the LLQ-ID. The LEASE-LIFE is set to the actual life of the LLQ in seconds. This
value may be less than, equal to, or greater than the LLQ requested.
In the case of a SERV-FULL error, the
LEASE-LIFE is used for a different purpose.
It is set to the time in seconds after which the client may retry the LLQ Setup.
For all other errors, the LEASE-LIFE is set to
0.
Step 3: challenge response
The client has been listening for a response to the original setup request. If no response was received, then up to three requests are transmitted with two seconds between the first two and four seconds between the second and third. Another eight seconds after transmitting the third request, the server should be assumed to be down or unreachable and the client should begin the process again no more than once per hour.
When the client receives a successful setup challenge, it sends a challenge
response, which is a DNS request with questions from the request and challenge,
and a single OPT-RR in the Additionals section with the RDATA that echoes the
random LLQ-ID and granted LEASE-LIFE for each set of fields in the order that
the questions were issued.
If the client receives a challenge with an error, it responds as follows:
For a
STATICerror, the client honors the resource record TTLs in the response and does not poll the server.In the case of a
SERV-FULLerror, the client may retry the LLQ Setup Request after an interval equal to that contained in theLEASE-LIFEfield.If there is another type of error or the server is determined not to support LLQ, the client may resort to polling the server not more than once every 30 minutes for a given query.
Step 4: ACK and answers
The final step of the handshake is the acknowledgment that the server sends
when it receives a successful challenge response. A successful challenge response
is one in which the LLQ-ID and LEASE-LIFE echoed by the client match the values
issued by the server. The server sends a DNS response containing all available
answers to the questions contained in the original setup request, additional
resource records for those answers in the Additionals section, and, finally, an
OPT-RR with the RDATA format as follows:
An
OPTION-CODEwith valueLLQ, followed by anOPTION-LENGTHfield.The
LLQ-Metadataportion is the now familiarVERSIONandLLQ-OPCODE, which is set toLLQ-SETUP.The
ERRORfield should be set toNO-ERROR.The
LLQ-IDis the originally granted long identification number.The
LEASE-LIFEis the remaining life of LLQ in seconds.
The reason for the challenge/response precaution at steps 3 and 4 is to prevent a kind of network attack called a byte-multiplication attack. Suppose you were a mischievous individual with a desire to cause trouble for http://bigcompany.com. You might decide to try to flood their network with traffic. You send nonsense data to their web server as fast as you can over your DSL line at home, but you find two things: your DSL line is so slow compared to their connection that they don’t even notice you, and when they do notice you, they can easily trace the packet stream back to the source, and you go to jail. Imagine how much better your attack could be if you could convince other machines, with much fatter network pipes, to flood the victim’s machine on your behalf. This is the essence of a byte-multiplication attack. You send request packets to well-connected machines, using the IP address of your intended victim as the fake source address in your packets, so that all the replies go to the victim’s machine instead of yours. If a reply packet is 100 times bigger than the request packet, then 1 Mbps of requests can generate 100 Mbps of responses directed at the victim’s machine. The challenge/response phase prevents DNS LLQ from being abused in this way. Before it begins sending answers, the DNS server sends the challenge to the target machine, requesting positive confirmation that it truly requested that stream of answer packets. Because the challenge packet is about the same size as the initial request packet, this phase of the protocol itself can’t be used to mount a very effective byte-multiplication attack—it only multiplies the attack size by one! Given that existing conventional DNS queries can already be crafted to result in a multiplier ratio larger than this, this means that DNS LLQ doesn’t add any new byte-multiplication potential to the DNS protocol.
Refreshes and Expiration
In order to extend the LLQ beyond the granted LEASE-LIFE, the client sends a Refresh request when 80% of its lease
life has elapsed. This request is identical to the LLQ Challenge Response, with the
exception that the LLQ-OPCODE is set to LLQ-REFRESH instead of LLQ-SETUP. The client should coalesce refresh methods for all LLQs
established with a given server as long as one of them has elapsed at least 80% of
its LEASE-LIFE. If including all of the LLQs
causes the message to no longer fit in a single packet, the client should include all
that will fit, preferring those closest to expiration . The requested LEASE-LIFE for a
single LLQ should equal the original granted LEASE-LIFE. For multiple LLQs, the client should request the same
LEASE-LIFE for all of them as the one granted
for the soonest to expire.
The server responds to an LLQ refresh message
with a response similar to the ACK described in step 4 above with the LLQ-OPCODE set to LLQ-REFRESH. If the client attempts to refresh an expired or
nonexistent LLQ, the server returns an ERROR value
of NO-SUCH-LLQ. If the client fails to extend the
LLQ beyond the granted LEASE-LIFE, or if the
client terminates a lease by sending a request with LEASE-LIFE equal to 0, the lease
expires.
Event Responses
Once the LLQ has been successfully set up, the server delivers change notifications to the client. There are two kinds of change notification that can occur and require action:
- Add Events
These occur when a new resource record appears that answers an LLQ. Often, these are the result of a dynamic DNS update. This added record is sent in the Answer section of the event to the client.
- Remove Events
These occur when a resource record becomes invalid. The deleted resource record is sent in the Answer section of the event to the client, with the TTL of the resource record set to
-1to indicate the record has been removed.
The format of the OPT-RR RDATA begins with the
OPTION-CODE with value LLQ and the OPTION-LENGTH field. The
VERSION is the version of the LLQ protocol
implemented in the server, and the LLQ-OPCODE is
set to LLQ-EVENT. The ERROR field has value 0, the
LLQ-ID is as above, and the LEASE-LIFE is set to 0.
Upon receiving a change notification from the server, the client sends an acknowledgment back to the server. This acknowledgment is a DNS response echoing the OPT-RR contained in the change notification, with the message ID of the notification echoed in the message header.
Identifying Whether the Local DNS Cache Supports LLQ
A client can first try to issue its LLQ request to the local DNS caching server,
just like normal DNS queries. However, most DNS caches today don’t implement LLQ and
will return a NOTIMPL or FORMERR error.
In this case, the client should contact the
authoritative server directly to issue its LLQ request. The client first uses an SOA
query to determine the zone and authoritative server responsible for the name it’s
querying. It then does an SRV query for the name _dns-llq._udp.
zone to find the target host and port number where LLQ
service is offered for this zone. Usually, it will be the same host as the master DNS
server but on a port number other than the normal DNS port 53. If the client receives
an NXDOMAIN response to its SRV query, the client
concludes that the zone does not support LLQs and instead resorts to low-rate polling
to keep its data reasonably up to date.
NAT Port Mapping Protocol (NAT-PMP)
The politics and economics of Internet access have made Internet addresses a rationed resource. Originally, Internet Service Providers (ISPs) sought to charge customers varying amounts depending on how many computers, printers, and other network devices they had. The logic was that anyone who had more than one computer, or owned a network printer, must be a business, and therefore should be charged a lot more for the exact same speed of network connectivity. Customers, naturally, were not enthusiastic about the idea of paying a printer tax to their ISP. NAT was invented and allowed customers to have any number of computers and other devices appear to their ISP as just a single device with a single IP address. ISPs countered by checking that the Ethernet address of the visible device matched the Ethernet address of the single computer the customer had signed up for. NAT vendors countered by adding configuration options to allow customers to set their NAT gateway to present a spoof Ethernet address matching the one the ISP was looking for. Around this time, the ISPs gave up the arms race, leaving us with today’s situation: most people get just a single IP address from their ISP, and if they want to use more than one computer, they have to use NAT to share that one IP address.
One thing that NAT vendors initially were not keen to point out is that NAT’s address sharing only half worked—it worked for outgoing connections but not for incoming ones. However, since at the time all that most Internet users knew about was the Web and email, they never noticed. Later, when security problems on the Internet became rife, some smart marketing people did what smart marketing people do—they recast NAT’s deficiency as a feature. It was good, they said, that NAT didn’t work for incoming connections, because that protected you from all the bad people out there. (Similar to how a telephone that was unable to receive incoming calls would protect you from receiving telemarketing calls.)
This is the world we find ourselves in today. What makes this a little sad is that the Internet is capable of much more than just the Web and email, but the prevalence of NAT makes many of those new uses difficult or impossible. Expert users may know how to set up manual port mappings for inbound connections, but the other 99% of users don’t. If you want to make a new product that communicates peer-to-peer or otherwise receives inbound connections, then requiring your customers to set up manual port mappings is a recipe for bankruptcy. iChat AV on the Macintosh, for example, has to go to great lengths and perform fancy tricks to get peer-to-peer audio and video to work without manual port mappings and requires a special server on the public Internet to facilitate this; even then, it still doesn’t work with all NAT gateways.
NAT Port Mapping Protocol (NAT-PMP) allows client software that needs inbound port mappings to request them, and, furthermore, if the client crashes or is disconnected or otherwise goes away, those port mappings are automatically tidied up. Of course, existing software that doesn’t need or want inbound port mappings doesn’t request them and doesn’t get them.
NAT-PMP is described at http://files.dns-sd.org/draft-cheshire-nat-pmp.txt.
Network Address Translation
The success of web browsing, email, and instant messaging is due, in large part, to the extent to which the end user has been shielded from the underlying protocols. When casual users click on a link in a web browser, they probably do not stop to consider that they have just issued a request and that the server responding to that request must know where to send the response. They almost certainly don’t consider how this works when they have a private IP address, and all the packets are being modified by the NAT gateway before being sent out to the rest of the Internet.
Figure 5-3 shows the configuration page for a typical NAT gateway. Its real public Internet IP address is 69.3.204.77, but on the local network it uses the private address 192.168.1.1. The public IP address 69.3.204.77 is globally unique—at any moment in time, only one computer on the Internet on the entire planet has that address. On the other hand, at any moment in time, there are thousands, maybe millions, of devices all thinking they have the IP address 192.168.1.1.

A computer on the local area network (LAN) connected to this NAT gateway may have an IP address such as 192.168.1.151. As with the address 192.168.1.1, there are probably thousands of computers around the world using the address 192.168.1.151 on their own LANs. If you or I were to send a packet addressed to 192.168.1.151, it would certainly not arrive at any machine outside of the LAN we were currently connected to.
When computer 192.168.1.151 sends out an outgoing TCP request to some machine on the Internet, the NAT gateway rewrites the source address in the packet from private address 192.168.1.151 to public address 69.3.204.77 (which is the IP address of the NAT gateway in this example). So that it can make sense of the replies that come back, it also rewrites the port number to a unique one that it’s not already using. Now, the outgoing packet has a globally meaningful source address, and when the machine on the Internet replies, the replies will successfully make it back to the NAT gateway. When the NAT gateway gets the reply, it looks up the destination port number in its table to see which LAN client this packet belongs to. It then rewrites the destination address and port number back to what the local client is expecting, corrects the packet checksum, and forwards it on.
The reason this works is because when a local client contacts an external server, it sends out an outgoing TCP connection request. The NAT gateway gets to see that outgoing TCP packet, and from the data in the packet header, the NAT gateway can glean the information it needs to make an entry in its mapping table.
In contrast, when a local machine listens for incoming connections, it is a passive operation. It doesn’t generate any packets or otherwise cause any activity that could allow the NAT gateway to work out what it was required to do. Even supposing the NAT gateway was able somehow to make the required mapping, external clients still couldn’t connect to that service without knowing the correct public IP address and port number to use.
Accordingly, we have two problems to solve. The local machine has to inform the NAT gateway of its desire to receive incoming connections, and then, having made a port mapping, it has to place that information somewhere external clients can get at it, so that they know which address and port number they should use to access the service.
The public place to store the service information, you should not be surprised to hear, is the global DNS system, using DNS-UL. The public address is stored in an address record, and the port number is stored in an SRV record describing the service.
Obtaining the Public Address
Before the local machine can perform a Secure DNS Dynamic Update to update its
address record to give the NAT’s public IP address, it first has to find out what
that address is. It does this by—simply enough—asking the NAT gateway. The local
machine sends a UDP request packet to port 5351 of its default gateway address. This
protocol is only designed for the usual case where the NAT
gateway is the one-and-only gateway on a small, single-subnet home network. The UDP
packet contains two bytes of data. The first byte is the protocol version (currently
0) and the second byte is the opcode. Opcode
0 requests the public IP
address.
Every packet used in the NAT Port Mapping Protocol starts with
an eight-bit version followed by an eight-bit operation code. Opcodes 0-127 are used
for client requests and opcodes 128-255 are used for the respective corresponding
responses from the gateway. Responses also always contain two additional fields: a
16-bit result code in network byte order with success represented by a response code
of 0, and a “seconds since reboot” field. Clients
use the “seconds since reboot” field to detect if the gateway crashes, is
power-cycled, or otherwise restarted. If this happens, your typical NAT gateway will
completely forget any mappings it may have created (yet another of the many
shortcomings of NAT gateways), so this is a valuable hint to tell clients that they
should reissue all their mapping requests to recreate their mappings.
If, after 250 ms, the client has not received a response from the gateway device, it should reissue its request. In the absence of a response, this process is repeated, with the interval doubling each time until either a response is received or two minutes have passed. If two minutes passes without a response, then the client can conclude that this gateway does not support NAT port mapping protocol.
The first byte of the response is again 0 for the version and, this time, the second byte is
128, the response code corresponding to request
code 0. The next two bytes contain the result code
and the final four bytes contain the public IP address. The possible result codes
are:
-
0 Success
-
1 Unsupported Version
-
2 Not Authorized/Refused (supported but disabled)
-
3 Network Failure
-
4 Out of resources (e.g., no more mappings currently available)
-
5 Unsupported opcode
If the result code is nonzero, the value stored in the public IP address field is undefined and must be disregarded by the client. In the future, other error codes may be added; any unknown nonzero result must be treated by the client as a permanent error.
NAT gateways often obtain their public IP address through DHCP or some other method that does not guarantee it will remain the same. If the public IP address changes, local machines will need to know to update their DNS records to show the new address. To let them know this, when its public IP address changes, the NAT gateway alerts devices on the local network by sending a series of gratuitous opcode 128 response packets to the all-hosts link-local multicast address 224.0.0.1 on port 5351, giving the new public IP address. This notification is sent 10 times, with an interval between the first two notifications of 250 ms and, as before, the interval between subsequent notifications doubling.
Tip
NAT-PMP is only designed for the common simple case of a single NAT gateway serving a small, single-subnet home network.
NAT-PMP is not intended to solve the problems of:
Nested NAT (NAT behind another NAT).
A NAT gateway serving a large multi-subnet routed private network, where the NAT gateway may not be the local default gateway for all hosts, and where all-hosts link-local multicast announcements from the NAT gateway may not reach all hosts.
A NAT offering to receive inbound connections on more than one IP address at once. When a NAT has more than one public IP address, one must be selected as the single designated address for receiving and forwarding inbound connections.
Transport traffic other than UDP- or TCP-based protocols.
Creating and Destroying a Mapping
Once the client has determined its public IP address, the next step is to request a public port number at this public address, to be used to receive inbound connection requests. The client initiates a request for a mapping by sending a UDP request packet to port 5351 on the default gateway, with the following format:
The first field is an eight-bit version code, currently set to
0.The second field is an eight-bit opcode that is set to
1if the client is requesting a map to a UDP port and set to2if the client is requesting a map to a TCP port. A NAT device that implements this protocol must be able to create TCP-only and UDP-only port mappings. If a device can only create these port mappings in pairs, it should not implement this protocol.The third field is a 16-bit reserved field that must be set to
0.The fourth field is 16 bits and contains the number of the private port that the device currently uses for the service.
The fifth field is 16 bits and is used for the number of the requested public port that will be mapped to the private port. Often, this requested port is the same value as the private port. If there is no preference, then this field should be set to
0.The sixth field is 32 bits and contains the requested lifetime in seconds. The recommended value for this field is 3,600 seconds (one hour).
As before, the client sends the request and waits for a response. If no response is received within 250 ms, the request is sent again. The client repeats this process with the interval between attempts doubling each time until either a response is received or until two minutes after the first request was sent. If no response is received in two minutes, an error message should be logged and the client should stop issuing requests.
The response from the NAT device looks very similar to the request sent by the client behind the NAT.
The first field is the eight-bit version code that is still set to
0.The second field is an eight-bit opcode that should be 128 greater than the opcode sent by the client. In other words, the value should be
129for a UDP port and130for a TCP port.The third field is a 16-bit result code. As before, success is indicated by a
0in this field. The values of the result code are listed in the preceding section.The fourth field repeats the private port sent in the request.
The fifth field is 16 bits and contains the number of the mapped port. This is the value that the service will use together with the public IP address to advertise the service. If no public ports are available then the result code of
4will indicate a lack of resources.The sixth field is 13 bits and is used to convey the actual lifetime of the mapping. This value is allowed to be equal to or less than the value requested by the client. It is not recommended that a lease be granted that is greater than that requested by the client.
The client should begin trying to renew the mapping halfway through the actual lifetime. The renewal packet is identical to the initial request packet, except that the fifth field, which contains the requested public port, is set to the actual port number that was allocated, rather than the port number the client may have originally requested (if different). Making the renewal packet identical to a request packet has a couple of useful properties. If the NAT gateway response to the first request packet is lost, then the client’s retransmission of the request packet looks, to the NAT gateway, just like a renewal and is handled correctly. Conversely, if the NAT gateway crashes or is rebooted, then the client’s renewal packet looks, to the NAT gateway, just like a brand new request. Since the client is requesting the same previously assigned public port number, the NAT gateway ends up re-creating the lost mapping. This makes the protocol self-healing in the face of packet loss and gateway reboots.
If a client is unsuccessful in renewing a mapping before its lifetime expires, then the mapping is deleted.
If a client’s DHCP lease times out, the gateway device should also delete any mappings belonging to that client. Stale mappings pointing to a private IP address could potentially direct traffic to a new device that is assigned that IP address by the DHCP server. Since the NAT gateway and DHCP server are normally the same box, this is often easy to do.
A client can request explicit deletion of a mapping by sending a request to the NAT device identical to the initial request, except that the requested lifetime in seconds is set to
0.
If the request to destroy a mapping is unsuccessful, the result
code in the response is not zero. One example might be that the client attempts to
delete a permanent port mapping manually configured by the human operator. In this
case, the response code is 2 to indicate the
request is not authorized.
If a mapping is successfully destroyed, the
response packet has a result code of 0, contains
the private and public ports of the destroyed mapping, and has a lifetime of 0. In the event that a NAT device receives a request to
destroy a mapping that does not exist, it issues a response as if an actual mapping
were successfully destroyed. This also is to guard against packet loss. For example,
suppose the NAT gateway receives a mapping deletion request and successfully deletes
the mapping, but the response packet is lost. When the client retransmits its
request, not knowing the mapping was actually successfully deleted already, the NAT
gateway needs to send it a “no error” successful response to assure it that the
mapping was, as it requested, successfully deleted.
Summary
Chapter 4 showed how DNS Service Discovery using Multicast DNS provides a simple, efficient, lightweight way to discover what services of a given type are available to you on the local network. DNS-SD using Unicast DNS takes the same elegant simple concepts and scales literally to the entire planet, using the existing hierarchy of DNS servers that’s already in place and well understood at just about all large companies, universities, and other similar organizations around the world.
Dynamic DNS Update Leases provide for automatic garbage collection of stale records. DNS Long-Lived Queries give clients timely notification of information they’re interested in. NAT Port Mapping Protocol lets clients behind NAT gateways receive incoming connections. Put these three technologies together with wide-area DNS Service Discovery, and computers at home behind NAT gateways can begin to function like computers connected to the “real” Internet.