
Chapter 16: Getting Started with MapKit
In the previous chapter, you learned about table views and table view controllers, and then implemented the Locations screen. It now displays a list of restaurant locations.
In this chapter, you'll display restaurant locations on the Map screen using custom pins. When you tap on a pin, you'll see a screen that shows details about a particular restaurant. Apple provides the MKAnnotation protocol, which allows you to associate the classes you create with a specific map location. First, you'll create a new class, RestaurantItem, that conforms to this protocol. Next, you'll create MapDataManager, a data manager class that loads restaurant data from a .plist file and puts it into an array of RestaurantItem instances. You'll then create a new DataManager protocol to read .plist files and update both the MapDataManager and ExploreDataManager classes to avoid redundant code (refactoring). After that, you'll create a MapViewController class, a view controller for the Map screen, and configure it to display custom pins. You'll configure the pins so that they display callouts and then configure the buttons in the callouts to display the Restaurant Detail screen when it's tapped. You'll then create the RestaurantDetailViewController class, a view controller for the Restaurant Detail screen, and pass restaurant data to it from the MapViewController instance. Finally, you'll clean up and organize your code using extensions to make it easier to read and maintain.
By the end of this chapter, you'll have learned how to create and add custom map views to a map, how to use storyboard references to link storyboards together, and how to use extensions to organize your code, making it easier to read.
The following topics will be covered in this chapter:
- Understanding and creating annotations
- Adding annotations to a map view
- Going from the map view to the Restaurant Detail screen
- Organizing your code
Technical requirements
You will continue working on the LetsEat project that you modified in the previous chapter.
The resource files and complete Xcode project for this chapter can be found in the Chapter16 folder of the code bundle for this book. This can be downloaded from https://github.com/PacktPublishing/iOS-14-Programming-for-Beginner-Fifth-Edition.
Check out the following video to see the Code in Action: https://bit.ly/3e3ZOeS
Now, let's learn about map annotations, which are used to mark restaurant locations on the Map screen.
Understanding and creating annotations
In Chapter 11, Finishing Up Your User Interface, you added a map view to the Map screen. A map view is an instance of the MKMapView class. You can see what it looks like by going to the Apple Maps app.
Important information
To learn more about MKMapView, see https://developer.apple.com/documentation/mapkit/mkmapview.
When you build and run your app, you will see a map on the screen. The part of the map that is visible onscreen can be specified by setting the region property of the map.
Important information
To learn more about regions and how to make them, see https://developer.apple.com/documentation/mapkit/mkmapview/1452709-region.
Pins on the Map screen are used to mark specific locations and are instances of the MKAnnotationView class. To add a pin to a map view, you need an object that conforms to the MKAnnotation protocol. This protocol allows you to associate an object with a specific map location.
Important information
To learn more about the MKAnnotation protocol, see https://developer.apple.com/documentation/mapkit/mkannotation.
Any object can conform to the MKAnnotation protocol by implementing a coordinate property that contains a map location. The optional MKAnnotation protocol properties are title, a string containing the annotation's title; and subtitle, a string containing the annotation's subtitle.
When an object conforming to the MKAnnotation protocol is in an area of the map that is visible onscreen, the map view asks its delegate (usually a view controller) to provide a corresponding instance of the MKAnnotationView class. This instance appears as a pin on the map.
Important information
To learn more about MKAnnotationView, see https://developer.apple.com/documentation/mapkit/mkannotationview.
If the user scrolls through the map and the MKAnnotationView instance goes off-screen, it will be put into a reuse queue and recycled later, similar to the way table view cells and collection view cells are recycled. An MKAnnotationView instance can be customized to display custom icons and can display callout bubbles when tapped. Callout bubbles can have buttons that perform actions, such as displaying a screen.
For your app, you will create a new class, RestaurantItem, that conforms to the MKAnnotation protocol. You'll learn how to create this class in the next section.
Creating the RestaurantItem class
To represent restaurant locations on the Map screen, you will create a class, RestaurantItem, that conforms to the MKAnnotation protocol. This class will have a coordinate property for storing the restaurant's location, a title property for storing the restaurant's name, and a subtitle property for storing the cuisines it offers.
You need the restaurant location to set the coordinate property of the RestaurantItem instance. The restaurant data (including its location) will be provided as a .plist file. Before you create the RestaurantItem class, you need to import this .plist file into your app. Follow these steps:
- Open the LetsEat project. In the Project navigator, right-click the LetsEat folder and create a new group called Map.
- Right-click the Map folder and create a new group called Model.
- If you have not done so yet, download the completed project and project resources from https://github.com/PacktPublishing/iOS-14-Programming-for-Beginner-Fifth-Edition. Once you've done this, find the Maplocations.plist file inside the resources folder in the Chapter16 folder.
- Drag the Maplocations.plist file into the Model folder in your project and click it to view its contents. You'll see that it is an array of dictionaries, with each dictionary containing a restaurant's details (including its location). You'll create properties in your RestaurantItem class for the data that you will use. This will eventually be displayed on the Restaurant Detail screen:

Figure 16.1 – Editor area showing the contents of MapLocations.plist
Let's create the RestaurantItem class by following these steps:
- Right-click the Model folder and select New File.
- iOS should already be selected. Choose Cocoa Touch Class and then click Next.
- Configure the file as follows:
Class: RestaurantItem
Subclass: NSObject
Also create XIB: Grayed out
Language: Swift
Click Next.
- Click Create. RestaurantItem.swift will appear in the Project navigator.
- In RestaurantItem.swift, type the following after the import UIKit statement:
import MapKit
This imports the MapKit framework, which gives you access to protocols such as MKAnnotation and MKMapViewDelegate.
- Modify the class declaration as follows to adopt the MKAnnotation protocol:
class RestaurantItem: NSObject, MKAnnotation {
You'll see an error since you haven't implemented the coordinate property yet, which is required to conform to MKAnnotation. You will do so shortly.
- Type the following inside the curly braces:
var name: String?
var cuisines:[String] = []
var lat: Double?
var long: Double?
var address: String?
var postalCode: String?
var state: String?
var imageURL: String?
var restaurantID: Int?
These properties will hold the data you get from Maplocations.plist. Let's see what they are used for:
name stores the name of the restaurant.
cuisines stores the cuisines offered by the restaurant.
lat and long store the latitude and the longitude of the restaurant's location, respectively.
address stores the restaurant's address.
postalCode stores the restaurant's postal code.
state stores the state the restaurant is located in.
imageURL stores a photo of the restaurant.
restaurantID stores a unique number that will be used as the identifier for the restaurant.
Note that you haven't created properties that will store all the details of a restaurant contained in Maplocations.plist, and that's fine. You only need to create properties for the details that will appear on the Restaurant Detail screen.
- You'll use a custom initializer to initialize RestaurantItem instances with data from the .plist file. Type the following after the last property declaration:
init(dict:[String:AnyObject]){
if let lat = dict["lat"] as? Double { self.lat = lat }
if let long = dict["long"] as? Double { self.long = long }
if let name = dict["name"] as? String { self.name = name }
if let cuisines = dict["cuisines"] as? [String] { self.cuisines = cuisines }
if let address = dict["address"] as? String { self. address = address }
if let postalCode = dict["postalCode"] as? String { self.postalCode = postalCode }
if let state = dict["state"] as? String { self.state = state }
if let image = dict["image_url"] as? String { self. imageURL = image }
if let id = dict["id"] as? Int { self.restaurantID = id }
}
Even though this initializer looks complicated, it's actually quite straightforward. Each line looks for a specific dictionary item key and assigns its value to the corresponding property. For example, the first line looks for the dictionary item with a key containing lat and assigns the associated value to the lat property.
- You'll use the lat and long properties to create the value for the coordinate property, which is required to conform to to MKAnnotation. Type the following after the init(dict:) method to implement it:
var coordinate: CLLocationCoordinate2D {
guard let lat = lat, let long = long else {
return CLLocationCoordinate2D()
}
return CLLocationCoordinate2D(latitude: lat, longitude: long)
}
The coordinate property is of the CLLocationCoordinate2D type, and it holds a geographical location. The value of the coordinate property is not assigned directly; the guard statement gets the latitude and longitude values from the lat and long properties, which are then used to create the value for the coordinate property. Such properties are called computed properties.
- Implement the title property by adding the following code after the coordinate property:
var title: String? {
return name
}
title is a computed property that returns the contents of the name property.
- Finally, implement the subtitle property by adding the following code after the title property:
var subtitle: String? {
if cuisines.isEmpty { return "" }
else if cuisines.count == 1 { return cuisines.first }
else { return cuisines.joined(separator: ", ") }
}
subtitle is also a computed property. The first line checks to see whether the cuisines property is empty, and if so, returns an empty string. If the cuisines property contains a single item, that item will be returned. If the cuisines property contains more than a single item, each item is added to a string, with a comma in-between the items. For example, if cuisines contained the ["American", "Bistro", "Burgers"] array, the generated string would be "American, Bistro, Burgers".
With that, your RestaurantItem class should now be complete and free of errors. It should look like this:
import UIKit
import MapKit
class RestaurantItem: NSObject, MKAnnotation {
var name: String?
var cuisines:[String] = []
var lat: Double?
var long: Double?
var address: String?
var postalCode: String?
var state: String?
var imageURL: String?
var restaurantID: Int?
init(dict:[String:AnyObject]){
if let lat = dict["lat"] as? Double { self.lat = lat }
if let long = dict["long"] as? Double { self. long = long }
if let name = dict["name"] as? String { self. name = name }
if let cuisines = dict["cuisines"] as? [String] { self.cuisines = cuisines }
if let address = dict["address"] as? String { self.address = address }
if let postalCode = dict["postalCode"] as? String { self.postalCode = postalCode }
if let state = dict["state"] as? String { self. state = state }
if let image = dict["image_url"] as? String { self.imageURL = image }
if let id = dict["id"] as? Int { self. restaurantID = id }
}
var coordinate: CLLocationCoordinate2D {
guard let lat = lat, let long = long else {
return CLLocationCoordinate2D() }
return CLLocationCoordinate2D(latitude: lat, longitude: long)
}
var title: String? {
return name
}
var subtitle: String? {
if cuisines.isEmpty { return "" }
else if cuisines.count == 1 { return cuisines. first }
else { return cuisines.joined(separator: ", ") }
}
}
At this point, you've added Maplocations.plist to your app and created the RestaurantItem class. Next, you'll create a data manager class that reads restaurant data from Maplocations.plist and puts it into an array of RestaurantItem instances for use by your app.
Creating the MapDataManager class
As you've done in previous chapters, in this section, you'll create a data manager class, MapDataManager, that will load restaurant data from Maplocations.plist and put the data into an array of RestaurantItem instances. Follow these steps:
- Right-click the Model folder inside the Map folder and select New File.
- iOS should already be selected. Choose Swift File and then click Next.
- Name this file MapDataManager. Click Create. MapDataManager.swift will appear in the Project navigator.
- Add the following after the import statement to declare the MapDataManager class:
class MapDataManager {
}
- Add the following properties between the curly braces to store the RestaurantItem instances that will be read from the .plist file:
fileprivate var items:[RestaurantItem] = []
var annotations:[RestaurantItem] {
return items
}
The items array will contain RestaurantItem instances. fileprivate makes the items array only accessible from within the MapDataManager class, while annotations is a computed property that returns a copy of items when accessed. This allows the contents of the items array to be accessed, but not modified, by other objects.
- Add the following methods after the property declarations to load the .plist file, read the data inside it, and store it in an array of RestaurantItem instances:
func fetch(completion:(_ annotations:[RestaurantItem]) -> ()){
if items.count > 0 { items.removeAll() }
for data in loadData() {
items.append(RestaurantItem(dict: data))
}
completion(items)
}
fileprivate func loadData() -> [[String:AnyObject]] {
guard let path = Bundle.main.path(forResource: "MapLocations", ofType: "plist"), let items = NSArray(contentsOfFile: path) else {
return [[:]]
}
return items as! [[String:AnyObject]]
}
The fetch(completion:) and loadData() methods work the same way as the fetch() and loadData() methods in the ExploreDataManager class.
Tip
You may wish to reread Chapter 14, Getting Data into Collection Views, to refresh your memory on the ExploreDataManager class.
However, the fetch(completion:) method being used here has a completion closure as a parameter that can accept any function or closure that takes an array of RestaurantItems as a parameter:
(_ annotations:[RestaurantItem]) -> ())
Sometimes, you don't know when an operation will be completed. For example, let's say you need to perform an action once you've downloaded a file from the internet, but you don't know how long it will take to download. Here, you can specify a completion closure to be applied once the operation has been completed. In this case, the completion closure will process the items array once all the data from the .plist file has been read.
Now, consider the MapLocations.plist file once more:
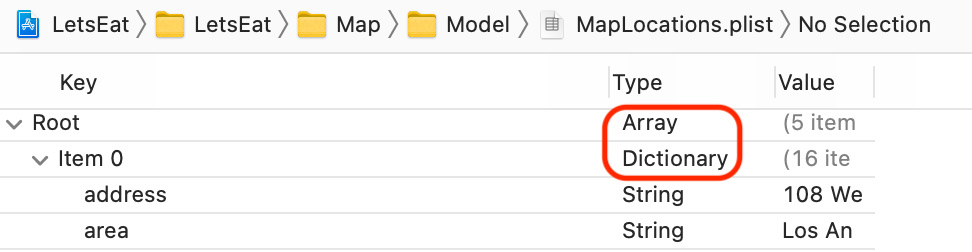
Figure 16.2 – Editor area showing the arrays and dictionaries in MapLocations.plist
This file has the same structure as ExploreData.plist. The Root item is an array that contains dictionaries. Since both ExploreData.plist and MapLocations.plist contain an array of dictionaries, it would be more efficient if you could create a single method that can load .plist files and use it wherever it's needed. You will do this in the next section.
Creating the DataManager protocol
Instead of creating a method in each class to load a .plist file, you can create a new protocol, DataManager, to handle .plist file loading. This protocol will implement a method that will load .plist files using an extension.
Tip
You may wish to reread Chapter 8, Protocols, Extensions, and Error Handling, to refresh your memory on protocols and extensions.
Once you have created the DataManager protocol, any class that needs to load a .plist file can adopt it. You'll need modify both the ExploreDataManager and MapDataManager classes to adopt this protocol. Follow these steps:
- Right-click the LetsEat folder and create a new group called Misc.
- Right-click on the Misc folder and choose New File.
- iOS should already be selected. Choose Swift File and then click Next.
- Name this file DataManager. Click Create.
- Click DataManager.swift in the Project navigator and declare the DataManager protocol, as follows:
protocol DataManager {
}
- Add the following method requirement between the curly braces:
func load(file name:String) -> [[String:AnyObject]]
This requires any conforming object to have a method named load(file:) that takes a string as a parameter and returns an array of dictionaries. The string will hold the name of the .plist file to be loaded.
- Add an extension below the protocol declaration:
extension DataManager {
}
- Add the implementation of the load(file:) method between the curly braces:
func load(file name:String) -> [[String:AnyObject]] {
guard let path = Bundle.main.path(forResource: name, ofType: "plist"), let items = NSArray(contentsOfFile: path) else {
return [[:]]
}
return items as! [[String:AnyObject]]
}
Any class that adopts this protocol will obtain the load(file:) method. This method looks for a .plist file specified in the file parameter inside the application bundle. If successful, the contents of the .plist file will be loaded into an array of dictionaries and returned. If the file is not found, an empty array of dictionaries will be returned.
- Verify that your code looks like this:
import Foundation
protocol DataManager {
func load(file name:String) -> [[String:AnyObject]]
}
extension DataManager {
func load(file name:String) -> [[String:AnyObject]] {
guard let path = Bundle.main. path(forResource: name, ofType: "plist"), let items = NSArray(contentsOfFile: path) else {
return [[:]]
}
return items as! [[String:AnyObject]]
}
}
Now that you have this protocol, you can modify the MapDataManager and ExploreDataManager classes so that they adopt it. The process of taking existing code and modifying it to accomplish the same thing more efficiently is called refactoring.
You will start by refactoring the MapDataManager class so that it conforms to the DataManager protocol in the next section.
Refactoring the MapDataManager class
The MapDataManager class already has a loadData() method that's hardcoded to read Maplocations.plist. Now that you have created the DataManager protocol, you will modify the MapDataManager class to use it instead. Follow these steps:
- With MapDataManager.swift selected in the Project navigator, find and delete the loadData() method. You'll see an error since the fetch() method calls the loadData() method, which you just removed. You'll fix this shortly.
- Add the DataManager protocol to the class declaration as follows:
class MapDataManager: DataManager
This makes the load(file:) method available to the MapDataManager class.
- Modify the for data in loadData() line in the fetch() method as follows to fix the error:
for data in load(file: "MapLocations")
Your updated MapDataManager class should look like this:
import Foundation
class MapDataManager: DataManager {
fileprivate var items:[RestaurantItem] = []
var annotations:[RestaurantItem] {
return items
}
func fetch(completion:(_ annotations:[RestaurantItem]) -> ()){
if items.count > 0 { items.removeAll() }
for data in load(file: "MapLocations") {
items.append(RestaurantItem(dict: data))
}
completion(items)
}
}
The error should now be gone. In the next section, you will refactor the ExploreDataManager class as well, to make it conform to the DataManager protocol.
Refactoring the ExploreDataManager class
Like the MapDataManager class, the ExploreDataManager class has a loadData() method that is hardcoded to read ExploreData.plist.
Tip
You may wish to reread Chapter 14, Getting Data into Collection Views, to refresh your memory on the ExploreDataManager class.
You need to make the same changes to the ExploreDataManager class that you made to the MapDataManager class. Click ExploreDataManager.swift in the Project navigator and follow these steps:
- Delete the loadData() method. Ignore the error that appears; it will be fixed shortly.
- Add the DataManager protocol to the class declaration, as follows:
class ExploreDataManager: DataManager
This makes the load(file:) method available to the ExploreDataManager class.
- Modify the for data in loadData() line in the fetch() method as follows to fix the error:
for data in load(file: "ExploreData")
Your updated ExploreDataManager class should look like this:
import Foundation
class ExploreDataManager: DataManager {
fileprivate var items:[ExploreItem] = []
func fetch() {
for data in load(file: "ExploreData") {
items.append(ExploreItem(dict: data))
}
}
func numberOfItems() -> Int {
items.count
}
func explore(at index:IndexPath) -> ExploreItem {
items[index.item]
}
}
You can now make any class that needs to load a .plist file containing an array of dictionaries adopt the DataManager protocol, as you did here with the MapDataManager and ExploreDataManager classes. It's not always clear when you should refactor, but the more experience you have, the easier it becomes. One indication that you need to refactor is when you are writing the same code in more than one class.
With that, you have finished implementing the MapDataManager class, which can load data from the MapLocations.plist file and return an array of RestaurantItem instances. Now, let's learn how to use this array to add annotations to a map view, which will be displayed as pins in the Map screen.
Adding annotations to a map view
In Chapter 11, Finishing Up Your User Interface, you added a map view to the Map screen. In the previous sections, you added MapLocations.plist to your project and created the RestaurantItem and MapDataManager classes. Remember the MVC design pattern? At this point, you have created the views and models for the Map screen, so all you need now is the view controller.
The view controller will be responsible for the following tasks:
- Adding RestaurantItem instances, which conform to the MKAnnotation protocol, to the map view.
- For RestaurantItem instances within the region displayed in the map view, it will provide MKAnnotationView instances requested by the map view.
- Providing custom MKAnnotationView instances that display a callout bubble containing a button when tapped, and then presenting the Restaurant Detail screen when the button is tapped.
You'll start by creating the MapViewController class as the view controller for the Map screen in the next section.
Creating the MapViewController class
So far, you've created the view and model objects for the Map screen, so all that remains is to create the view controller for it. In this section, you'll create a new class, MapViewController, that will be used as the view controller for the Map screen. Follow these steps:
- Right-click the Map folder and select New File.
- iOS should already be selected. Choose Cocoa Touch Class and then click Next.
- Configure the file as follows:
Class: MapViewController
Subclass: UIViewController
Also create XIB: Unchecked
Language: Swift
Click Next.
- Click Create. MapViewController.swift will appear in the Project navigator.
- In MapViewController.swift, add the following line after import UIKit to import the MapKit framework:
import MapKit
- Modify the class declaration as follows to make the MapViewController class adopt the MKMapViewDelegate protocol:
class MapViewController: UIViewController, MKMapViewDelegate {
With that, you have declared the MapViewController class. In the next section, you'll assign this class as the view controller for the Map screen and create an outlet for the map view.
Connecting the outlets for the map view
The view controller scene for the Map screen displays a map, but there is currently no way to set the map region to be displayed and no way to display annotations. In this section, you'll assign the MapViewController class as the view controller for the Map screen and add an outlet for the map view to it. Follow these steps:
- Click Main.storyboard. Then, click the View Controller icon in View Controller Scene for the Map screen. In the Identity inspector, under Custom Class, set Class to MapViewController:
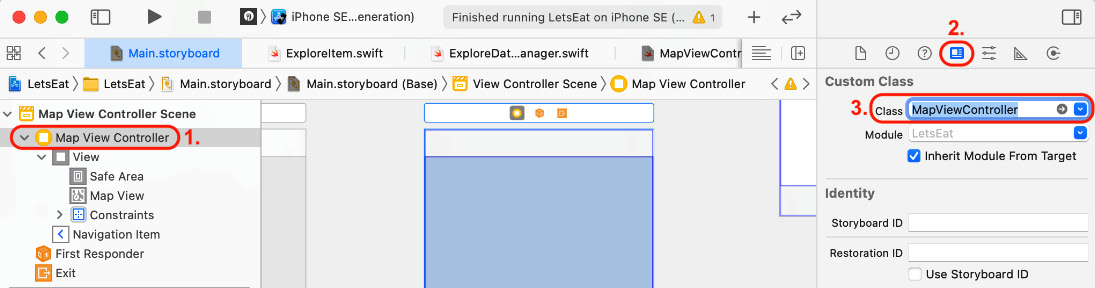
Figure 16.3 – Identity inspector showing the Class setting for MapViewController
- Select Map View from the document outline:

Figure 16.4 – Document outline with Map View selected
- Click the Adjust Editor Options button.
- Choose Assistant from the pop-up menu.
- The assistant editor will now appear, showing the contents of MapViewController.swift. Ctrl + Drag from the map view to the space just under the class declaration:

Figure 16.5 – Editor area showing MapViewController.swift
- Type mapView into the Name field and click Connect:
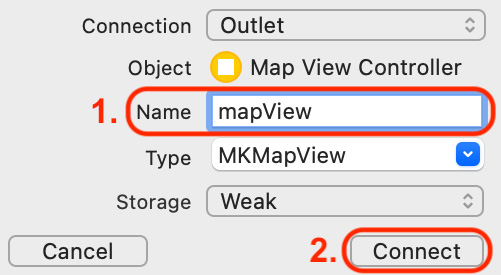
Figure 16.6 – Pop-up dialog box for the mapView outlet's creation
- The map view has been connected to the mapView outlet in the MapViewController class. Click the x button to close the assistant editor:

Figure 16.7 – Assistant editor close button
The MapViewController class now has an outlet, mapView, that is linked to the map view in the Map screen. In the next section, you'll modify the MapDataManager class by adding a method to generate a new region based on the restaurant's location. This will allow it to provide a map region for the map view to display.
Setting the map view region to be displayed
In a map view, the portion of the map that is visible onscreen is called a region. To specify a region, you need the coordinates for the region's center point, as well as the horizontal and vertical span representing the dimensions of the map to be displayed.
The MapDataManager class returns an array of RestaurantItem instances. In this section, you will implement a method, currentRegion(latDelta:longDelta:), to get the first RestaurantItem instance from this array, get the restaurant's coordinates, and then use them to create a region. Follow these steps:
- Click MapDataManager.swift in the Project navigator. After the import Foundation statement, add import MapKit.
- Just before the closing curly brace, implement currentRegion(latDelta:longDelta:), as follows:
func currentRegion(latDelta:CLLocationDegrees, longDelta:CLLocationDegrees) -> MKCoordinateRegion {
guard let item = items.first else {
return MKCoordinateRegion()
}
let span = MKCoordinateSpan(latitudeDelta: latDelta, longitudeDelta: longDelta)
return MKCoordinateRegion(center:item.coordinate, span:span)
}
Let's break this down:
func currentRegion(latDelta:CLLocationDegrees, longDelta:CLLocationDegrees) -> MKCoordinateRegion
This method takes two parameters and returns an MKCoordinateRegion instance. latDelta specifies the north-to-south distance (measured in degrees) to display for the map region. 1 degree is approximately 69 miles. longDelta specifies the amount of east-to-west distance (measured in degrees) to display for the map region. The MKCoordinateRegion instance that is returned determines the region that will appear onscreen.
guard let item = items.first else { return MKCoordinateRegion() }
The guard statement gets the first item in the array of RestaurantItem instances and assigns it to item. If the array is empty, an empty MKCoordinateRegion instance is returned.
let span = MKCoordinateSpan(latitudeDelta: latDelta, longitudeDelta: longDelta)
latDelta and longDelta are used to make a MKCoordinateSpan instance, which is the horizontal and vertical span of the region to be created.
return MKCoordinateRegion(center:item.coordinate, span:span)
An MKCoordinateRegion instance is created and returned using the coordinate property of item and the MKCoordinateSpan instance.
Now that the map region has been determined, you can determine which RestaurantItem instances are in this region based on their coordinate property. Remember that the RestaurantItem class conforms to MKAnnotation. As the view controller for the map view, the MapViewController class is responsible for providing MKAnnotationView instances for any RestaurantItem instances in this region.
In the next section, you'll modify the MapViewController class to provide MKAnnotationViews for the RestaurantItem instances in the region displayed by the map view.
Displaying MKAnnotationView instances on the map view
At this point, you have the MapViewController class, which is used to manage the map view on the Map screen. This means you can now call the currentRegion(latDelta:longDelta:) method in the MapDataManager class to set the map region. In this section, you will modify the MapViewController class to get an array of RestaurantItem instances from the MapDataManager class and add it to the map view. Follow these steps:
- Click MapViewController.swift in the Project navigator and remove the boilerplate code.
- Just after the mapView property declaration, add the following to create an instance of the MapDataManager class and assign it to manager:
let manager = MapDataManager()
- Add the following method after viewDidLoad(). This method will add RestaurantItem instances (which conform to the MKAnnotation protocol) to the map view:
func addMap(_ annotations:[RestaurantItem]) {
mapView.setRegion(manager.currentRegion(latDelta: 0.5, longDelta: 0.5), animated: true)
mapView.addAnnotations(manager.annotations)
}
The addMap(_:) method takes a parameter, annotations, that is an array of RestaurantItem instances. It sets the region of the map to be displayed in the map view using the currentRegion(latDelta:longDelta:) method of the MapDataManager class, and then adds each RestaurantItem instance in the annotations array to the map view. The map view's delegate (the MapViewController class, in this case) automatically provides an MKAnnotationView instance for every RestaurantItem instance within the region.
- Add the following method before the addMap(_:) method. This calls the fetch(completion:) method of the MapDataManager instance and passes in the addMap(_:) method as a completion closure:
func initialize() {
manager.fetch {(annotations) in addMap(annotations)}
}
The fetch(completion:) method loads MapLocations.plist and creates and assigns the array of RestaurantItem instances to the items array. The annotations property returns a copy of the items array. This array is then processed by the addMap(_:) method that was passed in as the completion closure.
- Call the initialize() method inside viewDidLoad() so that it will be called when the map view is loaded:
override func viewDidLoad() {
super.viewDidLoad()
initialize()
}
Build and run the application. You should now see pins (MKAnnotationView instances) on the Map screen:

Figure 16.8 – iOS Simulator showing standard MKAnnotationView instances
An MKAnnotationView instance has been added for each RestaurantItem instance in the map region. Each MKAnnotationView instance is represented by a pin. With that, you now have pins showing restaurant locations on your map. However, you also need to add code that will display custom pins, as shown in the app tour. You will do that in the next section.
Creating custom MKAnnotationView instances
Currently, the Map screen displays standard MKAnnotationView instances that look like pins. You can replace the standard pin image with a custom image. There is a custom image in the Assets.xcassets file, and you'll configure the MapViewController class to use it. This will make the pins onscreen match the ones in the app tour. You'll also configure each pin so that they display a callout bubble when tapped. Follow these steps:
- Click MapViewController.swift in the Project navigator.
- Add the following code inside the initialize() method after the opening curly brace. This makes the MapViewController class the delegate for the map view:
mapView.delegate = self
- Add the following method after the addMap(_:) method. This method returns a custom MKAnnotationView instance for every MKAnnotation instance in the region displayed by the map view:
func mapView(_ mapView: MKMapView, viewFor annotation:MKAnnotation) -> MKAnnotationView? {
let identifier = "custompin"
guard !annotation.isKind(of: MKUserLocation.self) else { return nil }
var annotationView: MKAnnotationView?
if let customAnnotationView = mapView. dequeueReusableAnnotationView(withIdentifier: identifier) {
annotationView = customAnnotationView
annotationView?.annotation = annotation
} else {
let av = MKAnnotationView(annotation: annotation, reuseIdentifier: identifier)
av.rightCalloutAccessoryView = UIButton(type:. detailDisclosure)
annotationView = av
}
if let annotationView = annotationView {
annotationView.canShowCallout = true
annotationView.image = UIImage(named: "custom- annotation")
}
return annotationView
}
Let's break this down:
func mapView(_ mapView: MKMapView, viewFor annotation:MKAnnotation) -> MKAnnotationView
This is one of the delegate methods specified in the MKMapViewDelegate protocol. It's triggered when an MKAnnotation instance is within the map region, and returns an MKAnnotationView instance, which the user will see on their screen. You'll use this method to replace the default pins with custom pins.
let identifier = "custompin"
A constant, identifier, is assigned the "custompin" string. This will be the reuse identifier.
guard !annotation.isKind(of: MKUserLocation.self) else { return nil }
This guard statement checks whether the annotation is the user's location. If it is, nil is returned as the user's location is not a restaurant location.
var annotationView: MKAnnotationView?
annotationView is an optional variable of the MKAnnotationView type. You create this so that you can configure and return it later.
if let customAnnotationView = mapView.dequeueReusableAnnotationView (withIdentifier: identifier) {
annotationView = customAnnotationView
annotationView?.annotation = annotation}
The if statement checks whether there are any existing annotations that were initially visible but have been scrolled off the screen. If there are, the MKAnnotationView instance for that annotation can be reused and is assigned to the annotationView variable. The annotation parameter is assigned to the annotation property of annotationView.
else {
let av = MKAnnotationView(annotation: annotation, reuseIdentifier: identifier)
av.rightCalloutAccessoryView = UIButton(type:.detailDisclosure)
annotationView = av
}
The else clause is executed if there are no existing MKAnnotationView instances that can be reused. A new MKAnnotationView instance is created with the reuse identifier specified earlier (custompin). The MKAnnotationView instance is configured with a callout. When you tap a pin on the map, a callout bubble will appear, showing the title (restaurant name), subtitle (cuisines), and a button. You'll program the button later to present the Restaurant Detail screen.
if let annotationView = annotationView {
annotationView.canShowCallout = true
annotationView.image = UIImage(named: "custom-annotation")
}
This configures the MKAnnotationView instance that you just created so that it displays extra information in a callout bubble and sets the custom image to the custom-annotation image stored in Assets.xcassets.
return annotationView
The custom MKAnnotationView instance is returned.
Build and run your app. You will see the custom pins on your map:

Figure 16.9 – iOS Simulator showing custom MKAnnotationView instances
Tapping a pin displays a callout bubble showing the restaurant's name and the cuisines it offers. Tapping the button in the callout bubble doesn't do anything yet. You'll configure the button so that it presents the Restaurant Detail screen in the next section.
Going from the Map screen to the Restaurant Detail screen
The Map screen now displays your custom MKAnnotationView instances, and tapping one displays a callout bubble showing a restaurant's details. The button in the callout bubble doesn't work, though.
Inside the resources folder that you downloaded earlier, you'll find some completed storyboards named RestaurantDetail.Storyboard, PhotoFilter.Storyboard, and ReviewForm.Storyboard, which you'll need to add to your project. These storyboards contain the scenes for the Restaurant Detail screen, the Photo Filter screen, and the Review Form screen.
To present the Restaurant Detail screen from the callout button, you'll need to add a storyboard reference to your project and link the RestaurantDetail.storyboard to it. You'll do this in the next section.
Creating and configuring a storyboard reference
There are a lot of scenes in Main.storyboard. As your project grows, you'll find it more challenging to keep track of all the scenes in your app. One way to manage this is to create additional storyboards and use storyboard references to link them. In this section, you will link Main.storyboard to RestaurantDetail.storyboard using a storyboard reference. Follow these steps to add a storyboard reference to your project:
- Open Main.storyboard and click the Library button.
- Type story into the filter field. A Storyboard Reference object will appear in the results.
- Drag the Storyboard Reference object into Main.storyboard, next to the Map View Controller Scene section:

Figure 16.10 – Library with the Storyboard Reference object selected
- Open the resources folder that you downloaded earlier and locate the three storyboard files in it (RestaurantDetail.storyboard, PhotoFilter.storyboard, and ReviewForm.storyboard). You'll add these to your project:
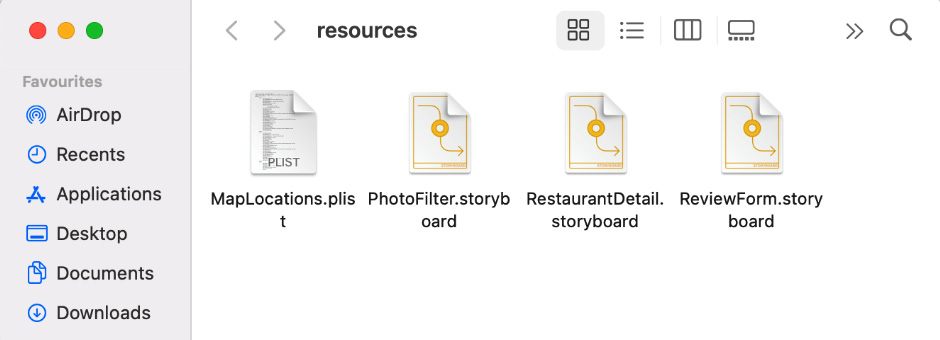
Figure 16.11 – Contents of the resources folder
- In the Project navigator, create a new folder inside your LetsEat folder named RestaurantDetail and copy RestaurantDetail.storyboard into it:

Figure 16.12 – Project navigator showing the RestaurantDetail folder and its contents
- Create a new folder inside your LetsEat folder named ReviewForm and copy ReviewForm.storyboard into it. Then, create a new folder inside your LetsEat folder named PhotoFilter and copy PhotoFilter.storyboard into it. Your folder structure should look as follows:
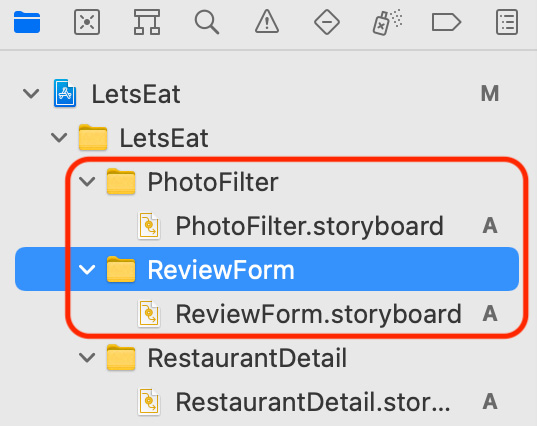
Figure 16.13 – Project navigator showing the PhotoFilter and ReviewForm folders and their contents
- Now, you need to assign RestaurantDetail.storyboard to the storyboard reference you added earlier to your project. Click Main.storyboard, select the storyboard reference you added earlier, and click the Attributes inspector button. Under Storyboard Reference, set Storyboard to RestaurantDetail.Storyboard:

Figure 16.14 – Attributes inspector settings for the RestaurantDetail storyboard reference
- Ctrl + Drag from the Map View Controller icon to the storyboard reference and choose Show from the pop-up menu to add a segue between the Map View Controller Scene section and the storyboard reference:

Figure 16.15 – Segue pop-up menu
This is required for the Restaurant Detail screen to be displayed when you tap an MKAnnotationView instance's callout bubble button in the Map screen.
- Now, you need to set an identifier for this segue. Later, you'll add a method that performs the segue with this identifier when the callout bubble button is tapped. Select the segue connecting the Map View Controller Scene section to the storyboard reference:

Figure 16.16 – Segue between the Map View Controller Scene section and RestaurantDetail
- In the Attributes inspector, under Storyboard Segue, set Identifier to showDetail:

Figure 16.17 – Attributes inspector settings for the showDetail segue
You have now linked the view controller scene for the Map screen to the view controller scene for the Restaurant Detail screen using a segue. In the next section, you'll implement a method that will present the Restaurant Detail screen when the callout bubble button is tapped.
Performing the showDetail segue
So far, you've linked the view controller scene for the Map screen to the view controller scene for the Restaurant Detail screen using a segue. You've also set the segue identifier to showDetail. Now, you need a method that will perform that segue. However, before you implement it, you'll need to create an enumeration that contains all the segue identifiers for this project. This reduces potential errors by enabling autocompletion when you type the segue identifiers into your code later. Follow these steps:
- Right-click on the Misc folder inside the LetsEat folder and choose New File.
- iOS should already be selected. Choose Swift File and then click Next.
- Name this file Segue. Click Create. Segue.swift will appear in the Project navigator.
- Add the following after the import statement to declare and define the Segue enumeration:
enum Segue:String {
case showDetail
case showRating
case showReview
case showAllReviews
case restaurantList
case locationList
case showPhotoReview
case showPhotoFilter
}
Note that the segue's type is String, so the raw values for each case are strings. For example, the raw value for case showDetail is "showDetail".
Now, you can add the method that will perform the showDetail segue when the callout button is tapped. Click MapViewController.swift in the Project navigator and add the following method after the addMap(_:) method:
func mapView(_ mapView: MKMapView, annotationView view: MKAnnotationView, calloutAccessoryControlTapped control: UIControl){
self.performSegue(withIdentifier: Segue.showDetail. rawValue, sender: self)
}
mapView(_:annotationView:calloutAccessoryControlTapped:) is another method that's specified in the MKMapViewDelegate protocol. It is triggered when the user taps the callout bubble button.
self.performSegue(withIdentifier: Segue.showDetail.rawValue, sender: self) performs the segue with the "showDetail" identifier, which presents the Restaurant Detail screen.
Build and run your project. On the Map screen, tap a pin and tap the button inside the callout bubble:

Figure 16.18 – iOS simulator showing the button inside the callout bubble
The new Restaurant Detail screen will appear. However, it does not contain any details about the restaurant:
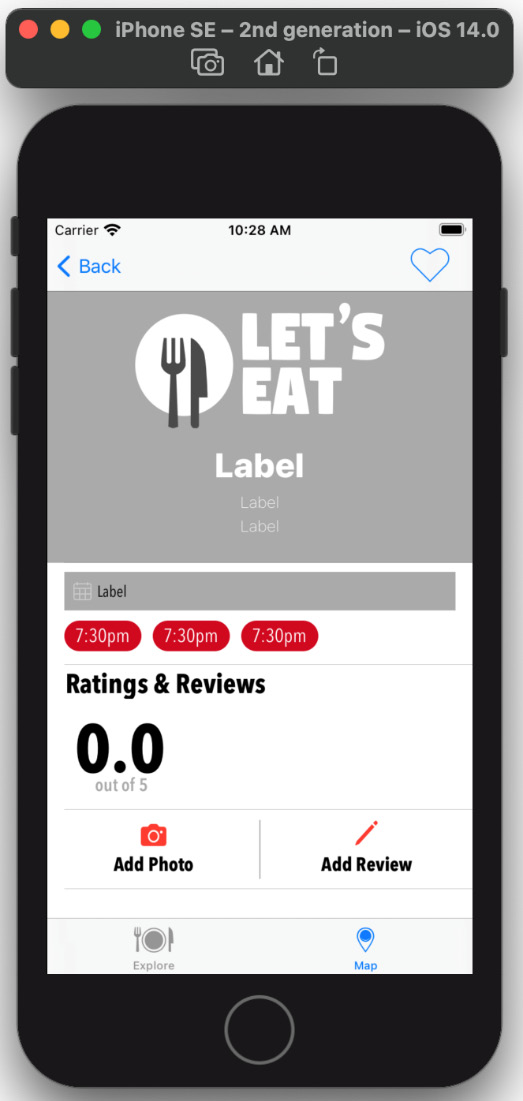
Figure 16.19 – iOS simulator showing the Restaurant Detail screen
You will make the Restaurant Detail screen display the details of a restaurant in the next chapter, but for now, let's just pass the data about the selected restaurant to the Restaurant Detail screen's view controller and print it to the Debug area. You will do this in the next section.
Passing data to the Restaurant Detail screen
The Map screen now displays custom MKAnnotationView instances that display callout bubbles when tapped. When the button in the callout bubble is tapped, the Restaurant Detail screen appears. However, so far, it does not contain any data about the restaurant. To do this, you'll need to pass restaurant data from the associated RestaurantItem instance to the view controller for the Restaurant Detail screen, which has not been created yet. Follow these steps to create it:
- Right-click the RestaurantDetail folder and select New File.
- iOS should already be selected. Choose Cocoa Touch Class and then click Next.
- Configure the file as follows:
Class: RestaurantDetailViewController
Subclass: UITableViewController
Also create XIB: Unchecked
Language: Swift
Click Next.
- Click Create. RestaurantDetailViewController.swift will now appear in the Project navigator.
- Delete all of the code after the viewDidLoad() method. Your file should look like this:
import UIKit
class RestaurantDetailViewController: UITableViewController {
override func viewDidLoad() {
super.viewDidLoad()
}
}
- Declare a property named selectedRestaurant before the viewDidLoad() method:
var selectedRestaurant: RestaurantItem?
This property holds the RestaurantItem instance that will be passed to the RestaurantDetailViewController instance from the MapViewController instance.
- Add the following code inside the viewDidLoad() method to print the RestaurantItem instance's contents to the Debug area:
dump(selectedRestaurant as Any)
This confirms that the MapViewController instance has successfully passed the RestaurantItem instance to the RestaurantDetailViewController instance.
- Verify that your file looks as follows:
import UIKit
class RestaurantDetailViewController: UITableViewController {
var selectedRestaurant: RestaurantItem?
override func viewDidLoad() {
super.viewDidLoad()
dump(selectedRestaurant as Any)
}
}
- Click RestaurantDetail.storyboard inside the RestaurantDetail folder. Select Table View Controller Scene in the storyboard. Click the Identity inspector button. Under Custom Class, set Class to RestaurantDetailViewController:

Figure 16.20 – Identity inspector settings for the Restaurant Detail View Controller scene
Note that the scene name will change to Restaurant Detail View Controller Scene.
- Click MapViewController.swift in the Project navigator.
- Add a property that will hold a RestaurantItem instance after the let manager = MapDataManager() statement:
var selectedRestaurant:RestaurantItem?
- Add the following code to the func mapView(_:annotationView:calloutAccessoryControlTapped:) method, before the self.performSegue(withIdentifier:sender:) method call:
guard let annotation = mapView.selectedAnnotations.first else { return }
selectedRestaurant = annotation as? RestaurantItem
This gets the RestaurantItem instance associated with the MKAnnotationView instance that was tapped and assigns it to selectedRestaurant.
- Verify that the func mapView(_:annotationView:calloutAccessoryControlTapped:) method looks as follows:
func mapView(_ mapView: MKMapView, annotationView view: MKAnnotationView, calloutAccessoryControlTapped control: UIControl){
guard let annotation = mapView.selectedAnnotations. first else { return }
selectedRestaurant = annotation as? RestaurantItem
self.performSegue(withIdentifier: Segue.showDetail. rawValue, sender: self)
}
- To pass the RestaurantItem instance from the MapViewController instance to the RestaurantDetailViewController instance, you'll need to override the prepare(for:sender:) method. Type the following code after viewDidLoad():
override func prepare(for segue: UIStoryboardSegue, sender: Any?){
switch segue.identifier! {
case Segue.showDetail.rawValue:
showRestaurantDetail(segue: segue)
default:
print("Segue not added")
}
}
The prepare(for:sender:) method is executed by a view controller before transitioning to another view controller. In this case, this method is called before the Map screen transitions to the Restaurant Detail screen. If the segue's identifier is showDetail, which it is in this case, the showRestaurantDetail(segue:) method will be called. This method will set the selectedRestaurant property for the RestaurantDetailViewController instance. However, you'll see an error because showRestaurantDetail(segue:) has not been created yet.
- Add the following code after the addMap(_:) method to implement showRestaurantDetail(segue:):
func showRestaurantDetail(segue:UIStoryboardSegue){
if let viewController = segue.destination as? RestaurantDetailViewController, let restaurant = selectedRestaurant {
viewController.selectedRestaurant = restaurant
}
}
This checks to ensure the segue destination is a RestaurantDetailViewController instance. If it is, a temporary constant, restaurant, is set for the selectedRestaurant property in the MapViewController instance. The selectedRestaurant property in the RestaurantDetailViewController instance is then set to restaurant.
In other words, the restaurant details that you get from the RestaurantItem instance are passed to the RestaurantDetailViewController instance.
Build and run your app. On the Map screen, tap a pin and then tap the callout button. The Restaurant Detail screen will appear. Click the Report navigator button and click the first entry, as shown in the following screenshot. You should see the restaurant details in the Editor area:
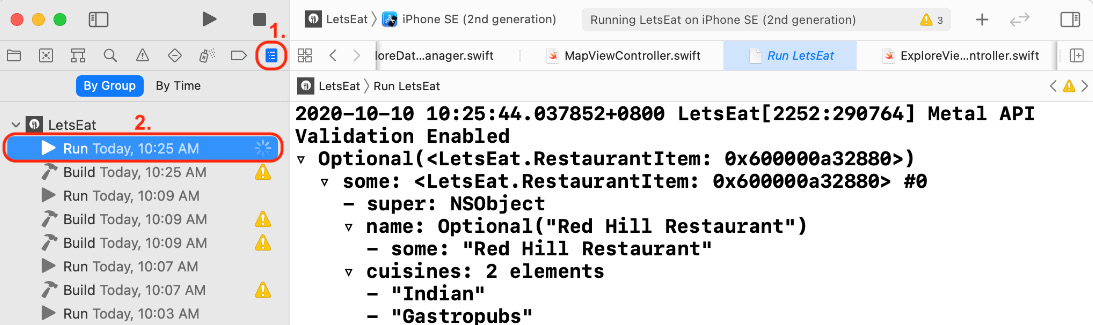
Figure 16.21 – Report navigator showing the contents of the first entry
This shows that the RestaurantDetailViewController instance now contains the data from the RestaurantItem instance that was selected on the Map screen. Great!
You'll configure the Restaurant Detail screen so that it displays that data in the next chapter.
You have done a lot of work in this chapter, so before you go on to the next chapter, you need to organize the code that you have written to make it easier to understand. You will use extensions to do so in the next section.
Organizing your code
As your programs become more complex, you will use extensions (covered in Chapter 8, Protocols, Extensions, and Error Handling) to organize your code. Extensions can help you make your code more readable and avoid clutter.
In this section, you will organize four classes: ExploreViewController, RestaurantListViewController, LocationViewController, and MapViewController. You will then segregate blocks of related code using extensions. You'll begin with the ExploreViewController class in the next section.
Refactoring the ExploreViewController class
In this section, you will divide the code in ExploreViewController.swift into distinct sections using extensions. Follow these steps:
- Click ExploreViewController.swift in the Project navigator. After the final curly brace, add the following:
// MARK: Private Extension
private extension ExploreViewController {
// code goes here
}
// MARK: UICollectionViewDataSource
extension ExploreViewController: UICollectionViewDataSource {
// code goes here
}
Here, you are creating two extensions. The first extension will be private, which means the contents of this extension can only be accessed by the ExploreViewController class. The second extension will contain all the UICollectionViewDataSource methods.
- You'll get an error because UICollectionViewDataSource appears in two places. Delete UICollectionViewDataSource from the class declaration at the top of the file. Your class declaration should look like this:
class ExploreViewController: UIViewController, UICollectionViewDelegate {
- Move all the UICollectionViewDataSource methods into the second extension. It should look like this:
// MARK: UICollectionViewDataSource
extension ExploreViewController: UICollectionViewDataSource {
func collectionView(_ collectionView: UICollectionView, viewForSupplementaryElementOfKind kind: String, at indexPath: IndexPath) -> UICollectionReusableView {
let headerView = collectionView. dequeueReusableSupplementaryView(ofKind: kind, withReuseIdentifier: "header", for: indexPath)
return headerView
}
func collectionView(_ collectionView: UICollectionView, numberOfItemsInSection section: Int) -> Int {
manager.numberOfItems()
}
func collectionView(_ collectionView: UICollectionView, cellForItemAt indexPath: IndexPath) -> UICollectionViewCell {
let cell = collectionView. dequeueReusableCell(withReuseIdentifier: "exploreCell", for: indexPath) as! ExploreCell
let item = manager.explore(at: indexPath)
cell.lblName.text = item.name
cell.imgExplore.image = UIImage(named: item. image)
return cell
}
}
To keep viewDidLoad() as clean as possible, you will create an initialize() method inside the private extension, and then put everything you need to initialize the view controller in there. After that, you will call initialize() in viewDidLoad(). Follow these steps:
- Add the initialize() method inside the private extension:
func initialize() {
manager.fetch()
}
- Move the unwindLocationCancel(segue:) method inside the private extension as well:
@IBAction func unwindLocationCancel(segue:UIStoryboardSegue){
}
- Verify that the private extension looks like this:
// MARK: Private Extension
private extension ExploreViewController {
func initialize() {
manager.fetch()
}
@IBAction func unwindLocationCancel(segue:UIStoryboardSegue){
}
}
- Finally, modify viewDidLoad(), as follows:
override func viewDidLoad() {
super.viewDidLoad()
initialize()
}
The benefits of segregating your code in this way may not seem obvious now, but as your classes become more complex, you will find it is easier to look for a specific method and maintain your code. Before you do the same to the other files, let's see how the // MARK: syntax is used.
Using the // MARK: syntax
The //MARK: syntax is used to navigate easily between different parts of your code. Let's see what it does:
- Look at the path that is visible just under the Toolbar and click on the last part, as shown in the following screenshot:
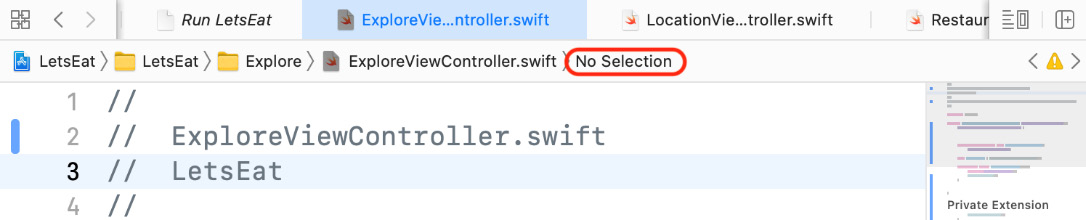
Figure 16.22 – Editor area showing the path
- A menu will be displayed. Here, you will see both Private Extension and UICollectionViewDataSource, both of which were generated by the //MARK: syntax. This enables you to easily jump to these sections:

Figure 16.23 – Path menu with Private Extension selected
With that, you have organized the ExploreViewController class. Now, let's do the RestaurantListViewController class by refactoring it and adding extensions.
Refactoring the RestaurantListViewController class
In this section, you will add two extensions to the RestaurantListViewController class, similar to those you added to the ExploreViewController class. Follow these steps:
- Click RestaurantListViewController.swift in the Project navigator. After the final curly brace, add the following:
// MARK: Private Extension
private extension RestaurantListViewController {
// code goes here
}
// MARK: UICollectionViewDataSource
extension RestaurantListViewController: UICollectionViewDataSource {
// code goes here
}
You'll put all the private methods for the RestaurantListViewController class in the first extension, and all the UICollectionViewDataSource methods in the second extension.
- Delete UICollectionViewDataSource from the class declaration at the top of the file. Your class declaration should look like this:
class RestaurantListViewController: UIViewController, UICollectionViewDelegate {
- Move all the UICollectionViewDataSource methods into the second extension. It should look like this when you're done:
// MARK: UICollectionViewDataSource extension RestaurantListViewController: UICollectionViewDataSource
{
func collectionView(_ collectionView: UICollectionView, numberOfItemsInSection section: Int) -> Int {
1
}
func collectionView(_ collectionView: UICollectionView, cellForItemAt indexPath: IndexPath) -> UICollectionViewCell {
collectionView. dequeueReusableCell(withReuseIdentifier: "restaurantCell", for: indexPath)
}
}
With that, you have finished organizing the RestaurantListViewController class. You'll clean up the LocationViewController class in the next section.
Refactoring the LocationViewController class
As you did previously, you now need to add two extensions to LocationViewController.swift. Follow these steps:
- Click LocationViewController.swift in the Project navigator. After the final curly brace, add the following:
// MARK: Private Extension
private extension LocationViewController {
// code goes here
}
// MARK: UITableViewDataSource
extension LocationViewController: UITableViewDataSource {
// code goes here
}
The first extension will contain private methods for the LocationViewController class. The second extension will contain all the UITableViewDataSource methods.
- Delete UITableViewDataSource from the class declaration at the top of the file. Your class declaration should look like this:
class LocationViewController: UIViewController {
- Move all the UITableViewDataSource methods into the second extension. It should look like this:
// MARK: UITableViewDataSource
extension LocationViewController: UITableViewDataSource {
func tableView(_ tableView: UITableView, numberOfRowsInSection section: Int) -> Int {
return manager.numberOfItems()
}
func tableView(_ tableView: UITableView, cellForRowAt indexPath: IndexPath) -> UITableViewCell {
let cell = tableView. dequeueReusableCell(withIdentifier: "locationCell", for: indexPath)
cell.textLabel?.text = manager. locationItem(at:indexPath)
return cell
}
}
- Just like you did in the ExploreViewController class, you need to create an initialize() method inside the first extension, and then put everything you need to initialize the LocationViewController class inside it. After that, you will need to call initialize() in viewDidLoad(). Add the following inside the first extension:
func initialize() {
manager.fetch()
}
- Verify that the first extension looks like this:
// MARK: Private Extension
private extension LocationViewController {
func initialize() {
manager.fetch()
}
}
- Finally, modify viewDidLoad(), as follows:
override func viewDidLoad() {
super.viewDidLoad()
initialize()
}
With that, you have finished organizing the LocationViewController class. You will clean up the MapViewController class in the next section.
Refactoring the MapViewController class
As you did previously for the other classes, in this section, you will add two extensions to the MapViewController class. Follow these steps:
- Click MapViewController.swift in the Project navigator. After the final curly brace, add the following:
// MARK: Private Extension
private extension MapViewController {
// code goes here
}
// MARK: MKMapViewDelegate
extension MapViewController: MKMapViewDelegate {
// code goes here
}
The first extension will contain private methods for the MapViewController class. The second one will contain all the MKMapViewDelegate methods.
- Delete MKMapViewDelegate from the class declaration at the top of the file. Your class definition should look like this:
class MapViewController: UIViewController {
- Move all the MKMapViewDelegate methods into the second extension. It should look like this:
// MARK: MKMapViewDelegate
extension MapViewController: MKMapViewDelegate {
func mapView(_ mapView: MKMapView, annotationView view: MKAnnotationView, calloutAccessoryControlTapped control: UIControl){
guard let annotation = mapView. selectedAnnotations.first else { return }
selectedRestaurant = annotation as? RestaurantItem
self.performSegue(withIdentifier: Segue. showDetail.rawValue, sender: self)
}
func mapView(_ mapView: MKMapView, viewFor annotation:MKAnnotation) -> MKAnnotationView? {
let identifier = "custompin"
guard !annotation.isKind(of: MKUserLocation. self) else { return nil }
var annotationView: MKAnnotationView?
if let customAnnotationView = mapView.dequeueReusableAnnotationView (withIdentifier: identifier) {
annotationView = customAnnotationView
annotationView?.annotation = annotation
} else {
let av = MKAnnotationView(annotation: annotation, reuseIdentifier: identifier)
av.rightCalloutAccessoryView = UIButton(type:.detailDisclosure)
annotationView = av
}
if let annotationView = annotationView {
annotationView.canShowCallout = true
annotationView.image = UIImage(named: "custom-annotation")
}
return annotationView
}
}
- Move the initialize(), addMap(_:), and showRestaurantDetail(segue:) methods into the first extension. It should now look like this:
// MARK: Private Extension
private extension MapViewController {
func initialize() {
mapView.delegate = self
manager.fetch { (annotations) in addMap(annotations) }
}
func addMap(_ annotations:[RestaurantItem]) {
mapView.setRegion(manager. currentRegion(latDelta: 0.5, longDelta: 0.5), animated: true)
mapView.addAnnotations(manager.annotations)
}
func showRestaurantDetail(segue:UIStoryboardSegue){
if let viewController = segue.destination as?RestaurantDetailViewController, let restaurant = selectedRestaurant {
viewController.selectedRestaurant = restaurant
}
}
}
With that, you have organized all four view controllers (ExploreViewController, RestaurantListViewController, LocationViewController, and MapViewController) using extensions. Great job!
Summary
In this chapter, you created a new class, RestaurantItem, that conforms to the MKAnnotation protocol. Next, you created MapDataManager, a data manager class that loads restaurant data from a .plist file and puts it into an array of RestaurantItem instances. You then created the DataManager protocol and refactored both the MapDataManager and ExploreDataManager classes to use this protocol. After that, you created the MapViewController class, a view controller for the Map screen, and configured it to display custom annotations. You also configured callout buttons in the custom annotations to present the Restaurant Detail screen. Next, you created the RestaurantDetailViewController class, a view controller for the Restaurant Detail screen, and passed data to it from the MapViewController instance. At this point, you know how to create objects that conform to the MKAnnotation protocol, how to add them to a map view, and how to create custom MKAnnotationViews, which allows you to add annotated maps to your own projects.
You also added storyboard files to your project, learned how to use storyboard references, and organized your view controller classes (ExploreViewController, RestaurantListViewController, LocationViewController, and MapViewController) using extensions. This will help you organize storyboards and code for large projects, thus making them easier to read and maintain.
In the next chapter, you'll learn about JSON files, as well as how to load data from them so that the Restaurant List and Map screens can display details about a particular restaurant.