
In This Chapter
Adjusting light levels
Correcting color casts in your photos
Changing the Exposure, Contrast, and Definition
Adjusting Highlights and Shadows
Editing Saturation levels
Sharpening techniques
Cutting noise distortions
Playing with Effects
Saving Adjust tool settings
It's time to put iPhoto into hyper-warp drive, so to speak. You've taken your photos and used iPhoto's basic editing techniques. Maybe, though, there are still some corrections to make, and by looking at the Adjust tool's histogram for a particular photo, you see the direction you want to go.(Read all about using histograms in Chapter 9.)
Note
It's important to remember that when you use the iPhoto Adjust tool, you're entering the realm of subjective evaluation. There really aren't any "magic settings" that'll guarantee a great photo. The real questions to ask yourself are whether the settings make the photo look like the scene you captured and also whether you like how the photo looks. If the answers are yes, those are correct settings for you.
In this chapter, I show you a hands-on approach to correcting flaws in your photos to make them the best they can be. Using every aspect of the Adjust tool allows you to become proficient in identifying areas to correct and adept at making proper adjustments. You'll find lots of ways to use this tool.
Tip
If you haven't already (or you read it a long time ago), now's a good time to read Chapter 9 and get familiar with the iPhoto histogram and see how crucial it is to the proper and full use of the Adjust tool. Understanding where and why you use iPhoto's Advanced tool's controls is almost as important as how to use them.
Warning
Clicking the Reset button in the Adjust pane takes all settings back to their default values; for example, removes any changes you have made to the photo.
Warning
As I mention in earlier chapters of this book, editing a photo in the iPhoto Library changes it in every Album, slideshow, book, calendar, or card where it appears. This is true for every Adjust tool control and the Effects tool. If you want to edit a photo without changing it elsewhere, make a duplicate of the photo by choosing Photos
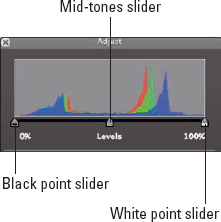
When you look at a particular photo's histogram in the Adjust tool window, you'll notice the three indicators on the Levels sliders directly under the histogram: one on the left, one in the center, and one on the right, as shown in Figure 10-1. These sliders affect the settings for the black point, mid-tones, and the white point, respectively.
Even though these are the first controls in the Adjust tool window, I recommend you apply them, if at all, only after you correct for Exposure, Contrast, Highlights, and Shadows because adjusting these controls will cause the histogram to move quite a bit. After gaining some experience with iPhoto, you might choose to do things in a different order.
If you refer to Figure 10-1, you'll notice a gap between the black point (left) slider and the beginning of the histogram curves. This means there are very few, if any, pixels in the lowest shadow-area light levels — and thus no absolute black. If this is the case, you can do the following:
In the Edit pane, set the magnification of the photo to at least 100% (halfway), using the slider in the lower-right corner.
Tip
As is true with many of the slider controls, it's best to try moving the black point slider while watching the photo, with at least 100% magnification, to see whether you like it better.
Move the black point slider (the left slider under the histogram) to the right until it just reaches the point where a bump in the histogram appears.
This moves the black point to a higher value and means that the pixels (if any) lower than the black point slider will be set to 0% luminosity, or absolute black. This should enhance the tones in your photo. Don't move the black point slider so far to the right that the shadows lose all their detail.
Now you can press and release the Shift key to compare the current settings with the photo as it existed before you opened the Adjust tool.
If you don't like the new setting, you can always choose Edit

If you're satisfied with your changes, click the Done button in the Edit pane or continue with other changes, using the Adjust tool.
Tip
My advice on making these advanced changes is that because some controls can affect other controls, you make these changes iteratively. Don't be afraid to go back to something previously set and try changing it a little after you've used another control to make an edit.
In a similar way to modifying the black point, you can modify the white point using the slider on the far right of the histogram. In this case, moving the slider to the left sets the level for absolute white. Referring to Figure 10-1, you see there are very few pixels on the far right of the histogram. By moving the white point slider to the left, you're setting any pixels that exist to the right of it to absolute white. Here's how to do this:
In the Edit pane, set the magnification of the photo to at least 100% (halfway), using the slider in the lower-right corner.
This will assist you in making sure the highlights don't lose all their detail when you make adjustments.
Move the white point slider (the right slider) under the histogram to the left until it just reaches the point where a bump in the histogram appears.
This should enhance the tones in your photo and make the overall photo brighter. As you move the slider, pay particular attention to the detail in the brightest areas of your photo. You don't want to move the slider such that you lose the detail that's already there. Any pixel values above the white point slider are set to 100% luminosity or absolute white.
Now you can press and release the Shift key to compare the current settings with the photo as it existed before you opened the Adjust tool.
If you don't like the new setting, you can always choose Edit
If you're satisfied with your changes, click the Done button in the Edit pane or continue with other changes, using the Adjust tool.
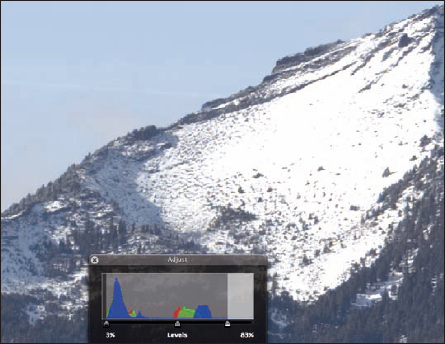
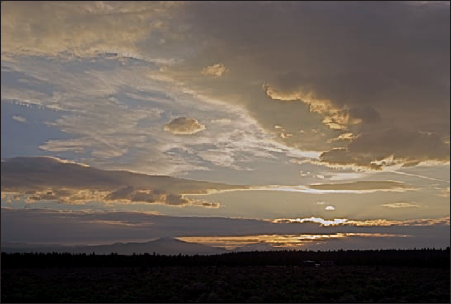
Let me give you an idea of what I mean by losing detail. Figure 10-2 shows a photo of part of the peak of Mt. Washington and the photo's histogram with the white point set to 83%. Pay particular attention to the right half of the large snow area.
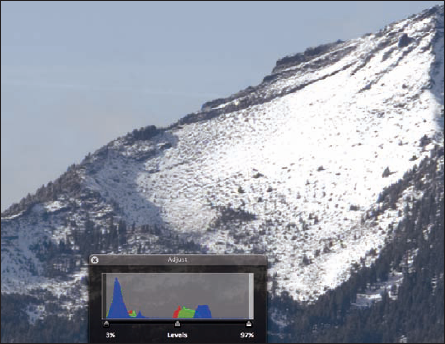
Now look at Figure 10-3. The white point slider is now set to 97% (much less movement), the highlights are still brightened, but there is also more detail in the snow area. For me, this is a much better setting. This is the kind of trade off you need to be aware of as you make your changes.
After you adjust the light range for the photo using the two sliders on the ends (making the light range smaller in this example), you can use the mid-tone slider to achieve a balance of brightness and shadow detail. To do so, follow these steps:
In the Edit pane, set the magnification at the minimum value that still allows you to see the entire photo.
Tip
For adjusting mid-tones, it's best to see all the photo when making adjustments.
Move the mid-tone slider to the left to brighten the photo or to the right to darken it.
This adjustment shouldn't require large changes, so move the slider around a little and watch the photo to judge where you want the adjustment to be.
Tip
I've found it helpful to move the Saturation slider all the way to the left to give the appearance of a black-and-white photo. Then adjust the mid-tones, which are grays. When you're satisfied, bring the Saturation slider back to the middle or its previous setting to restore the color.
Now you can press and release the Shift key to compare the current settings with the original photo.
At this point, you can then make more changes, accept what you've done, undo your last change, choose Photos
If you're satisfied with your changes, click the Done button in the Edit pane or continue with other changes, using the Adjust tool.
At one time or another, we've all been shocked at seeing a photograph that has an overall distorting color cast that makes many colors in the photo look unreal. It's not a disgrace if this happens to you, but it's important you have the power to correct it. And in iPhoto, you do. This is the point where you should correct this — before making any other corrections.
To fix a color cast, follow these steps:
Open the photo in the Edit pane or in full-screen view, if you haven't already.
Click the Adjust tool button.
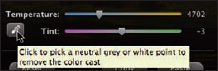
In the Adjust tool window, click the eye-dropper button just to the left of the Tint control, as shown in Figure 10-4.
The mouse pointer will turn into a cross-hair.
Pick a white or neutral gray color in the photo and click it. If neither white nor neutral gray exist in the photo, try to find a neutral color that will work.
Both the Tint and Temperature sliders will adjust automatically, and there'll be no color cast if you chose the neutral color correctly.
If the photo is still not corrected (it might even look worse), don't panic. Pick another area that you feel is neutral and click it.
The settings will change, as will the look of the photo. Usually, two or three choices will be all it takes. Sometimes what looks neutral to our eyes has some color in it. You just have to find the part of the photo that removes any color casts. It's often an iterative process.
When you're satisfied, color balancing is complete. Make sure you don't change the Temperature or Tint sliders after this, or you might have to color balance again.
You can press and release the Shift key to compare the current look with the original photo.
If no other adjustments are needed, you're done.
If you're satisfied with your changes, click the Done button in the Edit pane or continue with other changes, using the Adjust tool.
Digital cameras these days are wonderful gadgets; even the least-expensive have electronics that allow them to make exposure adjustments automatically for you. They tend to do an incredible job of making compromises so your photo is at least viewable, even though you might be capturing a scene in the worst of photographic circumstances. These compromises, however, are made in a split second. You, on the other hand, have an opportunity to take your time, use your eyes, and make the changes in editing you wish you'd made when capturing the shot. Sound great? See how this works by getting acquainted with the controls you'll be using:
Exposure: The Exposure control, as the name suggests, allows you modify the exposure (overall lightness or darkness of the photo) almost as though you had changed the shutter speed and/or aperture when the photo was taken. You can think of it as going back in time without having to build a special way-back machine or going through wormholes. I promise you won't feel a thing except pride and satisfaction at what you've accomplished!
Contrast: The Contrast control changes the difference between the light and dark areas of your photo. It affects contrast on all areas of your photo equally.
Definition: The Definition control adjusts local contrast, which can help you improve clarity and also reduce haze in your photos.
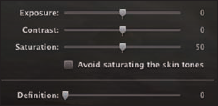
The Exposure, Contrast, and Definition sliders are initially set to 0, 0, and 50, respectively, for no effect on the photo, as shown in Figure 10-5.
The Exposure slider provides very critical adjustments, and you can even recover some of the highlights that have been overexposed by using negative values. Remember that half the data values captured by the camera sensor are in the highlight area, so it's important to use as much of that data as possible. (See Chapter 9 for a more complete description of why this is true.)
To recover some highlights and save an otherwise overexposed photo, follow these steps:
Open the photo in the Edit pane and do a color balance.
Click the Adjust tool button.
Use the Adjust tool window and perform a color balance. (See the previous section for more details.)
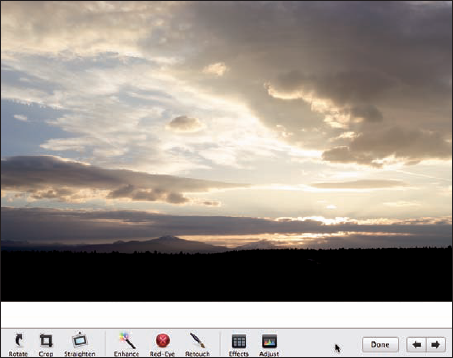
Figure 10-6 is an example of the overexposed photo I'm using to show you this process. I already applied a color balance to the photo, but there are light levels off the right side of its histogram (indicated in the photo by all the bright areas that have little or no detail).
Move the Exposure slider and watch the histogram to see what happens.
It's best to move the slider with the mouse to get an idea of the direction and amount required. In this example, −0.98 seems to be about right and restores some cloud highlight detail.
Move the Contrast slider to further enhance the photo.
I recommend moving the Contrast slider while watching the photo to see what changes to make. For this example, I used a value of +8.
Drag the Definition slider until your photo looks how you want.
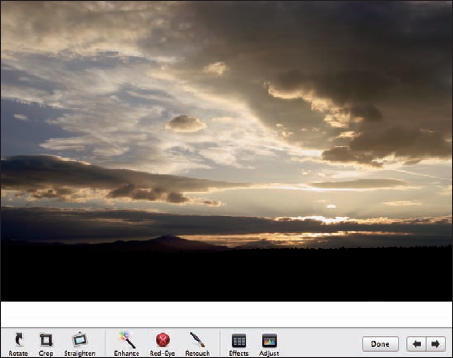
Try going back and reducing Contrast after you adjust Definition. Iterate, if necessary, between Exposure and Contrast. Always work the controls until you achieve the look you want. Use the Shift key to compare the original with the current look. In this example, the photo is much improved already. Figure 10-7 shows the effect of all three changes.
If you're satisfied with your changes, click the Done button in the Edit pane or continue with other changes, using the Adjust tool.
Note
In Chapter 9, I mention that modifying an overexposed photo is usually preferable to modifying an underexposed one. With the latter, you're trying to stretch the small amount of data in the shadows into the upper mid-tones and highlights, and this can lead to shadow noise and a generally ugly look to the photo. When take your photos in the future, keep in mind the limits to exposure adjustment after the capture.
You might have already made changes in the light levels and the overall exposure of the photo. (If not, I recommend doing so before reading this section.) Now your changes will concentrate only on the highlights and shadows. For these changes, you use (you guessed it) the Highlights and Shadows controls. With these two controls, you can work directly on the highlights and shadows to improve the highlight and shadow detail in your photo.
Warning
From this point on, you need to really look at your photo and decide whether altering more Adjust tool controls is warranted. You can get to a point where you're doing more harm than good. If you decide to make more adjustments, making them with the photo at a minimum of 100% magnification is crucial. This allows you to see exactly what each change is doing.
To modify the highlights and shadows, you can do the following:
In the Edit pane, set the magnification of the photo to at least 100% using the slider in the lower-right corner.
Use the small Navigation window to position the photo so you can observe an area of highlights.
Figure 10-8 shows the area of the Adjust tool window you'll be using.
I recommend you begin by moving the Highlight slider with the mouse while watching the photo for changes.
This allows you to get a feeling for the amount of highlight darkening you want to apply.
When you're satisfied with the setting in the area you're observing, move to another highlight area and see how that looks.
Note
Don't be afraid to make changes in the amount of highlight darkening in this new area to make sure that whatever value you apply is best for the entire photo, not just part of it.
Zoom out to the minimum magnification that allows you to see how the entire photo looks with the change you made. Then go back to 100% magnification and recheck each highlight area.
Tip
Don't forget you can press on the Shift key to see a comparison of the current version of the photo and the original.
Now you can lighten the shadow areas, if necessary.
Again, zoom in to 100% magnification, use the small Navigation window, and concentrate on a shadow area that seems too dark.
Use the same technique of moving the Shadows slider with the mouse to get an idea of how much shadow lightening you want to apply.
The idea is to try and provide some detail in the shadows, enough so the eye can recognize there's something there and not just a black smudge.
Make use of the Shift key to see the difference between the current photo and your original.
If you're satisfied with your changes, click the Done button in the Edit pane or continue with other changes, using the Adjust tool.
Figure 10-9 shows how the example photo looks after these changes. More detail is evident in the highlights as well as the shadows.
Tip
This would be a good time to make changes to the light Levels sliders if you wish. Use the instructions in the "Modifying Light Levels" section, earlier in this chapter.
No matter how "artsy" the results are described to be, I'm not a fan of cranking up any software editing tools to the point that the colors in a photo scream "unrealistic" to the viewer. On the other hand, as I mention in Chapter 9, what we see and feel and what the camera records might not be the same. I do believe, as do most professional photographers, that the final photo should represent what the photographer saw at the moment of capture and that corrections made to the digital image are appropriate and recommended based on the histogram.
Three controls can dramatically affect colors — Saturation, Temperature, and Tint, as shown in Figure 10-10.
If you've already done a color balance on a photo (see the "Fixing a Color Cast" section, earlier in this chapter), the Temperature and Tint were automatically adjusted. The Temperature, expressed in degrees Kelvin, is a measure of the color temperature of the light in the photo. Moving the Temperature slider to the left introduces more blue (colder), and moving it to the right introduces more yellow (warmer). The Tint is just a value with no units. Moving the Tint slider increases or decreases the red/green tint of the photo.

Warning
Unless you want to undo the color balance or make very small adjustments to it, don't adjust the Temperature and Tint controls. Doing so can introduce a color cast!
I'll concentrate on the use of the Saturation control, which will be the only one you'll use most of the time. Here's what it can do.
Select your photo and click the Edit button in iPhoto.
iPhoto displays the photo in the Edit pane.
Tip
It's best to use the other tools already discussed in this chapter first. If you haven't already used them, do so now. That would be the light Levels control; Tint's eye-dropper for color balance; and the Exposure, Contrast, Definition, Highlights, and Shadows controls.
Click the Adjust button to open the Adjust tool window.
In the Saturation section of the Adjust tool, select the Avoid Saturating the Skin Tones check box if there are skin tones in the photograph.
This allows you to increase saturation without destroying the subtle facial and body tones.
In the Edit pane, set the magnification at the minimum value that allows you to see the entire photo. Then, with the mouse, move the Saturation slider to the right to increase color saturation or to the left to decrease it.
You'll notice in the histogram that this slider mostly affects the mid-tones.
Watch your photo to see the changes that occur.
Keep in mind what you saw when you captured the photo so you can make your adjustments to re-create that look for the viewer. Typically, your settings will be between 40 and 65.
Press and release the Shift key to compare the current photo with the original.
Happy with the result? Then you're done. Otherwise, continue with adjusting the saturation.
If there are no other changes, click the Done button in the Edit pane.
At this point, you've corrected both the luminosity and color in your photo. What remains are two tasks that can put the finishing touches on your masterpiece.
Any type of pixel editing, especially when it involves post-capture exposure adjustments, can cause an overall softening of the image. iPhoto provides the Sharpness tool for handling this situation. Figure 10-11 shows the Sharpness (and De-noise, covered in the next section) control in the Adjust tool window.
Here's how it works:
Select your photo and click the Edit button in iPhoto.
iPhoto displays the photo in the Edit pane.
Click the Adjust button to open the Adjust tool window.
In the Edit pane, set the magnification of the photo to at least 100% (halfway) using the slider in the lower-right corner.
Pick something in the photo with edges (using the small Navigation window to move the photo around), and watch while you vary the Sharpness control.
Like other controls, it's best to watch the photo while you move the slider to get a feel for how your photo is responding. As you move the slider, look at the edges of the object you zoomed in on. A sign of over-sharpening is a halo effect along the edges of leaves, mountains, or clouds. If you see this, reduce the amount of sharpening. Otherwise, the rule here is "sharpen to taste" but use only as much sharpening as necessary.
Note
This control is meant to correct for a softening in the look of the photo. It can't correct for a photo that was out of focus at the time of capture.
Press and release the Shift key to compare the current photo with the original.
If there are no other changes, click the Done button in the Edit pane.
Noise is a distortion in your image. In some ways it's similar to film grain. Electronic noise shows up as extraneous pixels sprinkled throughout an image. Dealing with noise in the digital age is a fact of life. Eliminating or lowering the amount of noise in your photos is another reason for making correct exposures at the time of capture. An underexposed photo has more noise than one that's correctly exposed. And when performing exposure corrections in iPhoto, that noise can become more noticeable, especially in the shadow areas.
Another fact is that noise is a function of the ISO, or sensitivity setting of your camera. This is the digital equivalent of film speed. Keep in mind that setting the ISO to high numbers can make a photo possible in very weak light, but noise can negate the value of such a photo.
Tip
All digital photos have noise, but it's important to understand that noise we can see in iPhoto might not be visible when we print. The objective is to reduce noise so it isn't visible or damaging. Because it is very difficult to see noise in print, I'm not showing any examples in the following step list.
Color noise, especially in the shadow areas, looks something like confetti, with color speckles visible even at 100% magnification. To reduce noise as much as possible, do the following:
Select your photo and click the Edit button in iPhoto.
iPhoto displays the photo in the Edit pane.
Click the Adjust button to open the Adjust tool window.
In the Edit pane, set the magnification of the photo to at least 100% (halfway) using the slider in the lower-right corner.
Using the small Navigation window to move the photo, look in the shadow areas of your photo for evidence of noise.
If you don't see noise at this magnification, try a higher magnification. If you still see nothing, it's unlikely any noise will show up in a print, even a fairly large one.
If you do see noise, watch that area of the photo and use the mouse to move the De-noise slider (refer to Figure 10-11) to the right.
Warning
Don't overdo it because noise reduction also has a smoothing effect on the photo, negating some of the sharpening you might have already done.
Check all areas of the photo to ensure that you eliminated the noise problem as much as possible.
Use the Shift key to check the current photo against the original to gauge how much noise reduction you have done.
If you're finished, click the Done button in the Edit pane.
You've used your skills and your creativity to make your photo the best it can be. There is one more thing that you can decide to do and that requires the use of photographic effects, which is something iPhoto can provide.
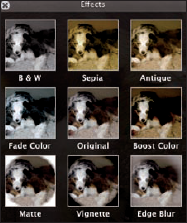
The Effects tool is right next to the Adjust tool in the Edit pane. The Effects tool window displays nine photos, eight showing each type of effect applied and one for the original photo. Figure 10-12 shows the Effects tool window.
Tip
iPhoto allows you to have multiple photo effects active at the same time. Say, if you click B&W and then click Vignette, both B&W and Vignette are applied to the photo. Only one from the first row of effects shown in Figure 10-12 can be on at any time (B&W, Sepia, Antique). As for the others, the more the merrier! If you want to see what happens with only one effect active after you've tried several, make sure you click the Original effect to cancel any effect you previously turned on before choosing another.
The nice thing about the Effects tool window is that you can try each of the effects (except the first row), without having to change any other settings. Keep reading to see what kinds of things you can do.
Choose your photo and click the Edit button to open it in Edit mode.
Click the Effects button.
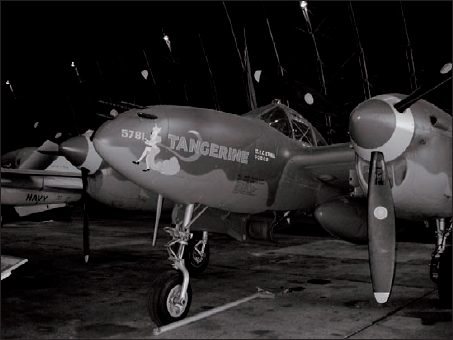
The Effects tool window opens and shows a thumbnail of your photo with each of the eight effects applied so you have an idea of what each one does. Figure 10-13 shows the photo I've chosen before applying any effects.
Click the B&W (black and white) effect in the Effects tool window.
Notice that an ON button appears at the bottom of the B&W effect in the Effects tool window, and you can click it to remove (turn OFF) the B&W effect. Figure 10-14 shows you what this effect looks like when applied to the photo. You can also try manipulating the Saturation slider in the Adjust tool window to augment this effect.
Click the Original effect, and then click Sepia to turn it on.
Once again, an ON button appears; you can click it remove the Sepia effect.
Click the Original effect; then click Antique to turn it on.
Notice this time that a number appears, with small arrows on either side, at the bottom of the Antique effect in the Effects tool window. Click the right arrow to increase the power of the effect, and click the left arrow to decrease.
Note
You can always press the Shift key to alternate between the current photo state and the original.
Click the Original effect; then click the Fade Color to turn it on.
Once again, a number appears, with small arrows on either side. This allows you to increase or decrease the power of the effect.
Click the Original effect; then click the Boost Color effect to turn it on.
You guessed it! Another number appears, with small arrows on either side. This allows you to increase or decrease the power of the effect.
Click the Original effect; then click the Matte effect.
A number appears, with small arrows on either side. This allows you to increase or decrease the power of the effect. Figure 10-15 shows the result of this effect at the lowest level.
Click the Original effect; then click the Vignette effect to turn it on.
A number appears, with small arrows on either side. This allows you to increase or decrease the power of the effect.
And last, but not least, click the Original effect and then click the Edge Blur effect to turn it on.
Again, a number appears with small arrows on either side to change the power of the effect.


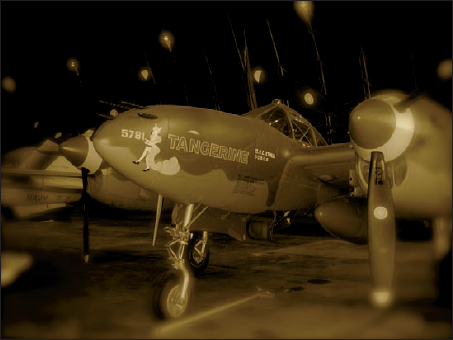
That takes care of all the single effects . . . but there's more! You can click multiple effects and combine them on a single photo. This obviously takes some playing around to get a desired effect, but the ability to do this in iPhoto really opens the creative doors. As an example, Figure 10-16 shows the same photo with both Sepia and Edge Blur applied.
This completes your tour of the iPhoto Effects tool. Get creative and have fun with it.
Say you completed corrections for Exposure, Contrast, Highlights, and so on, and now you want to take your hard work with the Adjust tool settings and apply them to other similar photos. Do you have to go through the process all over again with each photo? Luckily, the answer is no.
When you take a series of photos at the same time in the same lighting conditions, they often lend themselves to the same Adjust tool corrections. At least, you'll come close to the right settings and can then just make small individual corrections.
Here's what you do to save your Adjust tool settings and apply them to other photos:
Open the Adjust tool from the Edit pane.
Make all your corrections to the photo.
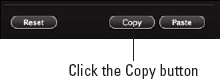
Click the Copy button in the Adjust tool window, as shown in Figure 10-17.
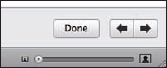
Use the arrows next to the Edit pane's Done button to get to another photo. Or, click the Done button and pick another photo to display it in the Edit pane.
Figure 10-18 shows the arrows' location.
When you have the next photo in the Edit pane, apply the previous Adjust tool settings by clicking the Adjust tool button and then clicking the Paste button
That's it! All your corrections will be applied to the new photo. You can continue to do this as long as you don't quit iPhoto or click the Copy button again.