
Identifying the histogram
Reading a histogram
Using a histogram to create an editing plan
Before you can arrive at your destination, you must know where you're going. To effectively use the power of advanced editing techniques, you need to understand how to determine what corrections need to be made to bring out the best in your photos.
A histogram is a great tool that doesn't just tell you what's wrong with a photo — it shows you. A histogram also makes clear what the application of any corrections will do to your photograph. This is key to taking advantage of the power of iPhoto's advanced editing capabilities.
In this chapter, I introduce you to histograms and how to understand what they mean for your photographs, current and future. Learning to interpret histograms helps you correct current photo problems, such as exposure and lighting, and avoid the same photographic problem areas in the future.
Tip
Any descriptions of the interplay of light, sensors, and electronics can easily become unnecessarily complex, so I'm going to try and avoid doing that. This means that although the descriptions I give are correct, they might not be complete. For your purposes, though, they'll be enough.
Regardless of the photo format you choose for your camera's output (if you'd like to know more about photo formats, see the "Formats and visual quality" sidebar later in this chapter), the iPhoto histogram (available in the Adjust tool) is an aid that you'll find indispensable. Say what?
Basically, a histogram is a graphical way of showing you, the photographer, how the light levels in a photograph are distributed between the shadows and the highlights.
Tip
An important fact to remember when taking photos is that your camera's sensor records light (as photons) in a linear fashion. If the light reaching the sensor from one area of the photo is twice as bright as another area, the sensor records it as twice as bright (twice as many photons). Our eyes, on the other hand, are non-linear. Look at a scene that is twice as bright as another: We know that it's brighter, but we don't see it as twice as bright. Just be aware that what you sense in a scene, using your eyes, might not be what the camera records. The amount of light is a measure of how many photons were recorded.
If your camera has a histogram, use it to help you in judging exposure — it's always better to get this kind of information when you're taking the photo. If no histogram is available, learn from experience how to compensate for the difference between sensors and your eyes by studying the histogram in the iPhoto Adjust tool. If your camera includes presets for common lighting conditions (indoor, snow, portrait, and so on) take advantage of those.
Note
Your digital camera devotes a large number of levels to the highlight area (where our eyes are not very sensitive to differences) and a much smaller number of levels to the shadow areas (where our eyes are much more sensitive). Each level represents a distinct number of photons recorded, and the higher the number of photons, the brighter the light. Keep this in mind as I discuss the histogram and the Adjust tool.
Tip
If your photograph requires using the Adjust tool, I recommend the following plan of action:
Use, if necessary, the Rotate, Crop, Straighten, and Red-Eye tools first, as I describe in Chapter 8.
Do not use the Enhance tool.
Using the Enhance tool makes many of the same changes you can make with the Adjust tool, but you won't have any control of them — if you recall, the Enhance tool simply takes a click of the mouse, and it's done (see Chapter 8).
Use the Adjust tool to make advanced edits to the photo.
Experience is the best educator. That said, the best way to look at how to read a histogram is by jumping right in and getting your hands dirty. Roll up your sleeves because here we go.
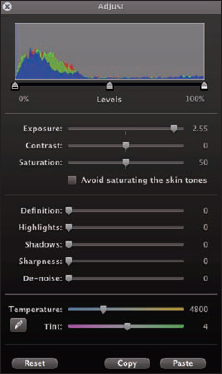
Figure 9-1 shows the Adjust tool with the histogram of a particular photo at the top.
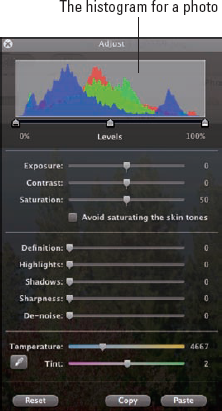
There are several things in this figure to make note of:
The histogram shows the light levels (number of photons) along the horizontal axis for each of the three color channels in the camera: red, blue, and green. This means the most intense light in the photo — the highlights — is depicted on the right of the histogram, with the mid-tones in the center and the shadows on the left. The color channel information helps make it possible for the camera to create a color photo from the black-and-white sensor data.
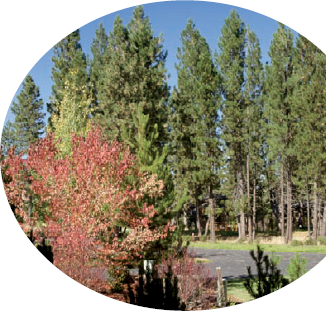
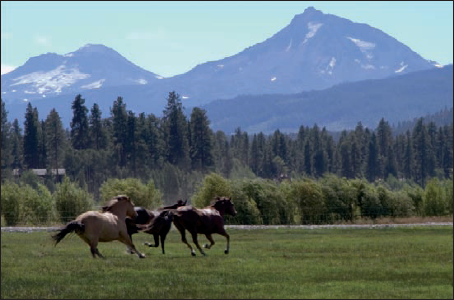
You can see that there's quite a bit of blue in the shadows (you know that because of the height of the blue curve on the left of the histogram), mostly red and green in the mid-tones, and mostly blue in the highlight area. This makes sense given the actual photo (see Figure 9-2) this histogram represents.
The histogram doesn't tell you whether the photo is boring or not (I think it is), but rather that it's fairly well exposed because the light levels are nicely distributed across the histogram. On the other hand, just looking at the photo, with its familiar shapes and colors, can distract us from analyzing it properly. You figuratively "can't see the light for the trees!" And if there's one thing that's true about photography, it's all about the light.
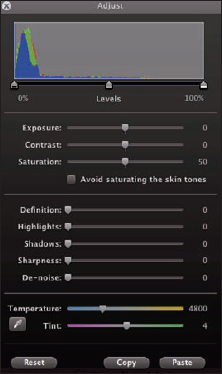
The relative number of pixels in the photo at each light level is shown by the height of the curve vertically. The more vertical the curve, the more pixels there are in the photo at that light intensity. When you compare the histogram in Figure 9-1 with the photo in Figure 9-2, you can see just how much useful information a histogram provides. It shows a lot of pixels in the shadow area, indicating a fair amount of detail there. It also shows plenty of pixels in the mid-tones and a highlight area that isn't overexposed. If you look at the histogram in Figure 9-3, you see a very uneven distribution of pixels.
It's obvious that almost all the pixels in the photo represented by the histogram in Figure 9-3 are in the shadow area, meaning that the photo will be dark and also that there'll be very little, if any, detail in the mid-tones and highlights.
You're probably wondering that with the Adjust tool at your disposal, why not just use that to fix exposure problems? And you're right, as long as you keep in mind what "fix" means. Think of it this way. The histogram in Figure 9-3 represents all the light that was captured when the photo was taken. When you use the Adjust tool's Exposure control slider, the light in the shadow area is "stretched" toward the mid-tones and highlights. The total number of pixels in the photo stays the same, but some of them have moved into the mid-tone levels. If you look at the histogram in Figure 9-4, you will see that the height of the curves on the left are now lower, meaning that not as many pixels are located in the shadows.
Warning
The danger is that if you move too many pixels, you introduce noise, which is a distortion in your image. In some ways it's similar to film grain. Electronic noise shows up as extraneous pixels sprinkled throughout an image. Noise degrades a photo and/or cause gaps in the light levels when it's extreme, thus giving the photo a poster-esque quality. So when using any of the Adjust tool's control sliders, keep your eye on the histogram and the photo to see the results.
Tip
Note
Yes, there are tools in iPhoto to correct your mistakes, but it's always better to make your photos as good as they can be when you capture them.
The curve in Figure 9-1 doesn't quite go all the way to the right or left. It comes pretty close, but heck! You paid for the camera and all the light levels it can sense, so why not use them? That statement's not as flippant as you might think.
Without going through a long technical discussion, take this as fact: Half of the light levels that a digital camera sensor can capture are in the highlights! Those levels are there to record as much detail in the highlights as possible. So if you're going to err in taking a photo, err on the side of slight overexposure (emphasis on the word slight). When looking at a histogram, this means exposing to the right edge or slightly beyond it.
There's a second reason that exposing properly or even slightly overexposing to the right is important. As I mention earlier in the chapter, our eyes are much more sensitive in the shadow area than the highlights. So if you're going to use the Adjust tool, it's a better situation to have to move the Exposure control slider to the left and push pixels (and more detail) toward the shadows than to move the Exposure control slider to the right, which pushes them into the highlights.
Tip
Saying this another way, when using a digital camera (unlike a film camera), expose for the highlights and develop for the shadows. By develop, I mean use iPhoto to finalize your photo. And, if you remember nothing else from reading this chapter, this tip will have made it all worthwhile.
These are three very important observations, and they help to explain why a histogram is so important — and how you can use it to your photographic advantage.
Before you start using the Adjust tool and any of its control sliders, just look at the histogram for your photo and "read" what it's telling you. I walk you through using the Adjust tool in detail in the next chapter, but the key to properly using it is to observe first and act second. "Okay," you ask, "what should I observe?" Here's the answer:
Look at the photo in Edit mode. Is the photo pleasing to your eye? Is it too dark or washed out? Can you see detail in the shadows and in the highlights? Did it turn out how you thought it would when you captured it? In other words, get a sense, visually, of what you want to do to the photo (important for the present) as well as what you wish you had done (important for capturing future photos).
Look at the histogram in the Adjust tool window. The histogram should confirm your own feelings about the photo. Ask yourself these questions. Do the curves go past the edge in either the shadows (on the left) or highlights (on the right)? Do the curves take up the entire histogram or only a part of it? Are the peaks of the curves very short or near the top (which tells you something about how well the scene was lit)? Are there pixels recorded at every light level across the histogram, or are there long stretches were there are no pixels?
Note
As I mention before, if a photograph is really poorly captured, there might be nothing to do but move on because fixing one thing will make something else worse.
Concentrate on the positives, though, and assume that your photo can be improved. I'm going to show you the approach I take, and I recommend you emulate it until you gain some experience and can make your own modifications.
Tip
The approach I describe below mentions using the controls in the Adjust tool window to make advanced edits. Right now, the focus is to give you an idea of the approach to take for determining what advanced edits need to be made. In Chapter 10, I give you the details for actually using the Adjust tool's controls and making advanced edits.
My approach answers the questions posed above and helps formulate a game plan for advanced editing.
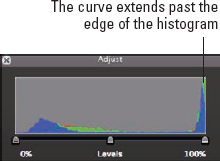
Check whether the curves go past any edge of the histogram, as shown in Figure 9-5.
When this occurs, the curve climbs straight up. If you look closely, you can see this happened on the right in this case — and, of course, the higher the curve climbs vertically, the more pixels it represents. This tells you that you attempted to capture a range of light beyond the capability of the camera's sensor. All those different light intensity levels (and there might be lots of them) have simply been piled up on top of each other at the edge, and this is clipping. In this case, I would try adjusting the Exposure and Highlight controls in the Adjust window to correct this and reclaim some highlight detail.
Adjust the curves so they take up all the histogram.
This might involve setting the Levels control end points, thus increasing exposure and also increasing highlight and shadow detail.
Although it might be slight, always check for a color cast.
This is called "setting the white point" and makes use of the eye-dropper in the Tint control. See Figure 9-6 for an example of a photo with a bluish cast.
Make necessary adjustments for color saturation and color temperature.
These are really personal choices, but I give you some hints for doing this in Chapter 10. Over-saturation is evident in a histogram if the tops of the curves are flattened against the top of the histogram window. Try backing off on the Saturation control in the Adjust window.
Zoom in on the photo to 100% or higher and apply any needed sharpening.
Watch carefully while you apply sharpening to ensure you do only what's necessary.
Zoom in on the photo to at least 100% and check for color or luminance noise and correct for it.
As you might have noticed, this order of corrections closely follows the layout of controls in the Adjust tool window. Great minds think alike! Actually, it's just a sensible order in which to do things. But be aware, as you gain experience there may be photos where it makes sense to do things in a slightly different order.
My aim, in the guidance I give you, is to help you use iPhoto to your maximum advantage. Part of this comes from understanding the process to use and the tools that can help. Part of the process is developing good techniques for taking well-exposed photos in the first place. After you master that, knowing what to correct is much simpler.