Chapter 5. iTunes Power Moves
NOW THAT YOU’VE SEEN HOW EASY ITUNES MAKES IT TO CONVERT your favorite CD tracks into small, great-sounding files, it’s time to do some serious tune-tweaking. Apple’s music-management program lets you do things like rate albums and individual songs, tap into Internet radio, share music and videos with other folks on your network, and even download your past and present purchases to your iPod or other iOS devices.
You can also use iTunes as an editor: It gives you the tools you need to change song formats, edit on-stage banter from live recordings, and apply preset or customized equalizer settings to tracks. Once you get everything to your liking, you’ll learn how to add, delete, and manually manage the music on your ‘Pod.
Finally, you’ll learn how iTunes can help with a vital—but often ignored—part of music management: backing up your catalog for safekeeping in case your hard drive croaks and takes all your songs and videos with it.
You’re the Critic: Rate Your Music
ALTHOUGH THERE’S NO WAY to give a song two thumbs up in iTunes, you can assign an album—or each song in your collection—a rating of from one to five stars. Then you can use the ratings to produce playlists of nothing but the greatest hits on your hard drive.
First, a couple of notes: If you assign an album a rating, then all the songs on the album get the same number of stars. If you rate just a few tracks on an album, the album’s rating reflects the average of the rated songs—so an album with two five-star songs and a bunch of unrated tracks gets five stars.
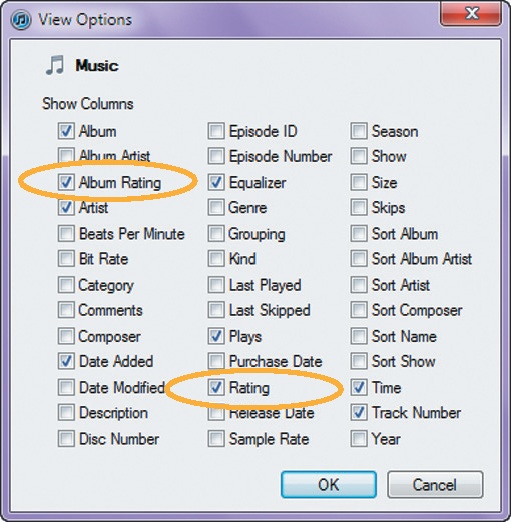
To add ratings, first make sure you turn on the Album Rating and/or Rating columns in iTunes’ View Options box (Ctrl+J [⌘-J]).
Highlight the song you want to rate by clicking it. iTunes displays five dots in the Rating column (in the iTunes main window). When you click a dot, iTunes turns it into a star. Now either drag your mouse across the column to create one to five stars, or click one of the dots itself to apply a rating (click the third dot, for example, and iTunes gives the song three stars).
Once you assign ratings, you can sort your song list by star rating (click the Album Rating or Rating column title), create a Smart Playlist of only your personal favorites (File→New Smart Playlist; choose Album Rating or Rating from the first drop-down menu), and so on.
You can even rate songs from within your iPod, and iTunes records the ratings the next time you sync up.
To rate a song on your iPod Classic, start playing it and tap the Select button a few times until you see dots onscreen. Use the scroll wheel to transform those dots into the number of stars you want to give the song. Your star ratings show up on the iPod’s Now Playing screen. To rate songs on the Touch, swipe the dots on the Now Playing screen (Explore the Now Playing Screen). On the Nano, tap the Now Playing art, tap ![]() , and then swipe the dots to convert them to stars.
, and then swipe the dots to convert them to stars.
Listen to Internet Radio
NOT SATISFIED WITH BEING a mere virtual jukebox, iTunes also serves as an international radio—without the shortwave static. You can tune in everything from mystical Celtic melodies to Zambian hip-hop. Computers with high-speed Internet connections have a smoother streaming experience, but the vast and eclectic mix of music is well worth checking out—even with a dial-up modem. Just click the Radio icon in iTunes’ Source list to see a list of stations.
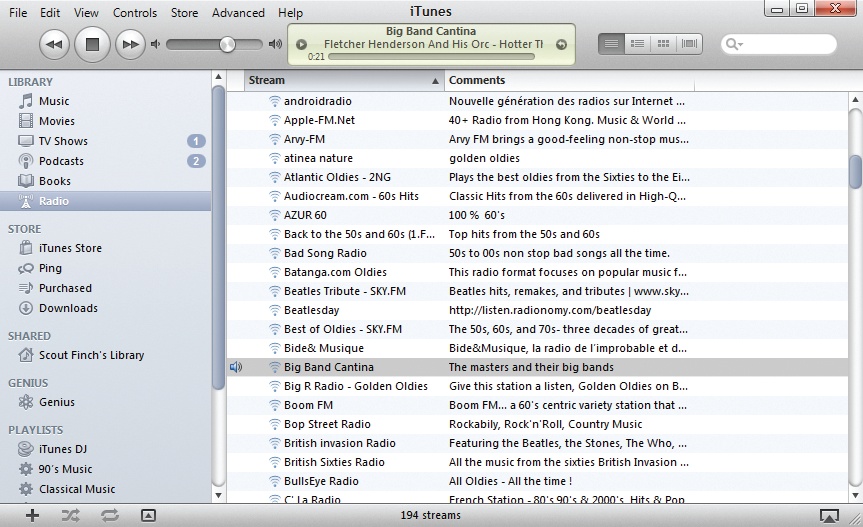
Stations are roughly organized by genre like Blues, Classical, and Country. Click a genre to see its list of stations. Beyond these broad groupings are specialized categories, like College/University, Sports Radio, and Golden Oldies, which includes a channel devoted to nothing but big-band music. There’s even a station called Bad Song Radio that promises “nonstop bad songs all the time.”
Once you listen to all the stations listed in iTunes, hit the Internet. You can find more radio stations at www.shoutcast.com. Windows 7 and Mac OS x users can play them through iTunes by clicking the yellow Tune In button. (If this is your first time at Shoutcast, a prompt asks how you want to hear the stream—click the button for iTunes.) xP users, save the offered .pls file to your desktop and then drag and drop it on Playlists. Click the resulting “tunein-station” playlist.
Tip
Radio stations do a great job of making song volumes consistent from song to song—and you can do the same with iTunes. Open the Preferences box (Ctrl+comma [⌘-comma]). Click the Playback icon or tab, and turn on the box for Sound Check. You also need to turn on Sound Check on your iPod. On the Classic, choose Settings→Sound Check. On the iPod Touch or Nano, choose Settings→Music and then tap Sound Check “On.” The next time you connect your iPod to your computer, iTunes makes the necessary audio adjustments.
Share Your iTunes Music and Videos
NOW THAT YOU’VE BUILT a fabulous media collection, you may feel like sharing it. You can, under one condition: Your fellow sharers need to be on the same computer network. For instance, family members on your home network: kosher. Cousin Ferdinand, living in another state: not kosher.
The power to share music—that is, stream it between computers—has been with iTunes for years. But iTunes’ Home Sharing feature, introduced way back in iTunes 9, lets you do more than just stream songs; you can actually copy music and videos from one computer to another.
Sounds great, doesn’t it? Home Sharing does have its limits, though. For starters, you can share content among only five computers. Each also needs the following:
A connection to the same (wired or wireless) network.
A copy of iTunes 9 or later installed.
The name and password of a single iTunes Store account or App Store account (see Chapter 7 if you need one).
Once you have all these things in hand, it’s time to share:
In the iTunes Source list, click the Home Sharing icon. (If you don’t see the cute little house-shaped graphic, choose Advanced→Turn On Home Sharing. If you get told to authorize the computer for that iTunes account, choose Store→Authorize Computer.) On the screen that appears, type in an iTunes account name and password.
Click the Create Home Share button.
Repeat these steps for every computer you want to share with on your network (up to four others).
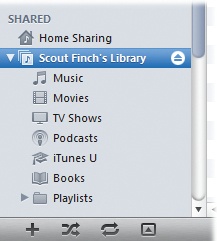
Once you set up all the computers, each of their iTunes libraries appears in everyone’s Source list. Click the triangle beside the icon for the library you want to explore. After iTunes hits the network, icons for that library’s contents appear in your own iTunes window. Click a shared Music icon and then double-click a song title in your iTunes window to hear it.
In addition to streaming audio files, you can stream videos, but their large size can make them skippy. This is where the power to copy files from one shared machine to another comes in handy.
Copy Files with Home Sharing
You can copy files between shared iTunes libraries two ways: manually or automatically. The manual method works well when you want to occasionally raid someone’s media collection for random albums or videos. But if everyone listens to the same audiobook or just has to have every new album that comes into the house, the automatic method saves time and effort.
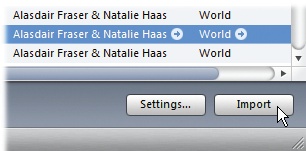
The manual method. In the shared library, select the title (or Ctrl-click [⌘-click] to select multiple titles) of the audio or video files you want to copy to your Windows PC or Mac. Click the Import button in iTunes’ bottom-right corner and wait as your selections pour into your own library. If, in the shared library, you want to see only the items that you don’t have, jump down to the Show pop-up menu at the bottom-left of the iTunes window and choose “Items not in my library.”
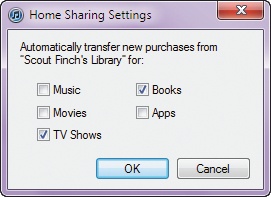
The automatic method. With the shared library onscreen, click the Settings button at the bottom-right of the iTunes window. Turn on the checkboxes next to the types of content, like music, that you want to automatically Hoover onto your own machine. Click OK.

But what if you don’t want to share everything in your library? Or if you want to password-protect your stuff from siblings or other annoyances? That’s where the Sharing preferences box comes to the rescue.
Call up the iTunes Preferences box (Ctrl+comma [⌘-comma]) and then click the Sharing tab. Turn on “Share my library on my local network.” You can choose to share your entire collection or selected playlists. (You can also tell your computer to look for other people’s music here.)
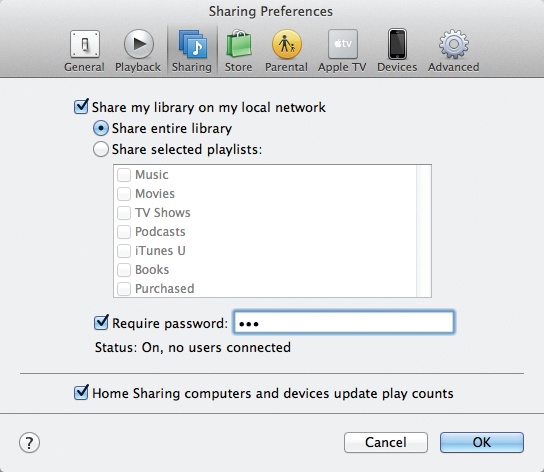
To secure your library, turn on the checkbox for “Require password” and give your cypher to trusted network buddies. If they lock up their media, you’ll need their passwords, too. Finally, click the General tab in this same preferences box. The name you type in the Library Name box will show up in your friends’ iTunes Source lists.
Use iTunes In the Cloud
IT’S EASY TO BUY digital goods from the iTunes Store, but how do you easily get the stuff you buy on one gadget onto all your computers and iOS devices if you’re not home to use Home Sharing (Share Your iTunes Music and Videos)? That’s where Apple’s confusingly named service iTunes In the Cloud comes in. It acts an online record-keeper for all the apps, music, and books you buy (and TV Shows, if you’re downloading to a Windows PC or Mac). Once you buy something from the Store, iTunes in the Cloud knows it and can download copies to all the computers and devices that use the same Apple ID. As with many things in the Appleverse (as well as automobiles), you have two ways to copy files across devices: automatic and manual. Here’s how to do either:
Automatically download purchases. To have iTunes on your computer automatically download to your iPod Touch a copy of the music, apps, and books you buy on other devices, choose Edit [iTunes]→Preferences→Store. Under Automatic Downloads, turn on the checkboxes next to Music, Apps, and/or Books; you need to manually download TV shows, which is described next. Click OK.
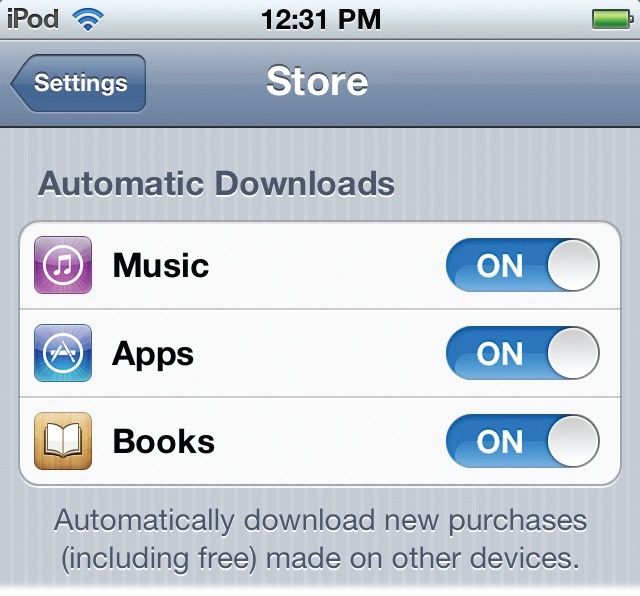
To make your iPod Touch reach out and grab stuff you bought through iTunes on your computer, go to the iPod’s Home screen and tap Settings→Store. Sign into your iTunes account and tap the On button next to Music, Apps, and/or Books to snag each type of file.
Manually download purchases. If you just want certain things from your Store purchases, you can download what you want when you want it. On your computer, click the Store link in the iTunes Source list and log into your account. In the Quick Links panel, click the Purchased link. On the next screen, you can see the music, TV shows, apps, and books you bought; click the All button to see everything, or the “Not in My Library” button to see items your computer lacks. Click an item’s title and then click the Cloud icon to download it.
To get selective on the Touch, tap iTunes open from the Home screen and then tap the Purchased icon at the bottom of the Store screen. Tap All to see everything you’ve ever bought, or “Not on this iPod” to see a list of the things missing from your player. Tap the Cloud icon and type in your iTunes Store name and password to download the stuff to your ‘Pod.
Use iTunes Match
YOU MAY BE SAYING to yourself, “Well, this iTunes In the Cloud thing is great in case my hard drive dies, but I didn’t buy everything in my library from the iTunes Store. What about all the tracks I ripped from my CD collection?”
You have two options here. First, you can back up your computer (and iTunes library with it) to an external drive or set of discs with free software, like Windows’ Backup utility or Apple’s Time Machine for Mac OS x (Back Up Your iTunes Files). Second, for $25 a year, you can use Apple’s iTunes Match subscription service. iTunes Match safely stores any song in your music library on Apple’s iCloud servers. You can download a copy to any of your iOS devices and computers (up to 10 total, and five of them can be authorized with the same Apple ID) so your library is always with you.
For home-ripped tracks that the iTunes Store also sells (it has 20 million songs), iTunes Match adds new Store copies to your iCloud account. For more obscure tracks, ones that the Store doesn’t sell, iTunes Match uploads a copy of each rare gem from your computer to iCloud (and yes, that means Apple is wading around in your personal music files).
To use iTunes Match, you need an Apple ID (Set Up an iTunes Store Account), an Internet connection, and an iPod Touch, iPad, or iPhone running iOS 5. Then there’s the money part—you also need a credit card to pay $24.99 a year for an iTunes Match subscription, which covers up to 25,000 songs. And finally, you need some time while iTunes Match uploads your rare tracks to iCloud.
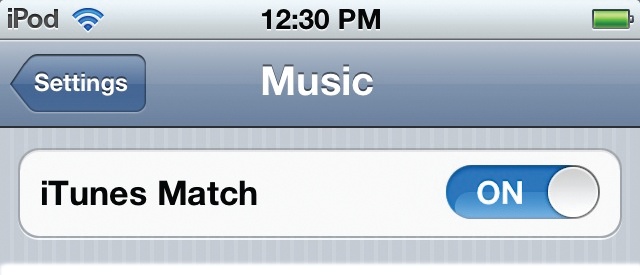
To sign up for iTunes Match, open iTunes on the computer, choose Store→Turn On iTunes Match, and then click the Subscribe button. After you sign up, your music and playlists are added to your big giant iCloud library, including any tracks that iTunes had to upload.
Now you need to get your iPod into the mix. Tap Settings→Music. Flip on iTunes Match; it nags you if you haven’t signed up for a subscription yet. And while this initially removes all the songs from your Touch, you can grab them again by tapping the Cloud icon and downloading at will. To see the tracks you’ve already downloaded, along with tracks you can download, tap Settings→Music→Show All Music→On.
The iTunes Match deal is not without its drawbacks. For one, you’re on the hook for $25 a year to rent your online music locker. The service also disables the Genius Playlists and Mixes on the iPod Touch, which may bum you out. But hey, you’ve got all your music—right up there in the Cloud, whenever you need it.
Change a Song’s File Format
SOMETIMES YOU’VE GOT A song in iTunes whose format you want to change—you might need to convert an AIFF file before loading it onto your iPod Shuffle, for example. First, head over to Edit→Preferences (iTunes→Preferences), click the General tab, and then click the Import Settings button. From the Import Using pop-up menu, pick the format you want to convert to and then click OK.
Now, in your iTunes library, select the song you want to convert and choose Advanced→Create MP3 Version (or AIFF, or whatever format you just picked).
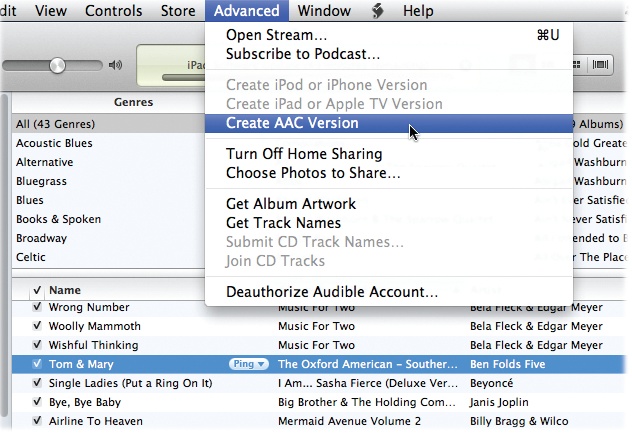
If you have a whole folder or disk full of potential converts, hold down the Shift (Option) key as you choose Advanced→Convert to AAC (or your chosen encoding format). A window pops up, which you can use to navigate to the folder or disk holding the files you want to convert. The only files that don’t get converted are protected ones: Audible.com tracks and older tracks from the iTunes Store that still have copy protection built in. If you bought a song after January 2009, though, odds are you have a high-quality iTunes Plus track (see Usage Rights: What You Can Do with Your Purchases) that’s delightfully free of such restrictions.
The song or songs in the original format, as well as the freshly converted tracks, now reside in your library.
Tip
Although you have intentionally created a duplicate of a song here, you may have other unintended dupes from home sharing, ripping the same album twice, or other accidental copying. To find these duplicates—and recover a little hard drive space—choose File→Display Duplicates. iTunes dutifully rounds up all the dupes in one window for you to inspect and possibly delete. Just make sure they are true duplicates, not, say, a studio and a live version of the same song. (To search for exact duplicates, hold down the Shift [Option] key and choose File→Display Exact Duplicates.) Click the Show All button to return the window to your full collection.
Set Up Multiple iTunes Libraries
THERE’S HOME SHARING AND then there’s home, sharing. Many families have just one computer. If everyone uses the same copy of iTunes, you soon hear the Wiggles bumping up against the Wu-Tang Clan if you shuffle your music tracks or when you autosync multiple iPods. Wouldn’t it be great if everyone had a personal iTunes library to have and to hold, to sync and to shuffle—separately? Absolutely.
To use multiple iTunes libraries, follow these steps:
Quit iTunes.
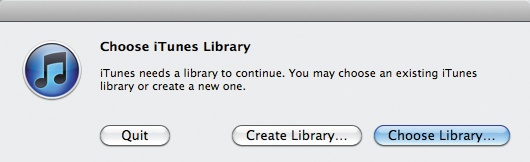
Hold down the Shift (Option) key on your Windows PC or Mac keyboard and launch iTunes. In the box that pops up, click Create Library. Give it a name, like “Tiffany’s Music” or “Songs My Wife Hates.”
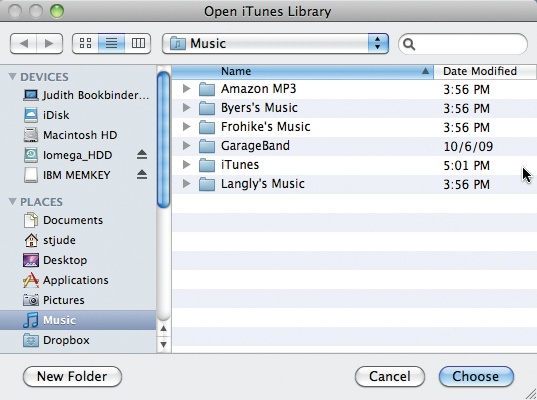
iTunes opens up, but with an empty library. If you have a bunch of music or videos in your main library that you want to copy over to this one, choose File→Add to Library.
Navigate to the files you want and add them. If the songs are in your original library, they’re probably in Music→iTunes→iTunes Media→Music (Home→Music→iTunes→iTunes Media→Music), in folders sorted by artist name; videos are in TV Shows or Movies. Choose the files you want to add.
To switch among libraries, hold down the Shift (Option) key when you start iTunes, and you’ll get a box that lets you pick the library you want. (If you don’t choose a library, iTunes opens the last one used.) Tracks you copy go into whatever library you have currently open. And now that you have those files in that library, you can switch back to the other library and get rid of them there if you want.
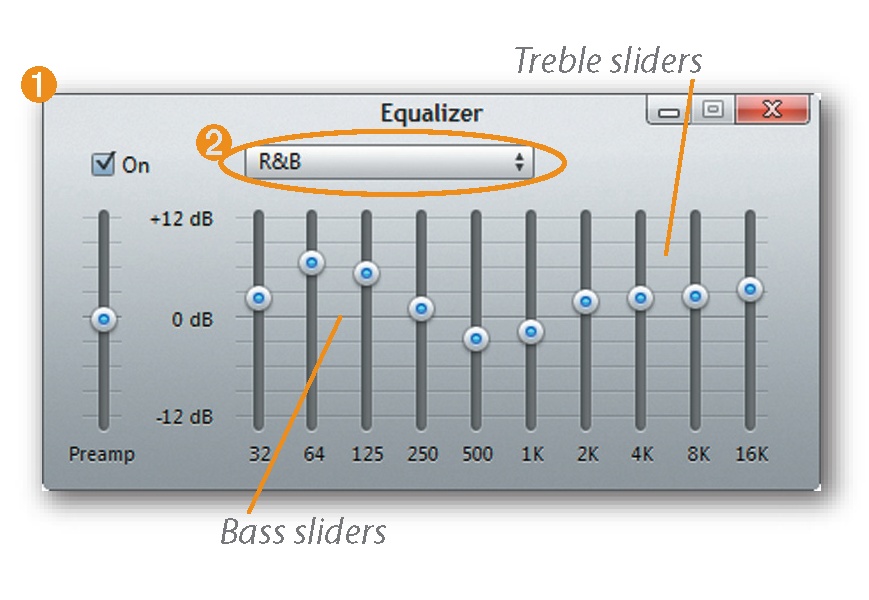
Improve Your Tunes with the Graphic Equalizer
IF YOU’D LIKE TO improve the way your songs sound, you can use iTunes’ graphic equalizer (EQ) to adjust various frequencies in certain types of music. You might want to boost the bass tones in dance tracks to emphasize the booming rhythm, for example.
To get the equalizer front and center, choose View (Window)→Equalizer to unleash some of your new EQ powers.
Drag the sliders (bass on the left, treble on the right) to accommodate your listening tastes (or the strengths and weaknesses of your speakers or headphones). You can drag the Preamp slider up or down to compensate for songs that sound too loud or too soft. To create your own presets, click the pop-up menu and select Make Preset.
Use the pop-up menu to choose one of the canned presets for different types of music (Classical, Dance, Jazz, and so on).
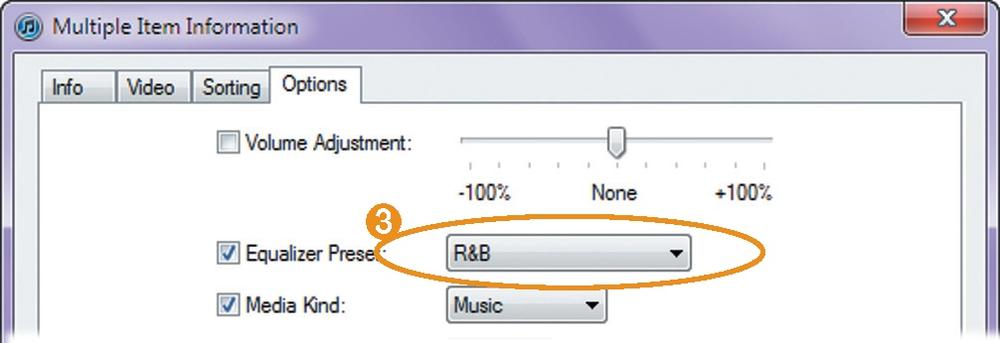
You can apply equalizer settings to an entire album or to individual songs.
To apply settings to a whole album, select the album’s name (either in Grid view or in the iTunes browser pane). Then press Ctrl+I (⌘-I) and click Yes if iTunes asks whether you’re sure you want to edit multiple items. In the box that pops up, click the Options tab and choose your preferred setting from the Equalizer Preset pull-down menu.
Note
Equalization is the art of adjusting the frequency response of an audio signal. An equalizer emphasizes, or boosts, some of the signal’s frequencies while lowering others. In the range of audible sound, bass frequency is the low rumbly noise; treble is at the opposite end of the sound spectrum, with high, even shrill, notes; and midrange is, of course, in the middle, and it’s the most audible to human ears.
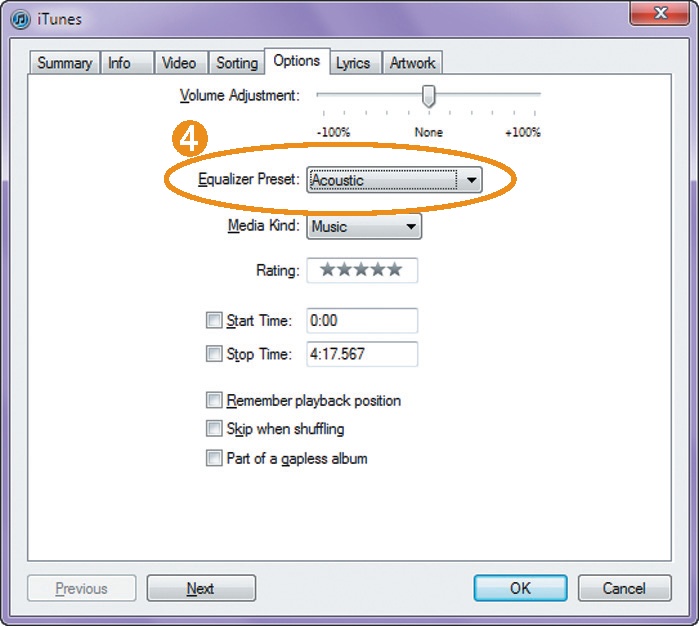
You can apply equalizer presets to individual songs as well. Instead of selecting the album name in the iTunes window, click the song name, and then press Ctrl+I (⌘+I). Click the Options tab and choose a setting from the Equalizer Preset menu.
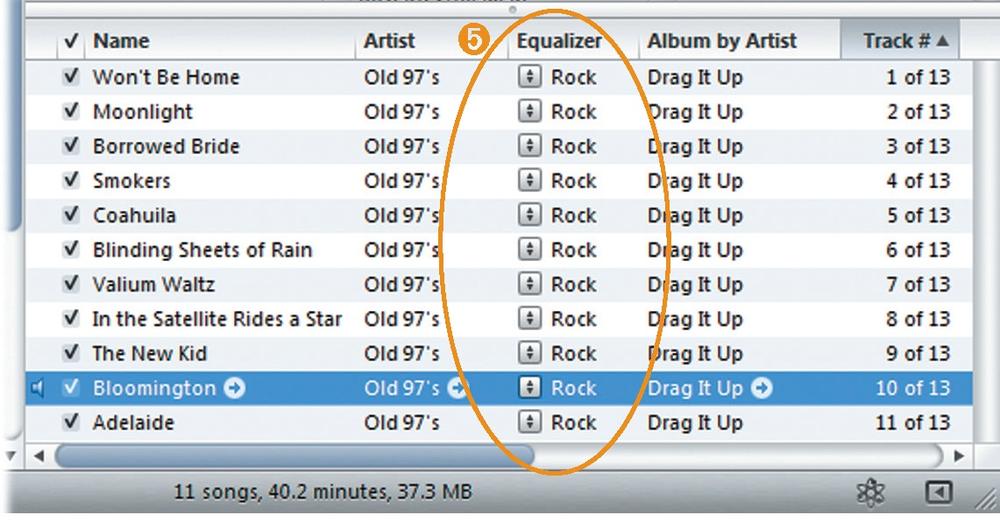
Finally, you can change the EQ settings right from your song lists by adding an Equalizer column. Choose View→View Options and turn on the Equalizer checkbox. A new column appears in your track lists, where you can select EQ settings.
Tip
The iPod itself has more than 20 equalizer presets you can use on the go. To set your iPod Touch’s equalizer, choose Settings→Music→EQ. Flick down the list of presets until you find one that matches your music style, and then tap it. Your iPod now lists the preset’s name next to EQ on the Settings menu. The process works pretty much the same way on the other iPods. You can tap your way into the Nano’s EQ controls by going to the Home screen and choosing Settings→Music→EQ. The iPod Classic’s EQ menu is at iPod→Settings→EQ.
Change a Song’s Start and Stop Times
GOT A SONG WITH a bunch of onstage chit-chat before it starts, or after the music ends? Fortunately, you can change a song’s start and stop times to skip the boring parts and hear only the juicy middle.
To change a track’s stop time, play the song and observe the status window at the top of iTunes. Watch for the point in the timeline where you get bored. Then:
Click the track you want to adjust.
Choose File→Get Info (Ctrl+I [⌘-I]) to call up the song’s information box.
Click the Options tab and take a look at the Stop Time box, which shows the full duration of the song.
Enter the new stopping point for the song, the one you noted earlier.
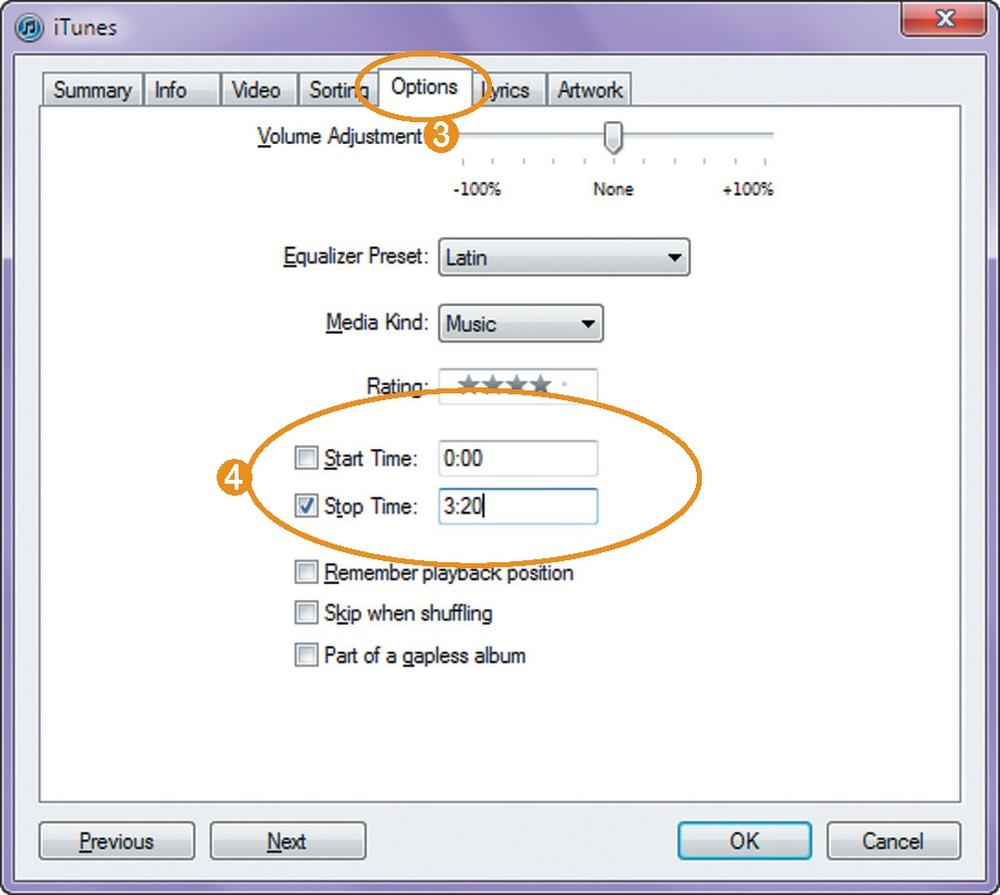
You can perform the same trick at the beginning of a song by adjusting the number in the Start Time box. The shortened version plays in iTunes and on your iPod, but the additional recorded material isn’t really lost. If you ever change your mind, go back to the song’s Options box and turn off the Start Time or Stop Time checkbox to return the song to its original length.
Edit Song Information
TIRED OF ITUNES NAMING so many songs “Untitled”? You can change song titles in iTunes—to enter a song’s real name, for example, or to fix a typo—in a couple of ways.
In the song list, click the text you want to change, wait a moment, and then click again. The title now appears highlighted, and you can edit the text—just as you do when you change a file name on a desktop computer.
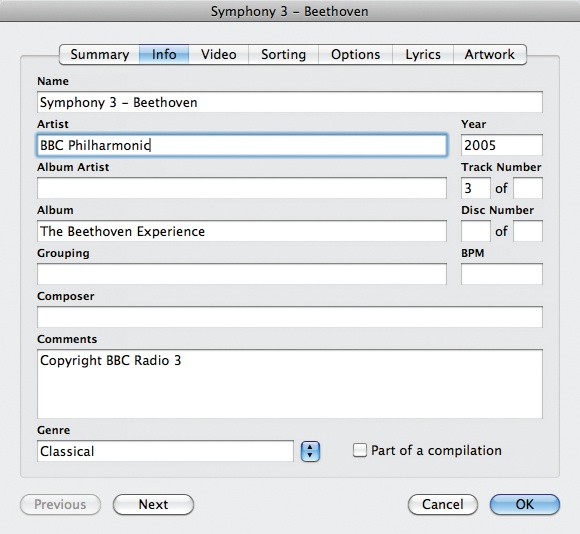
Another way to change a song’s title, artist name, or other information is to click the song in the iTunes window and press Ctrl+I (⌘-I) to summon the Get Info box. (Choose File→Get Info if you forget the keyboard shortcut.) Click the Info tab and then type in the new track information.
Too much work? Try Advanced→Get CD Track Names to hunt down titles from the Internet, though if the track is something deeply obscure or homemade, the Gracenote database that iTunes uses may not know the name, either.
Tip
Once you’ve got a song’s Get Info box onscreen, use the Previous and Next buttons to navigate to other tracks grouped with it in the iTunes song list. That way, you can rapidly edit all the track information in the same playlist, on the same album, and so on, without closing and opening boxes the whole time.
Edit Album Information
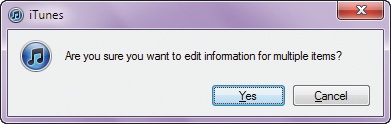
YOU DON’T HAVE TO adjust your track information on a song-by-song basis. You can edit an entire album’s worth of tracks simultaneously by clicking the album name in the iTunes column browser (or by clicking its cover in Grid view) and pressing Ctrl+I (⌘-I) to bring up the Get Info box.
Ever careful, iTunes flashes an alert box asking if you really want to change the info for a bunch of things at once. Click Yes.
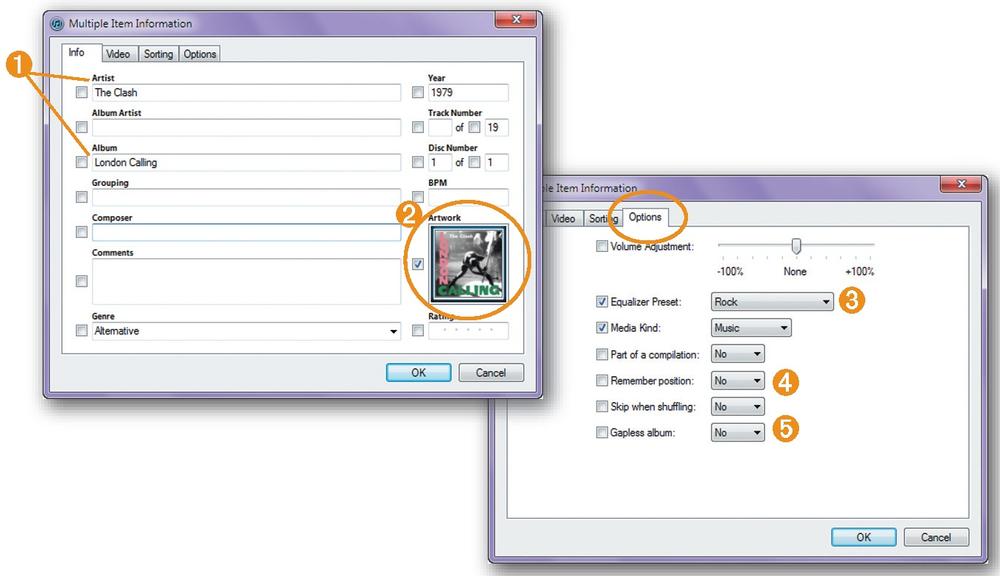
You can make all sorts of changes to an album in the four-tabbed box that pops up. Here are a few examples:
Fix a typo or mistake in the Album or Artist name boxes.
Manually add an album cover or photo of your choice to the whole album by dragging it into the Artwork box.
Click the Options tab and change the equalizer preset for all the songs. Right below that, use the Media Kind menu to change a mislabeled Music file to, say, Audiobook for proper sorting (see The iTunes Window: An Introduction).
Have iTunes skip the album when you shuffle music—great for keeping winter holiday music out of your summer barbecue album rotation.
Tell iTunes to play back the album without those two-second gaps between tracks by choosing “Gapless album” (perfect for opera and Abbey Road!).
Fetch Missing Album Covers
SONGS YOU DOWNLOAD FROM the iTunes Store often include artwork—usually a picture of the album cover. iTunes displays the picture in the lower-left corner of its main window (you may need to click the Show Artwork icon at the lower left). Covers also appear in the Album List, Grid, and Cover Flow views. But even if you rip most of your music from your own CD collection, you’re not stuck with artless tracks. You can ask iTunes to head to the Internet and find as many album covers as it can.

You need a (free) iTunes Store account to make this work, so if you haven’t signed up yet, flip ahead to Chapter 7 to learn how. To make iTunes go fetch, choose Advanced→Get Album Artwork. Since Apple has to root around in your library to figure out which covers you need, you get an alert box warning you that the company will be getting (and then dumping) personal information from you (but it’s not laughing at your Bay City Rollers tracks).
If you have a huge library, this may take a little while, so make yourself a sandwich while iTunes gets to work. When it finishes, you should have a healthy dose of album art whizzing by in Cover Flow view or filling up the grid in the middle of the iTunes window.
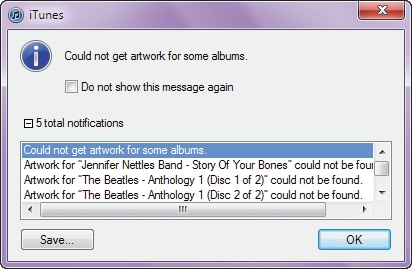
If iTunes can’t find certain album covers on its own, it displays a list of the missing artwork. You can use this helpful accounting to hunt for and place the art yourself, as described next.
Replace Album Covers Manually
DESPITE ITS BEST INTENTIONS, sometimes iTunes can’t find an album cover (or retrieves the wrong one). If that happens, take matters into your own hands by manually adding your own album artwork—or a photo of your choice. If Pachelbel’s Canon in D makes you think of puppies, you can have baby dachshunds appear in iTunes every time you play that song.
To add your own art to a song, pick a photo or image—JPEG files are the most common.
If you found the cover on Amazon (hint: a great source!), save a copy of it by dragging it off the web page and onto your desktop or by right-clicking (Ctrl-clicking) it and choosing the “Save Image” option in your web browser.
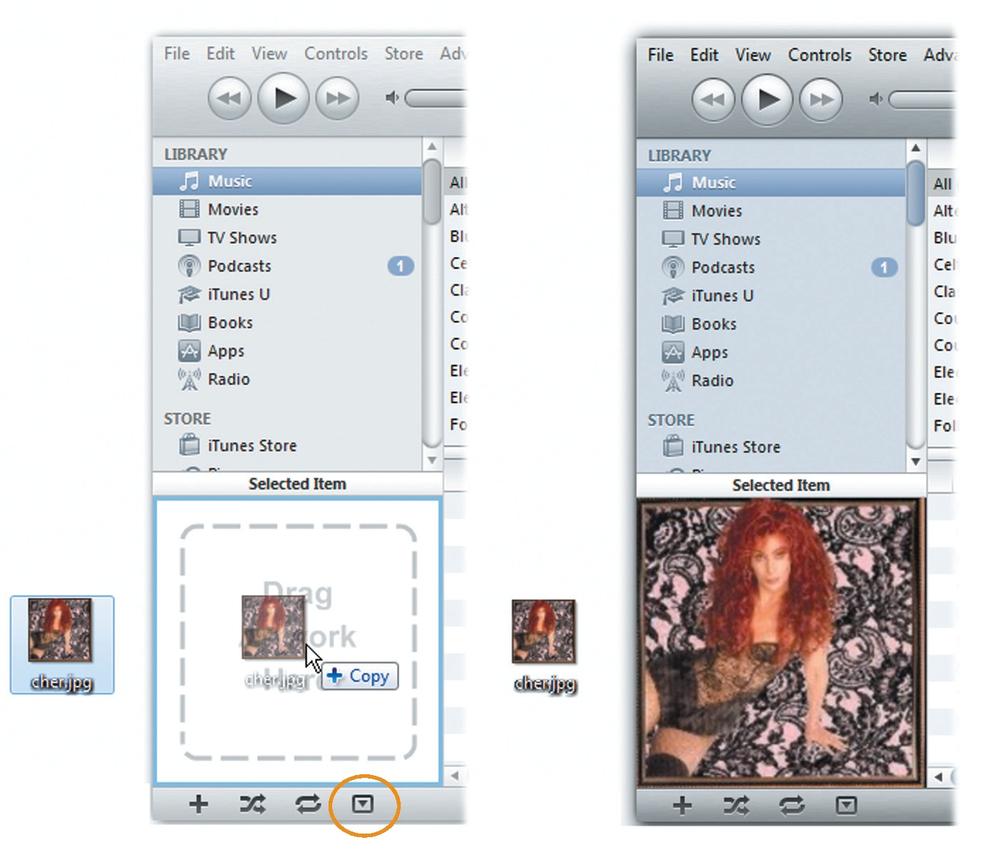
With your image near the iTunes window, select the song and click the Show Artwork button in the bottom-left corner of the iTunes window.
Drag the image into the iTunes Artwork pane to add it to the song file.
Find and Add Lyrics to Your Song Files
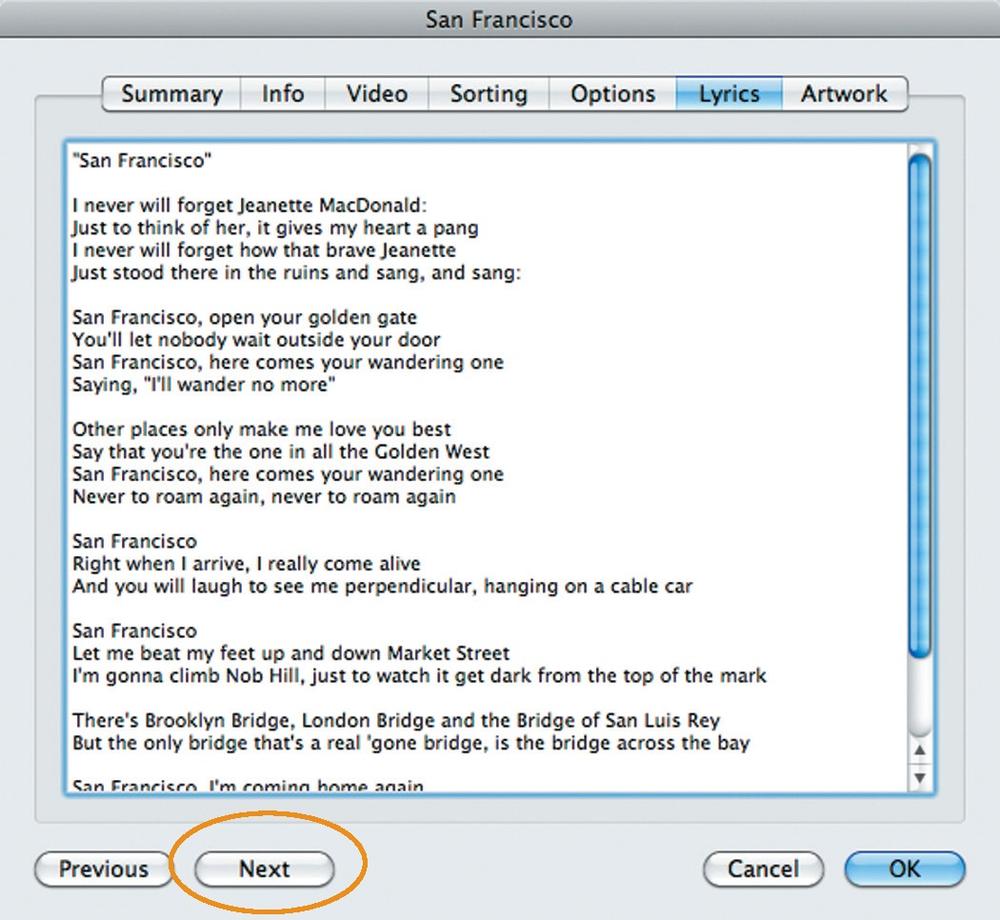
YOU CAN SAVE LYRICS with a song file just as you do album art. To add lyrics, select a song in iTunes and press Ctrl+I (⌘-I) to call up the Get Info box. Then click the Lyrics tab.
Here, you can either meticulously type in a song’s verses or look them up on one of the hundreds of websites devoted to cataloging them. Once you find your words, getting them into iTunes is a mere cut ‘n’ paste job away. If you want to add lyrics to all the songs on an album, or to several songs on the same playlist, click the Next button (circled). That advances you to the next song, thereby saving you repeated keystrokes invoking the Get Info command.
View Lyrics on the iPod
NOW THAT YOU’VE SPENT all that time grooming your song files and adding lyrics, wouldn’t it be great if you could take the fruits of your labor with you? The good news is, you can—all the info in an iTunes song file transfers over when you sync your iPod (except, of course, in the case of iPod Shuffles, which lack the whole screen thing needed to view images and text).
When you’re out strolling with your iPod Classic and have a song playing, press the center button to cycle through all the information about the song. After four or five taps, the lyrics appear on the iPod’s screen, making it a handheld karaoke machine you can sing along with as you go down the street. Got an iPod Touch? Just tap the album cover to see the lyrics. On the Nano, tap Now Playing on the Home screen and then tap the album art to make the song controls appear. Swipe to the left until you see your lyrics.

What iTunes Can Tell You About Your iPod
ITUNES NOT ONLY LETS you decide which songs and videos end up on your iPod, it also helps keep your iPod’s own internal software up to date, see how much space you have left on your player, and change your music, video, and podcast synchronization options.
When you connect your iPod to your computer, it shows up in the iTunes Source list (under Devices). Click the iPod icon to see all your options. Each tab at the top of the screen lets you control a different kind of content, like music or photos.
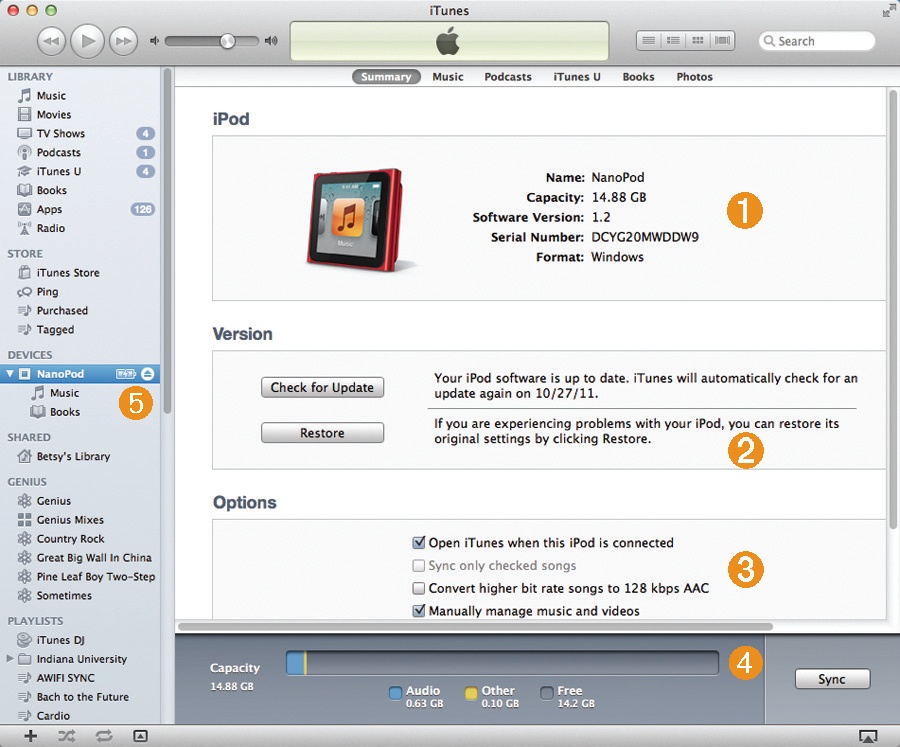
On the Summary screen (first tab), iTunes tells you:
The size of your iPod, its serial number, and whether it’s formatted for Windows or the Mac.
Whether your iPod has the latest software (and if you’re having problems, you get the chance to reinstall it).
Whether iTunes automatically synchronizes your iPod or whether you need to update its contents manually. (Automatic means everything in iTunes ends up on your iPod—space permitting, of course; manual means you get to pick and choose.) If you have a Touch, Nano, or Shuffle, you can turn on VoiceOver prompts to hear your iPod identify things like song titles, menu names, and so on. If you have an iPod Touch, a Backup section for iCloud or iTunes is displayed right above the Options area on the Summary screen.
The bar at the bottom of the window uses color to identify the different media types filling up your iPod. Click the bar to see the information displayed in number of items, the amount of drive space used, or the number of days’ worth of a particular type of media.
Click the flippy triangle next to the iPod in the Source list to see its contents, like your music, audiobooks, and any playlists you’ve made.
Adjust Your iPod’s Syncing Preferences with iTunes
ONCE YOUR IPOD IS connected and showing up in iTunes, you can modify all the settings that control what goes onto (and comes off of) your media player. Thanks to iTunes’ long, scrollable screen full of checkboxes and lists in most categories, it’s easier than ever to get precisely what you want on your ‘Pod.
So where do you start? See those tabs all in a row toward the top of iTunes? Click each one to see the preferences for that type of media. (The tabs vary slightly depending on the type of iPod you have; the Touch even has a Ringtones tab for your Skype phone calls.) Here’s what you’ll find there:
Summary. Key iPod hardware info here: drive capacity, serial number, and software version (and a button to update the software when Apple releases a new version). The Options area lets you choose syncing preferences and whether you want to turn your iPod into a portable data drive for carrying around big files.
Apps. Here’s where you sync all those wonderful little programs you downloaded from the App Store to your computer and then to your iPod Touch.
Music. Click this tab to synchronize all your songs and playlists—or just the ones you like best. Keep scrolling down—you can sync by artist and genre as well.
Movies. Full-length movies can take up to a gigabyte or more of precious ‘Pod space, so iTunes gives you the option to load all, selected, or even just unwatched films.
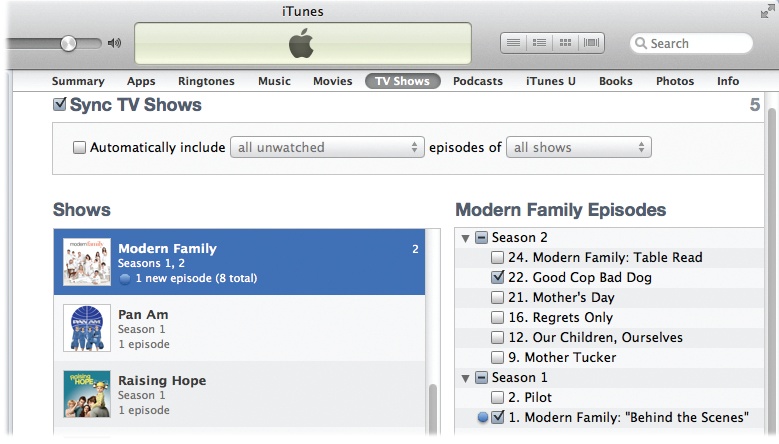
TV Shows. As with movies, you can selectively choose which TV shows (or episodes thereof) you bring along on your iPod.
Podcasts. Your pal iTunes can automatically download the podcasts you’ve subscribed to through the iTunes Store (see Chapter 7); here, you can decide which ones you want to listen to on the go.
iTunes U. Over the years, the iPod has found a place as a learning tool in the Groves of Academe. But you don’t need to be a registered student at any of the major universities to take advantage of the free audio lectures and video presentations in the iTunes U section of the Store. You download the content here, and then sync up your ‘Pod.
Books. This literary tab lets you selectively sync up your audiobooks and your Touch’s electronic iBooks files.
Photos. The Touch, Nano, and Classic can all display little copies of your digital photos. Click this tab to select where you want iTunes to look for them (like in an iPhoto or Photoshop Elements folder) and which photo albums you want to bring with you.
Info. It’s not just an all-purpose media player! The iPod Classic and Touch are happy to carry copies of all the addresses and phone numbers listed in your computer’s address book (from Microsoft Outlook, the Mac OS x Address Book, and other programs). Scroll down the screen until you find an option to grab Outlook or iCal calendars. On the Touch, you can sync up web browser bookmarks and email account settings from your computer, too. If you have a free iCloud account (Set Up an iCloud Account), you can add the Touch to your collection of über-synced computers and iPhones to keep your info current across all your Internet-connected hardware.
Nike + iPod. If you’re using the Nano’s pedometer feature or the Nike + iPod app on your Nano or Touch, you can set the device to upload your workout results to the www.nikeplus.com website so you can track your fitness progress online.
Note
The iPod Touch, Nano, Shuffle, and iTunes have features for the visually impaired to navigate audio content by verbal cues instead of onscreen menus. On the Touch’s Summary screen in iTunes, click the Configure Universal Access button, and then click the button to enable VoiceOver. On the Touch itself, you can turn the feature on or off at Settings→General→Accessibility. On the Nano, tap Settings→General→Accessibility, choose your speech options, and then tap VoiceOver to On. For the Shuffle, connect it to iTunes and turn on the checkbox next to Enable VoiceOver on the Summary screen. Using VoiceOver does change the way you control the iPod (especially the Touch), so be sure to read up on the feature at www.apple.com/accessibility/.
Load Songs onto an iPod from More Than One Computer
ITUNES’ AUTOSYNC FEATURE MAKES keeping your iPod up to date a breeze, but there’s a big catch: You can sync your iPod with only one computer. Lots of people have music scattered around multiple machines: a couple of different family Macs, an office PC and a home PC, and so on. If you want to load up your music from each of these sources, you have to change your iPod settings to manual management. That’s easy to do. Just connect your iPod to iTunes, select it in the Source list, and then click the Summary tab in iTunes. Then:
Scroll down to the Options area and turn on the checkbox next to “Manually manage music and videos.” Click the Apply button in the bottom-right corner of iTunes to cement the change.
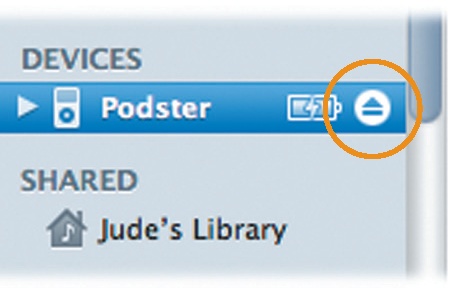
Don’t forget to manually eject your iPod from iTunes when you want to safely remove it from your computer. (Manual updates give you total control, but as Uncle Ben said in Spider-Man, “With great power comes great responsibility.”) Eject the iPod by either clicking the Eject button next to the iPod’s name in the iTunes Source list or by pressing Ctrl+E (⌘-E) to properly free the player from the computer.

Tip
Your iPod’s Summary screen (in iTunes) shows whether your iPod is formatted for Windows or a Mac. If you have a new iPod and want to use it with both a PC and a Mac, connect it to the PC first and have iTunes format it for Windows. A Mac can read the Windows format just fine, but Windows won’t recognize the Mac format without special software. The iPod Touch, however, will talk to either type of computer, no matter which one you use it with first.
Manually Delete Music and Videos from Your iPod
PEOPLE WHO CHOOSE TO autosync their iPods don’t have to worry about taking stuff off of their players. They can choose which playlists and media to automatically copy over to their iPods—or they can just delete unwanted items out of iTunes and resync their ‘Pods to wipe the same files off the player.
But if you’re a manual manager, you have to delete unwanted files yourself. (You can, however, have iTunes automatically update your podcast subscriptions; see Chapter 7 for more about podcasts.)
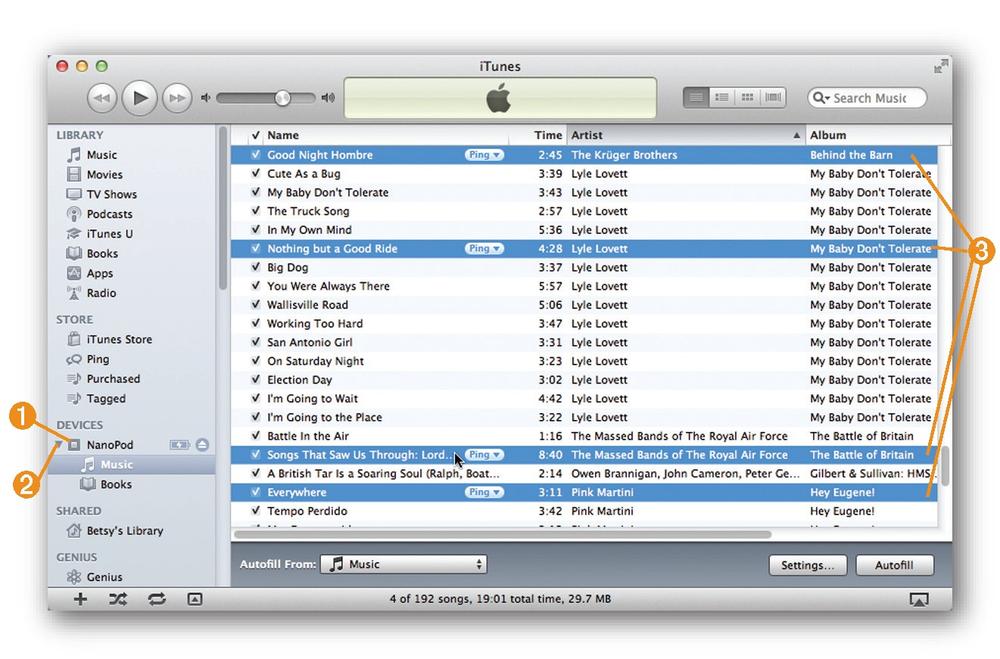
To delete files from your iPod, connect it to your computer and click the iPod icon in iTunes’ Source list.
Click the flippy triangle next to the iPod icon to get to the media library you want to clean up. To delete songs, for example, click the Music icon.
In the list that appears on the right side of iTunes, select the unwanted track. If you have a bunch of items you want to clear off your iPod in one fell swoop, Ctrl-click (⌘-click) to select multiple tracks. With the tracks selected, press the Delete key on the keyboard, and then confirm your choice in the iTunes alert box that appears. This removes the files from your iPod but doesn’t whack them out of the iTunes library, where you can always reload them if you find you miss those songs after all.
Copy Your Music from iPod to iTunes
TO PREVENT RAMPANT PIRACY across the seven seas of Musicdom, Apple originally designed the data transfer between iTunes and the iPod as a one-way trip—you could copy music to a connected iPod, but not from an iPod to your computer. This is still pretty much Apple’s way, although you can now copy iTunes Store purchases from your iPod to iTunes; Chapter 7 has the details.
But there are times when perfectly honest people need to get their songs off of their iPods—like when your computer dies and takes your iTunes library with it.
The Web is full of tips and tricks for harvesting content off of an iPod and getting it back into iTunes, often by fiddling with system settings in Windows or Mac OS x. These methods can vary based on which iPod and which version of an operating system you have. Thankfully, there’s also The Shareware Option. Several helpful folks have developed free or inexpensive programs to copy content from your iPod to your computer:
TouchCopy. The program costs $25, but it works with Windows PCs and Mac OS x—and on all iPod models (www.wideanglesoftware.com/touchcopy).
YamiPod. A free program that runs off of the iPod itself and exports music back to Windows, Mac, and Linux systems (www.yamipod.com).
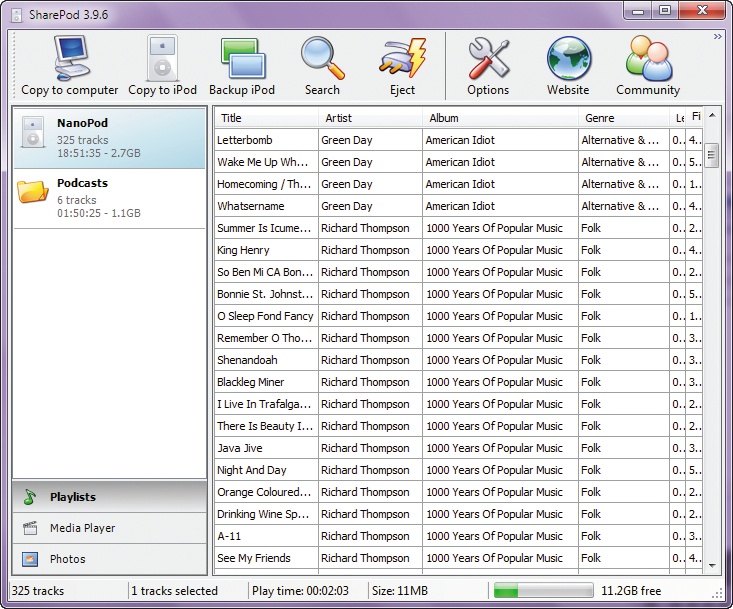
SharePod. This freeware program for Windows, pictured at right, can copy music and videos back to your PC and also edit playlists, artwork, and song tags (labels) (www.getsharepod.com).
Senuti. The name makes sense when you realize it’s iTunes spelled backward. Senuti is a $19 shareware program for the Mac that lets you copy all (or just some) of the music on your iPod back to iTunes (www.fadingred.org/senuti).
Move Your iTunes Media Folder to an External Drive
MEDIA LIBRARIES GROW LARGE, and hard drives can seem to shrink as you add thousands of songs and hundreds of videos to iTunes. You may, in fact, think about using a big external drive for iTunes storage. That’s just dandy, but you need to make sure that iTunes knows what you intend to do.
If you rudely drag your iTunes Media (or Music) folder to a different place without telling iTunes, it thinks the songs and videos in your collection are gone. The next time you start the program, you’ll find a newly created, empty Media/ Music folder. (While iTunes remains empty but calm, you may be having heart palpitations as you picture your media collection vanishing in a puff of bytes.)
To move the Media/Music folder to a new drive, give iTunes a heads-up. Before you start, make sure iTunes has been putting all your songs and videos in the iTunes Media/Music folder by opening the Preferences box (Ctrl+comma [⌘-comma]) and confirming the folder location. Then:
Click the Advanced tab and turn on the checkbox next to “Keep iTunes Media folder organized.”
Click the Change button in the iTunes Media folder location area and navigate to the external hard drive.
Click the New Folder button in the window, type in a name for the iTunes library, and then click the Create button.
Back in the Change Media Folder Location box, click the Open button.
Click OK to close the iTunes Preferences box.
Choose File→Library→Organize Library and then check “Consolidate files.”

Ignore the ominous warnings (“This cannot be undone”) and let iTunes heave a complete copy of your iTunes folder to the external drive. Once you confirm that everything is in the new library, trash your old iTunes Media folder and empty the Recycle Bin or Trash to get all those gigs of hard drive space back.
Where iTunes Stores Your Files
BEHIND ITS STEELY SILVER-FRAMED window, iTunes has a very precise system for storing your music, movies, and everything else you add to it. Inside its own iTunes folder on your hard drive (which, unless you moved it, is in Music→iTunes [Home→Music→iTunes]), the program keeps all your files and song information. (If you’re running Windows Vista, then your iTunes folder is at User→<user name>→Music→iTunes, and Windows xP users can find it at My Documents→My Music→iTunes.)
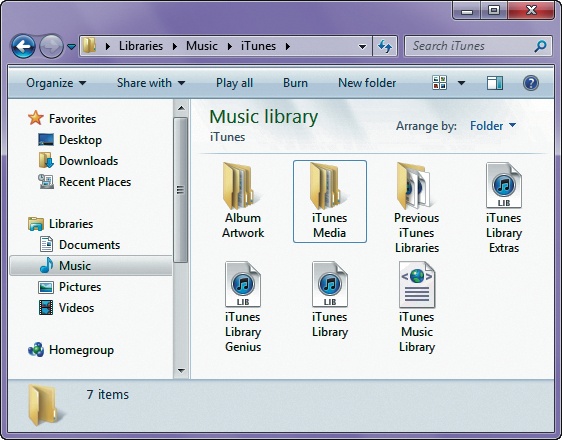
Your iTunes Library file, iTunes Library.itl (iTunes Library on Macs with old versions of iTunes), is a record of the names of all the songs, playlists, videos, and other content you added to iTunes. It sits inside the iTunes folder. Be very careful not to move or delete this file if you happen to be poking around in the iTunes folder. If iTunes can’t find it, it gives a little sigh and creates a new library—one that doesn’t have a record of all your songs and other media goodies.
But even if you do accidentally delete the Library file, your music is still on your computer—even if iTunes doesn’t know it. That’s because all the song files are actually stored in the iTunes Media folder (or Music folder; see the Tip below), which is also inside the main iTunes folder. You may lose your custom playlists if your Library file goes missing, but you can always add your music files back (File→Add to Library) to recreate your library.
Tip
Depending on whether you updated an older version of iTunes, your iTunes Media folder may actually be an iTunes Music folder. If you have a Media folder, iTunes neatly groups things like games, music, TV shows, movies, and other content in their own subfolders, making it much easier to find your downloaded episodes of Mad Men among all the song files. If you want to reorganize, media-style, choose File→Library→Organize Library and choose “Upgrade to iTunes Media organization.”
Back Up Your iTunes Files
IF YOUR HARD DRIVE dies and takes your whole iTunes folder with it, you could be in for a major media migraine, depending on your backup situation. You can easily recover music, apps, TV shows, and books you purchased from the iTunes Store now, thanks to iTunes In the Cloud (Use iTunes In the Cloud), but your hand-ripped tracks from your personal CD collection and music purchased from other online stores (Buy Songs from Other Music Stores) are gone unless you’re an iTunes Match subscriber (Use iTunes Match). But iTunes Match doesn’t upload copies of your video clips and full-length movies, so those may have just disappeared into the ether as well.
That’s why it’s important to back up the iTunes library—if not your whole computer—unless you’re one of those types who likes starting over from scratch.
If you just want to back up your iTunes collection to set of CDs or DVDs, fire up your disc-making program and burn a copy of your iTunes folder to the recordable platters. (The previous page explains how to find your iTunes folder and files.)
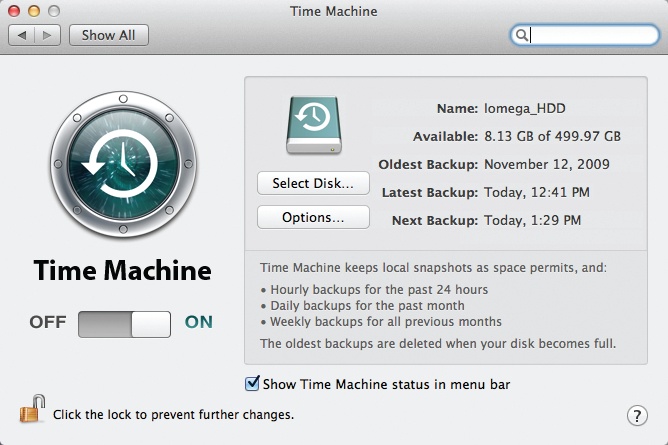
Use a dedicated program to back up your computer’s contents to an external hard drive or recordable discs. Plenty of third-party options are out there (many offered as part of system security suites or included with new USB external hard drives), but your computer itself may have built-in tools. For example, Mac OS x 10.5 and later includes Apple’s Time Machine utility (shown here), which works with most external hard drives and makes frequent snapshots of your computer’s contents throughout the day. Find it at Home→Applications→Time Machine; bring your own dedicated external hard drive.
Windows Vista and Windows 7 also include a backup program. Go to Start→Control Panel→System and Maintenance→Backup and Restore to find it and set it up. (If you use Windows xP, you may first have to install the backup program from your system discs, depending on which version of the operating system you have; Microsoft has details at http://support.microsoft.com/kb/308422.)
Online backup services like Mozy (www.mozy.com), iDrive (www.idrive.com), and Carbonite (www.carbonite.com) are alternatives to using a USB drive. You typically get 2 gigabytes of free storage and then pay as little as $5 a month.