
Chapter 4
Connect to the Network
We live in a connected world. Wireless Internet (Wi-Fi) access has become the rule, not the exception—and chances are you're already using Wi-Fi at your home or office. Now you can use it to connect your iPod touch to the Internet.
In this chapter, we'll show you all the ways to get connected or disconnected from virtually any form of Wi-Fi network, whether open or secure. If you work at an organization with a VPN (Virtual Private Network), we will show you how to get connected to that network.
What Can I Do When I'm Connected to a Wi-Fi Network?
Here are some of the things you can do when connected to a Wi-Fi network:
- Access and download apps (programs) from the App Store.
- Access and download music, videos, podcasts, and more from the iTunes app on your iPod touch.
- Browse the web using Safari.
- Send and receive email messages.
- Use social networking sites that require an Internet connection like Facebook, Twitter, and so on.
- Play games that use a live Internet connection.
- Do anything else that requires an Internet connection.
NOTE: iPod touch has support for the faster, longer range 802.11n standard. However, it only supports 802.11n on the more crowded 2.4MHz band, not the less crowded 5MHz band. If you want to use iPod touch with your 802.11n Wi-Fi router, make sure it's either a dual-band router or set the router to 2.4MHz.
Connecting to a Wi-Fi Network
To set up your Wi-Fi connection, follow these steps:

- Tap the Settings icon.
- Tap Wi-Fi near the top.
- Make sure the Wi-Fi switch is set to ON. If it is currently OFF, then tap it to turn it ON.
- Once Wi-Fi is ON, the iPod touch will automatically start looking for wireless networks.
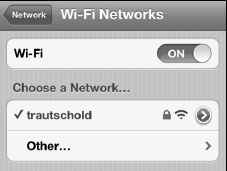
- The list of accessible networks is shown below the Choose a Network… option. This screenshot shows that we have one network available
- To connect to any network listed, just touch the network name. If the network is unsecure (does not have a Lock icon), you will be connected automatically.
Connecting at a Public Wi-Fi Hotspot with Web Login
In some locations where they offer free Wi-Fi networks, such as coffee shops, hotels, or restaurants; you will see a pop-up window appear as soon as your iPod touch comes into contact with the network. In these cases, simply tap the network name. You may be brought to a Safari browser screen to complete your login to the network:
- If you see a pop-up window similar to the one shown, tap the network name you wish to join. In the case to the right, we tap the Panera network.

- In some cases, you may see a Safari window pop up, which can be quite confusing because it is so small on your iPod touch's screen. You need to use the double-tap or pinch-open gesture (see the Quick Start Guide for help) to zoom in on the Web page. You are looking for a button that says Login, Agree, or something similar. Tap that button to complete the connection.
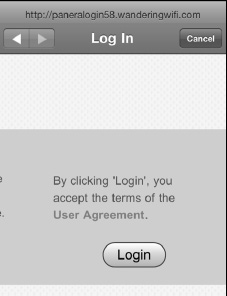
NOTE: Some places, like coffee shops, use a web-based login instead of a username/password screen. In those cases, when you click the network (or try to use Safari), your iPod touch will open a browser screen, and you'll see the web page along with your login options.
Secure Wi-Fi Networks—Entering a Password
Some Wi-Fi networks require a password to connect. This is set when the network administrator creates the wireless network. You will have to know the exact password, including whether it is case-sensitive.

If the network does require a password, then you will be taken to the Enter Password screen. Type the password exactly as given to you and press the Enter key on the on-screen keyboard (which is now labeled Join).
On the Network screen, you'll see a Checkmark icon showing that you are connected to the network.

TIP: You can paste into the password dialog; so for longer, random passwords, you can transfer them to your iPod touch (in an email message) and just copy and paste them. Just remember to delete the email immediately afterwards, so you can keep things secure. Tap and hold the password in the mail message, select it, and then tap Copy. In the Wi-Fi network Password field, tap and then select Paste.

Switching to a Different Wi-Fi Network
At times you may want to change your active Wi-Fi network. This might occur if you are in a hotel, apartment, or other place where the network selected by the iPod touch is not the strongest network, or you want to use a secure network instead of an unsecure one.
To switch from the currently selected Wi-Fi network, tap the Settings icon, touch Wi-Fi, and then touch the name of the Wi-Fi network you want to join. If that network requires a password, you'll need to enter it to join.
Once you type the correct password (or if you touched an open network), your iPod touch will join that network.
Verifying Your Wi-Fi Connection
It is easy to see if you are connected to a network (and which one) by looking next to the Wi-Fi setting in your main Settings screen. Follow these steps to check your Wi-Fi connection status:

- Tap your Settings icon.
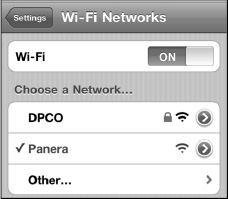
- Look next to the Wi-Fi option at the top:
- If you see Not Connected, you do not have an active Wi-Fi connection.
- If you see some other name, such as Panera, then you are connected to that Wi-Fi network.
Advanced Wi-Fi Options (Hidden or Undiscoverable Networks)
Sometimes you may not be able to see the network you want to join because the name has been hidden (the SSID is not being broadcast) by the network administrator. Next, you will learn how to join such networks on your iPod touch. Once you have joined such a network, you will join that network automatically the next time you come into contact with it—with no prompt from your iPod touch. You can also tell your iPod touch to ask every time it joins a network; we will show you how to do that, as well. Sometimes you may want to erase or forget a network. For example, perhaps you were at a one-time convention and want to get rid of the associated network—you'll learn how to do that, too.
Why Can't I See the Wi-Fi Network I Want to Join?
Sometimes, for security reasons, people don't make their networks discoverable (they hide the network name, called the SSID), and you have to manually enter the name and security options to connect to it.
As you can see, your list of available networks includes Other.
- Tap the Other button, and you can manually enter the name of a network you would like to join.
- Type in the Wi-Fi network Name.

- Tap the Security tab.
- Choose which type of security is being used on that network. If you are unsure, you'll need to find out from the network administrator.

When you have the information you need, enter it along with the proper password, and this new network will be saved to your network list for future access.
Reconnecting to Previously Joined Wi-Fi Networks
The nice thing about the iPod touch is that, when you return to an area with a Wi-Fi network you previously joined (whether it was an open or a secure, password-protected, network), your iPod touch will automatically join the network again without asking you first. However, you can turn off this automatic-joining feature, as described in the next section.
The Ask to Join Networks Main Switch
There is a main Ask to Join Networks switch, which is set to ON by default. Known networks are joined automatically, but this only takes effect if no known networks are available. With this switch set to ON, you will be asked to join visible Wi-Fi networks. If networks are available that are not known to you, you will be asked before being connected.
If the switch is set to OFF, you will have to manually join unknown networks.

Why might you want to turn off this feature?
Doing so could be a good security measure if, for example, you don't want your kids to be able to join a wireless network on the iPod touch without your knowledge.
It can also be annoying if your iPod touch is continuously popping up the Join Network connector screen in areas where you don't want to join Wi-Fi, such as when traveling through a place with many hotspots.
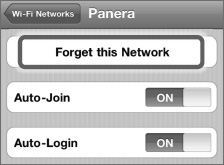
Ask to Join and Ask to Login Switch on Each Network
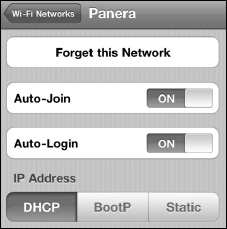
Sometimes, you may find that a particular Wi-Fi network has additional switches that override the main Ask to Join Networks switch. Tap the little blue Arrow icon
![]() next to the network name to see details about this Wi-Fi network. Auto-Join and Auto-Login are set to ON by default.
next to the network name to see details about this Wi-Fi network. Auto-Join and Auto-Login are set to ON by default.
To disable Auto-Join or Auto-Login, tap each switch to set it to OFF.
Forget (or Erase) a Network
If you find that you no longer want to connect to a network on your list, you can Forget it—i.e., take it off your list of networks. Follow these steps to do so:
- Tap the Settings icon.
- Tap Wi-Fi to see your list of networks.
- Tap the small blue Arrow
 next to the network you want to forget in order to see the screen shown here.
 - Tap Forget this Network at the top of the screen.
- You will be prompted with a warning. Just touch Forget and the network will no longer show up on your list.

Flying on an Airplane: Airplane Mode
Often when you are flying on an airplane, the flight crew will ask you to turn off all portable electronic devices for takeoff and landing. Then, when you get to a certain altitude, the crew will say that “all approved electronic devices” can be turned back on.
If you need to turn off your iPod touch completely, press and hold the Power button on the top-right edge, and then Slide to Power Off with your finger.
Since the iPod touch is a Wi-Fi only device, why would you want or need to go into Airplane Mode or turn off Wi-Fi? The iPod touch has other radios as well, like Bluetooth, and Airplane mode is a quick way to turn everything off at once.
Also, if you're low on battery life and don't need internet access, turning off Wi-Fi or going into Airplane Mode Is a quick way to stretch out your remaining battery life as much as possible.
In order to enable Airplane Mode, follow these steps:
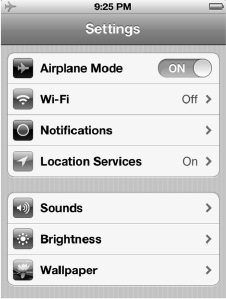
- Tap the Settings icon.
- Set the switch next to Airplane Mode in the top of the left column to ON.
- Notice that the Wi-Fi is automatically turned OFF.
TIP: Some airlines have in-flight Wi-Fi networks. On those flights, you may want to turn your Wi-Fi back ON at the appropriate time.
You can turn your Wi-Fi connection OFFor ON by following these steps:
- Tap the Settings icon.
- Tap Wi-Fi near the top of the screen.

- To enable the Wi-Fi connections, set the switch next to Wi-Fi in the top of the page to ON.
- To disable Wi-Fi, set the same switch to OFF.
- Select the Wi-Fi network and follow the steps given by the flight attendant to get connected.
VPN: Virtual Private Network
Your organization may have what is called a VPN, or Virtual Private Network. A VPN allows you to securely connect your iPod touch, laptop, or other device to the corporate network.
Getting Connected
In order to get connected, you need to determine the type of VPN and specific login instructions from your organization's help desk or network administrator. Then, you will type these login details into the VPN area in the Settings app on your iPod touch.
TIP: You can probably save yourself a call to the help desk and skip Step 1 if you have already set up your computer to connect to the VPN. This is because your iPod touch will most likely use the same VPN login credentials as your computer.
Step 1: Contact Your Organization's Help Desk
You need to ask your help desk or VPN administrator for the details about how to log into the VPN. Your iPod touch can currently connect with the following types of VPNs: L2TP, PPTP, and IPSec (Cisco). You also need to know if your VPN uses a Proxy and whether the configuration is manual or automatic.
Step 2: Set Up the VPN Connection on Your iPod touch
Armed with the login instructions and type of VPN connection, you are ready to connect with your iPod touch:
- Tap the Settings icon.

- Tap General.
- Tap Network.
- Scroll down to the bottom of the screen and tap VPN.
- On the VPN screen, tap the switch next to the VPN option to set it to ON. You should then be taken to the Add Configuration screen. If not, then tap Add VPN Configuration at the bottom to set up a new VPN connection.

- The Add Configuration screen is where you set up your VPN login details, using the information from your help desk or VPN administrator.

- If your VPN is an L2TP type, then you would use the screen shown here. Scroll to the bottom and enter the Proxy information as required.
- If your VPN is a PPTP type, then you would tap PPTP at the top and use the screen shown here. Scroll to the bottom and enter the Proxy information as required.
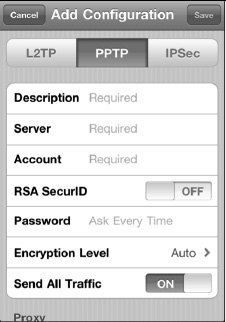
- If your VPN is an IPSec (Cisco) type, then you would tap IPSec and use the screen shown here. Scroll to the bottom and enter the Proxy information as required.

- When you are done with your setup, tap the Save button in the upper-right corner.
- If you have trouble logging in, make sure you are in a strong wireless coverage area and verify you have typed all your login credentials correctly. It can be difficult when passwords disappear as you type them. You may want to try re-typing passwords and server information before calling the help desk.
Knowing When You Are Connected to a VPN Network
You will see a small VPN icon ![]() just to the right of your network connection status display. You will know that you are securely connected to the VPN network only when you see this icon.
just to the right of your network connection status display. You will know that you are securely connected to the VPN network only when you see this icon.
Switching VPN Networks
You may have several VPN networks to which you need to connect. You can select between different VPN configurations on your iPod touch by following these steps:
- Tap the Settings icon.
- Tap General.
- Tap Network.
- Scroll down to the bottom of the screen and tap VPN.
- On the VPN screen, tap a different VPN configuration to connect to it. Don't tap the blue Circle icon with the > symbol, unless you want to change the login settings for that network.