
Lesson 17. Manage Time Machine
GOALS
![]() Describe Time Machine
Describe Time Machine
![]() Configure Time Machine to back up data
Configure Time Machine to back up data
![]() Restore data or macOS from a Time Machine backup
Restore data or macOS from a Time Machine backup
In this lesson, you learn how Time Machine enables you to browse the backup history of a file system. You become familiar with the configuration of Time Machine. And you explore ways to recover data from Time Machine backups.
Reference 17.1 Time Machine
With Time Machine, you can back up your entire Mac, including system files, apps, music, photos, emails, and documents. When Time Machine is turned on, it automatically backs up your Mac and performs hourly, daily, and weekly backups of your files.
When you use Time Machine on a Mac using Apple File System (APFS), not only does Time Machine keep a copy of everything on your backup disk, but it also saves local snapshots of files that have changed on your internal disk so that you can recover previous versions. These local snapshots are saved hourly (unless you deselect Back Up Automatically), and they’re stored on your Mac computer’s internal disk.
If you accidentally delete or change a file, you can use Time Machine to recover it.
Even though Time Machine creates local snapshots on computers using APFS, you should also back up your files to a location other than your internal disk, such as an external hard disk, a disk on your network, or a Time Capsule. That way, if anything ever happens to your internal disk or to your Mac, you can restore your entire system to another Mac.
About Backup Disks
Time Machine is the built-in backup feature of your Mac. To use it, you need one of these external storage solutions:
![]() External hard drive connected to a USB, FireWire, or Thunderbolt port on your Mac
External hard drive connected to a USB, FireWire, or Thunderbolt port on your Mac
![]() Another Mac using macOS High Sierra with a shared folder configured to be a Time Machine backup destination on your network
Another Mac using macOS High Sierra with a shared folder configured to be a Time Machine backup destination on your network
![]() Time Capsule on your network
Time Capsule on your network
![]() External hard drive connected to the USB port of an AirPort Extreme Base Station on your network
External hard drive connected to the USB port of an AirPort Extreme Base Station on your network
![]() macOS Server 5.3 or earlier on your network
macOS Server 5.3 or earlier on your network
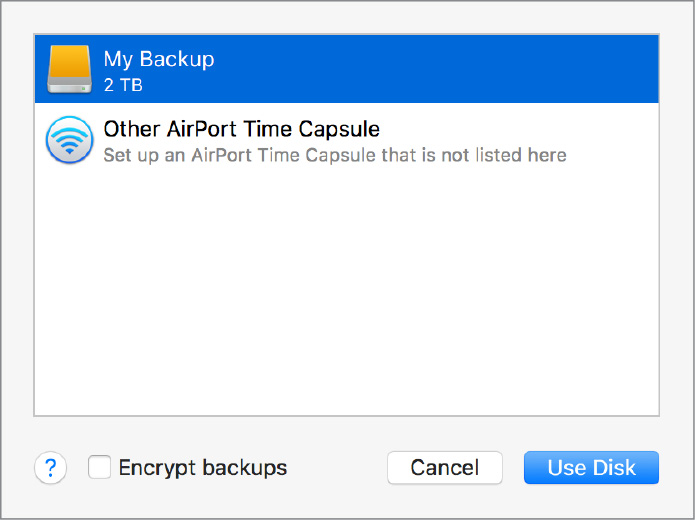
When you connect an external hard drive directly to your Mac, you might be asked if you want to use the drive to back up with Time Machine.
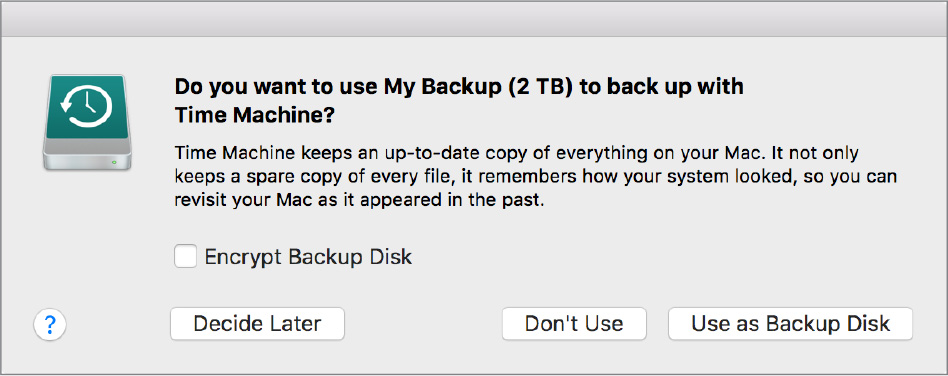
If Time Machine doesn’t ask you to choose a backup disk when you connect the drive to your Mac:
1 Open Time Machine preferences (choose Apple menu > System Preferences, then click Time Machine).
2 Click Select Backup Disk, Select Disk, or Add or Remove Backup Disk.
3 Select a backup disk from the list, then click Use Disk.
The most common format for a Time Machine backup disk is Mac OS Extended (HFS Plus) (Journaled) format, but Time Machine also supports HFS Plus (Case-sensitive, Journaled) and Xsan formats.
You can back up from an HFS Plus or APFS-formatted disk to an HFS Plus disk; however, Time Machine can’t back up to an APFS-formatted disk. If you select a backup disk formatted as APFS, Time Machine offers to reformat it as HFS Plus.
For additional backup security and convenience, you can repeat these steps to add another backup disk. For example, you might use one backup disk while at home and another backup disk while at work.
Time Machine works best if you use your backup disk only for Time Machine backups. If you keep files on your backup disk, Time Machine won’t back up those files, and the space available for Time Machine backups is reduced.
Encryption
If you select the option to encrypt:
![]() You must provide a password and a password hint.
You must provide a password and a password hint.
![]() Your backups will be accessible only to users with the password.
Your backups will be accessible only to users with the password.
![]() macOS reformats the backup disk as Mac OS Extended (Journaled, Encrypted).
macOS reformats the backup disk as Mac OS Extended (Journaled, Encrypted).
NOTE ![]() Reformatting erases all files on the disk, so do it only if you no longer need the files or have copied them to a different disk.
Reformatting erases all files on the disk, so do it only if you no longer need the files or have copied them to a different disk.
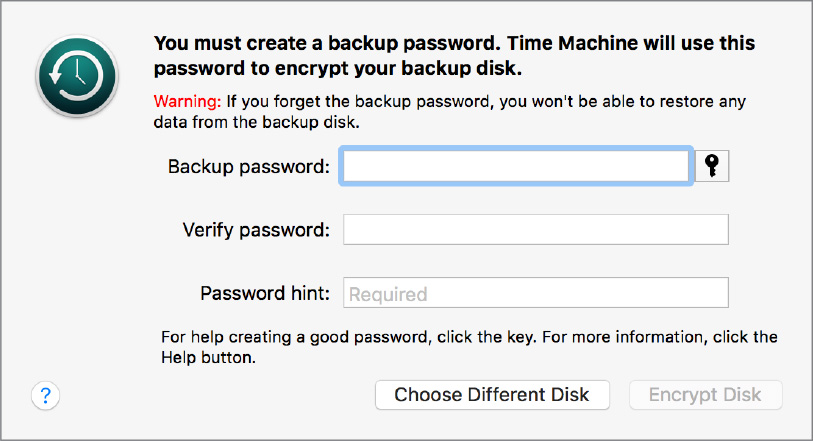
When configured, the encrypted Time Machine disk password isn’t initially saved. The next time the encrypted backup disk is connected, you are prompted to enter the password and optionally save it to the secure keychain system for automatic retrieval. If the encrypted disk is connected to another system, you must enter the password to access the backup items.
Encryption isn’t available if you use a disk that’s directly connected to your Mac that is formatted using an Apple Partition Map (APM) or Master Boot Record (MBR) partition and the disk has more than one partition.
If the encryption checkbox is dimmed, hover your pointer over it for a moment to see an explanation. For example, the selected disk may need to be reformatted or repartitioned. If no explanation appears, the selected disk doesn’t support encryption.
Backup Schedule
After you set up Time Machine, it automatically makes hourly backups for the past 24 hours, daily backups for the past month, and weekly backups for all previous months. The oldest backups are deleted when your backup disk is full.
Time Machine Backups
The initial Time Machine backup copies most of the contents of your file system to the specified backup volume.
Between backups, a background process similar to the one used by the Spotlight search service automatically tracks any changes to the original file system. When the next scheduled backup occurs, only the items that have changed are copied to the backup volume. Time Machine then combines this new content with hard-link file-system pointers (which occupy nearly zero disk space) to the previous backup content, and creates a simulated view of the entire file system at that point in time.
Time Machine also saves space by ignoring files that don’t need to be backed up—ones that can be re-created after a restoration. Generally speaking, Time Machine ignores temporary files, Spotlight indexes, items in the Trash, and anything that can be considered a cache. Time Machine doesn’t back up system log files. Software developers can also instruct Time Machine to ignore specific app data that does not need to be backed up. For example, Internet file storage providers, like Dropbox or OneDrive, can instruct Time Machine to ignore files saved to a cloud service.
Time Machine always ignores files listed in the configuration file StdExclusions.plist, which is stored in /System/Library/CoreServices/backupd.bundle/Contents/Resources.
Some database files appear as large, single files to the file system. The database app may be able to change just a few bytes of the large file as a user edits the database, but Time Machine creates another copy of the entire database file during the next backup. This can fill your backup volume much more quickly than if the database had been stored as many smaller files.
Time Machine Local Snapshots
Local snapshots help Time Machine restore data even when your Time Machine backup disk isn’t available.
Your Time Machine backup disk might not always be available, so Time Machine also stores some of its backups to your built-in startup drive and other local drives. These backups are called local snapshots.
![]() A daily snapshot is saved every 24 hours, beginning from the time you start or restart your computer.
A daily snapshot is saved every 24 hours, beginning from the time you start or restart your computer.
![]() A weekly snapshot is saved every week.
A weekly snapshot is saved every week.
![]() An additional snapshot is saved before installing any macOS update.
An additional snapshot is saved before installing any macOS update.
Time Machine in macOS High Sierra stores snapshots on every APFS-formatted, all-flash storage device in your Mac or directly connected to your Mac. Time Machine in earlier macOS versions stores snapshots only on the internal startup disk of Mac notebook computers.
To make sure that you have storage space when you need it, snapshots are stored only on disks that have plenty of free space. When storage space gets low, snapshots are automatically deleted, starting with the oldest. This is why Finder and Get Info windows don’t include local snapshots in their calculations of the storage space available on a disk.
To restore from a local snapshot:
1 Start your Mac from macOS Recovery.
2 Select Restore From Time Machine Backup in the macOS Utilities window and click Continue.
3 In the Restore from Time Machine screen click Continue.
4 Select your startup disk and click Continue.
5 In the Select a Local Snapshot screen, select a local snapshot and click continue.
At the confirmation dialog, if you click Continue, all changes you’ve made to the disk after the snapshot was taken will be lost.
For more information about local snapshots read Apple Support article HT204015, “About Time Machine local snapshots,” and the man page for tmutil.
Reference 17.2 Configure Time Machine
You can use Time Machine preferences to do the following:
![]() Select a network backup disk
Select a network backup disk
![]() Verify the backup status
Verify the backup status
![]() Manually configure backup settings
Manually configure backup settings
![]() Configure the option to show Time Machine in the menu bar
Configure the option to show Time Machine in the menu bar
![]() Configure the option to back up automatically
Configure the option to back up automatically

Manage Time Machine Options
Clicking the Options button at the bottom of the Time Machine preferences reveals a dialog where you can adjust backup settings.
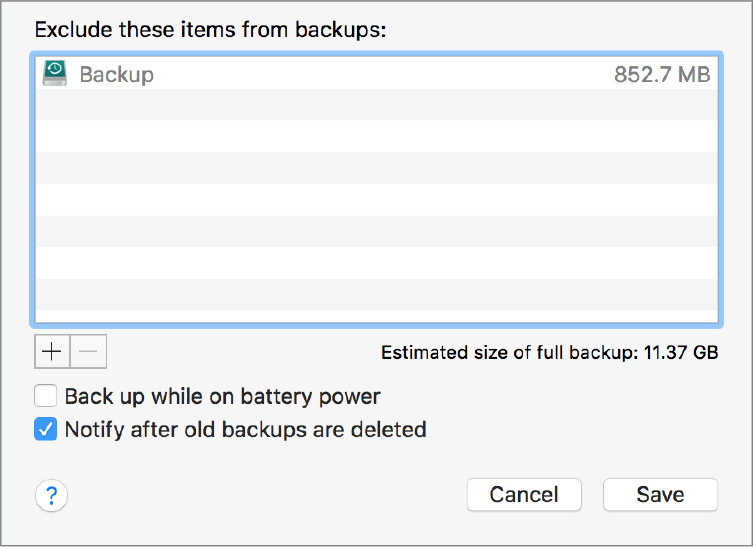
You can exclude items from the backup, which reduces the amount of space needed for your backups. The system automatically excludes any backup disk; this is to prevent multiple backup disks from backing up each other.
You can drag items into the list field, or you can click the Add (+) button at the bottom of the list to reveal a file browser, allowing you to select specific folders or volumes to exclude. Be sure to click Save to close this dialog, because backups will not be made until you have set the options here.
If you want to save space by excluding system items, add /System to the exclude list; you will be prompted to exclude all system files or just /System. However, if you do not perform a full backup of your system volume, you won’t be able to perform a full restoration of it. Instead, you will have to install macOS first, and then you restore the remainder using Migration Assistant, as covered later in this lesson.
![]() You can restore specific items by entering Time Machine.
You can restore specific items by entering Time Machine.
![]() You can restore user accounts and entire home folders with Migration Assistant.
You can restore user accounts and entire home folders with Migration Assistant.
![]() You can restore an entire macOS system with macOS Recovery.
You can restore an entire macOS system with macOS Recovery.
Restore Specific Items from a Time Machine Backup
Start by opening a window for the item that you want to restore. For example:
![]() To restore a file you accidentally deleted from your Documents folder, open the Documents folder.
To restore a file you accidentally deleted from your Documents folder, open the Documents folder.
![]() To restore an email message, open your inbox in Mail.
To restore an email message, open your inbox in Mail.
![]() If you’re using an app that automatically saves versions of documents as you work on them, you can open a document and then use Time Machine to restore earlier versions of that document.
If you’re using an app that automatically saves versions of documents as you work on them, you can open a document and then use Time Machine to restore earlier versions of that document.
Use Spotlight Search to open Time Machine, choose Enter Time Machine from the Time Machine menu, or click Time Machine if it’s in the Dock. This example shows Time Machine for the Documents folder:
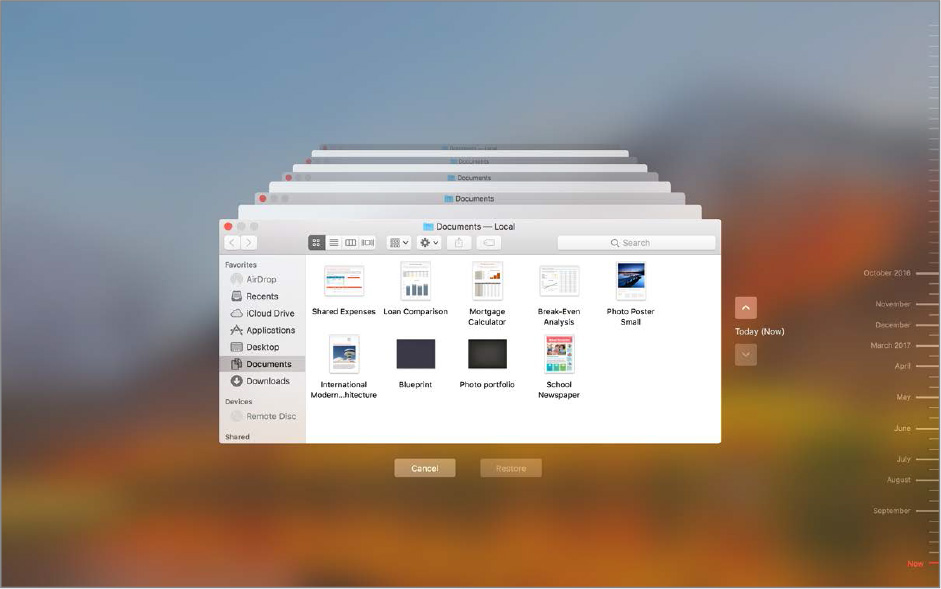
![]() Use the timeline on the edge of the screen to see the items in your Time Machine backup as they were at that date and time.
Use the timeline on the edge of the screen to see the items in your Time Machine backup as they were at that date and time.
![]() A bright red tick mark is a backup that can be restored now, either from a local snapshot or from your backup drive. When your backup drive isn’t available, only the local snapshots are bright red.
A bright red tick mark is a backup that can be restored now, either from a local snapshot or from your backup drive. When your backup drive isn’t available, only the local snapshots are bright red.
![]() A dimmed red tick mark is a backup that can be restored from your backup drive after that drive becomes available. Until then, the stack of windows on the screen shows a blank window for that backup.
A dimmed red tick mark is a backup that can be restored from your backup drive after that drive becomes available. Until then, the stack of windows on the screen shows a blank window for that backup.
![]() Use the onscreen up and down arrows to jump to the last time the contents of the window changed. You can also use the search field in a window to find an item, and then move through time while focused on changes to that item.
Use the onscreen up and down arrows to jump to the last time the contents of the window changed. You can also use the search field in a window to find an item, and then move through time while focused on changes to that item.
![]() Select an item and press Space bar to preview it and make sure it’s the one you want.
Select an item and press Space bar to preview it and make sure it’s the one you want.
![]() Click Restore to restore the selected item, or secondary-click (or Control-click) the item for other options.
Click Restore to restore the selected item, or secondary-click (or Control-click) the item for other options.
Restore with Migration Assistant
You can restore a complete user home folder or other nonsystem data from a Time Machine backup using Migration Assistant. You cannot, however, restore an entire system with Migration Assistant. Restoring an entire system is covered in the next section of this lesson.
When Migration Assistant opens, either during new system setup or when opened manually, choose to restore from a Time Machine backup.
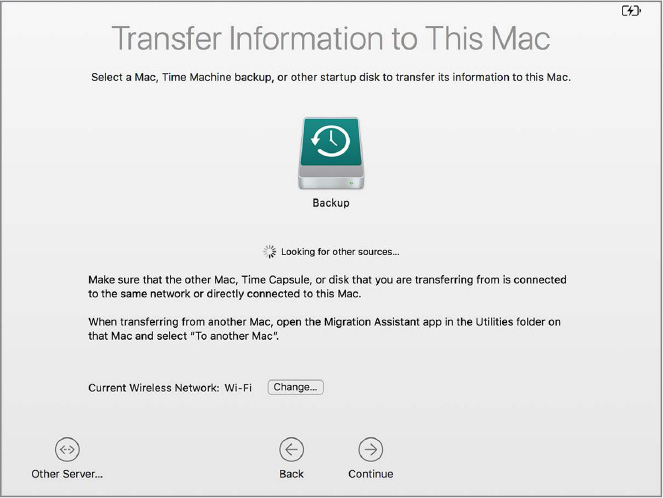
Once you have selected the backup disk and authenticated to access its content, the remainder of the Migration Assistant process is similar to the standard migration process covered in Lesson 3, “Set Up and Configure macOS,” for apps and settings, or in Lesson 8, “Manage User Home Folders,” for user-specific items.
Restore an Entire System
To completely restore your Mac, use the “Restore from Time Machine Backup” utility in macOS Recovery. The disk you’re restoring is erased before receiving the macOS and other contents of your Time Machine backup.
To copy just your files, settings, or user accounts, use Migration Assistant instead.
You can start up the Mac using the normal macOS Recovery techniques, as covered in Lesson 5, “Use macOS Recovery.”
Manually Restore with the Finder
If you are experiencing problems using one of the other Time Machine restoration interfaces, you can always browse the backup from the Finder. The Time Machine backup technology uses file system features that are part of standard Mac OS Extended volumes, so no special software is needed to browse through backup contents.
If you’re accessing a locally attached Time Machine backup disk, the backup files are located on the root of the backup disk in a folder named Backups.backupdb. Inside the backup database folder are folders with the name of each computer backed up to that disk. Inside each computer folder are folders named using the date and time of each backup. Finally, inside each dated folder are folders representing each backed-up volume.
There are some caveats when directly accessing Time Machine backups from the Finder:
![]() You can only read the contents of a Time Machine backup, which has access control entries (ACEs) that deny write access.
You can only read the contents of a Time Machine backup, which has access control entries (ACEs) that deny write access.
![]() If you don’t have file system permissions to the backup folders, you have to change the ownership or permissions to open the folders in the Finder. You can find out more about changing permissions in Lesson 13, “Manage Permissions and Sharing.”
If you don’t have file system permissions to the backup folders, you have to change the ownership or permissions to open the folders in the Finder. You can find out more about changing permissions in Lesson 13, “Manage Permissions and Sharing.”
If you’re accessing Time Machine over a network, you need to manually connect to the Time Machine share first. (Connecting to shares is covered in Lesson 24, “Manage Network Services.”) Once connected, you need to locate the Time Machine backup disk images. They are at the root of the Time Machine share, most commonly named Backups. Each Mac computer’s backup is saved as a separate sparse disk image file named with the computer’s sharing name.
Exercise 17.1 Configure Time Machine
![]() Prerequisites
Prerequisites
![]() You must have created the Local Administrator (Exercise 3.1, “Configure a New Mac for Exercises,” or Exercise 3.2, “Configure an Existing Mac for Exercises”) and Johnny Appleseed (Exercise 7.1, “Create a Standard User Account”) accounts.
You must have created the Local Administrator (Exercise 3.1, “Configure a New Mac for Exercises,” or Exercise 3.2, “Configure an Existing Mac for Exercises”) and Johnny Appleseed (Exercise 7.1, “Create a Standard User Account”) accounts.
![]() You must have an external storage device (USB flash drive or other media) to use for backups.
You must have an external storage device (USB flash drive or other media) to use for backups.
In this exercise, you configure Time Machine to back up your user home folders to your external storage device.
Configure Exclusions for Time Machine
By default, Time Machine backs up the startup volume (excluding some file types). In this exercise you configure it to back up only user files. In most situations, backing up only user files works because you can always reinstall macOS and apps. If you want to do a full system restore, don’t exclude anything from the backup.
1 If necessary, log in as Johnny Appleseed.
2 Open System Preferences, and select the Time Machine pane.
3 If necessary, click the lock button, and authenticate as Local Administrator.
4 Select the “Show Time Machine in menu bar” checkbox if it isn’t selected.
5 Click the Options button to reveal a dialog that enables you to exclude folders from backups.
There might be an entry for /Users/Shared/adi in the exclude list. This is used internally by iBooks, and you can ignore it.
6 Click the Add (+) button at the bottom of the list.
7 Navigate to your startup volume (generally Macintosh HD), and select the Applications, Library, and System folders.
You can Command-click folders to add them to the selection.

8 Click Exclude.
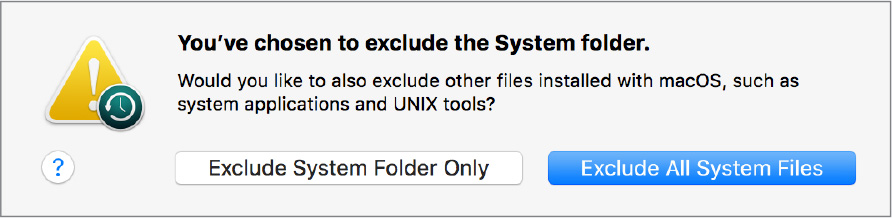
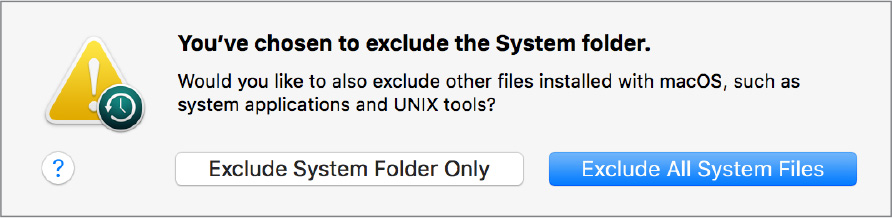
9 When you see the message “You’ve chosen to exclude the System folder,” click Exclude All System Files.
Your exclusion list now looks like the following figure (although the sizes may be different, /Users/Shared/adi might be listed, and the option to back up while on battery power appears only on laptop computers).
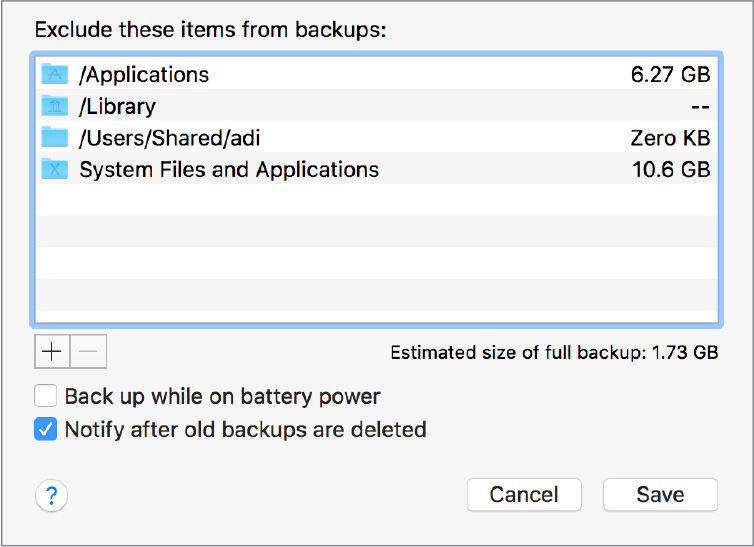
10 Click Save.
Select a Backup Volume
1 Connect your external storage device to the Mac.
2 If a dialog appears and asks if you want to use the disk to back up with Time Machine, click Decide Later so that you can configure the backup manually.
3 If your external disk isn’t currently named Backup, select it, go to the menu bar, choose File > Rename, and type Backup to rename the disk.
4 Select the Back Up Automatically checkbox.
A dialog appears with a choice of backup targets.
5 Select the external volume named Backup.
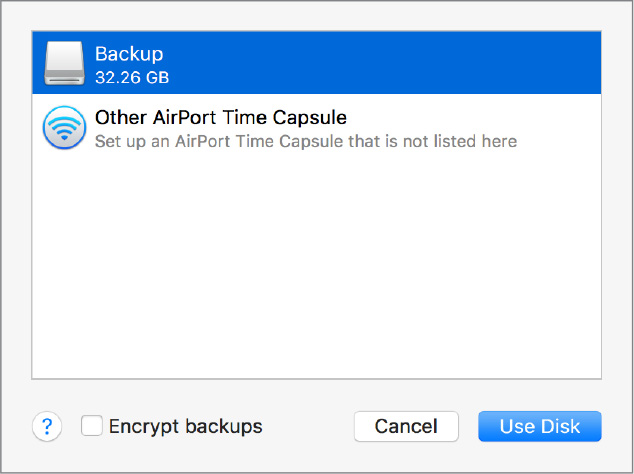
Note the checkbox that enables you to encrypt backups. When you select this checkbox, you encrypt the backup volume the same way as you would encrypt it in the Finder.
If you are performing these exercises in a classroom environment, don’t encrypt the volume. It delays the initial backup. If you are performing the exercises in independent study, you can encrypt the backup volume. You must wait for the conversion to encrypted format to finish before you can start Exercise 17.2, “Restore Using Time Machine.”
6 Click Use Disk.
If your external storage device is formatted as APFS, FAT32, or another file system, a dialog appears and asks if you are sure that you want to erase the backup disk. The dialog shows the current destination selected having an incompatible file system. At the time of this writing, Time Machine destinations must be formatted as Mac OS Extended (Journaled), or HFS Plus using the GPT partition scheme. Destinations formatted with other file system schemes—besides Mac OS Extended (Journaled)—are incompatible and are erased and formatted as HFS Plus for use with Time Machine.

7 If you want to continue, click Erase, and authenticate as Local Administrator.
You see a “preparing disk” message. The Backup disk unmounts, formats as HFS Plus (Journaled), and reappears. Time Machine starts backing up in two minutes. You don’t have to wait for it before proceeding with the exercise.
8 Open Disk Utility, and in the sidebar, select Backup.
The Backup volume is formatted as Mac OS Extended (Journaled), or HFS Plus (Journaled).
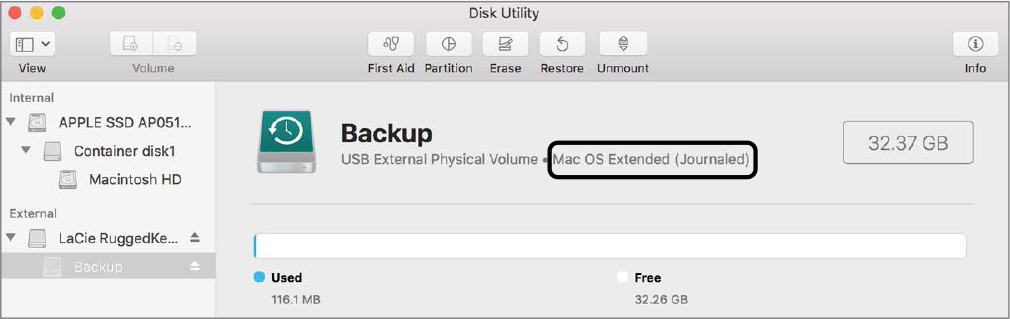
9 Quit Disk Utility.
10 Quit System Preferences.
Perform Exercise 17.2, “Restore Using Time Machine,” to test the backup.
Exercise 17.2 Restore Using Time Machine
In this exercise, you learn how to use Time Machine to recover lost files from the backup.
1 If necessary, log in as Johnny Appleseed.
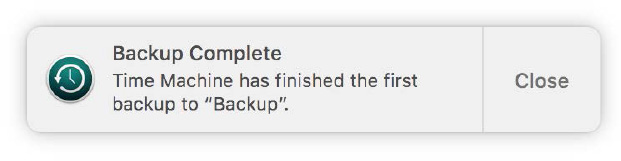
2 Click the Time Machine menu bar item. If the menu indicates that the backup is still in progress, wait for it to finish.

3 If you are notified that the backup isn’t encrypted, click Close.
4 When you are notified that the backup is finished, click Close.
Delete Files
Here you delete files and folders from the participant materials.
1 In the Finder, open /Users/Shared/StudentMaterials/Lesson17.
2 Move the “Archived announcements” folder to the Trash.
This folder contains the Pretendco company’s old media information.
3 If you are prompted to, authenticate as Local Administrator.
4 From the menu bar, choose Finder > Empty Trash. In the confirmation dialog, click Empty Trash.
Restore a File Using Time Machine
Search for an announcement about Pretendco’s plans for solid-state encabulation device (SSED) development.
1 From the menu bar, choose Time Machine > Enter Time Machine.
Time Machine opens and shows successive snapshots of your files with more recent ones in front of older ones, which appear to recede into the past.
2 Enter SSED in the Search field at the upper right of the window.
No matching files appear, since the only match was in the folder you deleted and you are viewing files as they exist now.
3 Use the up and down arrows to navigate through time until the file SSED plans.rtf appears.
You can also navigate through time using the timeline along the right side of the screen.
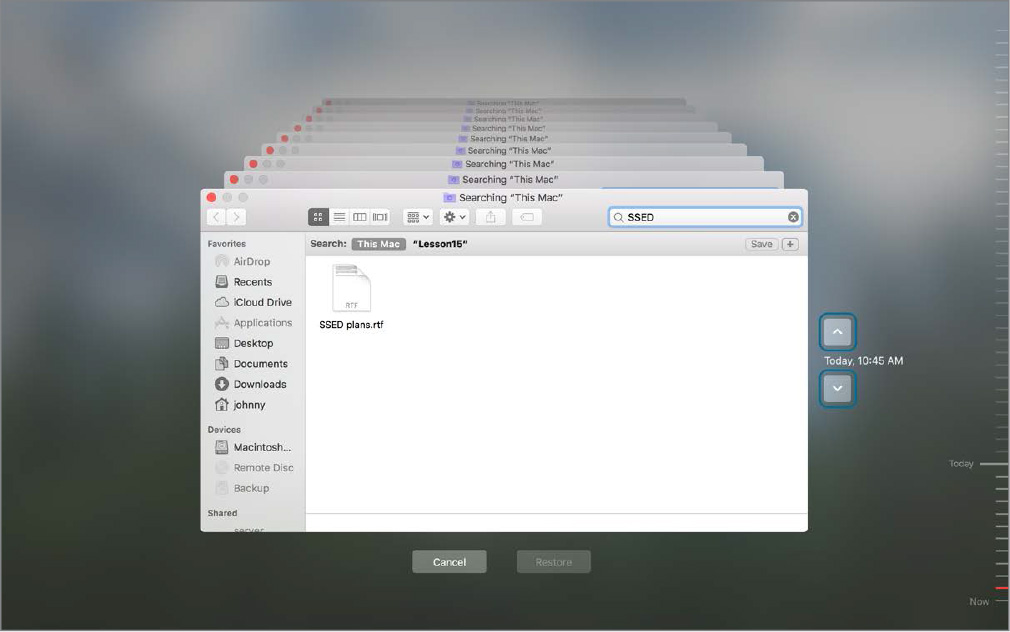
4 Select SSED plans.rtf and press Command-Y, or the Space bar.
A Quick Look preview opens. Quick Look is available in Time Machine so you can verify that you have the right file before you restore it.
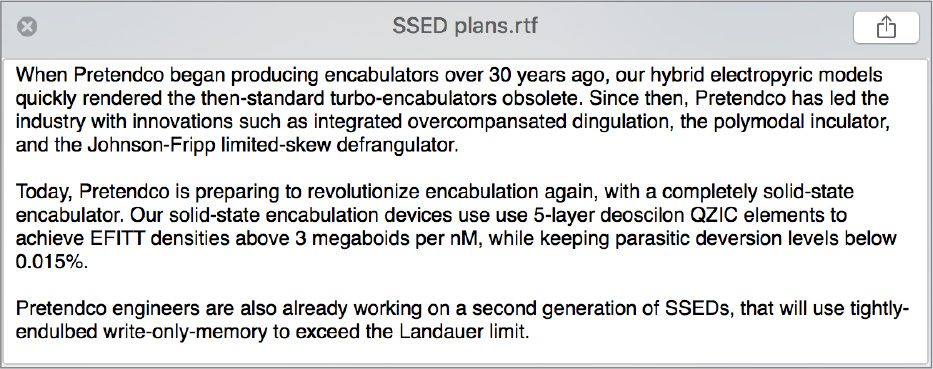
5 Press Command-Y, or the Space bar, to close Quick Look.
6 With the file selected, click Restore.
Since the folder the file was in was deleted, Time Machine gives you the option to re-create the original enclosing folder or choose a new location for the restore.
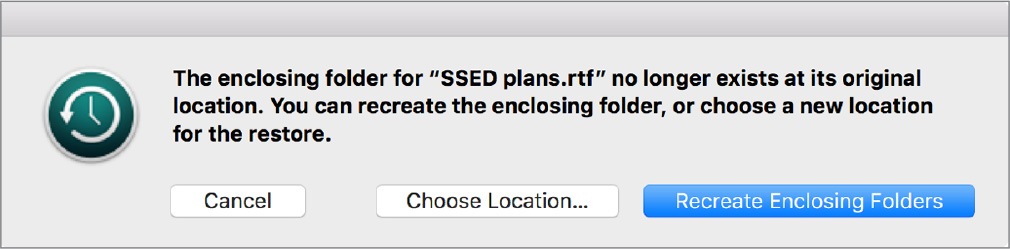
7 Click Choose Location. The Choose Folder dialog opens.
8 Navigate to your Documents folder by selecting it in the sidebar, and click Choose.
9 If you are prompted, authenticate as Local Administrator.
10 In the Finder, navigate to your Documents folder (from the menu bar, choose Go > Documents, or press Command-Shift-O).
The restored SSED plans.rtf file is visible.
1 In the Finder, open the volume you chose to back up to.
2 Open the Backups.backupdb folder. In this folder is a folder for your client. Open it.
The folder contains one or more snapshot folders, named with the date and time they were taken. There is an alias named Latest that points to the latest backup.
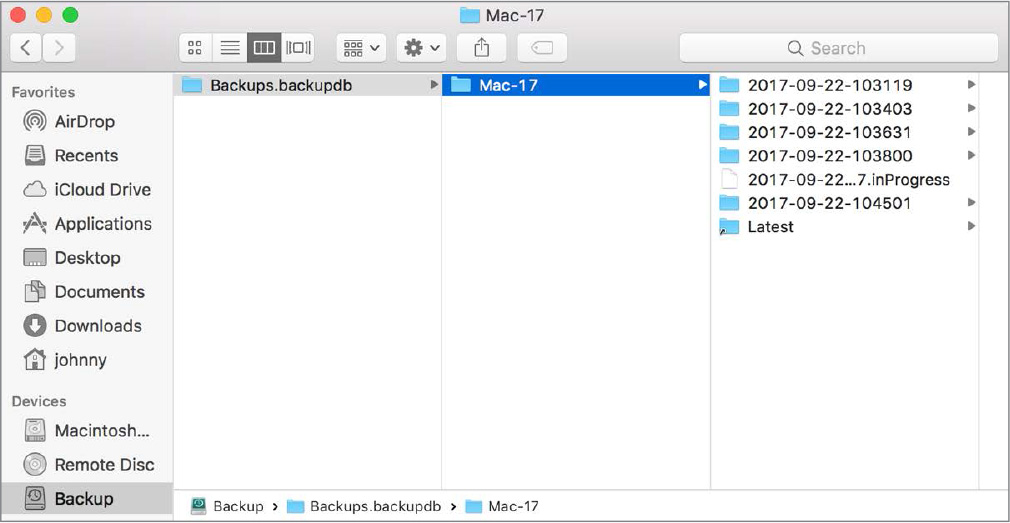
3 Browse through these folders: /Backups.backupdb/Mac-NN/Latest/Macintosh HD/Users/Shared/StudentMaterials/Lesson17/Archived announcements/2010/04-April.
4 Drag a copy of SSED plans.rtf to your desktop.
5 If prompted, authenticate as Local Administrator.
6 Select the Backup volume on your desktop, Control-click it, and choose Eject “Backup.”
7 Unplug the external storage device from your Mac.