
Chapter 24
Test Organization Patterns
Patterns in This Chapter
Test Code Reuse
Testcase Class Structure
Testcase Class per Feature 624
Testcase Class per Fixture 631
Utility Method Location
Named Test Suite
How do we run the tests when we have arbitrary groups of tests to run?
We define a test suite, suitably named, that contains a set of tests that we wish to be able to run as a group.

When we have a large number of tests, we need to organize them in a systematic way. A test suite allows us to group tests that have related functionality close to each other. Although we want to be able to run all the tests for the entire application or component easily, we also want to be able to run only those tests applicable to specific subsets of the functionality or subcomponents of the system. In other situations, we want to run only a subset of all the tests we have defined.
Named Test Suites give us a way to choose which predefined subset of the tests we want to run.
How It Works
For each group of related tests that we would like to be able to run as a group, we can define a special Test Suite Factory (see Test Enumeration on page 399) with an Intent-Revealing Name. The Factory Method [GOF] can use any of several test suite construction techniques to return a Test Suite Object (page 387) containing only the specific Testcase Objects (page 382) we wish to execute.
When to Use It
Although we often want to run all the tests with a single command, sometimes we want to run only a subset of the tests. The most common reason for doing so is time; for this purpose, running the AllTests Suite for a specific context is probably our best bet. When our member of xUnit doesn't support Test Selection and the tests we want to run are scattered across multiple contexts and some contexts contain tests we definitely don't want run, we can use a Subset Suite.
Variation: AllTests Suite
We often want to run all the tests we have available. With smaller systems, it may be standard practice to run the AllTests Suite after checking out a new code base (to ensure we start at a known point) and before every check-in (to ensure all our code works). We typically have an AllTests Suite for each package or namespace of software so that we can run subsets of the tests after each code change as part of the "red–green–refactor" cycle.
Variation: Subset Suite
Developers often do not want to run tests because they are Slow Tests (page 253). Tests that exercise components that access a database will inevitably run much more slowly than tests that run entirely in memory. By defining one Named Test Suite for the database tests and another Named Test Suite for the in-memory tests, we can choose not to run the database tests simply by choosing to run the in-memory Subset Suite.
Another common reason given for not running tests is because the context they need to run is not available. For example, if we don't have a Web server running on our development desktop, or if deploying our software to the Web server takes too long, we won't want to run the tests of components that require the Web server to be running (they would just take extra time to run, and we know they will fail and spoil our chances of achieving a green bar).
Variation: Single Test Suite
The degenerate form of a Subset Suite is the Single Test Suite, in which we instantiate a single Testcase Object so that we can run a single Test Method (page 348). This variation is particularly useful when we don't have a Test Tree Explorer (see Test Runner on page 377) available or when the Test Method requires some form of Setup Decorator (page 447) to run properly. Some test automaters keep a "MyTest" Testcase Class (page 373) open in their workspace at all times specifically for this purpose.
Implementation Notes
The concept of running named sets of tests is independent of how we build the Named Test Suites. For example, we can use Test Enumeration to build up our suites of tests explicitly or we can use Test Discovery (page 393) to find all tests in a particular place (e.g., a namespace or assembly). We can also do Test Selection (page 403) from within a suite of tests to create a smaller suite dynamically. Some members of the xUnit family require us to define the AllTests Suites for each test package or subsystem manually; others, such as NUnit, automatically create a Test Suite Object for each namespace.
When we are using Test Enumeration and have Named Test Suites for various subsets of the tests, it is better to define our AllTests Suite in terms of these subsets. When we implement the AllTests Suite as a Suite of Suites (see Test Suite Object), we need to add a new Testcase Class to only a single Named Test Suite; this collection of tests is then rolled up into the AllTests Suite for the local context as well as the Named Test Suite and the next higher context.
Refactoring Notes
The steps to refactor existing code to a Named Test Suite are highly dependent on the variant of Named Test Suite we are using. For this reason, I'll dispense with the motivating example and skip directly to examples of Named Test Suites.
Example: AllTests Suite
An AllTests Suite helps us run all the tests for different subsets of the functionality of our choosing. For each subcomponent or context (e.g., a Java package), we define a special test suite (and its corresponding Test Suite Factory) called AllTests. In the suite Factory Method on the Test Suite Factory, we add all the tests in the current context and all the Named Test Suites from any nested contexts (such as nested Java packages). That way, when the top-level Named Test Suite is run, all Named Test Suites for the nested contexts will be run as well.
The following example illustrates the kind of code that would be required to run all the tests in most members of the xUnit family:
public class AllTests {
public static Test suite() {
TestSuite suite = new TestSuite("Test for allJunitTests");
//$JUnit-BEGIN$
suite.addTestSuite(
com.clrstream.camug.example.test.InvoiceTest.class);
suite.addTest(com.clrstream.ex7.test.AllTests.suite());
suite.addTest(com.clrstream.ex8.test.AllTests.suite());
suite.addTestSuite(
com.xunitpatterns.guardassertion.Example.class);
//$JUnit-END$
return suite;
}
}
We had to use a mix of methods in this case because we are adding other Named Test Suites as well as Test Suite Objects representing a single Testcase Class. In JUnit, we use different methods to do this. Other members of the xUnit family, however, may use the same method signature.
The other notable aspect of this example is the JUnit-start and JUnit-end comments. The IDE (in this case, Eclipse) helps us out by automatically regenerating the list between these two comments—a semi-automated form of Test Discovery.
Example: Special-Purpose Suite
Suppose we have three major packages (A, B, and C) containing business logic. Each package contains both in-memory objects and database access classes. We would then have corresponding test packages for each of the three packages. Some tests in each package would require the database, while others could run purely in memory.
We want to be able to run the following sets of tests for the entire system, and for each package (A, B, and C):
- All tests
- All database tests
- All in-memory tests
This implies a total of 12 named sets of tests (three named sets for each of four contexts).
In each of the three packages (A, B, and C), we should define the following Named Test Suites:
AllDbTests, by adding all the Testcase Classes containing database testsAllInMemoryTests, by adding all the Testcase Classes containing in-memory testsAllTests, by combiningAllDbTestsandAllInMemoryTests
Then, at the top-level testing context, we define Named Test Suites by the same names as follows:
AllDbTests, by composing all theAllDbTestsTestcase Classes from packages A, B, and CAllInMemoryTests, by composing all theAllInMemoryTestsTestcase Classes from packages A, B, and CAllTests, by composing all theAllTestsTestcase Classes from packages A, B, and C (This is just the normal AllTests Suite.)
If we find ourselves needing to include some tests from a single Testcase Class in both Named Test Suites, we should split the class into one class for each context (e.g., database tests and in-memory tests).
Example: Single Test Suite
In some circumstances—especially when we are using a debugger—it is highly desirable to not run all the tests in a Testcase Class. One way to run only a subset of these tests is to use the Test Tree Explorer provided by some Graphical Test Runners (see Test Runner). When this capability isn't available, a common practice is to disable the tests we don't want run by either commenting them out, copying the entire Testcase Class and deleting most of the tests, or changing the names or attributes of the test that cause them to be included by the Test Discovery algorithm.
public class LostTests extends TestCase {
public LostTests(String name) {
super(name);
}
public void xtestOne() throws Exception {
fail("test not implemented");
}
/*
public void testTwo() throws Exception {
fail("test not implemented");
}
*/
public void testSeventeen() throws Exception {
assertTrue(true);
}
}
All of these approaches suffer from the potential for Lost Tests (see Production Bugs on page 268) if the means of running a single test is not reversed properly when the situation requiring this testing strategy has passed. A Single Test Suite makes it possible to run the specific test(s) without making any changes to the Testcase Class in question. This technique takes advantage of the fact that most implementations of xUnit require a one-argument constructor on our Testcase Class; this argument consists of the name of the method that this instance of the class will invoke using reflection. The one-argument constructor is called once for each Test Method on the class, and the resulting Testcase Object is added to the Test Suite Object. (This is an example of the Pluggable Behavior [SBPP] pattern.)
We can run a single test by implementing a Test Suite Factory class with a single method suite that creates an instance of the desired Testcase Class by calling the one-argument constructor with the name of the one Test Method to be run. By returning a Test Suite Object containing only this one Testcase Object from suite, we achieve the desired result (running a single test) without touching the target Testcase Class.
public class MyTest extends TestCase {
public static Test suite() {
return new LostTests("testSeventeen");
}
}
I like to keep a Single Test Suite class around all the time and just plug in whatever test I want to run by changing the import statements and the suite method. Often, I maintain several Single Test Suite classes so I can flip back and forth between different tests very quickly. I find this technique easier to do than drilling down in the Test Tree Explorer and picking the specific test to run manually. (Your mileage may vary!)
Example: Smoke Test Suite
We can take the idea of a Special-Purpose Suite and combine it with the implementation technique of a Single Test Suite to create a Smoke Test [SCM] suite. This strategy involves picking a representative test or two from each of the major areas of the system and including those tests in a single Test Suite Object.
public class SmokeTestSuite extends TestCase {
public static Test suite() {
TestSuite mySuite = new TestSuite("Smoke Tests");
mySuite.addTest( new LostTests("testSeventeen") );
mySuite.addTest( new SampleTests("testOne") );
mySuite.addTest( new FlightManagementFacadeTest(
"testGetFlightsByOriginAirports_TwoOutboundFlights"));
// add additional tests here as needed...
return mySuite;
}
}
This scheme won't test our system thoroughly, but it is a quick way to find out whether some part of the core functionality is broken.
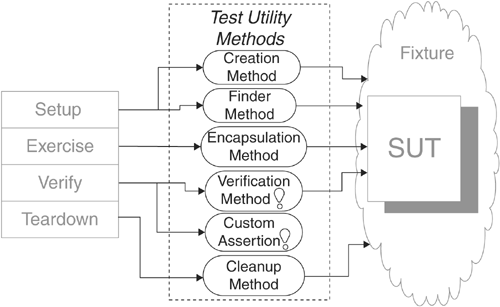
Test Utility Method
How do we reduce Test Code Duplication?
We encapsulate the test logic we want to reuse behind a suitably named utility method.
As we write tests, we will invariably find ourselves needing to repeat the same logic in many, many tests. Initially, we will just "clone and twiddle" as we write additional tests that need the same logic. Sooner or later, however, we will come to the realization that this Test Code Duplication (page 213) is starting to cause problems. This point is a good time to think about introducing a Test Utility Method.
How It Works
The subroutine and the function were two of the earliest ways devised to reuse logic in several places within a program. A Test Utility Method is just the same principle applied to object-oriented test code. We move any logic that appears in more than one test into a Test Utility Method; we can then call this method from various tests or even several times from within a single test. Of course, we will want to pass in anything that varies from usage to usage as arguments to the Test Utility Method.
When to Use It
We should use a Test Utility Method whenever test logic appears in several tests and we want to be able to reuse that logic. We might also use a Test Utility Method because we want to be very sure that the logic works as expected. The best way to achieve that kind of certainty is to write Self-Checking Tests (unit tests—see page 26) for the reusable test logic. Because the Test Methods (page 348) cannot easily be tested, it is best to do this by moving the logic out of the test methods and into Test Utility Methods, where it can be more easily tested.
The main drawback of using the Test Utility Method pattern is that it creates another API that the test automaters must build and understand. This extra effort can be largely mitigated through the use of Intent-Revealing Names [SBPP] for the Test Utility Methods and through the use of refactoring as the means for defining the Test Utility Methods.
There are as many different kinds of Test Utility Methods as there are kinds of logic in a Test Method. Next, we briefly summarize some of the most popular kinds. Some of these variations are important enough to warrant their own pattern write-ups in the corresponding section of this book.
Variation: Creation Method
Creation Methods (page 415) are used to create ready-to-use objects as part of fixture setup. They hide the complexity of object creation and interdependencies from the test. Creation Method has enough variants to warrant addressing this pattern in its own section.
Variation: Attachment Method
An Attachment Method (see Creation Method) is a special form of Creation Method used to amend already-created objects as part of fixture setup.
Variation: Finder Method
We can encapsulate any logic required to retrieve objects from a Shared Fixture (page 317) within a function that returns the object(s). We then give this function an Intent-Revealing Name so that anyone reading the test can easily understand the fixture we are using in this test.
We should use a Finder Method whenever we need to find an existing Shared Fixture object that meets some criteria and we want to avoid a Fragile Fixture (see Fragile Test on page 239) and High Test Maintenance Cost (page 265). Finder Methods can be used in either a pure Shared Fixture strategy or a hybrid strategy such as Immutable Shared Fixture (see Shared Fixture). Finder Methods also help prevent Obscure Tests (page 186) by encapsulating the mechanism of how the required objects are found and exactly which objects to use, thereby enabling the reader to focus on understanding why a particular object is being used and how it relates to the expected outcome described in the assertions. This helps us move toward Tests as Documentation (see page 23).
Although most Finder Methods return a single object reference, that object may be the root of a tree of objects (e.g., an invoice might refer to the customer and various addresses as well as containing a list of line items). In some circumstances, we may choose to define a Finder Method that returns a collection (Array or Hash) of objects, but the use of this type of Finder Method is less common. Finder Methods may also update parameters to pass additional objects back to the test that called them, although this approach is not as intent-revealing as use of a function. I do not recommend initialization of instance variables as a way of passing back objects because it is obscure and keeps us from moving the Finder Method to a Test Helper (page 643) later.
The Finder Method can find objects in the Shared Fixture in several ways: by using direct references (instance variables or class variables initialized in the fixture setup logic), by looking the objects up using known keys, or by searching for the objects using specific criteria. Using direct references or known keys has the advantage of always returning exactly the same object each time the test is run. The main drawback is that some other test may have modified the object such that it may no longer match the criteria implied by the Finder Method's name. Searching by criteria can avoid this problem, though the resulting tests may take longer to run and might be less deterministic if they use different objects each time they are run. Either way, we must modify the code in fewer places whenever the Shared Fixture is modified (compared to when the objects are used directly within the Test Method).
Variation: SUT Encapsulation Method
SUT API Encapsulation
Another reason for using a Test Utility Method is to encapsulate unnecessary knowledge of the API of the SUT. What constitutes unnecessary? Any method we call on the SUT that is not the method being tested creates additional coupling between the test and the SUT. Creation Methods and Custom Assertions (page 474) are common enough examples of SUT Encapsulation Methods to warrant their own write-ups as separate patterns. This section focuses on the less common uses of SUT Encapsulation Methods. For example, if the method that we are exercising (or that we use for verifying the outcome) has a complicated signature, we increase the amount of work involved to write and maintain the test code and may make it harder to understand the tests (Obscure Test). We can avoid this problem by wrapping these calls in SUT Encapsulation Methods that are intent-revealing and may have simpler signatures.
Variation: Custom Assertion
Custom Assertions are used to specify test-specific equality in a way that is reusable across many tests. They hide the complexity of comparing the expected outcome with the actual outcome. Custom Assertions are typically free of side effects in that they do not interact with the SUT to retrieve the outcome; that task is left to the caller.
Variation: Verification Method
Verification Methods (see Custom Assertion) are used to verify that the expected outcome has occurred. They hide the complexity of verifying the outcome from the test. Unlike Custom Assertions, Verification Methods interact with the SUT.
Variation: Parameterized Test
The most complete form of the Test Utility Method pattern is the Parameterized Test (page 607). It is, in essence, an almost complete test that can be reused in many circumstances. We simply provide the data that varies from test to test as a parameter and let the Parameterized Test execute all the stages of the Four-Phase Test (page 358) for us.
Variation: Cleanup Method
Cleanup Methods1 are used during the fixture teardown phase of the test to clean up any resources that might still be allocated after the test ends. Refer to the pattern Automated Teardown (page 503) for a more detailed discussion and examples.
Implementation Notes
The main objection some people have to using Test Utility Methods is that this pattern removes some of the logic from the test, which may make the test harder to read. One way we can avoid this problem when using Test Utility Methods is to give Intent-Revealing Names to the Test Utility Methods. In fact, well-chosen names can make the tests even easier to understand because they help prevent Obscure Tests by defining a Higher Level Language (see page 41) for defining tests. It is also helpful to keep the Test Utility Methods relatively small and self-contained. We can achieve this goal by passing all arguments to these methods explicitly as parameters (rather than using instance variables) and by returning any objects that the tests will require as explicit return values or updated parameters.
To ensure that the Test Utility Methods have Intent-Revealing Names, we should let the tests pull the Test Utility Methods into existence rather than just inventing Test Utility Methods that we think may be needed later. This "outside-in" approach to writing code avoids "borrowing tomorrow's trouble" and helps us find the minimal solution.
Writing the reusable Test Utility Method is relatively straightforward. The trickier question is where we would put this method. If the Test Utility Method is needed only in Test Methods in a single Testcase Class (page 373), then we can put it onto that class. If we need the Test Utility Method in several classes, however, the solution becomes a bit more complicated. The key issue relates to type visibility. The client classes need to be able to see the Test Utility Method, and the Test Utility Method needs to be able to see all the types and classes on which it depends. When it doesn't depend on many types/classes or when everything it depends on is visible from a single place, we can put the Test Utility Method into a common Testcase Superclass (page 638) that we define for our project or company. If it depends on types/classes that cannot be seen from a single place that all the clients can see, then we may need to put the Test Utility Method on a Test Helper in the appropriate test package or subsystem. In larger systems with many groups of domain objects, it is common practice to have one Test Helper for each group (package) of related domain objects.
Variation: Test Utility Test
One major advantage of using Test Utility Methods is that otherwise Untestable Test Code (see Hard-to-Test Code on page 209) can now be tested with Self-Checking Tests. The exact nature of such tests varies based on the kind of Test Utility Method being tested but a good example is a Custom Assertion Test (see Custom Assertion).
Motivating Example
The following example shows a test as many novice test automaters would first write it:
public void testAddItemQuantity_severalQuantity_v1(){
Address billingAddress = null;
Address shippingAddress = null;
Customer customer = null;
Product product = null;
Invoice invoice = null;
try {
// Fixture Setup
billingAddress = new Address("1222 1st St SW",
"Calgary", "Alberta",
"T2N 2V2", "Canada");
shippingAddress = new Address("1333 1st St SW",
"Calgary", "Alberta",
"T2N 2V2", "Canada");
customer = new Customer( 99, "John", "Doe",
new BigDecimal("30"),
billingAddress,
shippingAddress);
product = new Product( 88, "SomeWidget",
new BigDecimal("19.99"));
invoice = new Invoice( customer );
// Exercise SUT
invoice.addItemQuantity( product, 5 );
// Verify Outcome
List lineItems = invoice.getLineItems();
if (lineItems.size() == 1) {
LineItem actItem = (LineItem) lineItems.get(0);
assertEquals("inv", invoice, actItem.getInv());
assertEquals("prod", product, actItem.getProd());
assertEquals("quant", 5, actItem.getQuantity());
assertEquals("discount",
new BigDecimal("30"),
actItem.getPercentDiscount());
assertEquals("unit price",
new BigDecimal("19.99"),
actItem.getUnitPrice());
assertEquals("extended",
new BigDecimal("69.96"),
actItem.getExtendedPrice());
} else {
assertTrue("Invoice should have 1 item", false);
}
} finally {
// Teardown
deleteObject(invoice);
deleteObject(product);
deleteObject(customer);
deleteObject(billingAddress);
deleteObject(shippingAddress);
}
}
This test is difficult to understand because it exhibits many code smells, including Obscure Test and Hard-Coded Test Data (see Obscure Test).
Refactoring Notes
We often create Test Utility Methods by mining existing tests for reusable logic when we are writing new tests. We can use an Extract Method [Fowler] refactoring to pull the code for the Test Utility Method out of one Test Method and put it onto the Testcase Class as a Test Utility Method. From there, we may choose to move the Test Utility Method to a superclass by using a Pull Up Method [Fowler] refactoring or to another class by using a Move Method [Fowler] refactoring.
Example: Test Utility Method
Here's the refactored version of the earlier test. Note how much simpler this test is to understand than the original version. And this is just one example of what we can achieve by using Test Utility Methods!
public void testAddItemQuantity_severalQuantity_v13(){
final int QUANTITY = 5;
final BigDecimal CUSTOMER_DISCOUNT = new BigDecimal("30");
// Fixture Setup
Customer customer =
findActiveCustomerWithDiscount(CUSTOMER_DISCOUNT);
Product product = findCurrentProductWith3DigitPrice( );
Invoice invoice = createInvoice(customer);
// Exercise SUT
invoice.addItemQuantity(product, QUANTITY);
// Verify Outcome
final BigDecimal BASE_PRICE = product.getUnitPrice().
multiply(new BigDecimal(QUANTITY));
final BigDecimal EXTENDED_PRICE =
BASE_PRICE.subtract(BASE_PRICE.multiply(
CUSTOMER_DISCOUNT.movePointLeft(2)));
LineItem expected =
createLineItem( QUANTITY, CUSTOMER_DISCOUNT,
EXTENDED_PRICE, product, invoice);
assertContainsExactlyOneLineItem(invoice, expected);
}
Let's go through the changes step by step. First, we replaced the code to create the Customer and the Product with calls to Finder Methods that retrieve those objects from an Immutable Shared Fixture. We altered the code in this way because we don't plan to change these objects.
protected Customer findActiveCustomerWithDiscount(
BigDecimal percentDiscount) {
return CustomerHome.findCustomerById(
ACTIVE_CUSTOMER_WITH_30PC_DISCOUNT_ID);
}
Next, we introduced a Creation Method for the Invoice to which we plan to add the LineItem.
protected Invoice createInvoice(Customer customer) {
Invoice newInvoice = new Invoice(customer);
registerTestObject(newInvoice);
return newInvoice;
}
List testObjects;
protected void registerTestObject(Object testObject) {
testObjects.add(testObject);
}
To avoid the need for In-line Teardown (page 509), we registered each of the objects we created with our Automated Teardown mechanism, which we call from the tearDown method.
private void deleteTestObjects() {
Iterator i = testObjects.iterator();
while (i.hasNext()) {
try {
deleteObject(i.next());
} catch (RuntimeException e) {
// Nothing to do; we just want to make sure
// we continue on to the next object in the list.
}
}
}
public void tearDown() {
deleteTestObjects();
}
Finally, we extracted a Custom Assertion to verify that the correct LineItem has been added to the Invoice.
void assertContainsExactlyOneLineItem( Invoice invoice,
LineItem expected) {
List lineItems = invoice.getLineItems();
assertEquals("number of items", lineItems.size(), 1);
LineItem actItem = (LineItem)lineItems.get(0);
assertLineItemsEqual("",expected, actItem);
}
Parameterized Test
How do we reduce Test Code Duplication when the same test logic appears in many tests?
We pass the information needed to do fixture setup and result verification to a utility method that implements the entire test life cycle.

Testing can be very repetitious not only because we must run the same test over and over again, but also because many of the tests differ only slightly from one another. For example, we might want to run essentially the same test with slightly different system inputs and verify that the actual output varies accordingly. Each of these tests would consist of the exact same steps. While having a large number of tests is an excellent way to ensure good code coverage, it is not so attractive from a test maintainability standpoint because any change made to the algorithm of one of the tests must be propagated to all similar tests.
A Parameterized Test offers a way to reuse the same test logic in many Test Methods (page 348).
How It Works
The solution, of course, is to factor out the common logic into a utility method. When this logic includes all four parts of the entire Four-Phase Test (page 358) life cycle—that is, fixture setup, exercise SUT, result verification, and fixture teardown—we call the resulting utility method a Parameterized Test. This kind of test gives us the best coverage with the least code to maintain and makes it very easy to add more tests as they are needed.
If the right utility method is available to us, we can reduce a test that would otherwise require a series of complex steps to a single line of code. As we detect similarities between our tests, we can factor out the commonalities into a Test Utility Method (page 599) that takes only the information that differs from test to test as its arguments. The Test Methods pass in as parameters any information that the Parameterized Test requires to run and that varies from test to test.
When to Use It
We can use a Parameterized Test whenever Test Code Duplication (page 213) results from several tests implementing the same test algorithm but with slightly different data. The data that differs becomes the arguments passed to the Parameterized Test, and the logic is encapsulated by the utility method. A Parameterized Test also helps us avoid Obscure Tests (page 186); by reducing the number of times the same logic is repeated, it can make the Testcase Class (page 373) much more compact. A Parameterized Test is also a good steppingstone to a Data-Driven Test (page 288); the name of the Parameterized Test maps to the verb or "action word" of the Data-Driven Test, and the parameters are the attributes.
If our extracted utility method doesn't do any fixture setup, it is called a Verification Method (see Custom Assertion on page 474). If it also doesn't exercise the SUT, it is called a Custom Assertion.
Implementation Notes
We need to ensure that the Parameterized Test has an Intent-Revealing Name [SBPP] so that readers of the test will understand what it is doing. This name should imply that the test encompasses the whole life cycle to avoid any confusion. One convention is to start or end the name in "test"; the presence of parameters conveys the fact that the test is parameterized. Most members of the xUnit family that implement Test Discovery (page 393) will create only Testcase Objects (page 382) for "no arg" methods that start with "test," so this restriction shouldn't prevent us from starting our Parameterized Test names with "test." At least one member of the xUnit family—MbUnit—implements Parameterized Tests at the Test Automation Framework (page 298) level. Extensions are becoming available for other members of the xUnit family, with DDSteps for JUnit being one of the first to appear.
Testing zealots would advocate writing a Self-Checking Test (see page 26) to verify the Parameterized Test. The benefits of doing so are obvious—including increased confidence in our tests—and in most cases it isn't that hard to do. It is a bit harder than writing unit tests for a Custom Assertion because of the interaction with the SUT. We will likely need to replace the SUT2 with a Test Double so that we can observe how it is called and control what it returns.
Variation: Tabular Test
Row Test
Several early reviewers of this book wrote to me about a variation of Parameterized Test that they use regularly: the Tabular Test. The essence of this test is the same as that for a Parameterized Test, except that the entire table of values resides in a single Test Method. Unfortunately, this approach makes the test an Eager Test (see Assertion Roulette on page 224) because it verifies many test conditions. This issue isn't a problem when all of the tests pass, but it does lead to a lack of Defect Localization (see page 22) when one of the "rows" fails.
Another potential problem is that "row tests" may depend on one another either on purpose or by accident because they are running on the same Testcase Object; see Incremental Tabular Test for an example of this behavior.
Despite these potential issues, Tabular Tests can be a very effective way to test. At least one member of the xUnit family implements Tabular Tests at the framework level: MbUnit provides an attribute [RowTest] to indicate that a test is a Parameterized Test and another attribute [Row(x,y,...)] to specify the parameters to be passed to it. Perhaps it will be ported to other members of the xUnit family? (Hint, hint!)
Variation: Incremental Tabular Test
An Incremental Tabular Test is a variant of the Tabular Test pattern in which we deliberately build on the fixture left over by the previous rows of the test. It is identical to a deliberate form of Interacting Tests (see Erratic Test on page 228) called Chained Tests (page 454), except that all the tests reside within the same Test Method. The steps within the Test Method act somewhat like the steps of a "DoFixture" in Fit but without individual reporting of failed steps.3
Variation: Loop-Driven Test
When we want to test the SUT with all the values in a particular list or range, we can call the Parameterized Test from within a loop that iterates over the values in the list or range. By nesting loops within loops, we can verify the behavior of the SUT with combinations of input values. The main requirement for doing this type of testing is that we must either enumerate the expected result for each input value (or combination) or use a Calculated Value (see Derived Value on page 718) without introducing Production Logic in Test (see Conditional Test Logic on page 200). A Loop-Driven Test suffers from many of the same issues associated with a Tabular Test, however, because we are hiding many tests inside a single Test Method (and, therefore, Testcase Object).
Motivating Example
The following example includes some of the runit (Ruby Unit) tests from the Web site publishing infrastructure I built in Ruby while writing this book. All of the Simple Success Tests (see Test Method) for my cross-referencing tags went through the same sequence of steps: defining the input XML, defining the expected HTML, stubbing out the output file, setting up the handler for the XML, extracting the resulting HTML, and comparing it with the expected HTML.
def test_extref
# setup
sourceXml = "<extref id='abc'/>"
expectedHtml = "<a href='abc.html'>abc</a>"
mockFile = MockFile.new
@handler = setupHandler(sourceXml, mockFile)
# execute
@handler.printBodyContents
# verify
assert_equals_html( expectedHtml, mockFile.output,
"extref: html output")
end
def testTestterm_normal
sourceXml = "<testterm id='abc'/>"
expectedHtml = "<a href='abc.html'>abc</a>"
mockFile = MockFile.new
@handler = setupHandler(sourceXml, mockFile)
@handler.printBodyContents
assert_equals_html( expectedHtml, mockFile.output,
"testterm: html output")
end
def testTestterm_plural
sourceXml ="<testterms id='abc'/>"
expectedHtml = "<a href='abc.html'>abcs</a>"
mockFile = MockFile.new
@handler = setupHandler(sourceXml, mockFile)
@handler.printBodyContents
assert_equals_html( expectedHtml, mockFile.output,
"testterms: html output")
end
Even though we have already factored out much of the common logic into the setupHandler method, some Test Code Duplication remains. In my case, I had at least 20 tests that followed this same pattern (with lots more on the way), so I felt it was worthwhile to make these tests really easy to write.
Refactoring Notes
Refactoring to a Parameterized Test is a lot like refactoring to a Custom Assertion. The main difference is that we include the calls to the SUT made as part of the exercise SUT phase of the test within the code to which we apply the Extract Method [Fowler] refactoring. Because these tests are virtually identical once we have defined our fixture and expected results, the rest can be extracted into the Parameterized Test.
Example: Parameterized Test
In the following tests, we have reduced each test to two steps: initializing two variables and calling a utility method that does all the real work. This utility method is a Parameterized Test.
def test_extref
sourceXml = "<extref id='abc' />"
expectedHtml = "<a href='abc.html'>abc</a>"
generateAndVerifyHtml(sourceXml,expectedHtml,"<extref>")
end
def test_testterm_normal
sourceXml = "<testterm id='abc'/>"
expectedHtml = "<a href='abc.html'>abc</a>"
generateAndVerifyHtml(sourceXml,expectedHtml,"<testterm>")
end
def test_testterm_plural
sourceXml = "<testterms id='abc'/>"
expectedHtml = "<a href='abc.html'>abcs</a>"
generateAndVerifyHtml(sourceXml,expectedHtml,"<plural>")
end
The succinctness of these tests is made possible by defining the Parameterized Test as follows:
def generateAndVerifyHtml( sourceXml, expectedHtml,
message, &block)
mockFile = MockFile.new
sourceXml.delete!(" ")
@handler = setupHandler(sourceXml, mockFile )
block.call unless block == nil
@handler.printBodyContents
actual_html = mockFile.output
assert_equal_html( expectedHtml,
actual_html,
message + "html output")
actual_html
end
What distinguishes this Parameterized Test from a Verification Method is that it contains the first three phases of the Four-Phase Test (from setup to verify), whereas the Verification Method performs only the exercise SUT and verify result phases. Note that our tests did not need the teardown phase because we are using Garbage-Collected Teardown (page 500).
Example: Independent Tabular Test
Here's an example of the same tests coded as a single Independent Tabular Test:
def test_a_href_Generation
row( "extref" ,"abc","abc.html","abc" )
row( "testterm" ,'abc',"abc.html","abc" )
row( "testterms",'abc',"abc.html","abcs")
end
def row( tag, id, expected_href_id, expected_a_contents)
sourceXml = "<" + tag + " id='" + id + "'/>"
expectedHtml = "<a href='" + expected_href_id + "'>"
+ expected_a_contents + "</a>"
msg = "<" + tag + "> "
generateAndVerifyHtml( sourceXml, expectedHtml, msg)
end
Isn't this a nice, compact representation of the various test conditions? I simply did an In-line Temp [Fowler] refactoring on the local variables sourceXml and expectedHtml in the argument list of generateAndVerify and "munged" the various Test Methods together into one. Most of the work involved something we won't have to do in real life: squeeze the table down to fit within the page-width limit for this book. That constraint forced me to abridge the text in each row and rebuild the HTML and the expected XML within the row method. I chose the name row to better align this example with the MbUnit example provided later in this section but I could have called it something else like test_element.
Unfortunately, from the Test Runner's (page 377) perspective, this is a single test, unlike the earlier examples. Because the tests all reside within the same Test Method, a failure in any row other than the last will cause a loss of information. In this example, we need not worry about Interacting Tests because generateAndVerify builds a new test fixture each time it is called. In the real world, however, we have to be aware of that possibility.
Example: Incremental Tabular Test
Because a Tabular Test is defined in a single Test Method, it will run on a single Testcase Object. This opens up the possibility of building up series of actions. Here's an example provided by Clint Shank on his blog:
public class TabularTest extends TestCase {
private Order order = new Order();
private static final double tolerance = 0.001;
public void testGetTotal() {
assertEquals("initial", 0.00, order.getTotal(), tolerance);
testAddItemAndGetTotal("first", 1, 3.00, 3.00);
testAddItemAndGetTotal("second",3, 5.00, 18.00);
// etc.
}
private void testAddItemAndGetTotal( String msg,
int lineItemQuantity,
double lineItemPrice,
double expectedTotal) {
// setup
LineItem item = new LineItem( lineItemQuantity,
lineItemPrice);
// exercise SUT
order.addItem(item);
// verify total
assertEquals(msg,expectedTotal,order.getTotal(),tolerance);
}
}
Note how each row of the Incremental Tabular Test builds on what was already done by the previous row.
Example: Tabular Test with Framework Support (MbUnit)
Here's an example from the MbUnit documentation that shows how to use the [RowTest] attribute to indicate that a test is a Parameterized Test and another attribute [Row(x,y,...)] to specify the parameters to be passed to it.
[RowTest()]
[Row(1,2,3)]
[Row(2,3,5)]
[Row(3,4,8)]
[Row(4,5,9)]
public void tAdd(Int32 x, Int32 y, Int32 expectedSum)
{
Int32 Sum;
Sum = this.Subject.Add(x,y);
Assert.AreEqual(expectedSum, Sum);
}
Except for the syntactic sugar of the [Row(x,y,...)] attributes, this code sure looks similar to the previous example. It doesn't suffer from the loss of Defect Localization, however, because each row is considered a separate test. It would be a simple matter to convert the previous example to this format using the "find and replace" feature in a text editor.
Example: Loop-Driven Test (Enumerated Values)
The following test uses a loop to exercise the SUT with various sets of input values:
public void testMultipleValueSets() {
// Set up fixture
Calculator sut = new Calculator();
TestValues[] testValues = {
new TestValues(1,2,3),
new TestValues(2,3,5),
new TestValues(3,4,8), // special case!
new TestValues(4,5,9)
};
for (int i = 0; i < testValues.length; i++) {
TestValues values = testValues[i];
// Exercise SUT
int actual = sut.calculate( values.a, values.b);
// Verify result
assertEquals(message(i), values.expectedSum, actual);
}
}
private String message(int i) {
return "Row "+ String.valueOf(i);
}
In this case we enumerated the expected value for each set of test inputs. This strategy avoids Production Logic in Test.
Example: Loop-Driven Test (Calculated Values)
This next example is a bit more complex:
public void testCombinationsOfInputValues() {
// Set up fixture
Calculator sut = new Calculator();
int expected; // TBD inside loops
for (int i = 0; i < 10; i++) {
for (int j = 0; j < 10; j++) {
// Exercise SUT
int actual = sut.calculate( i, j );
// Verify result
if (i==3 & j==4) // Special case
expected = 8;
else
expected = i+j;
assertEquals(message(i,j), expected, actual);
}
}
}
private String message(int i, int j) {
return "Cell( " + String.valueOf(i)+ ","
+ String.valueOf(j) + ")";
}
Unfortunately, it suffers from Production Logic in Test because of the need to deal with the special case.
Further Reading
See the documentation for MbUnit for more information on the [RowTest] and [Row()] attributes. Likewise, see http://www.ddsteps.org for a description of the DDSteps extension for JUnit; while its name suggests a tool that supports Data-Driven Testing, the examples given are Parameterized Tests. More arguments for Tabular Test can be found on Clint Shank's blog at http://clintshank.javadevelopersjournal.com/tabulartests.htm.
Testcase Class per Class
How do we organize our Test Methods onto Testcase Classes?
We put all the Test Methods for one SUT class onto a single Testcase Class.

As the number of Test Methods (page 348) grows, we need to decide on which Testcase Class (page 373) to put each Test Method. Our choice of a test organization strategy affects how easily we can get a "big picture" view of our tests. It also affects our choice of a fixture setup strategy.
Using a Testcase Class per Class is a simple way to start off organizing our tests.
How It Works
We create a separate Testcase Class for each class we wish to test. Each Testcase Class acts as a home to all the Test Methods that are used to verify the behavior of the SUT class.
When to Use It
Using a Testcase Class per Class is a good starting point when we don't have very many Test Methods or we are just starting to write tests for our SUT. As the number of tests increases and we gain a better understanding of our test fixture requirements, we may want to split the Testcase Class into multiple classes. This choice will result in either Testcase Class per Fixture (page 631; if we have a small number of frequently used starting points for our tests) or Testcase Class per Feature (page 624; if we have several distinct features to test). As Kent Beck would say, "Let the code tell you what to do!"
Implementation Notes
Choosing a name for the Testcase Class is pretty simple: Just use the SUT classname, possibly prefixed or suffixed with "Test." The method names should try to capture at least the starting state (fixture) and the feature (method) being exercised, along with a summary of the parameters to be passed to the SUT. Given these requirements, we likely won't have "room" for the expected outcome in the method name, so the test reader must look at the Test Method body to determine the expected outcome.
The creation of the fixture is the primary implementation concern when using a Testcase Class per Class. Conflicting fixture requirements will inevitably arise among the various Test Methods, which makes use of Implicit Setup (page 424) difficult and forces us to use either In-line Setup (page 408) or Delegated Setup (page 411). A second consideration is how to make the nature of the fixture visible within each test method so as to avoid Obscure Tests (page 186). Delegated Setup (using Creation Methods; see page 415) tends to lead to more readable tests unless the In-line Setup is very simple.
Example: Testcase Class per Class
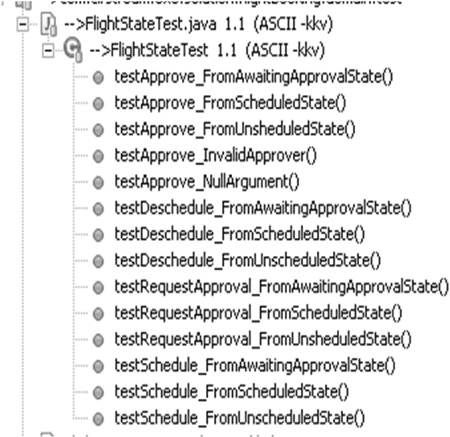
Here's an example of using the Testcase Class per Class pattern to structure the Test Methods for a Flight class that has three states (Unscheduled, Scheduled, and AwaitingApproval) and four methods (schedule, requestApproval, deSchedule, and approve. Because the class is stateful, we need at least one test for each state for each method.
public class FlightStateTest extends TestCase {
public void testRequestApproval_FromScheduledState() throws Exception {
Flight flight = FlightTestHelper.getAnonymousFlightInScheduledState();
try {
flight.requestApproval();
fail("not allowed in scheduled state");
} catch (InvalidRequestException e) {
assertEquals("InvalidRequestException.getRequest()",
"requestApproval",
e.getRequest());
assertTrue("isScheduled()", flight.isScheduled());
}
}
public void testRequestApproval_FromUnsheduledState()
throws Exception {
Flight flight = FlightTestHelper.
getAnonymousFlightInUnscheduledState();
flight.requestApproval();
assertTrue("isAwaitingApproval()",
flight.isAwaitingApproval());
}
public void testRequestApproval_FromAwaitingApprovalState()
throws Exception {
Flight flight = FlightTestHelper.
getAnonymousFlightInAwaitingApprovalState();
try {
flight.requestApproval();
fail("not allowed in awaitingApproval state");
} catch (InvalidRequestException e) {
assertEquals("InvalidRequestException.getRequest()",
"requestApproval",
e.getRequest());
assertTrue("isAwaitingApproval()",
flight.isAwaitingApproval());
}
}
public void testSchedule_FromUnscheduledState()
throws Exception {
Flight flight = FlightTestHelper.
getAnonymousFlightInUnscheduledState();
flight.schedule();
assertTrue( "isScheduled()", flight.isScheduled());
}
public void testSchedule_FromScheduledState()
throws Exception {
Flight flight = FlightTestHelper.
getAnonymousFlightInScheduledState();
try {
flight.schedule();
fail("not allowed in scheduled state");
} catch (InvalidRequestException e) {
assertEquals("InvalidRequestException.getRequest()",
"schedule",
e.getRequest());
assertTrue("isScheduled()", flight.isScheduled());
}
}
public void testSchedule_FromAwaitingApprovalState()
throws Exception {
Flight flight = FlightTestHelper.
getAnonymousFlightInAwaitingApprovalState();
try {
flight.schedule();
fail("not allowed in scheduled state");
} catch (InvalidRequestException e) {
assertEquals("InvalidRequestException.getRequest()",
"schedule",
e.getRequest());
assertTrue( "isAwaitingApproval()",
flight.isAwaitingApproval());
}
}
public void testDeschedule_FromScheduledState()
throws Exception {
Flight flight = FlightTestHelper.
getAnonymousFlightInScheduledState();
flight.deschedule();
assertTrue("isUnscheduled()", flight.isUnscheduled());
}
public void testDeschedule_FromUnscheduledState()
throws Exception {
Flight flight = FlightTestHelper.
getAnonymousFlightInUnscheduledState();
try {
flight.deschedule();
fail("not allowed in unscheduled state");
} catch (InvalidRequestException e) {
assertEquals("InvalidRequestException.getRequest()",
"deschedule",
e.getRequest());
assertTrue("isUnscheduled()", flight.isUnscheduled());
}
}
public void testDeschedule_FromAwaitingApprovalState()
throws Exception {
Flight flight = FlightTestHelper.
getAnonymousFlightInAwaitingApprovalState();
try {
flight.deschedule();
fail("not allowed in awaitingApproval state");
} catch (InvalidRequestException e) {
assertEquals("InvalidRequestException.getRequest()",
"deschedule",
e.getRequest());
assertTrue( "isAwaitingApproval()",
flight.isAwaitingApproval());
}
}
public void testApprove_FromScheduledState()
throws Exception {
Flight flight = FlightTestHelper.
getAnonymousFlightInScheduledState();
try {
flight.approve("Fred");
fail("not allowed in scheduled state");
} catch (InvalidRequestException e) {
assertEquals("InvalidRequestException.getRequest()",
"approve",
e.getRequest());
assertTrue("isScheduled()", flight.isScheduled());
}
}
public void testApprove_FromUnsheduledState()
throws Exception {
Flight flight = FlightTestHelper.
getAnonymousFlightInUnscheduledState();
try {
flight.approve("Fred");
fail("not allowed in unscheduled state");
} catch (InvalidRequestException e) {
assertEquals("InvalidRequestException.getRequest()",
"approve",
e.getRequest());
assertTrue( "isUnscheduled()", flight.isUnscheduled());
}
}
public void testApprove_FromAwaitingApprovalState()
throws Exception {
Flight flight = FlightTestHelper.
getAnonymousFlightInAwaitingApprovalState();
flight.approve("Fred");
assertTrue("isScheduled()", flight.isScheduled());
}
public void testApprove_NullArgument() throws Exception {
Flight flight = FlightTestHelper.
getAnonymousFlightInAwaitingApprovalState();
try {
flight.approve(null);
fail("Failed to catch no approver");
} catch (InvalidArgumentException e) {
assertEquals("e.getArgumentName()",
"approverName", e.getArgumentName());
assertNull( "e.getArgumentValue()",
e.getArgumentValue());
assertTrue( "isAwaitingApproval()",
flight.isAwaitingApproval());
}
}
public void testApprove_InvalidApprover() throws Exception {
Flight flight = FlightTestHelper.
getAnonymousFlightInAwaitingApprovalState();
try {
flight.approve("John");
fail("Failed to validate approver");
} catch (InvalidArgumentException e) {
assertEquals("e.getArgumentName()",
"approverName",
e.getArgumentName());
assertEquals("e.getArgumentValue()",
"John",
e.getArgumentValue());
assertTrue( "isAwaitingApproval()",
flight.isAwaitingApproval());
}
}
}
This example uses Delegated Setup of a Fresh Fixture (page 311) to achieve a more declarative style of fixture construction. Even so, this class is getting rather large and keeping track of the Test Methods is becoming a bit of a chore. Even the "big picture" provided by our IDE is not that illuminating; we can see the test conditions being exercised but cannot tell what the expected outcome should be without looking at the method bodies (Figure 24.1).
Figure 24.1. Testcase Class per Class example as seen in the Package Explorer of the Eclipse IDE. Note how both the starting state and event are included in the Test Method names.
Testcase Class per Feature
How do we organize our Test Methods onto Testcase Classes?
We group the Test Methods onto Testcase Classes based on which testable feature of the SUT they exercise.
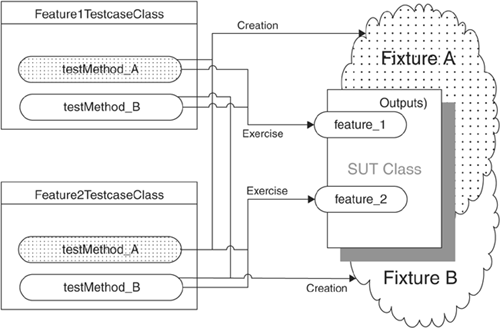
As the number of Test Methods (page 348) grows, we need to decide on which Testcase Class (page 373) to put each Test Method. Our choice of a test organization strategy affects how easily we can get a "big picture" view of our tests. It also affects our choice of a fixture setup strategy.
Using a Testcase Class per Feature gives us a systematic way to break up a large Testcase Class into several smaller ones without having to change our Test Methods.
How It Works
We group our Test Methods onto Testcase Classes based on which feature of the Testcase Class they verify. This organizational scheme allows us to have smaller Testcase Classes and to see at a glance all the test conditions for a particular feature of the class.
When to Use It
We can use a Testcase Class per Feature when we have a significant number of Test Methods and we want to make the specification of each feature of the SUT more obvious. Unfortunately, Testcase Class per Feature does not make each individual Test Method any simpler or easier to understand; only Testcase Class per Fixture (page 631) helps on that front. Likewise, it doesn't make much sense to use Testcase Class per Feature when each feature of the SUT requires only one or two tests; in that case, we can stick with a single Testcase Class per Class (page 617).
Note that having a large number of features on a class is a "smell" indicating the possibility that the class might have too many responsibilities. We typically use Testcase Class per Feature when we are writing customer tests for methods on a service Facade [GOF].
Variation: Testcase Class per Method
When a class has methods that take a lot of different parameters, we may have many tests for the one method. We can group all of these Test Methods onto a single Testcase Class per Method and put the rest of the Test Methods onto one or more other Testcase Classes.
Variation: Testcase Class per Feature
Although a "feature" of a class is typically a single operation or function, it may also be a set of related methods that operate on the same instance variable of the object. For example, the set and get methods of a Java Bean would be considered a single (and trivial) "feature" of the class that contains those methods. Similarly, a Data Access Object [CJ2EEP] would provide methods to both read and write objects. It is difficult to test these methods in isolation, so we can treat the reading and writing of one kind of object as a feature.
Variation: Testcase Class per User Story
If we are doing highly incremental development (such as we might do with eXtreme Programming), it can be useful to put the new Test Methods for each story into a different Testcase Class. This practice prevents commit-related conflicts when different people are working on different stories that affect the same SUT class. The Testcase Class per User Story pattern may or may not end up being the same as Testcase Class per Feature or Testcase Class per Method, depending on how we partition our user stories.
Implementation Notes
Because each Testcase Class represents the requirements for a single feature of the SUT, it makes sense to name the Testcase Class based on the feature it verifies. Similarly, we can name each test method based on which test condition of the SUT is being verified. This nomenclature allows us to see all the test conditions at a glance by merely looking at the names of the Test Methods of the Testcase Class.
One consequence of using Testcase Class per Feature is that we end up with a larger number of Testcase Classes for a single production class. Because we still want to run all the tests for this class, we should put these Testcase Classes into a single nested folder, package, or namespace. We can use an AllTests Suite (see Named Test Suite on page 592) to aggregate all of the Testcase Classes into a single test suite if we are using Test Enumeration (page 399).
Motivating Example
This example uses the Testcase Class per Class pattern to structure the Test Methods for a Flight class that has three states (Unscheduled, Scheduled, and AwaitingApproval) and four methods (schedule, requestApproval, deSchedule, and approve. Because the class is stateful, we need at least one test for each state for each method. (In the interest of saving trees, I've omitted many of the method bodies; please refer to Testcase Class per Class for the full listing.)
public class FlightStateTest extends TestCase {
public void testRequestApproval_FromScheduledState()
throws Exception {
Flight flight = FlightTestHelper.
getAnonymousFlightInScheduledState();
try {
flight.requestApproval();
fail("not allowed in scheduled state");
} catch (InvalidRequestException e) {
assertEquals("InvalidRequestException.getRequest()",
"requestApproval",
e.getRequest());
assertTrue("isScheduled()", flight.isScheduled());
}
}
public void testRequestApproval_FromUnsheduledState()
throws Exception {
Flight flight = FlightTestHelper.
getAnonymousFlightInUnscheduledState();
flight.requestApproval();
assertTrue("isAwaitingApproval()",
flight.isAwaitingApproval());
}
public void testRequestApproval_FromAwaitingApprovalState()
throws Exception {
Flight flight = FlightTestHelper.
getAnonymousFlightInAwaitingApprovalState();
try {
flight.requestApproval();
fail("not allowed in awaitingApproval state");
} catch (InvalidRequestException e) {
assertEquals("InvalidRequestException.getRequest()",
"requestApproval",
e.getRequest());
assertTrue("isAwaitingApproval()",
flight.isAwaitingApproval());
}
}
public void testSchedule_FromUnscheduledState()
throws Exception {
Flight flight = FlightTestHelper.
getAnonymousFlightInUnscheduledState();
flight.schedule();
assertTrue( "isScheduled()", flight.isScheduled());
}
public void testSchedule_FromScheduledState()
throws Exception {
// I've omitted the bodies of the rest of the tests to
// save a few trees
}
}
This example uses Delegated Setup (page 411) of a Fresh Fixture (page 311) to achieve a more declarative style of fixture construction. Even so, this class is getting rather large and keeping track of the Test Methods is becoming a bit of a chore. Because the Test Methods on this Testcase Class require four distinct methods, it is a good example of a test that can be improved through refactoring to Testcase Class per Feature.
Refactoring Notes
We can reduce the size of each Testcase Class and make the names of the Test Methods more meaningful by converting them to follow the Testcase Class per Feature pattern. First, we determine how many classes we want to create and which Test Methods should go into each one. If some Testcase Classes will end up being smaller than others, it makes the job easier if we start by building the smaller classes. Next, we do an Extract Class [Fowler] refactoring to create one of the new Testcase Classes and give it a name that describes the feature it exercises. Then, we do a Move Method [Fowler] refactoring (or a simple "cut and paste") on each Test Method that belongs in this new class along with any instance variables it uses.
We repeat this process until we are down to just one feature in the original Testcase Class; we then rename that class based on the feature it exercises. At this point, each of the Testcase Classes should compile and run—but we still aren't completely done. To get the full benefit of the Testcase Class per Feature pattern, we have one final step to carry out. We should do a Rename Method [Fowler] refactoring on each of the Test Methods to better reflect what the Test Method is verifying. As part of this refactoring, we can remove any mention of the feature being exercised from each Test Method name—that information should be captured in the name of the Testcase Class. This leaves us with "room" to include both the starting state (the fixture) and the expected result in the method name. If we have multiple tests for each feature with different method arguments, we'll need to find a way to include those aspects of the test conditions in the method name, too.
Another way to perform this refactoring is simply to make copies of the original Testcase Class and rename them as described above. Then we simply delete the Test Methods that aren't relevant for each class. We do need to be careful that we don't delete all copies of a Test Method; a less critical oversight is to leave a copy of the same method in several Testcase Classes. We can avoid both of the potential errors by making one copy of the original Testcase Class for each of the features and rename them as described above. Then we simply delete the Test Methods that aren't relevant for each class. When we are done, we simply delete the original Testcase Class.
Example: Testcase Class per Feature
In this example, we have converted the previously mentioned set of tests to use Testcase Class per Feature.
public class TestScheduleFlight extends TestCase {
public void testUnscheduled_shouldEndUpInScheduled()
throws Exception {
Flight flight = FlightTestHelper.
getAnonymousFlightInUnscheduledState();
flight.schedule();
assertTrue( "isScheduled()", flight.isScheduled());
}
public void testScheduledState_shouldThrowInvalidRequestEx()
throws Exception {
Flight flight = FlightTestHelper.
getAnonymousFlightInScheduledState();
try {
flight.schedule();
fail("not allowed in scheduled state");
} catch (InvalidRequestException e) {
assertEquals("InvalidRequestException.getRequest()",
"schedule",
e.getRequest());
assertTrue( "isScheduled()", flight.isScheduled());
}
}
public void testAwaitingApproval_shouldThrowInvalidRequestEx()
throws Exception {
Flight flight = FlightTestHelper.
getAnonymousFlightInAwaitingApprovalState();
try {
flight.schedule();
fail("not allowed in scheduled state");
} catch (InvalidRequestException e) {
assertEquals("InvalidRequestException.getRequest()",
"schedule",
e.getRequest());
assertTrue( "isAwaitingApproval()",
flight.isAwaitingApproval());
}
}
}
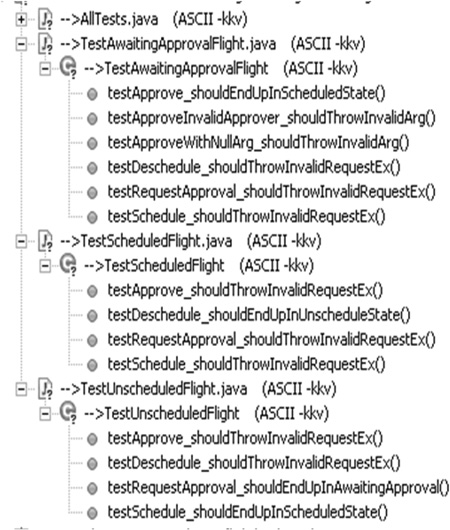
Except for their names, the Test Methods really haven't changed here. Because the names include the pre-conditions (fixture), the feature being exercised, and the expected outcome, they help us see the big picture when we look at the list of tests in our IDE's "outline view" (see Figure 24.2). This satisfies our need for Tests as Documentation (see page 23).
Figure 24.2. Testcase Class per Feature example as seen in the Package Explorer of the Eclipse IDE. Note how we do not need to include the starting state in the Test Method names, leaving room for the name of the method being called and the expected end state.
Testcase Class per Fixture
How do we organize our Test Methods onto Testcase Classes?
We organize Test Methods into Testcase Classes based on commonality of the test fixture.

As the number of Test Methods (page 348) grows, we need to decide on which Testcase Class (page 373) to put each Test Method. Our choice of a test organization strategy affects how easily we can get a "big picture" view of our tests. It also affects our choice of a fixture setup strategy.
Using a Testcase Class per Fixture lets us take advantage of the Implicit Setup (page 424) mechanism provided by the Test Automation Framework (page 298).
How It Works
We group our Test Methods onto Testcase Classes based on which test fixture they require as a starting point. This organization allows us to use Implicit Setup to move the entire fixture setup logic into the setUp method, thereby allowing each test method to focus on the exercise SUT and verify outcome phases of the Four-Phase Test (page 358).
When to Use It
We can use the Testcase Class per Fixture pattern whenever we have a group of Test Methods that need an identical fixture and we want to make each test method as simple as possible. If each test needs a unique fixture, using Testcase Class per Fixture doesn't make a lot of sense because we will end up with a large number of single-test classes; in such a case, it would be better to use either Testcase Class per Feature (page 624) or simply Testcase Class per Class (page 617).
One benefit of Testcase Class per Fixture is that we can easily see whether we are testing all the operations from each starting state. We should end up with the same lineup of test methods on each Testcase Class, which is very easy to see in an "outline view" or "method browser" of an IDE. This attribute makes the Testcase Class per Fixture pattern particularly useful for discovering Missing Unit Tests (see Production Bugs on page 268) long before we go into production.
Testcase Class per Fixture is a key part of the behavior-driven development style of testing/specification. It leads to very short test methods, often featuring only a single assertion per test method. When combined with a test method naming convention that summarizes the expected outcome of the test, this pattern leads to Tests as Documentation (see page 23).
Implementation Notes
Because we set up the fixture in a method called by the Test Automation Framework (the setUp method), we must use an instance variable to hold a reference to the fixture we created. In such a case, we must be careful not to use a class variable, as it can lead to a Shared Fixture (page 317) and the Erratic Tests (page 228) that often accompany this kind of fixture. [The sidebar "There's Always an Exception" on page 384 lists xUnit members that don't guarantee Independent Tests (see page 42) when we use instance variables.]
Because each Testcase Class represents a single test fixture configuration, it makes sense to name the Testcase Class based on the fixture it creates. Similarly, we can name each test method based on the method of the SUT being exercised, the characteristics of any arguments passed to the SUT method, and the expected outcome of that method call.
One side effect of using Testcase Class per Fixture is that we end up with a larger number of Testcase Classes. We may want to find a way to group the various Testcase Classes that verify a single SUT class. One way to do so is to create a nested folder, package, or namespace to hold just these test classes. If we are using Test Enumeration (page 399), we'll also want to create an AllTests Suite (see Named Test Suite on page 592) to aggregate all the Testcase Class per Fixtures into a single suite.
Another side effect is that the tests for a single feature of the SUT are spread across several Testcase Classes. This distribution may be a good thing if the features are closely related to one another because it highlights their interdependency. Conversely, if the features are somewhat unrelated, their dispersal may be disconcerting. In such a case, we can either refactor to use Testcase Class per Feature or apply an Extract Class [Fowler] refactoring on the SUT if we decide that this symptom indicates that the class has too many responsibilities.
Motivating Example
The following example uses Testcase Class per Class to structure the Test Methods for a Flight class that has three states (Unscheduled, Scheduled, and AwaitingApproval) and four methods (schedule, requestApproval, deSchedule, and approve). Because the class is stateful, we need at least one test for each state for each method. (In the interest of saving trees, I've omitted many of the method bodies; please refer to Testcase Class per Class for the full listing.)
public class FlightStateTest extends TestCase {
public void testRequestApproval_FromScheduledState()
throws Exception {
Flight flight = FlightTestHelper.
getAnonymousFlightInScheduledState();
try {
flight.requestApproval();
fail("not allowed in scheduled state");
} catch (InvalidRequestException e) {
assertEquals("InvalidRequestException.getRequest()",
"requestApproval",
e.getRequest());
assertTrue("isScheduled()", flight.isScheduled());
}
}
public void testRequestApproval_FromUnsheduledState()
throws Exception {
Flight flight = FlightTestHelper.
getAnonymousFlightInUnscheduledState();
flight.requestApproval();
assertTrue("isAwaitingApproval()",
flight.isAwaitingApproval());
}
public void testRequestApproval_FromAwaitingApprovalState()
throws Exception {
Flight flight = FlightTestHelper.
getAnonymousFlightInAwaitingApprovalState();
try {
flight.requestApproval();
fail("not allowed in awaitingApproval state");
} catch (InvalidRequestException e) {
assertEquals("InvalidRequestException.getRequest()",
"requestApproval",
e.getRequest());
assertTrue("isAwaitingApproval()",
flight.isAwaitingApproval());
}
}
public void testSchedule_FromUnscheduledState()
throws Exception {
Flight flight = FlightTestHelper.
getAnonymousFlightInUnscheduledState();
flight.schedule();
assertTrue( "isScheduled()", flight.isScheduled());
}
public void testSchedule_FromScheduledState()
throws Exception {
// I've omitted the bodies of the rest of the tests to
// save a few trees
}
}
This example uses Delegated Setup (page 411) of a Fresh Fixture (page 311) to achieve a more declarative style of fixture construction. Even so, this class is getting rather large and keeping track of the Test Methods is becoming a bit of a chore. Because the Test Methods on this Testcase Class require three distinct test fixtures (one for each state the flight can be in), it is a good example of a test that can be improved through refactoring to Testcase Class per Fixture.
Refactoring Notes
We can remove Test Code Duplication (page 213) in the fixture setup and make the Test Methods easier to understand by converting them to use the Testcase Class per Fixture pattern. First, we determine how many classes we want to create and which Test Methods should go into each one. If some Testcase Classes will end up being smaller than others, it will reduce our work if we start with the smaller ones. Next, we do an Extract Class refactoring to create one of the Testcase Classes and give it a name that describes the fixture it requires. Then, we do a Move Method [Fowler] refactoring on each Test Method that belongs in this new class, along with any instance variables it uses.
We repeat this process until we are down to just one fixture in the original class; we can then rename that class based on the fixture it creates. At this point, each of the Testcase Classes should compile and run—but we still aren't completely done. To get the full benefit of the Testcase Class per Fixture pattern, we have two more steps to complete. First, we should factor out any common fixture setup logic from each of the Test Methods into the setUp method, resulting in an Implicit Setup. This type of setup is made possible because the Test Methods on each class have the same fixture requirements. Second, we should do a Rename Method [Fowler] refactoring on each of the Test Methods to better reflect what the Test Method is verifying. We can remove any mention of the starting state from each Test Method name, because that information should be captured in the name of the Testcase Class. This refactoring leaves us with "room" to include both the action (the method being called plus the nature of the arguments) and the expected result in the method name.
As described in Testcase Class per Fixture, we can also refactor to this pattern by making one copy of the Testcase Class (suitably named) for each fixture, deleting the unnecessary Test Methods from each one, and finally deleting the old Testcase Class.
Example: Testcase Class per Fixture
In this example, the earlier set of tests has been converted to use the Testcase Class per Fixture pattern. (In the interest of saving trees, I've shown only one of the resulting Testcase Classes; the others look pretty similar.)
public class TestScheduledFlight extends TestCase {
Flight scheduledFlight;
protected void setUp() throws Exception {
super.setUp();
scheduledFlight = createScheduledFlight();
}
Flight createScheduledFlight() throws InvalidRequestException{
Flight newFlight = new Flight();
newFlight.schedule();
return newFlight;
}
public void testDeschedule_shouldEndUpInUnscheduleState()
throws Exception {
scheduledFlight.deschedule();
assertTrue("isUnsched", scheduledFlight.isUnscheduled());
}
public void testRequestApproval_shouldThrowInvalidRequestEx(){
try {
scheduledFlight.requestApproval();
fail("not allowed in scheduled state");
} catch (InvalidRequestException e) {
assertEquals("InvalidRequestException.getRequest()",
"requestApproval", e.getRequest());
assertTrue("isScheduled()",
scheduledFlight.isScheduled());
}
}
public void testSchedule_shouldThrowInvalidRequestEx() {
try {
scheduledFlight.schedule();
fail("not allowed in scheduled state");
} catch (InvalidRequestException e) {
assertEquals("InvalidRequestException.getRequest()",
"schedule", e.getRequest());
assertTrue("isScheduled()",
scheduledFlight.isScheduled());
}
}
public void testApprove_shouldThrowInvalidRequestEx()
throws Exception {
try {
scheduledFlight.approve("Fred");
fail("not allowed in scheduled state");
} catch (InvalidRequestException e) {
assertEquals("InvalidRequestException.getRequest()",
"approve", e.getRequest());
assertTrue("isScheduled()",
scheduledFlight.isScheduled());
}
}
}
Note how much simpler each Test Method has become! Because we have used Intent-Revealing Names [SBPP] for each of the Test Methods, we can use the Tests as Documentation. By looking at the list of methods in the "outline view" of our IDE, we can see the starting state (fixture), the action (method being called), and the expected outcome (what it returns or the post-test state)—all without even opening up the method body (Figure 24.3).
Figure 24.3. The tests for our Testcase Class per Fixture as seen in the Package Explorer of the Eclipse IDE. Note how we do not need to include the name of the method being called in the Test Method names, leaving room for the starting state and the expected end state.

This "big picture" view of our tests makes it clear that we are only testing the approve method arguments when the Flight is in the awaitingApproval state. We can now decide whether that limitation is a shortcoming of the tests or part of the specification (i.e., the result of calling approve is "undefined" for some states of the Flight).
Testcase Superclass
Abstract Testcase, Abstract Test Fixture, Testcase Baseclass
Where do we put our test code when it is in reusable Test Utility Methods?
We inherit reusable test-specific logic from an abstract Testcase Super class.
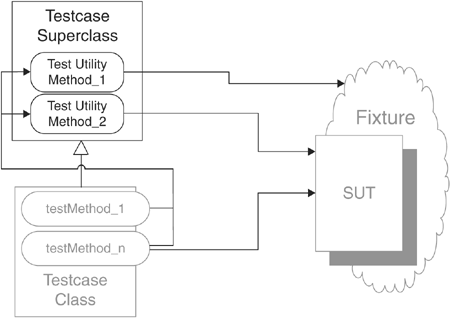
As we write tests, we will invariably find ourselves needing to repeat the same logic in many, many tests. Initially, we may just "clone and twiddle" as we write additional tests that need the same logic. Ultimately, we may introduce Test Utility Methods (page 599) to hold this logic—but where do we put the Test Utility Methods?
A Testcase Superclass is one option as a home for our Test Utility Methods.
How It Works
We define an abstract superclass to hold the reusable Test Utility Method that should be available to several Testcase Classes (page 373). We make the methods that will be reused visible to subclasses (e.g., protected in Java). We then use this abstract class as the superclass (base class) for any tests that wish to reuse the logic. The logic can be accessed simply by calling the method as though it were defined on the Testcase Class itself.
When to Use It
We can use a Testcase Superclass if we wish to reuse Test Utility Methods between several Testcase Classes and can find or define a Testcase Superclass from which we can subclass all tests that require the logic.
This pattern assumes that our programming language supports inheritance, we are not already using inheritance for some other conflicting purpose, and the Test Utility Method doesn't need access to specific types that are not visible from the Testcase Superclass.
The decision between a Testcase Superclass and a Test Helper (page 643) comes down to type visibility. The client classes need to see the Test Utility Method, and the Test Utility Method needs to see the types and classes it depends on. When it doesn't depend on many types/classes or when everything it depends on is visible from a single place, we can put the Test Utility Method into a common Testcase Superclass we define for our project or company. If the Test Utility Method depends on types/classes that cannot be seen from a single place that all clients can access, it may be necessary to put it on a Test Helper in the appropriate test package or subsystem.
Variation: Test Helper Mixin
In languages that support mixins, Test Helper Mixins give us the best of both worlds. As with a Test Helper, we can choose which Test Helper Mixins to include without being constrained by a single-inheritance hierarchy. As with a Test Helper Object (see Test Helper), we can hold a test-specific state in the mixin but we don't have to instantiate and delegate that task to a separate object. As with a Testcase Superclass, we can access everything as methods and attributes on self.
Implementation Notes
In variants of xUnit that require all Testcase Classes to be subclasses of a Testcase Superclass provided by the Test Automation Framework (page 298), we define that class as the superclass of our Testcase Superclass. In variants that use annotations or method attributes to identify the Test Method (page 348), we can subclass any class that we find useful.
We can implement the methods on the Testcase Superclass either as class methods or as instance methods. For any stateless Test Utility Methods, it is perfectly reasonable to use class methods. If it isn't possible to use class methods for some reason, we can work with instance methods. Either way, because the methods are inherited, we can access them as though they were defined on the Testcase Class itself. If our language supports managing the visibility of methods, we must ensure that we make the methods visible enough (e.g., protected in Java).
Motivating Example
The following example shows a Test Utility Method that is on the Testcase Class:
public class TestRefactoringExample extends TestCase {
public void testAddOneLineItem_quantity1() {
Invoice inv = createAnonInvoice();
LineItem expItem = new LineItem(inv, product, QUANTITY);
// Exercise
inv.addItemQuantity(product, QUANTITY);
// Verify
assertInvoiceContainsOnlyThisLineItem(inv, expItem);
}
void assertInvoiceContainsOnlyThisLineItem(
Invoice inv,
LineItem expItem) {
List lineItems = inv.getLineItems();
assertEquals("number of items", lineItems.size(), 1);
LineItem actual = (LineItem)lineItems.get(0);
assertLineItemsEqual("",expItem, actual);
}
}
This Test Utility Method is not reusable outside this particular class or its subclasses.
Refactoring Notes
We can make the Test Utility Method more reusable by moving it to a Testcase Superclass by using a Pull Up Method [Fowler] refactoring. Because the method is inherited by our Testcase Class, we can access it as if the method were defined locally. If the Test Utility Method accesses any instance variables, we must perform a Pull Up Field [Fowler] refactoring to move those variables to a place where the Test Utility Method can see them. In languages that have visibility restrictions, we may need to make the fields visible to subclasses (e.g., default or protected in Java) if Test Methods on the Testcase Class need to access the fields as well.
Example: Testcase Superclass
Because the method is inherited by our Testcase Class, we can access it as if it were defined locally. Thus the usage looks identical.
public class TestRefactoringExample extends OurTestCase {
public void testAddItemQuantity_severalQuantity_v12(){
// Fixture Setup
Customer cust = createACustomer(new BigDecimal("30"));
Product prod = createAProduct(new BigDecimal("19.99"));
Invoice invoice = createInvoice(cust);
// Exercise SUT
invoice.addItemQuantity(prod, 5);
// Verify Outcome
LineItem expected = new LineItem(invoice, prod, 5,
new BigDecimal("30"), new BigDecimal("69.96"));
assertContainsExactlyOneLineItem(invoice, expected);
}
}
The only difference is the class in which the method is defined and its visibility:
public class OurTestCase extends TestCase {
void assertContainsExactlyOneLineItem(Invoice invoice,
LineItem expected) {
List lineItems = invoice.getLineItems();
assertEquals("number of items", lineItems.size(), 1);
LineItem actItem = (LineItem)lineItems.get(0);
assertLineItemsEqual("",expected, actItem);
}
}
Example: Test Helper Mixin
Here are some tests written in Ruby using Test::Unit:
def test_extref
# setup
sourceXml = "<extref id='abc'/>"
expectedHtml = "<a href='abc.html'>abc</a>"
mockFile = MockFile.new
@handler = setupHandler(sourceXml, mockFile)
# execute
@handler.printBodyContents
# verify
assert_equals_html( expectedHtml, mockFile.output,
"extref: html output")
end
def testTestterm_normal
sourceXml = "<testterm id='abc'/>"
expectedHtml = "<a href='abc.html'>abc</a>"
mockFile = MockFile.new
@handler = setupHandler(sourceXml, mockFile)
@handler.printBodyContents
assert_equals_html( expectedHtml, mockFile.output,
"testterm: html output")
end
def testTestterm_plural
sourceXml ="<testterms id='abc'/>"
expectedHtml = "<a href='abc.html'>abcs</a>"
mockFile = MockFile.new
@handler = setupHandler(sourceXml, mockFile)
@handler.printBodyContents
assert_equals_html( expectedHtml, mockFile.output,
"testterms: html output")
end
These tests contain a fair bit of Test Code Duplication (page 213). We can address this issue by using an Extract Method [Fowler] refactoring to create a Test Utility Method. We can then make the Test Utility Method more reusable by moving it to a Test Helper Mixin using a Pull Up Method refactoring. Because the mixed-in functionality is considered part of our Testcase Class, we can access it as if it were defined locally. Thus the usage looks identical.
class CrossrefHandlerTest < Test::Unit::TestCase
include HandlerTest
def test_extref
sourceXml = "<extref id='abc' />"
expectedHtml = "<a href='abc.html'>abc</a>"
generateAndVerifyHtml(sourceXml,expectedHtml,"<extref>")
end
The only difference is the location where the method is defined and its visibility. In particular, Ruby requires mixins to be defined in a module rather than a class.
module HandlerTest
def generateAndVerifyHtml( sourceXml, expectedHtml,
message, &block)
mockFile = MockFile.new
sourceXml.delete!(" ")
@handler = setupHandler(sourceXml, mockFile )
block.call unless block == nil
@handler.printBodyContents
actual_html = mockFile.output
assert_equal_html( expectedHtml,
actual_html,
message + "html output")
actual_html
end
Test Helper
Where do we put our test code when it is in reusable Test Utility Methods?
We define a helper class to hold any Test Utility Methods we want to reuse in several tests.
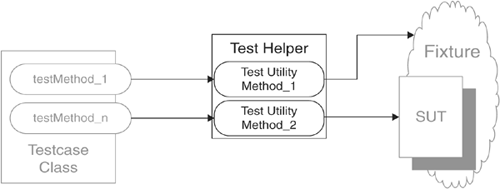
As we write tests, we will invariably find ourselves needing to repeat the same logic in many, many tests. Initially, we may just "clone and twiddle" as we write additional tests that need the same logic. Ultimately, we may introduce Test Utility Methods (page 599) to hold this logic—but where should we put such reusable logic?
A Test Helper is one possible choice of home for reusable test logic.
How It Works
We define a separate class to hold the reusable Test Utility Methods that should be available to several Testcase Classes (page 373). In each test that wishes to use this logic, we access the logic either using static method calls or via an instance created specifically for the purpose.
When to Use It
We can use a Test Helper if we wish to share logic or variables between several Testcase Classes and cannot (or choose not to) find or define a Testcase Superclass (page 638) from which we might otherwise subclass all tests that require this logic. We might pursue this course in several circumstances: Perhaps our programming language doesn't support inheritance (e.g., Visual Basic 5 or 6), perhaps we are already using inheritance for some other conflicting purpose, or perhaps the Test Utility Method needs access to specific types that are not visible from the Testcase Superclass.
The decision between a Test Helper and a Testcase Superclass comes down to type visibility. The client classes need to see the Test Utility Method, and the Test Utility Method needs to see all the types and classes it depends on. When it doesn't depend on many types/classes or when everything it depends on is visible from a single place, we can put the Test Utility Method into a common Testcase Superclass we define for our project or company. If the Test Utility Method depends on types/classes that cannot be seen from a single place that all clients can access, it may be necessary to put it on a Test Helper in the appropriate test package or subsystem. In larger systems with many groups of domain objects, it is common practice to have one Test Helper for each group (package) of related domain objects.
Variation: Test Fixture Registry
A Registry [PEAA] is a well-known object that can be accessed from anywhere in a program. We can use the Registry to store and retrieve objects from different parts of our program or tests. (Registry objects are often confused with Singletons [GOF], which are also well known but have only a single instance. With a Registry object, there may be one or more instances—we don't really care.) A Test Fixture Registry gives the tests the ability to access the same fixture as other tests in the same test run. Depending on how we implement our Test Helper, we may choose to provide a different instance of the Test Fixture Registry for each Test Runner (page 377) in an effort to prevent a Test Run War (see Erratic Test on page 228). A common example of a Test Fixture Registry is the Database Sandbox (page 650).
A Test Fixture Registry is typically used with a Setup Decorator (page 447) or with Lazy Setup (page 435); it isn't needed with Suite Fixture Setup (page 441) because only tests on the same Testcase Class need to share the fixture. In such a case, using a fixture holding class variable works well for this purpose.
Variation: Object Mother
The Object Mother pattern is simply an aggregate of several other patterns, each of which makes a small but significant contribution to making the test fixture easier to manage. The Object Mother consists of one or more Test Helpers that provide Creation Methods (page 415) and Attachment Methods (see Creation Method), which our tests then use to create ready-to-use test fixture objects. Object Mothers often provide several Creation Methods that create instances of the same class, where each method results in a test object in a different starting state (a Named State Reaching Method; see Creation Method). The Object Mother may also have the ability to delete the objects it creates automatically—an example of Automated Teardown (page 503).
Because there is no single, crisp definition of what someone means by "Object Mother," it is advisable to refer to the individual patterns (such as Automated Teardown) when referring to specific capabilities of the Object Mother.
Implementation Notes
The methods on the Test Helper can be implemented as either class methods or instance methods depending on the degree to which we want to keep the tests from interacting.
Variation: Test Helper Class
If all of the Test Utility Methods are stateless, the simplest approach is to implement the functionality of the Test Helper as class methods and then to have the tests access those methods using the ClassName.methodName (or equivalent) notation. If we need to hold references to fixture objects, we could place them in class variables. We need to be careful to avoid inadvertently creating a Shared Fixture (page 317), however—unless, of course, that is exactly what we are trying to do. In such a case, we are actually building a Test Fixture Registry.
Variation: Test Helper Object
If we can't use class methods for some reason, we can work with instance methods instead. In this case, the client test will need to create an instance of the Test Helper class and store it in an instance variable; the methods can then be accessed via this variable. This pattern is a good approach when the Test Helper holds references to fixture or SUT objects and we want to make sure that we don't creep into a Shared Fixture situation. It is also useful when the Test Helper stores expectations for a set of Mock Objects (page 544), because this pattern ensures that we can verify the calls are interleaved between the Mock Objects correctly.
Motivating Example
The following example shows a Test Utility Method that is on the Testcase Class:
public class TestUtilityExample extends TestCase {
public void testAddOneLineItem_quantity1() {
Invoice inv = createAnonInvoice();
LineItem expItem = new LineItem(inv, product, QUANTITY);
// Exercise
inv.addItemQuantity(product, QUANTITY);
// Verify
assertInvoiceContainsOnlyThisLineItem(inv, expItem);
}
void assertInvoiceContainsOnlyThisLineItem(
Invoice inv,
LineItem expItem) {
List lineItems = inv.getLineItems();
assertEquals("number of items", lineItems.size(), 1);
LineItem actual = (LineItem)lineItems.get(0);
assertLineItemsEqual("",expItem, actual);
}
}
This Test Utility Method is not reusable outside this particular class.
Refactoring Notes
We can make a Test Utility Method more reusable by moving it to a Test Helper class. This transformation is often as simple as doing a Move Method [Fowler] refactoring to our Test Helper class. One potential problem arises when we have used instance variables to pass arguments to or return data from the Test Utility Method. These "global data" need to be converted to explicit arguments and return values before we can perform the Move Method refactoring.
Example: Test Helper with Class Methods
In this modified version of the preceding test, we have turned the Test Utility Method into a class method on a Test Helper Class so we can access it via the classname without creating an instance:
public class TestUtilityExample extends TestCase {
public void testAddOneLineItem_quantity1_staticHelper() {
Invoice inv = createAnonInvoice();
LineItem expItem = new LineItem(inv, product, QUANTITY);
// Exercise
inv.addItemQuantity(product, QUANTITY);
// Verify
TestHelper.assertContainsExactlyOneLineItem(inv, expItem);
}
}
Example: Test Helper with Instance Methods
In this example, we have moved the Test Utility Method to a Test Helper as an instance method. Note that we must now access the method via an object reference (a variable that holds an instance of the Test Helper).
public class TestUtilityExample extends TestCase {
public void testAddOneLineItem_quantity1_instanceHelper() {
Invoice inv = createAnonInvoice();
LineItem expItem = new LineItem(inv, product, QUANTITY);
// Exercise
inv.addItemQuantity(product, QUANTITY);
// Verify
TestHelper helper = new TestHelper();
helper.assertInvContainsExactlyOneLineItem(inv, expItem);
}
}