14. The Translator
IT GOES WITHOUT SAYING THAT THE TRANSLATOR or localizer plays a fundamental role in the internationalization process. Even if you use machine translation, a human will still be needed to review and fix the result of the machine’s translation. Your translator/localizer could be a professional agency, a freelance translator, or, indeed, a bilingual, business-aware employee working in the same country as or a different country than the development team. Regardless, the role of the translator/localizer is critical, and the success of the internationalization of the project is dependent to some extent on how well this role is integrated into the development process. In this chapter, we explore strategies for including the translator/localizer in the development process and how to reintegrate this work with the project’s source. Your options are dictated by whether your application is a Windows Forms application or an ASP.NET application, by whether it is a .NET Framework 1.1 application or a .NET Framework 2.0 application, and also by your perception of the translator/localizer’s scope in the localization process.
The Translation Process
The essential steps in the translation process are not particularly surprising:
1. The developers package up the resources and ship them to the translator/localizer.
2. The translator/localizer updates the resources and returns them to the developers.
3. The developers reintegrate the resources into the application source.
Though these steps are easily recognizable, it is worth highlighting a couple points. First, and most important, there is a time delay between when the resources are shipped to the translator/localizer and when those resources are returned to development for reintegration into the application. During this time, the development of the application will continue, and it is unrealistic to treat the resources as “locked” during this period. Consequently, you should consider that development maintains the “master” copy of resources and that the resources that are returned from the translator/localizer must be reintegrated into the master copy (as opposed to replacing the master copy). We return to this subject in the “Reintegrating Resources” section.
Second, it should be recognized that translation/localization is a part of the development process. This means that if development is an iterative process, translation/localization is likely to be an iterative process, too. Translation/localization might not follow the same iterations as development, but it is highly likely that it will be performed in iterative steps. So whereas you might strive to complete a considerable part of the application before translation/localization occurs, and even use pseudo translation to catch as many translation/localization errors as possible before engaging the translator/localizer, the application is unlikely to be frozen after translation/localization has occurred. Instead, as each bug is fixed and as each form is modified, new text is used. Your translation/localization process could well consist of a large translation/localization phase, but it will be followed up with smaller iterative phases. This means that your translator/localizer needs a way of finding all the new text and resources to translate. Without this, the translator/localizer will need to manually search the application for new resources to translate, and this is a labor-intensive and error-prone approach.
Translator or Localizer?
Before you engage the services of a translator or localizer, you should be sure what role you expect this person to play. A translator simply translates all the text in the application. A localizer also does this but has a wider scope. A localizer considers the size and position of controls, the assignments of hotkeys, the use of images and colors, the assignment of right-to-left properties and IME modes, and the correctness of globalization; in general, a localizer has an understanding of the appropriateness of the resulting application in the chosen culture. The choice between these roles is dependent, to a large extent, on the technology you have used to build your application. For example, if you have written a Windows Forms 1.1 application, the controls’ positions (and, to some extent, their sizes) are most likely fixed. In this scenario, you might want to give the translator/localizer the opportunity to move and resize controls for a given culture. If, however, you have written a Windows Forms 2.0 application and used TableLayoutPanels and FlowLayoutPanels, the positioning and sizing of the controls will probably already be handled by the .NET Framework, and such changes would be unwanted. Similarly, an ASP.NET application might rely on the essential nature of HTML for positioning and sizing, and again such changes to positions and sizes would be unwanted. You need to make similar decisions on issues such as hotkey assignments, fonts, right-to-left settings and IME modes, to determine whether these are handled within the application logic (and, therefore, by developers) or within resources (and, therefore, by a localizer). With these decisions in place, you are better able to give your translator/localizer an accurate scope of his or her role.
Your decision on the translator/localizer’s role might have an impact on how you process the resources when they return. If the translator/localizer’s role is solely one of translation, your reintegration process will only reintegrate text strings into the master copy. All other resources (e.g., colors, Size, Location, Font, RightToLeft, ImeMode) will be ignored. In this scenario, your translation/localization tool should disable or hide these resources to avoid unnecessary frustration on your translator’s part. Unfortunately, this is not possible if you use the Windows Forms Resource Editor (WinRes.exe) because it does not support customization. This lends more weight to the argument to write your own WinRes.
Translation/Localization Strategies
The approach that you take to translation/localization depends partly on the role that your translator/localizer takes, partly on what format you use to store your resources, and partly on whether your application is a Windows Forms or ASP.NET application. We start by considering the translator/localizer’s role. At the minimal-ist end of the scale, your translator could simply translate all the text in your resources and return them to you. The tool used to perform the translation could even be NotePad if the resources are resx files. This is, of course, possible but not desirable. The problem with this minimalist approach is that there is no feedback process. The translator translates the text out of context. This means that the translator does not see the context in which the translation is used. A vital part of this process is that the translator must see the result of the translation in context. The context in which a phrase is used often changes the vocabulary or grammar used in a translation. If the translator does not see this until the changes are reintegrated into the product, the number of round-trips between the developers and the translators will be unnecessarily high. For this reason, we need to employ a translation/localization strategy in which the translator/localizer is given feedback before the resources are returned to the developers. In an ideal world, this would mean allowing the translator/localizer to make changes in context. WinRes is an excellent tool for this purpose in Windows Forms applications (assuming that the user interface is static and not dynamically generated at runtime), and we return to WinRes later.
The second factor that has a significant impact on your translation/localization strategy is what format you use to store your resources. Some formats are read directly by an application, and others require processing before they can be read. For example, if you store your resources in a database, the translator need only change the database, and the application will use the updated text. However, if you use resx files, Windows Forms applications and ASP.NET 1.1 applications do not directly read resx files. Instead, they read resources from resource assemblies. Consequently, any change to a resx file needs to be propagated to its resource assembly before the change can be seen.
The third factor that has a significant impact on your translation/localization strategy is whether your application is a Windows Forms application, an ASP.NET 1.1 application, or an ASP.NET 2.0 application. We cover the issues concerning each over the next sections.
ASP.NET 2.0 Translation/Localization Strategies
ASP.NET 2.0 has the simplest translation/localization strategy. ASP.NET 2.0 applications compile resx files to resource assemblies when a page is first requested. This process is handled by the ResXBuildProvider and is part of the nature of ASP.NET 2.0; you need take no steps to ensure that this happens. More important, when a resx file is changed, ASP.NET 2.0 unloads the application domain, rebuilds the resource assembly, and continues to process the request. Any changes made by the translator/localizer can be seen immediately by refreshing the page. This kind of immediate feedback improves the quality and speed of the translation/localization. The downside to this approach is that when the application domain is unloaded, all state is lost unless the state is held in a separate location. This affects the behavior of the application, so translators/localizers might need to retrace their path through the application. The solution to this problem is to store the state in a separate process using the Web.config sessionState element (set the mode attribute to either StateServer or SQLServer).
Windows Forms and ASP.NET 1.1 Translation/Localization Strategies
To some extent, Windows Forms (1.1 and 2.0) applications and ASP.NET 1.1 applications have the same translation/localization problems with the same solutions. The problem is that if your resources are stored in resx files, your application will not, by default, see any changes made by the translator/localizer to those resx files because the application reads its resources from its resource assemblies. This section is about solving this problem.
ResXResourceManager
In Chapter 12, “Custom Resource Managers,” I wrote a ResXResourceManager class that reads resources directly from resx files instead of from assemblies. In addition, unlike ResourceManager.CreateFileBasedResourceManager, these resx files are not locked, so they can be updated while the application is running. This is a relatively easy solution to the problem, with only a few drawbacks. First, you would need to modify your application to use a ResXResourceManager instead of a regular ResourceManager or ComponentResourceManager. The best approach here would be to use the ResourceManagerProvider class, also introduced in Chapter 12. In addition, in a Windows Forms application, you would need to use the Resource ManagerSetter component (also in Chapter 12) to change the resource manager in Windows Forms. Second, you would be advised to create two versions of your application: one for production and one for translation/localization. The former would use either ResourceManager (Windows Forms 1.1, ASP.NET 1.1) or Component ResourceManager (Windows Forms 2.0), and the latter would use ResXResource Manager. In this way, the production version uses the resource managers that are optimized for performance, and the translation/localization version uses the resource manager that provides the necessary functionality for translating the application.
Linked Satellite Resource Assemblies
A less intrusive but less effective solution to the same problem is to use linked satellite resource assemblies. A linked satellite resource assembly is a satellite resource assembly in which the resources have been linked to the assembly instead of being embedded in the assembly. The satellite resource assemblies that have been discussed throughout the majority of this book have all used embedded resources—that is, the resources have been embedded inside the assembly. The resulting assembly is a single file that contains all the resources for a single culture. A linked satellite resource assembly, on the other hand, is an assembly that has links to separate .resources files in the same directory. The benefit of this solution is that it is unobtrusive. The application source code is not modified in any way; the solution is simply a packaging/deployment issue. The application continues to use the same ResourceManager or ComponentResourceManager as before. The difference between the production version and the translation/localization version is that the former uses embedded assemblies and the latter uses linked assemblies. There are two disadvantages to this solution. The first is that the translation/localization version must include some facility to convert the updated resx files to resources files (i.e., the only format recognized by linked resource assemblies). The second is that the ResourceManager class locks the resources files when it reads them, preventing them from being written to (i.e., when the resx file is converted to a resources file) until the ResourceManager’s application domain is unloaded (which is typically when the application is closed) or the resources files are unlocked using Resource-Manager.ReleaseAllResources.
Building a Linked Satellite Resource Assembly Using the .NET Framework SDK
Visual Studio builds satellite resource assemblies with embedded resources, so to build a satellite resource assembly with linked resources, you have to use either the .NET Framework SDK tools or the .NET Framework classes. The former is suitable for inclusion in a build process, and we cover it in this section. The latter is suitable for inclusion in custom utilities, and we cover it in the next section.
In this example, we build a French (fr) satellite resource assembly. To convert a resx file to a resources file, use resgen.exe. Assuming that you have a resx file called Form1.fr.resx, open a Visual Studio command prompt and, in the same folder as your resx file, type this:
resgen Form1.fr.resx
The result is a new binary resource file called Form1.fr.resources. The .NET Framework SDK includes a tool called Assembly Linker (al.exe), which exists to create assemblies. The following command creates a French linked satellite resource assembly from the Form1.fr.resources file:
al /target:library
/link:Form1.fr.resources,WindowsApplication1.Form1.fr.resources
/culture:fr /out:WindowsApplication1.resources.dll
The /target switch specifies the output type (library, exe, or win). The /link switch tells Assembly Linker to add a linked resource. The “Form1.fr.resources” part is the name of the file to link, and the “WindowsApplication1.Form1.fr. resources” part is the name that the resource is given inside the assembly. The resource name must be fully qualified, so it must include the application’s default namespace (e.g., “Windows-Application1”). To create a “normal” resource assembly where resources are embedded, replace the /link switch with the /embed switch. To specify more than one resource to include in the assembly, you specify multiple /link or /embed switches. The /culture switch specifies the culture of the assembly and is essential. Simply placing the assembly in a directory with the culture name is not enough to identify its culture. Finally, the /out switch specifies the output assembly filename.
Building a Linked Satellite Resource Assembly Using .NET Framework Classes
The .NET Framework includes a class called AssemblyBuilder (in System. Reflection.Emit) that exists to build assemblies in code. To achieve the same result as the Assembly Linker in the previous example, I have written a method called BuildLinkedSatelliteResourceAssembly. It is called like this:
BuildLinkedSatelliteResourceAssembly(
new string[] {"Form1.fr.resources"},
"WindowsApplication1",
new CultureInfo("fr"),
"WindowsApplication1.resources.dll");
The first parameter is an array of resources files to link. The second parameter is the default namespace. The third parameter is the CultureInfo. The fourth parameter is the resource assembly output filename. The method is implemented like this:
public static void BuildLinkedSatelliteResourceAssembly(
string[] resourceFileNames, string defaultNamespace,
CultureInfo cultureInfo, string outputFilename)
{
AssemblyName assemblyName = new AssemblyName();
assemblyName.CultureInfo = cultureInfo;
assemblyName.Name =
Path.GetFileNameWithoutExtension(outputFilename);
AssemblyBuilder assemblyBuilder =
System.Threading.Thread.GetDomain().
DefineDynamicAssembly(assemblyName,
AssemblyBuilderAccess.RunAndSave,
Path.GetDirectoryName(outputFilename));
foreach(string resourceName in resourceFileNames)
{
assemblyBuilder.AddResourceFile(
defaultNamespace + "." + resourceName, resourceName);
}
assemblyBuilder.Save(assemblyName.Name + ".dll");
}
The AssemblyBuilder class does not have a public constructor. Instead, you construct new AssemblyBuilder objects using the AppDomain.DefineDynamic Assembly method. This method accepts an AssemblyName object, which represents the full name of the assembly (name, culture, version, public key). DefineDynamic Assembly’s second parameter specifies that the assembly can be executed and also saved to disk. The third parameter specifies the location of the new assembly.
The AssemblyBuilder.AddResourceFile method represents one of a tiny minority of methods in the .NET Framework that is poorly named. The name implies that it will add a resource file, but it does not do this. Instead, it adds a link to a resource file instead of embedding the resource in the assembly (to embed a resource, use the ModuleBuilder.DefineResource method). Finally, note that the AssemblyBuilder.Save method accepts a simple filename. It must not contain a path. The path is set in the original call to AssemblyBuilder.DefineDynamicAssembly.
Rebuilding Satellite Resource Assemblies
A variation on the previous theme is to rebuild the satellite resource assembly entirely using embedded resources. In this scenario, the translator/localizer gets the same production version of the application as everyone else. In addition, the translator/localizer gets the original resx files plus a utility to rebuild the satellite resource assemblies from those resx files. The benefits of this approach are that it is unobtrusive and you do not have to create a separate version of the application for the translator/localizer. There are several drawbacks to this approach, though. The first is that the satellite resource assembly is opened by the application, which means that it cannot be written to until the application is closed. Another potential drawback is that the new satellite assembly is not identical (excluding the resources) to the original satellite assembly. Information such as version information, public key, custom attributes, and AssemblyName.Flags is not transferred from the original assembly to the new (you see how to do this in the next section). Whether this is a problem depends upon whether your application needs this information. The final drawback is that the new assembly contains resources only for which resx files exist. If the original assembly contains resources for which no resx file is present (because not all of the original resx files used to build the assembly were deployed to the translator’s machine), the new assembly will not contain that resource. Again, you learn how to overcome this in the next section.
To rebuild a satellite resource assembly from resx files, I have written a method called BuildEmbeddedSatelliteResourceAssembly, which is called like this:
BuildEmbeddedSatelliteResourceAssembly(
new string[] {"Form1.fr.resx"},
"WindowsApplication1",
new CultureInfo("fr"),
"WindowsApplication1.resources.dll");
The parameters are the same as for the BuildLinkedSatelliteResource-Assembly method, shown earlier, with the exception that the filenames are resx files and not resources files. The method is implemented like this:
public static void BuildEmbeddedSatelliteResourceAssembly(
string[] resourceFileNames,
string defaultNamespace,
CultureInfo cultureInfo,
string outputFilename)
{
AssemblyName assemblyName = new AssemblyName();
assemblyName.CultureInfo = cultureInfo;
assemblyName.Name =
Path.GetFileNameWithoutExtension(outputFilename);
AssemblyBuilder assemblyBuilder =
System.Threading.Thread.GetDomain().
DefineDynamicAssembly(
assemblyName,
AssemblyBuilderAccess.RunAndSave,
Path.GetDirectoryName(outputFilename));
ModuleBuilder moduleBuilder =
assemblyBuilder.DefineDynamicModule(
assemblyName.Name + ".dll",
assemblyName.Name + ".dll",
false);
foreach(string resourceFileName in resourceFileNames)
{
string resourceName = Path.ChangeExtension(
Path.GetFileName(resourceFileName), ".resources");
IResourceWriter resourceWriter =
moduleBuilder.DefineResource(
defaultNamespace + "." + resourceName,
resourceName, ResourceAttributes.Public);
WriteResourceFromResXToResourceWriter(
resourceWriter, resourceFileName);
}
assemblyBuilder.Save(assemblyName.Name + ".dll");
}
The first part of the BuildEmbeddedSatelliteResourceAssembly method is the same as the previous BuildLinkedSatelliteResourceAssembly method. The differences start with the call to AssemblyBuilder.DefineDynamicModule, which defines a new module and enables us to add resources to the module using the ModuleBuilder return result. What is not obvious from this code is the importance of DefineDynamicModule’s name parameter (i.e., its first parameter). For the resources to be embedded in the assembly, this parameter must exactly match the assemblies’ filename (without the path).
The ModuleBuilder enables us to create new embedded resources using its DefineResource method. We do this in the foreach block, where we iterate through each of the resx files. DefineResource does not allow us to embed a resx or resources file wholesale in a single operation. Instead, it returns an IResourceWriter, which we use in WriteResourceFromResXToResourceWriter to add each entry in the resx file one by one:
private static void WriteResourceFromResXToResourceWriter(
IResourceWriter resourceWriter, string resourceFileName)
{
using (ResXResourceReader reader =
new ResXResourceReader(resourceFileName))
{
foreach(DictionaryEntry entry in reader)
{
resourceWriter.AddResource(
entry.Key.ToString(), entry.Value);
}
}
}
Rebuilding Satellite Resource Assemblies from Original Assemblies
The solution to two of the drawbacks in the previous approach is to load missing information (e.g., resources, version information, public key, custom attributes) from the original assembly. To load this information, the original assembly must be loaded using reflection. This introduces a new drawback. When you load an assembly, it cannot be written to because it is already open. You could create a new application domain that could be unloaded before the new assembly is written, but satellite assemblies cannot be loaded into any domain other than the current domain (a SerializationException occurs). Microsoft’s Introspection Engine (as used in FxCop), also called the Common Compiler Infrastructure (CCI), can solve this problem; however, at the time of writing, it is not part of the .NET Framework SDK and has little documentation, so I have chosen not to use it. However, it might become part of the .NET Framework SDK in the future, so this is a potential solution to remember. A workaround is to begin by copying the assembly to a temporary location, loading it from the temporary location, and then writing the new assembly to the original location. This works if the operation occurs once within an application domain, but thereafter the assembly is still loaded from the first attempt and subsequent attempts will fail. With this limitation in mind, I have written BuildEmbeddedSatelliteResourceAssemblyFromAssembly, which is called like this:
BuildEmbeddedSatelliteResourceAssemblyFromAssembly(
new string[] {"Form1.fr.resx"},
"WindowsApplication1",
new CultureInfo("fr"),
"WindowsApplication1.resources.dll");
BuildEmbeddedSatelliteResourceAssemblyFromAssembly is implemented like this:
public static void
BuildEmbeddedSatelliteResourceAssemblyFromAssembly(
string[] resourceFileNames,
string defaultNamespace,
CultureInfo cultureInfo,
string outputFileName)
{
string inputFileName;
string tempPath = Path.GetTempPath();
if (tempPath.EndsWith(Path.DirectorySeparatorChar.ToString()))
inputFileName = tempPath + Path.GetFileName(outputFileName);
else
inputFileName = tempPath + Path.DirectorySeparatorChar +
Path.GetFileName(outputFileName);
if (File.Exists(inputFileName))
// there is already a version of the input file
// in the temporary folder
File.Delete(inputFileName);
// move original assembly to a temporary location
File.Move(outputFileName, inputFileName);
Assembly inputAssembly = Assembly.LoadFrom(inputFileName);
AssemblyName inputAssemblyName =
AssemblyName.GetAssemblyName(inputFileName);
AssemblyName assemblyName = new AssemblyName();
assemblyName.CultureInfo = inputAssemblyName.CultureInfo;
assemblyName.Name =
Path.GetFileNameWithoutExtension(outputFileName);
assemblyName.CodeBase = inputAssemblyName.CodeBase;
assemblyName.Version = inputAssemblyName.Version;
assemblyName.SetPublicKey(inputAssemblyName.GetPublicKey());
assemblyName.Flags = inputAssemblyName.Flags;
AssemblyBuilder assemblyBuilder =
System.Threading.Thread.GetDomain().
DefineDynamicAssembly(assemblyName,
AssemblyBuilderAccess.RunAndSave,
Path.GetDirectoryName(outputFileName));
AddVersionInfoResource(assemblyBuilder, inputAssembly);
ModuleBuilder moduleBuilder =
assemblyBuilder.DefineDynamicModule(
assemblyName.Name + ".dll",
assemblyName.Name + ".dll", false);
string[] resourceNames =
inputAssembly.GetManifestResourceNames();
foreach(string resourceName in resourceNames)
{
string fixedName = resourceName.Substring(
resourceName.IndexOf(".") + 1);
IResourceWriter resourceWriter =
moduleBuilder.DefineResource(
resourceName, fixedName, ResourceAttributes.Public);
WriteResourceToResourceWriter(
inputAssembly, resourceWriter, defaultNamespace,
resourceName, resourceFileNames);
}
assemblyBuilder.Save(assemblyName.Name + ".dll");
}
This method follows a similar pattern to previous methods, with some notable differences. It starts by attempting to move the original assembly to a temporary location, and the “input” assembly is loaded from the temporary location (making the original location available to write the new assembly to). It loads its assembly name information (name, version, culture, public key) from the input assembly. It copies the input assembly’s Version Information resource to the output assembly using AddVersionInfoResource. Previous methods in this chapter have iterated through all of the input resource files, adding them to the assembly. In this method, however, the driving force is not the input file list, but the resources that exist in the input assembly. Assembly.GetManifestResourceNames gets an array of resource names in the assembly. We walk through this list looking for matching input resource files. Where an input resource file is found, the resources are loaded from the input resource file. Where a matching resource file is not found, the resources are loaded from the input assembly. This process occurs in the WriteResourceToResourceWriter method:
private static void WriteResourceToResourceWriter(
Assembly inputAssembly,
IResourceWriter resourceWriter,
string defaultNamespace,
string resourceName,
string[] resourceFileNames)
{
string resourceFileName = GetResourceFile(
defaultNamespace, resourceName, resourceFileNames);
if (resourceFileName != null)
WriteResourceFromResXToResourceWriter(
resourceWriter, resourceFileName);
else
WriteResourceFromAssemblyToResourceWriter(
inputAssembly, resourceWriter, resourceName);
}
private static string GetResourceFile(
string defaultNamespace,
string resourceName,
string[] resourceFileNames)
{
foreach(string resourceFileName in resourceFileNames)
{
string resourceFileNameWithResourcesExtension =
Path.GetFileName(Path.ChangeExtension(
resourceFileName, ".resources"));
if (String.Compare(resourceName,
defaultNamespace + "." +
resourceFileNameWithResourcesExtension,
true,
CultureInfo.InvariantCulture) == 0)
return resourceFileName;
}
return null;
}
WriteResourceToResourceWriter uses the GetResourceFile method to determine whether the resource should be loaded from the resource file or the assembly. The WriteResourceFromResXToResourceWriter method is the same method as shown earlier in this chapter. The WriteResourceFromAssemblyToResourceWriter method is this:
private static void WriteResourceFromAssemblyToResourceWriter(
Assembly inputAssembly,
IResourceWriter resourceWriter,
string resourceName)
{
Stream resourceStream =
inputAssembly.GetManifestResourceStream(resourceName);
try
{
ResourceSet resourceSet = new ResourceSet(resourceStream);
IDictionaryEnumerator dictionaryEnumerator =
resourceSet.GetEnumerator();
while (dictionaryEnumerator.MoveNext())
{
object resourceValue = resourceSet.GetObject(
dictionaryEnumerator.Key.ToString(), true);
resourceWriter.AddResource(
dictionaryEnumerator.Key.ToString(), resourceValue);
}
}
finally
{
resourceStream.Close();
}
}
The Assembly.GetManifestResourceStream gets a resource Stream from the assembly, given a resource name. The ResourceSet constructor accepts a stream as a source of resources, so iterating over the entries in this stream is straightforward.
Rebuilding Satellite Resource Assemblies from Original Assemblies Without Resx Files
One last option that you might consider is to not ship your resx files to your translator/localizer at all. At first, this might not seem like such a great idea because, without resx files, how will your translator/localizer translate the resources? However, consider that the previous example could draw on resources from the original assembly when resx files were missing. If all the resx files were missing, the satellite resource assembly would become the complete source of resources. Clearly, there is not much point in rebuilding an assembly that is exactly the same as the original (you would be better off simply copying the file), but if your translation tool could read resources directly from the assembly, you would not need to ship resx files to the translator/localizer. The resx files are, after all, just an intermediary file that allows the resources to be modified as XML. If you write your own translation tools, the need for XML files disappears. The benefit to this approach is that the translator gets exactly the same version of the application as everyone else. In addition, no special preparation is needed to add resources files to the translator’s copy. When the translator has finished translating/localizing, it simply sends back the satellite resource assemblies. One disadvantage to this approach is that when the assemblies are returned to development, they have to be processed to be converted back into resx files. You might argue, however, that this reintegration step is a necessary step, regardless of whether files are returned from the translator/localizer as resx files, satellite resource assemblies, or a database. Another disadvantage to this approach is that it makes using WinRes a little more difficult; resources must be copied out from the satellite resource assembly to a temporary resx file because WinRes can read only resx files. This is another justification for writing a WinRes alternative.
Signed Assemblies
The translation/localization strategies for rebuilding assemblies offered in this chapter are less suitable if you sign your assemblies. The problem is that you need to rebuild the satellite resource assemblies, but you don’t want to release your private key for these assemblies to be re-signed. If you do sign your assemblies, you need to ship a separate version of your application to your translator/localizer. The production version of your application would use signed assemblies, and the translator/localizer’s version would either use delay-signed assemblies or would use an alternative solution altogether (e.g., ResXResourceManager).
WinRes Translation/Localization Strategies
In Chapter 4, “Windows Forms Specifics,” I introduced the Windows Resource Localization Editor (WinRes.exe). To recap, WinRes is part of the .NET Framework SDK and allows localizers to localize Windows Forms using an editor that closely resembles the Visual Studio Windows Forms Designer. As such, the translator/localizer must install the .NET Framework SDK to use WinRes. WinRes is covered in depth in Chapter 4, so you should refer back to this chapter if you are unfamiliar with it. In this section, we look at issues that are specific to the translation/localization process.
Invoking WinRes from Within an Application
WinRes can be used by the translator/localizer simply by running WinRes.exe and selecting a relevant resource file. However, this process will rapidly become tedious in a large application, and developers can provide a little help in this area to simplify this process. WinRes can be invoked from within the application itself. The idea is that the translator/localizer uses the application as is, and whenever he wants to translate/localize a form, he presses some key or performs some action that invokes WinRes for the current context. This speeds up the translation/localization process and reduces the translators/localizer’s need to manually map forms to files. It is not a panacea, however, because the translator/localizer might well want to invoke WinRes manually, but automating the process will save some time and aggravation.
The essential process of invoking WinRes is achieved using System.Diagnostics.Process.Start:
Process.Start("WinRes.exe", "Form1.fr-FR.resx");
This passes “Form1.fr-FR.resx” as a parameter to WinRes.exe. This assumes that WinRes.exe and Form1.fr-FR.resx are in the same directory as the application, which is unrealistic, so a little more work is required. The InvokeWinRes class included in the downloadable source for this book solves the problem with a little more polish. We start with the problem of deciding upon an action that the translator/localizer should use to invoke WinRes. I have chosen a keystroke of F10 (simply because I don’t use F10 very often in Windows Forms applications). To use it, I set the Form’s KeyPreview to true and add a KeyUp event:
private void Form1_KeyUp(
object sender, System.Windows.Forms.KeyEventArgs e)
{
InvokeWinRes.CheckInvoke(e.KeyCode, this);
}
This is best set up in some form base class from which all forms inherit. The InvokeWinRes.CheckInvoke method checks the key pressed against the keystroke designated to invoke WinRes and attempts to invoke WinRes for the given form. InvokeWinRes has the following fields, which have corresponding property wrappers:
private static bool enabled = true;
private static string resourceExtension = ".resx";
private static string resourcePath = @"resources";
private static Keys invokeKey = Keys.F10;
private static string winResPath;
The enabled field and corresponding property allow developers to turn off InvokeWinRes. You would turn it off in the production version. The resourceExtension field and corresponding property enable you to switch to another extension (which, given the current functionality of WinRes, could be only “.resources”). The resourcePath field and corresponding property enable you to specify where the resx files are. The invokeKey and corresponding property specify the keystroke used to invoke WinRes. The winResPath field is the path to the WinRes executable (and required DLLs). The corresponding property initializes winResPath by looking for WinRes.exe in the application’s path and falling back to the location of the .NET Framework SDK. It is important that it looks first in the application’s path because WinRes 2.0 is typically placed in the application’s path to locate the application’s assemblies in order to load forms that use form inheritance (see the “WinRes and Visual Form Inheritance” section of Chapter 4). Here is the WinResPath property:
public static string WinResPath
{
get
{
if (winResPath == null)
{
string applicationPath = Path.GetDirectoryName(
Application.ExecutablePath);
if (File.Exists(applicationPath +
Path.DirectorySeparatorChar + "WinRes.exe"))
winResPath = applicationPath;
else
{
string frameworkSdkPath = GetFrameworkSdkPath();
if (frameworkSdkPath != null &&
frameworkSdkPath != String.Empty)
winResPath = frameworkSdkPath + "bin";
}
}
return winResPath;
}
set {winResPath = value;}
}
protected static string GetFrameworkSdkPath()
{
string sourcesKeyName = @"SoftwareMicrosoft.NETFramework";
RegistryKey frameworkKey =
Registry.LocalMachine.OpenSubKey(sourcesKeyName);
if (frameworkKey == null)
return null;
string frameworkVersion =
System.Environment.Version.Major.ToString() + "." +
System.Environment.Version.Minor.ToString();
object sdkValue = frameworkKey.GetValue(
@"sdkInstallRootv" + frameworkVersion);
if (sdkValue == null)
return null;
return sdkValue.ToString();
}
The GetFrameworkSdkPath method gets the location of the .NET Framework SDK that corresponds to the version of the .NET Framework that the application is using. So if the application is a Windows Forms 1.1 application running on a development machine, the key would be HKey_Local_MachineSoftwareMicrosoft.NETFrameworksdkInstallRootv1.1 and the value would be something like C:Program FilesMicrosoft Visual Studio .NET 2003SDKv1.1. The WinResPath property then appends “bin” to the folder name to get to the SDK’s binaries.
The InvokeWinRes.CheckInvoke method is a convenient wrapper around the InvokeWinRes.Invoke method:
public static void CheckInvoke(Keys key, Form form)
{
CheckInvoke(key, form.GetType().Name);
}
public static void CheckInvoke(Keys key, string baseName)
{
if (key == invokeKey)
{
Invoke(baseName);
}
}
After the keystroke is checked, Invoke is called with the baseName of the form (e.g., “Form1”). InvokeWinRes.Invoke is this:
public static void Invoke(string baseName)
{
if (enabled)
{
string winResPath = WinResPath;
if (winResPath == null || winResPath == String.Empty)
MessageBox.Show("WinRes path is not found");
else
{
string winResProgram = winResPath + @"WinRes.exe";
if (! File.Exists(winResProgram))
MessageBox.Show(String.Format(
"WinRes ({0}) not found", winResProgram));
else
{
bool isFileFound = false;
CultureInfo cultureInfo =
Thread.CurrentThread.CurrentUICulture;
string resxFileName = resourcePath + baseName +
"." + cultureInfo.Name + resourceExtension;
StringBuilder resxFileNamesBuilder =
new StringBuilder(resxFileName);
while (true)
{
if (File.Exists(resxFileName))
{
Process.Start(winResProgram, resxFileName);
isFileFound = true;
break;
}
if (cultureInfo == cultureInfo.Parent)
break;
cultureInfo = cultureInfo.Parent;
if (cultureInfo.Equals(
CultureInfo.InvariantCulture))
resxFileName = resourcePath + baseName +
resourceExtension;
else
resxFileName = resourcePath + baseName + "."
+ cultureInfo.Name + resourceExtension;
resxFileNamesBuilder.Append(", " + resxFileName);
}
if (! isFileFound)
{
MessageBox.Show(String.Format(
"No resx files ({0}) found to translate"
, resxFileNamesBuilder.ToString()));
}
}
}
}
}
The Invoke method cycles through CultureInfos looking for a corresponding resource file. So if the CurrentUICulture is “fr-FR”, then it first looks for “Form1.fr-FR.resx”. If this is not found, it then looks for the parent (“Form1.fr.resx”) and then its parent (“Form1.resx”), until there are no more parents. Notice that the error messages are not localized. I have taken the attitude that these messages are intended for the translator/localizer, and working on the principle that the vast majority of translators/localizers read English, it is not necessary to localize these messages.
Using WinRes with Formats Other than Resx and Resources
One of the limitations of WinRes is that it can read and write only resx and resources files. If you have used another format (such as a database), WinRes cannot be made to read your format. The workaround is to export the resources from their original format to a temporary resx file, run WinRes, and then import the resources from the resx file into the original format. Whether this export/import process occurs on the fly or whether it is part of the setup process on the localizer’s machine is a matter of preference. However, if the modified resources are not immediately reimported after the localizer has made changes, the application will not immediately reflect those changes.
To export the resources from their original source to resx files, we use the IResourcesGovernor interface and ResourcesGovernor classes created in Chapter 10, “Resource Administration.” The InvokeWinRes resourcesGovernor field and corresponding ResourcesGovernor property are as follows:
private static IResourcesGovernor resourcesGovernor;
public static IResourcesGovernor ResourcesGovernor
{
get {return resourcesGovernor;}
set {resourcesGovernor = value;}
}
These allow the application to specify what the original source of the resources is. Typically, this would be specified at the same time that the IResourcesGovernor is initially created (i.e., at application start up):
public Form1()
{
InvokeWinRes.ResourcesGovernor = new DbResourcesGovernor(
"server=localhost;database=InvokingWinRes;" +
"trusted_connection=true");
InitializeComponent();
}
The InvokeWinRes.Invoke method needs a couple lines added to export the resource immediately before WinRes is invoked. The following two lines are added immediately inside the else block, which has determined that WinRes can be invoked:
if (resourcesGovernor != null)
ExportResources(baseName);
So if a ResourcesGovernor has been set, the resources must be exported from that ResourcesGovernor to resx files. This is what the ExportResources method does:
protected static void ExportResources(string baseName)
{
if (resourcesGovernor != null)
{
IResourcesGovernor outputResourcesGovernor =
new ResXResourcesGovernor(resourcePath);
CultureInfo cultureInfo =
Thread.CurrentThread.CurrentUICulture;
ArrayList resourceSets = new ArrayList();
ArrayList cultureInfos = new ArrayList();
while (true)
{
IResourceGovernor inputResourceGovernor =
resourcesGovernor.GetResourceGovernor(
baseName, cultureInfo);
ResourceSet resourceSet =
inputResourceGovernor.ReadResourceSet();
resourceSets.Add(resourceSet);
cultureInfos.Add(cultureInfo);
if (cultureInfo == cultureInfo.Parent)
break;
cultureInfo = cultureInfo.Parent;
}
for(int cultureInfoNumber = cultureInfos.Count - 1;
cultureInfoNumber >= 0; cultureInfoNumber--)
{
ResourceSet resourceSet =
(ResourceSet) resourceSets[cultureInfoNumber];
cultureInfo =
(CultureInfo) cultureInfos[cultureInfoNumber];
if (resourceSet != null)
{
IResourceGovernor outputResourceGovernor =
outputResourcesGovernor.GetResourceGovernor(
baseName, cultureInfo);
outputResourceGovernor.WriteResourceSet(resourceSet);
}
}
}
}
This method exports all resources for the given base name (e.g., “Form1”) from the original source to resx files. The algorithm that the ExportResources method uses is not as straightforward as you might have imagined for solving this problem. Indeed, if you were to refactor this code, you would probably end up with a slicker solution to the problem. ExportResources takes two passes through the culture hierarchy, and at this stage in the problem, there is no justification for taking these two passes. However, this approach will become necessary in the next section, so, for now, take it on trust that this is necessary.
ExportResources cycles through the culture hierarchy from the CurrentUICulture (e.g., “Form1.fr-FR”) through all of its parents (e.g., “Form1.fr” and “Form1”), getting a ResourceSet from the “input” source (using IResourceGovernor.Read-ResourceSet()). The CultureInfo and its corresponding ResourceSet are stored in lists. The subsequent for loop traverses these lists in the reverse order, so the invariant culture is processed first, then the neutral culture, and then the specific culture, each writing the ResourceSet to the “output” source (using IResourceGovernor. WriteResourceSet()). Again, at this point, there is nothing to be gained in traversing the list in one direction, so this additional effort is not yet necessary.
WinRes 1.1 and Single File Mode
In Chapter 4, you learned that the WinRes included in the .NET Framework 2.0 supports two file modes: Visual Studio File Mode and Single File Mode. Unfortunately, the WinRes included in the .NET Framework 1.1 supports just Single File Mode. This means that the resx files created by Visual Studio 2003 are incompatible with WinRes 1.1, and vice versa. The distinction between the two modes is that Visual Studio maintains resx files using inheritance, whereas WinRes’s Single File Mode does not use inheritance and “flattens” resx files. That is, WinRes 1.1 resx files must be wholly contained and self-sufficient. In this section, we work around this limitation so that WinRes 1.1 can be used with Visual Studio 2003’s resx files.
The solution is straightforward: We must “flatten” the resx files that WinRes uses. This means that the resx files must contain all their own resources, plus the resources of their parents and their grandparents, etc. So Form1.fr.resx should contain all its own resources, plus all the resources of Form1.resx. Similarly, Form1.fr-FR.resx should contain all the resources of Form1.fr.resx (which now includes all the resources of its parent, Form1.resx).
The flattening process is achieved using IResourceGovernor.AddResourceSet, which is implemented in the ResourceGovernor base class:
public void AddResourceSet(
ResourceSet resourceSet1, ResourceSet resourceSet2)
{
Hashtable resourceTable1 = GetResourceSetTable(resourceSet1);
IDictionaryEnumerator resourceSet2Enumerator =
resourceSet2.GetEnumerator();
while (resourceSet2Enumerator.MoveNext())
{
DictionaryEntry entry =
(DictionaryEntry) resourceSet2Enumerator.Current;
if (! resourceTable1.ContainsKey(entry.Key))
resourceTable1.Add(entry.Key, entry.Value);
}
}
This method accepts two ResourceSets. The entries of the second ResourcSet that do not already exist in the first ResourceSet are added to the first ResourcSet. So the first ResourceSet might represent Form1.fr-FR, and the second Resource Set might represent Form1.fr.
The point in time at which the flattening should occur is dependent upon the original source of the resources. If the original source is not a resx file format (e.g., it is a database), the resources must be flattened when they are exported. This requires a change to the ExportResources method shown in the previous section. The for loop now looks like this:
for(int cultureInfoNumber = cultureInfos.Count - 1;
cultureInfoNumber >= 0; cultureInfoNumber--)
{
ResourceSet resourceSet =
(ResourceSet) resourceSets[cultureInfoNumber];
cultureInfo = (CultureInfo) cultureInfos[cultureInfoNumber];
if (resourceSet != null)
{
IResourceGovernor outputResourceGovernor =
outputResourcesGovernor.GetResourceGovernor(
baseName, cultureInfo);
if (System.Environment.Version.Major == 1 &&
cultureInfoNumber != cultureInfos.Count - 1)
{
ResourceSet parentResourceSet = (ResourceSet)
resourceSets[cultureInfoNumber + 1];
outputResourceGovernor.AddResourceSet(
resourceSet, parentResourceSet);
}
outputResourceGovernor.WriteResourceSet(resourceSet);
}
}
The difference lies in the innermost if statement. It checks the major version of the .NET Framework, and if it is 1, it knows that the resx files must be flattened. At this point, the reasoning behind walking through the list cultures twice should be clearer. This for loop starts with the invariant resources and then proceeds to the neutral resources. The neutral resources must be flattened before the specific resources so that the specific resources contain the resources of both the neutral and the invariant resources.
If the original source of resources is resx files, a better solution would be to perform this flattening process when the resx files are prepared for translation and sent to the translator/localizer.
Resource Translation Manager
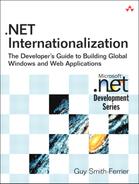
We have looked at using WinRes to allow the translator/localizer to edit Windows Forms’ forms, but this approach covers only part of the localizable resources in an application and is applicable only to Windows Forms applications. A significant number of resources cannot be maintained using this approach, and the .NET Framework does not include a translator/localizer tool for editing resources directly. Translators/localizers might already have their own (preferred) tools for translating resx files that use Translation Memories (TMs) or other translation technologies; if so, you are well advised to leave this decision in their hands. However, if you are using a bilingual, business-aware employee or your resource format is not resx, you might need to provide a tool for editing resources. In the downloadable source code for this book, you will find the Resource Translation Manager. Figure 14.1 shows the Resource Translation Manager being used to maintain the German resources for a Windows Forms application.
Figure 14.1. The Resource Translation Manager
The Resource Translation Manager shows the translator/localizer a tree view of all the resources. Clicking on a resource base name (e.g., “Form2”) in the tree view shows the list of resource entries for both the original (invariant) language and the selected target language (and their comments, if the resource source supports them). The translator/localizer can edit the target language entries. Untranslated entries are shown in red so that the translator/localizer can easily identify entries that need attention. The translator/localizer can mark a resource entry as translated (by right-clicking the entry and selecting “Mark As Translated”) so that entries that are the same in both the original language and the target language do not continually show up as untranslated. The list of entries specifically marked as translated is maintained in a separate XML file so that when the next translation iteration occurs, the list does not have to be remarked.
The translator/localizer can change languages or the source of the resources by selecting Tools, Resources Source. Settings are stored in ResourceTranslation Manager.exe.config.
Reintegrating Resources
At the beginning of this chapter, I pointed out that there is a time delay between sending the resources to the translator/localizer and getting them back, and that during this time it is unrealistic to stop development. The solution described assumes that the development department has the “master” copy of resources and is free to modify forms as it sees fit. Thus, the incoming resources from the translator/localizer cannot simply be copied back to the master copy. Instead, they must be reintegrated with the original copy.
The process of reintegrating resources is a little involved, so we start with an overview of the process. The essential goal is to add back to the original “master” resources any resources that have been changed by the translator/localizer. It is more complicated than you might imagine because of the fact that Visual Studio form resources use inheritance. Assume that we are using the .NET Framework 2.0. If we send a French resx file (Form1.fr.resx), for example, to the translator, it will contain only those differences from the invariant resx file (Form1.resx). If the translator/localizer makes a change to the French form by translating the Form’s title, this new item will be different than the invariant resource, and the French resx file will contain a new entry:
<data name="$this.Text">
<value>L'Information Personnelle</value>
</data>
Thus, the incoming French resx file contains more entries than the original master French resx file.
Alternatively, if we are using the .NET Framework 1.1, we have to flatten the Form resx files so that WinRes 1.1 can read them. In this case, the incoming French resx file will also contain more entries than the original master French resx file. So regardless of the version of the .NET Framework you are using, the incoming resources will contain more entries than the original master resources. However, to reintegrate these resources, we cannot simply copy all “new” resource entries from the incoming resources to the master resources. If the form has been updated since its release to the translator/localizer and a control has been deleted, adding back all “new” entries would mean that the deleted control would be added back to the project. In addition, if you are using the .NET Framework 1.1, adding back all “new” entries would mean that the master resx files would be converted from Visual Studio File Mode to Single File Mode. This is why the reintegration process is more complicated than you might imagine. In addition to this, you might want to perform some filtering of changes. Recall that you might or might not want to allow your translator/localizer to redesign your forms. If you want to leave form design in the hands of developers, you would reject any changes that are not strings or images. Still further, you might want to reject any incoming change if the incoming invariant resource value is not the same as the current “master” invariant value. This situation would indicate that the resource value has been changed by the development team since it was sent to the translator. In this case, you should reject the incoming translation because it is a translation of a different string and is no longer correct.
So the strategy is this: For each incoming set of resources (where a set is all the files related to a single base name e.g., Form1.resx, Form1.fr.resx, Form1. fr-FR.resx), a flattened ResourceSet for the master resources is created. This contains the complete set of the resources for the given base name. For each incoming resource, we compare the incoming resource entries against this flattened ResourceSet to see if the entry’s key already exists. If it does already exist, the entry is one that existed at the time that the resources were sent to the translator/localizer and that still exists in master copy now. If the entry’s value is different, the translator/localizer has changed this value, so we need to update our resources. If the incoming resource key exists in the master “unflattened” resource, this is a value that already existed but has now been changed, so we simply change our copy of it. If the resource key does not exist in the master “unflattened” resource, this is a value that had no previous translation but does now, so we add the new entry to the master “unflattened” resource.
With the problems and solutions outlined, let’s proceed to the code. The IResourceGovernor has a method called ReintegrateResourceSet that is implemented in the ResourceGovernor base class. This method accepts the flattened master ResourceSet, the master ResourceSet to be updated, and the incoming ResourceSet:
public bool ReintegrateResourceSet(
ResourceSet flattenedMasterResourceSet,
ResourceSet masterResourceSet,
ResourceSet incomingResourceSet,
AcceptResourceEntry acceptResourceEntry)
{
bool changesMade = false;
Hashtable flattenedMasterResourceTable =
GetResourceSetTable(flattenedMasterResourceSet);
Hashtable masterResourceTable =
GetResourceSetTable(masterResourceSet);
IDictionaryEnumerator incomingResourceSetEnumerator =
incomingResourceSet.GetEnumerator();
while (incomingResourceSetEnumerator.MoveNext())
{
DictionaryEntry incomingEntry = (DictionaryEntry)
incomingResourceSetEnumerator.Current;
if (incomingEntry.Value != null &&
flattenedMasterResourceTable.ContainsKey(
incomingEntry.Key) && !
flattenedMasterResourceTable[incomingEntry.Key].Equals(
incomingEntry.Value))
{
if (acceptResourceEntry == null ||
acceptResourceEntry(incomingEntry,
flattenedMasterResourceTable[incomingEntry.Key]))
{
if (masterResourceTable.ContainsKey(
incomingEntry.Key))
masterResourceTable[incomingEntry.Key] =
incomingEntry.Value;
else
masterResourceTable.Add(
incomingEntry.Key, incomingEntry.Value);
changesMade = true;
}
}
}
return changesMade;
}
The method updates the master ResourceSet with changes from the incoming ResourceSet. To call ReintegrateResourceSet, we iterate through each of the incoming base names (using IResourcesGovernor.GetInvariantCultureBase-Names()):
IResourcesGovernor incomingResourcesGovernor =
new ResXResourcesGovernor(@"C:CustomerCareIncoming");
IResourcesGovernor masterResourcesGovernor =
new ResXResourcesGovernor(@"C:CustomerCare");
foreach(string baseName in
incomingResourcesGovernor.GetInvariantCultureBaseNames())
{
ResourceSet flattenedMasterResourceSet =
GetFlattenedResourceSet(masterResourcesGovernor, baseName);
foreach(CultureInfo cultureInfo in
incomingResourcesGovernor.GetExistingCultures(baseName))
{
IResourceGovernor incomingResourceGovernor =
incomingResourcesGovernor.GetResourceGovernor(
baseName, cultureInfo);
IResourceGovernor masterResourceGovernor =
masterResourcesGovernor.GetResourceGovernor(
baseName, cultureInfo);
if (incomingResourceGovernor.ResourceExists() &&
masterResourceGovernor.ResourceExists())
{
ResourceSet incomingResourceSet =
incomingResourceGovernor.ReadResourceSet();
ResourceSet masterResourceSet =
masterResourceGovernor.ReadResourceSet();
if (masterResourceGovernor.ReintegrateResourceSet(
flattenedMasterResourceSet, masterResourceSet,
incomingResourceSet, null))
masterResourceGovernor.WriteResourceSet(
masterResourceSet);
}
}
}
So the base names might be “Form1”, “Form1Resources”, “Form2”, and so on. We get the flattened master ResourceSet using GetFlattenedResourceSet, which we return to in a moment. We get an array of CultureInfo objects for which resources exist for the given base name, so if “Form1.resx”, “Form1.fr.resx”, and “Form1.fr-FR.resx” exist, the array will contain the invariant CultureInfo, the “fr” CultureInfo, and the “fr-FR” CultureInfo. We see if both the incoming resource exists and a corresponding master resource exists (a form could have been deleted in its entirety since the translator/localizer was sent the original files). Finally, we call IResourceGovernor.ReintegrateResourceSet; if this returns true, indicating that changes were made, we call IResourceGovernor.WriteResourceSet to make the changes permanent.
Notice that we pass null as the fourth parameter to IResourceGovernor.Rein-tegrateResourceSet. This parameter enables us to control which entries are accepted as valid updates. It is an AcceptResourceEntry delegate:
public delegate bool AcceptResourceEntry(
DictionaryEntry entry, object originalValue);
By passing null for this parameter, we accept all updates. If you have taken the approach that your translator/localizer is simply a translator and all other changes (such as moving and resizing controls) should be rejected, you would pass a delegate for this parameter:
if (masterResourceGovernor.ReintegrateResourceSet(
flattenedMasterResourceSet,
masterResourceSet,
incomingResourceSet,
new AcceptResourceEntry(AcceptStringAndImageResourceEntry)))
The AcceptStringAndImageResourceEntry method is shown here:
private bool AcceptStringAndImageResourceEntry(
DictionaryEntry entry, object originalValue)
{
return entry.Value is string || entry.Value is Image;
}
This method rejects changes to all entries that are not strings or images. You could also use this approach to strip out hotkeys if you are using an automated runtime solution (see the Hotkeys section of Chapter 8, “Best Practices”). Another possibility is to compare the number of parameters in the original string with the number of parameters in the new string. So “Welcome, {0}” has one parameter, but “Bien-venue” has none, and this could be perceived as a translation error. A variation on the same theme is to check that the type of parameters in the new string is the same as in the original string. So if the original string was “Your goods will be delivered on {0:D}” (where “D” is being used as a long date format) and the parameter was changed to “{0:C}” (where “C” is a currency format), a runtime error would occur and this problem could be caught here.
The final piece is the GetFlattenedResourceSet method. The purpose of this method is to return a completely flattened ResourceSet from all the ResourceSets for a given base name:
private ResourceSet GetFlattenedResourceSet(
IResourcesGovernor masterResourcesGovernor, string baseName)
{
CultureInfo[] masterCultureInfos =
masterResourcesGovernor.GetExistingCultures(baseName);
if (masterCultureInfos.GetLength(0) == 0)
return null;
Array.Sort(masterCultureInfos, new CultureInfoParentComparer());
IResourceGovernor masterResourceGovernor =
masterResourcesGovernor.GetResourceGovernor(
baseName, masterCultureInfos[
masterCultureInfos.GetLength(0) - 1]);
ResourceSet flattenedMasterResourceSet =
masterResourceGovernor.ReadResourceSet();
for(int cultureInfoNumber =
masterCultureInfos.GetLength(0) - 2;
cultureInfoNumber >= 0; cultureInfoNumber--)
{
CultureInfo cultureInfo =
masterCultureInfos[cultureInfoNumber];
masterResourceGovernor =
masterResourcesGovernor.GetResourceGovernor(
baseName, cultureInfo);
masterResourceGovernor.AddResourceSet(
flattenedMasterResourceSet,
masterResourceGovernor.ReadResourceSet());
}
return flattenedMasterResourceSet;
}
This method gets a list of existing cultures (e.g., invariant, “fr”, “fr-FR”) and sorts them in parental order so that the invariant culture is first, then the neutral culture (“fr”), and then the specific culture (“fr-FR”). It creates a new ResourceSet from the most specific culture (e.g., “fr-FR”) and then adds in new resource entries from each of the “parent” cultures using IResourceGovernor.AddResourceSet. The IComparer class used to perform the sorting in Array.Sort is as follows:
public class CultureInfoParentComparer : IComparer
{
int IComparer.Compare(Object x, Object y)
{
CultureInfo cultureInfoX = ((CultureInfo) x);
CultureInfo cultureInfoY = ((CultureInfo) y);
if (cultureInfoX.Equals(CultureInfo.InvariantCulture) &&
cultureInfoY.Equals(CultureInfo.InvariantCulture))
return 0;
else if (cultureInfoX.Equals(CultureInfo.InvariantCulture))
return -1;
else if (cultureInfoY.Equals(CultureInfo.InvariantCulture))
return 1;
else if (cultureInfoX.IsNeutralCulture &&
cultureInfoY.IsNeutralCulture)
return 0;
else if (cultureInfoX.IsNeutralCulture)
return -1;
else if (cultureInfoY.IsNeutralCulture)
return 1;
else if (! cultureInfoX.IsNeutralCulture &&
! cultureInfoY.IsNeutralCulture)
return 0;
else if (! cultureInfoX.IsNeutralCulture)
return -1;
else
return 1;
}
}
The IComparer.Compare method returns -1 if x is before y, 0 if x is the same as y, and +1 if x is after y.
Where Are We?
This chapter proposes many strategies. Your choice of strategy is determined to some extent by the technology behind your application (i.e., Windows Forms or ASP.NET, .NET Framework 1.1 or 2.0), but also by your choice of resource format. Clearly, the .NET Framework favors using resx files: WinRes 2.0 reads and writes Visual Studio File Mode resx files directly, and ASP.NET 2.0 automatically detects changes to resx files. However, other formats, such as a database, can ease the translation/localization process: Changes to a database are recognized immediately (if the resource is not cached by a ResourceManager), and there is no need to rebuild resource assemblies. The reintegration of resources returned by the translator/localizer is a critical part of the internationalization process, and consideration should be given to the fact that the application might well have changed since the resources were sent to the translator/localizer, and not all of the translator/localizer’s changes will necessarily be accepted.
Where are we in terms of this book? I sincerely hope that you are standing on top of the mountain and enjoying the view.