
4. Windows Forms Specifics
IN THIS CHAPTER, WE COVER SUBJECTS that are relevant only to Windows Forms applications.
Localizing Forms
In the previous chapter, you saw how strings and bitmaps can be localized using ResourceManager and satellite assemblies. The same process could be used to localize forms, but it would be extremely tedious. Every string and bitmap would need to be manually loaded, but the job wouldn’t stop there. Numerous other properties, such as Size, Location, RightToLeft, and ImeMode, might also need to be localized. This would amount to a significant amount of additional, repetitive code. Fortunately, Visual Studio has functionality for localizing forms in a neat and simple manner. Here we will follow an example of localizing a form. This example is deliberately simplistic, to focus on the details of localizing a form instead of providing a real-world example.
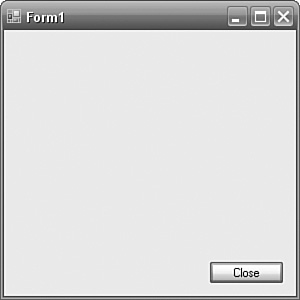
Create a new Windows Forms application, add a button in the bottom-right corner, and set its Text to “Close” (see Figure 4.1).
Figure 4.1. Simple Form Localization Example
Here’s the first part of the InitializeComponent code generated by Visual Studio 2005 in the Form1.Designer.cs file:
private void InitializeComponent()
{
this.button1 = new System.Windows.Forms.Button();
this.SuspendLayout();
//
// button1
//
this.button1.Location = new System.Drawing.Point(205, 231);
this.button1.Name = "button1";
this.button1.Size = new System.Drawing.Size(75, 23);
this.button1.TabIndex = 0;
this.button1.Text = "Close";
this.button1.UseVisualStyleBackColor = true;
// etc.
// etc.
Visual Studio 2003’s generated code (in Form1.cs) differs by the inclusion or exclusion of properties that are specific to a version of the .NET Framework. Notice the assignment to the button’s Text property; clearly, the “Close” text is hard-coded and cannot be localized in its current form.
Property Assignment Model
Now set Form1.Localizable to True (in the Properties Window) and look at the code again. What you see depends on whether you are using Visual Studio 2003 or Visual Studio 2005. Regardless of the version of Visual Studio, I recommend that you follow the explanation for both versions—Visual Studio 2005 developers will learn why Visual Studio 2005 works the way it does, and Visual Studio 2003 developers will learn what they can look forward to. In Visual Studio 2003, you will see this in the Form1.cs file:
private void InitializeComponent()
{
System.Resources.ResourceManager resources =
new System.Resources.ResourceManager(typeof(Form1));
this.button1 = new System.Windows.Forms.Button();
this.SuspendLayout();
//
// button1
//
this.button1.AccessibleDescription =
resources.GetString("button1.AccessibleDescription");
this.button1.AccessibleName =
resources.GetString("button1.AccessibleName");
this.button1.Anchor = ((System.Windows.Forms.AnchorStyles)
(resources.GetObject("button1.Anchor")));
this.button1.BackgroundImage = ((System.Drawing.Image)
(resources.GetObject("button1.BackgroundImage")));
this.button1.Dock = ((System.Windows.Forms.DockStyle)
(resources.GetObject("button1.Dock")));
this.button1.Enabled =
((bool)(resources.GetObject("button1.Enabled")));
this.button1.FlatStyle = ((System.Windows.Forms.FlatStyle)
(resources.GetObject("button1.FlatStyle")));
this.button1.Font = ((System.Drawing.Font)
(resources.GetObject("button1.Font")));
this.button1.Image = ((System.Drawing.Image)
(resources.GetObject("button1.Image")));
this.button1.ImageAlign = ((System.Drawing.ContentAlignment)
(resources.GetObject("button1.ImageAlign")));
this.button1.ImageIndex = ((int)
(resources.GetObject("button1.ImageIndex")));
this.button1.ImeMode = ((System.Windows.Forms.ImeMode)
(resources.GetObject("button1.ImeMode")));
this.button1.Location = ((System.Drawing.Point)
(resources.GetObject("button1.Location")));
this.button1.Name = "button1";
this.button1.RightToLeft = ((System.Windows.Forms.RightToLeft)
(resources.GetObject("button1.RightToLeft")));
this.button1.Size = ((System.Drawing.Size)
(resources.GetObject("button1.Size")));
this.button1.TabIndex = ((int)
(resources.GetObject("button1.TabIndex")));
this.button1.Text = resources.GetString("button1.Text");
this.button1.TextAlign = ((System.Drawing.ContentAlignment)
(resources.GetObject("button1.TextAlign")));
this.button1.Visible = ((bool)
(resources.GetObject("button1.Visible")));
// etc.
// etc.
This code is significantly longer than the original, unlocalizable code. Let’s look at the important differences. First, and most important, the first line creates a new ResourceManager object, passing in the type of Form1, and assigns the new object to a local variable called resources:
System.Resources.ResourceManager resources =
new System.Resources.ResourceManager(typeof(Form1));
The subsequent code uses this resource manager to retrieve all the string, bitmap, and other resources that are necessary to localize this form. Take a look at the assignment to the button’s Text property. It has changed from this:
this.button1.Text = "Close";
to this:
this.button1.Text = resources.GetString("button1.Text");
In the localizable form, a "button1.Text" string resource is being loaded from the resource manager. In Solution Explorer, click the Show All Files button, expand the Form1.cs node, and double-click Form1.resx (see Figure 4.2).
Figure 4.2. Form1.resx in Visual Studio 2003 after Localizable Is Set to True
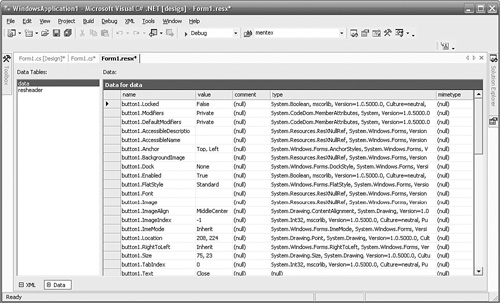
You can see that the “button1.Text” entry has a value of “Close”. So the approach used to associate each property with its localized value is to load a resource whose name is made from the name of the object plus a period, plus the name of the property. Simple and effective. Now take a look at the button’s Location property. It has changed from this:
this.button1.Location = new System.Drawing.Point(205, 231);
to this:
this.button1.Location = ((System.Drawing.Point)
(resources.GetObject("button1.Location")));
The Location property is of type System.Drawing.Point, so the code uses ResourceManager.GetObject to retrieve the value and then casts the resulting object to a System.Drawing.Point.
The next difference between the unlocalized and localized code is that, whereas the button on the unlocalized form includes 6 properties (4 properties in Visual Studio 2003) to assign values to, this localized version includes 20. In the unlocalized form, Visual Studio 2003 has simply listed every property that has a different value than its default value. In the localized form, Visual Studio 2003 has listed every property that has a Localizable attribute, regardless of whether its value is different than its default value. This approach to serializing the form is called the property assignment model.
Visual Studio 2003 deliberately ignores whether the value is different than its default value because the value that it is comparing against the default value is only the value that is used in the fallback assembly. It does not follow that the property would have the same value in a different culture (the RightToLeft property, for example, would clearly be different in a right-to-left culture). Instead, it has had to take the approach that any property that could be localizable (i.e., has a Localizable attribute) must be localizable. Consequently, all Localizable properties are saved to the resource file, and all their values are loaded at runtime. Naturally, this occurs even when the property has its default value. So the buttons’ Dock property is assigned its default value from the button1.Dock resource.
In this example, this redundancy occurs for 16 properties for Visual Studio 2003. It is possible to argue that this is an unnecessary performance hit. Visual Studio 2005 addresses this issue, but if you are using Visual Studio 2003 and do not intend to upgrade in the near future, you should consider two points. The first is that, accepting that all performance judgments are relative, this problem possibly sounds worse than it actually is. The fear for a developer is that a lot of unnecessary resource accesses and property assignments are going on that will affect performance. Clearly, these will affect performance, but, to borrow a tenet from Extreme Programming, don’t engineer solutions to problems that you don’t know you have. Start by proving that you actually do have a problem. In the tests that I have performed, in which I continually have opened and closed an unlocalized form and then continually opened and closed the same localized form, I cannot see a difference. Clearly, there is a difference, but remember that we are looking at this problem from the user’s perspective, and users can’t measure in clock cycles. Of course, this is a scaling issue; if you see the issue at all, you are likely to see it only on forms with a very large number of components.
The second point is that if this issue still bothers you and you can’t upgrade to Visual Studio 2005, you should take a look at the Localization Filter (http://windowsforms.net/articles/localizationfilter.aspx), from Brian Pepin, who works in Microsoft’s development tools group. The Localization Filter is a design-time component that enables developers to specify which properties should be localized (and which should not). As a consequence, it reduces the number of properties on a localized form and improves the performance of localized forms. This is also an interesting example of how to interfere with the form’s serialization process.
Property Reflection Model
Visual Studio 2005 is used in the same way (i.e., you set Form1.Localizable to true), but the way in which properties are loaded differs. Take a look at the InitializeComponent method:
private void InitializeComponent()
{
System.ComponentModel.ComponentResourceManager resources = new
System.ComponentModel.ComponentResourceManager(typeof(Form1));
this.button1 = new System.Windows.Forms.Button();
this.SuspendLayout();
//
// button1
//
resources.ApplyResources(this.button1, "button1");
this.button1.Name = "button1";
this.button1.UseVisualStyleBackColor = true;
//
// Form1
//
resources.ApplyResources(this, "$this");
this.AutoScaleMode = System.Windows.Forms.AutoScaleMode.Font;
this.Controls.Add(this.button1);
this.Name = "Form1";
this.ResumeLayout(false);
}
The first line creates a System.ComponentModel.ComponentResourceManager instead of a System.Resources.ResourceManager. ComponentResourceManager inherits from ResourceManager, so it has all the same properties and methods. ComponentResourceManager, which is part of both the .NET Framework 1.1 and 2.0, adds a single method, ApplyResources, and does not override any methods. You can see the ApplyResources method being used in InitializeComponents:
resources.ApplyResources(this.button1, "button1");
this.button1.Name = "button1";
this.button1.UseVisualStyleBackColor = true;
The 20 assignments used in Visual Studio 2003 have been reduced to just these 3 assignments in Visual Studio 2005. The ApplyResources method looks through every entry in the resource for a key that meets the following criteria:
• The key has the same name as the object (i.e., “button1”).
• The key has a property that matches the property name in the key (e.g., “Text” in “button1.Text”).
• The property type is the same as the resource value’s type.
For each such entry, it assigns the value in the resource to the object’s property. This model is called the property reflection model because it uses reflection to probe the object for corresponding properties. If you take a look at Form1.resx in Visual Studio 2005, you will see that only those Localizable properties that do not have the same value as their default are included in the resource file. When the form is localized for a different culture and more or fewer properties are localized, the properties will still be assigned their values, and the resources need to be only as large as is necessary for that culture. The intention is that the performance savings of assigning only those properties that need to be localized is greater than the performance loss of having to use reflection to probe the object and assign its value. With a smaller number of properties, such as we have with the button in the example, the gain outweighs the loss. You should be aware, however, that in the unlikely event that the number of localized properties approaches the number of localizable properties, the loss will outweigh the gain. However, this scenario is rather unlikely.
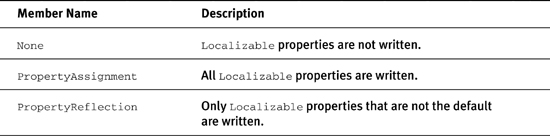
The .NET Framework 2.0 supports both the property assignment model used by Visual Studio 2003 and the property reflection model used by Visual Studio 2005. If you write your own form designer or need to generate form-serialization code yourself, you can specify which model you want to use with the CodeDomLocalizationModel enumeration, shown in Table 4.1.
Table 4.1. CodeDomLocalizationModel Enumeration
You pass the desired CodeDomLocalizationModel enumeration to the Code-DomLocalizationProvider constructor to tell it how to serialize forms. However, Visual Studio 2005 does not have any facility for setting this value; although the framework supports the capability to change the model, the IDE does not surface this capability, so you cannot choose the property assignment model.
Localizing a Form
Now that our form is localizable, we can localize it. Select the form and, in the Properties Window, drop down the Languages combo box. The list is populated using CultureInfo.GetCultures. This method accepts a parameter specifying what kind of cultures to get. The parameter value that is passed is CultureTypes.All-Cultures. In Visual Studio 2003, this returns a list that is hard-coded in the .NET Framework 1.1. In Visual Studio 2005, this returns the list of cultures available to the .NET Framework, the operating system, and the user-defined cultures. Note that the combo box does not support an incremental search, so if you type “Fr”, you will get “Romanian” instead of “French” (because the “F” goes first to “French” and the “r” then goes to “Romanian”).
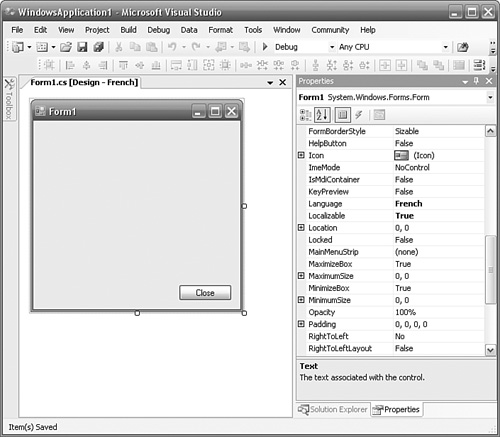
Select French from the list. In Visual Studio 2005, the Form Designer caption changes to show that you are designing the French version of this form (see Figure 4.3). In Visual Studio 2003, there is no visual indication of which form you are localizing, except for the Languages property in the Properties Window.
Figure 4.3. Visual Studio 2005 Localizing a Form
Change Button1.Text to “Fermer” (the French for “Close”). In the Solution Explorer, expand the Form1.cs node; you will see a new file, Form1.fr.resx, which holds the French resources for this form. Currently, this resx file has an entry for Button1.Text but no entry for Button1.Size because this property does not differ from the fallback resource (Form1.resx). Recall from the previous chapter that if a resource is not found in a neutral culture (i.e., WindowsApplication1.Form1.fr.resources), ResourceManager falls back to the default resources (WindowsApplication1. Form1.resources), so it is necessary to list only the differences from the parent. If you build the solution now, you will find a new folder (“fr”) beneath the output folder that holds the French resources (“WindowsApplication1.resources.dll”).
Finally, to illustrate a point, move the button to a different location and change its size. In the Form1.Language combo box, select “(Default)”; Visual Studio shows the fallback resource. You can alternate between the different languages, modifying the localized form(s) as necessary. You can save your project with any language version of your form loaded in the editor; the selected language has no effect at runtime. Despite this, I recommend that you return Language to “(Default)” when you are finished making changes. In Visual Studio 2003, this is essential because there is no immediate visual feedback on which form you are editing; it is easy to save the project with a specific language visible and open it again later (or for a different developer to open it), and forget or not realize that the default is not selected before you start making changes to a language-specific version of the form instead of to the default.
The important point to grasp from moving the button is that the resources behave according to the rules of inheritance. Because of the way the ResourceManager falls back to more generalized resources when specific resources are missing, you can think of this as inheritance for resources. So the French resource is a more specific kind of the default resource. It is simply a list of differences from its base, just as all classes are simply a list of differences from their base. This relationship is reflected in the French resource file, Form1.fr.resx.
<data name="button1.Location" type="System.Drawing.Point,
System.Drawing">
<value>170, 12</value>
</data>
<data name="button1.Size" type="System.Drawing.Size, System.Drawing">
<value>110, 32</value>
</data>
<data name="button1.Text" xml:space="preserve">
<value>Fermer</value>
</data>
These elements are the only entries that refer to button1 after the Location, Size, and Text properties have been changed.
This demo is fine as far as it goes, but it doesn’t cover the fundamental truth of development; everything changes. It is a certainty that we will change this form at some point in the future. How does this model hold up when the form is changed?
With Language set to “(Default)”, add a Label and a TextBox to the form and set label1.Text to “Company name”. Now set Language to French, and you can see that the French version of the form includes the newly added components. If you go back to the default version and increase the size of the TextBox, for example, the change is reflected in the French form. However, if you change the size of the TextBox on the French form, the link with the default form is lost, and changes to the TextBox’s Location on the default form are not applied to the French form. Changes to other properties, such as Font and Size, are still linked and are applied to the French form.
One final piece of the localization jigsaw is missing. If you modify a property on a culture-neutral or culture-specific form by mistake and you want to revert to the default form’s property, how can you do this? Simply changing the property on the culture-neutral or culture-specific form to be the same value as the property on the default form doesn’t have the right effect. Sure, they will have the same value, but they are not linked; if you change the property on the default form again, the property on the culture-neutral or culture-specific form will not change. The answer is to dive into the culture-neutral or culture-specific resx file, find the entry for the offending property, and delete it.
Adding and Deleting Components
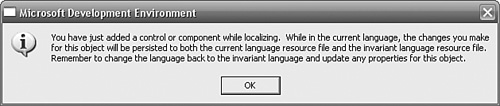
You can easily delete components on a form in the normal way by selecting them and then pressing the Del key. If you delete the newly added TextBox and then select the French form, you will see that the TextBox has been deleted from all versions of the form. This rule holds true even if the currently selected Language is not the default, so if you delete the newly added Label from the French form, it will be deleted from the default and all other forms. We’ve also seen that when components are added to the default form, they are added to all versions of the forms. If you add a component to a form other than the default form, the behavior you see depends on the version of Visual Studio you are using. In Visual Studio 2003, you get the dialog in Figure 4.4, stating that the component will be added to all versions of the form. In Visual Studio 2005, you get a dialog stating that controls cannot be added in localization mode, and you will have to change the language back to the default.
Figure 4.4. Visual Studio 2003 Warning Explaining the Effect of Adding Components to Specific Language Forms
From this adding and deleting behavior, you can conclude that components either exist or do not exist on all versions of the form; only the properties can differ, not the existence of a component. Whereas this makes life much easier in terms of localization, it can make customization more difficult. What do you do if you want a button to appear on the French form but not on any other form (including the default)? The answer is that you employ a little trickery. Add the button to the default form and set its Visible property to False. In the French form, set its Visible property to True. Problem solved.
Setting the CurrentUICulture
Now that we have made our form localizable and have localized it, our user needs a way to see the French form. Recall from Chapter 3, “An Introduction to Internationalization,” that the user interface of our application is determined by the resources loaded by the ResourceManager, and that the GetString and GetObject methods default the culture to CultureInfo.CurrentUICulture, and that CurrentUICulture gets its default from the Win32 GetUserDefaultUILanguage function, which is normally the language version of Windows installed on the machine (except in Windows MUI, where it can be set by the user). So the only time we would see the French version of our application is when it is run on a French version of Windows. This is standard Windows behavior, but in some situations, you might need a more flexible solution.
In Chapter 3, you also learned that CurrentUICulture has a sister property, CurrentCulture, which determines the defaults for the .NET Framework’s globalization classes. The user does have direct control over this value by setting the culture in the Regional and Language Options control panel applet. Though Microsoft recommends keeping these settings distinct, a common approach is to use the Regional and Language Options dialog to set both the CurrentCulture and the CurrentUICulture. To do this, add the following line as early in the application’s startup process as possible (in our simple example, this would be in the application’s main form’s constructor, before the call to InitializeComponent).
Thread.CurrentThread.CurrentUICulture =
Thread.CurrentThread.CurrentCulture;
(This assumes that there is a suitable using System.Threading in the file.) This solves the problem but might be inefficient in your scenario. If you offer only neutral cultures in your application (e.g., French, German, Spanish) and do not offer specific cultures (e.g., French (Canada), German (Germany), Spanish (Mexico)), the previous line will result in unnecessary checking for the missing specific resource. A better approach would be to use the specific culture’s parent:
Thread.CurrentThread.CurrentUICulture =
Thread.CurrentThread.CurrentCulture.Parent;
Notice that we don’t need to check whether CurrentCulture has a parent because CurrentCulture is always culture specific.
Of course, if the user is using Windows MUI, the user already has control over this problem because he can set the user interface in Regional and Language Options. Despite this, the user might be confused or annoyed by having to specify the culture twice in the Regional and Language Options (once for the CurrentCulture and once for the CurrentUICulture), so you might like to make one setting the dominant setting and use it for both. If this is the case, you should still use the globalization setting instead of the language setting because CurrentCulture must include a region, whereas the language setting in Regional and Language Options does not require this.
If using Regional and Language Options doesn’t suit your needs, there are alternatives. You could accept a command-line switch. You could load the setting from a configuration file or database. You could let the user specify the language of choice in a menu option (see the section “Changing the Culture During Execution”).
If you are using Visual Studio 2005, the simplest solution is to maintain the user’s setting in the application’s settings file. In Solution Explorer, right-click the Windows Forms project, select Properties, and select the Settings tab. Enter a name for the setting (e.g., UICulture) and a value (e.g., “fr-FR”). The settings are stored in an XML file called Settings.settings. Visual Studio 2005 automatically maintains a strongly typed Settings class for this file in Settings.Designer.cs. The values can be accessed using the Settings class in the application’s Properties name-space. The previous example for setting the CurrentUICulture now looks like this:
AppSettingsReader reader = new AppSettingsReader();
Thread.CurrentThread.CurrentUICulture =
new CultureInfo(Properties.Settings.Default.UICulture);
Changing the Culture During Execution
In some applications, it might be helpful to allow the user to switch between different cultures while the application is running. This kind of application is great to demo because it provides immediate visual feedback on the act of changing the language. Figure 4.5 shows an application that offers a menu of languages.
Figure 4.5. Windows Forms Application Offering a Choice of Languages
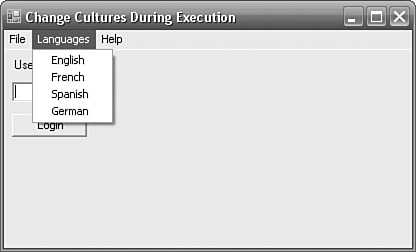
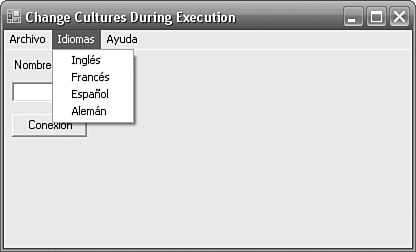
Figure 4.6 shows the same application after the user has selected Spanish as the language of choice.
Figure 4.6. Windows Forms Application after Selecting Spanish
To achieve this result, we need to solve two problems. First, we need to be able to get a list of all forms in the application. Second, we need to be able to reapply the new resources to each form.
The first problem is easy to solve if you are using the .NET Framework 2.0. The System.Windows.Forms.Application class has a static property called OpenForms, which is a FormCollection. To solve our problem, we create a new class that looks like this:
public class ChangeFormCulture
{
public static void ChangeAllForms(string culture)
{
FormCollection forms = Application.OpenForms;
foreach (Form form in forms)
{
ChangeForm(form, culture);
}
}
}
The static ChangeAllForms method iterates through each form in the Application.OpenForms collection, calling the ChangeForm method.
public static Form[] OpenForms
{
get
{
Module MSCorLibModule = typeof(Form).BaseType.Module;
Type threadWindowsType =
MSCorLibModule.GetType(
"System.Windows.Forms.Application+ThreadWindows");
ConstructorInfo constructorInfo =
threadWindowsType.GetConstructor(
BindingFlags.Instance |
BindingFlags.NonPublic,
null, CallingConventions.HasThis,
new Type[] {typeof(Control),
typeof(Boolean)},
null);
if (constructorInfo == null)
return null;
Object threadWindow = constructorInfo.Invoke(
new object[] {null, (Object) false});
FieldInfo windowsFieldInfo =
threadWindowsType.GetField("windows",
BindingFlags.NonPublic |
BindingFlags.Instance);
if (windowsFieldInfo == null)
return null;
IntPtr[] windows = (IntPtr[])
windowsFieldInfo.GetValue(threadWindow);
ArrayList forms = new ArrayList();
foreach(IntPtr window in windows)
{
Control control =
Control.FromHandle(window);
if (control != null)
forms.Add((Form) control);
}
return (Form[]) forms.ToArray(typeof(Form));
}
}
The second problem, applying the new resources to each form, has two solutions, each with pros and cons. The first solution is simply to use ComponentResource Manager to apply the new resources to each control. The ChangeForm method shows how to do this:
public static void ChangeForm(Form form, string culture)
{
Thread.CurrentThread.CurrentUICulture =
new System.Globalization.CultureInfo(culture);
ComponentResourceManager resourceManager =
new ComponentResourceManager(form.GetType());
// apply resources to each control
foreach (Control control in form.Controls)
{
resourceManager.ApplyResources(control, control.Name);
}
// apply resources to the form
int X = form.Location.X;
int Y = form.Location.Y;
resourceManager.ApplyResources(form, "$this");
form.Location = new Point(X, Y);
ApplyMenuResources(resourceManager, form);
}
ChangeForm starts by changing the CurrentUICulture to the desired culture. It then gets a ComponentResourceManager for the given form and iterates through every control, reapplying its resources. It then saves the form’s position, applies the new resources to the form, and restores the form’s position. So far, so good. At the end of the method is a call to ApplyMenuResources. The problem with MenuItems is that they are components, not controls; as such, their Name property returns an empty string. The name is essential because it is the key by which the corresponding resource entries are found. The form’s InitializeComponent method gets around this limitation because it knows the name of each component on the form and can generate code that uses a literal string:
resources.ApplyResources(this.menuItem1, "menuItem1");
To load the resources for the menu item, we need to find the menu item’s name. The ApplyMenuResources method uses reflection to iterate through all the private fields on the form, looking for fields that have a type of MenuItem. Having found such a field, the name of the corresponding resources can be found from the name of the field, and ComponentResourceManager.ApplyResources can be called:
private static void ApplyMenuResources(
ComponentResourceManager resourceManager, Form form)
{
if (form.Menu != null)
{
FieldInfo[] fieldInfos = form.GetType().GetFields(
BindingFlags.Instance | BindingFlags.NonPublic);
foreach (FieldInfo fieldInfo in fieldInfos)
{
if (fieldInfo.FieldType ==
typeof(System.Windows.Forms.MenuItem))
{
MenuItem menuItem =
(MenuItem)fieldInfo.GetValue(form);
resourceManager.ApplyResources(
menuItem, fieldInfo.Name);
}
}
}
}
This solution works well, but it does not work with all components. Some components inject additional code into the form’s serialization code (in the Initialize Component method). Because the InitializeComponent method is not called when the form’s culture is changed, this code will not be executed. Whether this is important depends upon the nature of the injected code. If it is important, you need the second solution to this problem. The ChangeFormUsingInitializeComponent method uses reflection to get a MethodInfo object for the form’s private Initialize Component method. It deletes all the controls on the form, saves the form’s position, invokes the InitializeComponent method, and restores the form’s position.
public static void ChangeFormUsingInitializeComponent(
Form form, string culture)
{
// get the form's private InitializeComponent method
MethodInfo initializeComponentMethodInfo =
form.GetType().GetMethod("InitializeComponent",
BindingFlags.Instance | BindingFlags.NonPublic);
if (initializeComponentMethodInfo != null)
{
// the form has an InitializeComponent method
// that we can invoke
// save all controls
List<Control> controls = new List<Control>();
foreach (Control control in form.Controls)
{
controls.Add(control);
}
// remove all controls
foreach (Control control in controls)
{
form.Controls.Remove(control);
}
int X = form.Location.X;
int Y = form.Location.Y;
Thread.CurrentThread.CurrentUICulture =
new System.Globalization.CultureInfo(culture);
// call the InitializeComponent method to add back controls
initializeComponentMethodInfo.Invoke(
form, new object[] { });
form.Location = new Point(X, Y);
}
}
So in this strategy, all the controls are destroyed and then rebuilt. This solves the original problem of ensuring that injected code is run, but it creates two new problems: The current values of controls are lost (e.g., TextBox.Text, CheckBox.Checked, ListBox.SelectedIndex), and the controls’ events might fire, affecting the behavior or appearance of the form. You must decide which evil you can live with.
With our solution in place, each language menu item (e.g., English, French, Spanish, German) needs only to call the ChangeAllForms method, passing the correct culture:
ChangeFormCulture.ChangeAllForms("es");
Using Regional and Language Options to Change the Culture
A variation on the previous theme is to do away with the menu in the application altogether. Assume that the user controls the application’s current culture using the Regional and Language Options dialog. Thus, whenever the user changes the setting in this dialog, the application should adapt to the changed setting. Unfortunately, the CultureInfo class does not surface a .NET event for this purpose, but the form can still trap this event by overriding the WndProc method and looking for a WM_SETTINGSCHANGE event, where the message’s LParam is intl:
[DllImport("kernel32.dll")]
protected static extern int GetUserDefaultLCID();
private const int WM_SETTINGSCHANGE = 0x001A;
protected override void WndProc(ref Message message)
{
switch (message.Msg)
{
case WM_SETTINGSCHANGE:
{
if ((int) message.WParam == 0 &&
message.LParam != IntPtr.Zero &&
Marshal.PtrToStringAuto(message.LParam) == "intl")
{
if (Thread.CurrentThread.CurrentCulture.LCID !=
GetUserDefaultLCID())
{
Thread.CurrentThread.CurrentCulture =
new CultureInfo(GetUserDefaultLCID());
Thread.CurrentThread.CurrentUICulture =
Thread.CurrentThread.CurrentCulture;
ChangeFormCulture.ChangeAllForms(Thread.
CurrentThread.CurrentUICulture.Name);
}
else
{
Thread.CurrentThread.
CurrentCulture.ClearCachedData();
Thread.CurrentThread.
CurrentUICulture.ClearCachedData();
}
}
break;
}
}
base.WndProc(ref message);
}
With the “culture change” event trapped, we check to see whether the new culture is the same as our current culture. This implementation assumes that the application’s CurrentCulture and CurrentUICulture are the same, and that CurrentUICulture has been initialized to the CurrentCulture when the application started. If the culture has changed, we change the CurrentCulture and CurrentUICulture and call ChangeFormCulture.ChangeAllForms to change all the forms. If the new culture is the same culture as our current culture, the user has simply modified the settings for the existing culture (e.g., they have changed the date/time formats). In this case, we need to only clear our cached version of the culture so that the updated information is reread.
Although this solves the immediate problem, I must advise caution with this approach. For an application simply to rebuild all its forms, no matter what state it is currently in or what it is currently doing, is disturbing and might lead to unpredictable results.
Dialogs
The .NET Framework includes many dialog components and a MessageBox class, all of which display dialog boxes. These dialog boxes are part of the user interface and, therefore, require some localization. The support offered to you is either a curse or a blessing, depending upon your requirements. All the dialog components in the .NET Framework have built-in support for localization. Table 4.2 shows the components and classes, and the source of their support.
Table 4.2. Classes and Components, and Their Localization Support
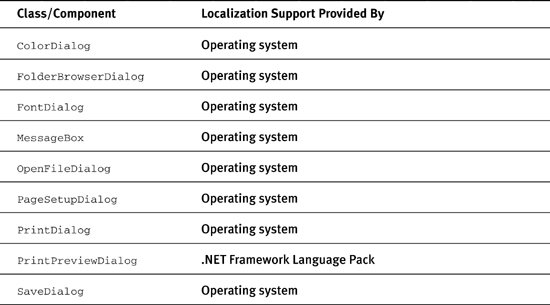
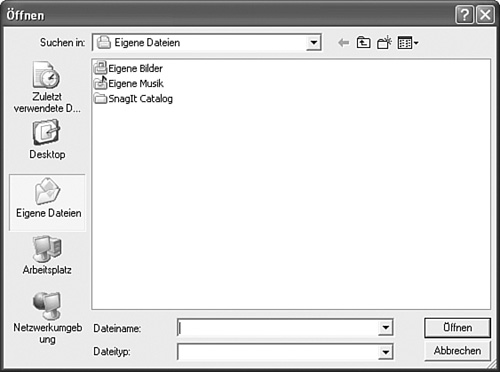
Most of these components offer their localization support courtesy of the operating system, and this is because these components are wrappers around Win32 dialogs. So on the German version of Windows, the OpenDialog component is shown in German (see Figure 4.7).
Figure 4.7. OpenDialog on German-Language Windows
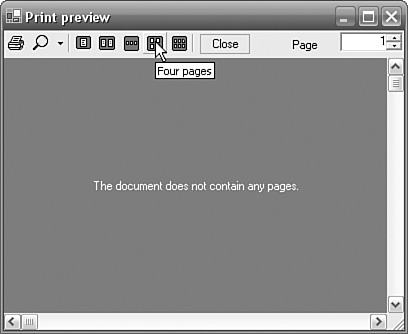
One component, PrintPreviewDialog, is specific to the .NET Framework and has no equivalent dialog in the operating system; it is supplied wholly by the .NET Framework. Figure 4.8 shows PrintPreviewDialog running on English Windows.
Figure 4.8. PrintPreviewDialog on English Windows
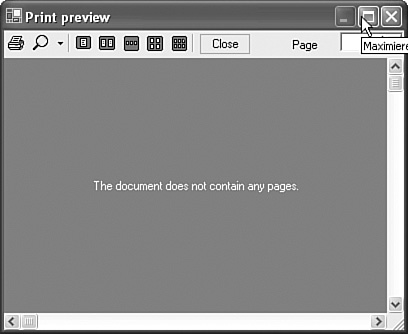
Because the localized version is dependent upon the .NET Framework Language Packs installed—and, therefore, the current setting of CurrentUICulture—if you open the dialog on German Windows without a German .NET Framework Language Pack installed, you get a mostly English dialog. In Figure 4.9, notice that the ToolTip is in German, whereas the rest of the dialog is in English.
Figure 4.9. PrintPreviewDialog on German Windows with No .NET Framework Language Pack
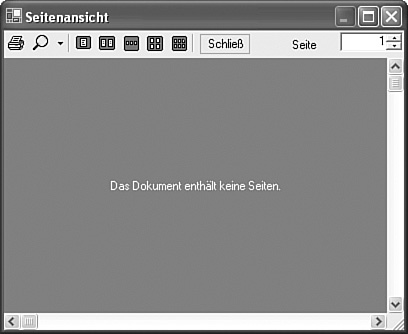
To get the fully localized German dialog (see Figure 4.10), you must install the German .NET Framework Language Pack.
Figure 4.10. PrintPreviewDialog on German Windows with the German .NET Framework Language Pack
This is where the curse or the blessing comes in. If you want the user interface in your application to be dictated by the operating system (i.e., on French Windows, your application always runs in French), this approach is a blessing because you do not need to do anything; the work has already been done for you. If you don’t want the user interface in your application to be dictated by the operating system (i.e., the user should have the control to choose a user interface language that is different than the language of the operating system), this approach is a curse. In this scenario, your application will have a schizophrenic user interface; part will be in the language chosen by the user, and part will be in a different language provided by the operating system.
Unfortunately, the only solutions to this problem are not easy. The most straightforward solution is not to use the built-in components for these purposes and to write your own identical classes from scratch that mimic the behavior completely but that have a localizable user interface. A less straightforward solution is to let the dialogs load as normal but then iterate through all the controls on the dialog looking for known control names and changing appropriate properties to localized versions.
If you choose to abandon the .NET Framework dialog components, you might like to use the “Dialog culture dictated by operating system” and “Dialog culture dictated by .NET Framework” FxCop rules, in Chapter 13, “Testing Internationalization Using FxCop,” to ensure that you do not accidentally use one of these dialogs.
Windows Resource Localization Editor (WinRes)
As the name implies, the Windows Resource Localization Editor (WinRes) is a localization editor for Windows Forms resources (i.e., .resx and .resources, but not .restext and .txt). It is intended to be used by localizers to localize forms without the need for Visual Studio. WinRes is part of the .NET Framework SDK, so it is free; in comparison, only the Express editions of Visual Studio are free, and it would be impractical to insist that localizers install Visual Studio solely to localize forms. WinRes is essentially a cut-down version of the Visual Studio Forms Designer. In Figure 4.11, you can see WinRes being used to edit a form’s resx file. The Properties Window on the right side is the same PropertyGrid component that Visual Studio uses. The Form Designer that occupies most of the window behaves in mostly the same way as the Form Designer in Visual Studio. The localizer needs to have the application’s forms’ resx (or resources) files, but at no point is the source code required. So for an external party to localize your forms, he would need to install the .NET Framework and the .NET Framework SDK; then you would need to send the localizer your application’s forms’ resx files. The localizer would localize these resx files and return them to you for reintegration into your application.
Figure 4.11. WinRes Editing a Default Resource
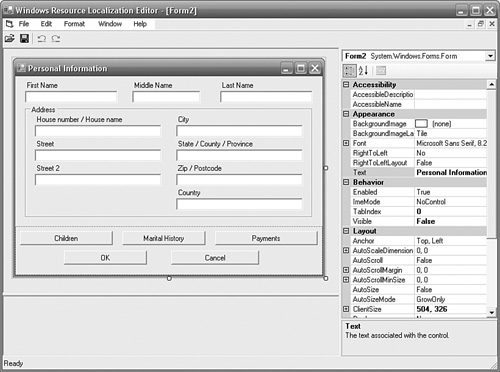
The idea is a good one, and if you are using the .NET Framework 2.0, you will probably find WinRes a useful tool. We return to WinRes in the .NET Framework 1.1 later. Figure 4.11 shows WinRes after it has opened an original, default form resource (say, Form1.resx). From here, the localizer can translate text, move and resize controls, and change fonts and other properties. The localizer cannot add new controls, delete existing controls, or add, edit, or delete events or source code.
When the localizer has finished with one target language, he can select File, Save As (see Figure 4.12) and save the work as a new culture (say, Form1.fr.resx). We return to the File Mode combo box in a moment.
Figure 4.12. WinRes File, Save As Dialog
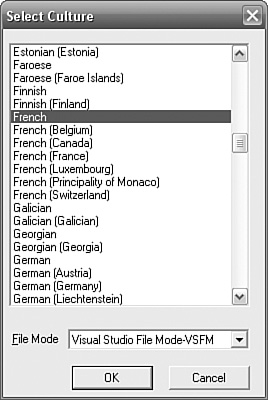
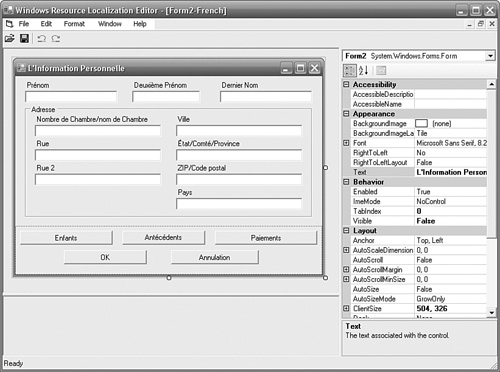
Once saved (see Figure 4.13), WinRes shows the language in the title bar. The localizer can open any or all of the fallback resx, culture-neutral resx, or culture-specific resx files. The localizer also can create new culture versions of the resx files, so they are not limited to the cultures that developers originally supplied them with.
Figure 4.13. WinRes Editing a Culture-Neutral Resource
Resource File Mode
The File, Save As dialog offers a File Mode combo box (see Figure 4.12). File Mode defaults to Visual Studio File Mode (VSFM) in the .NET Framework 2.0. No File Mode option exists in the .NET Framework 1.1, where WinRes can use only Single File Mode (SFM). The two modes differ in whether the files use resource inheritance: Visual Studio File Mode uses resource inheritance, and Single File Mode does not. So when you save the French version of the form using VSFM, the resx file contains only entries that are different from the parent, just as Visual Studio does. For example, if you add a button to a form, set the button’s Text to Close, and set Form.Localizable to true, the form’s resx file will contain these entries:
<data name="button1.Text" xml:space="preserve">
<value>Close</value>
</data>
<data name=">>$this.Type" xml:space="preserve">
<value>System.Windows.Forms.Form, System.Windows.Forms,
Version=2.0.0.0, Culture=neutral, PublicKeyToken=b77a5c561934e089
</value>
</data>
<assembly alias="System.Drawing" name="System.Drawing,
Version=2.0.0.0, Culture=neutral, PublicKeyToken=b03f5f7f11d50a3a" />
<data name="$this.ClientSize" type="System.Drawing.Size,
System.Drawing">
<value>292, 266</value>
</data>
<data name=">>button1.Parent" xml:space="preserve">
<value>$this</value>
</data>
<data name="button1.Size" type="System.Drawing.Size, System.Drawing">
<value>75, 23</value>
</data>
<assembly alias="mscorlib" name="mscorlib, Version=2.0.0.0,
Culture=neutral, PublicKeyToken=b77a5c561934e089" />
<data name="button1.TabIndex" type="System.Int32, mscorlib">
<value>0</value>
</data>
<data name=">>button1.ZOrder" xml:space="preserve">
<value>0</value>
</data>
<data name="$this.Text" xml:space="preserve">
<value>Form1</value>
</data>
<data name="button1.Location" type="System.Drawing.Point,
System.Drawing">
<value>205, 231</value>
</data>
<data name=">>button1.Type" xml:space="preserve">
<value>System.Windows.Forms.Button, System.Windows.Forms,
Version=2.0.0.0, Culture=neutral, PublicKeyToken=b77a5c561934e089
</value>
</data>
<data name=">>button1.Name" xml:space="preserve">
<value>button1</value>
</data>
<data name="$this.AutoScaleDimensions" type="System.Drawing.SizeF,
System.Drawing">
<value>6, 13</value>
</data>
<data name=">>$this.Name" xml:space="preserve">
<value>Form1</value>
</data>
<metadata name="$this.Localizable" type="System.Boolean, mscorlib,
Version=2.0.0.0, Culture=neutral, PublicKeyToken=b77a5c561934e089">
<value>True</value>
</metadata>
If you open the resx file in WinRes, change the button’s Text to “Fermer”, and save it to a new resx file using Visual Studio File Mode, the new resx will contain just a single entry:
<data name="button1.Text" xml:space="preserve">
<value>Fermer</value>
</data>
As you would expect, these VSFM resx files are completely compatible with Visual Studio and can be exchanged between Visual Studio and WinRes without issue. Bear in mind, though, that because the resx “inherits” from its parent resx, WinRes must have access to the parent resx as well; otherwise, WinRes cannot open it (the actual error message is “Error - File : ‘Form1.fr.resx’ The default culture file for the current culture not found. Please add the default culture file.”). I recommend using VSFM because the files are compatible with Visual Studio.
The alternative File Mode is Single File Mode, and this is the only option available to the .NET Framework 1.1 WinRes. In Single File Mode, the resource file contains the complete resource information, which is necessary to render the form. No other resource files are necessary. So if you open a default form resource created by Visual Studio in WinRes and then save it using Single File Mode, the resource file will contain all the entries in the original resx with the values for the new culture, regardless of whether those values are the same as or different from the original resource. If you had saved the previous example using Single File Mode instead of Visual Studio File Mode, the entries would have been as follows:
<data name="$this.Text" xml:space="preserve">
<value>Form1</value>
</data>
<assembly alias="System.Drawing" name="System.Drawing,
Version=2.0.0.0, Culture=neutral, PublicKeyToken=b03f5f7f11d50a3a" />
<data name="$this.ClientSize" type="System.Drawing.Size,
System.Drawing">
<value>292, 266</value>
</data>
<data name=">>$this.Name" xml:space="preserve">
<value>Form1</value>
</data>
<data name=">>$this.Type" xml:space="preserve">
<value>System.Windows.Forms.Form, System.Windows.Forms,
Version=2.0.0.0, Culture=neutral, PublicKeyToken=b77a5c561934e089
</value>
</data>
<assembly alias="mscorlib" name="mscorlib, Version=2.0.0.0,
Culture=neutral, PublicKeyToken=b77a5c561934e089" />
<data name="button1.TabIndex" type="System.Int32, mscorlib">
<value>0</value>
</data>
<data name="button1.Size" type="System.Drawing.Size, System.Drawing">
<value>75, 23</value>
</data>
<data name="button1.Text" xml:space="preserve">
<value>Fermer</value>
</data>
<data name="button1.Location" type="System.Drawing.Point,
System.Drawing">
<value>205, 231</value>
</data>
<data name=">>button1.Name" xml:space="preserve">
<value>button1</value>
</data>
<data name=">>button1.Type" xml:space="preserve">
<value>System.Windows.Forms.Button, System.Windows.Forms,
Version=2.0.0.0, Culture=neutral, PublicKeyToken=b77a5c561934e089
</value>
</data>
<data name=">>button1.Parent" xml:space="preserve">
<value>$this</value>
</data>
<data name=">>button1.ZOrder" xml:space="preserve">
<value>0</value>
</data>
Although the entries are in a different order than in the default resx file, they are all there, except for “$this.Localizable”, which is assumed to be true.
WinRes 2.0 and Cultures
The list of cultures that the .NET Framework 2.0 supports depends on both the operating system on which the framework is running and the custom cultures that are installed on that machine. WinRes 2.0 cannot open resx files for unknown cultures, so if you develop using Windows XP Professional Service Pack 2 and create, say, a culture for Welsh (United Kingdom), but your localizer uses Windows Professional 2000, they will not be able to open the cy-GB.resx files for this culture. The same is true for any custom cultures that you create (e.g., Spanish (United States)). The latter problem can be solved simply by installing the required custom culture. The former problem can be solved either by creating a dummy custom culture for the missing culture and installing that culture on the target operating system, or hijacking a culture that you do not use that is known to be present on all operating systems. For example, imagine that you do not use the Malay (Malaysia) culture. You would rename all the cy-GB.resx files to ms-MY.resx files before sending the resx files to the localizer, and you would rename them all back again upon their return.
WinRes 1.1 and Visual Studio 2003 Compatibility
As has already been noted, the WinRes that ships in the .NET Framework 1.1 SDK does not offer a choice of File Modes because it supports only one: Single File Mode. This means that the culture-neutral and culture-specific files that WinRes creates are incompatible with Visual Studio, and vice versa. So if the localizer uses WinRes to open a default resx file and create a culture-neutral or culture-specific file, Visual Studio cannot open that file. And if developers create culture-neutral or culture-specific resx files using Visual Studio, WinRes cannot open those resx files. This implies that your development strategy must be an “either/or” approach in which you should commit either wholly to Visual Studio or wholly to WinRes with regard to culture-neutral and culture-specific resx files. However, with a little bit of ingenuity, this obstacle can be overcome.
Recall the earlier discussions on resource inheritance in this chapter. WinRes wants to “flatten” the resource inheritance so that each resx file is wholly contained. Visual Studio wants culture-neutral and culture-specific files to contain only the differences from their parent and, therefore, be dependent upon their parent file. The conclusion is that you can use both Visual Studio and WinRes to maintain the same resources, provided that you convert between Single File Mode and Visual Studio File Mode. The strategy works like this: The developers maintain all the resx files as part of the source code in whatever version control system you use. These resx files are used in the normal development process. When it is time to ship the resx files to the localizer to be translated, the resx files are put through a conversion process to convert them from Visual Studio File Mode to Single File Mode. The resulting files are then shipped off to the localizer. When the updated versions come back from the localizer, the files are converted back from Single File Mode to Visual Studio File Mode, and are incorporated back into the development process. This strategy is implemented in Chapter 14, “The Translator.”
WinRes and Visual Form Inheritance
Visual form inheritance is a natural and obvious application of object-oriented programming; it applies the concept of class inheritance to forms. Inheritance is just as essential to form development as it is to class development. A good practice is to create a base form from which all other forms in the application inherit. This acts as a placeholder to which modifications can subsequently be made. The benefit is that to change all forms in an application, you need to make only a single change to the base form. The idea is often extended to create, say, a generic maintenance form from which all specific maintenance forms (e.g., a customer maintenance form and a contact maintenance form) inherit. There are several recommendations throughout this book for placing common code in a base form.
Using WinRes 2.0 with forms that use form inheritance requires an additional step. Before we can understand this step, we must look at the problem that WinRes 2.0 has with form inheritance. Assume that we have a form called BaseForm and a form that inherits from BaseForm, called MaintenanceForm and a form that inherits from MaintenanceForm, called CustomerMaintenanceForm. Assume also that we have French versions of each of these forms (i.e., BaseForm.fr.resx, MaintenanceForm.fr.resx, and CustomerMaintenanceForm.fr.resx). To localize the French BaseForm, the WinRes command is this:
WinRes BaseForm.fr.resx
This works just as you expect it to, and there is nothing special to report here. The problem comes when you try to localize the form that inherits from BaseForm:
WinRes MaintenanceForm.fr.resx
WinRes reports that it cannot load MaintenanceForm, and it uses a placeholder instead. WinRes shows all the controls that are specific to MaintenanceForm, but none of the controls that are inherited from BaseForm. To understand the problem (and the solution), we need to look inside the resx files. In BaseForm.resx, you find the definition for the BaseForm’s Type:
<data name=">>$this.Type" xml:space="preserve">
<value>System.Windows.Forms.Form, System.Windows.Forms,
Version=2.0.0.0, Culture=neutral,
PublicKeyToken=b77a5c561934e089</value>
</data>
From this entry, we learn that BaseForm inherits from System.Windows.Forms. Form, which is what we expect. In MaintenanceForm.resx, you find a similar entry for the MaintenanceForm’s Type:
<data name=">>$this.Type" xml:space="preserve">
<value>FormInheritanceExample.BaseForm, FormInheritanceExample,
Version=1.0.0.0, Culture=neutral, PublicKeyToken=null</value>
</data>
From this entry, we learn that MaintenanceForm inherits from BaseForm, which we already know. However, if you consider what this entry means, you will see that MaintenanceForm inherits from the BaseForm in the FormInheritanceExample assembly. From this, you should learn that, as far as the resx file is concerned, Main-tenanceForm.resx does not inherit from the BaseForm.resx file; it inherits from the BaseForm class in the assembly. WinRes requires original assembly in addition to the MaintenanceForm.resx file to render the form correctly. When WinRes complains that it cannot load the type for the MaintenanceForm, it is complaining that it cannot find the assembly that contains the BaseForm (i.e., FormInheritanceExample.exe, in this example).
There are several solutions to this problem. Either add the assembly to the Global Assembly Cache (GAC) so that WinRes can find it, or copy the assembly into the same location as WinRes.exe. The former approach requires that you strong name your assemblies; if this is not acceptable, you must take the latter approach. The latter approach suffers from the problem that the .NET Framework SDK’s bin directory rapidly becomes littered with erroneous application assemblies that have nothing to do with the .NET Framework SDK. A better solution is to turn the problem around and copy WinRes.exe to the assemblies’ location and run WinRes from there.
WinRes 1.1 does not suffer from this issue because WinRes 1.1 does not support form inheritance. As has been noted previously, WinRes 1.1 supports Single File Mode only; as such, all resx files must contain the complete definition of the form. To localize forms that use form inheritance using WinRes 1.1 the resx files must be flattened. For example, to localize MaintenanceForm.fr.resx, a new MaintenanceForm.fr.resx file must be created that is the sum of BaseForm.resx plus BaseForm.fr.resx plus MaintenanceForm.resx plus MaintenanceForm.fr.resx.
WinRes Pros and Cons
WinRes is a great localization tool that has a number of pros and cons. On the pros side, WinRes provides localization facilities for a form in context. This means that the localizer sees the context in which translations are made and gets immediate feedback on the suitability of choices. They can see clipping problems, overlapping problems, and hot key clashes, and can decide whether the translation is correct within the context that it is being used. Don’t underestimate the importance of this immediate visual feedback. From the localizer’s point of view, WinRes is a great tool because the localizer can move and resize components, and change fonts, RightToLeft and ImeMode properties, and, indeed, any localizable property. Localizers like to be in control of these issues; after all, these issues make the difference between their jobs being localizers as opposed to merely translators.
On the cons side, developers might not want localizers to be able to change all the properties that they have access to. For example, developers might feel that the default resource should be designed to cope with all cultures and might adopt practices such as ensuring that controls set their AutoSize property to true and that the Font, ImeMode, and RightToLeft properties are set on an application-wide basis instead of on an individual control basis. You must establish who controls nontext properties in your resources (i.e., the developers or the localizer) before you get too far into your development. If you decide that these issues should be under developer control, there is no way you can prevent WinRes from allowing localizers to change properties. The solution is to write a utility to read in specific properties (such as Text) from the resx files coming back from the localizers, and apply them to the existing developer’s resx files. In this way, only the localizer’s translations are used; all other changes are dumped. Regardless of who has control over these properties, you might like to adopt the approach of applying the localizer’s changes to the developers’ “master” resx files so that the developers can continue to add and delete components to resx files while the localizer is working on the remote copy. See the “Reintegrating Resources” section of Chapter 14 for solutions to these problems.
Staying on the cons side, WinRes reads and writes only resx and resources files. If you have chosen to store your resources in a database (see Chapter 12, “Custom Resource Managers”) or to use a different resource format, WinRes cannot be made to use it. Two possible solutions to this problem exist. One is to rewrite WinRes yourself. This is significantly more achievable in the .NET Framework 2.0 than in the .NET Framework 1.1, but it still represents a reasonable piece of work with specialized knowledge. If you were to rewrite WinRes, an additional benefit would be that you can specify which properties the localizer can see and change in the Property-Grid. The other possibility is to translate back and forth between the resx file format. So when you ship your application to the localizer, you export your resources to resx files; when the localizer returns the resx files, you import them back into your own resource source.
Another issue that might or might not bother you is that WinRes is a stand-alone executable. If you intend to invoke WinRes from within your application (see Chapter 14) so that the localizer can localize while wandering around the application, a better solution for WinRes is for it to be a component. The WinRes component would be part of the application instead of a separate executable. Apart from the neatness of this solution, this would mean that the localizer wouldn’t have to install the .NET Framework SDK.
Another problem with WinRes is that if you are using the .NET Framework 1.1, you are stuck with Single File Mode and you have to write a translation facility to translate to and from Visual Studio File Mode, to allow both tools to coexist.
WinRes is revisited in Chapter 14, which covers some translator-specific issues. For a list of commercial alternatives to WinRes see Appendix B, “Information Resources.”
ClickOnce
Visual Studio 2005 and the .NET Framework 2.0 introduce a new deployment model for Windows Forms and Console applications called ClickOnce. ClickOnce is the successor to the .NET Framework 1.1’s No Touch Deployment (also called Zero Touch Deployment, HREF Deployment, and HTTP Download) and the Patterns and Practices Group’s Updater Application Block. If you are using the .NET Framework 1.1 and like the look of ClickOnce functionality, take a look at the most recent Updater Application Block, which offers similar functionality to ClickOnce for .NET Framework 1.1 applications. ClickOnce brings the ease and reliability of Web deployment to Windows Forms applications. It allows developers to publish applications to a Web server, file server, or CD-/DVD-ROM from which the client can run the application online or offline. An online application is one that is available only by connecting to the server containing the application and, as such, is similar in behavior to a Web application. An offline/online application (also called an installed application) is one that is installed locally on the client machine and, once it has been installed, can be run without a connection to the server containing the application. A significant benefit to this deployment model is that clients have a simple application-upgrade path. As new versions of the application are published, the client can optionally automatically receive the new upgrade.
This powerful new technology breathes new life into Windows Forms applications. This section is not intended to provide a complete introduction to ClickOnce. For further reading on ClickOnce, consult the following:
Smart Client Developer Center Home: ClickOnce (http://msdn.microsoft.com/smartclient/understanding/windows-forms/2.0/features/clickonce.aspx)
Essential ClickOnce, by Brian Noyes (Addison-Wesley: 2006)
Instead, this section covers ClickOnce issues that are specific to internationalization. If you are new to ClickOnce, read the section entitled “A Brief Introduction to ClickOnce.” If you are already familiar with ClickOnce, you can skip this section. Subsequent sections discuss publishing applications with a single culture using first Visual Studio 2005 and then msbuild, localizing the ClickOnce user interface, and publishing applications with multiple cultures using first Visual Studio 2005 and then msbuild.
A Brief Introduction to ClickOnce
To get started with ClickOnce, create a Windows Forms application—say, WindowsApplication1—and, within Visual Studio 2005, select Build, Publish WindowsApplication1. In the “Where do you want to publish the application?” dialog, accept the offered URL (i.e., http://localhost/WindowsApplication1). This option publishes your application to the local Web server, so you need IIS installed. If you don’t have IIS installed on any machine, you can publish to a file location. Click Next. In the “Will the application be available offline?” dialog, accept the “Yes, this application is available online or offline” radio button. This means that when the client first connects to the Web server, the application will be installed into the Click-Once cache on the client machine. Each time the application is run, ClickOnce will check that the application is the latest version and check whether it is the application that will be run from the cache. If a newer version has been published, the user will be given an opportunity to upgrade the application. Click Next. Click Finish. When Visual Studio has finished publishing the application, the publish.htm Web page is displayed, showing a button to install WindowsApplication1.
From here, you assume the role of the user. If you click the Install button, the WindowsApplication1 application is installed on your computer in the ClickOnce cache. An item is added to the Start menu, and an item is added to Add/Remove Programs to allow the user to remove the new application or to revert to the previous version. If you subsequently modify the application, all you need do is publish it again. When users run their application again, they will be prompted to upgrade it. You now have the basics of ClickOnce.
Bear in mind that ClickOnce is a powerful and flexible technology, and this description skims the surface of this significant subject. Numerous options exist for changing ClickOnce behavior from within Visual Studio. Also be aware that the tools offered in Visual Studio are built using the ClickOnce API and simply represent just one way of assembling this functionality. If you find that one part of this technology is not to your liking, it is likely that your requirements can be met by using the tools or API at a lower level.
Deploying a Single Culture Using Visual Studio 2005
The first issue that you will notice when you publish an application with satellite assemblies is that none of the satellite assemblies are published. Let’s assume that you now localize Form1 in the simple Windows Forms application created in the previous section, and that you create a French version of Form1. When you build the application, there will obviously be a new folder called fr that contains a satellite assembly called WindowsApplication1.resources.dll. When you publish the application, however, this assembly will not be published, and all recipients will get the fallback resources only.
You can solve this problem in two ways. The first solution is to specify that the resource assemblies should be included. In the application’s Properties page, select the Publish tab and click the Application Files... button. You should see just the main application, not the French satellite assembly. Check the “Show all files” check box, and the French satellite assembly appears (see Figure 4.14).
Figure 4.14. ClickOnce Application Files Dialog Showing Satellite Assemblies
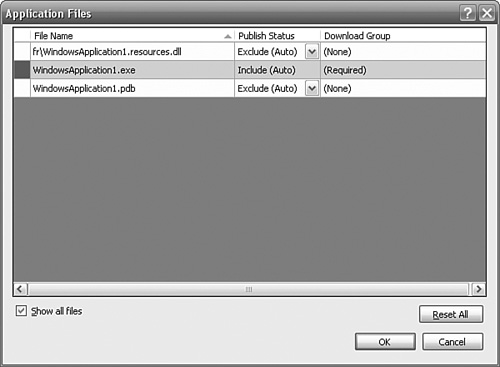
You can see from this dialog that the French satellite assembly is excluded. To include the French satellite assembly, drop down the Publish Status combo box on the frWindowsApplication1.resources.dll line and click Include. Problem solved.
The second solution is to set the ClickOnce publish language (also called the target culture). (If you intend to use this option, you should return to the ClickOnce Application Files dialog first and click the Reset All button to undo the previous change.) From the Publish tab of the application’s Properties page, click the Options... button to see the ClickOnce Publish Options (see Figure 4.15).
Figure 4.15. ClickOnce Publish Options
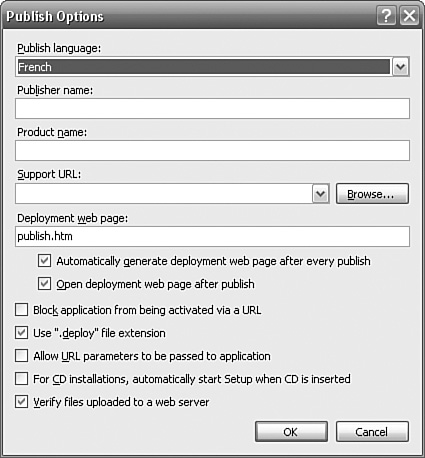
In the “Publish language” combo box, select French. If you return to the Application Files dialog now, you will see that the frWindowsApplication1. resources.dll assembly’s Publish Status has been set to “Include (Auto)”. This is not quite the same as simply “Include”. This means that the inclusion of the satellite assembly depends on the Publish language. If you had both French and Spanish resources, for example, and you changed the Publish language to Spanish, the French satellite assembly would be excluded and the Spanish satellite assembly would be included.
When you publish the application after changing the target language, you receive the warning shown in Figure 4.16. The warning simply notes that the culture of the previously published version of the application is not the same as the culture of the version that you are now publishing. Answer Yes to overwrite the previous version of the application.
Figure 4.16. ClickOnce Published Culture Change Warning

In addition, if you do not have the .NET Framework 2 Language Pack installed for the target language, you will receive the following warning:
Could not match culture 'fr' for item '.NET Framework 2.0'. Using culture 'en'
instead.
You can ignore this warning for now. The relevance of the presence or absence of a corresponding .NET Framework 2 Language Pack is discussed in the section entitled “The ClickOnce User Interface.”
Note that the Publish language automatically includes resources specifically, not generically. This means that if you add French (France) and French (Canada) versions of Form1, then setting the Publish language to French includes only the French satellite assembly; it does not also include the French (France) and French (Canada) satellite assemblies. So using the Publish language to automatically include satellite assemblies is not suitable if you want to publish a “generic” French version of your application that includes generic French and all specific versions of French. (Incidentally, if you set the Publish language to French (France), ClickOnce is intelligent enough to include the culture-neutral French satellite assembly.)
The Publish language is used for two purposes: the automatic inclusion of satellite assemblies and also the language of the ClickOnce bootstrapper. We cover the latter in the next section.
The ClickOnce User Interface
So far, we have simply specified what assemblies are included in the published application. An important part of internationalizing the ClickOnce deployment process is the localization of the ClickOnce user interface. All the dialogs from the publish.htm Web page onward (such as security warnings, installing and updating dialogs, and the add/remove program dialog) are all used by the recipient of your application and must all be localized. The localization of each dialog depends on the origin of the dialog (see Table 4.3).
Table 4.3. The Origin of ClickOnce Dialogs

The publish.htm Web page that starts the ClickOnce process going (if you are using IIS) originates from Visual Studio 2005. The language used in the dialog is determined by the language that Visual Studio 2005 uses, the presence of a corresponding .NET Framework Language Pack and the language of the operating system. For example, if you are developing using the English version of Visual Studio 2005, you will always get the English publish.htm. If you are developing using the Japanese version of Visual Studio 2005 (which includes the Japanese .NET Framework Language Pack) on a Japanese version of Windows, you will always get the Japanese publish.htm. There is no way to tell Visual Studio to generate publish.htm using a different language, so the English Visual Studio 2005 cannot generate a French publish.htm. In all likelihood, however, you would replace publish.htm with your own branded version of publish.htm, so even if such functionality existed, you might not use it anyway. To replace publish.htm with your own branded version, first publish your ClickOnce application as normal; when publishing is complete, then copy your branded publish.htm over the generated publish.htm. Simple, low-tech, and effective.
The ClickOnce bootstrapper (setup.exe) is used to install the application’s prerequisites (e.g., the .NET Framework and the .NET Framework Language Packs). Whether your users see dialogs from setup.exe depends on whether they need to install the application’s prerequisites. The ClickOnce bootstrapper’s user interface is determined by the application’s Publish language. The support files for the ClickOnce bootstrapper are installed in %FrameworkSDK%Bootstrapper (see Figure 4.17).
Figure 4.17. ClickOnce Bootstrapper Support Files
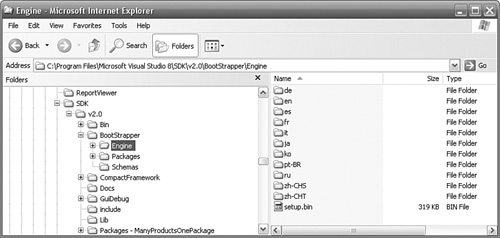
The Engine folder contains setup.bin and a collection of folders that are culture names. Each culture folder contains a localized setup.xml with Win32 resource strings, so the fr folder’s setup.xml contains the French resource strings. When the application is published, a custom setup.exe is created by combining setup.bin with the resources in the setup.xml that corresponds to the publish language. This means that the ClickOnce bootstrapper that you create is for a single language. If you want to support more than one language, you must publish the application once for one language and then again for the second language. A number of localized setup.xml files are included in the .NET Framework SDK, but you are not restricted to this list. To add a new language, simply create a new folder, copy over the setup.xml from the English folder, and translate all the strings.
The remaining dialogs (i.e., the dialogs that are certain to be seen by all users who use a ClickOnce-deployed application) are all supplied by a .NET Framework Language Pack. The ClickOnce engine, dfsvc.exe, is a .NET Framework application. It uses a ResourceManager to get its resources and obeys the resource-fallback behavior that we already know. ResourceManager uses CurrentUICulture to determine which culture to load resources for, and we know that CurrentUI Culture defaults to the language version of the operating system. So the language that the user sees in the ClickOnce dialogs is determined by the language of the operating system and the availability of a corresponding .NET Framework Language Pack. So if a user is running German Windows and has the German .NET Framework Language Pack installed, all ClickOnce applications will show German ClickOnce dialogs. If a user is running German Windows and the German .NET Framework Language Pack has not been installed, all ClickOnce applications will show English ClickOnce dialogs (because the fallback culture for the .NET Framework itself is English). The Publish language plays no part in this process. Also note that it is not possible to change this behavior because the ClickOnce engine, dfsvc.exe, does not support any facility for changing its CurrentUICulture. For example, you cannot deploy a French application and use a French ClickOnce user interface on an English version of Windows.
From these explanations, you can see that the language of the complete ClickOnce user experience comes from three sources: Visual Studio, the ClickOnce bootstrapper, and the .NET Framework Language Packs. A well-designed deployment scenario would ensure that the language does not change as the user progresses from one stage of deployment to the next. Obviously, it is undesirable to have the publish.htm in English, the bootstrapper in French, and the ClickOnce dialogs in German. Your Click-Once strategy will be determined by those elements that you have control over and those elements that you do not. You have control over the publish.htm file because this is simply HTML that you can rewrite. You have control over the ClickOnce boot-strapper language because you can create new setup.xml files for your required languages. You do not have control over .NET Framework Language Packs because you are limited to the languages supported by Microsoft. You probably do not have control over the language version of the operating system that your users are running. Based on a lowest-common-denominator approach, you should restrict yourself primarily to the language version of the operating systems on which your application will run, and then to languages for which a .NET Framework Language Pack exists.
Deploying a Single Culture Using msbuild
Visual Studio is great for interactive development, but the .NET Framework 2.0 msbuild command-line utility is more appropriate for automating builds and automating publishing. To build a project from the command line, open a .NET Framework SDK Command Prompt (from the Microsoft .NET Framework SDK v2.0 program group), change directory to your application’s source folder, and enter this:
The default target for msbuild is “build”, so this is the same as the following:
msbuild /target:build
To publish your application (i.e., deploy it using ClickOnce), enter this:
msbuild /target:publish
To override a setting in the application’s project file (i.e., the values set in the Publish page of the project’s properties), use the /property switch:
msbuild /target:publish /property:ProductName=TimeZones
Note that not all settings in the project file are applied when building from the command line. For example, the “Automatically increment revision with each release” check box does not apply when building using the command line, so no matter how many times you build using the command line, the revision number will not change. You can specify the full version number using the ApplicationVersion property, or, if this property ends in a “*” you can specify just the revision number (which is substituted for the “*”) using the ApplicationRevision property.
To publish your application using msbuild, open a .NET Framework SDK Command Prompt and, from your application’s folder, run msbuild and specify the TargetCulture:
msbuild /target:publish /property:TargetCulture=fr
/property:PublishUrl=http://localhost/WindowsApplication1/fr
When the publish is complete, copy the files from the temporary publish directory to the publish destination (e.g., inetpubwwwrootWindowsApplication1).
Another localization issue to consider is that your publisher name and product name form part of the installation process and are used in the Start menu item and Add/Remove Programs item. If these differ in different cultures, you must include these differences in your language-specific publishing. You can specify the publisher name in msbuild using the PublisherName property, and you can specify the product name using the ProductName property.
Deploying All Cultures Using Visual Studio 2005
The scenario that we have looked at so far deploys a single-culture version of the application. If your application has more than one culture, you might like to deploy all cultures together. This scenario matches the typical Windows Installer deployment model used prior to ClickOnce. To deploy all cultures, you open the ClickOnce Application Files dialog (see Figure 4.14) and set all satellite assemblies’ Publish Status to Include. This solves the immediate problem but introduces two new problems. First, the Publish language is no longer very meaningful and should not be used. Recall that the Publish language has two purposes: to automatically include and exclude satellite assemblies, and to specify the ClickOnce bootstrapper culture. The first use is now obsolete because we have taken direct control over the inclusion or exclusion of satellite assemblies. The second use is not meaningful anymore because no single language works for all users of the application. If the Publish language is left as “(Default)”, it defaults to the Visual Studio language. Whatever decision you make for the language of publish.htm and the ClickOnce bootstrapper, remember that it is a single language for all users, and that the language the ClickOnce dialogs use depends on the client’s machine and might not necessarily be the same.
The second problem that this scenario introduces is unnecessary downloads during updating. When you update your application and republish it, all users get the updated version of the application (according to your update policy). The problem is that they get all satellite assemblies, regardless of whether they want them. So the French users will also get the updates to the German satellite assemblies. Whereas each individual user might not be overly concerned about the extra download time, the cumulative effect on your server might not be so easily overlooked.
Deploying All Cultures Using msbuild
Deploying all cultures using msbuild is a relatively simple matter because the TargetCulture property supports the “*” wildcard:
msbuild /target:publish /property:TargetCulture=*
/property:PublishUrl=http://localhost/WindowsApplication1
Deploying All Cultures Individually Using Visual Studio 2005
Perhaps the optimum ClickOnce solution in internationalization terms is to deploy all cultures individually. Each culture (or group of cultures) is deployed to a separate location, so the French group of cultures (e.g., French, French (France) and French (Canada)) is deployed to, say, inetpubwwwrootWindowsApplication1fr and the Spanish group of cultures (e.g., Spanish, Spanish (Spain), and Spanish (Mexico)) is deployed to, say, inetpubwwwrootWindowsApplication1es. The French deployment would use a French publish.htm and a French ClickOnce bootstrapper, and the Spanish deployment would use a Spanish publish.htm and a Spanish ClickOnce bootstrapper. Certainly, this demands the greatest deployment (and maintenance) effort, but it provides the best user experience and best update performance (because users download only those satellite assemblies that are relevant to them).
Deploying all cultures individually in Visual Studio 2005 is a laborious process. You should start by considering whether to uncheck the “Automatically increment revision with each publish” check box in the Publish properties. If you uncheck this check box, all language versions will have the same publish version. This might be convenient at first, but it might not last. Bear in mind that the publish version is not the same as the build version. The build version refers to the application, whereas the publish version refers to the version of the publish operation. If you intend to update satellite resources independently of the application itself (so that typos can be fixed, for example), you will not want to republish every language when only one language changes. If this is the case, there is no value in keeping the publish version in step for all languages.
The effort involved in publishing each culture depends on whether you publish groups of cultures or individual cultures. The latter is the simplest approach because you can simply leave the Publish Status of all satellite assemblies as “Auto” and set the Publish language to the culture to be published. Finally, set the publishing location (on the main Publish properties page) to a specific location, e.g., http://localhost/WindowsApplication/fr. Then repeat the process for each culture, changing the Publish language and Publish location appropriately.
However, if you want to publish groups of cultures, you cannot rely on the inclusion or exclusion of satellite assemblies using the “Auto” Publish Status. Instead, you must explicitly set each satellite assembly to either Include or Exclude each time before you publish. So, for example, you would set the Publish Status of the French, French (France), and French (Canada) satellite assemblies to Include and the Publish Status of all other satellite assemblies to Exclude, and then set the Publish language to French and the Publish location to http://localhost/Windows Application/fr, and publish. Then repeat the process for the Spanish group of cultures, and so on. The result is a lot of error-prone work.
Deploying All Cultures Individually Using msbuild
To publish all cultures individually using msbuild, open a .NET Framework SDK Command Prompt and, from your application’s folder, run msbuild:
msbuild /target:publish /property:TargetCulture=fr
/property:PublishUrl=http://localhost/WindowsApplication1/fr
msbuild /target:publish /property:TargetCulture=es
/property:PublishUrl=http://localhost/WindowsApplication1/es
These two commands publish first the French culture and then, separately, the Spanish culture. For these commands to work correctly, the satellite assemblies’
Publish Status must be set to Auto so that they can be included or excluded using the TargetCulture property. This works well for including a single culture in a publish operation. Unfortunately, it is not possible to set the Publish Status of a satellite assembly from the msbuild command line. This means that it is not possible to specify whether a satellite assembly should be included or excluded from a given publish operation, so there is no built-in capability to publish a group of related cultures (e.g., French, French (France), and French (Canada)) in a single operation. You have two choices: either publish every specific culture individually (i.e., publish the French culture and then the French (France) culture and then the French (Canada) culture) or else write a utility to modify the .csproj file before each build. The .csproj file contains a list of all the files that can be published and, most important, their Publish Status. Here is the entry for the French satellite assembly:
<PublishFile Include="frWindowsApplication1.resources">
<InProject>False</InProject>
<Group>
</Group>
<TargetPath>
</TargetPath>
<PublishState>Exclude</PublishState>
<FileType>Satellite</FileType>
</PublishFile>
Such a utility would change the PublishState element to Include for the given PublishFile.
Download On Demand
Another publish and deployment scenario that you could consider is to let the user delay the decision on their choice of language until runtime. In this scenario you publish the entire application with all languages to a single location. However, in the Application Files dialog (see Figure 4.18) you set all satellite assemblies to Include. In addition you assign a Download Group name to each of the assemblies. I recommend using the culture identifier (e.g. fr, es) to identify the file group but this is only a convention; you could just as easily use the full name (e.g. French, Spanish).
Figure 4.18. ClickOnce Application Files Dialog Showing Satellite Assemblies in Download Groups
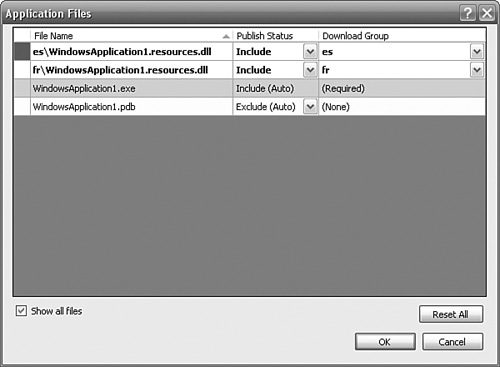
Any file that is part of a Download Group is not automatically downloaded by the client. Instead these files are downloaded on demand. This means that when your users download your application they will receive only the fallback assemblies initially. Your application would include a means by which the user can select their choice of language. Let’s say you provide a menu with French and Spanish menu items then the French menu item would include the following code:
if (!ApplicationDeployment.CurrentDeployment.
IsFileGroupDownloaded("fr"))
ApplicationDeployment.CurrentDeployment.DownloadFileGroup("fr");
The IsFileGroupDownloaded returns True if the given file group has already been downloaded for this version. The DownloadFileGroup downloads the files in the given file group.
This solution has pros and cons. On the upside it is simple to configure and publish the application. In addition there is a single publish location that is shared across all languages and the download demand on your servers is as low as possible. On the downside the use of the ClickOnce API demands that your application is installed with Full Trust. In addition this solution is slightly intrusive in that the application must be modified in order to support the solution. A further problem is that the ClickOnce application does not automatically download previously downloaded groups when a new version of the application is downloaded. This problem can be solved by persisting the user’s language preference and adding this code to the application’s startup code:
if (ApplicationDeployment.CurrentDeployment.IsFirstRun)
{
Properties.Settings settings = new Properties.Settings();
if (settings.UICulture == "fr")
ApplicationDeployment.CurrentDeployment.
DownloadFileGroup("fr");
else if (settings.UICulture == "es")
ApplicationDeployment.CurrentDeployment.
DownloadFileGroup("es");
}
This code checks that the application is being run for the first time (which it will be if a new version has been downloaded), gets the user’s UICulture from the application’s settings and uses DownloadFileGroup to get the file group that corresponds to the user’s language preference.
The final problem with this solution is that there is no automated way to install a corresponding .NET Framework Language Pack on the user’s machine. The problem here is that the relevant .NET Framework Language Pack can only be installed by the ClickOnce bootstrapper and the user’s choice of language isn’t made until the application is running, which is after the bootstrapper has run.
.NET Framework Language Packs and ClickOnce Prerequisites
ClickOnce enables you to add prerequisites to your deployment that are installed by the ClickOnce bootstrapper before your application is installed. Primarily, this includes the .NET Framework 2.0, but ClickOnce recognizes many other prerequisites and enables you to add your own prerequisites. An obvious prerequisite for an internationalized application is one or more .NET Framework Language Packs. By default, these do not appear in the ClickOnce prerequisites dialog (click the Prerequisites... button in the project’s properties Publish tab). However, after downloading a .NET Framework Language Pack, you can add it as a custom prerequisite. To make a custom prerequisite available to Visual Studio 2005 you need to create a new folder in the %FrameworkSDK%BootstrapperPackages folder containing a product.xml file and a culture specific folder containing a package.xml. You could learn the format of these files and write them by hand but a simpler solution would be to download the Bootstrapper Manifest Generator (http://www.gotdotnet.com/workspaces/work-space.aspx?id=ddb4f08c-7d7c-4f44-a009-ea19fc812545) and use it to create these files and build the resulting custom prerequisite.
There are two approaches that you can take to build a custom pre-requisite product and we will cover both in this section. The first is to build a single custom prerequisite product that includes a .NET Framework Language Pack for each culture (see Figure 4.19).
Figure 4.19. Bootstrapper Manifest Generator Showing One Product that Includes Many Packages
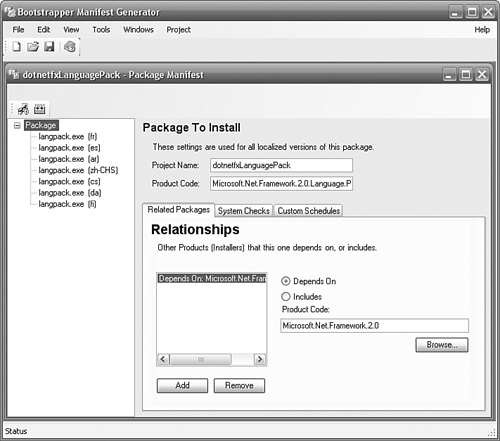
In Visual Studio 2005 the pre-requisites dialog shows a single product: the .NET Framework Language Pack (see Figure 4.20).
Figure 4.20. Visual Studio 2005 ClickOnce Prerequisite Showing One Product that Includes Many Packages
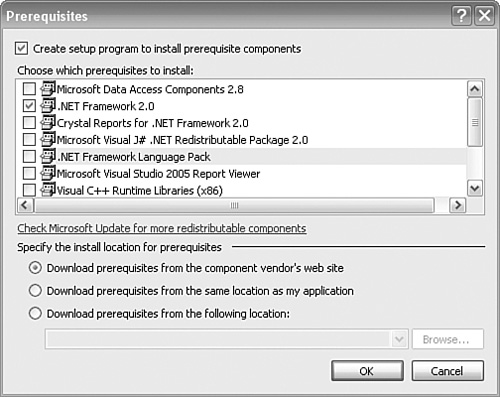
The product is used as a group name for all of the .NET Framework Language Packs that you have included in the product. When you publish your application just one of these language packs will be included in the ClickOnce bootstrapper. The selection is made by matching the Publish language with a package for the same culture. This approach works well if you want to deploy a single .NET Framework Language Pack with your application and you use the Publish language to drive the language selection process.
The second, less likely, approach is to build a separate custom pre-requisite product for each .NET Framework Language Pack. Figure 4.21 shows a single product containing the French .NET Framework Language Pack. In this example the product has a single package that is not specific to a culture. You would create a separate product for each language.
Figure 4.21. Bootstrapper Manifest Generator Showing One Product that Includes One Package

In Visual Studio 2005 the prerequisites dialog shows a product for each language (see Figure 4.22).
Figure 4.22. Visual Studio 2005 ClickOnce Prerequisite Showing Many Products that Includes a Single Package Each
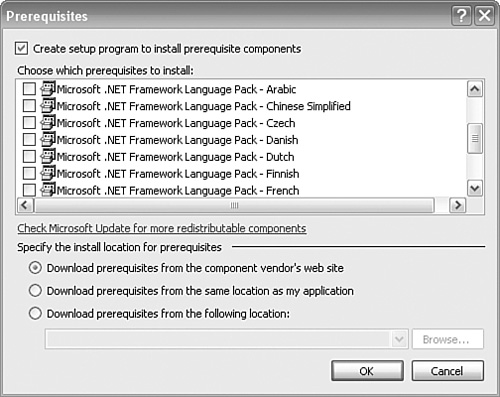
In this scenario each language-specific .NET Framework Language Pack product must be selected explicitly and the Publish language plays no part in the selection process. This approach requires greater configuration during the publish stage but it allows you to select more than one .NET Framework Language Pack should this be necessary for your application.
Thread.CurrentThread.CurrentCulture and ClickOnce Security
Internationalized applications also have security considerations when deployed as ClickOnce applications. You should consider how the application’s Thread. CurrentThread.CurrentCulture is set because the application requires the ControlThread flag security permission to set this property. ClickOnce applications adopt their security settings from the zone they were installed from. So if you install the application from a remote Web server, the application uses the Internet security zone settings. Similarly, if you install from a path on a file server, the application uses the Local Intranet security zone settings. Neither the Internet nor the Local Intranet security zones include the necessary permission for the application to change the Thread.CurrentThread.CurrentCulture property. Only if the application is installed using Full Trust (i.e., it is installed from a local path or from a CD, or it demands Full Trust) or if the application has a Trust License (see “Trusted Application Deployment” in the .NET Framework SDK Help) will the application have the necessary permission to allow this property to be set. The Thread.Current-Thread.CurrentUICulture does not require security permissions to set its value. You can configure your application’s security requirements from the project’s properties Security tab (see Figure 4.23).
Figure 4.23. Configuring ClickOnce Security
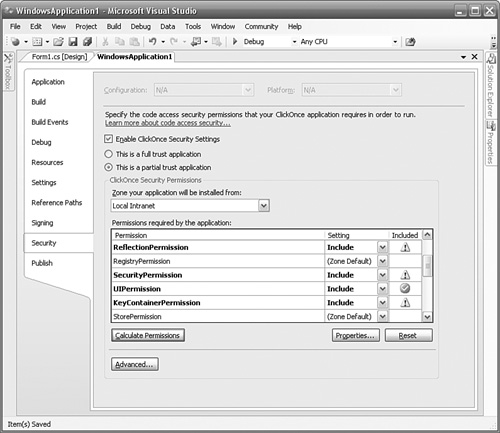
If you click the Calculate Permissions button (positioned just below the “Permissions required by the application” grid), Visual Studio 2005 runs permcalc.exe to calculate the security permissions that your application requires and then sets those permissions in the grid above the button. Notice the warning yellow triangle with the exclamation mark in the SecurityPermission line. Select this line, click the Properties... button (see Figure 4.24), and note the status of the “Enable thread control” permission. This permission is required when the CurrentCulture is set in code such as this:
Thread.CurrentThread.CurrentCulture =
Thread.CurrentThread.CurrentUICulture;
Figure 4.24. ClickOnce Permission Settings
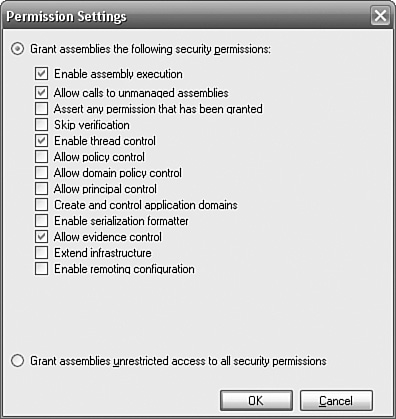
The same issue applies to file-based resource managers created using Resource-Manager.CreateFileBasedResourceManager because these resource managers require FileIOPermission.
Where Are We?
In this chapter, we covered the internationalization issues that are specific to Windows Forms applications. You learned how to use Visual Studio to make forms localizable and to localize them, and you saw that this rests on the resource technology we discussed in the previous chapter. We looked at the different serialization models used by Visual Studio 2003 and Visual Studio 2005, and we compared their relative merits and implementations. We looked at how the user can specify the user interface culture, and how an application can cope with its culture changing without having to restart the application. We saw that the .NET Framework’s dialog components and classes depend on the operating system or .NET Framework Language Pack for their resources, and that this can be either a curse or a blessing, depending on your application. We looked at the Windows Resource Localization Editor and saw that it is a great tool that can be made to work with a little thought. Finally, we looked at the way ClickOnce deploys localized applications and saw that localized applications need some additional attention to get the most from this powerful technology.