
Accessing COM Components from .NET
The companion Web site contains a project called Test to build a DLL-based COM component that we will use for our demonstrations. The executable is named test.dll. Here is some relevant information about the component, taken from its IDL file:
// Project ComFromNet/Test

[
     uuid(653E70B3-4243-4A25-B713-0BFA7A271D02),
     oleautomation,
     ...
]
interface IMyFoo : IUnknown {
     HRESULT GetGreeting([in] BSTR user, [out] BSTR* greeting);
};

[
     uuid(B879FF11-EEAF-474C-B28C-F214B893A4B7),
     version(1.0),
     ...
]
library TestLib
{
     [uuid(FADA4A73-76DC-443C-838E-E6B98251E428)]
     coclass MyTest
     {
        [default] interface IMyFoo;
     };
};
As can be seen from the IDL definition, the component exposes a COM class MyTest that implements a COM interface IMyFoo. Interface IMyFoo defines a method GetGreeting that takes a BSTR user as input and returns a BSTR greeting as output.
The implementation of GetGreeting can be found on the companion Web site. It essentially creates a string as "Hello " + user and returns it as output. For example, if the input user is Jay, the output greeting is Hello Jay.
Note that IMyFoo is automation compatible. Any custom interface that is marked with the oleautomation attribute is automation compatible. In addition, dispinterface-based or IDispatch-based interfaces are also automation compatible.
What's the significance of a COM interface being automation compatible? Recall that the .NET programming model is built around metadata information. To consume COM-style interfaces, .NET requires the metadata for the interfaces. As you may know, COM provides a mechanism called type libraries to store metadata for automation-compatible COM interfaces. As we will see shortly, .NET is capable of consuming the metadata from a type library.
Note that, for interoperability, it is not necessary that a COM interface be automation compatible or that a type library be available for .NET's consumption. In such cases, however, you will have to construct the interface metadata manually in your managed code.
A type library contains metadata (in binary format) for one or more automation-compatible interfaces. A type library can either be created as a stand-alone binary file or be embedded in the executable itself. In our case, the type library is embedded in the executable Test.dll. This type library stores metadata information on the COM class MyTest as well as the interface IMyFoo.
To extract the metadata from the type library, the .NET SDK provides a tool called the Type Library Importer (tlbimp.exe). This tool converts the type definitions found within a type library into equivalent definitions in a .NET assembly. The generated assembly is referred to as an interop assembly. The tool contains many options to customize interop assemblies. The following command line, for example, produces an interop assembly from our COM component Test.dll. The interop assembly is named TestImport.dll and the imported types are wrapped in the namespace MyImports:
tlbimp.exe Test.dll /out:TestImport.dll /namespace:MyImports
Here is a partial output from TestImport.dll as produced from the IL disassembler:
.namespace MyImports
{
     .class interface public abstract auto ansi import IMyFoo
     {
     .method public hidebysig newslot virtual abstract
       instance void  GetGreeting(
         [in] string  marshal( bstr) user,
         [out] string&  marshal( bstr) greeting)
           runtime managedinternalcall
       {
       } // end of method IMyFoo::GetGreeting
     } // end of class IMyFoo

     .class public auto ansi import MyTestClass
       extends [mscorlib]System.Object
       implements MyImports.IMyFoo
     {
       ...
     } // end of class MyTestClass
} // end of namespace MyImports
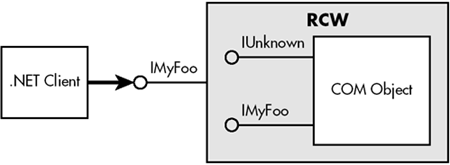
As can be seen, the type library importer wraps the COM object in an interop layer. This interop layer is referred to as the runtime-callable wrapper (RCW). The RCW takes care of transforming each call to the COM object to the COM calling convention. For example, it transforms .NET strings to COM-style BSTR and vice versa. A close inspection of the declaration of GetGreeting from the disassembler's output would make this clear.
At this point, it is worth mentioning that Visual Studio .NET makes the job of generating the RCW easy. Just select Add Reference from the context menu of a project. The ensuing dialog box lets you select any of the registered type libraries on the local machine. You can also navigate through directories and select a specific COM component. Visual Studio .NET runs TlbImp.exe to generate the RCW and adds the generated interop assembly as a reference to your project.
A Simple Example
To access the COM component, all that is needed now is for the managed code to reference the generated assembly and use the defined types. Here is a code excerpt in C# that illustrates this:
// Project ComFromNet/NetClient

using MyImports;

class MyApp {
     public static void Greet01() {
       IMyFoo foo = new MyTestClass();
       String greeting;
       foo.GetGreeting("Jay", out greeting);
       Console.WriteLine(greeting);
     }
}
COM programmers will notice that there is no need to call the COM API CoCreateInstance to create the COM object, call QueryInterface to obtain the IMyFoo interface, or call Release to release the object. This is because behind the scenes, the RCW calls CoCreateInstance as well as other IUnknown methods, AddRef, QueryInterface, and Release as needed. Essentially, the RCW makes the COM object appear as a native .NET object and makes the .NET client appear to the COM object just as if it were a standard COM client. This is illustrated in Figure 7.1.
Figure 7.1. Accessing COM components from .NET.
The RCW goes beyond what is needed for COM interoperability. It goes through all the interfaces that are defined in the coclass section and makes the interface methods available as part of the imported class. This eliminates the need to explicitly obtain the interface to make a method call, as illustrated in the following code excerpt:
// Project ComFromNet/NetClient

public static void Greet02() {
     MyTestClass x = new MyTestClass();
     String greeting;
     x.GetGreeting("Jay", out greeting);
     Console.WriteLine(greeting);
}
To run the .NET application, the runtime should be able to locate the interop assembly. One option is to copy the interop assembly to the application's private path. However, it may be better to install the interop assembly in the GAC so that the COM component is available to any .NET application that needs it. Recall from Chapter 3 that only strong-named assemblies can be installed in the GAC. The type library importer provides a switch, -keyfile, to specify the file containing the strong-named key pair that should be used to sign the resulting interop assembly.
Lifetime Management
The RCW makes the COM object appear as a managed object. Naturally, the managed object has to follow the rules of the common language runtime. An interesting result of this is that the COM object is released only when the corresponding .NET object is garbage collected.
Recall from Chapter 4 that the garbage collection may happen much later than the last time a managed object is used. To hold the COM object until the .NET object is garbage collected may not be desirable in some cases (e.g., if the COM object holds some expensive resources).
The RCW has been designed to handle this situation. You can explicitly control the lifetime of the COM object from the managed code. The .NET Framework defines a static method, Marshal.ReleaseComObject, that you can use to explicitly release a COM object. This is illustrated in the following code excerpt:
// Project ComFromNet/NetClient

public static void LifetimeMgmtDemo() {
     MyTestClass x = new MyTestClass();

     ... // use x

     // explicit release
     Marshal.ReleaseComObject(x);

     // Don't use x anymore
}
Once the COM object has been explicitly released, any call made on the corresponding native object results in an exception of type InvalidComObjectException.
Error Handling
COM APIs and COM interface methods always have a return value of type HRESULT. COM applications check this return value to see if the called API or interface method succeeded. In case of failure, a COM object can return additional error information by means of a standard interface, ISupportErrorInfo.
The .NET programming model, on the other hand, is based on raising exceptions to indicate error conditions.
To provide the needed compatibility, the .NET interop layer internally checks for COM method call failures and automatically raises .NET style exceptions. These .NET style exceptions for COM style errors are of the type COMException. All that a .NET application has to do is to catch and process this type of exception, as illustrated in the following code excerpt:
// Project ComFromNet/NetClient

public static void DisplayException() {
     try {
        // some code
     }catch(COMException e) {
       Console.WriteLine("Exception: {0} (0x{1:x})",
         e.Message, e.ErrorCode);
     }
}
COM Apartments
A COM apartment is a logical container within a process that enforces certain threading requirements on COM objects. A thread must enter an apartment before it can access a COM object. Apartments are either single-threaded (STA) or multithreaded (MTA). COM objects instantiated in an STA can be directly accessed only from the STA thread that instantiated it. COM objects instantiated in an MTA can be directly accessed from any MTA thread. Accessing an object from an incompatible apartment requires marshaling. A process can contain zero or more STAs and at most one MTA.
Although the .NET Framework itself doesn't use apartments to access .NET objects, it still provides for a managed thread to enter a specified apartment. Otherwise, managed code will not be able to access any COM object.
The apartment that a managed thread must enter can be specified by setting the ApartmentState property of the thread to one of the values from ApartmentState enumeration. Meaningful values are ApartmentState.MTA (for MTA) and ApartmentState.STA (for STA). The following code excerpt sets the apartment state of the current thread to MTA:
// Project ComFromNet/NetClient

public static void Main() {

     Thread.CurrentThread.ApartmentState = ApartmentState.MTA;
     ...
}
By default, the apartment state of the thread is set to ApartmentState.Unknown, in which case .NET automatically initializes the thread to MTA when making the first COM call from the thread.
There is a subtle difference between managed and unmanaged threads with regards to their apartment states that is worth noting. An unmanaged thread can enter and leave an apartment as many times as desired. A managed thread, however, can enter the apartment only once. Once the managed thread enters an apartment, it stays in that apartment until it is terminated.
Finally, it is also possible to specify the apartment a thread must enter by means of STAThread or MTAThread attributes on the thread entry point method. The following code excerpt, for example, sets the apartment of the main thread to STA:
// Project ComFromNet/NetClient

     [STAThread]
     public static void Main() {
       ...
     }
DataTypes
The type library importer does a good job of wrapping most COM datatypes into their managed counterparts. COM datatype BSTR is mapped to System.String, as we saw earlier. Two COM datatypes, variants and safe arrays, deserve a little more attention.
Variants
Some programming languages such as VBScript forego the notion of typed data in favor of increased programming simplicity. These typeless languages support only one datatype called a variant. A variant can contain any type of data. Even many typed languages, such as Visual Basic, support variants natively.
The COM SDK defines a discriminated union to deal with variants. It is called VARIANT. The COM SDK performs APIs to deal with variants, such as converting basic datatypes to variants and vice versa, or to copy one variant to another.
Under .NET, the RCW maps a VARIANT datatype to System.Object and vice versa. The underlying datatype is preserved and can be obtained by casting System.Object appropriately.
Consider the following IDL method declaration:
// Project ComFromNet/Test

interface IMyFoo : IUnknown {
     HRESULT GetDataType(
       [in] VARIANT vin, [out] VARIANT* retVal);
     ...
}
The implementation of GetDataType examines the datatype of parameter vin and returns the type information as a BSTR in the parameter retVal.
The RCW wraps this method as:
void GetDataType(System.Object vin, out System.Object retVal);
Invoking this method is straightforward, as can be seen in the following code excerpt:
public static void VariantDemo() {
  MyTestClass test = new MyTestClass();

  object retVal;
  test.GetDataType("Hello", out retVal);
  String s = retVal as String;
  Console.WriteLine(s);

  test.GetDataType(20, out retVal);
  Console.WriteLine(retVal);
}
Safe Arrays
Programming languages such as C++ support arrays intrinsically. However, most do so without any index protection, size limit, and initialization. An array is just a pointer to a random memory location. Even experienced C++ programmers are reluctant to use raw arrays. Many of them write protect wrapper classes to deal with arrays.
On the other hand, Visual Basic (and now .NET) provides a more protected way of dealing with arrays; it stores the array bounds and does a run-time check to ensure that the boundaries are not violated.
To deal with arrays, the COM SDK defines a data structure called SAFEARRAY. A SAFEARRAY is an array of other automation-compatible datatypes.
Under .NET, the RCW wraps safe arrays into a managed array of the corresponding datatype.
Consider the following IDL method definition:
// Project ComFromNet/Test
interface IMyFoo : IUnknown {
     HRESULT Concatenate([in] SAFEARRAY(BSTR) psa,
       [out, retval] BSTR* retVal);
     ...
}
The implementation of method Concatenate (Project Test) takes the safe array of strings as a parameter and returns a new concatenated string.
The RCW makes method Concatenate appear as follows in the managed code:
System.String Concatenate(System.String[] psa);
The safe array is imported as a single-dimensional array with a lower bound that starts from zero.
Here is the code excerpt that demonstrates calling this method:
public static void SafeArrayDemo() {
  MyTestClass test = new MyTestClass();

  String[] nameList = new String[] {"Jay", "Pradeep"};
  String s = test.Concatenate(nameList);
  Console.WriteLine(s);
}
The RCW is also capable of wrapping a safe array into a more generic form of .NET arrays, the System.Array type. This is done by means of -sysarray switch on the type library importer. Doing so in our example results in the managed code representation as follows:
System.String Concatenate(System.Array psa);
The advantage of this mechanism is that the arrays can be multidimensional or can have nonzero lower bounds. The downside is that you lose information about the type of element (although it is captured in a custom attribute).
Custom Wrapper
Availability of a type library makes it easy to develop managed code that accesses COM objects, as we saw in the previous sample. Just running tlbimp.exe against the type library generates all the necessary metadata and marshaling information that the interop marshaler needs.
It is also possible under .NET to define the metadata for COM interfaces within the managed code. This is useful in many cases:
For some reason, the type library is not accessible during code development.
The interface to be accessed is not automation compatible. COM cannot save the metadata for such an interface in the type library.
Under some cases, the type library is not capable of truly representing the marshaling information. An example of such a case is conformant arrays. A conformant array is an array whose size (called conformance) is specified at runtime. Although the conformance can be represented correctly in the IDL definition, the IDL compiler conveniently drops this information while generating the type library.
Let's define a custom wrapper for a COM interface. Specifically, we will target marshaling a conformant array:
Here is the definition for the COM interface we will write the custom wrapper for:
// Project ComFromNet/Test
// File: Custom.idl

[
     uuid(018D9CF7-7C5F-4161-8114-99ECE2EAB361),
     ...
]
interface IMyBaz : IUnknown {
     HRESULT GetId([out, retval] long* pValue);
     HRESULT GetArray([in] long cElem,
       [out, size_is(cElem)] long array[]);
};
Method GetId returns an integer. I am adding this method primarily for testing purposes.
Method GetArray returns an array of integers. The caller allocates the array and specifies the size during the method call. The method implementation just fills the array with some values.
Here is how this interface can be represented in C#:
// Project ComFromNet/CustomWrapper
// File: CustomWrapper.cs

[
     ComImport,
     Guid("018D9CF7-7C5F-4161-8114-99ECE2EAB361"),
     InterfaceType(ComInterfaceType.InterfaceIsIUnknown)
]
public interface IMyBaz {

     [return : MarshalAs(UnmanagedType.I4)]
     int GetId();

     void GetArray([In, MarshalAs(UnmanagedType.I4)] int cElem,
       [Out, MarshalAs(UnmanagedType.LPArray,
         SizeParamIndex=0)]
         int[] array);
}
Attribute ComImport informs the runtime that the interface was originally defined as a COM interface. Attribute Guid specifies the identifier for the interface. Attribute InterfaceType is used to indicate whether an interface is dual, IDispatch only, or IUnknown based. The code indicates that the interface type is IUnknown based.
Interface IMyBaz defines two methods—GetId and GetArray. Note that neither the name of the interface nor the name of the method needs to match its counterparts in the original COM interface. What is important is that the GUID and the layout (including the order of methods) of the interfaces match.
Attribute target return on method GetId is applied to the return value. The code specified that the return value be marshaled as a 4-byte integer.
Although the preceding code explicitly specifies that a C# int type be marshaled as a 4-byte integer, it is not necessary to do so for basic data types. By default, the framework defines the right marshaling behavior for int as well as many other basic datatypes.
Take note of the attribute definition on the array parameter of method GetArray. Attribute Out indicates that the parameter is used only as an output type. The MarshalAs definition indicates that the parameter must be marshaled as an array (UnmanagedType.LPArray) and that the size of the array is defined by the first parameter to the method (SizeParamIndex=0). Parameter indexes are zero-based.
Let's also go ahead and define a dummy C# class, MyTestClass, to represent the original COM coclass. The following code excerpt shows the COM coclass in the IDL file and its representation under C#:
// Project ComFromNet/Test

// File Test.idl
     [
       uuid(FADA4A73-76DC-443C-838E-E6B98251E428),
       ...
     ]
     coclass MyTest
     {
       ...
     };

// Project ComFromNet/CustomWrapper
     [
       ComImport,
       Guid("FADA4A73-76DC-443C-838E-E6B98251E428")
     ]
     public class MyTestClass {
     }
As with interfaces, the class definition specifies attributes ComImport and Guid. The parameter to the GUID represents the CLSID of the coclass.
Here is the code excerpt that shows how the custom-defined class and the interface can be used for COM interop:
// File CustomWrapper.cs

IMyBaz baz = (IMyBaz) new MyTestClass();

Console.WriteLine(baz.GetId());

int[] prms = new int[] {-1, -2, -3};
baz.GetArray(prms.Length, prms);
Console.WriteLine(prms.Length);
for(int i=0;i<prms.Length; i++) {
  Console.WriteLine(prms[i]);
}
Before running this application, remember to build and register the proxy-stub DLL for Test.dll.
It is left as an exercise for you to extend this example to marshal an array of interface pointers. Those who are busy can take a peek at the sample code on the companion Web site.
The .NET interop marshaler provides a great deal of support for many other COM interop issues. For example, it is possible to allocate memory in the COM component (e.g., via CoTaskMemAlloc or SysAllocString) and to free the allocated memory in the managed code. Look at the SDK documentation for more details on COM interop. In particular, examine the COM interop methods provided by the class Marshal.
Late Binding
The RCW example that we have looked at so far is that of early binding, meaning that the developer requires access to the metadata at the time of building the assembly.
COM programmers are aware that COM supports the notion of late binding; that is, a method that is called is bound to at runtime instead of compile time. This late binding is possible for COM components that support IDispatch interface.
The .NET Framework supports late binding for COM components supporting the IDispatch interface.
Consider the following interface definition:
// Project ComFromNet/Test

interface IMyBar : IDispatch{
     HRESULT Add([in] long param1, [in] long param2,
       [out,retval] long* value);
}
Interface IMyBar is a dual interface in the sense that it supports the interface IDispatch as well as the custom interface IMyBar.
For our demonstration, this interface is implemented in a COM component with the PROGID Test.MyBar. The implementation of IMyBar.Add adds the two numbers that are passed as input parameters and returns the sum as output in the third parameter.
The following code shows how to use this COM component from .NET in a late-binding fashion:
// Project ComFromNet/LateBinding

     public static void LateBindingExample() {
       // Obtain type based on prog id
       Type t = Type.GetTypeFromProgID("Test.MyBar");

       // Create an instance using Activator
       Object o = Activator.CreateInstance(t);

       // input parameters
       Object[] prms = new object[] {2, 3};

       // make the call
       int val = (int) t.InvokeMember("Add",
         BindingFlags.InvokeMethod, null, o, prms);

       Console.WriteLine(val);
}
Static method Type.GetTypeFromProgID returns the .NET type of the COM object whose PROGID is specified. This method returns null if the object does not implement the IDispatch interface.
If you have the CLSID available instead of the PROGID, you can call another static method Type.GetTypeFromCLSID to obtain the .NET type.
Once you have the type available, you create the COM object using Activator.CreateInstance and call the method using Type.InvokeMember. You need to specify the name of the method, the type of method (method or property), the object you are calling this method on, and the parameters to the method.
Type.InvokeMember returns the logical return value from the interface method (e.g., that is, the parameter marked with retval).
A final word on method GetTypeFromProgID: One of its overloads can be used to obtain a type from the specified machine. This enables you to create an object from a remote machine and invoke methods on the object (assuming the DCOM gods are happy with your DCOM configuration).
This covers the basics of accessing COM components from .NET. The SDK contains some good sample programs on COM interoperability such as hosting Internet Explorer ActiveX controls within your managed code. David Platt's article in MSDN Magazine [Pla-01] is also worth a read.