Code Access Security
To understand CAS, let's develop a simple program that accesses the local file system. Here is the relevant code excerpt:
// Project Evidence/Foo

[assembly: AssemblyVersionAttribute("1.2.3.4")]
[assembly: AssemblyKeyFileAttribute(@".BinMyKey.snk")]

public class Foo {
     public void Store(String s){
       FileStream f = new FileStream("Foo.log",
         FileMode.Append, FileAccess.Write);
       StreamWriter w = new StreamWriter(f);
       w.WriteLine(s);
       w.Close();
       f.Close();
     }
}
Method Store simply opens a local file Foo.log, appends the specified string to the file, and closes the file.
We will build this code as a library application, Foo.dll. Note that the assembly is signed with a strong name. This is needed because we will download the assembly over the network and install it in the download cache later in the experiment.
Here is the code excerpt for the client application, built as MyClient.exe:
// Project Evidence/MyClient

public class MyApp {
     public static void Main() {
       Foo f = new Foo();
       f.Store("Hello World!");
     }
}
Copy Foo.dll and MyClient.exe in a directory and run MyClient.exe. You will see that a file Foo.log is created in the local directory. If you open this file using Notepad, you will see that it contains the string “Hello World!”
Now set up a virtual directory under IIS on the local machine. Copy Foo.dll to the root of the virtual directory. For my experiment, I am using an alias name SecurityDemo for the virtual directory. This allows Foo.dll to be accessible using the URL http://localhost/SecurityDemo/Foo.dll.
Copy MyClient.exe to a new directory. Do not copy Foo.dll to this directory. Instead, create an application configuration file in this directory, MyClient.exe.Config, that contains the codeBase entry for Foo.dll that points to this URL. Recall from Chapter 3 that the assembly pointed by the codeBase entry is automatically downloaded and installed in the current user's download cache.
Run MyClient.exe from the new directory. The program will abort with an exception that the code in Foo.dll does not have the security permission of type FileIOPermission.
In both the test cases, it is the same program and the same user. Yet one case succeeded and the other failed. The only difference is that in the first case Foo.dll was being accessed from the local directory, whereas in the second case the assembly originated, or was perceived to be originating, from a different machine on the intranet.
This is the essence of CAS under .NET. Based on certain evidence about the origin or the author of the assembly, the assembly is granted certain security permissions such as reading or writing files, changing environmental variables, displaying dialog boxes, and so on. The exact set of permissions to be granted is controlled by a security policy on the local machine. The standard classes under .NET that deal with any security sensitive operations are designed to perform the appropriate security check. If the assembly does not have the needed permissions, the security mechanism throws an exception of type SecurityException.
The security provided by CAS is above and beyond the security provided by the underlying OS. Even if some code successfully gets past the CAS, it still is subjected to the access checks provided by the OS.
Before we go any further, it is worth understanding that although the permissions are granted at the assembly level, the CAS check is performed on the complete call chain. To see why this is necessary, consider two assemblies, A and B. Based on the evidence, let's assume A is trustworthy and is granted complete permissions, whereas B is not that trustworthy and is granted minimal permissions. Now consider the case when B makes a call into A. We have a problem. Although B has restricted permissions, it can lure A into doing evil things (e.g., destroying your private documents, or leaking them out).
To avoid such luring attacks, the common language runtime walks the whole stack and verifies that every caller in the call chain has the permissions demanded by the operation. If even one caller in the call chain does not have the requisite permissions, the runtime throws the security exception.
Now let's delve further into various aspects of the CAS.
Code Access Permissions
Code access permissions protect resources and operations from unauthorized use. Each code access permission is implemented as a class. Table 9.1 summarizes the code access permission classes that are currently implemented by the .NET Framework.
| Permission | Description |
|---|---|
| DirectoryServicesPermission | Controls access to Active Directory classes (under the namespace System.DirectoryServices). |
| DnsPermission | Controls access to DNS servers on the network. |
| EnvironmentPermission | Controls read and write access to individual environment variables. |
| EventLogPermission | Controls read and write access to event log services. |
| FileDialogPermission | Allows read-only access to files that have been selected by the interactive user in an Open dialog box. |
| FileIOPermission | Controls read, write, and append access to individual files and directory trees. |
| IsolatedStorageFilePermission | Controls access to the isolated storage file system. Isolated storage provides a unique file system for an assembly. |
| IsolatedStoragePermission | Controls access to the isolated storage. |
| MessageQueuePermission | Controls access to Microsoft Message Queue (MSMQ). |
| OleDbPermission | Controls access to databases using Object Linking Embedding Database. |
| PerformanceCounterPermission | Controls access to performance counters. |
| PrintingPermission | Controls access to printers. |
| ReflectionPermission | Allows access to view assembly metadata using Reflection. |
| RegistryPermission | Controls read, write, create, and delete access to registry keys, subkeys, and values. |
| SecurityPermission | This is really a metapermission, as it governs the use of the security infrastructure itself. Several unrelated permissions are also grouped under this category. This includes the ability to execute managed code, call into unmanaged code, skip code verification, extend the infrastructure (e.g., adding context sinks), and so on. |
| ServiceControllerPermission | Controls access to Windows services, both running and stopped. |
| SocketPermission | Allows making or accepting connections on a transport address. |
| SqlClientPermission | Allows access to SQL databases. |
| UIPermission | Controls access to user interface functionality such as clipboard, user input, and so on. Can also be used to restrict window usage to “safe” windows so that the code cannot spool system dialog boxes and ask for sensitive information such as passwords. |
| WebPermission | Controls access to specific or all Internet resources (identified by their URLs). |
A CAS class is required to inherit from a standard class, CodeAccess-Permission (namespace System.Security). This class defines some standard methods to deal with permissions. As we go through the rest of this section, we will see many of these methods in action.
Demanding Permissions
Instead of relying on the underlying security-aware .NET class to throw a security exception, a component can perform the security check directly. Class CodeAccessPermission defines a method, Demand, that can be called to explicitly request a specific permission. If the requested permission has not been granted to any of the callers in the call stack, the method throws a SecurityException. This is illustrated in the following code excerpt, where method Store explicitly requests the permissions to append to a file and, if permission is not granted, takes a different action:
// Project Permission/SecurityChecks

public class Foo {
     public void StoreDemand(String s){
       String fullPath = Path.GetFullPath("Foo.log");
       CodeAccessPermission perm =
         new FileIOPermission(FileIOPermissionAccess.Append,
           fullPath);
       try {
         perm.Demand(); // Request for the permission
         ... // Proceed with opening the file
       }catch(SecurityException) {
         Console.WriteLine("Not permitted to append to
           file {0}", fullPath);
       }
     }
}
At this point, it is useful to remember that even if the code clears the .NET FileIOPermission check, it is still subject to the security check provided by the underlying OS. For example, if Foo.log is marked as a read-only file, then the preceding code will throw a System.UnauthorizedAccessException.
Implied Permissions
Before we go further, it is important to understand that some permissions, when granted, imply others. For example, if you are granted all access to the directory C:Temp, you are implicitly granted all access to its children in the hierarchy (C:Temp*.*, C:TempFoo*.*, C:TempBar*.*, etc.).
To check if a permission is a subset of another permission, you can call the IsSubsetOf method of CodeAccessSecurity. This is illustrated in the following code excerpt.
// Project Permissions/SecurityChecks

public static void SubsetTest() {
     CodeAccessPermission p1 = new FileIOPermission(
       FileIOPermissionAccess.AllAccess, @"C:Temp");
     CodeAccessPermission p2 = new FileIOPermission(
       FileIOPermissionAccess.Append,
@"C:TempFooBar.txt");
     bool b = p2.IsSubsetOf(p1);
     Console.WriteLine(b);
}
This code, when executed, indicates that p2 is a subset of p1.
The presence of implied permissions makes it convenient to administer security policies. The common language runtime automatically compares a demanded permission to see if it is a subset of a granted permission.
Restricted Permissions
If an assembly is installed locally, it most likely will have wide-ranging or even completely unrestricted code access permissions. Imagine if one of these highly trusted assemblies were to make a call into an unknown, perhaps untrustworthy, assembly.
Although the security policy is likely to ensure that the untrustworthy assembly is granted limited permissions, even the calling assembly can restrict the effective permissions before making the call. CodeAccessServices provides a method, Deny, to place an extra restriction in the current stack frame. It is also possible to group a number of permissions together as one set and deny the entire set. The collection of permissions is represented by a class PermissionSet. The following code excerpt illustrates the use of the PermissionSet object to deny access to certain resources:
// Project Permissions/SecurityChecks

public static void DenyPermissions() {
     PermissionSet ps =
       new PermissionSet(PermissionState.None);
     ps.AddPermission(new EnvironmentPermission(
       PermissionState.Unrestricted));
     ps.AddPermission(new UIPermission(
       PermissionState.None));
     ps.AddPermission(new FileIOPermission(
       FileIOPermissionAccess.Append,
       Path.GetFullPath("Foo.log")));
     ps.Deny();

     Foo f = new Foo();
     f.StoreDemand("Hello World!");
     ...
     CodeAccessPermission.RevertDeny();
}
The code places extra restrictions on the current stack frame. This means that if Foo.Store tries to access any environmental variable, sneak a peek at the contents of the clipboard, or access the file Foo.log, the operation will fail. The restrictions are also applicable to any other component that Foo.Store tries to access.
Note that each stack frame can have at the most one permission set used for denial. If Deny is called twice, the second call effectively overwrites the first.
When the method that called Deny returns, the denial permission set is automatically removed from the current stack frame. However, you can explicitly empty the denial permission set yourself by calling a static method, CodeAccessPermission.RevertDeny, as shown in the previous code.
If you find yourself denying lots of individual permissions, you might find it easier to take a different approach: instead of denying permissions, grant only specific permissions. This is done by calling the PermitOnly method, either on the CodeAccessSecurity object or the PermissionSet object. Obviously, this works only if you know exactly which permissions you'd like to allow. As with the denial permission set, the permit-only permission set is automatically emptied when the caller returns. However, you can also call a static method, CodeAccessPermission.RevertPermitOnly, explicitly to revert back to the original status.
Suppressing the Stack Walk
The stack-walking mechanism is great for avoiding luring attacks like the one described earlier. However, it also creates a problem for trustworthy assemblies.
Imagine a class that is designed to provide service to other assemblies. Our Foo class is a good example. Its StoreDemand method can be used to log errors at one central place. As Foo is a well-written class from a trusted source, the security policy grants it full access to the local file. Now consider the case when another assembly with restricted permissions tries to invoke the StoreDemand method on Foo. The stack-walking mechanism checks if every caller in the chain has the requisite FileIOPermission. As the calling code does not have this permission, it generates a SecurityException, although Foo has been deemed safe for use by the security policy.
To deal with such cases, the security mechanism provides for the code to assert its own authority. The code can assert the permissions that it needs by calling the method Assert (available on CodeAccessSecurity and hence any of its derivations). This is illustrated in the following code excerpt:
// Project Permissions/Foo

public class Foo {
     public void StoreAssert(String s){
       String fullPath = Path.GetFullPath("Foo.log");
       CodeAccessPermission perm =
         new FileIOPermission(FileIOPermissionAccess.Append,
           fullPath);
       perm.Assert();

       ... // Continue opening the file
     }
}
The method StoreAssert asserts a File-IO permission before opening the file. Each stack frame has the potential to have an asserted permission set. When the stack walk reaches the stack frame, it considers the asserted permission satisfied. The stack walk won't continue further unless there are other permissions being demanded that aren't satisfied by the asserted permission set.
Note that you can assert only those permissions that your assembly has been granted by the security policy.
Similar to denial and permit-only permission sets, the asserted permission set is torn down when the calling method returns. However, one can explicitly call CodeAccessPermission.RevertAssert to empty the asserted permission set.
At this point, it is worth mentioning that the ability to assert permissions can clearly be abused. For example, a rogue component can call Foo.StoreAssert and send very large strings to fill up the user's hard disk. So, even though Foo is considered safe, attacks can still occur simply because of the assertion.
Do not just avoid using Assert because of issues like these. Instead, ask your peers to review any use of this feature.
One instance in which assertions are absolutely essential is when invoking unmanaged code from the managed code. Consider the system-defined FileStream class as an example. Clearly, this class needs to make calls to the underlying OS (which is implemented as unmanaged code) to open, close, read, and write files. The interop layer demands a SecurityPermission (with flag SecurityPermissionFlag.UnmanagedCode) when these calls are made. If this demand were to propagate up the stack, no code would be allowed to access files unless also granted permission to make calls into unmanaged code.
From a design standpoint, it is worth noting that FileStream does not simply assert the UnmanagedCode permission. It first ensures that the callers have the permission for file IO by demanding a FileIOPermission in its constructor. If this permission is not satisfied, the object itself can never be constructed.
Finally, because assertion is a powerful facility with the potential for abuse, its usage is also governed by a SecurityPermission (with flag SecurityPermissionFlag.Assertion).
Permission Attributes
So far we have used the security actions (Demand, Deny, PermitOnly, Assert) programmatically. However, it is also possible to define these actions declaratively. Each of the code access permission classes that we listed in Table 9.1 has a corresponding attribute class. For example, FileIOPermission has a corresponding attribute class, FileIOPermissionAttribute, and RegistryPermission has a corresponding attribute class, RegistryPermissionAttribute.
The following code excerpt is a variation of our earlier defined method to append strings to a file. Here, FileIOPermissionAttribute is used to assert the file-append permission:
// Project Permissions/Foo

public class Foo {
     [FileIOPermission(SecurityAction.Assert,
								         Append=@"C:TempFoo.log")]
     public void StoreAssertEx(String s){
       // proceed with opening the file and appending
       // the string. No explicit assertion needed.
       ...
     }
}
The biggest advantage of defining security actions using attributes is that the attributes become part of the metadata and thus can be discovered easily via Reflection. This would allow you, for example, to write a tool that shows various permissions required for your classes and methods.
The main drawback of this approach is that it is impossible for the method to catch an exception if the permission being asserted or demanded is denied. This particular drawback applies only to asserting or demanding permissions. You will never have this problem if you are using declarative attributes to simply restrict permissions.
A second drawback of this approach is that arguments passed to the attribute should be known at compile time. For example, in the preceding code, the absolute path name of the file has to be known at compile time. Constructing the path name at runtime, as we did in our earlier examples, is not an option.
The permission attribute classes take the first parameter an enumeration of type SecurityAction. Table 9.2 describes the options available on the enumeration, along with the time at which the option is considered by the runtime.
| Action | Description | Time of Action |
|---|---|---|
| LinkDemand | Check demand only on the immediate caller. | JIT compilation |
| InheritanceDemand | Check demand on any derived class or an overridden method in the derived class. | Load time |
| Demand | Check demand on all the callers in the call stack. | Execution time |
| Assert | Check callers in the call stack only up to the point where the asserted permission is satisfied. | Execution time |
| Deny | Deny a specific permission to successive calls in the current call stack. | Execution time |
| PermitOnly | Allow only specific permissions to successive classes in the current call stack. | Execution time |
| RequestMinimum | The request for minimum permissions required for the code to run. This option can be used only at the assembly level. | Grant time |
| RequestOptional | The request for optional permissions. The code still executes if the requested permissions are not granted. This option can be used only at the assembly level. | Grant time |
| RequestRefuse | The request to deny specific permissions. This option can be used only at the assembly level. | Grant time |
The last three options in Table 9.2 are available only at the assembly level. We revisit these options later.
Evidence
The common language runtime grants permissions to an assembly based on the information it obtains about the assembly. This information, called evidence, includes items such as the origin or the author of the assembly.
The security policy gathers the evidence for an assembly in the form of the following questions:
From which site was this assembly obtained? An example of a site is www.somecompany.com.
From which URL was this assembly obtained? An example of the URL is www.somecompany.com/Demo/Foo.dll. An asterisk can be used as a wildcard character at the end of the URL, as in somecompany/Demo/*.
From what zone was this assembly obtained? .NET defines five zones: Internet, Local intranet, Trusted Sites, Untrusted Sites, and My Computer. The first four zones are the same as those found under Internet Explorer. The last zone represents the local computer.
Who is the publisher of this assembly? This is obtained from the Authenticode digital signature of the assembly, if present.
What is the strong name of this assembly?
What is the hash value of this assembly?
What is the directory name of this assembly? The security policy can be configured such that all the assemblies in the specified directory or its child directory can be granted specific permissions.
The evidence is gathered either by the common language runtime itself or the hosts of the common language runtime such as ASP.NET and the shell host (which launches .NET applications from the shell). The evidence is then submitted to the common language runtime, which in turn grants proper permissions to the assembly.
It is worth noting that the host itself must be trusted to not submit false evidence. This is the reason that the host is required to have a special security permission, ControlEvidence. The common language runtime itself is naturally trusted to provide evidence—after all, it is trusted to grant proper permission.
Identity Permissions
 | The .NET Framework also defines a different type of permission called the identity permission. Identity permissions represent characteristics that identify an assembly. The common language runtime grants identity permissions to an assembly based on the evidence provided by the hosts. Some examples of identity permissions are SiteIdentityPermission (representing the Web site where the assembly originated) and StrongNameIdentityPermission (representing the strong name of the assembly). Identity permissions have a set of functionality that is common with code access permissions. For example, identity permissions can be asserted or can be demanded. In fact, identity permissions inherit from the same base class as code access permissions, CodeAccessPermission. |
Let's now look at how the common language runtime grants code access permissions to an assembly.
Security Policy
Once the host and the common language runtime have gathered as much evidence as possible, they submit the evidence to the common language runtime. Based on the evidence, the common language runtime grants permission to an assembly.
The exact permissions that are granted to an assembly are based on an entity on the local machine called the security policy. The security policy defines the mapping between the evidence of the assembly and the permissions to be granted to the assembly.
The .NET Framework provides two tools to view and modify the security policy. The first tool is a command-line program called the Code Access Security Policy Tool (caspol.exe). The second one is a GUI tool called the .NET Framework Configuration tool (MsCorCfg.msc). Choosing which tool to use is a matter of personal preference. Both provide similar functionality, although the GUI-based tool is a bit more user-friendly.
Figure 9.2 shows a snapshot of the security policy from the .NET Framework Configuration tool.
Figure 9.2. Security policy configuration.

As shown in Figure 9.2, the security policy can be configured at three levels: enterprise, machine, and user. The significance of these levels will become clear when we will discuss how the security policy is evaluated against an assembly.
The enterprise level describes the security policy for the entire enterprise. The security settings are stored in XML format in the file <windir>Microsoft.NETFrameworkv<CLRVersion>configenterprisesec.config.
The machine level describes the security policy for all the assemblies on the local machine. This XML file can be found at <windir>Microsoft.NETFrameworkv<CLRVersion>configsecurity.config.
The user level describes the security policy for the user currently running the application. This XML file can be found at <UserProfile>Application DataMicrosoftCLR Security Configv<CLRVersion>security.config.
Not visible in Figure 9.2 is yet another level of security policy, the application domain level. It is possible to programmatically create a policy level (represented by the class PolicyLevel) and set it on an application domain by calling the method AppDomain.SetAppDomainPolicy. The AppDomain policy level is optional and is typically provided by the host.
Figure 9.2 also shows that the security policy at a security level is composed of a linear list of objects called the permission sets and a hierarchical list of objects called the code groups. Let's examine what they represent.
Permission Sets
A permission set is a named set of permissions. Table 9.3 shows some standard permission sets under .NET.
| Name | Description |
|---|---|
| Nothing | No permissions. Deny access to all the secure resources, including the right to execute. |
| Execution | Permits execution. |
| FullTrust | Unrestricted access to all the secure resources. Permissions in the set cannot be modified. |
| Everything | Unrestricted access to all the secure resources. An administrator can change any permission in the set. |
| Internet | Default rights given to applications originating from the Internet. |
| LocalIntranet | Default rights given to applications on the local intranet. |
| SkipVerification | Grants right to bypass the verification. |
A permission set can contain any number of permissions. As an example, Table 9.4 lists permissions available in the LocalIntranet permission set.
| Permission | Access Allowed |
|---|---|
| EnvironmentPermission | Read only USERNAME variable |
| FileDialogPermission | Unrestricted |
| IsolatedStorageFilePermission | Isolated by user; fixed disk quota |
| ReflectionPermission | Reflection/Emit |
| SecurityPermission | Assert granted permissions; enable code execution |
| UIPermission | Unrestricted |
| DnsPermission | Unrestricted |
| PrintingPermission | Default printer; safe printing through a dialog box |
| EventLogPermission | Write to local event log |
It is also possible to define a custom permission set. The .NET Framework Configuration tool provides a wizard to help you create a permission set. Alternatively, you can create an XML file that defines the permission set and add it to the policy using caspol.exe with the -addpset switch. Check the SDK documentation for the format of the XML file.
Code Groups
A code group maps specific evidence to a specific permission set. The evidence is represented as a membership condition. The structure of the code group is shown in Figure 9.3. Here, LocalIntranet_Zone is the name of the code group that represents the local intranet.
Figure 9.3. Code group.

The code groups that are available on your machine can be seen from the .NET Configuration tool (Figure 9.2), or you can run caspol.exe, as shown in the following command line:
caspol.exe -a -listgroups
In this command line, switch -a stands for all policy levels (if not specified, only the machine-level settings are displayed) and the switch -listgroups tells the tool to list the code groups.
Here is the partial output from caspol.exe:
1. All code: Nothing
   1.1. Zone - MyComputer: FullTrust
   1.2. Zone - Intranet: LocalIntranet
      1.2.1. All code: Same site Web.
      1.2.2. All code: Same directory FileIO - Read
   1.3. Zone - Internet: Internet
      1.3.1. All code: Same site Web.
Note that caspol.exe assigns a number to each code group. This number is not actually a part of the code group; it is generated by caspol.exe as an identity so that users can modify a code group using this identity.
At each policy level, code groups are organized in a hierarchical fashion, as illustrated in Figure 9.4. The common language runtime takes the gathered evidence, matches it up to the nodes in the hierarchy, and ends up with a merged list of permissions that can be granted to an assembly at that policy level.
Figure 9.4. Code groups hierarchy.
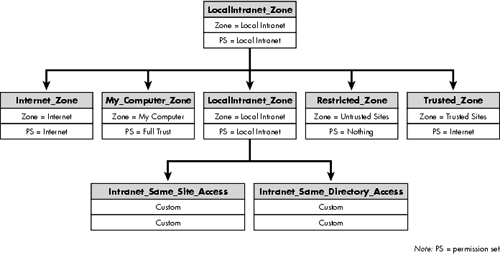
Figure 9.4 represents a partial snapshot of the default security policy at the machine level. The root code group, All_Code, matches any code (from anywhere). The code groups immediately under All_Code, except for My_Computer_Zone, represent the zones that you see under Internet Explorer's zone settings. My_Computer_Zone matches the assemblies that are installed locally, perhaps using an installation program. These assemblies are granted unrestricted code access permissions. LocalIntranet_Zone matches the assemblies downloaded from the local intranet, either over HTTP or from a shared network drive. These assemblies are granted the right to use isolated storage, full user interface access, some reflection capability, and limited access to the environment variables. Internet_Zone represents the assemblies downloaded over the Internet. These assemblies are granted very limited permissions.
Identifying Intranet versus Internet Sites
 | The common language runtime uses Windows LAN Manager APIs to identify if a computer is part of an intranet or Internet. For example, if you use a fully qualified domain name (FQDN) as the machine name, the site is treated as an Internet site. This is true even if the machine belongs to the local intranet. If you plan to use the FQDN to identify a machine on the local intranet, you may wish to add the FQDN to the trusted zone under Internet Explorer. |
Executing Internet-Downloaded Applications
 | The first release of the .NET Framework by default grants the permission to execute code for the assemblies in the Internet_Zone. This allows, for example, use of the href tag in a Web page to download an assembly (in the download cache) and execute it. However, it is interesting to note that Service Pack 1 (SP1) for .NET has removed this permission as default. In fact, assemblies in the Internet zone have no permissions at all (PermissionSet=Nothing). This has been done to make your computer more secure. Despite the fact that CAS provides a tight security mechanism, hackers are bound to find some security holes in the mechanism. After all, it is the first release of the CAS. Disabling code execution for applications downloaded over the Internet reduces the chances of some rogue application hacking into your computer. Starting with the SP1 release, to run an Internet downloaded assembly, you will need to explicitly create a code group to match the assembly evidence, and give the code group the permissions to execute. My recommendation is to use the publisher's digital signature as the membership condition as much as possible. This also puts a pressure on the software vendors to sign their assemblies with a digital signature. |
Recall that we have four levels of policy: enterprise, machine, user, and AppDomain. The evaluation process to obtain the merged list of permissions is run at each policy level. In the final step, only those permissions that are common to each policy level are selected. This is the final list of permissions that is granted to the assembly being evaluated.
For the purpose of policy evaluation, the enterprise level gets the top priority, followed by machine, user, and AppDomain levels in that order. Lower level policies cannot increase permission granted at the higher levels. However, lower level policies can decrease permissions. Furthermore, you can assign a LevelFinal attribute to a node. If this attribute is discovered on a matching node, no further policy levels are evaluated (except the AppDomain level which is always evaluated). This allows administrators, for example, to define security settings at the machine level that cannot be changed by individual users editing user-level policy.
The bulk of the policy, by default, is defined at the machine level.
So far we haven't discussed why code groups are organized in a hierarchy. The hierarchical structure helps the common language runtime prune down its search for the matching nodes. The traversing of the hierarchy is based on two rules:
A child node is visited only if the parent node matches. In other words, if a node does not match, none of its children are tested for matches.
If a matching node has been assigned an Exclusive attribute, only the permission set for that node is used. Naturally, it doesn't make sense for two matching nodes in a policy level to have this attribute, and therefore, is considered an error.
The root node of the hierarchy, All_Code, is just a starting point for the traversal. Hence, it matches all code and by default points to the permission set Nothing—a set containing no permissions.
To check the code groups an assembly belongs to, you can run caspol.exe with the switch -resolvegroup, as shown in the following command line for our assembly Foo.dll which was available over the local intranet.
caspol.exe –a
–resolvegroup http://localhost/SecurityDemo/Foo.dll
Alternatively, you can obtain the same information from the .NET Configuration tool. Select Evaluate Assembly menu item from the Runtime Security Policy context menu. A security wizard pops up that helps you evaluate the matching code groups. Figure 9.5 shows a snapshot of the output.
Figure 9.5. Resolving code groups.

Once you have the list of matching code groups, you can figure out the final set of permissions that can be granted to the assembly.
Better still, you can just select an option in the security wizard to give you the final set of permissions. Figure 9.6 shows a snapshot of such an output.
Figure 9.6. Permissions granted to Foo.dll.

As can be seen from Figure 9.6, our Foo.dll assembly that was downloaded from the local intranet does not have FileIOPermission. Now you know why our experiment failed.
As an exercise, run the security wizard once again. This time, however, specify the complete path to Foo.dll on the local disk. The assembly will then be seen as having unrestricted permissions.
You can also use caspol.exe to resolve the set of granted permissions using the switch -resolveperm. This is illustrated in the following command line:
caspol.exe -a
     -resolveperm http://localhost/SecurityDemo/Foo.dll
An interesting aspect of using caspol.exe to resolve the code access permissions is that it also shows the identity permissions that have been granted to the assembly.
Here is an interesting question: If you trust the source of an assembly, how can you set the security policy so that the necessary permissions are granted to the assembly, even if the assembly is downloaded from the Internet? What you are thinking is absolutely right; just create a new code group with an appropriate membership condition and a proper permission set.
The simplest way to create a code group is by using the .NET Configuration tool.
For Foo.dll, the requisite permission was not granted by the security policy at the machine level (the enterprise level and the user level grant FullTrust to any code by default). Therefore, it makes sense to add the code group at the machine level. Defining code groups at the machine level is the most likely scenario for any downloaded assembly.
Naturally, the code group node has to be created only under a matching node. Otherwise, it will never be traversed. However, the decision to pick a parent becomes difficult when there are many matching nodes. For example, as seen in Figure 9.5, some of the matching code groups for http://localhost/SecurityDemo/Foo.dll are All_Code and LocalIntranet_Zone. For such cases, selecting a parent depends on what your final goal is. You can create a code group under LocalIntranet_Zone and add the permission set that grants FileIOPermission. Remember that this permission set will be merged with the permission set of the parent node, LocalIntranet_Zone. Or, you can create a code group under the All_Code node and define all the necessary permissions that are needed by the assembly.
Sometimes choosing a proper parent for the code group also depends on the membership condition specified on the code group. For Foo.dll, for example, the membership condition can be either the URL of the source or the strong name of the assembly. There is an advantage of using the strong name as the membership condition and creating the code group directly under All_Code. The permissions granted to the assembly will be the same irrespective of whether the assembly comes from the local computer, intranet, or the Internet. If you use just the public key for the strong name (assembly name and version are optional), then any assembly matching the public key will be granted the same permissions. Generally, assemblies coming from the same publisher tend to have the same public key.
The recommended way to define the membership condition is by using the publisher's credentials. By doing so, we show our level of trust for the publisher, not the specific assemblies, which generally is true. Obviously, to use the publisher's credentials as the membership condition, the assembly has to be signed with a digital certificate.
It is left as an exercise for you to define an appropriate code group for Foo.dll and obtain the final list of granted permissions by running the assembly evaluation wizard. Hint: Use the public key for Foo.dll for the match.
Modify the Security Policy Cautiously
 | Do not blindly add Web sites to the trusted zone. Instead, define newer code groups using either the public key of the assembly or the publisher's credentials. |
Note that when you try to resolve either the code group or the code access permissions against a URL, the assembly pointed to by the URL is downloaded and installed in the user's download cache (recall from Chapter 3 that each user has a different download cache). Also note that, besides the strong name, each downloaded assembly is further identified by its evidence. For example, if you download the same Foo.dll from two different URLs, you will see two assemblies in the download cache with the same name, version, and public key token. As a matter of fact, the following three commands produce three entries in the download cache, despite the fact that all the commands are accessing the same assembly from the same machine. Here, mydev is the name of my local machine and mydev.mycompany.net is its FQDN.
caspol.exe –resolveperm http://localhost/SecurityDemo/Foo.dll
caspol.exe –resolveperm http://mydev/SecurityDemo/Foo.dll
caspol.exe –resolveperm
     http://mydev.mycompany.net/SecurityDemo/Foo.dll
It is interesting to note that the permission set returned for the third command is that of the Internet. As the machine name is specified as an FQDN, the runtime by default assumes that the machine is part of the Internet.
If you want the machine with an FQDN to be treated as part of the intranet, then add the FQDN to the intranet site from the Internet Explorer.
Finally, it is worth mentioning that a code group is represented by an abstract base class called CodeGroup. It is possible to create a new class by inheriting from CodeGroup to represent a code group that programmatically returns the name of the permission set. The membership condition for the code group can also be specified by implementing a class that implements a standard interface, IMembershipCondition.
Requesting Permissions
Once the common language runtime builds the list of permissions that can be granted to an assembly from the three policy levels, a final step allows the assembly itself to dictate the permissions that it needs or doesn't need.
Recall from Table 9.2 that the SecurityAction enumeration provides three actions that can be applied at the assembly level: SecurityAction .RequestMinimum, SecurityAction.RequestOptional, and SecurityAction.RequestRefuse.
RequestMinimum is used to define the minimum set of permissions requested by the assembly. If these permissions are not granted by the security policy, the assembly won't run. The following are two common examples that show how an assembly-level attribute can be defined that uses this security action:
// Project Permissions/Foo

[assembly:SecurityPermissionAttribute(
     SecurityAction.RequestMinimum,
     Flags = SecurityPermissionFlag.UnmanagedCode)]

[assembly:SecurityPermissionAttribute(
     SecurityAction.RequestMinimum,
     Flags = SecurityPermissionFlag.SkipVerification)]
The first example is useful if your assembly intends to make calls into the unmanaged code. The second example is useful if your assembly contains unsafe code and you don't want the common language runtime to verify your code for type safety. If the requested permissions cannot be granted to the assembly, the common language runtime ensures that the assembly does not get loaded at all.
Note that these examples represent the common cases of requesting assembly-level permission attributes. Assembly-level permission attributes by no means are limited just to SecurityPermissionAttribute; any code access permission attribute can be used.
Requesting the minimum permissions your code requires ensures that it either receives those permissions or does not run. By requesting minimum permissions, you don't have to worry that your code will crash in some unexpected way because it was not granted a permission it absolutely needed to function. Also, by doing the work up front to determine what permissions your code requires, you make it easier on users and administrators. The .NET Framework provides a tool called the Permission Request Viewer (PermView.exe) that you can run on an assembly to see what permissions the assembly requires. For example, systems administrators can determine if your code will run from a network share under their current corporate policy or whether they need to modify the policy to grant extra rights to your code.
Be careful about how you use this security action. For instance, if you ask for all the permissions your assembly might need, the assembly would fail to load in more circumstances than might be necessary. Moreover, this may lead an administrator to loosen up his or her security policy more than necessary to allow your assembly to run.
RequestRefuse allows you to simply deny yourself permissions that you might have been granted by the security policy. It is good programming advice to refuse the permissions that you know your assembly doesn't need. It certainly cannot hurt to play it safe.
RequestOptional allows you to specify optional permissions. Your assembly can use these permissions if granted. If not granted, your assembly is still expected to handle the situation gracefully and continue to execute.
Finally, instead of requesting individual permissions, you can also request any of the following built-in permission sets: Nothing, Execution, FullTrust, Internet, LocalIntranet, and SkipVerification. This is done using the PermissionSetAttribute class with the Name property representing the permission set, as illustrated in the following code excerpt:
[assembly:PermissionSetAttribute(
     SecurityAction.RequestMinimum,
     Name = "LocalIntranet")]
Note that you can request only those permission sets that do not change from system to system. This means that you cannot request custom-named permission sets or the Everything built-in permission set (which is modifiable).
This concludes our discussion on CAS. Interested readers may wish to read [Bro-01a] for an excellent introduction to CAS.