
SECTION 8 Time Savers
Tip 61: Code More Quickly with Automatic Code Completion
The IDE’s code completion feature assists you with writing code as you type. Code completion works in Java, Javadoc, HTML, XML, and Ant files, among other file types. Here are some examples of how to use this time saver:
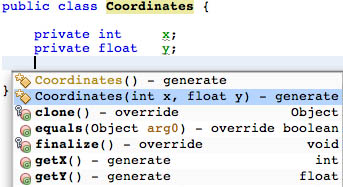
![]() Create a new Java class and add instance variables. Place the caret after the instance variables and press Ctrl-Space to call up the code completion dialog. The IDE will suggest to generate a matching constructor. The generated constructor will contain an appropriate method signature and skeleton code to initialize the instance variables (see Figure 63).
Create a new Java class and add instance variables. Place the caret after the instance variables and press Ctrl-Space to call up the code completion dialog. The IDE will suggest to generate a matching constructor. The generated constructor will contain an appropriate method signature and skeleton code to initialize the instance variables (see Figure 63).
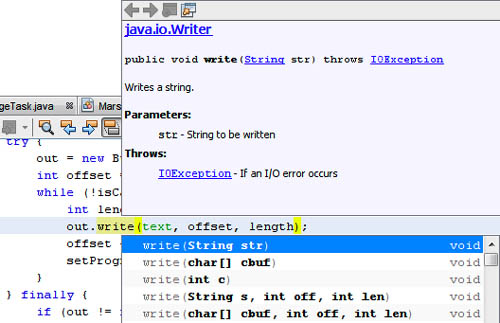
![]() Ctrl-Space additionally calls up a Javadoc pop up for the selected method. If the method is polymorphic or overloaded, it will show all sets of parameters that this method accepts. Press Enter on a list item to complete the selected method parameters automatically. Press the Tab key to jump from one parameter to the next (see Figure 64).
Ctrl-Space additionally calls up a Javadoc pop up for the selected method. If the method is polymorphic or overloaded, it will show all sets of parameters that this method accepts. Press Enter on a list item to complete the selected method parameters automatically. Press the Tab key to jump from one parameter to the next (see Figure 64).
![]() If you prefer a more lightweight parameter pop up, invoke it by pressing Ctrl-P (Mac: Command-P). This will quickly show the parameters this method expects (see Figure 65).
If you prefer a more lightweight parameter pop up, invoke it by pressing Ctrl-P (Mac: Command-P). This will quickly show the parameters this method expects (see Figure 65).

![]() When you type
When you type for and then press Ctrl-Space, the IDE offers a list of common for loop templates to choose from.
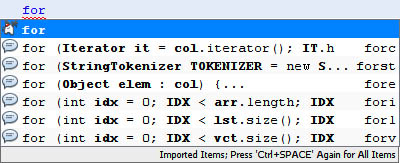
The same also works with other keywords such as while and if. If you were actually looking for a class starting with those letters (e.g., you typed for, expecting java.util.Formatter), press Ctrl-Space once more to show all possible completions.
![]() When you type the first letters of a long camel case class name, and then press Ctrl-Space, the IDE will also suggest classes matching these initials. You must type the initials in all capital letters to trigger this handy feature.
When you type the first letters of a long camel case class name, and then press Ctrl-Space, the IDE will also suggest classes matching these initials. You must type the initials in all capital letters to trigger this handy feature.
For instance, type ISR and press Ctrl-Space. The IDE suggests InputStreamReader and InitialServerRequestDispatcher.
http://blogs.sun.com/roumen/entry/how_we_are_solving_some
http://www.antonioshome.net/blog/pivot/entry.php?id=12
Abbreviations save you a lot of time. Instead of typing the same common code snippets over and over again, you type only a few letters and press the Tab key: The IDE automatically replaces the abbreviation with the full code template.
Here are a few examples for creating handy Java abbreviations.
![]() Typing
Typing psfs and pressing the Tab key completes to
private static final String
![]() Typing
Typing sout and pressing the Tab key completes to
System.out.println("|");
![]() Declare a string—for example,
Declare a string—for example, name.
String name = "Duke";
Now, typing soutv and pressing the Tab key expands to
System.out.println("name = " + name);
![]() Typing
Typing fori and pressing the Tab key completes to a for loop over an array. Instead of imageNames, the IDE will automatically insert the last defined array in the same code block, if there is one (see Figure 67).
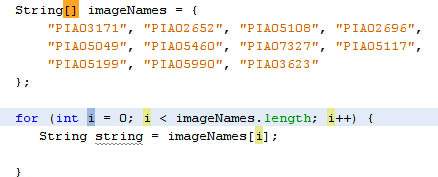
Note that the counter variable i is highlighted with a blue background and is ready to be edited. Press the Tab key to move the caret from one control expression to the next.
You can rename all instances of the counter variable in one go: When you rename the first i to, for example, name, the following dependent instances will be updated automatically. (Note, however, that if you rename one of the later instances, the relationship breaks, and instance names no longer update when you rename the first.)
The NetBeans IDE comes with a set of useful predefined templates for Java. Select Tools > Options > Editor > Code Templates from the menu to check out the full list.
See also Tip 63, Define Custom Templates and Abbreviations for Common Code Snippets.
http://blogs.sun.com/geertjan/entry/magic_multiline_code_templates_in1
http://blogs.sun.com/geertjan/entry/magic_multiline_code_templates_in
Code templates are very common code snippets that you insert into your code with only a few keystrokes. See also Tip 62, Expand Templates and Abbreviations for Code Snippets.
Let’s look at an example of a built-in template, dowhile (shown in Figure 68). In a Java class, declare a Boolean variable called isRunning. In the next line, type dowhile and immediately press the Tab key.
boolean isRunning = true;
do {
|
} while (isRunning)

The template expands to a do-while loop, and the previously defined Boolean is filled in. The caret is placed inside the do block, so you can write the loop body.
These smart templates save you a lot of typing time—and even more so when you create custom templates. Let’s go to Tools > Options > Editor > Code Templates and have a look at how the loop code template was defined:
do {
${selection line}${cursor}
} while ( ${EXP instanceof="java.lang.Boolean" default="exp"} );
The special terms in curly braces preceded by a dollar sign are template constructs. The code template in our example uses the following constructs: ${selection line}, ${cursor}, and an identifier named ${EXP}.
The most common template parameter is ${cursor}: Use it to specify the position of the caret where you will continue writing after the template expands.
The template also contains an identifier parameter, ${EXP}; when the template expands, ${EXP} will be automatically replaced by a previously defined identifier. By using the instanceof attribute, you constrain eligible identifiers to a certain type, in this case java.lang.Boolean. If there is no identifier of this type within the class’s scope, the template uses the default value (here “exp”).
The ${selection} parameter doesn’t have any visible effect on basic tab-expanded abbreviations. You use it to turn the basic template into a selection template: All selection templates show up in the Surround With pop up. This is how it works.
-
Create a custom template containing the
${selection}construct. For example:if (${EXP instanceof="java.lang.Boolean" default="exp"}) {
${selection line}${cursor}
} -
Select lines in a method, and a lightbulb icon appears.
-
Click the lightbulb to view all available Surround with actions.
-
Click one of the actions to surround the selected lines with a loop, an if-then block, a try-catch block, or your custom selection template (see Figure 69).

To learn more about custom code templates and abbreviations, choose Help > Help Contents from the menu. In the Help window, search for “template syntax” and “Java code templates”. You can define custom templates for every file type supported by the IDE, including Javadoc, Ant, CSS, HTML, and SQL.
http://blogs.sun.com/geertjan/entry/magic_multiline_code_templates_in1
http://blogs.sun.com/geertjan/entry/magic_multiline_code_templates_in
As a program grows, you may want to restructure it to make it easier to maintain. Perhaps you want to rename a widely used variable or method, move a field to another, more suitable class, turn a code block into a reusable method, reorder a method’s arguments, or use getters and setters instead of accessing variables directly.
However, updating all references in a project manually is time-consuming and error-prone. This is where the IDE comes to the rescue: Built-in refactoring actions automatically identify and update all references, and make sure the project still compiles. The following refactoring operations are available:
![]() Rename:finds every usage of an identifier and updates all references to the new name.
Rename:finds every usage of an identifier and updates all references to the new name.
![]() Move... and Copy... :moves (or copies) a class into another class or package.
Move... and Copy... :moves (or copies) a class into another class or package.
![]() Safely Delete:checks for references to an element and warns you if deleting it would break your code.
Safely Delete:checks for references to an element and warns you if deleting it would break your code.
![]() Encapsulate Fields:creates getter and setter methods for a field. Optionally updates all referencing code to use the new getters and setters instead of accessing a field directly.
Encapsulate Fields:creates getter and setter methods for a field. Optionally updates all referencing code to use the new getters and setters instead of accessing a field directly.
![]() Change Method Parameters:adds, removes, or reorders method parameters, or changes a method’s access modifier (e.g., from public to private).
Change Method Parameters:adds, removes, or reorders method parameters, or changes a method’s access modifier (e.g., from public to private).
![]() Pull Up:moves the selected class member up into a superclass.
Pull Up:moves the selected class member up into a superclass.
![]() Push Down:moves the selected class member down into one or more of its subclasses.
Push Down:moves the selected class member down into one or more of its subclasses.
![]() Extract Interface:creates a new interface from selected public, nonstatic methods in a class or interface.
Extract Interface:creates a new interface from selected public, nonstatic methods in a class or interface.
![]() Extract Superclass:creates a new abstract class, changes the current class to extend the new class, and moves the selected methods and fields to the new class.
Extract Superclass:creates a new abstract class, changes the current class to extend the new class, and moves the selected methods and fields to the new class.
![]() Use Supertype Where Possible:changes code that references the selected class (or other type) to use a supertype of that type.
Use Supertype Where Possible:changes code that references the selected class (or other type) to use a supertype of that type.
![]() Move Inner to Outer Level:moves an inner class one level up in the hierarchy.
Move Inner to Outer Level:moves an inner class one level up in the hierarchy.
![]() Convert Anonymous to Inner:converts an anonymous class to an inner class that has a name and a constructor; the anonymous inner class is then automatically replaced with a call to the new inner class.
Convert Anonymous to Inner:converts an anonymous class to an inner class that has a name and a constructor; the anonymous inner class is then automatically replaced with a call to the new inner class.
![]() Introduce Variable, Constant, Field:replaces the selected expression (e.g., a string constant) by a matching variable, constant, or field, respectively.
Introduce Variable, Constant, Field:replaces the selected expression (e.g., a string constant) by a matching variable, constant, or field, respectively.
![]() Introduce Method:creates a method from selected lines of code, and replaces them with a call to the method.
Introduce Method:creates a method from selected lines of code, and replaces them with a call to the method.
Tip
When a lightbulb icon appears, press Alt-Enter for quick fixes (see Figure 70).

Always perform a clean build after completing any refactoring commands: Right-click the project in the Projects window, and select Clean and Build Project from the context menu.
To roll back refactoring operations, use the Undo menu item from the Refactoring menu. If you have additionally modified any of the affected files since the refactoring took place, you must undo those changes first.
http://blogs.sun.com/roumen/entry/you_wanted_more_refactorings
http://refactoring.netbeans.org/refactorings/specifications.html
For security reasons, you should not expose class fields publicly. If you need to access data from the outside, the best practice is to encapsulate the field. Encapsulation means the field remains private, and you expose it only indirectly through public getter and setter methods.
private int number;
public int getNumber() {
return number;
}
There are three ways to encapsulate fields quickly.
![]() Open the Refactor > Encapsulate Fields... dialog, either from the main menu or by right-clicking in the editor. Mark the checkboxes to generate public getters and setters for selected fields. The dialog additionally adjusts the fields’ accessibility (e.g., makes them all private). Check the Use Accessors... box to automatically replace any direct access to these fields by the appropriate accessor. Use this dialog to generate several accessors in one step (see Figure 71).
Open the Refactor > Encapsulate Fields... dialog, either from the main menu or by right-clicking in the editor. Mark the checkboxes to generate public getters and setters for selected fields. The dialog additionally adjusts the fields’ accessibility (e.g., makes them all private). Check the Use Accessors... box to automatically replace any direct access to these fields by the appropriate accessor. Use this dialog to generate several accessors in one step (see Figure 71).

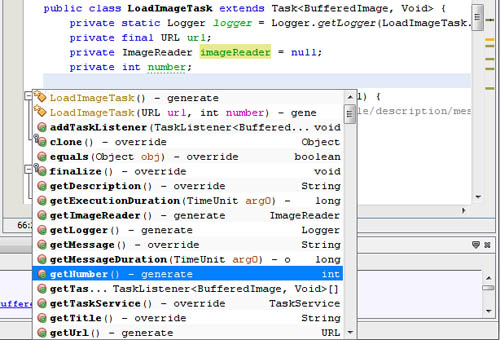
![]() Alternatively, position the caret between methods, and press the keyboard combination Ctrl-Space. The code completion window will offer you the option to create a getter or a setter for each unencapsulated field in this class. Use the arrow keys to select the accessor to be generated, and press Return. Use this method when you want to generate one getter (or setter) quickly (see Figure 72).
Alternatively, position the caret between methods, and press the keyboard combination Ctrl-Space. The code completion window will offer you the option to create a getter or a setter for each unencapsulated field in this class. Use the arrow keys to select the accessor to be generated, and press Return. Use this method when you want to generate one getter (or setter) quickly (see Figure 72).
![]() There is also a third, very intuitive method. After you have declared a field—for instance,
There is also a third, very intuitive method. After you have declared a field—for instance, number—begin typing the name of the field’s getter, in this example, getN. Then press Ctrl-Space. The code completion window offers to generate getNumber() (see Figure 73).

Press Return to generate this getter method. Similarly, you create a setter for the variable number by letting the IDE complete setN.
http://www.antonioshome.net/blog/pivot/entry.php?id=12
http://blogs.sun.com/roumen/entry/netbeans_quick_tip_2_generating
http://blogs.sun.com/roumen/resource/editor_hidden.html
It may happen that you copy a code snippet into your sources, and the result does not immediately compile. The editor shows a lightbulb with a red error sign next to the broken lines of code (
![]() ).
).
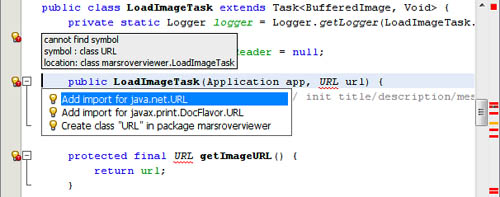
To learn more about the error, hover the mouse over the lightbulb icon and a hint will be displayed. In this example, the hint says that the compiler cannot find a certain symbol, the URL class (see Figure 74).

Unless there is a typo in the symbol’s name, this usually means that you used a class and did not specify the package it is from. The code snippet you copied did not use full package names, nor did it contain necessary import statements.
So, the first thing to try when fixing this type of error is to import the class in question. Right-click inside the editor and select Fix Import Statements from the context menu. The IDE will try to identify the missing symbols, and add the appropriate import statement to the class.
If the IDE finds more than one matching symbol on your classpath, you have to pick the right one from a list. In our example, the URL symbol could refer to java.net.URL or to javax.print.DocFlavor.URL (see Figure 75).
If the IDE cannot identify the symbol, check whether the class is really on your classpath: Make certain you have added the appropriate library to the project. (See also Tip 35, Add Libraries to a Project.)
The IDE also assists you in the opposite situation: Every time you remove lines, there is a chance that unused import statements will remain and clutter the class. Scroll up to the class’s import section and look out for lightbulb glyphs with a yellow warning sign (
![]() ). Pressing Alt-Enter (Mac: Ctrl-Enter) displays a hint suggesting that you remove the selected (or all) unused import statements. Use the arrow keys to choose the action and press Enter to execute it (see Figure 76).
). Pressing Alt-Enter (Mac: Ctrl-Enter) displays a hint suggesting that you remove the selected (or all) unused import statements. Use the arrow keys to choose the action and press Enter to execute it (see Figure 76).

http://blogs.sun.com/roller/resources/roumen/editor_hidden.html
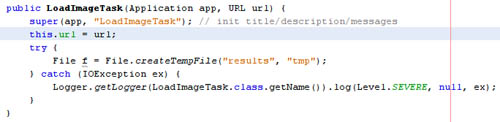
When a method can throw an exception that must be caught, the line of code will be underlined and marked with a lightbulb symbol. Move the mouse over the lightbulb symbol, and an editor hint will suggest that you surround the expressions with a try-catch statement. In the example in Figure 77, the createTempFile() method can throw an IOException.

Click the lightbulb to automatically surround the statement or block with a try-catch block (see Figure 78).
The method that performs the I/O operation is now correctly surrounded with a try-catch block. Now it’s time for you to write code that handles the exception.
http://blogs.sun.com/roumen/entry/surrounding_code_with_try_catch
When you extend another class, you often must implement some abstract methods. As long as you have not implemented all methods required for the class, the class will not compile.
Right after you typed the method declaration containing the extends keyword, a lightbulb will appear. Click the lightbulb or press Alt-Enter (Mac: Ctrl-Enter) on the line to display a hint. In Figure 79, the hint would suggest to “Implement all abstract methods” to fix the class.

To make the IDE execute the displayed fix, either click the hint, or press Enter on it. In our example, the IDE now generates skeleton code for the abstract method startup(), and the class will compile. Now it’s time for you to write code that implements what the abstract method should do. See also Tip 69, Override Methods.
http://blogs.sun.com/roumen/entry/netbeans_quick_tip_27_implementing
The IDE can generate skeleton code when you override methods. Skeleton code means code with which the class will compile for now; you customize the method later to actually implement what it should do.
There are three ways to access the IDE’s automatic override features.
![]() Place the caret between two methods and choose Insert Code from the Source menu. Use the arrow keys to select Override Method... from the Generate pop up (see Figure 80).
Place the caret between two methods and choose Insert Code from the Source menu. Use the arrow keys to select Override Method... from the Generate pop up (see Figure 80).
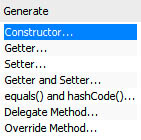
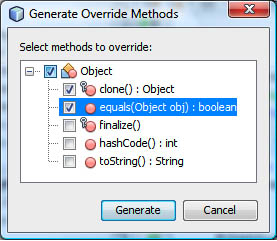
The Generate Override Methods dialog (Figure 81) appears. Use this dialog to generate clone(), equals(), finalize(), hashCode(), and toString() skeleton methods in one step. Check the method(s) to override, and click Generate.
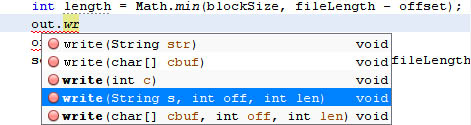
![]() If you want to quickly override only one method, you can also use code completion. Place the caret between methods and press Ctrl-Space. Select one of the override suggestions from the code completion window to generate this override method (see Figure 82).
If you want to quickly override only one method, you can also use code completion. Place the caret between methods and press Ctrl-Space. Select one of the override suggestions from the code completion window to generate this override method (see Figure 82).

![]() The fastest way to generate skeleton code is to type the first few characters of the method to override and complete the method name by pressing Ctrl-Space. For instance,
The fastest way to generate skeleton code is to type the first few characters of the method to override and complete the method name by pressing Ctrl-Space. For instance, toS will be completed as toString() and a method body.
See also Tip 68, Implement Abstract Methods.
http://www.antonioshome.net/blog/pivot/entry.php?id=12
The editor can reformat the indentation of all lines in a source file, or of a selected subset of lines. Right-click inside the editor and select Format from the context menu, or select Source > Format from the main menu.
But as people have individual coding styles, they have individual indentation and spacing habits: Some use four blanks for indentation, others eight, and so on. If you don’t like the way newlines and indentation are added by default, configure this action to suit your style.
Open the Options dialog and select the Java Code icon at the top, as shown in Figure 83. Have a look at the Formatting tab. Select the Category that you want to configure: Indents, Alignment and Braces, Wrapping, Blank lines, or Spaces. You will see very detailed options, so you can make automatic code formatting match your style.
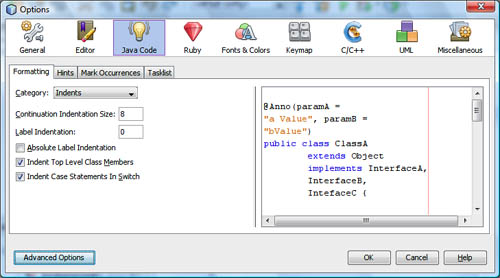
Very handy: A live preview shows you what effect the current formatting settings will have on a piece of example code.
Automatic code completion speeds up typing, but it works only for Java keywords and identifiers. What about people’s names, ID numbers, or text from Javadoc and comments? The NetBeans IDE allows you to auto-complete any string, even if it is not part of a programming language. The NetBeans editor supports a handy kind of word matching, which is often called Hippie Expand or Hippie Completion.
This is how to use it.
-
Start writing the beginning of a previously typed string that you want to repeat, and press Ctrl-K (Mac: Command-K). The rest of the string is automatically completed.
-
If what you typed was not unique, you cycle through all possible completions by repeatedly pressing Ctrl-K (Mac: Command-K).
-
Similarly, press Ctrl-Shift-K (Mac: Command-Shift-K) to cycle backward through the list of matches.
Hippie Completion is very fast, since (in contrast to code completion) it ignores context. The search for matching strings wraps around the end of files, and it continues searching in every file currently open in the editor. Hippie Expand works in all kinds of source files, including XML and plain text.
If you forget the shortcut, you can find this action in the Source menu as Insert Previous / Next Matching Word.
http://netbeans.dzone.com/tips/hidden-hippie
In NetBeans IDE 5.5, code completion only recognized keywords with the same capitalization as that with which they were defined. Many users felt that typing camel case slowed them down, so in NetBeans IDE 6.0, code completion is now case-insensitive by default.
This is a matter of personal preference, so try it and see which fits your typing style best. You can find this option in the menu under Tools > Options > Editor. Here you can check or uncheck the Case Sensitive Code Completion checkbox.
http://blogs.sun.com/roumen/entry/netbeans_quick_tip_25_insensitive
After the code completion window pops up (see Figure 84), you usually trigger the completion by clicking one of the lines in the pop up. Alternatively, you can select the line with the up and down arrow keys, and press the Enter key to insert it.
The appropriate code snippet is inserted, and (if arguments are expected) the caret lands between the parentheses. Note that the code is underlined in red until you go to the end and add the missing semicolon (see Figure 85).

Here is another way to achieve the same, but it saves you a couple of keystrokes: Instead of clicking, or pressing the Enter key, you press the Semicolon key to confirm the code completion pop up.
The code is generated just like before; however, now the code snippet is generated with a semicolon at the end! Again, the caret lands between the parentheses if the method has any arguments, so you can start typing without moving the caret. Otherwise, when there are no arguments, the caret will move to the end of the line as usual (see Figure 86).

Using the semicolon to confirm the selection is a handy shortcut that lets you continue typing smoothly. You no longer need to go to the end of the line to type the semicolon.
Alternatively, when you have already pressed the Enter key to confirm the code completion pop up, and you press the semicolon key immediately afterward, the semicolon will also automatically be inserted at the end of the line, where it belongs.
Note, however, that punctuation marks do not work this way if the first method argument happens to be a string: As long as the caret is between quotation marks, the punctuation mark will be interpreted as part of the string. To avoid that, press Ctrl-Semicolon (Mac: Command-Semicolon) to insert the semicolon at the end of the line.
If you press Ctrl-Shift-Semicolon (Mac: Command-Shift-Semicolon), the semicolon is added and the caret will move to a new line below.
http://blogs.sun.com/geertjan/entry/free_semi_colon_with_code
If you need a sophisticated task tracker, but you don’t want to install a separate application, consider the NetBeans User Tasks module (see Figure 87).

With User Tasks, you can define a list of daily tasks, and assign categories, owners, priorities, and subtasks. It even includes a timer that lets you keep track of how much time you spent on each task.
To install the User Tasks modules into the IDE, choose Tools > Plugins from the menu. Go to the Available Plugins tab, mark the checkbox next to the User Tasks entry, and click the Install button. After the IDE has downloaded and installed the module, it will show up under Window > Other > User Tasks (see Figure 88).

The members of the NetBeans community have collected tips on how to improve the IDE’s performance. You can find them in the NetBeans User FAQ at http://wiki.netbeans.org/wiki/view/FaqSlowNetBeans. Here are some of them.
![]() If you have more than one hard drive, install the IDE on the faster one. In particular, do not install the IDE on a network drive.
If you have more than one hard drive, install the IDE on the faster one. In particular, do not install the IDE on a network drive.
![]() Do not store any configuration files or projects on a network drive. The IDE scans your projects regularly (to give you code completion and editor hints), which is significantly faster on a local drive. This includes the NetBeans
Do not store any configuration files or projects on a network drive. The IDE scans your projects regularly (to give you code completion and editor hints), which is significantly faster on a local drive. This includes the NetBeans userdir! If your home directory is on a remotely mounted file system, edit the /etc/netbeans.conf file and change the default userdir path to your local hard drive.
![]() Some antivirus tools check the IDE’s classes and JARs again and again. To improve speed, configure your antivirus software to exclude the NetBeans IDE directory from its daily scan.
Some antivirus tools check the IDE’s classes and JARs again and again. To improve speed, configure your antivirus software to exclude the NetBeans IDE directory from its daily scan.
![]() In NetBeans IDE 6.0 and later, the JVM’s heap size is set automatically. In NetBeans IDE 5.x you can try to adjust it manually: Close the IDE and open the configuration file (
In NetBeans IDE 6.0 and later, the JVM’s heap size is set automatically. In NetBeans IDE 5.x you can try to adjust it manually: Close the IDE and open the configuration file (/etc/netbeans.conf in the installation directory) in a text editor. Modify the netbeans_default_options line as follows, and then save the netbeans.conf file and restart the IDE.![]() On machines with less than 384MB of RAM, set the initial heap size so that it is smaller than the default. Decrease the
On machines with less than 384MB of RAM, set the initial heap size so that it is smaller than the default. Decrease the -J-Xmx128m option to -J-Xmx96m, and decrease the -J-XX:MaxPermSize=96m option to -J-XX:MaxPermSize=64m. Should you encounter an OutOfMemoryError, you need to increase Xmx or XX:MaxPermSize back to the default.
![]() If you have more RAM and process large files (e.g., WSDL files), increase the heap size: Increase
If you have more RAM and process large files (e.g., WSDL files), increase the heap size: Increase -J-Xmx128m to -J-Xmx256m.
Tip
Do not set the heap size to a value close to or greater than the amount of physical RAM in your system, or it will cause severe swapping during runtime.
![]() Disable packs and modules that you do not use. In NetBeans IDE 6.0, choose Tools > Plugins; in NetBeans 5.x, choose Tools > Module Manager to deselect modules.
Disable packs and modules that you do not use. In NetBeans IDE 6.0, choose Tools > Plugins; in NetBeans 5.x, choose Tools > Module Manager to deselect modules.
![]() Close all projects in the Projects window that you do not use. The IDE will then not parse these projects’ sources, which will increase start-up speed.
Close all projects in the Projects window that you do not use. The IDE will then not parse these projects’ sources, which will increase start-up speed.
http://blogs.sun.com/roumen/entry/netbeans_startup_performance_tips
http://blogs.sun.com/roumen/entry/my_netbeans_4_1_presentation
http://performance.netbeans.org/howto/jvmswitches/index.html