
5. Finding Your Way Around in Vista
After you begin using Vista, you’ll definitely notice that some items aren’t located exactly where they were in Windows XP. To make matters more confusing, some items have been renamed or changed. This can be frustrating; however, this chapter lists many of these relocated settings, preferences, and features. Use this chapter to help you get on your feet and be productive with Vista in no time.
50. Renamed Windows Applications
Among all the new features and changes in Vista, several applications have been renamed, as Table 5.1 shows.
Table 5.1. Renamed Applications
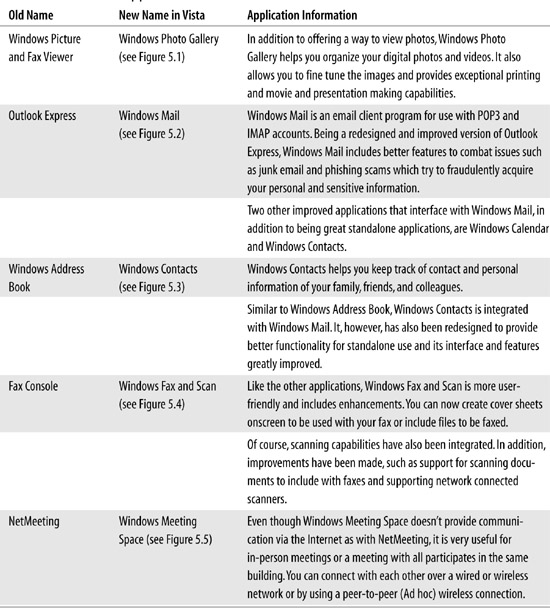

FIGURE 5.1 Windows Picture and Fax Viewer is now Windows Photo Gallery.

FIGURE 5.2 Outlook Express is now Windows Mail.
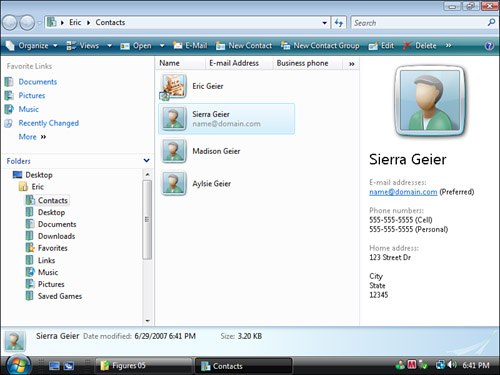
FIGURE 5.3 Windows Address Book is now Windows Contacts.
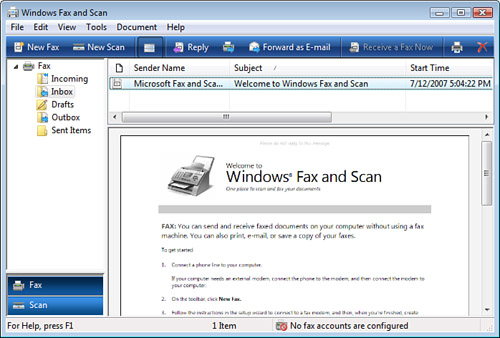
FIGURE 5.4 Fax Console is now Windows Fax and Scan.
FIGURE 5.5 NetMeeting is now Windows Meeting Space.
![]() NOTE
NOTE
Windows Fax and Scan is included only in Windows Vista Business, Windows Vista Enterprise, and Windows Vista Ultimate.
![]() TIP
TIP
For more information about the new Windows Meeting Space, see #25, “Windows Meeting Space.”
For more information about the new Windows Photo Gallery, see #22, “Photo Gallery.”
You can access all the applications mentioned in Table 5.1 from the Start menu, as pointed out in Figure 5.6.

FIGURE 5.6 How to access the mentioned applications.
![]() Open the Start menu, All Programs.
Open the Start menu, All Programs.
![]() Choose the program from the list.
Choose the program from the list.
51. My Documents
As you might recall, in previous versions of Windows there were a set of folders (one for each user account), called My Documents that offered convenient categorized folders to store your documents and files. Windows Vista doesn’t contain a My Documents folder; however, Vista does offer an equivalent set of folders referred to as personal folders (again, one for each user account). The folder is named by the Windows user account. For example, suppose you created a Windows account called Kids. The personal folder for that Windows account would automatically be labeled Kids.
Similar to Windows XP, you can access the personal folder from the Start menu, as shown in Figure 5.7 and in Windows Explorer, as shown in Figure 5.8.
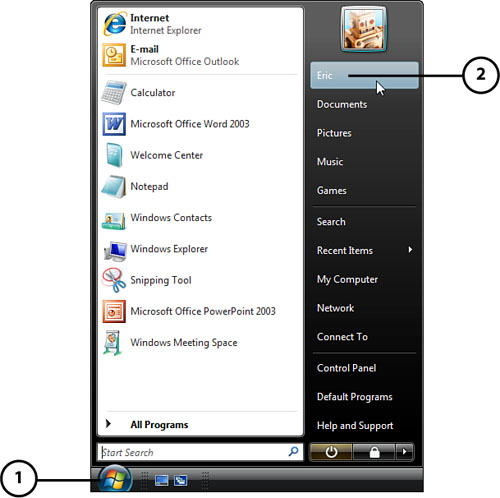
FIGURE 5.7 Accessing the personal folder from the Start menu.
![]() Personal folder for the currently logged-in user
Personal folder for the currently logged-in user

FIGURE 5.8 Accessing the personal folder in Windows Explorer.
![]() Double-click the My Computer icon to open this window.
Double-click the My Computer icon to open this window.
![]() Open the personal folder here.
Open the personal folder here.
![]() TIP
TIP
If you want the personal folder to appear on your desktop, you can refer to #40, “Add the Main Icons.”
After you open your personal folder, you’ll notice that there have been quite a few additions to the three simple folders (My Pictures, My Videos, and My Music) Windows XP offered. As you can see in Figure 5.9, you now also have the following new folders and shortcuts to better help organize and access your documents and information:
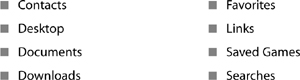

FIGURE 5.9 The personal folder.
![]() Click here to see the contents of your personal folder.
Click here to see the contents of your personal folder.
![]() Personal folder contents are shown here.
Personal folder contents are shown here.
52. Shared Documents Folder
Instead of the Shared Documents folder, Windows Vista offers the Public folder. As Figure 5.10 shows, you can access the Public folder from Windows Explorer.
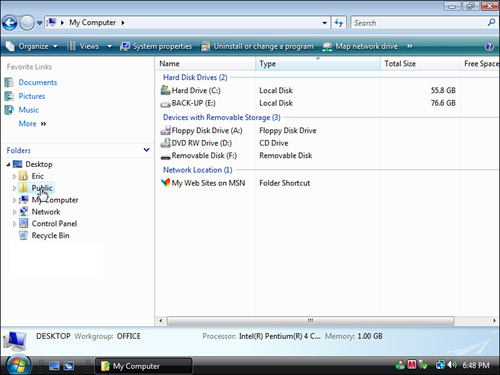
FIGURE 5.10 Accessing the Public folder in Windows Explorer.
If you use the Public folder, you should keep in mind one important change from XP. Not only are the files contained in the Public folder open to other user accounts on the same computer, but now by default, access is open to other computers on any networks you might connect to, such as by other family members at home connected to the same router or by strangers when browsing the web at your local café.
Windows Vista does, however, have a security measure in place, which prompts you to classify the trustworthiness of the networks you connect to. This helps prevent unauthorized access of your documents when on public and other untrusted networks. See #20, “Network and Sharing Center,” for more information.
![]() TIP
TIP
You can easily change the sharing status of the Public folder. Just open the Network and Sharing Center (by right-clicking on the Network Status icon in the system tray); the status and ability to change the setting is in the Sharing and Discovery section.
53. View the Folder Path
As you might notice, unlike Windows XP, Vista doesn’t show the “raw” folder path (for example, C:UsersPublicPicturesSample Pictures) when viewing files in Computer and Windows Explorer. Figure 5.11 shows the difference been XP and Vista.
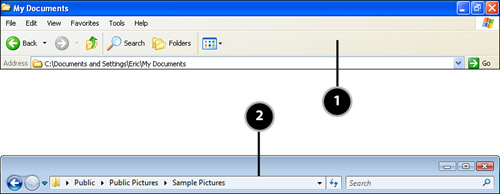
FIGURE 5.11 Address bars in Windows XP and Windows Vista.
As Figure 5.12 shows, Vista displays a breadcrumb navigation which is more user-friendly, however makes it more difficult to get to the raw path. Getting to the raw path is useful to those who copy and paste the path in other applications or for other miscellaneous uses.

FIGURE 5.12 Accessing the raw path.
![]() Click here to show the raw path.
Click here to show the raw path.
Nevertheless, you can access the raw path by clicking on the right of the breadcrumb navigation, inside the Address bar, as demonstrated in Figure 5.12.
The path will be highlighted and you can now copy and paste it as you want.
54. Up Arrow Has Been Removed
Among the other changes to Vista’s new interface when viewing files with Computer or Windows Explorer is the removal of the Up button (see Figure 5.13) to quickly take you to the parent or previous folder.
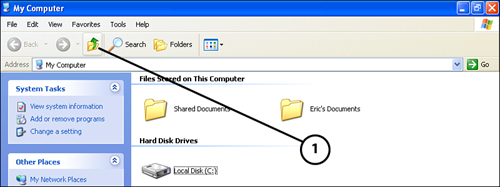
FIGURE 5.13 Using the up button to move back to the parent folder in Windows XP.
Similar functionality is given by clicking on the breadcrumb navigation links, such as demonstrated in Figure 5.14. Instead of clicking the Up arrow as you did in Windows XP, you simply click the actual folder name to navigate to that folder.
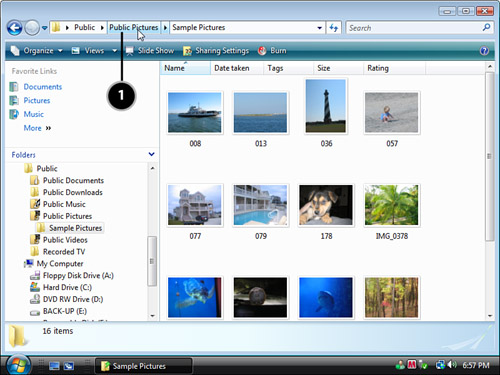
FIGURE 5.14 Clicking on the previous folder link to move back to the parent folder.
However, this new method of getting to the parent directory might not always be the best. For example, Figure 5.15 shows what happens when the Computer window is sized smaller; some of the breadcrumb navigation is lost, which prevents clicking on the parent link.

FIGURE 5.15 Example of how breadcrumb navigation links disappear when resizing.
![]() When the Computer window is sized down...
When the Computer window is sized down...
![]() ...some breadcrumb navigation links are not visible.
...some breadcrumb navigation links are not visible.
To overcome this problem, simply press Alt+↑ to navigate one level at a time. For instance, look at Figure 5.14. If I were to press Alt+↑, I would be taken to the Public Pictures folder. Pressing Alt+↑ again would take me to the Public folder.
55. My Network Places
The My Network Places feature found in Windows XP has been renamed simply to Network in Windows Vista. By default, a shortcut to your Network is on the Start menu, as you can see in Figure 5.16.

FIGURE 5.16 The Network icon on the Start menu.
![]() TIP
TIP
Another neat enhancement to Windows Vista that you might be interested in is the Network Map. This offers a visual diagram of the network, including infrastructure components such as routers and user devices.
To access the Network Map, open the Network and Sharing Center by right-clicking on the Network Status icon in the system tray, and click the View Full Map link in the upper-right corner.
![]() TIP
TIP
You can also add a Network shortcut to your desktop. For more information, see #40, “Add the Main Icons.”
You’ll also find a shortcut for the Network in Windows Explorer and Computer, as shown in Figure 5.17.

FIGURE 5.17 The Network icon in Windows Explorer.
56. Desktop Settings
As you might recall, previous versions of Windows had a central location from which you could access your display, desktop, monitor, and other environment settings. This single window, called Display Properties, has been renamed and repurposed in Vista as a Control Panel applet called Personalization.
The easiest way to access the Personalization window is via the desktop:
1. Right-click on your desktop.
2. Select Personalize, as shown in Figure 5.18.

FIGURE 5.18 Accessing the personalization settings from the desktop.
You can also access the Personalization window in Control Panel:
2. Click Control Panel, as shown in Figure 5.19.
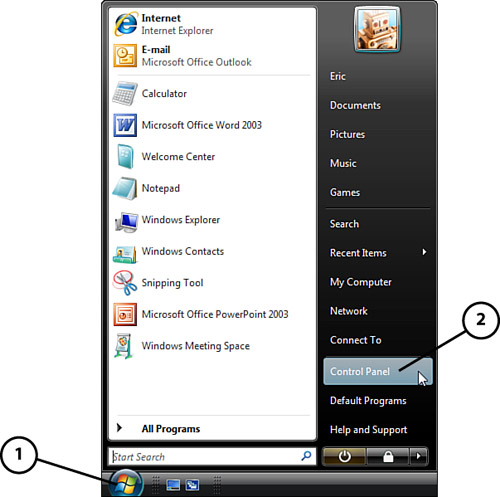
FIGURE 5.19 Opening Control Panel.
![]() ...and then click Control Panel.
...and then click Control Panel.
3. Double-click on the Personalization icon, as shown in Figure 5.20.

FIGURE 5.20 Accessing the personalization settings from Control Panel.
57. Advanced Performance Settings
In previous versions of Windows, you could the access advanced performance options, such as whether to smooth out edges of windows and other visual effects that involve the performance and appearance of Windows, from a tab on the System Properties window. The settings still are accessible from this window from within Vista, but you might find the Advanced Performance Options window itself difficult to find.
![]() TIP
TIP
By default, the Computer icon isn’t displayed on the desktop. If you want to add this icon to the desktop, see #40, “Add the Main Icons.”
Here’s how to get to the advanced performance options in Vista:
1. Right-click on the Computer icon. If the Computer icon isn’t on the desktop, open the Start menu, click Control Panel, double-click on the System Settings icon, and proceed to the next step.
2. Select Properties, as shown in Figure 5.21.
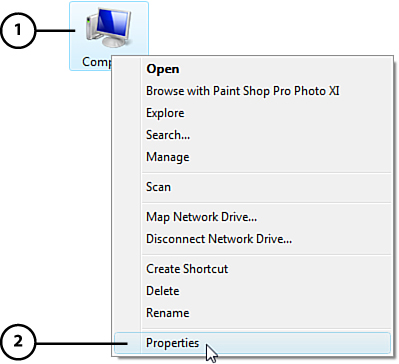
FIGURE 5.21 Accessing the system settings.
![]() Right-click the Computer icon...
Right-click the Computer icon...
3. Click the Advanced System Settings link, as shown in Figure 5.22, on the tasks pane.
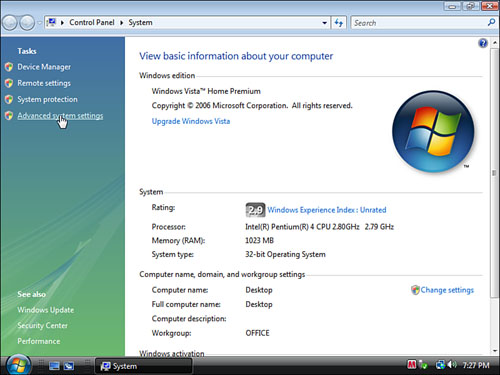
FIGURE 5.22 Accessing the advanced performance settings.
58. Network Connection Status Details
Viewing the details of your network connections (such as data rate and IP address information) in Windows Vista takes a few clicks—rather than the easy hovering-over or double-clicking the network status icon in the system tray as you could in XP.
In Vista, you access your network connection status details via the Network and Sharing Center. To access it:
1. Right-click on the Network Status icon in the system tray and select Network and Sharing Center, as shown in Figure 5.23.
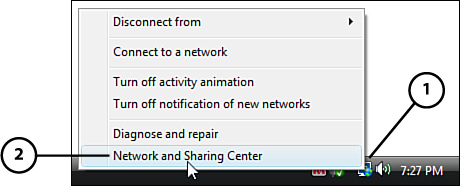
FIGURE 5.23 Opening the Network and Sharing Center.
![]() Right-click on the Network Status icon.
Right-click on the Network Status icon.
![]() Choose Network and Sharing Center.
Choose Network and Sharing Center.
2. Click the View Status link, as shown in Figure 5.24.
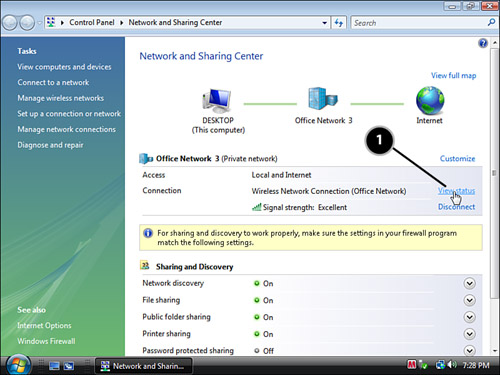
FIGURE 5.24 Accessing the connection details of the network connection.
![]() Click View Status to see network details.
Click View Status to see network details.
For even more network details, such as the IP addresses, click the Details... button.
59. Wireless Network Connection Priorities and Preferences
Just like the majority of the other networking tasks and preferences, to prioritize your wireless networks and to configure other individual settings (such as autoconnecting), you need to go to the Network and Sharing Center.
Here’s how to access the individual settings and preferences of wireless networks:
1. Right-click on the Network Status icon in the system tray, and select Network and Sharing Center, as shown in Figure 5.25.
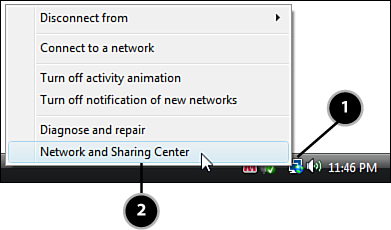
FIGURE 5.25 Opening the Network and Sharing Center.
![]() Choose Network and Sharing Center.
Choose Network and Sharing Center.
2. Click the Manage Wireless Networks link, as shown in Figure 5.26, on the tasks pane.
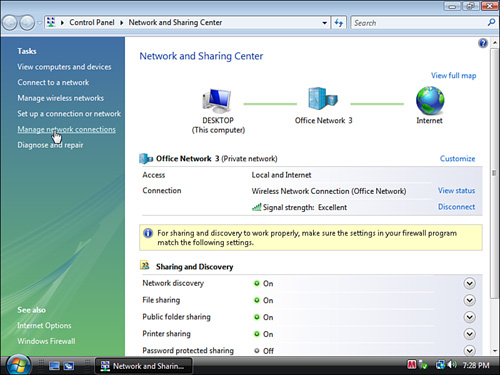
FIGURE 5.26 Opening the Manage Wireless Networks window.
3. To change the priority of the wireless networks, use the Move Up and Move Down arrows, which are shown in Figure 5.27. Prioritizing helps determine which network to use when there is more than one network in range.
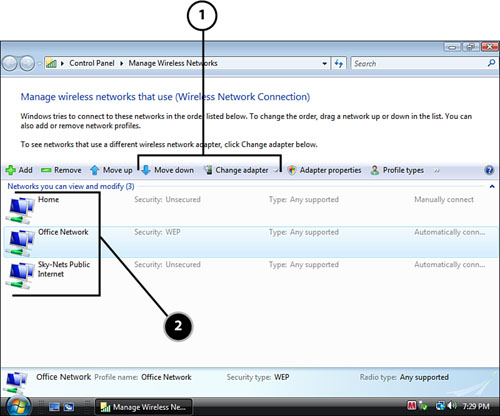
FIGURE 5.27 The arrow to change the position of the priority of a wireless network.
![]() Use the Move Up and Move Down arrows to set network priorities.
Use the Move Up and Move Down arrows to set network priorities.
![]() Double-click on a network to change its properties.
Double-click on a network to change its properties.
4. You can also double-click on a network to configure the properties of the individual wireless network connection. As Figure 5.28 shows, you can specify a few connectivity preferences and the connection’s security settings, as shown in Figure 5.29.
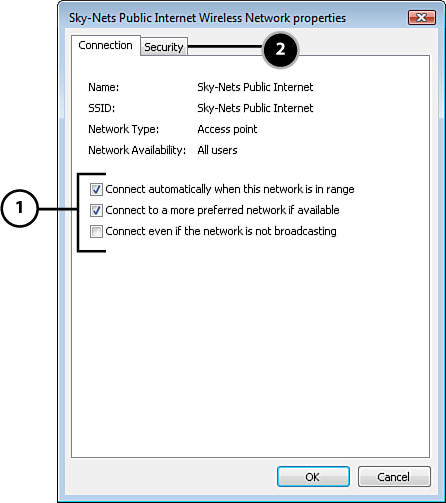
FIGURE 5.28 Example of the connectivity preferences of a wireless network.
![]() Set connectivity preferences here.
Set connectivity preferences here.
![]() Find network security settings here.
Find network security settings here.

FIGURE 5.29 Example of the security settings of a wireless network.
60. Network Connections
Just as in the two previous topics, the Network Connections window can be accessed from the Network and Sharing Center. The Network Connections window displays all the network adapters and connections, such as PCI wireless cards and integrated network cards. This window also provides access to the network connection properties and diagnosis tools, and is where they can be turned on and off.
Here’s how to access the Network Connections window:
1. Right-click on the Network Status icon in the system tray and select Network and Sharing Center, as shown in Figure 5.30.

FIGURE 5.30 Opening the Network and Sharing Center.
![]() Choose Network and Sharing Center.
Choose Network and Sharing Center.
2. Click the Manage Network Connections link, as shown in Figure 5.31, on the tasks pane.

FIGURE 5.31 Opening the Network Connections window.
Although the Network Connections window is only a few clicks away, Windows XP offered a Network Connections shortcut from the status icon in the system tray and from the Settings menu on the Start menu, which were a bit more convenient for regular network users. However, Windows Vista users can also get this icon on the Start menu if the Classic Start menu is enabled, which is discussed in #45, “Change to the Classic Start Menu.”
You can also create a shortcut to Network Connections on your desktop:
1. Right-click on the desktop.
2. Point to New and click Shortcut, as shown in Figure 5.32.
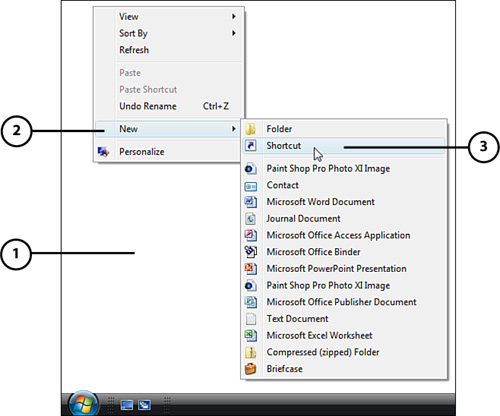
FIGURE 5.32 Creating a new shortcut.
3. Enter the following for the location, as shown in Figure 5.33:
C:windowssystem32
cpa.cpl
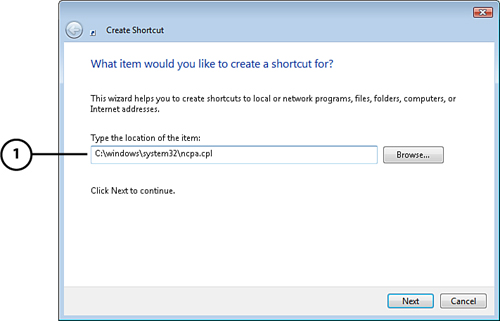
FIGURE 5.33 Entering a location for the new shortcut.
![]() Enter the location in which you want the shortcut placed and click Next.
Enter the location in which you want the shortcut placed and click Next.
4. Click Next.
5. Enter a desired name, such as that shown in Figure 5.34, and click Finish.
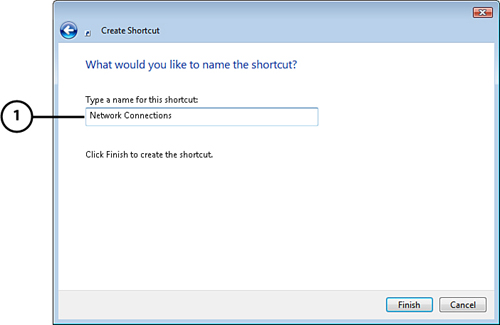
FIGURE 5.34 Entering a name for the new shortcut.
![]() Enter a name for the newly created shortcut.
Enter a name for the newly created shortcut.
61. HyperTerminal
HyperTerminal was included with previous versions of Windows to provide command-prompt, text-only connections to other computers and hosts; however, it has been removed from Windows Vista. You can use Telnet, however.
By default, Telnet is not installed with Windows Vista, although you can install it by following these steps:
1. Open the Start menu.
2. Click Control Panel, as shown in Figure 5.35.
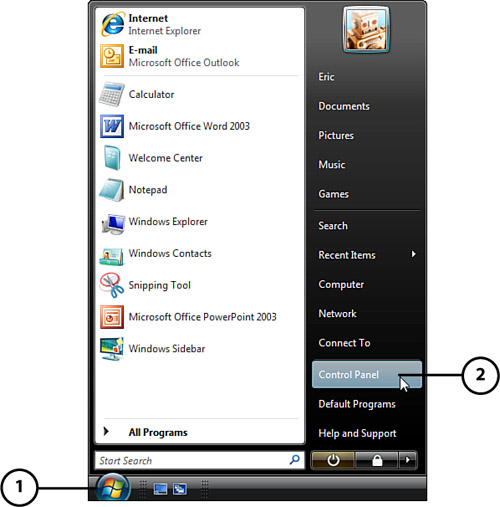
FIGURE 5.35 Opening Control Panel.
3. Click Programs and Features, as shown in Figure 5.36.
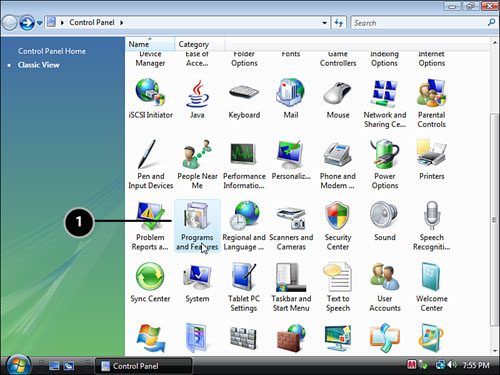
FIGURE 5.36 Accessing the Programs and Features section of Control Panel.
4. Click Turn Windows Features On or Off, as shown in Figure 5.37.
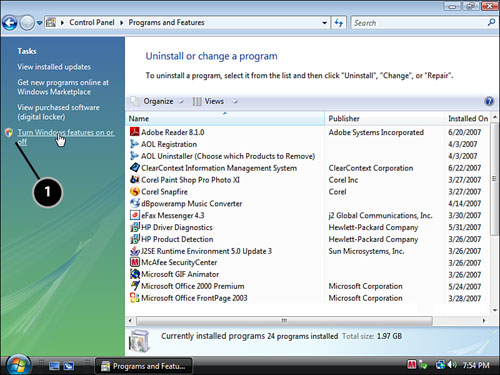
FIGURE 5.37 Accessing the Windows Features options.
![]() Choose Turn Windows Features On or Off.
Choose Turn Windows Features On or Off.
5. In the Windows Features dialog box, check the Telnet Client option, as shown in Figure 5.38, and then click OK.
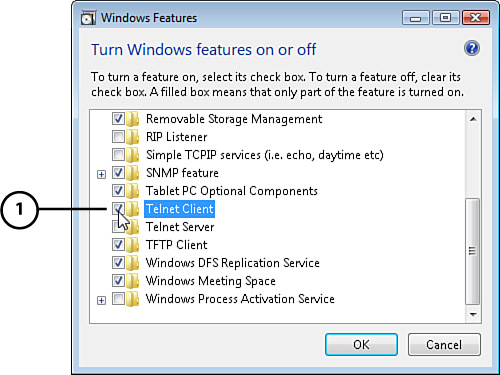
FIGURE 5.38 Enabling the Telnet Client option.
After the Telnet Client is installed, you can use the program by browsing to and opening the file at C:windowssystem32 elnet.exe, or you can use Vista’s new Search box on the Start menu:
1. Open the Start menu and type Telnet into the Search box, as shown in Figure 5.39.

FIGURE 5.39 Accessing the Telnet application.
![]() Type telnet into the Search box and press Enter.
Type telnet into the Search box and press Enter.
![]() Telnet appears here; double-click to run it.
Telnet appears here; double-click to run it.
If using the Classic Start menu, you need to click Run, type C:windowssystem32 elnet.exe, and then click OK.
![]() TIP
TIP
For a list of available commands in Telnet, simply type “?” and press Enter.
62. Run Prompt
The Run button that was accessible with a single click on the Start menu in other versions of Windows has been moved in Vista so that it appears in the Accessories folder. The Run prompt allows you to open files and folders by typing the exact path or to open other programs and tools by entering shortcuts, such as “msconfig.”
Here are step-by-step directions to access the Run prompt in Vista:
1. Open the Start menu.
2. Click All Programs.
3. Click Accessories.
4. Click Run, as shown in Figure 5.40.

FIGURE 5.40 Opening the Run prompt.
![]() TIP
TIP
If you enable the Classic Start menu, the Run button will return to the Start menu. For more information about this, see #45, “Change to the Classic Start Menu.”
![]() TIP
TIP
Keep in mind that you can also use the new search capabilities of the Start menu to access many items you use with the Run prompt.
For example, you can either click on the Start button or press the Win key on your keyboard to access the Start menu, then you could type “msconfig” (without the quotes) and press Enter, just like you would have when using Run to open the System Configuration utility.
For more information about the new search capabilities, see #17, “New Look and Functionality.”
63. System Restore
In Windows XP, you could change the System Restore settings via a tab on the System Properties window, accessed in Control Panel or by viewing the properties of My Computer. In Windows Vista, you can still access these settings from the System Properties window; however, the location of the settings isn’t as obvious.
Here’s how to get to the System Restore settings:
1. Right-click on the Computer icon and select Properties, as shown in Figure 5.41.
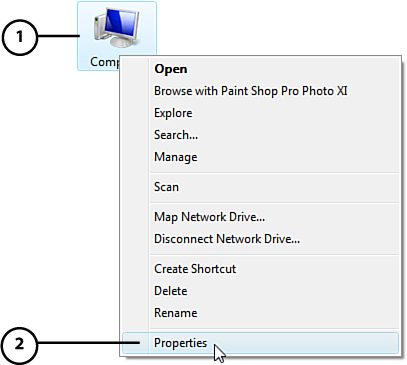
FIGURE 5.41 Accessing the system settings.
![]() Right-click the Computer icon.
Right-click the Computer icon.
2. Click System Protection, as shown in Figure 5.42.

FIGURE 5.42 Accessing the System Protection settings.
To open the actual System Restore program, where you can restore a hard drive, you can click the System Restore button on the System Protection window or go to Start, All Programs, Accessories, System Tools, and click System Restore, as shown in Figure 5.43, just like previous versions of Windows.
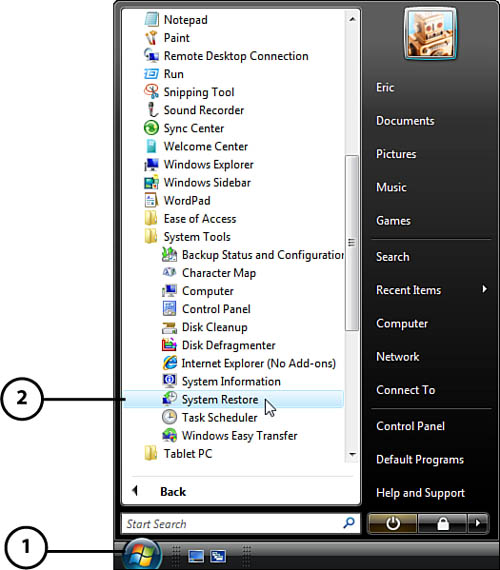
FIGURE 5.43 Opening the System Restore application.
![]() Choose All Programs, Accessories, System Tools, System Restore.
Choose All Programs, Accessories, System Tools, System Restore.
64. Web Desktop Items
Previous versions of Windows contained a feature where you could place websites or web items on your desktop. Windows Vista, however, doesn’t have this feature. Instead, you might want to use Windows Sidebar.
![]() TIP
TIP
You can use the Windows Sidebar to display the gadgets or you can detach them and place them on your desktop, which is similar to having the Web Desktop items in Windows XP.
For more information on Windows Sidebar, see #17, “New Look and Functionality.”
65. Drag the Shortcut Icon in Microsoft Internet Explorer 7
With previous versions of Internet Explorer, you could create a shortcut for the particular website you’re viewing by clicking and dragging the window’s icon on the title bar in the upper-left corner, or the icon in the Address bar area to the desktop or other acceptable place.
However, with Internet Explorer 7, you can’t use the icon in the title bar of the window, only the smaller icon directly to the left of the Address bar, as Figure 5.44 points out.

FIGURE 5.44 Dragging an icon to create a shortcut of the current website.
![]() ...and drag it to the desired location.
...and drag it to the desired location.
66. Find On This Page in Internet Explorer 7
Although in Internet Explorer 7 you can still access the Find On This Page shortcut from the Edit menu, the menu bar isn’t displayed by default. If you want, you can display the menu bar by pressing Alt on your keyboard or by right-clicking on the toolbar and selecting the Menu Bar option.
You can also search a page in Internet Explorer 7 by accessing the Find On This Page feature from the drop-down menu of the Search box, as shown in Figure 5.45.

FIGURE 5.45 Accessing the Find On This Page feature.
![]() TIP
TIP
You can also use the Alt key in most other Windows applications/windows to make the menu bar appear.
67. View History in Internet Explorer 7
The History button (the clock with the green arrow found on the menu bar) has been removed from Internet Explorer 7. Internet Explorer 7, however, does offer a new button, as shown in Figure 5.46, which allows quick access to your Favorites, Feeds, and browsing History.
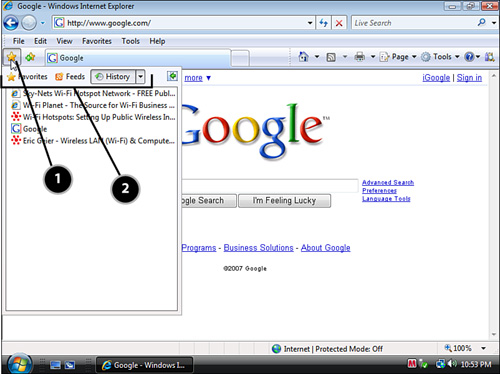
FIGURE 5.46 Button to access the browsing history and other items.
![]() CAUTION
CAUTION
Even though Internet Explorer’s History feature is good for you when trying to find previously visited websites, remember other people using your Windows account can also see where you’ve been. To protect your privacy you can clear your history: In Internet Explorer 7, click the Tools button on the toolbar, select Delete Browsing History, and choose your desired option.
If you wish, you can even disable the History feature: In Internet Explorer 7, click the Tools button on the toolbar, select Internet Options, click the Settings button in the Browsing History section, and enter zero into the Days to keep pages in history field.
With Internet Explorer 7, you can now search your browsing history (as shown in Figure 5.47) to make it even easier to find that previously viewed web page.
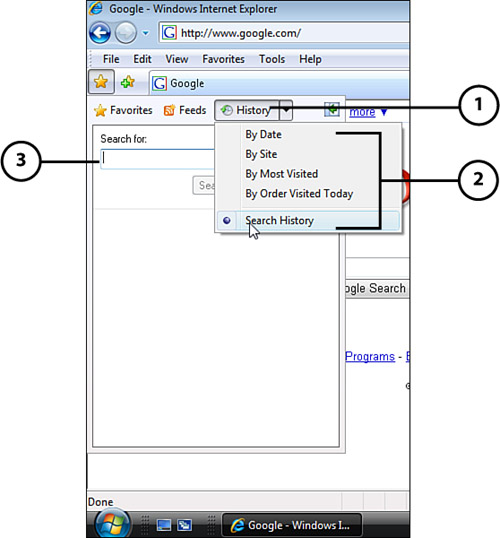
FIGURE 5.47 Example of searching through the browsing history.
![]() Enter the URL and keyword for which you want to search.
Enter the URL and keyword for which you want to search.
68. Secure Website Padlock in Internet Explorer 7
As you might already know, Internet Explorer, like most web browsers, displays a padlock when viewing a secured website (such as banking sites) using the Secure Sockets Layer (SSL) security method. In previous versions of Internet Explorer, the padlock was shown in the lower-right corner of the browser window. In Internet Explorer 7, however, the padlock is shown toward the top of the browser on the right of the Address bar, as shown in Figure 5.48.
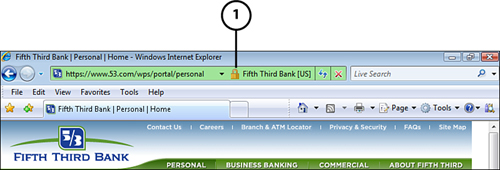
FIGURE 5.48 New location of Internet Explorer’s padlocks.
![]() Padlock icon indicates a security-enabled website.
Padlock icon indicates a security-enabled website.
There have also been a few enhancements to this version of Internet Explorer to further improve the security and protection of your private information when using SSL-enabled websites. For example, when problems are found with a site’s SSL certificate, Internet Explorer will display an alert page, such as the one shown in Figure 5.49, before loading the website.
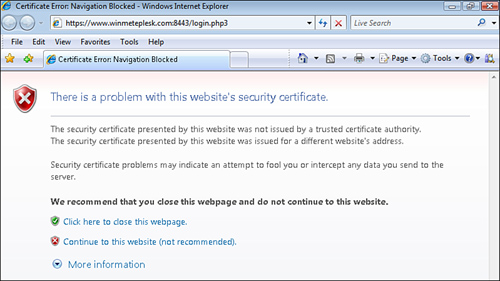
FIGURE 5.49 Example of an alert informing user of SSL certificate issues.
In addition, Internet Explorer now offers quick access to the SSL certificate details by clicking on the padlock, as shown in Figure 5.50.
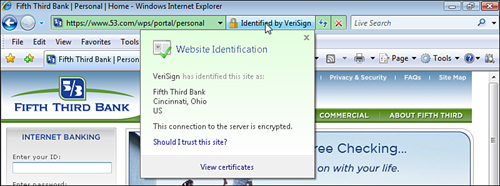
FIGURE 5.50 Accessing the SSL certificate details.
![]() TIP
TIP
Another enhancement of Windows Vista is the ability to change the volume for each individual application.
See #99, “Adjust Audio Levels per Application,” for more information.
69. Volume Control
In previous versions of Windows, you could access the Volume Control window by clicking Start, All Programs, Accessories, and Entertainment; however, in Vista there isn’t an Entertainment folder. In addition, this window has been renamed Volume Mixer and now allows you to control the volume for each individual application.
Here’s how to get to the new volume control utility, called Volume Mixer:
1. Right-click the Volume icon on the taskbar, as shown in Figure 5.51.
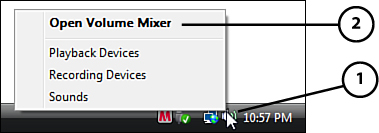
FIGURE 5.51 Right-clicking on the Volume icon.
![]() Right-click the Volume icon on the taskbar.
Right-click the Volume icon on the taskbar.
2. Select Open Volume Mixer.
![]() TIP
TIP
To access advanced volume and sound settings, you can right-click on the Volume icon and select Sounds.
70. Add/Remove Programs
Need to uninstall a program? Can’t find the Add/Remove utility? Well, it’s still accessible from Control Panel, but it has been renamed to Programs and Features.
Here’s how to get to the new Add/Remove utility, called Programs and Features:
2. Click Control Panel, as shown in Figure 5.52.

FIGURE 5.52 Opening Control Panel.
3. Double-click on the Programs and Features icon, as shown in Figure 5.53.
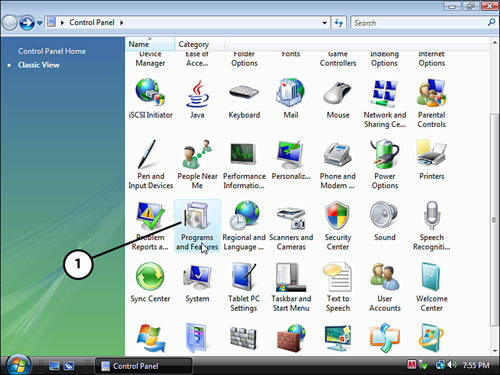
FIGURE 5.53 Accessing the Programs and Features section of Control Panel.
![]() Double-click Programs and Features.
Double-click Programs and Features.
![]() TIP
TIP
If you want to install or uninstall a Windows component, you can click on the Turn Windows Features On or Off link, located on the tasks pane of the Programs and Features window.
71. Display Properties
As you might recall, previous versions of Windows had a central place where you could access your display, desktop, monitor, and other environment settings. This single window, called Display Properties, has been manipulated in Windows Vista.
A main window called Personalization now exists in Vista. From this new window, you can access most of the old settings that were in the Display Properties window of previous versions of Windows.
The easiest way to access the Personalization window is via the desktop:
1. Right-click on your desktop.
2. Select Personalize, as shown in Figure 5.54.

FIGURE 5.54 Accessing the personalization settings from the desktop.
You can also access the Personalization window from Control Panel:
2. Click Control Panel, as shown in Figure 5.55.

FIGURE 5.55 Opening Control Panel.
3. Double-click on the Personalization icon, as shown in Figure 5.56.

FIGURE 5.56 Accessing the personalization settings from Control Panel.
![]() Choose the Personalization applet from Control Panel.
Choose the Personalization applet from Control Panel.
72. Filmstrip View
Many Windows XP users are fans of the Filmstrip view (as shown in Figure 5.57), which offers a very easy way to preview images and other documents without opening them directly.
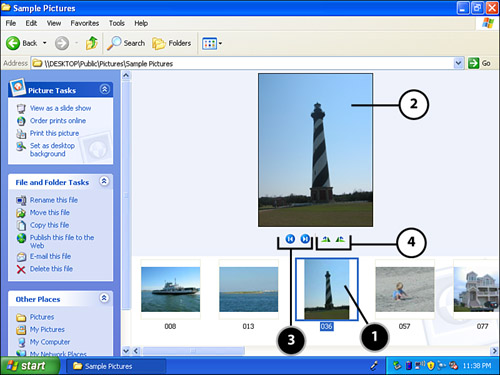
FIGURE 5.57 Example of viewing photos in Windows XP using the Filmstrip view.
![]() ...and see a larger version here.
...and see a larger version here.
![]() Flip forward or back through your image files.
Flip forward or back through your image files.
![]() Rotate the image for onscreen viewing.
Rotate the image for onscreen viewing.
Although Windows Vista doesn’t have the Filmstrip view, it does offer similar views, which are fairly difficult to unearth if you don’t know exactly what to look for.
First, you can try using the details pane, which is usually enabled by default. As Figure 5.58 shows, clicking on images in the Computer or Windows Explorer window shows the file’s details and a view of the image in the details pane which is actually smaller than the thumbnail.
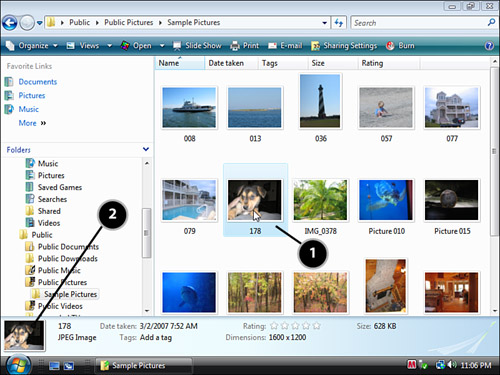
FIGURE 5.58 Example of using the details pane to preview photos.
![]() See a preview and the image properties here.
See a preview and the image properties here.
![]() TIP
TIP
To enable the details pane in the Computer or Windows Explorer window, click the Organize button on the toolbar, select Layout, and then click the Details Pane option.
The trick is to then resize the details pane to make it bigger, as shown in Figure 5.59, which will then be similar to the Filmstrip view offered in Windows XP.
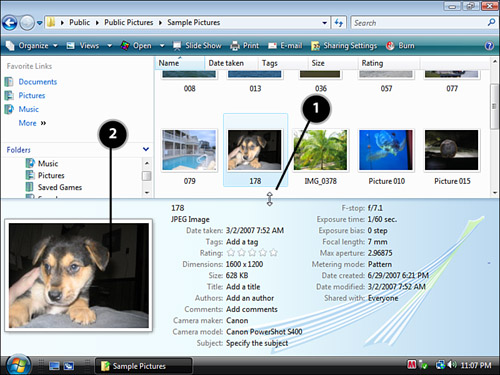
FIGURE 5.59 Resizing the details pane to better view photos.
![]() Use the resizing handle to change the size of the details pane.
Use the resizing handle to change the size of the details pane.
![]() The image preview will increase/decrease in size based on the relative size of the details pane.
The image preview will increase/decrease in size based on the relative size of the details pane.
If that option doesn’t float your boat, you can try using the preview pane:
1. In the Computer or Windows Explorer window, click the Organize button on the toolbar, as shown in Figure 5.60.
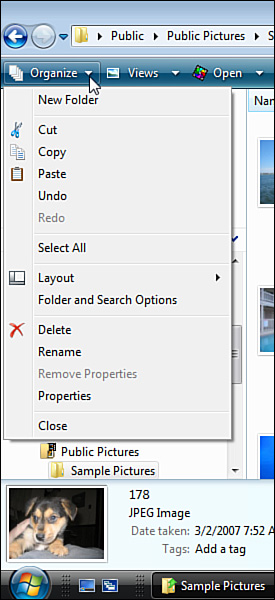
FIGURE 5.60 Accessing the organization settings for the folder.
2. Select Layout, and click the Preview Pane option, as shown in Figure 5.61.
3. Then, you can resize the preview pane to your liking and get rid of the details pane if you choose.
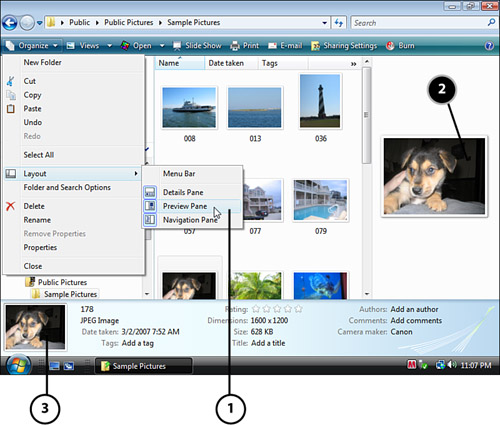
FIGURE 5.61 Enabling the preview pane for the folder.
![]() Choose Organize, Layout, Preview Pane.
Choose Organize, Layout, Preview Pane.