
6. Tips and Tricks
Want to do some neat things with Vista? Save time? Customize? Discover more? This chapter shows you many tips and tricks on Vista’s new features and capabilities. You’ll discover a very broad range of things you can do that will make your Windows Vista experience even better.
73. Apply the Vista Style to XP Computers
If you skipped Chapter 4, “Changing the Look and Feel of Vista,” and are sticking with Vista’s new interface, you might be interested in making other PCs running XP resemble Vista. Doing so might help you get used to the new interface, especially if you still regularly use your XP machines. In addition, flipping between the different Windows interfaces can be quite annoying. However, you can easily apply the Vista interface look and feel to your XP machines with some help from third-party programs, such as:
- Vista Transformation Pack:
www.windowsxlive.net/index.php?page_id=15 - WindowBlinds:
www.stardock.com/products/windowblinds
74. Display a Menu of Items on the Start Menu
Setting up some of the links and shortcuts on your Start menu to expand into a menu can save you from a few clicks here and there. For example, instead of clicking on the Computer shortcut and then having to click on the C drive, you can set up the Computer shortcut as a menu and then all you have to do is hover over the Computer shortcut on the Start menu and select the C drive. Figure 6.1 shows an example.

FIGURE 6.1 Example of menu option for Computer on the Start menu.
![]() Clicking on Start menu items with an arrow opens a submenu showing the contents of that item.
Clicking on Start menu items with an arrow opens a submenu showing the contents of that item.
![]() Submenu showing contents of Computer
Submenu showing contents of Computer
Here’s how to display menus for links and shortcut items on the Start menu:
1. Right-click on the taskbar and select Properties, as shown in Figure 6.2.

FIGURE 6.2 Opening Taskbar and Start Menu Properties.
2. Select the Start Menu tab, as shown in Figure 6.3.

FIGURE 6.3 Selecting the Start Menu tab.
3. Follow these steps if you’re using the Classic Start Menu option:
a. Click on the Customize button, as shown in Figure 6.4.
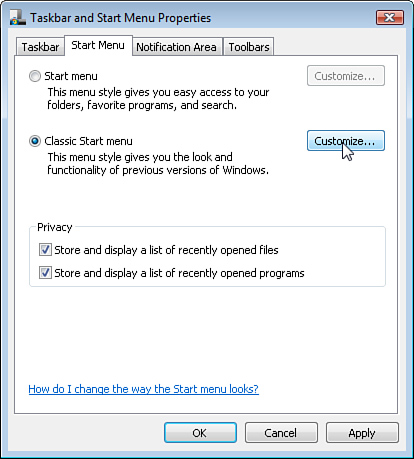
FIGURE 6.4 Opening the customization settings for the Classic Start menu style.
b. In the Advanced Start Menu Options section, as shown in Figure 6.5, check the items you want to be expanded as a menu. Vista allows you to expand Control Panel, Documents, Network Connections, Pictures, and Printers.
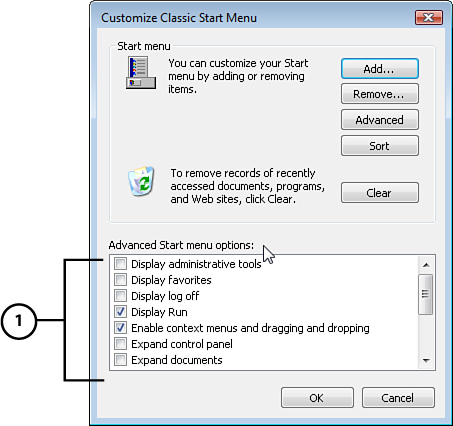
FIGURE 6.5 Customization settings for the Classic Start Menu style.
![]() Check the items you want to expand on the Start menu.
Check the items you want to expand on the Start menu.
4. Follow these steps if you’re using the Start Menu option:
a. Click on the Customize button, as shown in Figure 6.6.
b. Indicate which items you want to be expanded as a menu by checking the Display As a Menu option, as shown in Figure 6.7, on the appropriate item(s). Vista allows you to expand Control Panel, Documents, Network Connections, Pictures, and Printers.
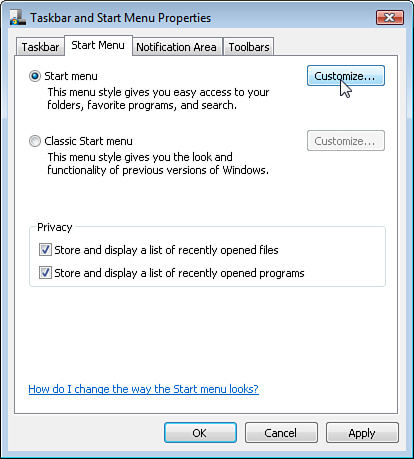
FIGURE 6.6 Opening the customization settings for the Start Menu style.
5. Click OK.

FIGURE 6.7 Customization settings for the Start Menu style.
![]() Checking Display As Menu makes the Control Panel menu fly out from the Start menu.
Checking Display As Menu makes the Control Panel menu fly out from the Start menu.
![]() Checking Display As a Link makes the Control Panel window open.
Checking Display As a Link makes the Control Panel window open.
75. Add More Gadgets to Sidebar
As you might have read in #17, “New Look and Functionality,” Windows Vista’s Sidebar feature can be a convenient and time-saving tool. However, to get the most out of it, you should explore all the gadgets and ensure it’s customized to your lifestyle and liking.
Here’s how to add gadgets to Windows Sidebar:
1. Either right-click on the Windows Sidebar and select Add Gadgets, as shown in Figure 6.8, or simply click the Add button on the top of the Sidebar, as shown in Figure 6.9.
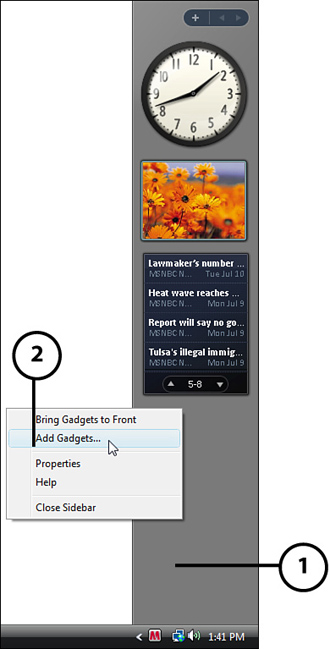
FIGURE 6.8 Opening the Gadget browser.
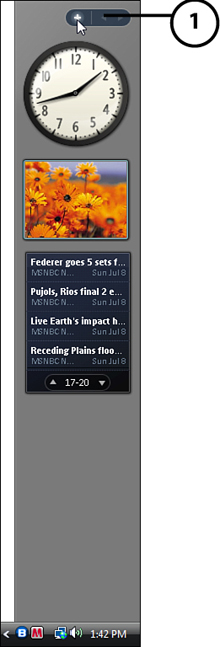
FIGURE 6.9 Opening the Gadget browser.
![]() Click the Add button on the Sidebar to add gadgets.
Click the Add button on the Sidebar to add gadgets.
2. Then, you’ll see all the installed gadgets, which include those from Microsoft (as Figure 6.10 shows) that are preloaded with Windows Vista.

FIGURE 6.10 The Windows Sidebar Gadget browser.
![]() Click here to get more gadgets.
Click here to get more gadgets.
![]() Click Show Details to learn more about the selected gadget.
Click Show Details to learn more about the selected gadget.
![]() Drag gadgets to the Sidebar or desktop to use them.
Drag gadgets to the Sidebar or desktop to use them.
![]() TIP
TIP
Windows Sidebar is set by default to automatically appear when you start Windows Vista. If you’ve closed it, however, don’t worry. You can open Windows Sidebar by opening the Start menu, pointing to All Programs, pointing to Accessories, and then clicking Windows Sidebar.
If you’ve also disabled it from automatically appearing when you start Windows and you’ve now changed your mind, you easily reenable this by right-clicking on Windows Sidebar, selecting Properties, and checking the Start Sidebar When Windows Starts option on the top.
Either double-click on a gadget to add it to the Sidebar, or click on a gadget and drag it anywhere on your desktop or the Sidebar. Keep in mind, dragging gadgets from the Sidebar or directly from the gadget window and placing them somewhere on your desktop typically makes the gadget larger and offers more features. For example, when the weather gadget is on the Sidebar, it only shows the temperature, however, when placed on the desktop, it displays the three-day forecast.
![]() TIP
TIP
Don’t limit yourself to the few gadgets Microsoft offers; there are thousands of gadgets out there!
To view Microsoft’s listing of third-party gadgets, click the Get More Gadgets Online button in the lower-right corner of the gadget window. You can also search the web for even more gadgets.
76. Change Power Button on Start Menu
By default, the Power button on your Start menu is set to put your PC in Sleep mode. Though this might be fine for some, you might want the Power button to simply shut down your PC. For example, if you usually choose to shut down your PC instead of putting it into Sleep mode, then you’re likely aware that it takes an added click to the arrow on the Start menu to shut down your PC. In other words, it’s a waste of time. Reconfiguring the Start menu Power button shaves a few seconds off the usual process.
![]() TIP
TIP
If you don’t like the Sidebar always taking up space on your screen, you can either close Windows Sidebar (by right-clicking on it and selecting Close Sidebar) and keep any gadgets on your desktop, or you can stop the Sidebar from appearing in front of other windows (by right-clicking on the Sidebar, selecting Properties, and unchecking the Sidebar is Always on Top of Other windows option), which makes it only accessible when viewing your desktop.
Here’s how to change the setting for your Start menu Power button:
1. Open the Start menu and select Control Panel.
2. Double-click on Power Options.
3. Click the Choose What the Power Button Does link, as shown in Figure 6.11, in the tasks pane.
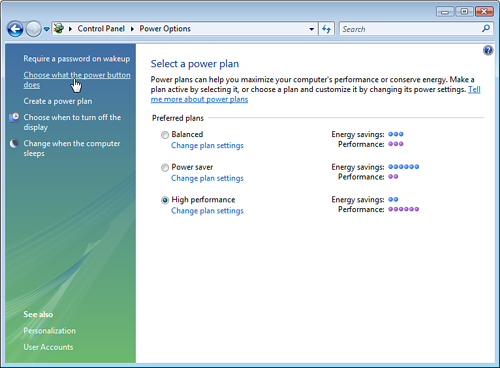
FIGURE 6.11 Opening the System Power Options.
![]() TIP
TIP
You might also be interested in getting back the Log Off button (which was a staple in Windows XP). If so, see #46, “Display the Log Off Button on the Start Menu.”
4. In the Power Button Settings area, as shown in Figure 6.12, choose either Do Nothing, Sleep, or Shut Down from the drop-down list.

FIGURE 6.12 Selecting the Power button option.
![]() ...and choose what action Vista should take when the Power button is clicked.
...and choose what action Vista should take when the Power button is clicked.
5. Click Save Settings.
77. Set Up Additional Clocks for Other Time Zones
Windows Vista allows you to set up two additional clocks, which can be very useful if you need to regularly reference the time from another zone. For example, you might set up an additional clock for a place you frequently visit or call.
Here’s how to set up an additional clock:
1. Click on the time, as shown in Figure 6.13, in the lower-right corner of Vista.
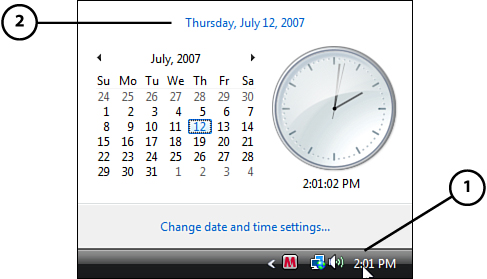
FIGURE 6.13 Bringing up the clock and calendar.
![]() Click the clock on the taskbar.
Click the clock on the taskbar.
![]() From this window, choose Change Date and Time Settings.
From this window, choose Change Date and Time Settings.
2. Click on the Change Date and Time Settings link.
3. Select the Additional Clocks tab.
4. Check one of the Show This Clock boxes, as shown in Figure 6.14.

FIGURE 6.14 Setting up an additional clock.
![]() Click Show This Clock to add another clock to the desktop.
Click Show This Clock to add another clock to the desktop.
![]() Choose the time zone for the new clock.
Choose the time zone for the new clock.
![]() Click Show This Clock to add yet another clock if desired.
Click Show This Clock to add yet another clock if desired.
5. Using the drop-down menu, select the desired time zone for the clock, enter your preferred display name for the clock in the appropriate box, and click OK.
After you set up another clock, you can see the time by hovering over the clock, as shown in Figure 6.15, in the lower-right corner of Vista.
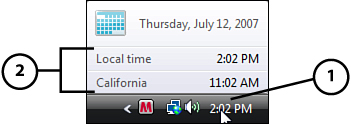
FIGURE 6.15 Viewing the additional clocks.
![]() Hover your mouse over the clock on the taskbar.
Hover your mouse over the clock on the taskbar.
![]() Times for all clocks you’ve set up appear.
Times for all clocks you’ve set up appear.
You can also click on the clock to view the actual clocks with the calendar.
78. Use Military Time Format for the Clock
Are you (or were you) in the service and now the military time format is embedded in your head? Or, do you simply prefer the 24-hour time format? Well, you actually can change the default format to the 24-hour format so that 2:30 p.m. shows as 14:30.
Here’s how to do it:
1. Click Start and type “intl.cpl” in the Search box, as shown in Figure 6.16, and then press Enter. If you’re using the Classic Start menu and the Search box is missing, you can open the Regional and Language Options from Control Panel and proceed to the next step.
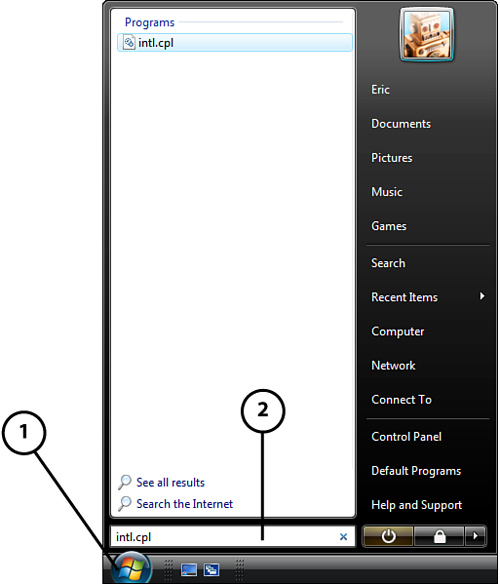
FIGURE 6.16 Opening the Regional and Language Options.
![]() Type “intl.cpl” in the Search box and press Enter.
Type “intl.cpl” in the Search box and press Enter.
2. Click the Customize This Format button, as shown in Figure 6.17.
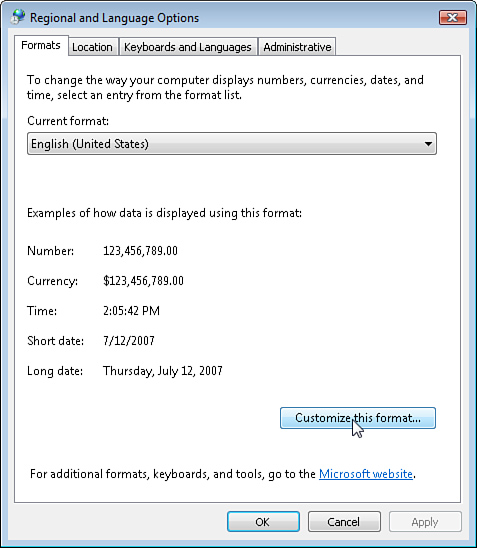
FIGURE 6.17 Opening the customization settings.
3. Click the Time tab.
4. Change the Time Format field to H:mm:ss, as shown in Figure 6.18.
5. Click OK to apply the changes.
![]() TIP
TIP
You can also change the date format while you’re here. Simply click the Date tab and make the changes.
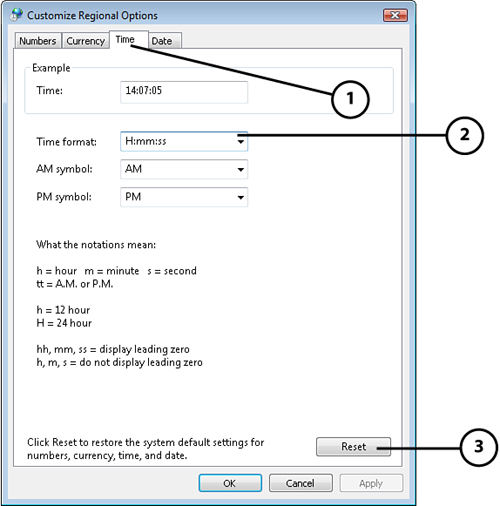
FIGURE 6.18 Example of correct Time Format to use military time.
![]() Change the Time Format field to H:mm:ss.
Change the Time Format field to H:mm:ss.
![]() Click Reset to go back to default date and time settings.
Click Reset to go back to default date and time settings.
79. Use the Taskbar Address Bar
Here’s a shortcut for the surfing addicts. Although it’s not a new feature to this version of Windows, you can add an Address bar to your Windows taskbar. This provides even quicker access to the Internet, taking advantage of today’s high-speed, always-on connections to the Internet.
All you’ll have to do is type an address in, press Enter, and then up pops the browser to the site you requested.
Here’s how to add the Address bar to your Windows taskbar:
1. Right-click on the taskbar.
2. Click Toolbars, Address, as shown in Figure 6.19.
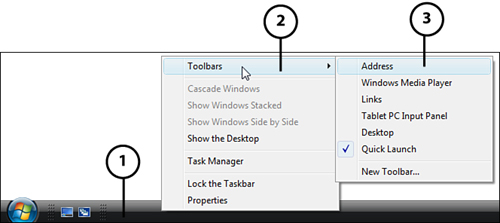
FIGURE 6.19 Enabling the Address bar on the Taskbar.
Now you can move and resize the Address bar by clicking on Address and dragging it to your desired location or size. Figure 6.20 shows an example.

FIGURE 6.20 Example of moving the Address bar.
![]() Use the move handle to place the Address bar wherever you prefer on the taskbar.
Use the move handle to place the Address bar wherever you prefer on the taskbar.
![]() Resize the Address bar simply by clicking and dragging.
Resize the Address bar simply by clicking and dragging.
![]() TIP
TIP
In case you didn’t already know, you can move and/or resize the Address bar. To do so, you first need to unlock the taskbar by right-clicking on the taskbar and selecting Lock the Taskbar.
To make more space on the Windows taskbar for open applications and windows to appear, you can expand your taskbar to two rows. To expand the taskbar, hover over the top edge so that the resize arrow appears and then drag to your desired size. Then, you could move the Address bar and other toolbars (such as the Quick Launch toolbar) to the bottom, leaving the top for application and window tabs. See Figure 6.21 for an example.

FIGURE 6.21 Example of improved taskbar.
![]() Resize the taskbar by clicking the top edge and dragging upward.
Resize the taskbar by clicking the top edge and dragging upward.
![]() Move the Address bar to the bottom row of the taskbar.
Move the Address bar to the bottom row of the taskbar.
After you’re done customizing your Windows taskbar, you should lock it again to prevent unintentional changes. To do this, right-click on the taskbar and select Lock the Taskbar.
80. Resize Icons with the Mouse
Windows Vista has three different default desktop icon sizes to choose from: Large, Medium, and Classic. As shown in Figure 6.22, you can change between these sizes by right-clicking on the desktop, choosing View, and then selecting the desired icon size.

FIGURE 6.22 Changing the icon size using predefined sizes.
![]() Select Large Icons, Medium Icons, or Classic Icons.
Select Large Icons, Medium Icons, or Classic Icons.
These aren’t the only options you have, though. You can basically make your own size, as shown in Figure 6.23, from very small to very large.

FIGURE 6.23 Vista allows you to choose your own custom icon size—from very small to very large.
Just having a choice between three different desktop icon sizes is an improvement from Windows XP, which only had one real default size and—if you were lucky enough to find it buried in the desktop effects preferences—a setting for larger icons. However, if you have a mouse with a scrolling wheel, Vista allows you to get exactly the size that’s right for you.
Here’s how to do it:
1. Simply click on your desktop or Computer/Windows Explorer.
2. Hold down the Ctrl key on your keyboard.
3. Scroll your mouse’s wheel forward and back to change the size of the icons.
![]() TIP
TIP
You can also use the scrolling wheel on your mouse with Flip 3D. You can activate Flip 3D by pressing the Windows logo key+Tab and then using the wheel to flip through the windows instead of pressing the Tab key or keyboard arrow.
For more information about this feature refer to #94, “Change Windows Using Flip 3D.”
This feature wasn’t only created to have some fun and play pranks on people (though it is good for that). It was created to help those with eyesight problems as well as appease those who prefer a minimalist approach to desktop organization. It’s also useful for sizing thumbnail icons when viewing photos in Thumbnails view.
![]() TIP
TIP
The Search box is included on the Start menu by default; however, if you cannot locate it, it’s likely because you’ve disabled it or have chosen the Classic Start menu.
To change the Search box settings, right-click on the taskbar, click Properties, and click the Start Menu tab. Ensure the Start Menu option is checked, click the Customize button, and make sure the Search option is marked.
81. Search from the Start Menu
As discussed in #17, “New Look and Functionality,” Vista contains a new search capability on the Start menu.
Here’s how to search:
1. Simply open the Start menu and begin typing. As seen in Figure 6.24, the Start menu changes to show the best possible results.
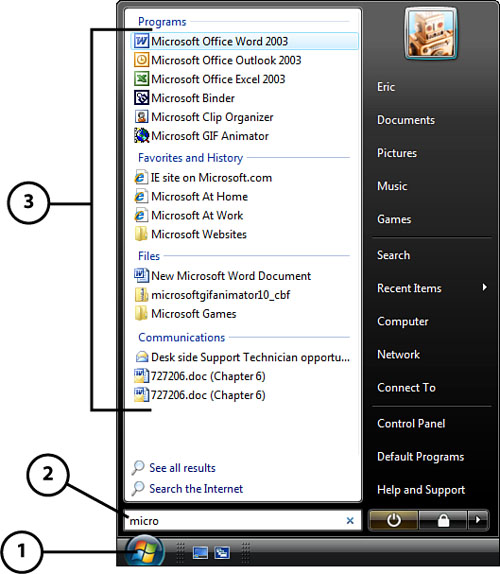
FIGURE 6.24 Example of using the Start menu’s search capabilities.
![]() Type what you want to search for here.
Type what you want to search for here.
![]() The results appear here; double-click the one you want to open.
The results appear here; double-click the one you want to open.
The results will be sorted with the most frequently opened items on top. The more you type, the narrower the results. This way, you don’t always have to type the entire name before finding what you want.
By default, the Search function will search communications (email messages, saved instant messages, appointments, and contacts), web favorites and history, user files (personal folders), and programs. If you want, you can disable any of these main search categories and you can choose to search the entire file index rather than just the user files.
Here’s how to access the search preferences:
1. Right-click on the taskbar and select Properties.
2. Click the Start Menu tab.
3. Click the Customize button next to the Start Menu option.
4. Scroll down to see the search options, as shown in Figure 6.25.

FIGURE 6.25 Search options for Start menu.
![]() Choose what items Windows should search.
Choose what items Windows should search.
5. Make your desired changes and click OK to exit.
![]() TIP
TIP
Keep in mind that you can also use the new search capabilities of the Start menu to access many items you use with the Run prompt.
For example, you could simply type “msconfig” (without the quotes) into the Start menu Search box and press Enter, rather than accessing the Run prompt, which is now located in the Accessories submenu of the Start menu.
By default, the Indexed locations (meaning the places Windows tracks and includes in your search results) include your personal folder, email, and Start menu. You can, however, include other folders in the index, for inclusion in the Start menu search. For example, by default, files and folders stored in other locations than the ones detailed previously (that is, C:Vacation Photos) won’t appear in the searches. However, you can add any location to the index.
Here’s how to add folders to the search index:
1. Open the Start menu.
2. Click Control Panel.
3. Double-click on the Indexing Options icon.
4. Click Modify, as shown in Figure 6.26.
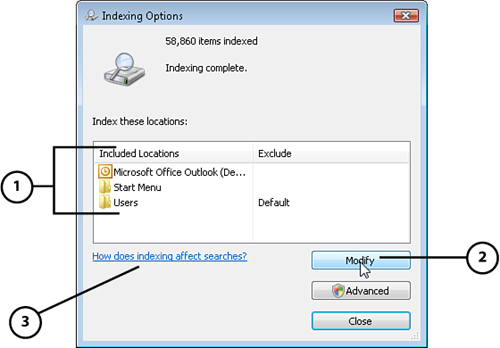
FIGURE 6.26 Accessing the Indexing settings.
![]() Currently indexed—or searchable—locations are shown here.
Currently indexed—or searchable—locations are shown here.
![]() Choose Modify to add or remove search locations.
Choose Modify to add or remove search locations.
![]() Click here to learn more about indexing and how it affects your searches.
Click here to learn more about indexing and how it affects your searches.
5. Click the Show All Locations button.
6. Browse through the locations using the arrows to expand the folders. Select folders to include in the index by marking its check box. Figure 6.27 shows an example.
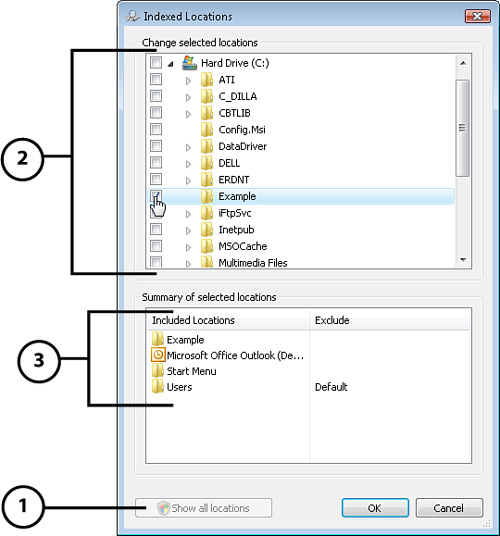
FIGURE 6.27 Example of adding a folder to be indexed.
![]() Click Show All Locations to see a listing of all possible search locations.
Click Show All Locations to see a listing of all possible search locations.
![]() All possible search locations appear in a scrollable list; choose the ones you want indexed.
All possible search locations appear in a scrollable list; choose the ones you want indexed.
![]() See a summary of the indexed locations here.
See a summary of the indexed locations here.
7. When you are finished, click OK to exit.
82. Use the Show Desktop Shortcut on the Taskbar Menu
You might have been fortunate enough to discover the Show Desktop shortcut in Windows XP. For those who weren’t, using this shortcut will save a great deal of clicks (and essentially time) on the Minimize button to reveal the desktop. This is especially true for those who multitask and have many windows and programs open at once.
![]() TIP
TIP
If the Quick Launch toolbar is missing, you can enable it by right-clicking on the Taskbar, selecting Toolbars, and clicking Quick Launch.
For example, clicking the Minimize button for several windows and/or programs to get to the desktop can take an extra five seconds. Suppose you do this six times a day; you waste 30 seconds a day, and over three hours each year! Using the Show Desktop shortcut takes you directly to the desktop and doesn’t waste any time. There are two ways to access this shortcut:
- Click on the Show Desktop icon, as shown in Figure 6.28, in the Quick Launch toolbar.
- Right-click on the Taskbar and click Show the Desktop (also shown in Figure 6.28).
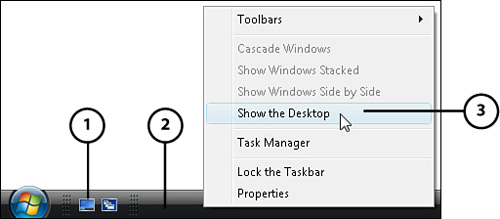
FIGURE 6.28 Showing the desktop.
![]() Click the Show Desktop icon in the taskbar.
Click the Show Desktop icon in the taskbar.
![]() Or, right-click the taskbar and...
Or, right-click the taskbar and...
83. Create a Shortcut to Network Connections
Although the new Network and Sharing Center might be great for the average consumer, it can be quite a nuisance for advanced users because of the added steps to access many of the networking configuration settings. Although Windows XP’s networking area didn’t offer an exceptionally user-friendly interface, it was quick and easy to access certain network settings if you knew what you were looking for.
For example, disabling or enabling a connection only took a right-click on the Network Status icon in the system tray; however, in Vista you have to open the Network and Sharing Center, click on a link to open the Network Connections window, and then you can disable/enable a connection.
To save a few clicks each time you need to manage your network connections, you can create a desktop shortcut directly to the Network Connections window; here’s how:
1. Right-click on the desktop, point to New, and then click Shortcut.
2. In the location field, enter the following (as shown in Figure 6.29):
explorer.exe ::{7007ACC7-3202-11D1-AAD2-00805FC1270E}
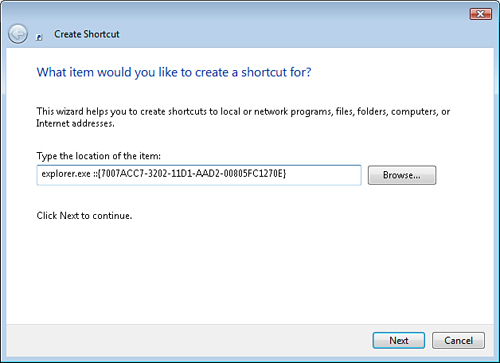
FIGURE 6.29 Entering the shortcut location.
3. After clicking Next, enter a name for the shortcut, as shown in Figure 6.30, and then click Finish.

FIGURE 6.30 Entering a shortcut name.
If you want, you can even apply the Network Connections icon to the shortcut. Here’s how:
1. Right-click the icon and select Properties.
2. Click the Change Icon button.
3. Enter the following into the text field (as shown in Figure 6.31):
%SystemRoot%system32
etshell.dll

FIGURE 6.31 Specifying the icon location.
![]() Choose the location to search for icons here.
Choose the location to search for icons here.
![]() Choose the icon you want to use from the ones appearing here.
Choose the icon you want to use from the ones appearing here.
4. Click OK to select the icon and click OK on the shortcut properties window to exit and apply the changes.
![]() TIP
TIP
For even quicker access to the Network Connections window, you can add the icon to the Quick Launch toolbar. Just drag the new desktop icon and drop it into the Quick Launch area.
84. Restart the Windows Explorer Shell Without Rebooting Windows
Like most Windows users, you’ve probably encountered the occasional freeze-up when working with a Windows component (such as Windows Explorer or the desktop), rather than a specific application. Often, your only recourse seems to be to reboot the PC, losing any unsaved data in open programs. However, there’s a way to fix this type of problem without rebooting and losing your work:
1. When a Windows component freezes and becomes unresponsive, press Ctrl+Alt+Del.
2. Click the Start Task Manager button, as shown in Figure 6.32.
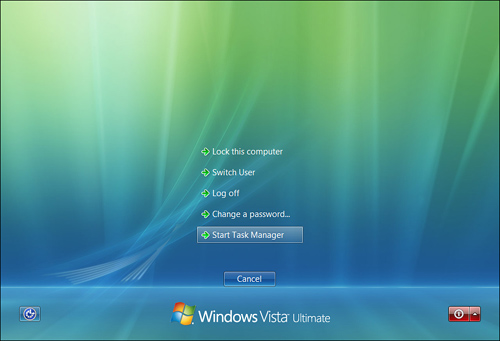
FIGURE 6.32 Opening Task Manager.
4. In the Image Name column, find the explorer.exe process.
5. Right-click on explorer.exe and select End Process, as shown in Figure 6.33.

FIGURE 6.33 Ending the Explorer process.
6. A Task Manager warning pop-up is displayed asking you to confirm that you really want to end the process. Click Yes to end the process, which should make the desktop, and possibly open applications, temporarily disappear.
7. In Task Manager, which should still be open, click on the File menu, and select New Task (Run...), as shown in Figure 6.34.

FIGURE 6.34 Starting a new task.
8. Type explorer.exe, as shown in Figure 6.35, and click OK. The Windows Explorer Shell restarts and should make the desktop, along with applications you had open, reappear.
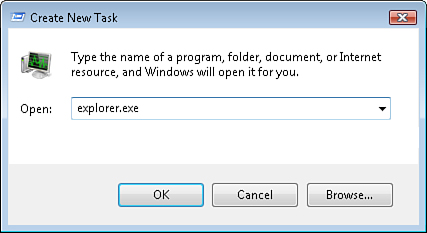
FIGURE 6.35 Opening Explorer.
85. View List of Shared Files and Folders
An exceptional improvement in the networking features of Windows Vista is the ability to easily and quickly see all the folders you’re sharing. It’s very easy to forget which folders you’ve shared over time. Vista, however, enables you to always know exactly what is being shared and to whom. Therefore, you can better protect your data and privacy, which is particularly important for those who often use untrusted networks such as Wi-Fi hot spots.
![]() TIP
TIP
It’s a good idea to periodically check your shared folders, their permission settings, and their contents to make sure you don’t unintentionally share something that’s private or sensitive.
Here’s how to view the lists of shared files and folders:
1. Right-click on the Network Status icon in the system tray, and select Network and Sharing Center.
2. Scroll all the way to the bottom of the Network and Sharing Center.
3. To view the files and folders you are sharing, click on the Show Me All the Files and Folders I Am Sharing and Show Me All the Shared Network Folders on This Computer links, as pointed out in Figure 6.36.

FIGURE 6.36 The links to view your shared resources.
![]() Scroll to the bottom of the Network and Sharing Center.
Scroll to the bottom of the Network and Sharing Center.
![]() Choose these links to see all of the shared folders on your computer.
Choose these links to see all of the shared folders on your computer.
86. Select Files Using Check Boxes
Have you ever been selecting multiple files by holding down the Ctrl key, you accidentally press or click something, and—BAM!—all the files open? (It happens to me at least once a month!) Well, you’ll be thankful for the new check box feature (which you can see in Figure 6.37), and if you’ve been fortunate enough to not have experienced this yet, you might not ever if you use the check boxes to select files.

FIGURE 6.37 Example of the new check box feature.
![]() Vista’s new check boxes allow you to select multiple files simply by clicking check boxes instead of Ctrl-clicking as you had to do in XP.
Vista’s new check boxes allow you to select multiple files simply by clicking check boxes instead of Ctrl-clicking as you had to do in XP.
Here’s how to enable the check box feature:
1. Open Computer, either via the Start menu or the desktop icon.
2. Click the Organize button and select Folder and Search Options, as shown in Figure 6.38.
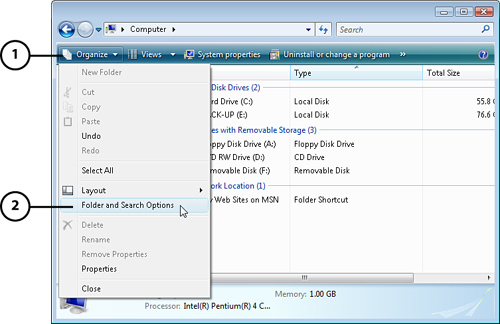
FIGURE 6.38 Opening the Folder and Search Options.
![]() From Computer, choose Organize...
From Computer, choose Organize...
![]() ...and then select Folder and Search Options.
...and then select Folder and Search Options.
3. Click the View tab.
4. Scroll down and mark the Use Check Boxes to Select Items option.
87. Use a USB Flash Drive to Improve PC Performance
Do you have a USB flash (thumb) drive that has some spare space? Would you like to speed up your PC? (Who doesn’t?) You’re in luck, a new feature of Windows Vista called Windows ReadyBoost allows you to use that spare space to do just that—speed up your computer!
1. Insert the USB drive into one of your computer’s USB ports. The AutoPlay dialog box opens a few seconds after plugging the drive in.
2. Click the Speed Up My System button on the AutoPlay window, as shown in Figure 6.39.
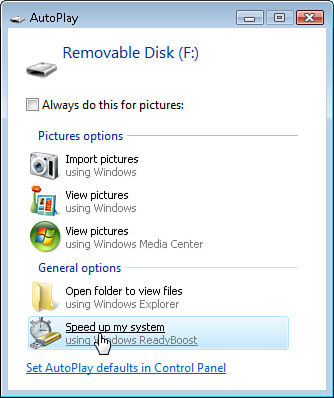
FIGURE 6.39 Opening the Windows ReadyBoost feature.
If the AutoPlay window doesn’t open, you can access the same location by opening Computer or Windows Explorer, right-clicking on the device drive, selecting Properties, and clicking on the ReadyBoost tab. Then, you can proceed to the next step.
3. Select the Use This Device option, as shown in Figure 6.40.

FIGURE 6.40 Enabling Windows ReadyBoost on the device.
![]() Use the slider to tell Vista how much of the drive you want to use, or...
Use the slider to tell Vista how much of the drive you want to use, or...
![]() ...type in a specific number of MB you want to use here.
...type in a specific number of MB you want to use here.
4. By using the slider bar or typing into the field, choose how much space you want to dedicate to Windows ReadyBoost.
5. Click OK to apply the changes and exit.
The space you specified will now be reserved for Windows ReadyBoost, which is represented by a cache file called ReadyBoost, as shown in Figure 6.41.
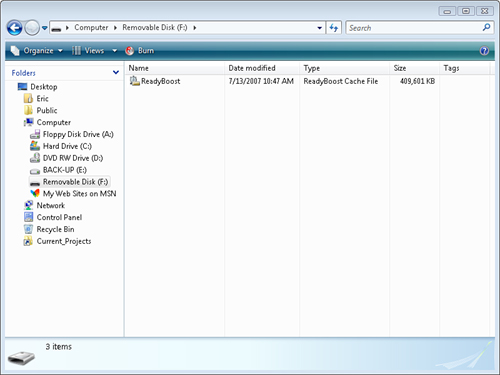
FIGURE 6.41 Example of the ReadyBoost cache file.
88. Refresh Your PC with a Nightly Reboot
Sometimes your PC needs a reboot to freshen up, which can help prevent lock ups and other performance issues and annoyances. However, like many others, you’re probably not in the habit of regularly rebooting or shutting down your PC. A simple solution is to set up a nightly reboot. Therefore, it will automatically refresh every day, while not taking away from your computing time.
Follow these steps to set up a scheduled reboot:
1. Open the Start menu, and then open Task Scheduler by following this path:
All Programs, Accessories, System Tools, Task Scheduler
2. Click on the Create Basic Task link, as shown in Figure 6.42, in the action pane on the right.
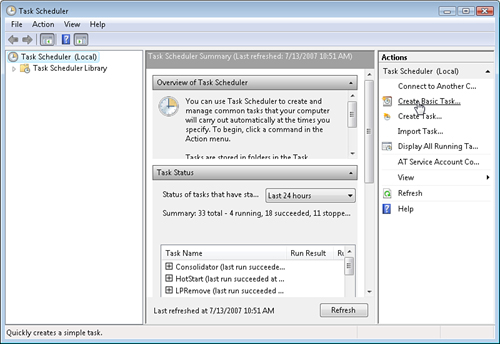
FIGURE 6.42 Creating a new task.
3. Enter a desired name and description, such as that shown in Figure 6.43, and click Next.
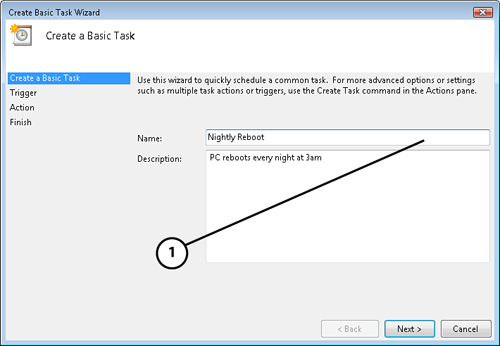
FIGURE 6.43 Entering task name and description.
4. Choose the desired frequency, and then click Next.
5. Set the frequency preferences, as shown in Figure 6.44. You can choose a start date and time, then set how often this task should recur automatically. Then click Next.
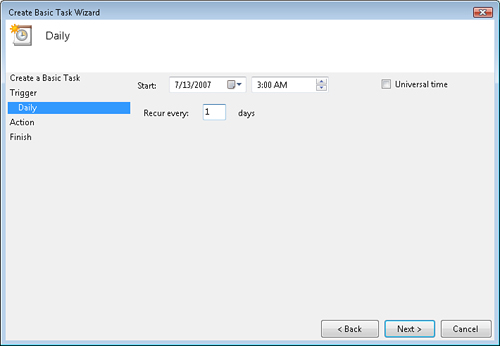
FIGURE 6.44 Setting the frequency preferences for the task.
6. Select the Start a Program option, as shown in Figure 6.45, and click Next.
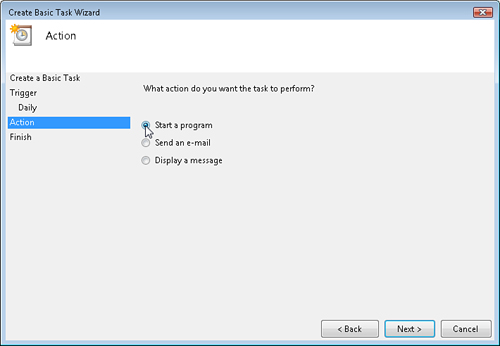
FIGURE 6.45 Choosing the Start a Program task action.
![]() CAUTION
CAUTION
You should be careful when working with scripting, as mistakes can cause problems. Follow these directions carefully.
If you want to learn more about scripting, you can refer to another book, such as Windows Vista Guide to Scripting, Automation, and Command Line Tools by Brian Knittel (Que, forthcoming).
7. In the Program/scripts field, enter the following:
%SystemRoot%System32shutdown.exe
8. In the Add Arguments field, enter “–r”, which tells Vista to reboot (see Figure 6.46).

FIGURE 6.46 Specifying the script and argument settings for the task.
![]() Enter a program or script here.
Enter a program or script here.
![]() Enter optional arguments here.
Enter optional arguments here.
10. Review the task properties and click Finish to create the new task.
To ensure you don’t lose any work, you should save any open documents and close all applications before the reboot task runs.
![]() TIP
TIP
You can also specify more arguments in addition to the –r, which tells it to reboot. Here are a few more arguments you could use:
-t: Tells it to wait a certain amount of seconds until it reboots.
-c: Lets you add a comment that pops up when the task is run.
-g: Used in place of –r. The only difference is that this option will open the applications that were running before the restart, after the scheduled restart.
Here’s an example of how these arguments would be typed in the Add Arguments field:
"-g –t 120 –c "Auto restart in 2 minutes... ""
89. Disable User Account Control Pop-up Alerts
As you perhaps have already found out, by default Windows Vista notifies you (see Figure 6.47 for an example) when certain areas that contain system settings are accessed. These pop-up alerts, however, can be annoying especially if you access these areas on a regular basis. The good news is that you can easily disable the User Account Control (UAC) and get rid of the alerts.
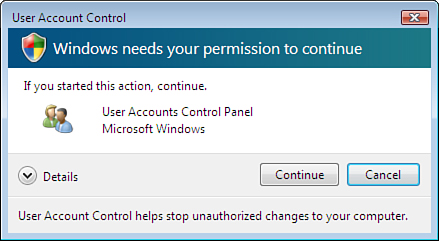
FIGURE 6.47 Example of a UAC alert.
![]() TIP
TIP
You can easily test out the new task by running the Task Scheduler program and clicking on the Task Scheduler Library folder in the left tasks pane. Right-click on the new task and click Run.
If the new task doesn’t appear in the Task Scheduler Library, you should click Action from the File menu at the top of the Task Scheduler program and choose Refresh.
Before you disable UAC, you should understand the risks involved, just as you should before disabling any type of security feature. You might think: “Why do I even need these alerts asking if I authorized the access of a certain area when I’m the one who told the computer to access it in the first place?” The answer is that the alerts notify you that you’re performing an action that could put your computer at risk. More important, UAC sounds the alarm in case your computer has been breached by a hacker, virus, or other Internet nasty. Therefore, when disabling this feature, you are exposing your computer to some additional risk, though typically minimal. The bottom line is that you should not disable UAC unless you are aware of the risks and are comfortable taking those risks. It is not recommended for beginners to disable UAC.
A useful feature of the UAC pop-ups is that other nonadministrator Windows accounts (such as an account you would set up for your children or other family members using your PC) can’t access areas protected by the UAC pop-ups. When a UAC pop-up appears on a nonadministrator Windows account, a password for an administrator must be given before access to the area is authorized. This is a great feature if you have children or others whom you don’t want to be able to change system settings. If you still want to disable the alerts for yourself (and any other Administrator accounts), but keep it active for other users, see #90, “Disable UAC Pop-up Alerts for Only Administrators,” rather than continuing with this one.
To disable UAC for all users:
1. Open the Start menu and select Control Panel.
2. Double-click User Accounts.
3. Click the Turn User Account Control On or Off link, as shown in Figure 6.48.
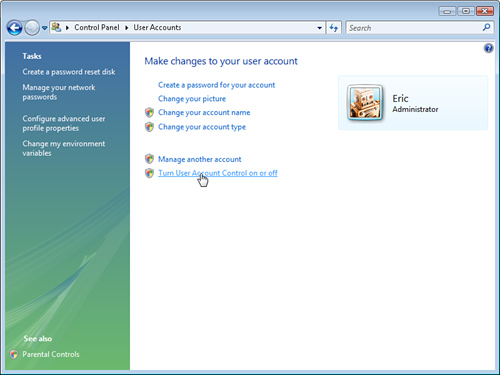
FIGURE 6.48 Accessing UAC settings.
4. Uncheck the Use User Account Control (UAC) to Help Protect Your Computer check box, as shown in Figure 6.49, and click OK.

FIGURE 6.49 Turning off the UAC feature and alerts.
5. A pop-up should appear stating a restart is required to apply the changes. Specify whether to restart now or later. UAC alerts will continue to appear until you restart.
![]() CAUTION
CAUTION
Be very careful when editing your Windows Registry. Mistakes could cause major problems, including making your PC unbootable. Before making any changes to the Registry, make sure you back it up first.
1. Open the Registry Editor by following steps 1 and 2.
2. In the Registry Editor, click File on the menu and select Export.
3. On the bottom of the dialog box, select the All option for the Export Range.
4. Browse, find, and select a location to save the registry. It’s best to save it to a removable storage device like a flash drive, floppy disc, or CD.
5. Enter your desired file name, such as Registry_Backup_DATE.
6. Click Save and wait until it’s done which may take a few minutes.
90. Disable UAC Pop-up Alerts for Only Administrators
As mentioned in the preceding topic, you can disable the UAC pop-up alerts for Windows account administrators while keeping them active for other accounts, which is useful if you have children or other nontechies you don’t want to have access to system settings. Disabling the alerts for specific users, however, requires editing the Windows Registry.
1. In the Search box, type “regedit”, as shown in Figure 6.50, and press Enter. Regedit will appear at the top of the window. Double-click regedit to launch the program.

FIGURE 6.50 Accessing the Registry Editor.
![]() Type “regedit” in the Search box and press Enter.
Type “regedit” in the Search box and press Enter.
![]() Double-click regedit to launch the program.
Double-click regedit to launch the program.
If using the Windows Classic Start menu, you need to click on Run, enter “regedit”, and click OK.
2. Navigate to the following folder, as demonstrated in Figure 6.51:
HKEY_LOCAL_MACHINESOFTWAREMicrosoftWindowsCurrentVersionPoliciesSystem
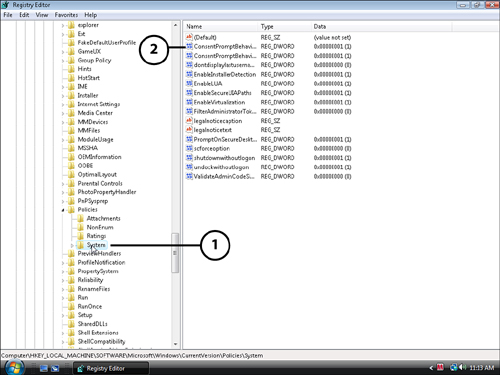
FIGURE 6.51 Navigating to the System registry folder and opening the registry key properties.
![]() Navigate to HKEY_LOCAL_MACHINESOFTWAREMicrosoftWindowsCurrentVersionPoliciesSystem.
Navigate to HKEY_LOCAL_MACHINESOFTWAREMicrosoftWindowsCurrentVersionPoliciesSystem.
![]() Then, double-click ConsentPromptBehavior Admin.
Then, double-click ConsentPromptBehavior Admin.
3. In the right pane, double-click the following key:
ConsentPromptBehaviorAdmin
4. In the Value Data field, type “0”, as shown in Figure 6.52, and click OK.
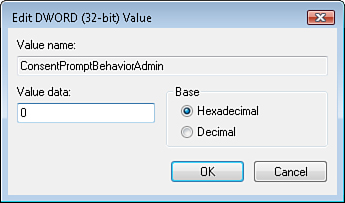
FIGURE 6.52 Inputting the new registry key value.
5. Now you can close the Registry Editor to apply the changes.
91. Use Computer Lock for Security When Leaving
Are you concerned about the security or privacy of your PC and its data? If so (and you should be), this tip is for you. As you might know, when you need to leave the computer, you can lock it so others can’t use it without the password. Of course, you must have a Windows account password enabled for the locking feature to serve its purpose.
![]() TIP
TIP
If you didn’t enable a password for your Windows Vista account, you can easily do it now so that you can take advantage of the locking feature. Open Control Panel, double-click User Accounts, and click the first link, Create a Password for Your Account.
Here are a few ways you can lock your PC:
- Press Ctrl+Alt+Delete and click the Lock This Computer button (which was also in Windows XP), as shown in Figure 6.53.

FIGURE 6.53 Locking your PC.
- Use the new Lock option on the Start menu, as shown in Figure 6.54.

FIGURE 6.54 Using the Lock option.
![]() Click the arrow on the bottom right of the Start menu.
Click the arrow on the bottom right of the Start menu.
- If you’re good with keyboard shortcuts, there’s another quick way to lock your PC. Just press the Windows logo key+L and your PC will be instantly locked, which also works in Windows XP.
![]() TIP
TIP
The next topic shows how you can add a shortcut to your desktop and/or the Quick Launch toolbar that will lock your computer.
92. Create a Shortcut to Lock Your Computer
As discussed in the previous tip, you can lock your PC (when using a password-protected Windows account) to provide security when leaving your desk. In addition to the ways already discussed in the previous tip, you can add a shortcut to your desktop and/or the Quick Launch toolbar to have another option at your fingertips when locking your PC:
1. Right-click on the desktop, point to New, and then click Shortcut.
2. In the location field, enter the following (Figure 6.55 shows an example):
rundll32.exe user32.dll, LockWorkStation
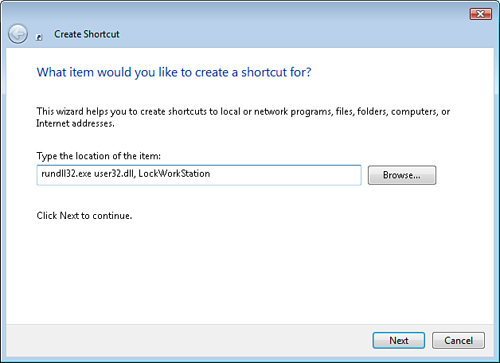
FIGURE 6.55 Entering a shortcut location.
3. After clicking Next, enter a name for the shortcut and click Finish.
4. For even quicker access to the Lock shortcut, you can add the icon to the Quick Launch toolbar. Just drag the new desktop icon and drop it into the Quick Launch area.
93. Auto-Login to Bypass the Logon Screen
If you have multiple user accounts on your PC but you’re the main user, you might want to enable auto-login. That way, you don’t have to click your account icon on the logon screen each time the PC is booted up. Then, if you need to access the other accounts, you can choose Switch User from your account to access the logon screen.
![]() CAUTION
CAUTION
Keep in mind that enabling auto-login for accounts that use password protection defeats the idea of the protection it provides. Someone can just boot up the PC and it will automatically load into your password-protected account. It’s best to use the auto-login feature if you aren’t worried about others getting into your account.
Here’s how to enable auto-login:
1. Open the Start Menu, type “netplwiz,” and press Enter.
If using the Windows Classic Start menu, you need to click on Run, enter “netplwiz”, and click OK.
2. Uncheck the Users Must Enter a User Name and Password to Use This Computer option, as shown in Figure 6.56.
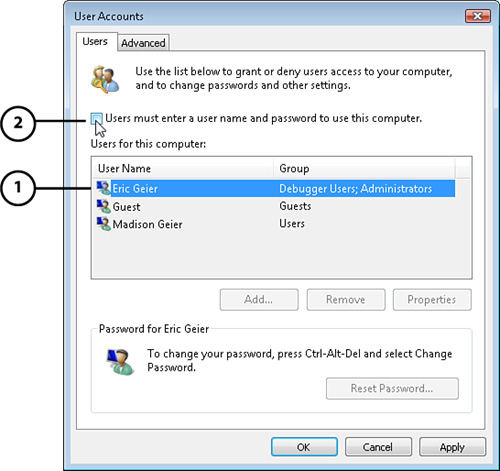
FIGURE 6.56 Enabling auto-login.
![]() Choose the user account you want to allow to log on automatically.
Choose the user account you want to allow to log on automatically.
![]() Select Users Must Enter a User Name and Password to Use This Computer.
Select Users Must Enter a User Name and Password to Use This Computer.
3. Click Apply.
4. In the Automatically Log On window, enter the username and password (twice) for the account you want to auto-login, and click OK.
5. Click OK to exit.
94. Change Windows Using Flip 3D
In XP, switching between applications with the Alt+Tab key combination was a neat trick, but you should check out Flip 3D, new in Vista, which allows you to see a small thumbnail of each application as you cycle through them.
![]() TIP
TIP
To use the Task Switch view and Flip 3D, as shown in Figure 6.57, Windows Aero must be enabled.
For more information on Windows Aero, refer to #23, “Windows Aero and Windows Flip.”
FIGURE 6.57 Example of the new Flip 3D feature.
As Figure 6.57 shows, the new Flip 3D feature provides a much better image of the currently open applications/windows. It’s actually a live thumbnail, so you can see the current state of the application/window.
To bring up Flip 3D, simply press the Windows logo key+Tab. Keep pressing the Tab key (while holding the Windows logo key) to cycle through the applications/windows. After you see the application/window you want, just release the Windows logo key and the selected window/application will fly into position.
You can also flip through the applications/windows with the arrows on the keyboard or the scrolling wheel (if you have one) on your mouse. Choose whatever works best for you.
![]() TIP
TIP
To cancel out of Flip 3D without choosing a different application/window, press the Esc key. This way, you don’t have to flip back to the screen you were originally on if you changed your mind and want to stay.
95. Add Providers to Live Search in Internet Explorer 7
You might have noticed the new Live Search feature added to Microsoft Internet Explorer 7, which gives you quick access for your web searching needs. By default, the Search box uses Microsoft Live Search; however, you can add other search engines such as Google or Yahoo!, and even topic-related sites such as Amazon, Monster, or eBay. If the site you’re looking for isn’t already on the list, you can manually add it, which allows you to use just about any website with searching capabilities.
After you’ve added search engines to the list, you can specify one of the sites for the default that’s searched when you simply type something in the field and press Enter (or click the Search button). Then to search the other sites, you type something in the field, click the arrow, and select the site you want to search, as shown in Figure 6.58. This is why the new searching feature is so great—you have many search engines and websites to search from by just a few clicks of the mouse!
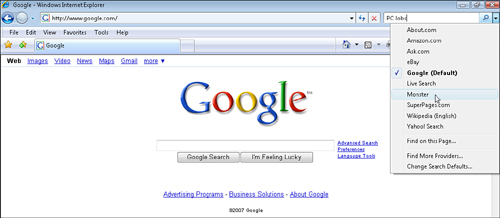
FIGURE 6.58 Example of using Live Search with multiple providers.
Here’s how to add providers to the Instant Search box in Internet Explorer 7:
1. In Internet Explorer, click the arrow next to the Search box and select the Find More Providers option. A web page appears, such as that shown in Figure 6.59.
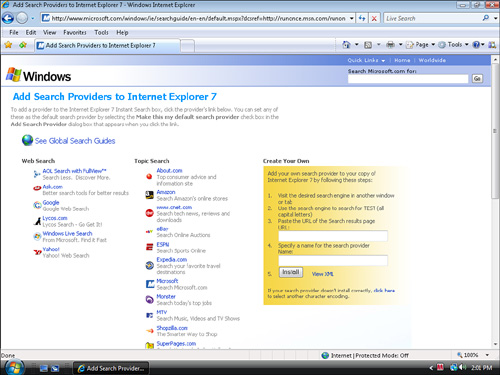
FIGURE 6.59 Example of web page to add providers to Live Search.
2. Simply click on a site to add it to the Instant Search box, or manually add it by following the directions in the Create Your Own section. You’ll be prompted to confirm that you want to add the site. Click Add Provider.
3. If you want to make the search engine or website your default search provider, check the appropriate check box.
4. Click the Add Provider button to proceed.
96. Change the Home Page of New Tabs in Internet Explorer 7
By default in Internet Explorer, you are prompted with the Welcome to Tabbed Browsing page when clicking on a new tab. However, this might be slightly annoying and you might wonder why it doesn’t just open your defined home page instead.
Well, good news, you can easily make new tabs go to your start page:
1. Open Internet Explorer 7.
2. Click on Tools on the menu bar and select Internet Options.
3. Click the Settings button in the Tabs section, as shown in Figure 6.60.
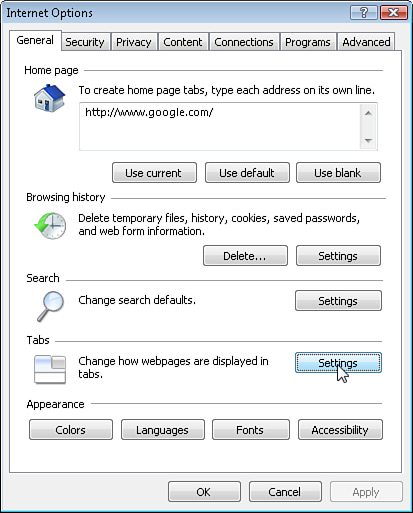
FIGURE 6.60 Opening the tabs settings.
4. Check the Open Home Page for New Tabs Instead of a Blank Page option, as pointed out in Figure 6.61.
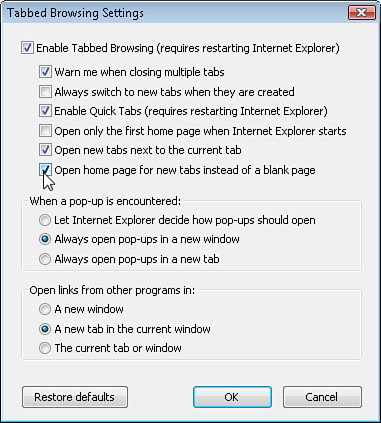
FIGURE 6.61 Making blank tabs open to your home page.
5. Click OK.
Now that you fixed that issue, there’s something even better: You can set multiple home pages to open in different tabs each time you start your browser. Like many other web users, you likely have more than one favorite website. Here’s the solution to this dilemma:
1. Open Internet Explorer 7.
2. Click Tools on the menu bar and select Internet Options.
3. In the Home Page box, enter your desired website addresses. See Figure 6.62 for an example.
4. Click OK.
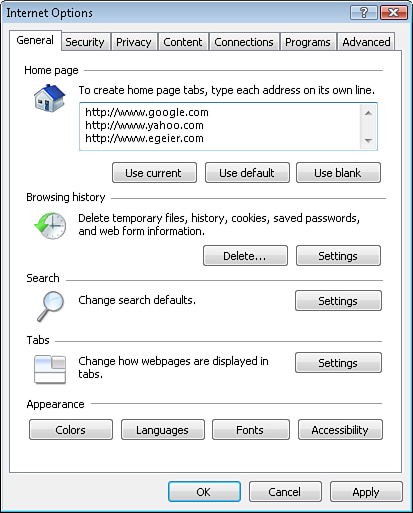
FIGURE 6.62 Entering home pages for tabs.
To see the changes, you must first close and reopen any currently open web browsers. The next time you open Internet Explorer, it should automatically load tabs for each of the websites you just specified.
97. Use Windows Keyboard Shortcuts
Keyboard shortcuts are one of the biggest advantages “computer geeks” have over the average user. Unlike other computer tasks, keyboard shortcuts aren’t self-learned, that is unless you go through a lot of trial and error. Using keyboard shortcuts can save a great deal of time. (I use many, with Ctrl C, V, and X being my most used, especially for this book!) Therefore, for your reference, Table 6.1 lists many common shortcuts. Some of the shortcuts shown in Table 6.1 are specific to Vista, whereas some worked in previous versions of Windows.
Table 6.1. Common Vista Keyboard Shortcuts
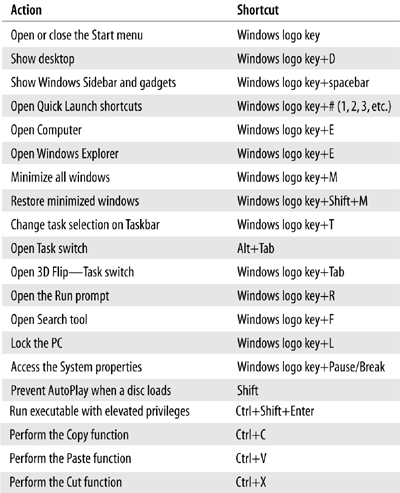
A trick to learn more keyboard shortcuts is to look through the menus in any program and note the keyboard shortcuts to the right of each command.
98. Use the Snipping Tool to Capture Screenshots
Windows now includes software to capture screenshots, called the Snipping Tool. This tool allows you to save an image of your screen or a selected area or window. You can save the image in several different formats: PNG, GIF, JPEG, or MHT.
Those who have previously used the Print Screen button on their keyboard to capture screenshots will greatly appreciate this addition to Windows. It saves you from a tedious and crude process, which consists of pressing the Print Screen button to copy an image of your current screen to the Clipboard, pasting the image into an editor (such as Paint), and then manually cropping and manipulating the screenshot for the window or area you want to save.
Here’s how to access and use the Snipping Tool:
1. Open the Start menu, and open the Snipping Tool by following this path:
All Programs, Accessories, Snipping Tool
2. After you open the Snipping Tool, you’ll automatically be in the capturing mode. You can move your cursor around to select a window and click to snip it. Hitting your Esc key will get you out of the capturing mode.
3. After you snip, a preview window will appear where you can make edits to the image and save it.
4. You can use other Snipping methods, such as a Full-screen capture, by clicking the New button’s arrow on the Snipping Tool. After you’re ready to capture images, click the New button.
5. Remember, you configure additional settings by clicking the Options button on the Snipping Tool.
99. Adjust Audio Levels per Application
A new feature of Vista, not in prior versions of Windows, allows you to control the audio levels for some individual applications. This can be especially useful if you have a desk job and boredom has struck. Now you can play games with the volume down, while still hearing other sounds such as from your work applications; so it sounds like you’re working!
To adjust the audio levels for individual applications, you use the Volume Mixer:
1. Double-click on the Volume icon in the system tray.
2. Click the Mixer link, as shown in Figure 6.63. The Volume Mixer dialog box opens.

FIGURE 6.63 Opening the Volume Mixer.
3. Adjust the volumes using the slider bar.
100. Use the Sync Center
Windows Vista comes with a new program, called Sync Center, to help you synchronize files between supported mobile devices and your computer. Many mobile devices support this type of synchronization, such as portable music (MP3) players, digital cameras, mobile phones, and USB flash drives. In addition, Vista Business and Ultimate editions also allow synchronization of files and folders on network drives.
![]() TIP
TIP
The Windows Mobile Device and Sync Center in Vista takes the place of an older synchronization application you might have used before, called ActiveSync, with previous versions of Windows.
Here’s how to set up a device with Sync Center:
1. Plug the mobile device into your computer.
2. Install any software/drivers that came with the device.
3. Open the Start menu and open Sync Center by following this path:
All Programs, Accessories, Sync Center
4. Click the Set Up New Sync Partnerships link, as pointed out in Figure 6.64, in the tasks pane on the left.

FIGURE 6.64 Starting the setup process of new Sync device.
5. Double-click on the device you want to set up.
6. Follow the onscreen directions to set up the sync partnership.
![]() TIP
TIP
If the device doesn’t appear on the list, it might not be supported for use with Sync Center. You should check the device manufacturer’s website for more information. You might have to use their software to sync or they might offer a driver to install that will enable support with Sync Center.